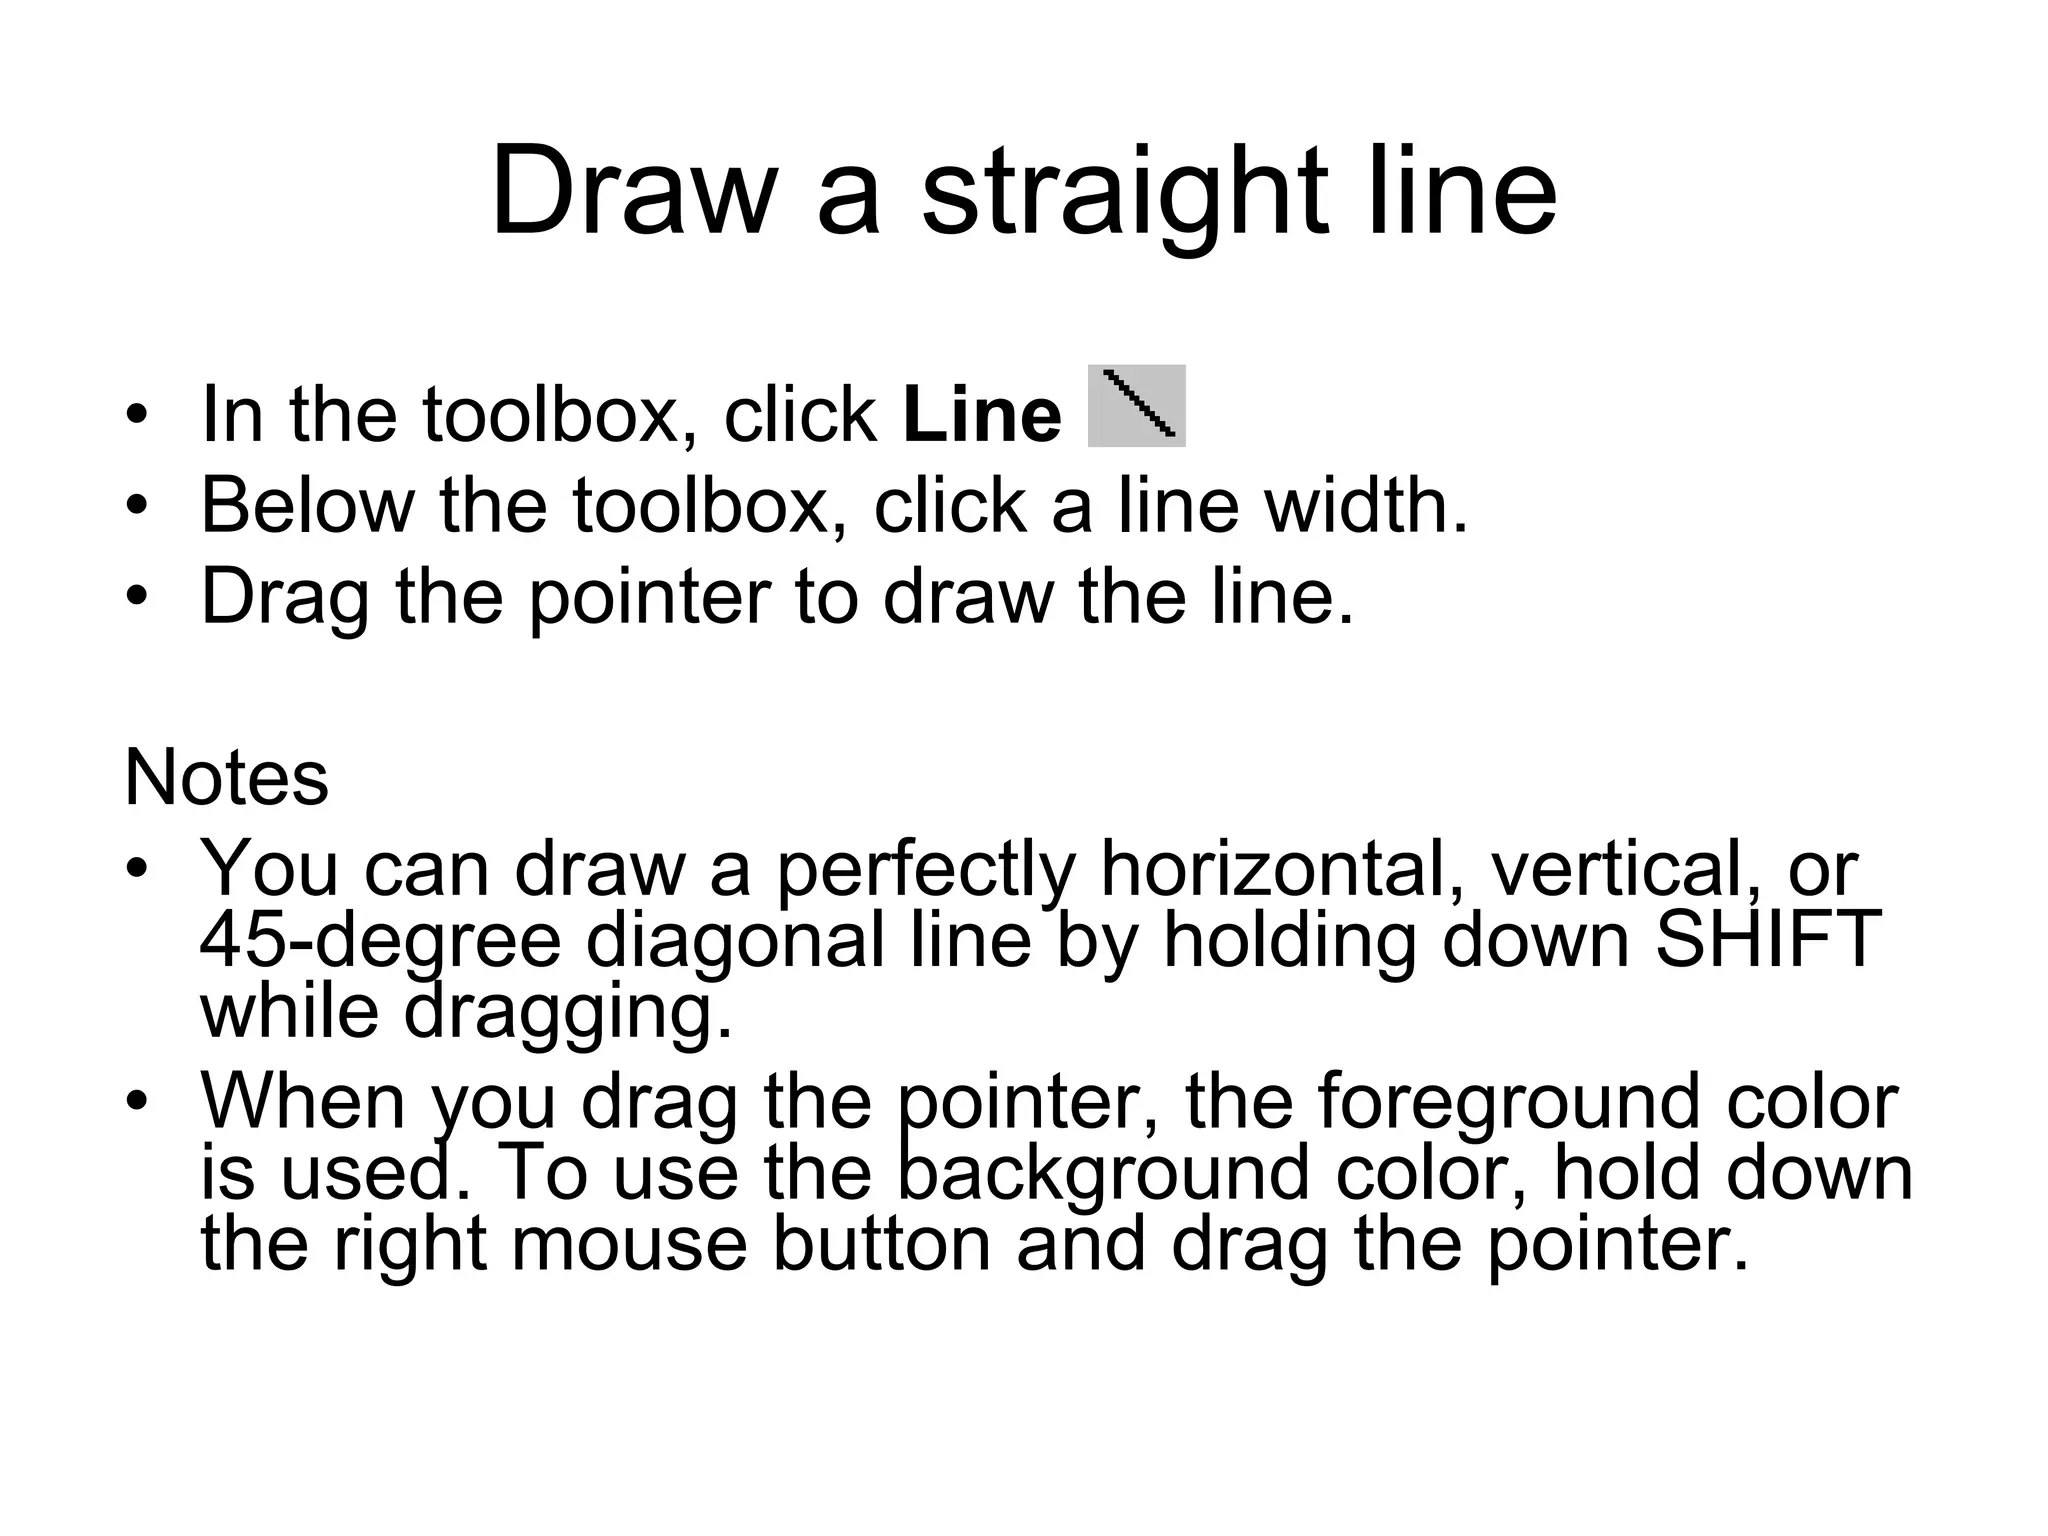
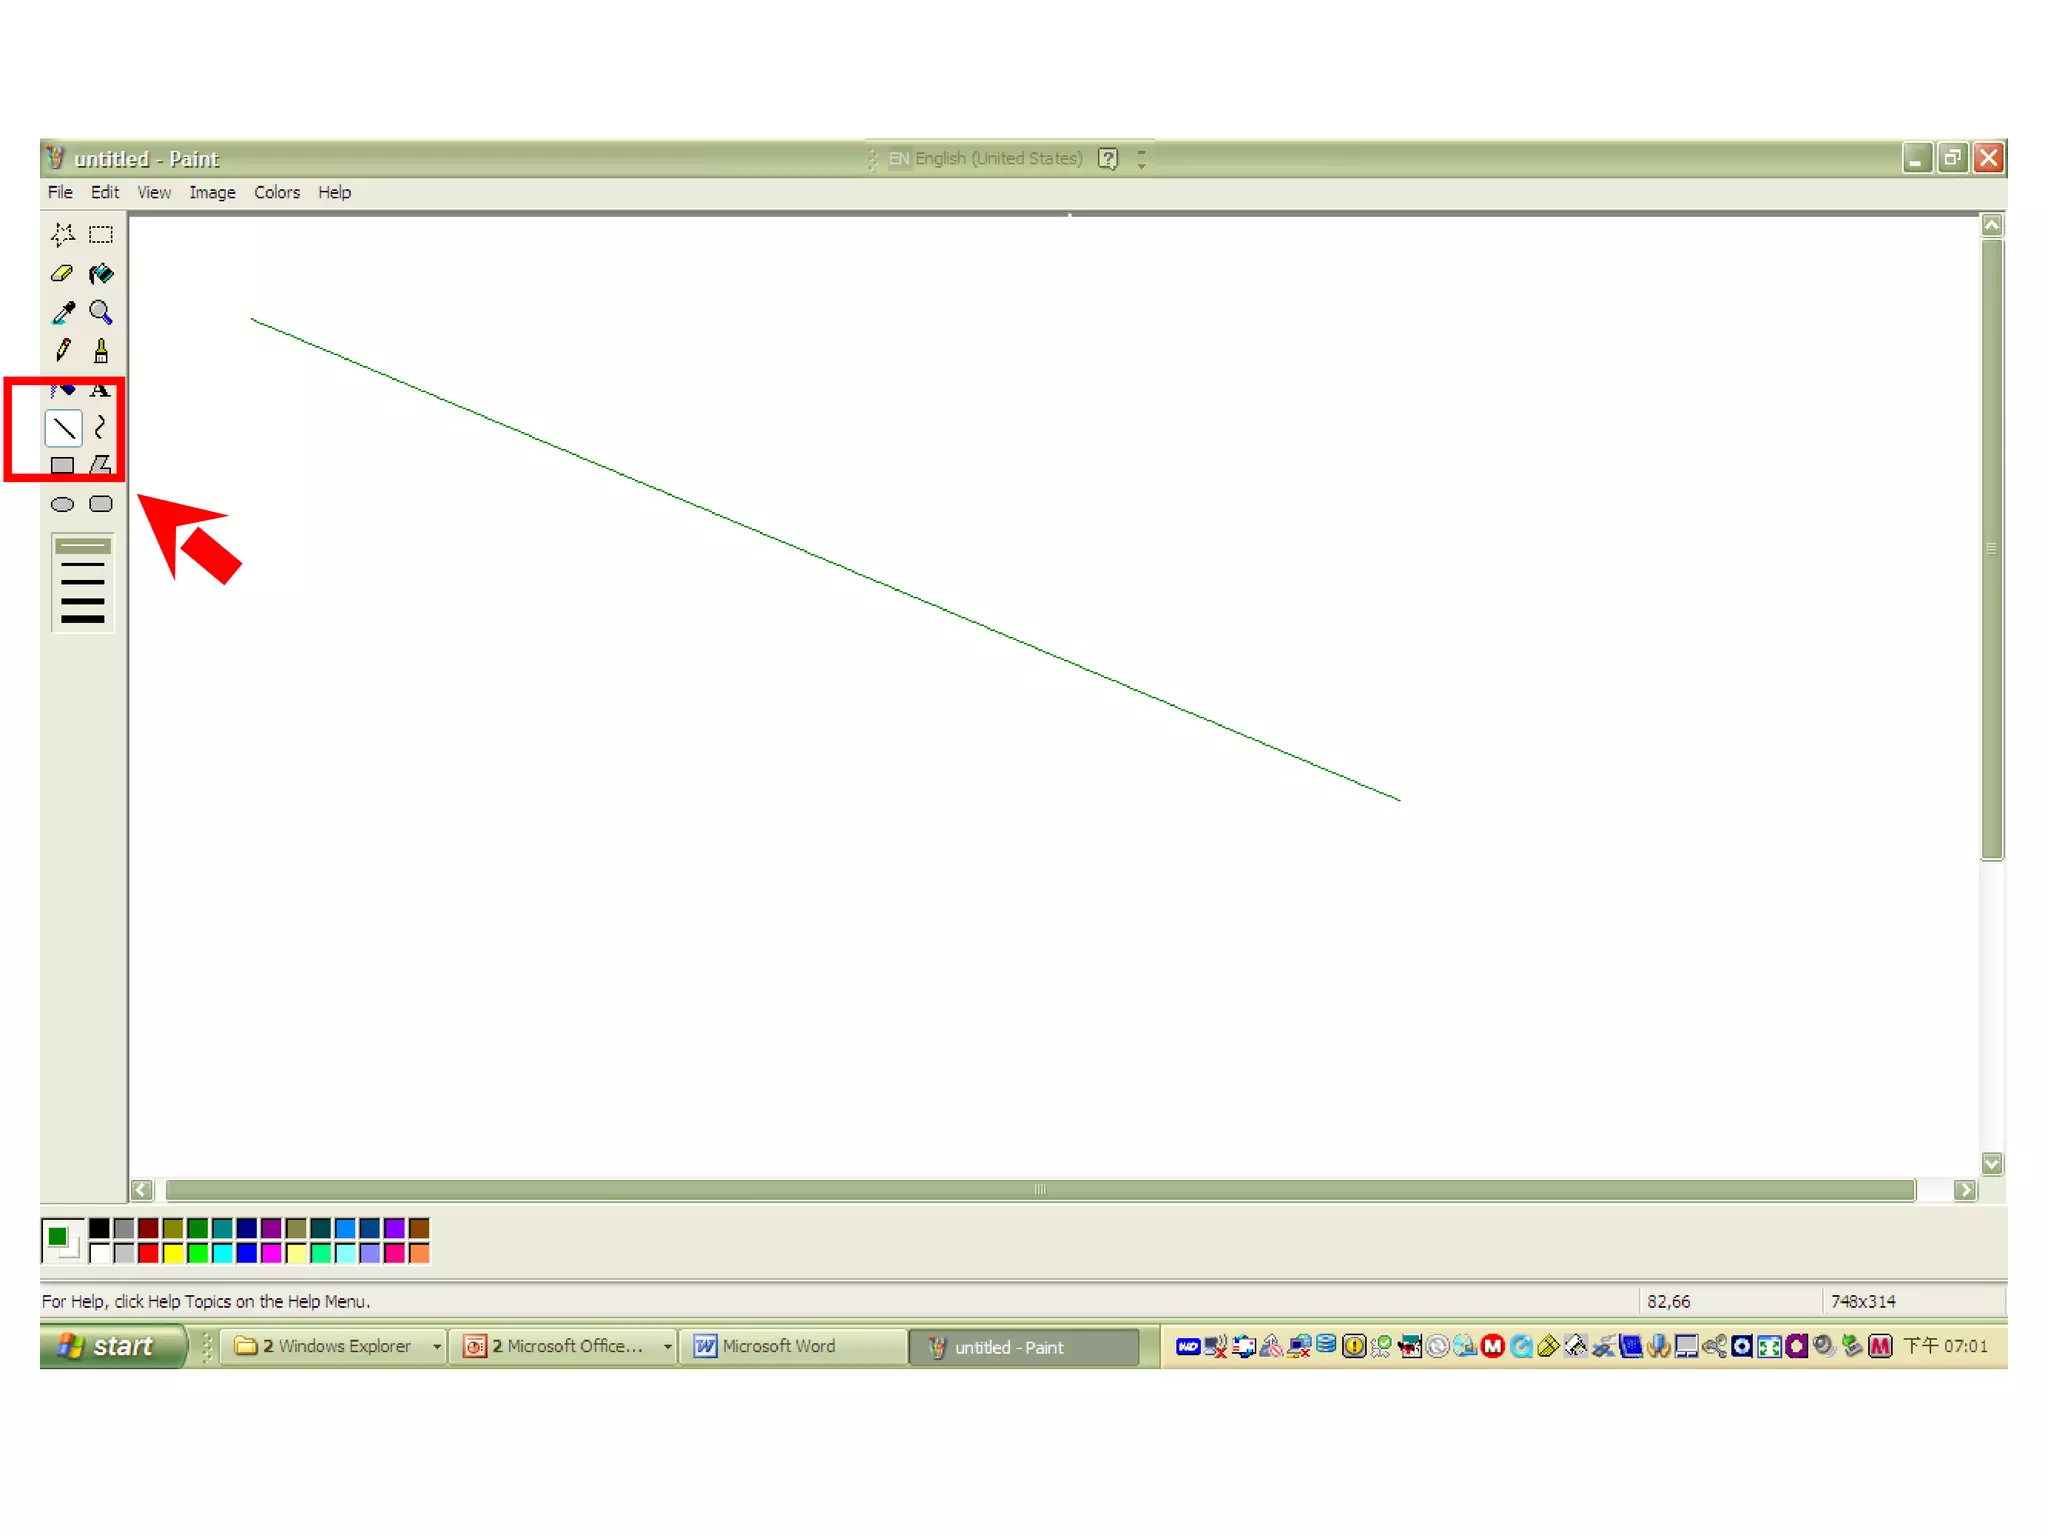
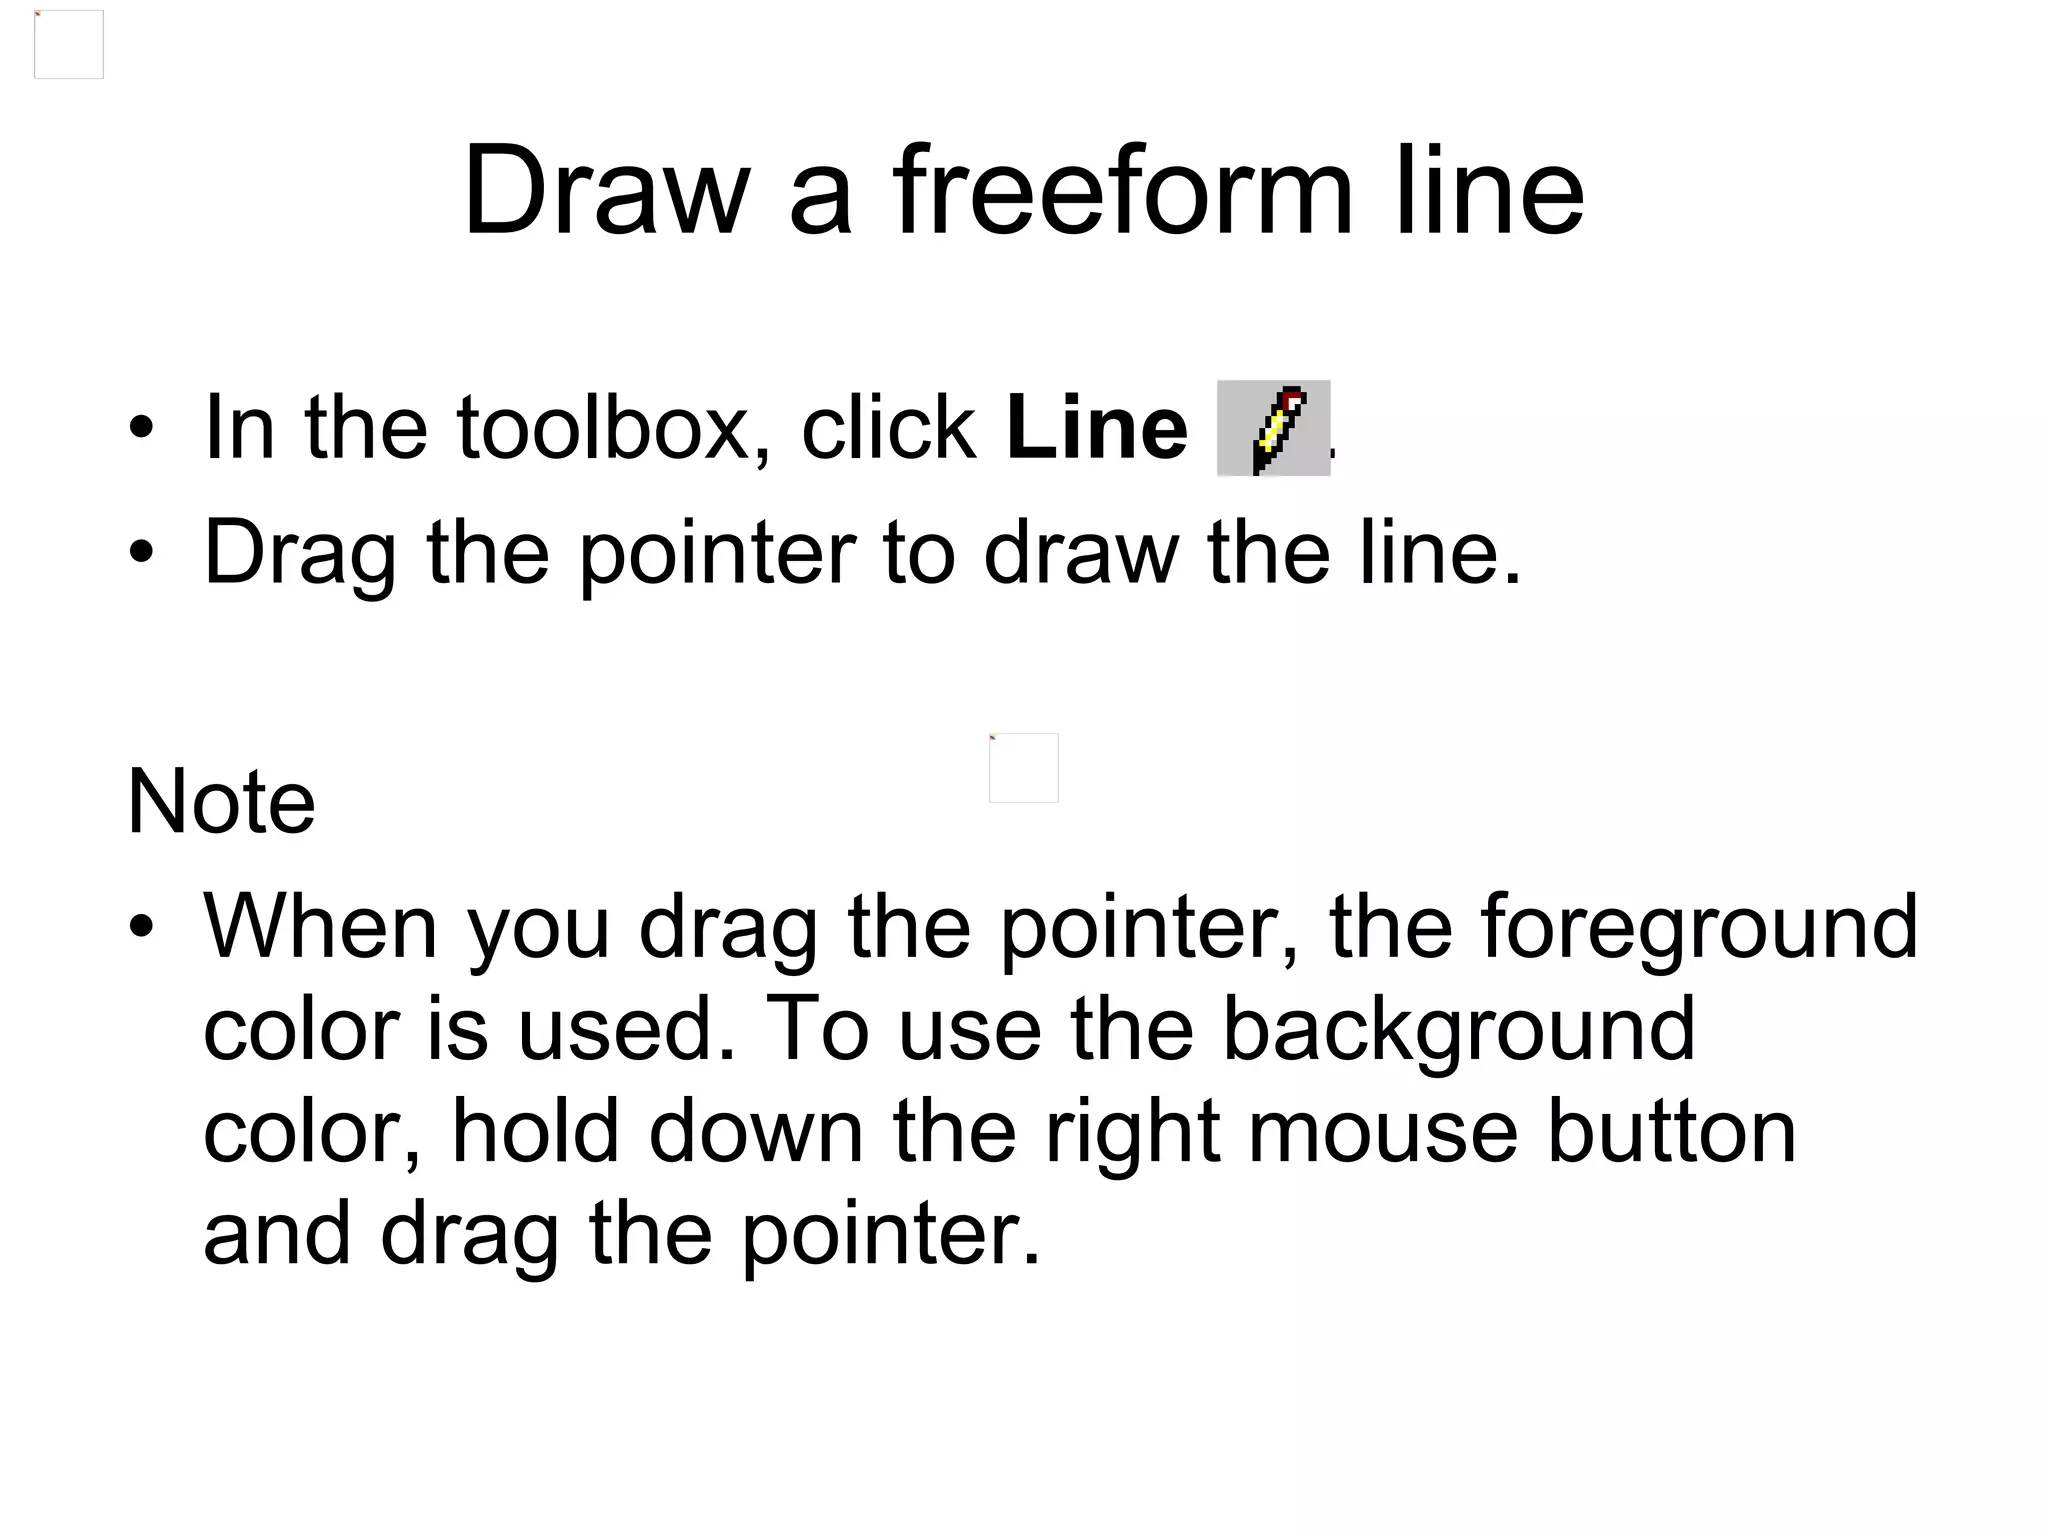
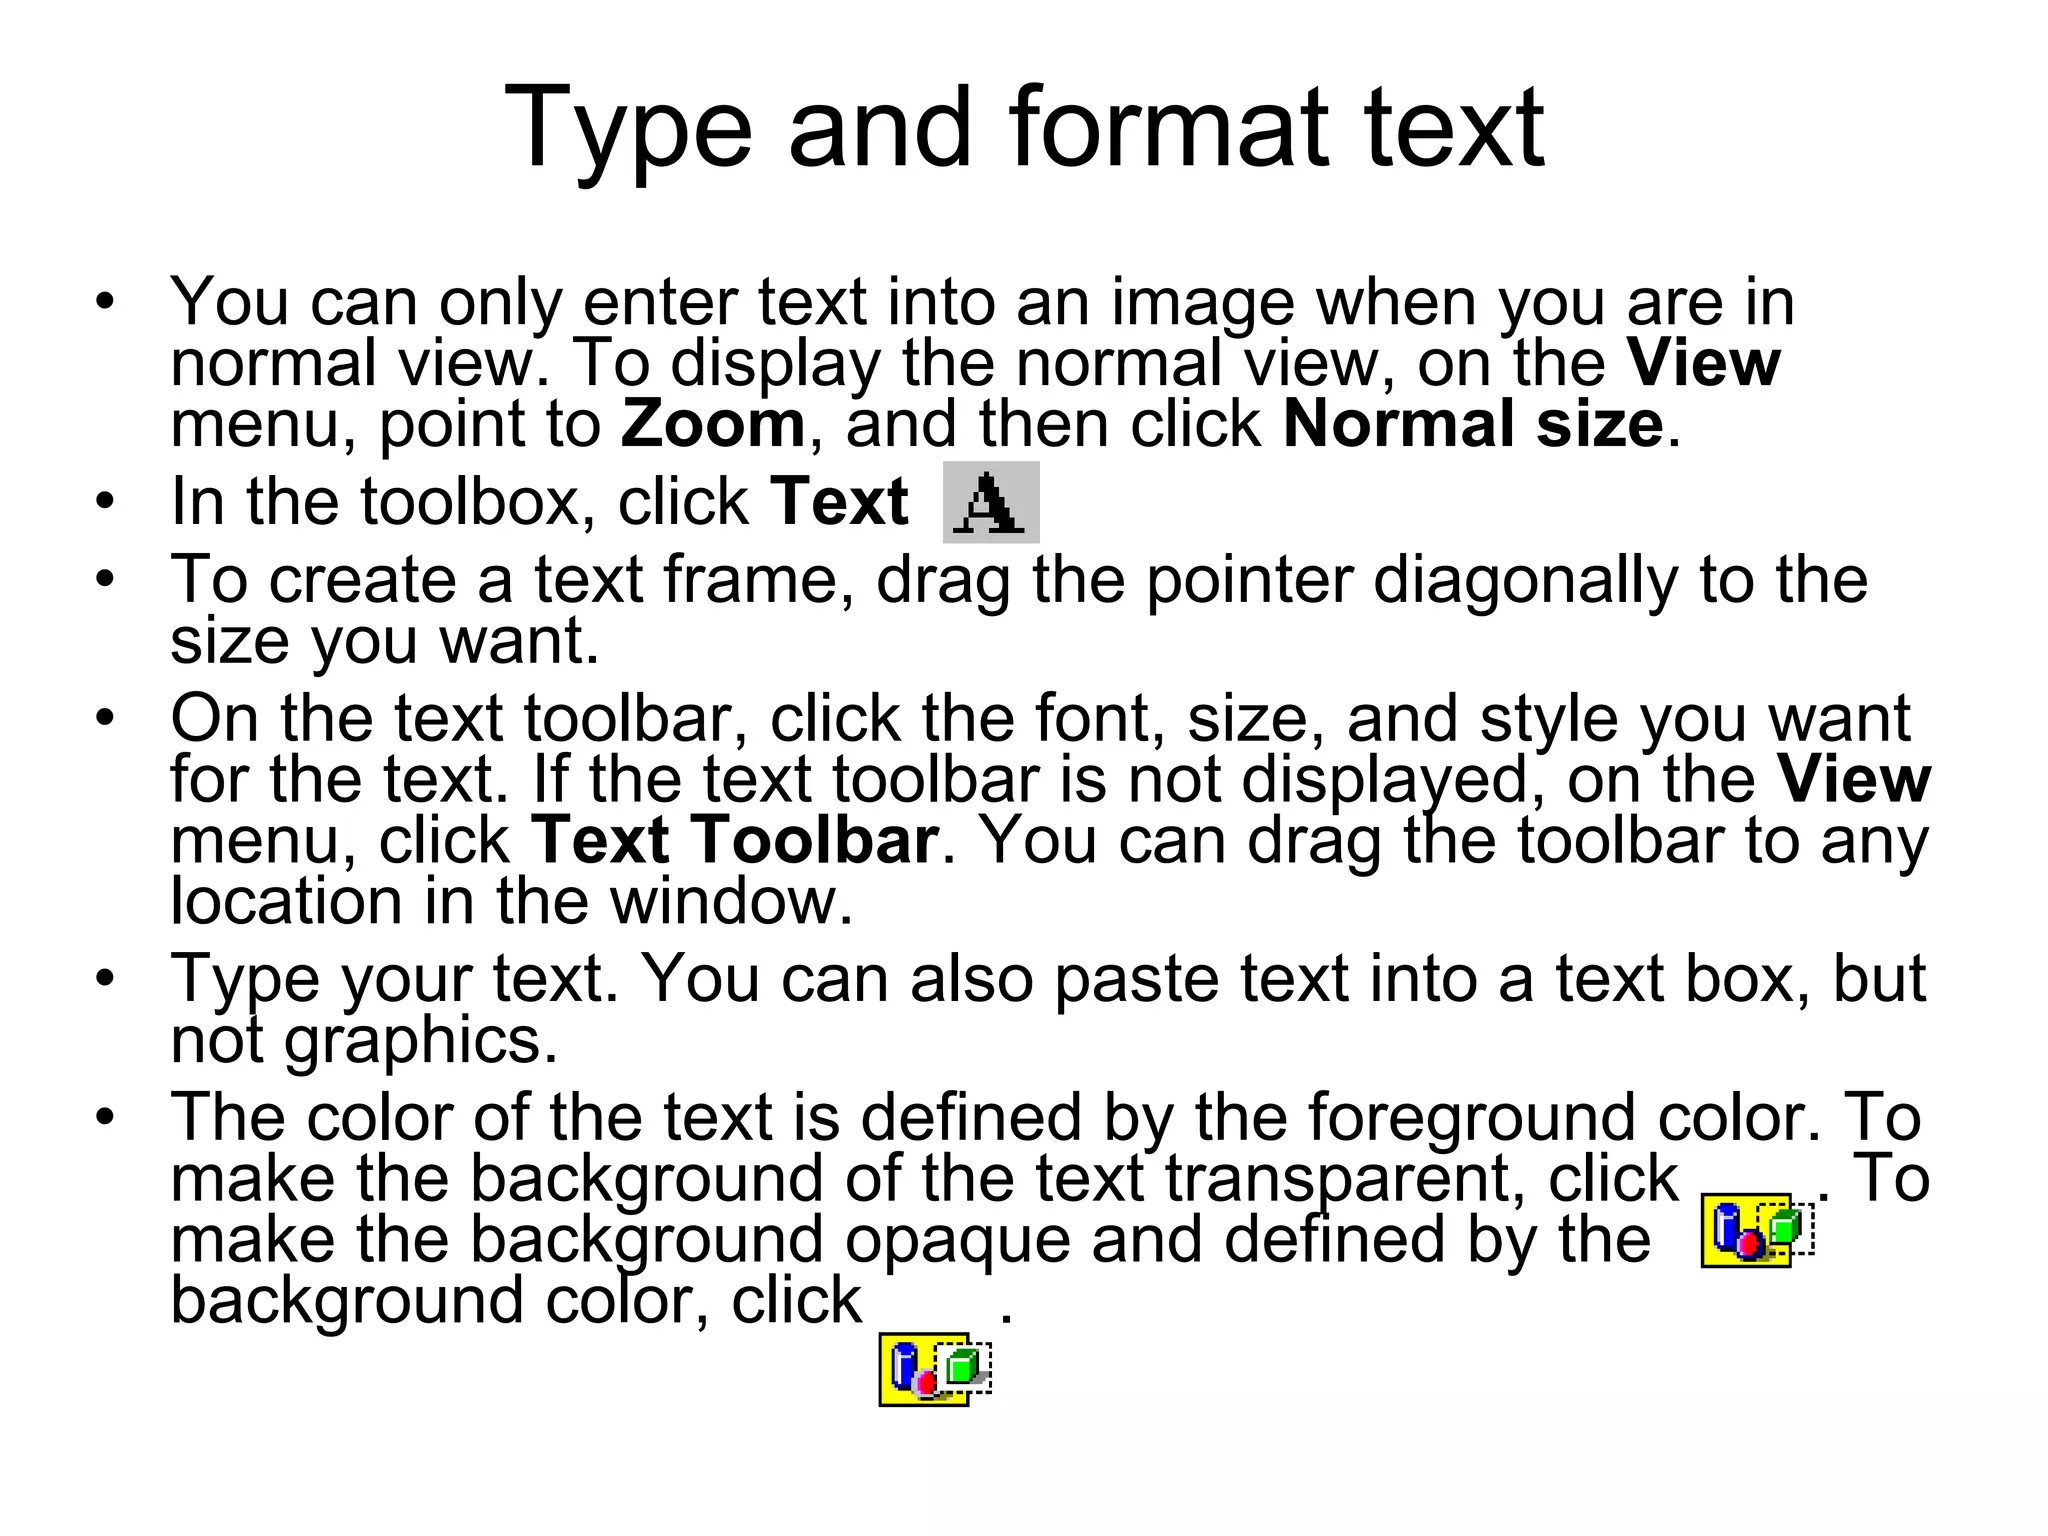
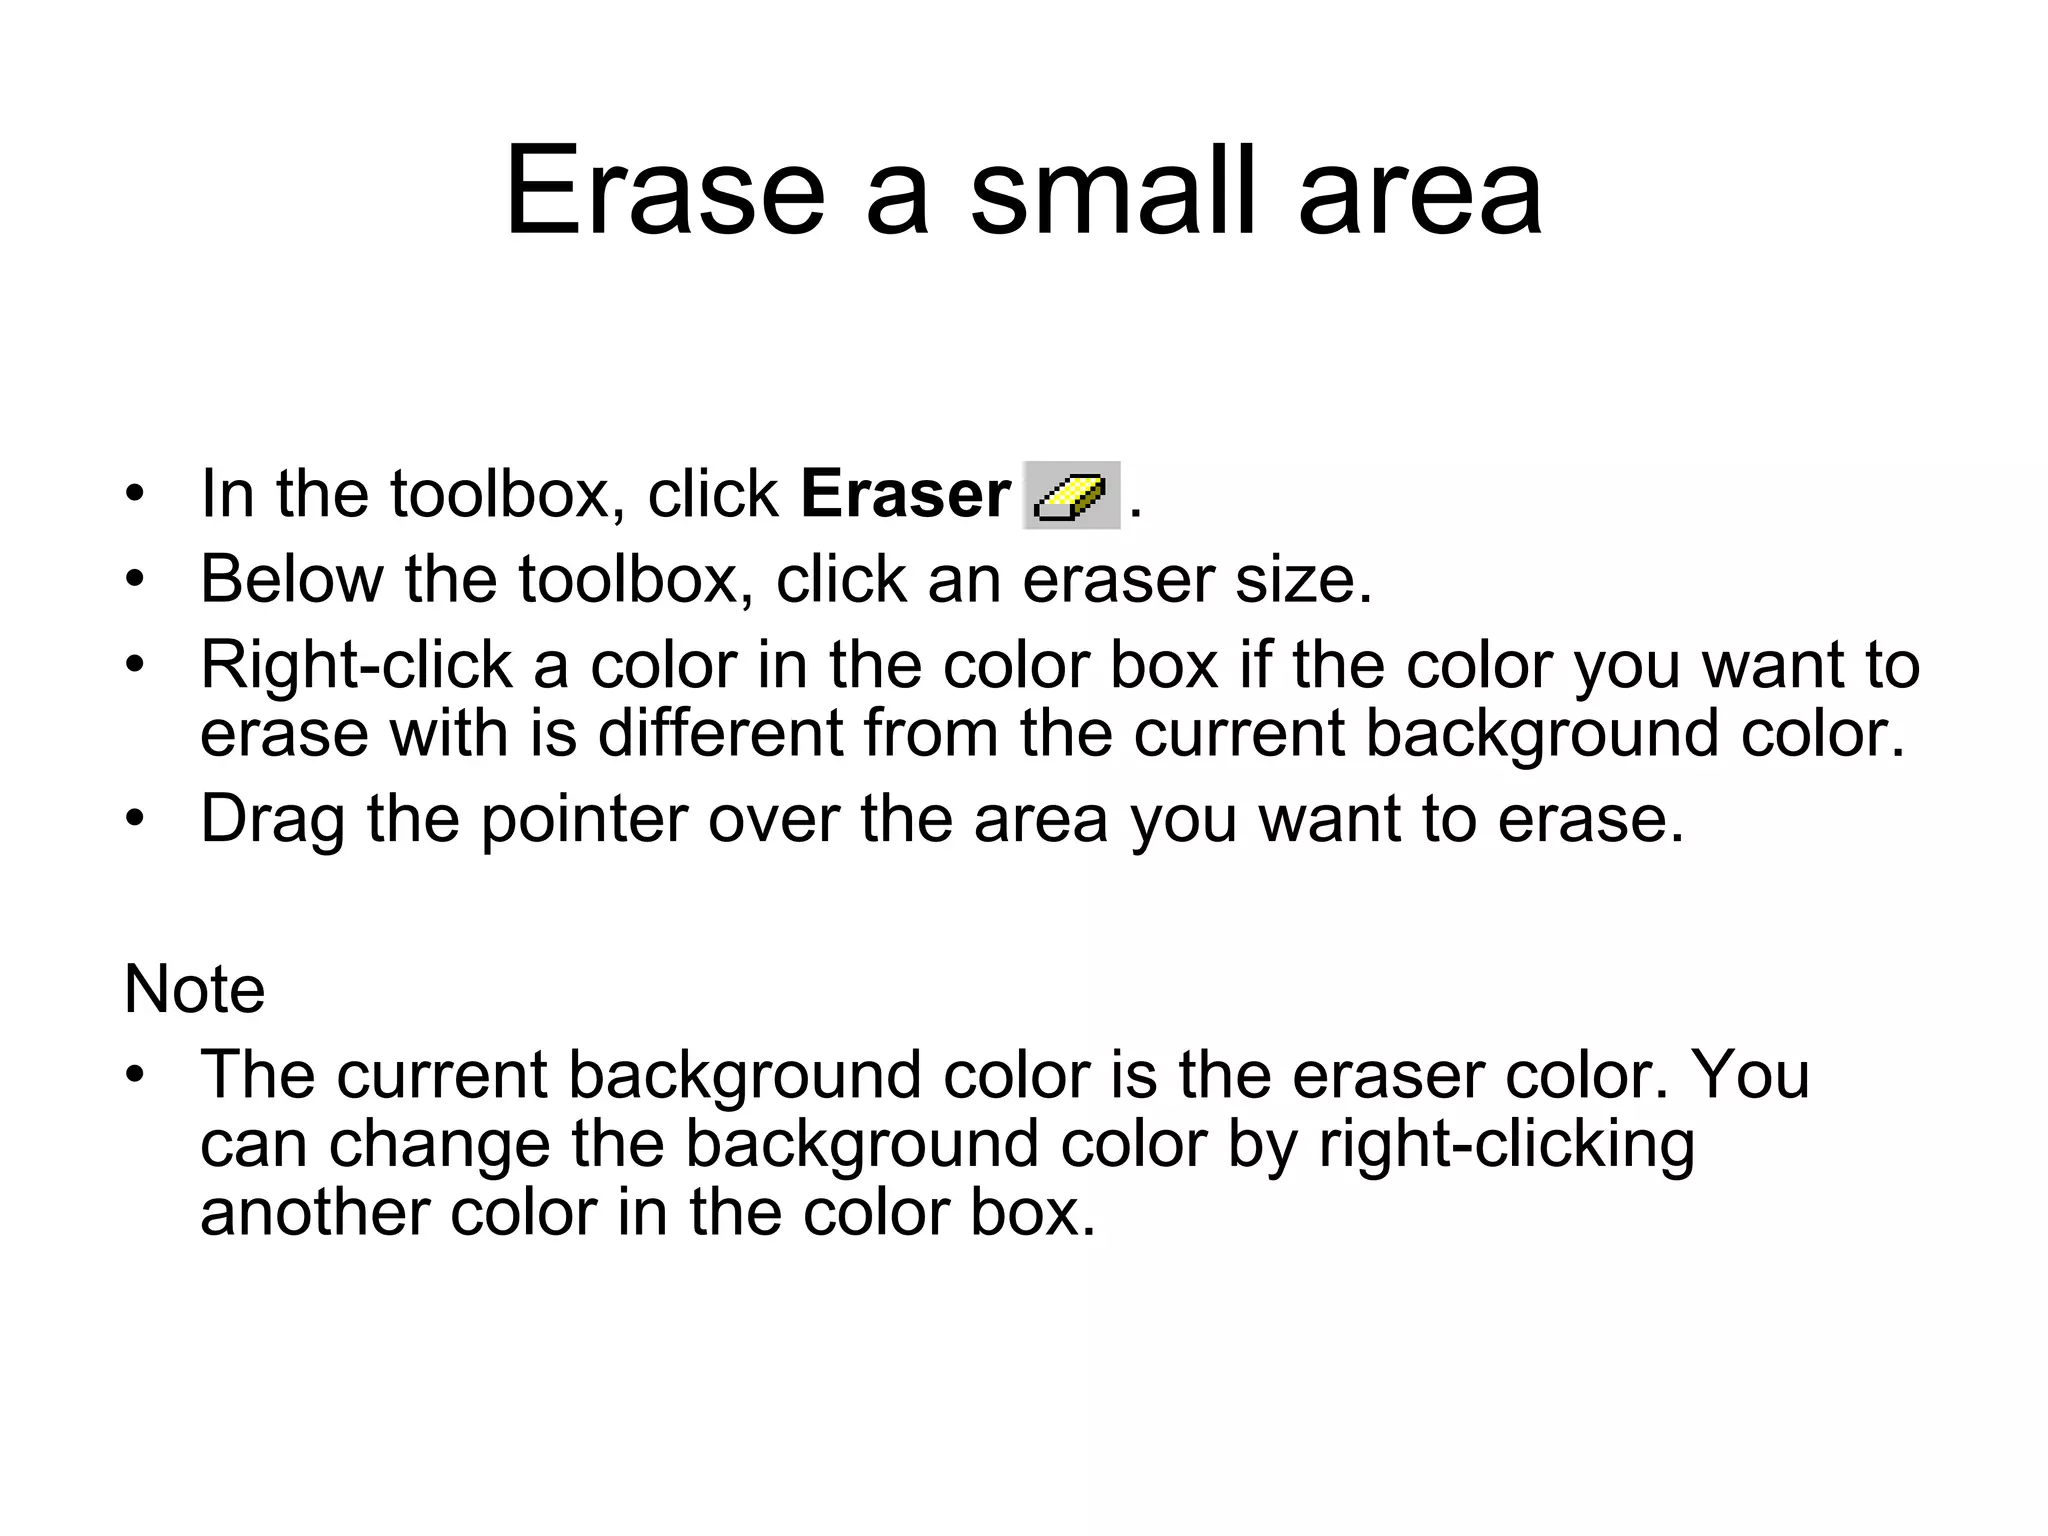
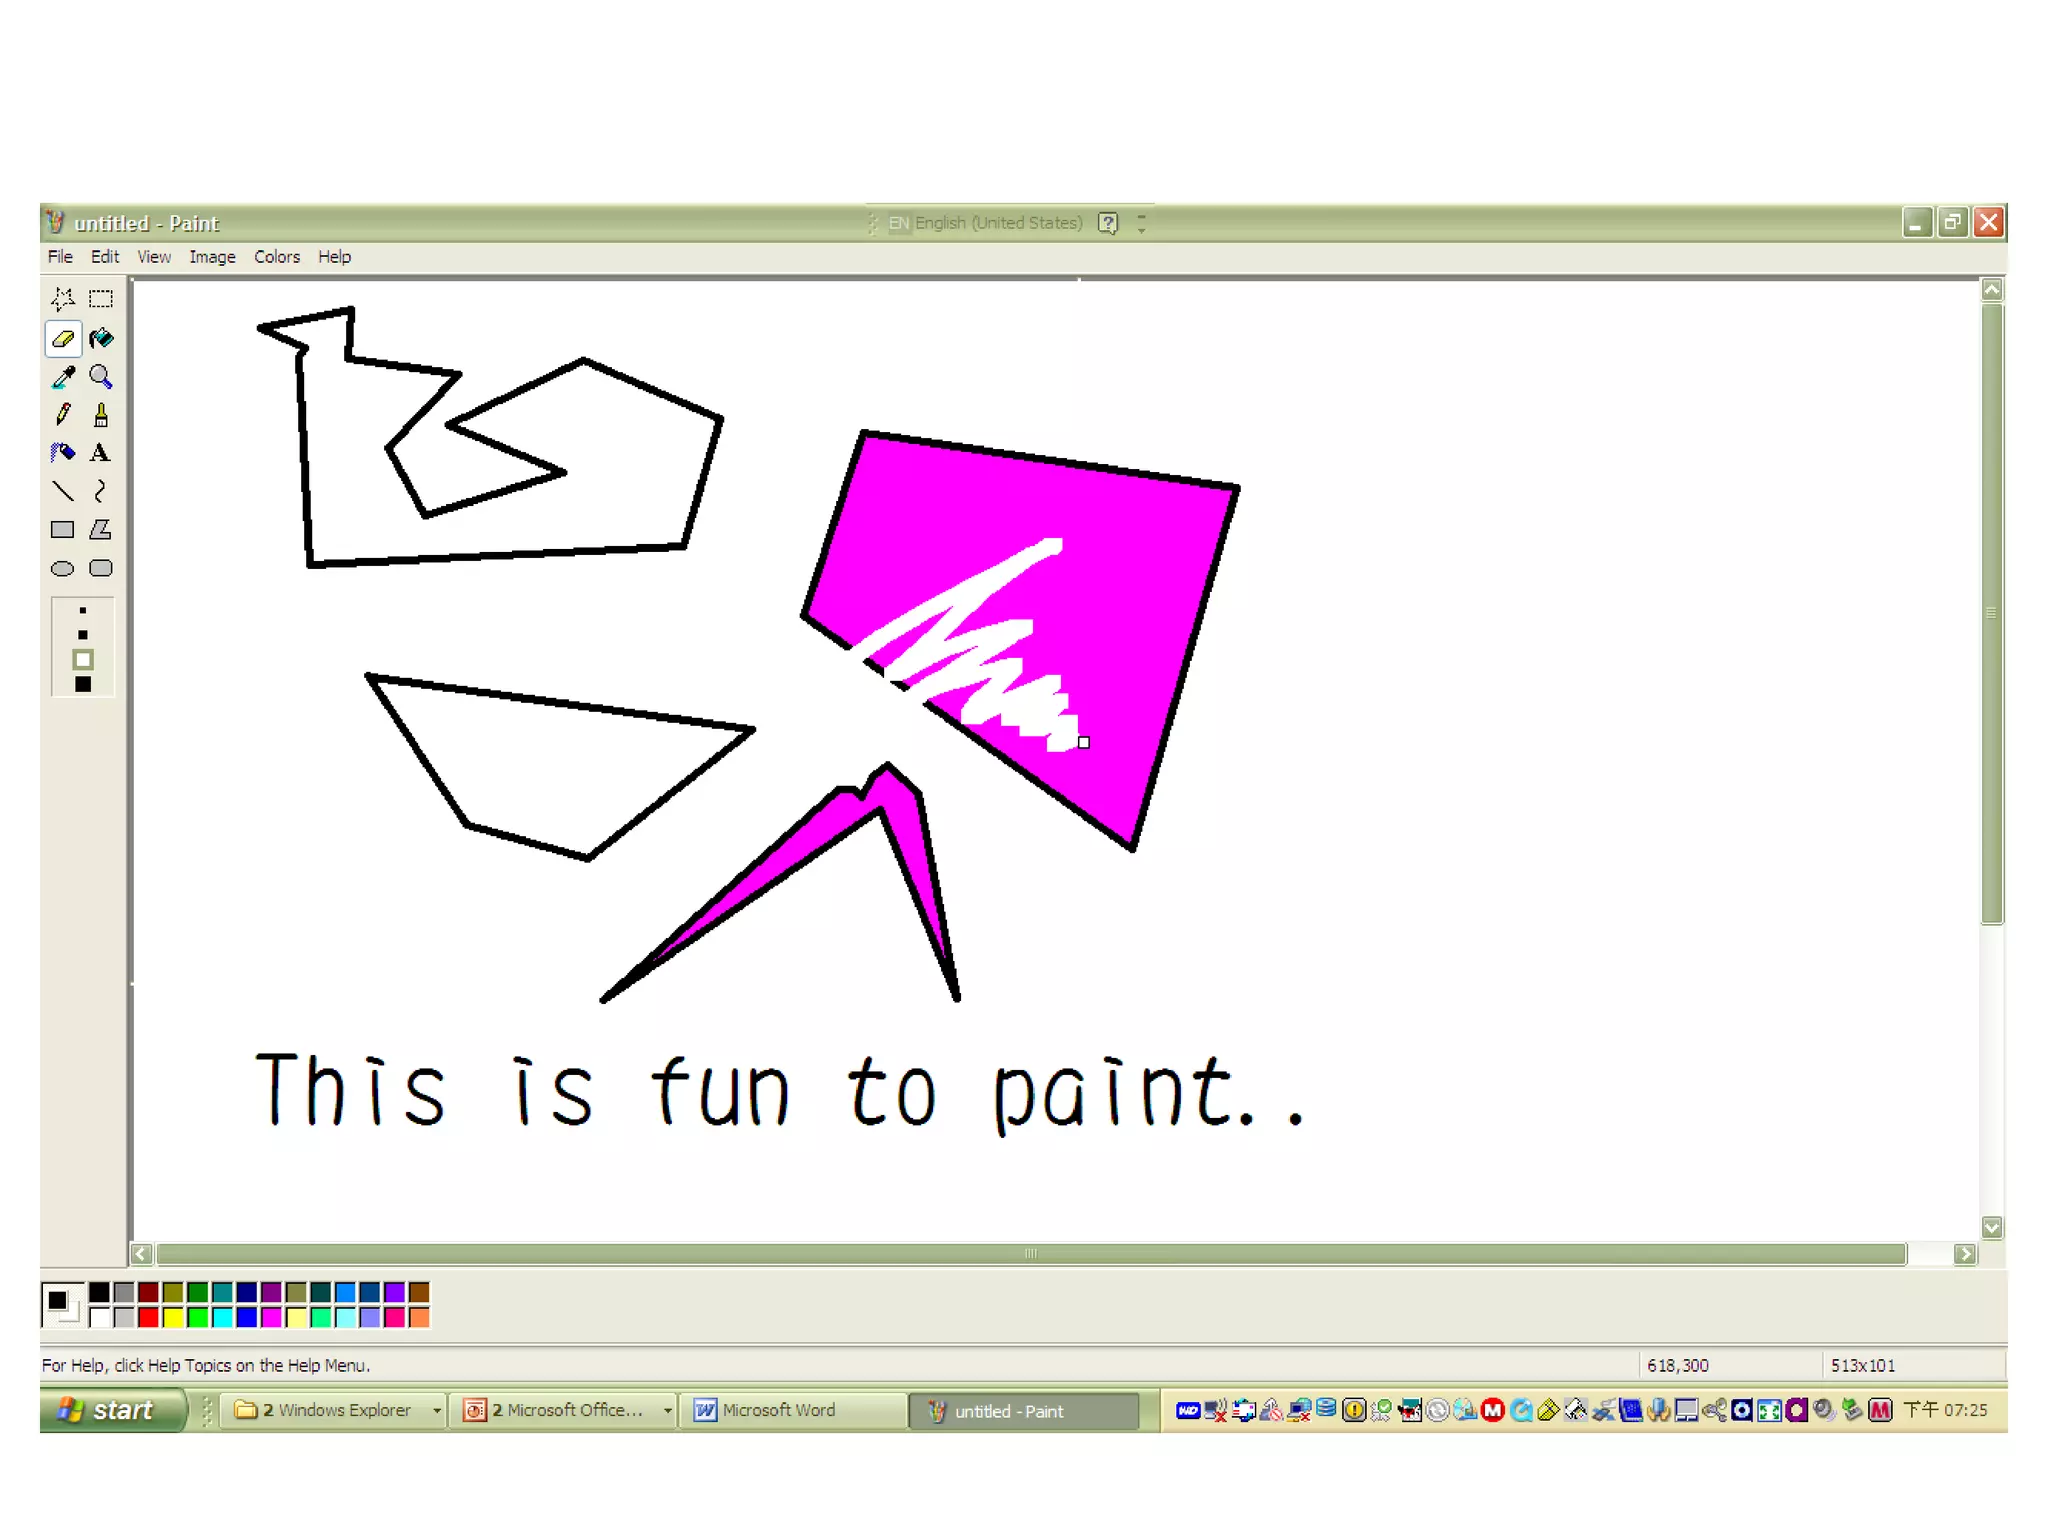
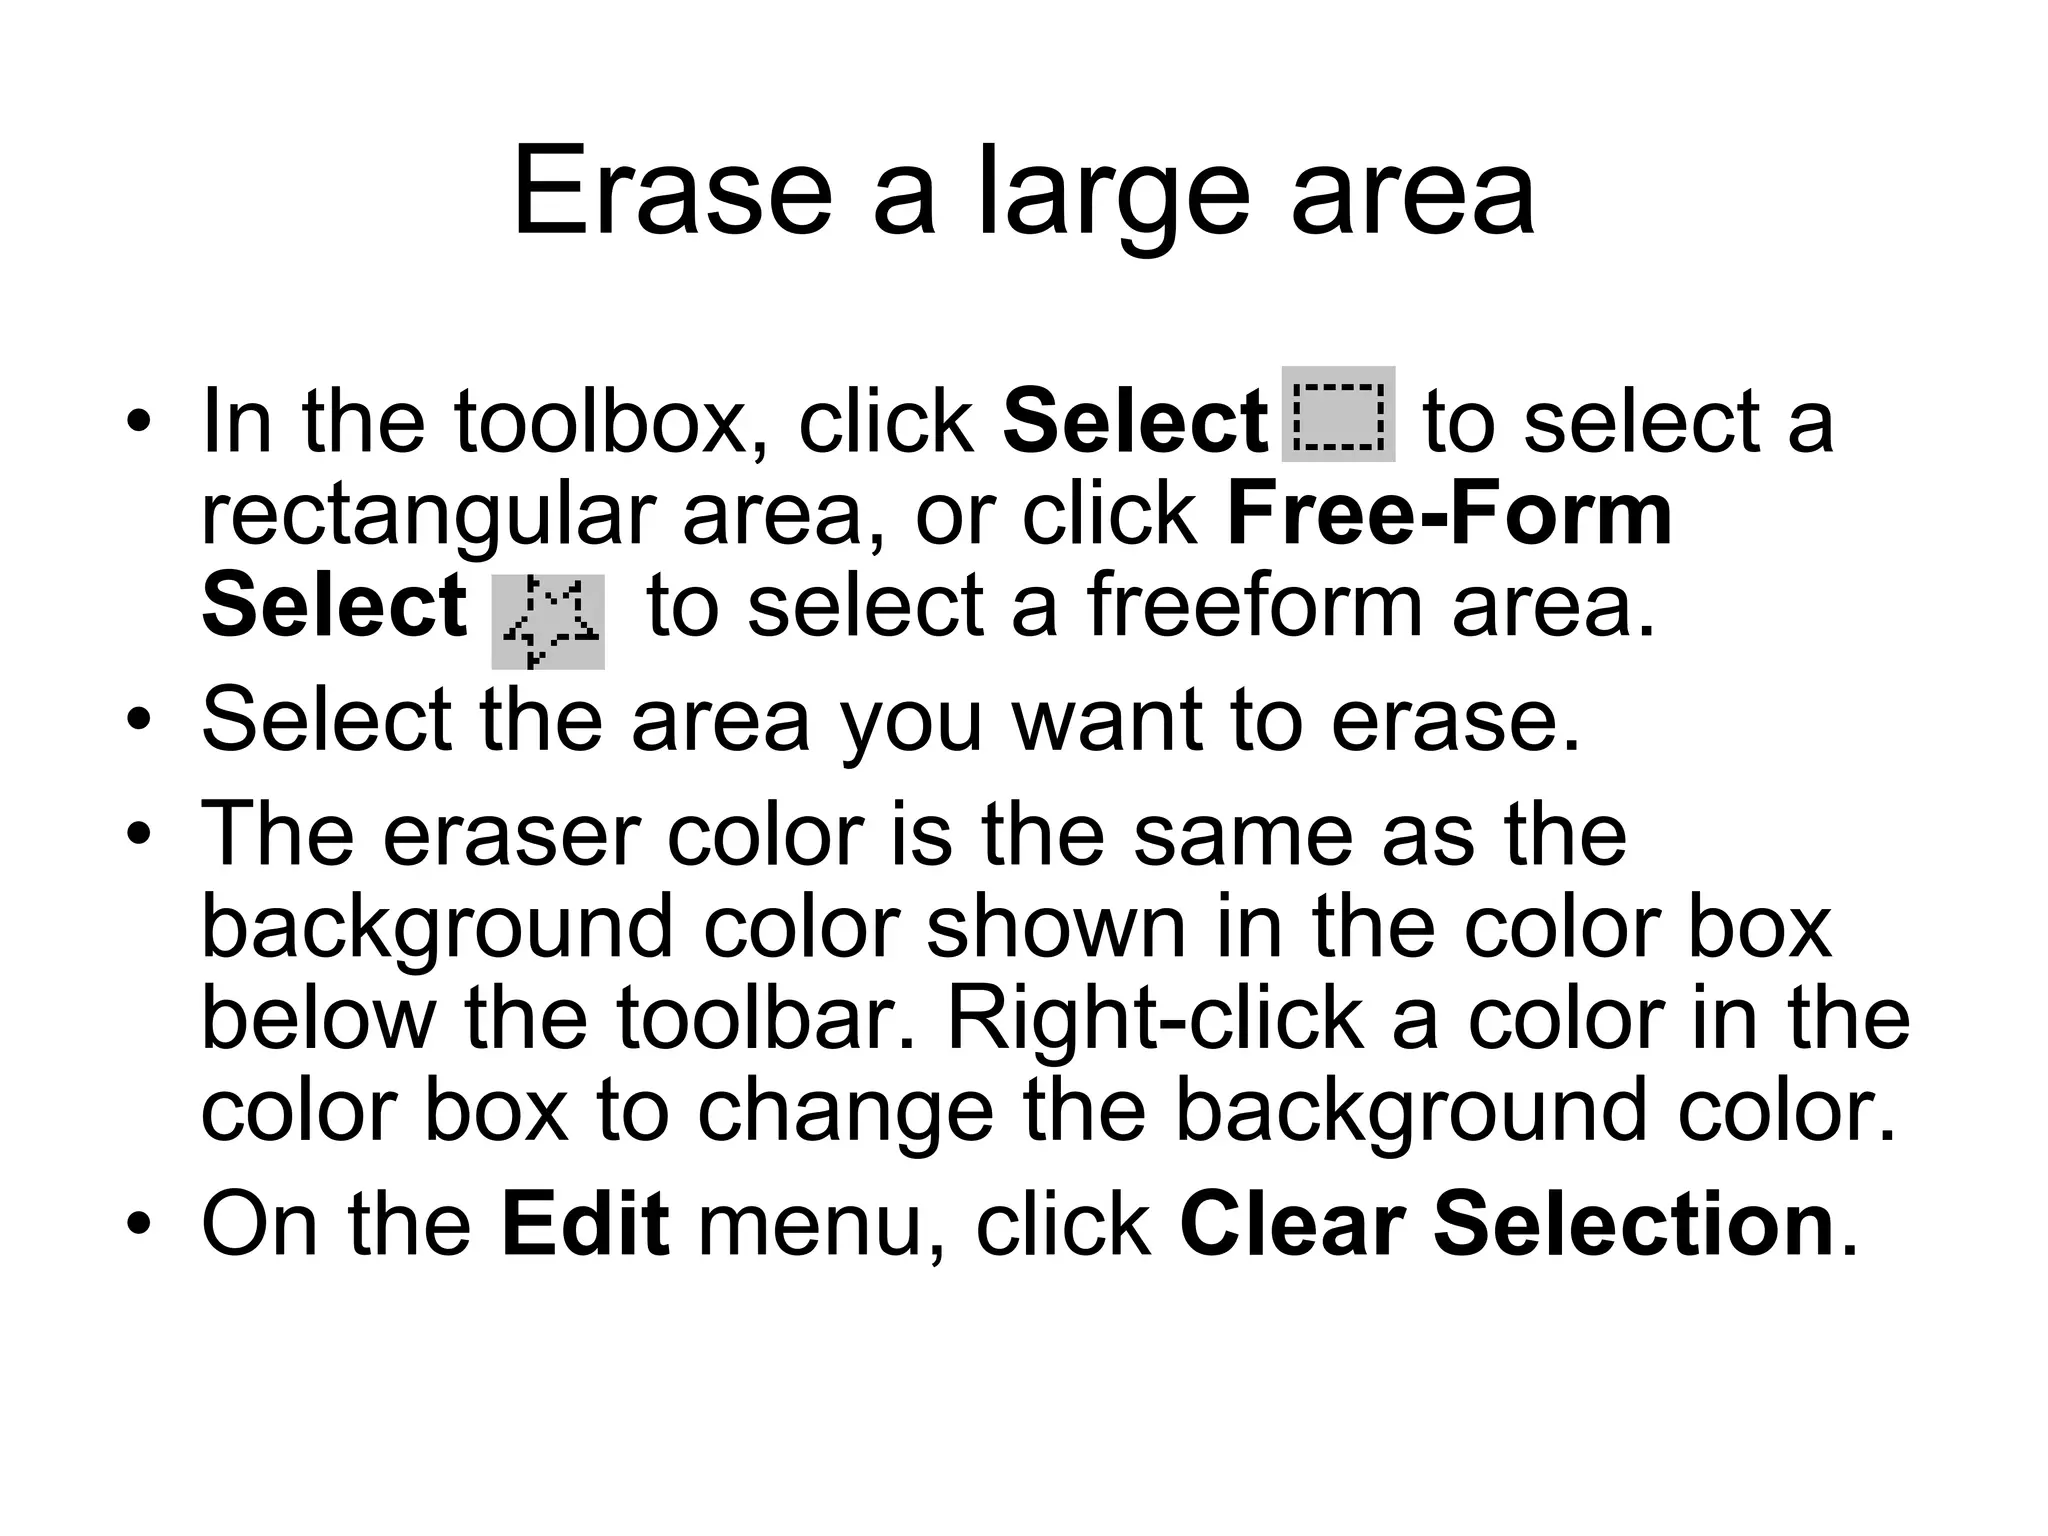
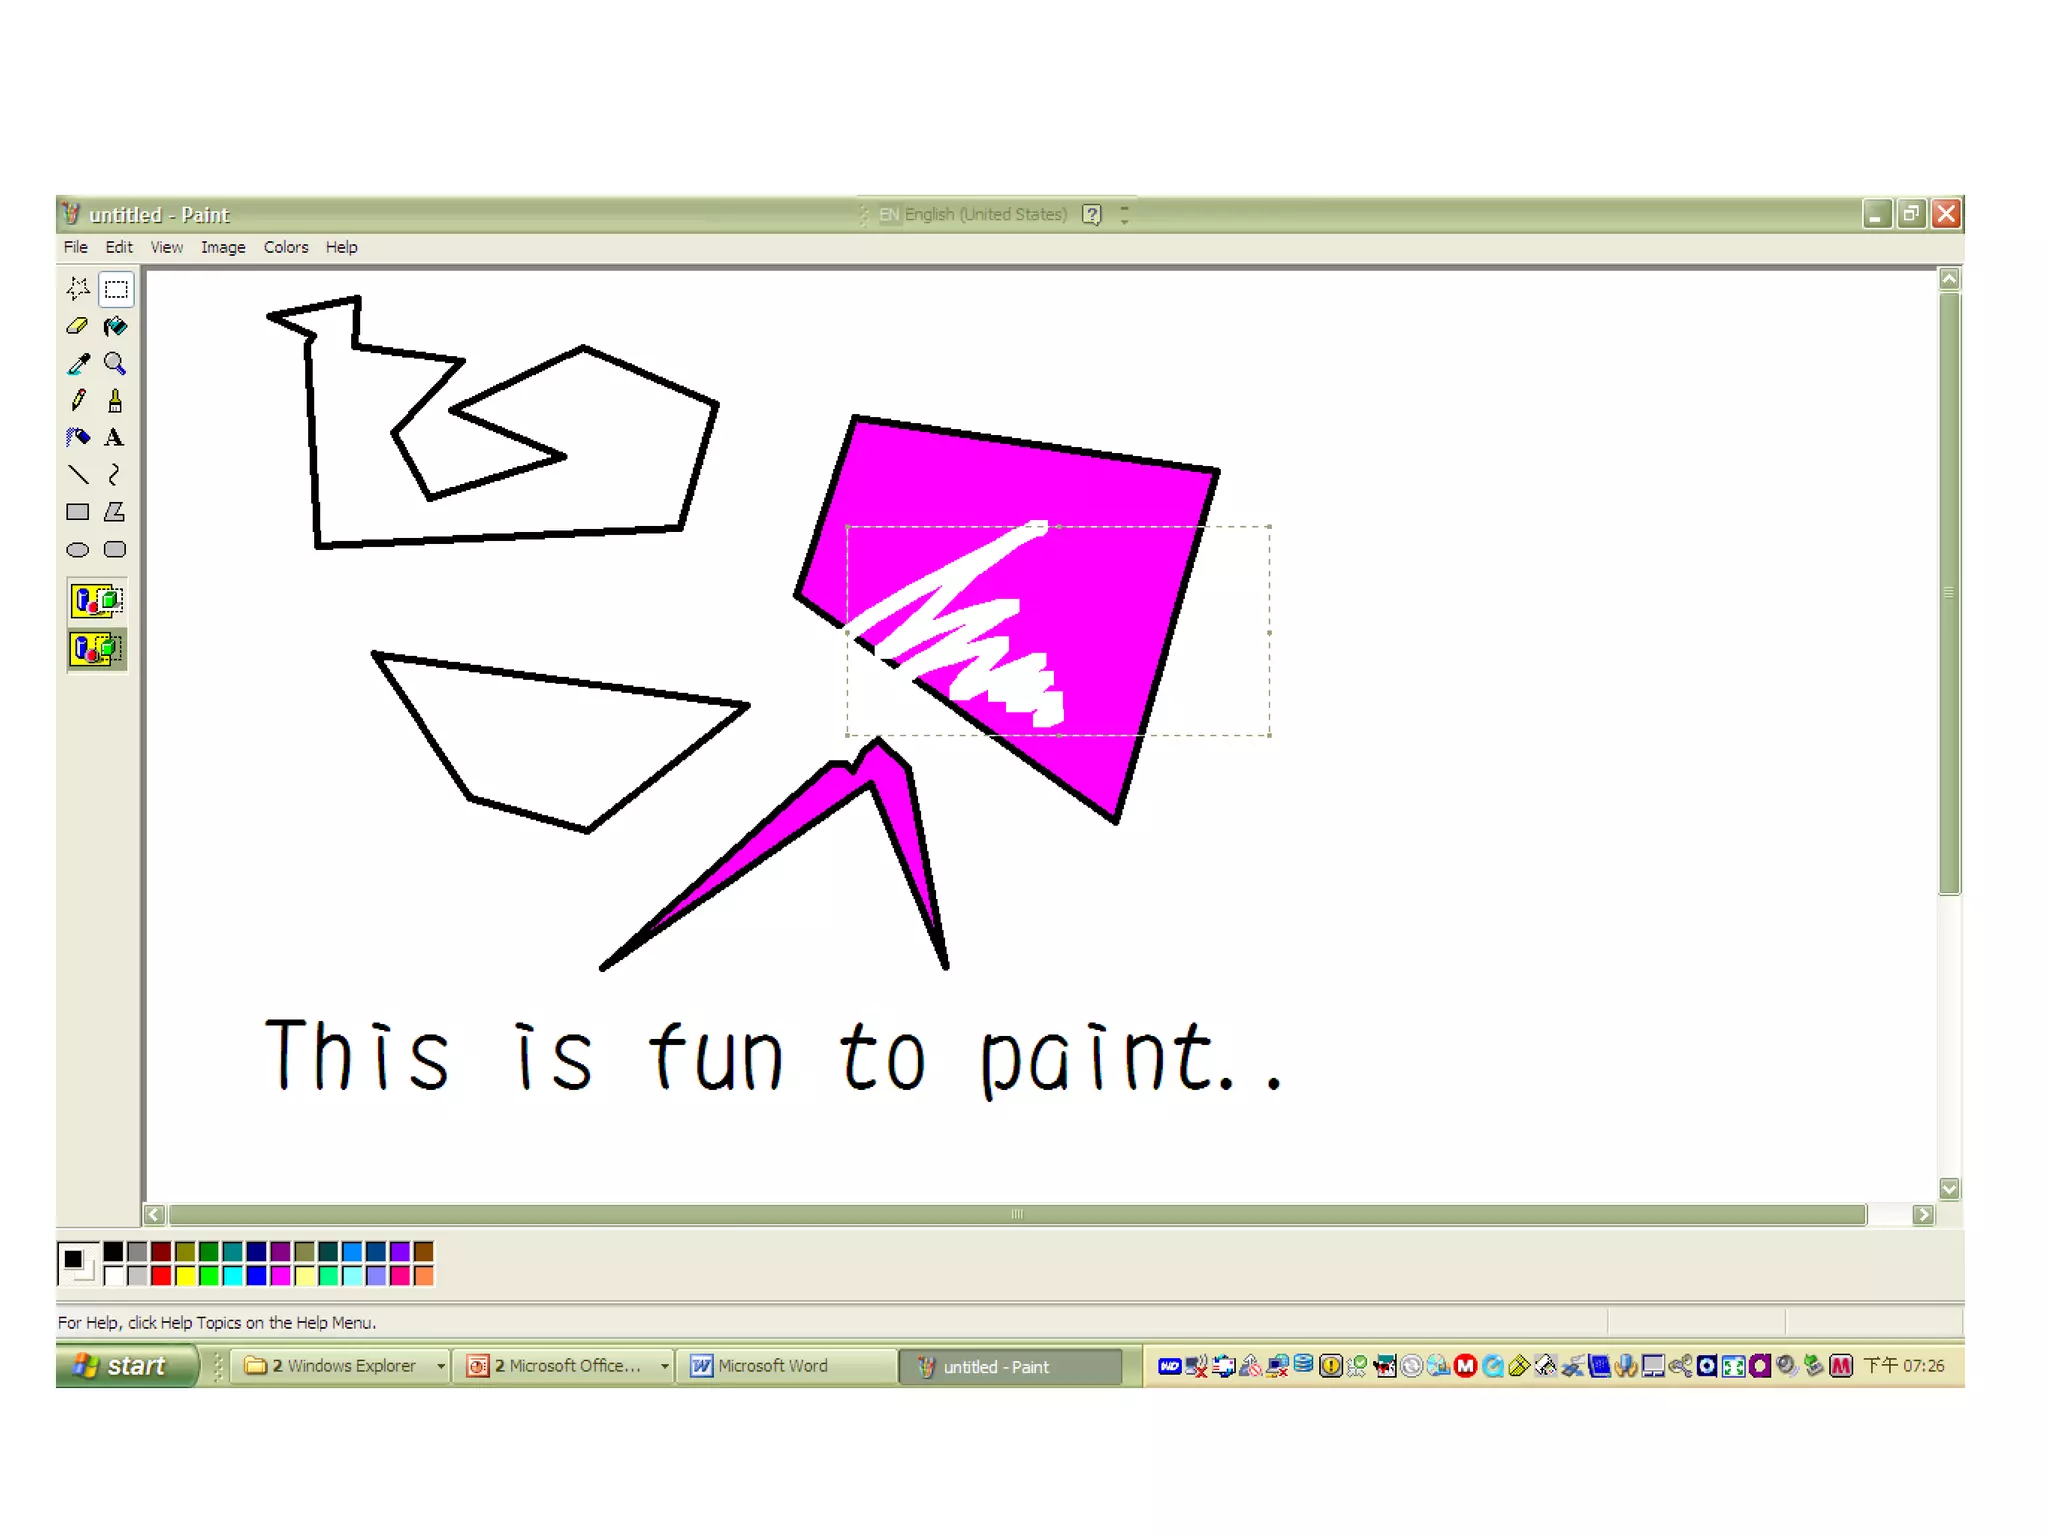
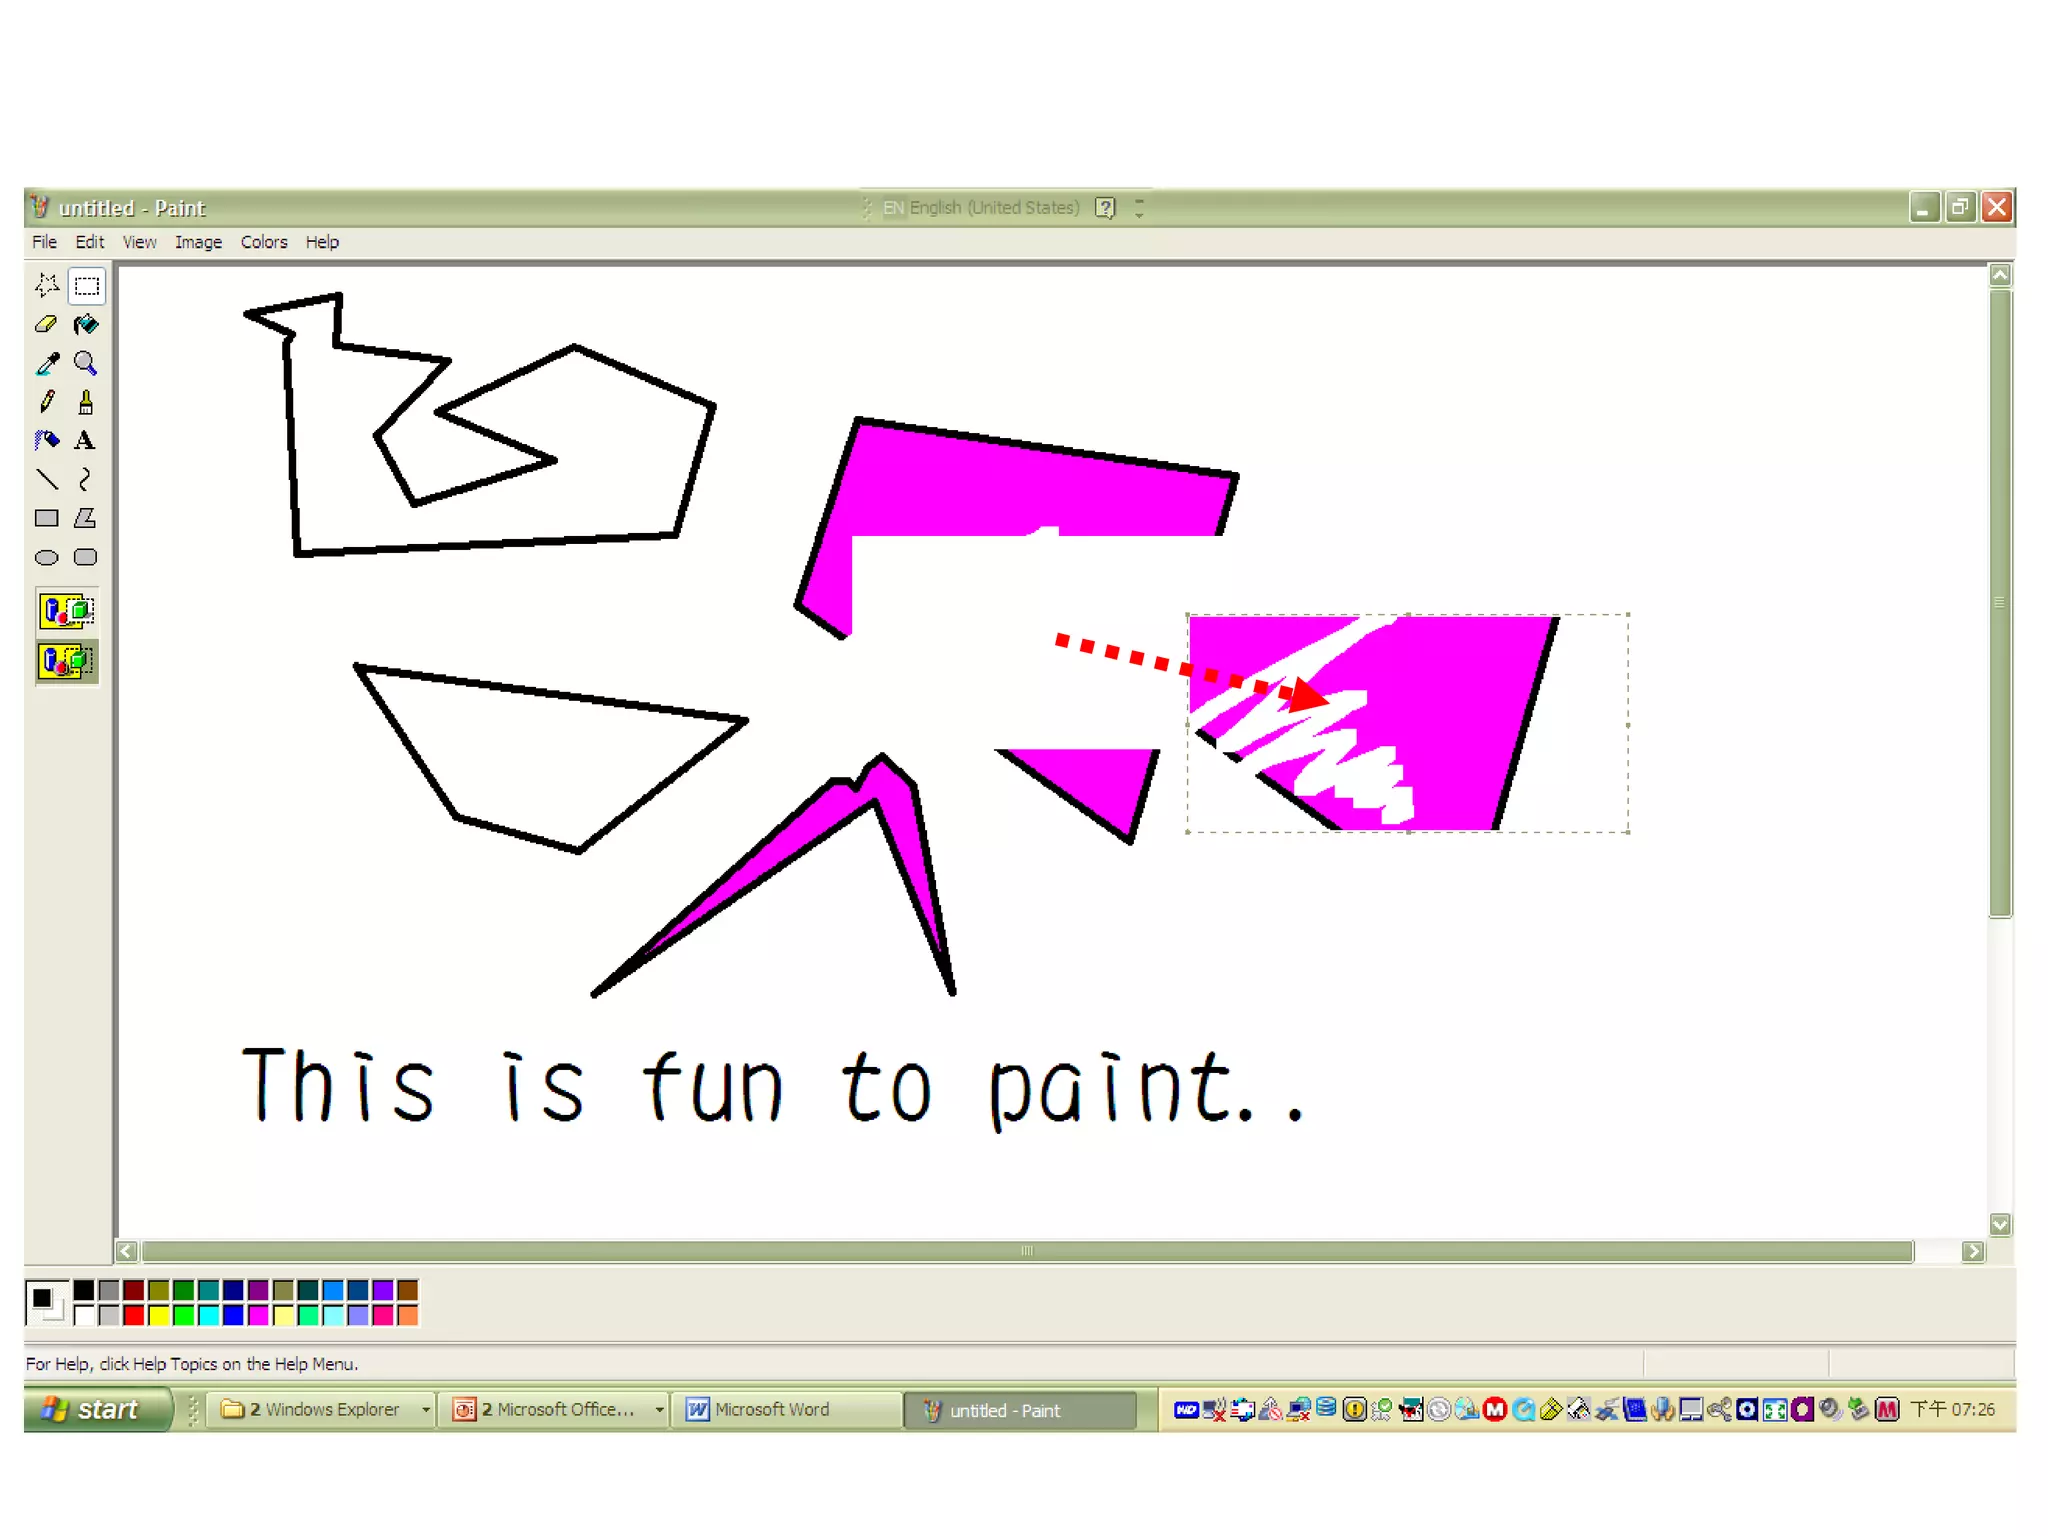
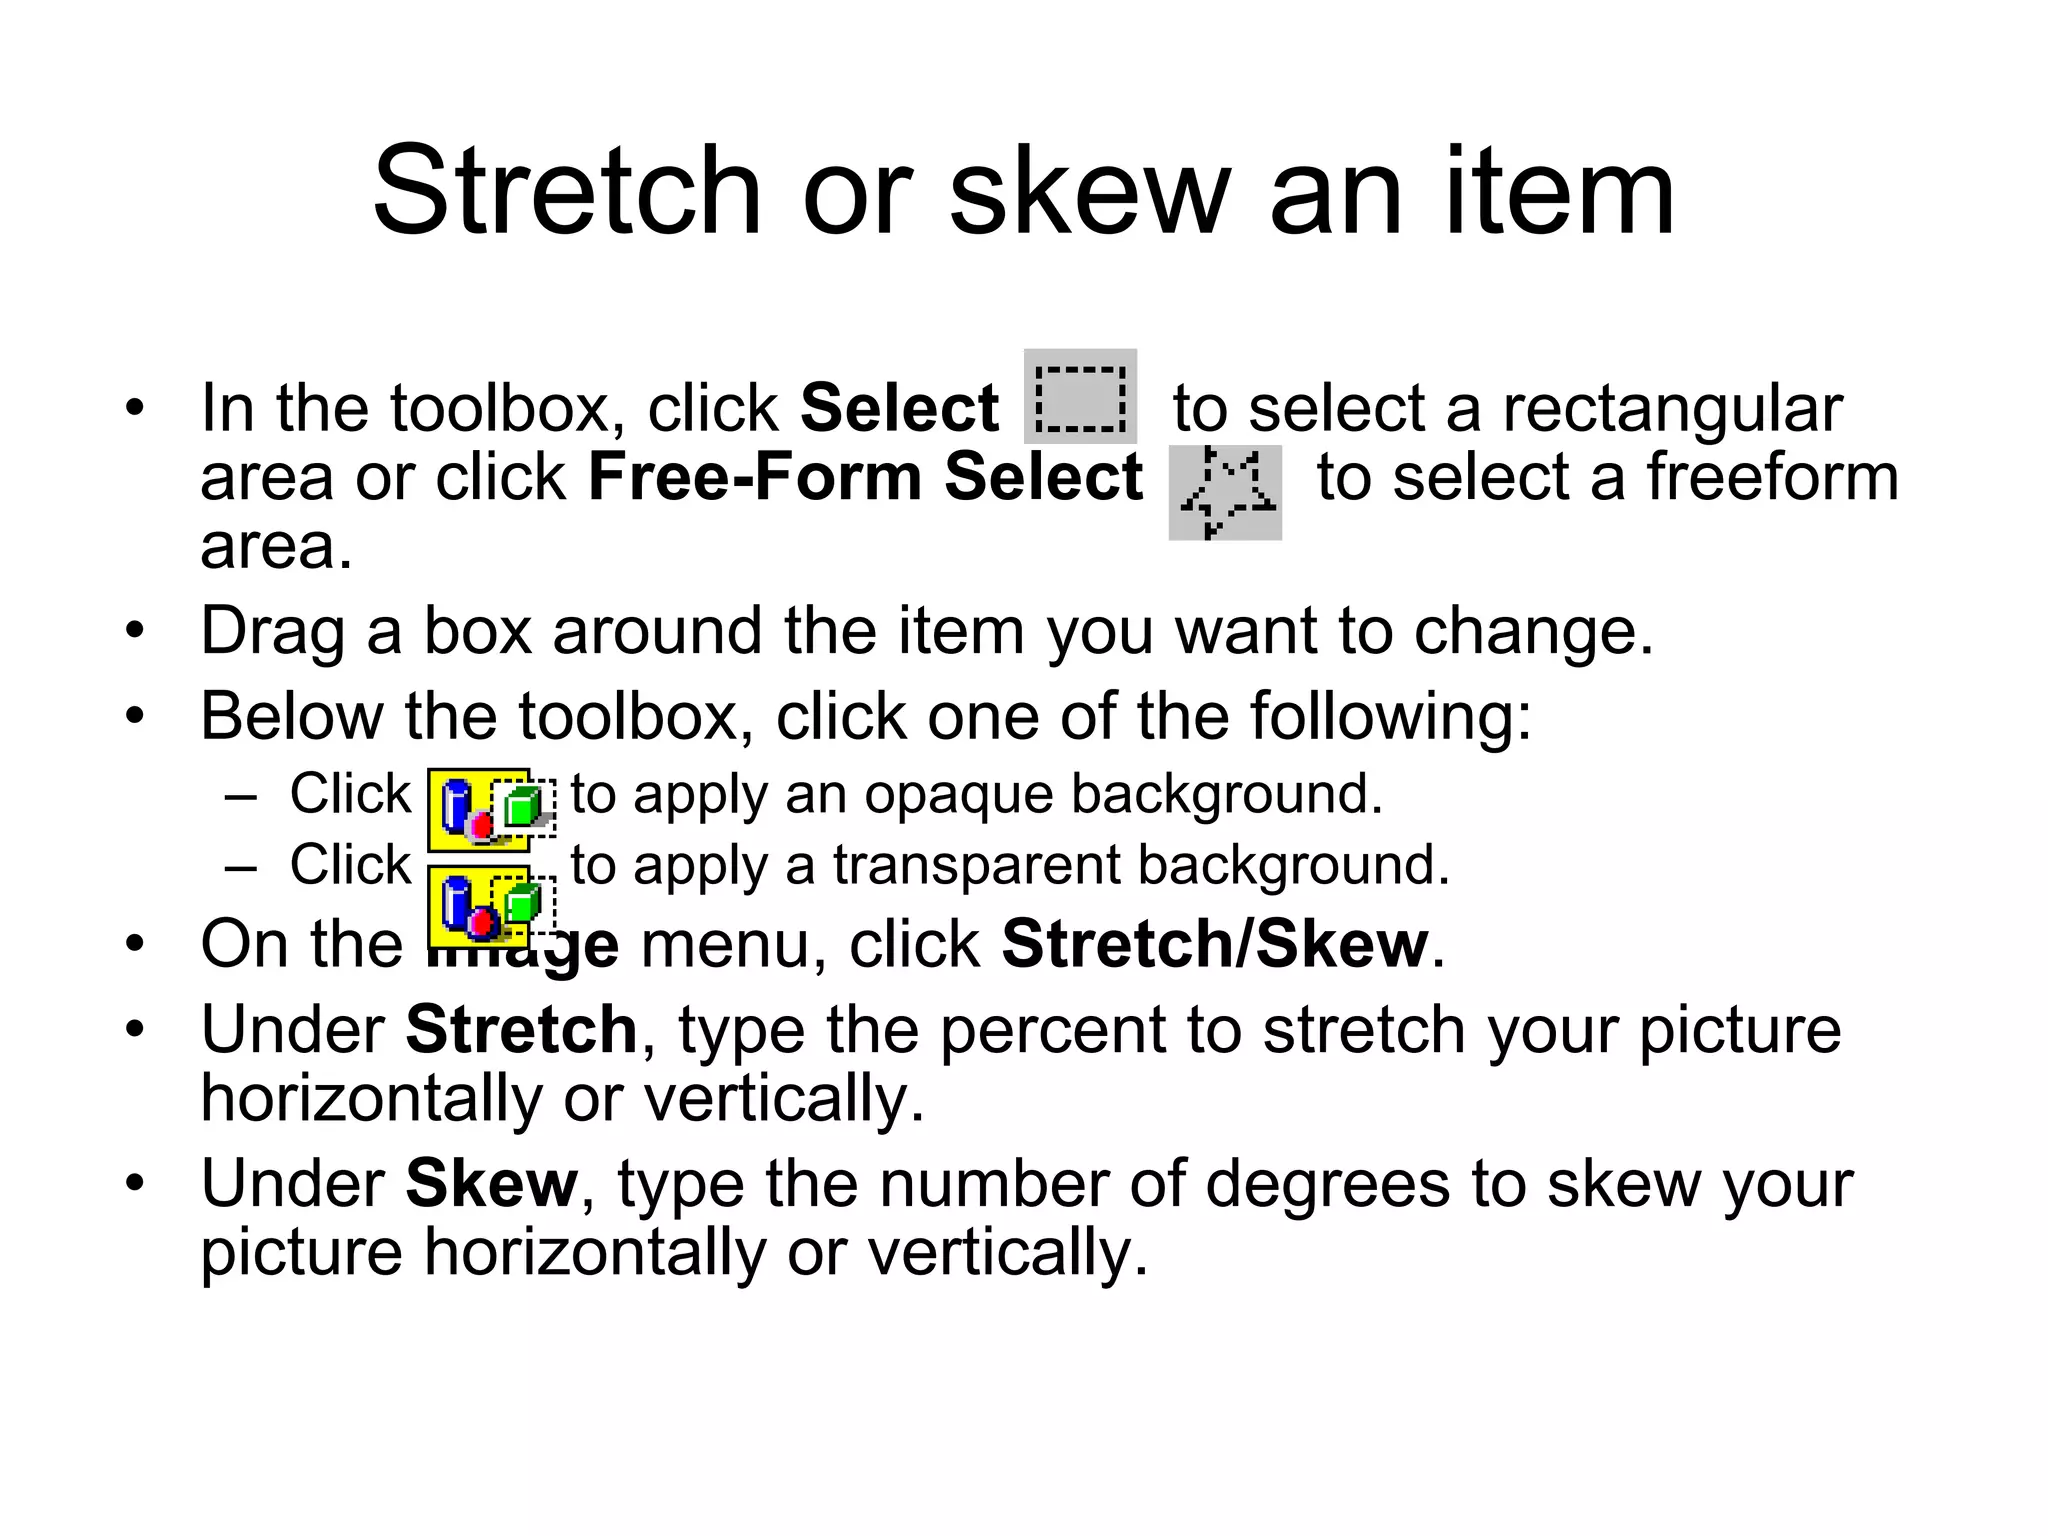
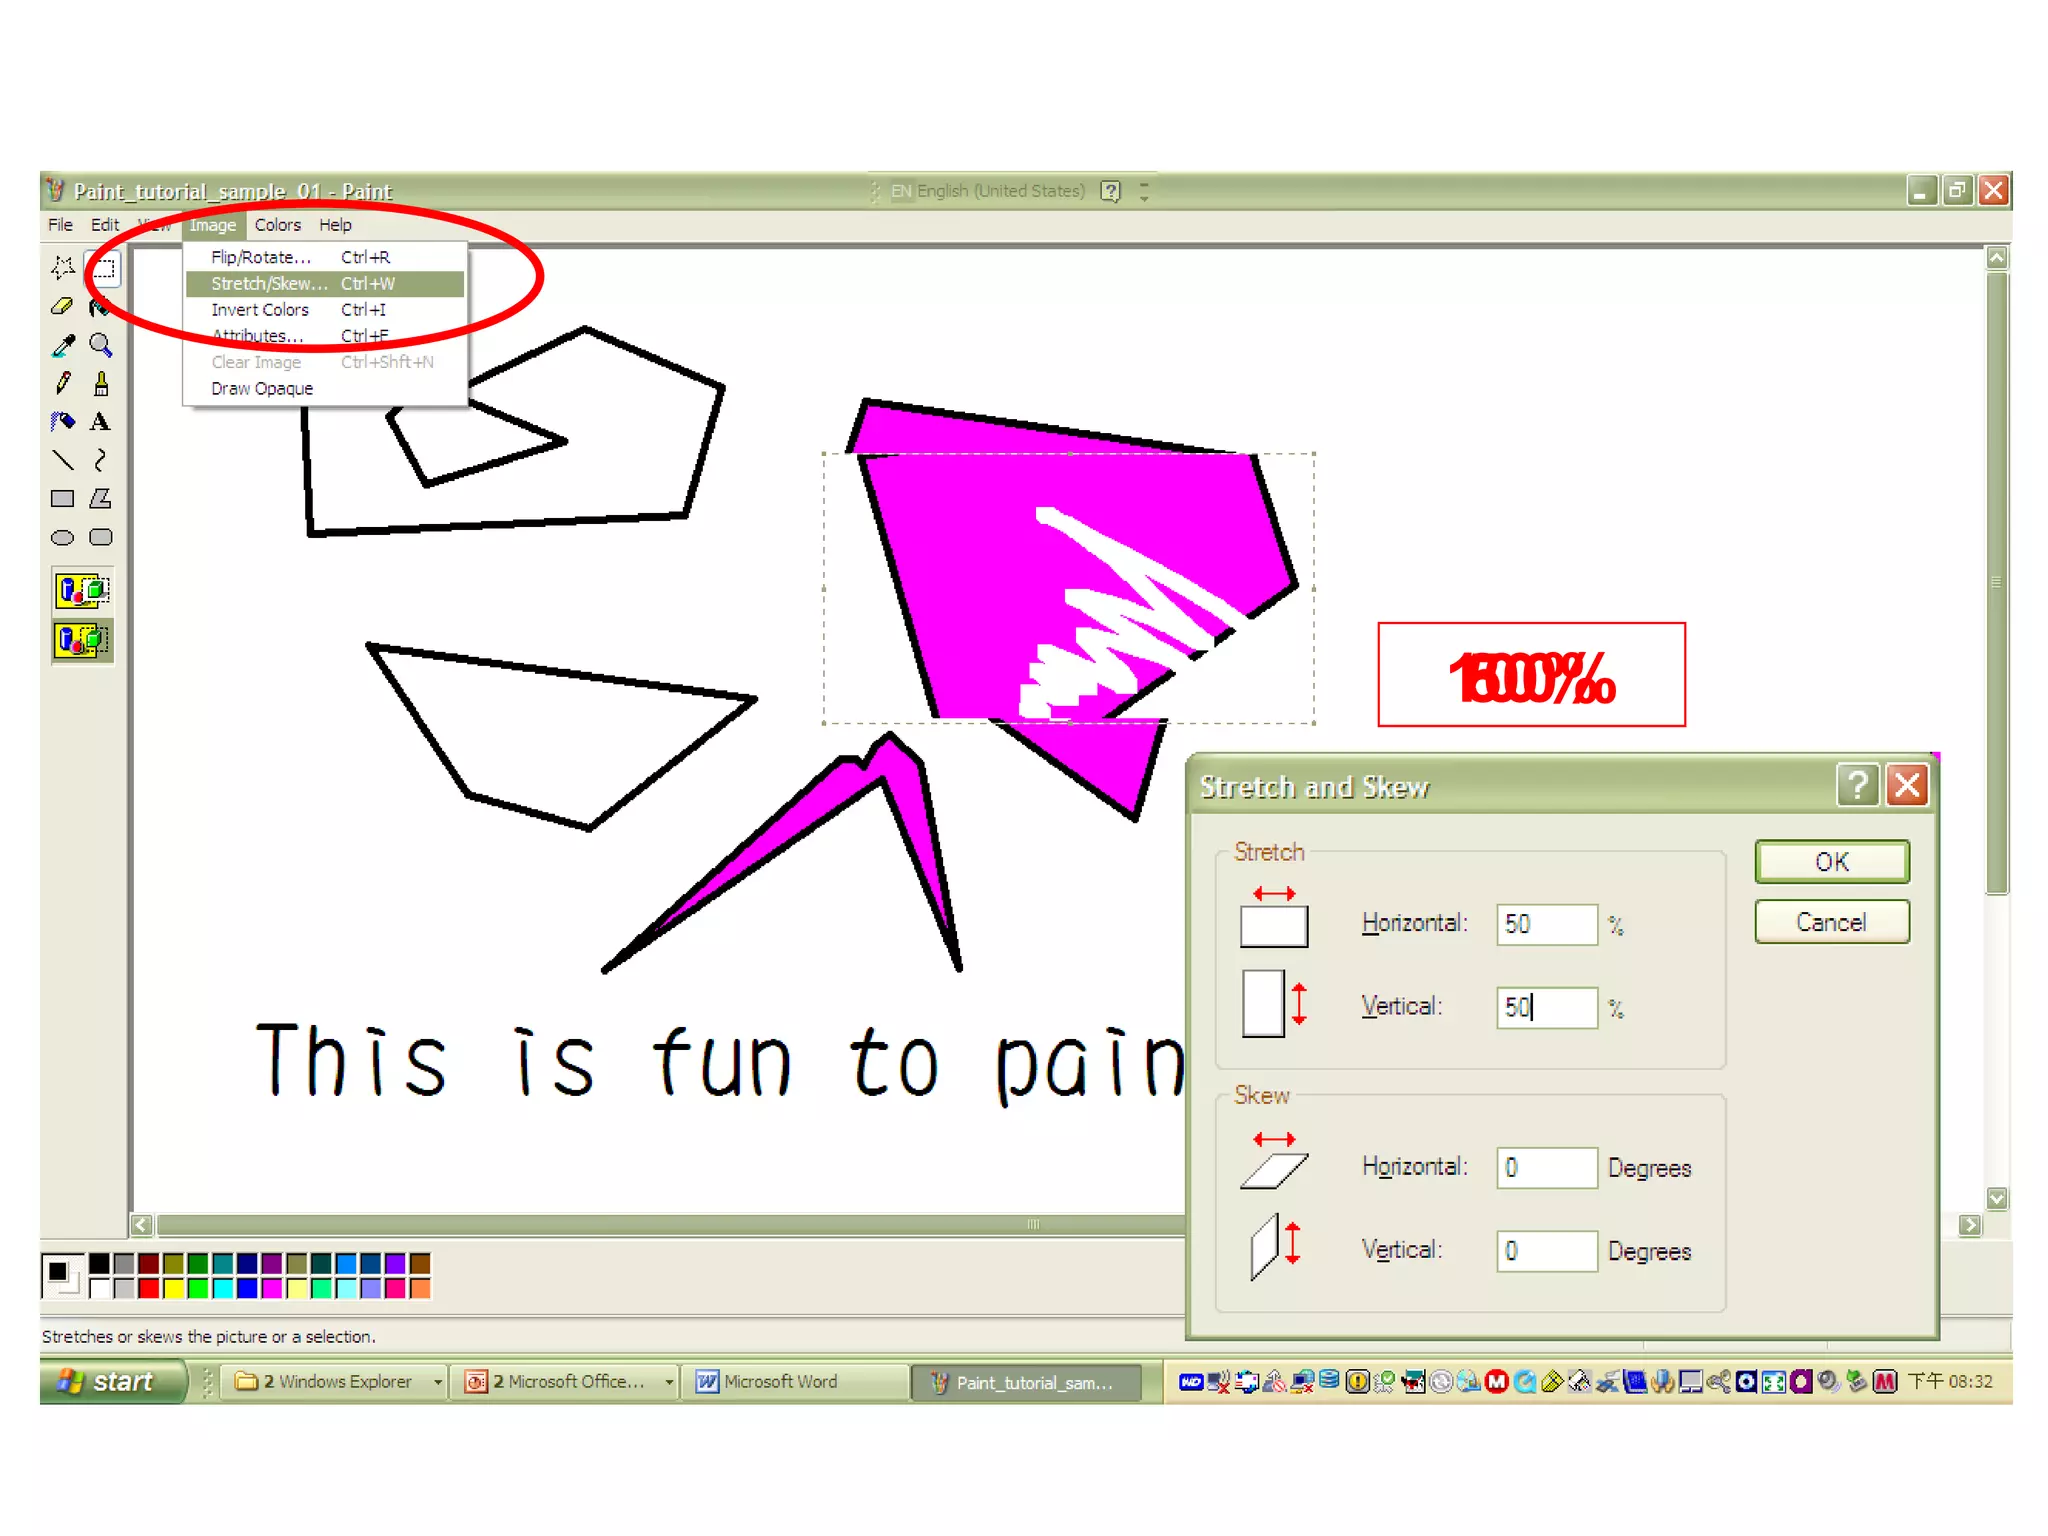
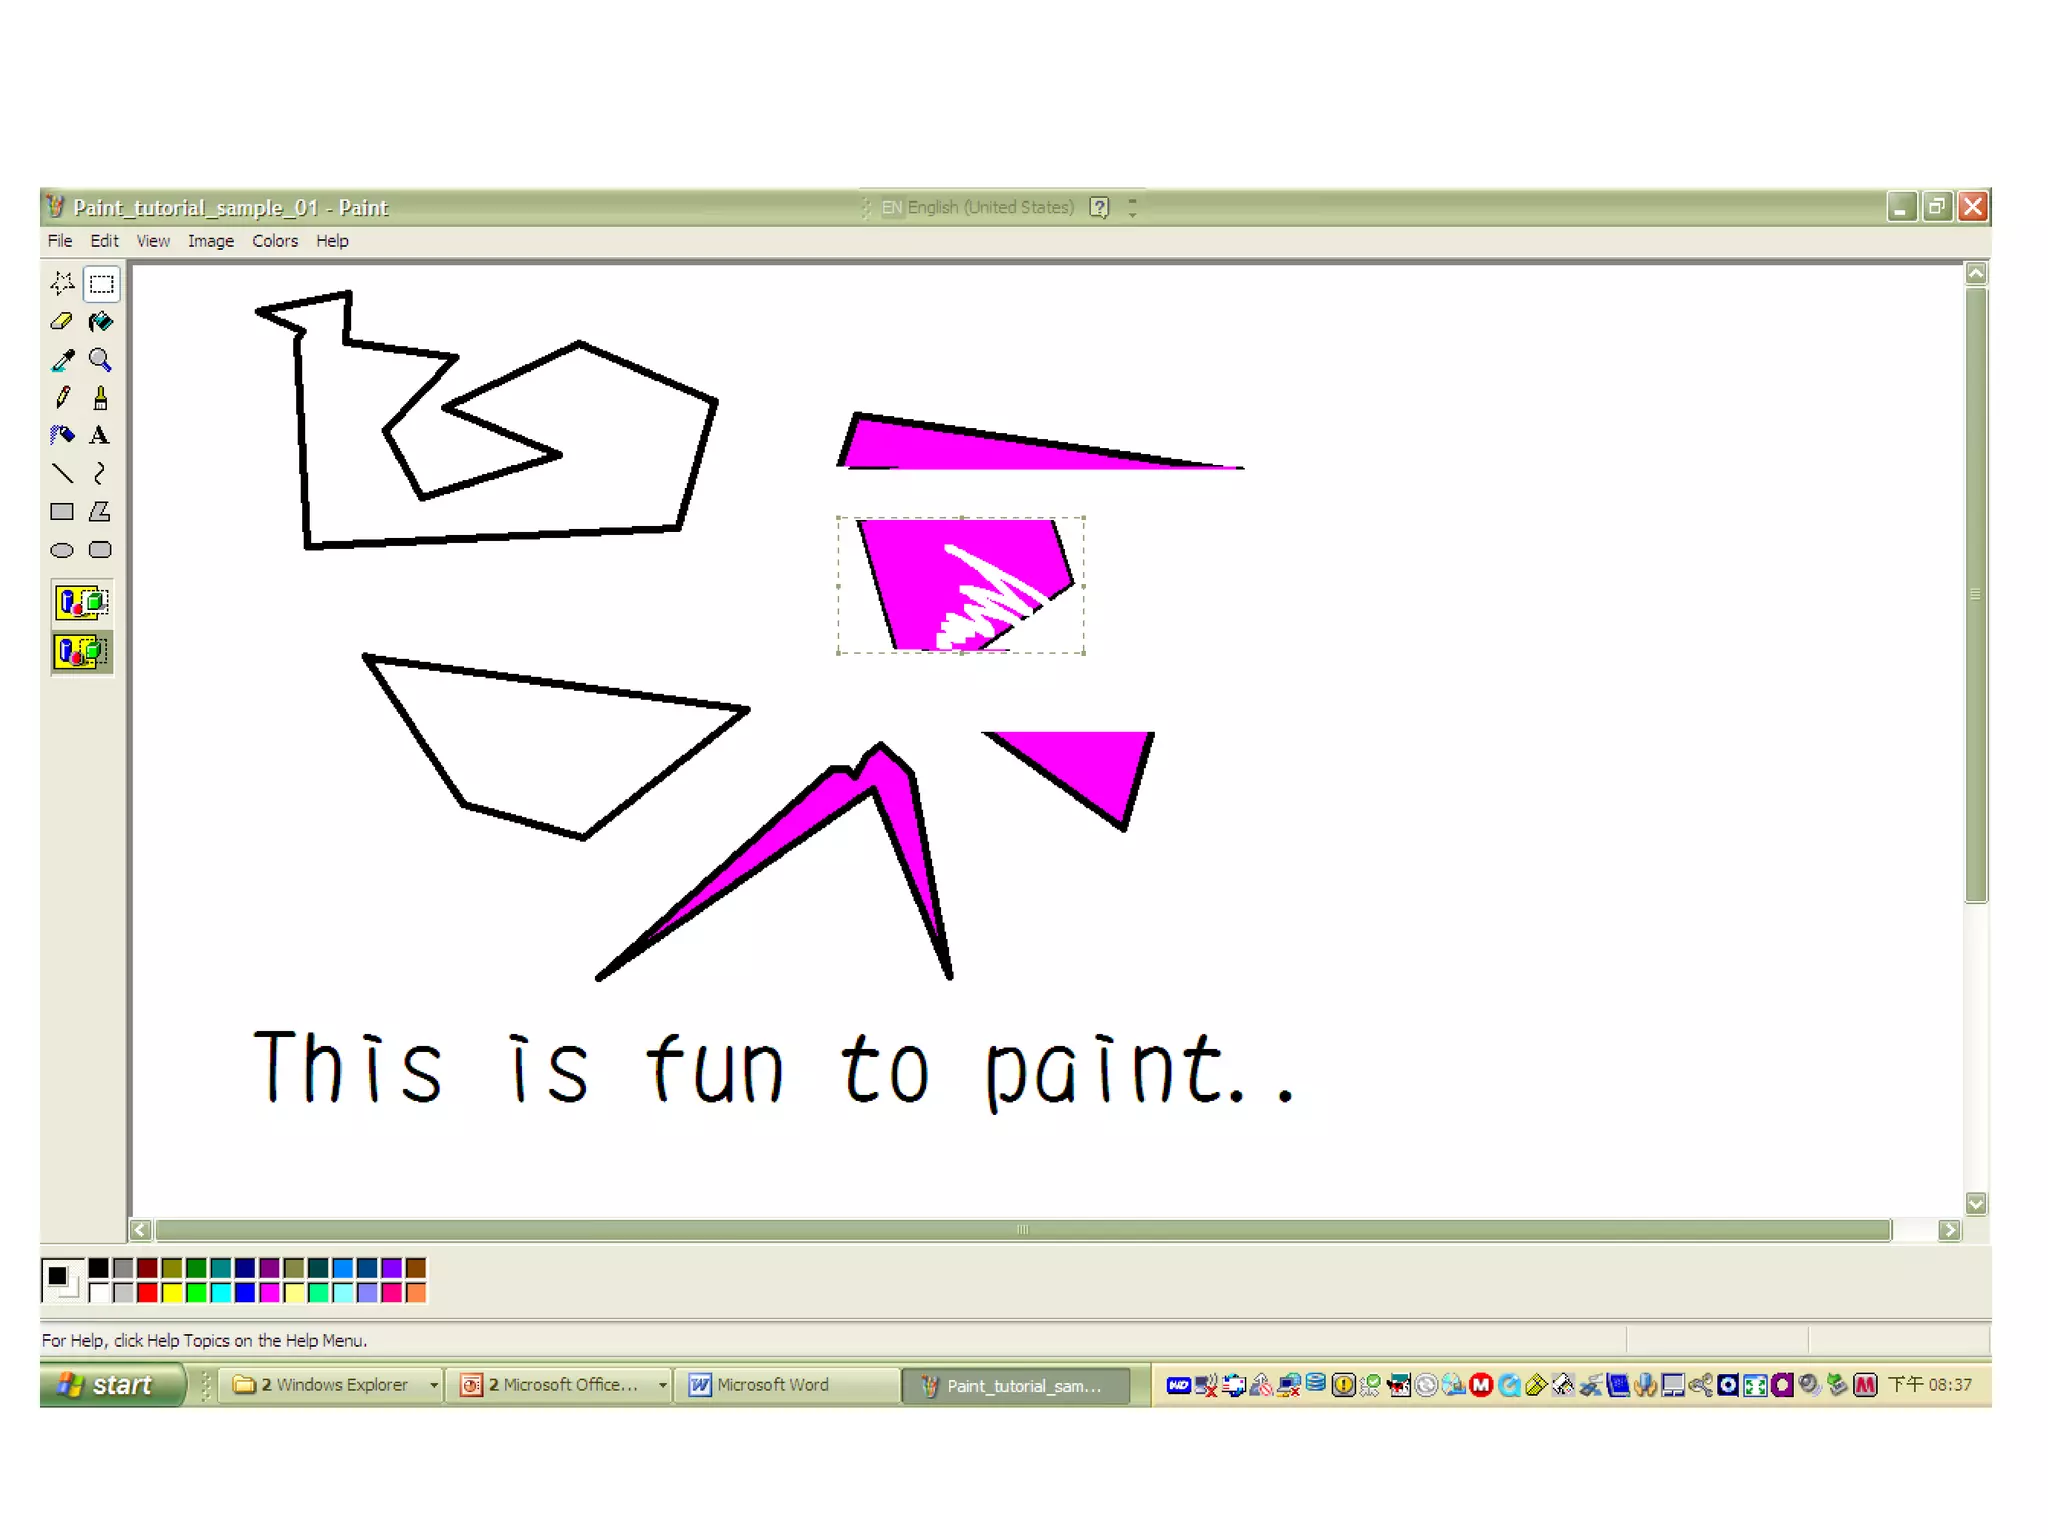
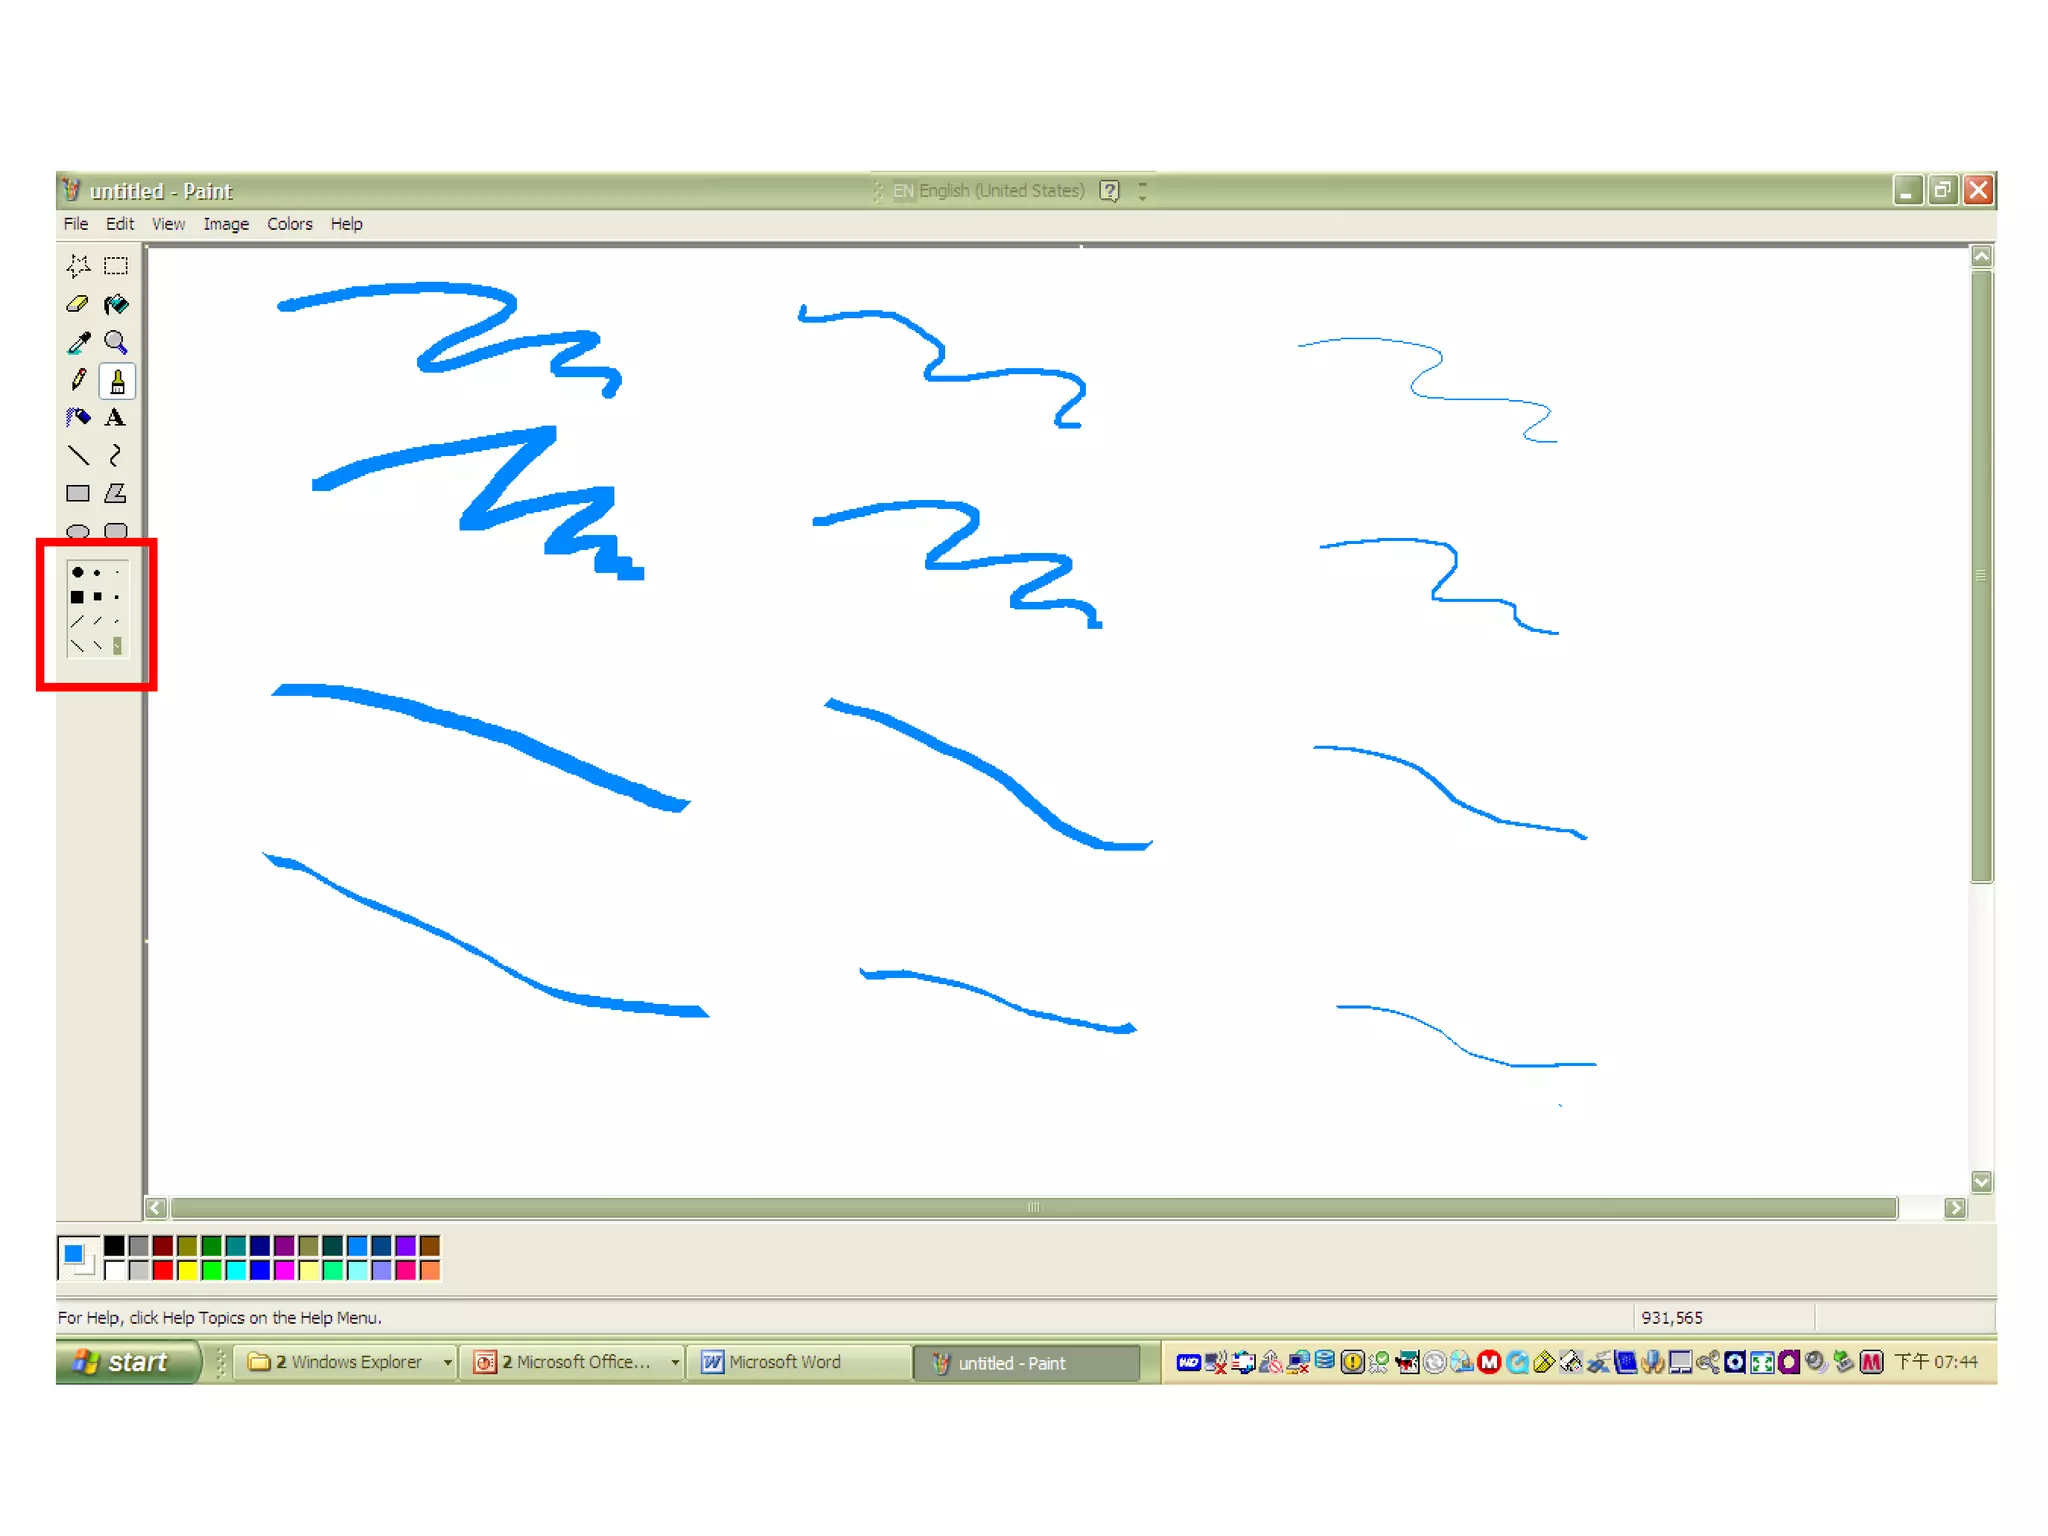
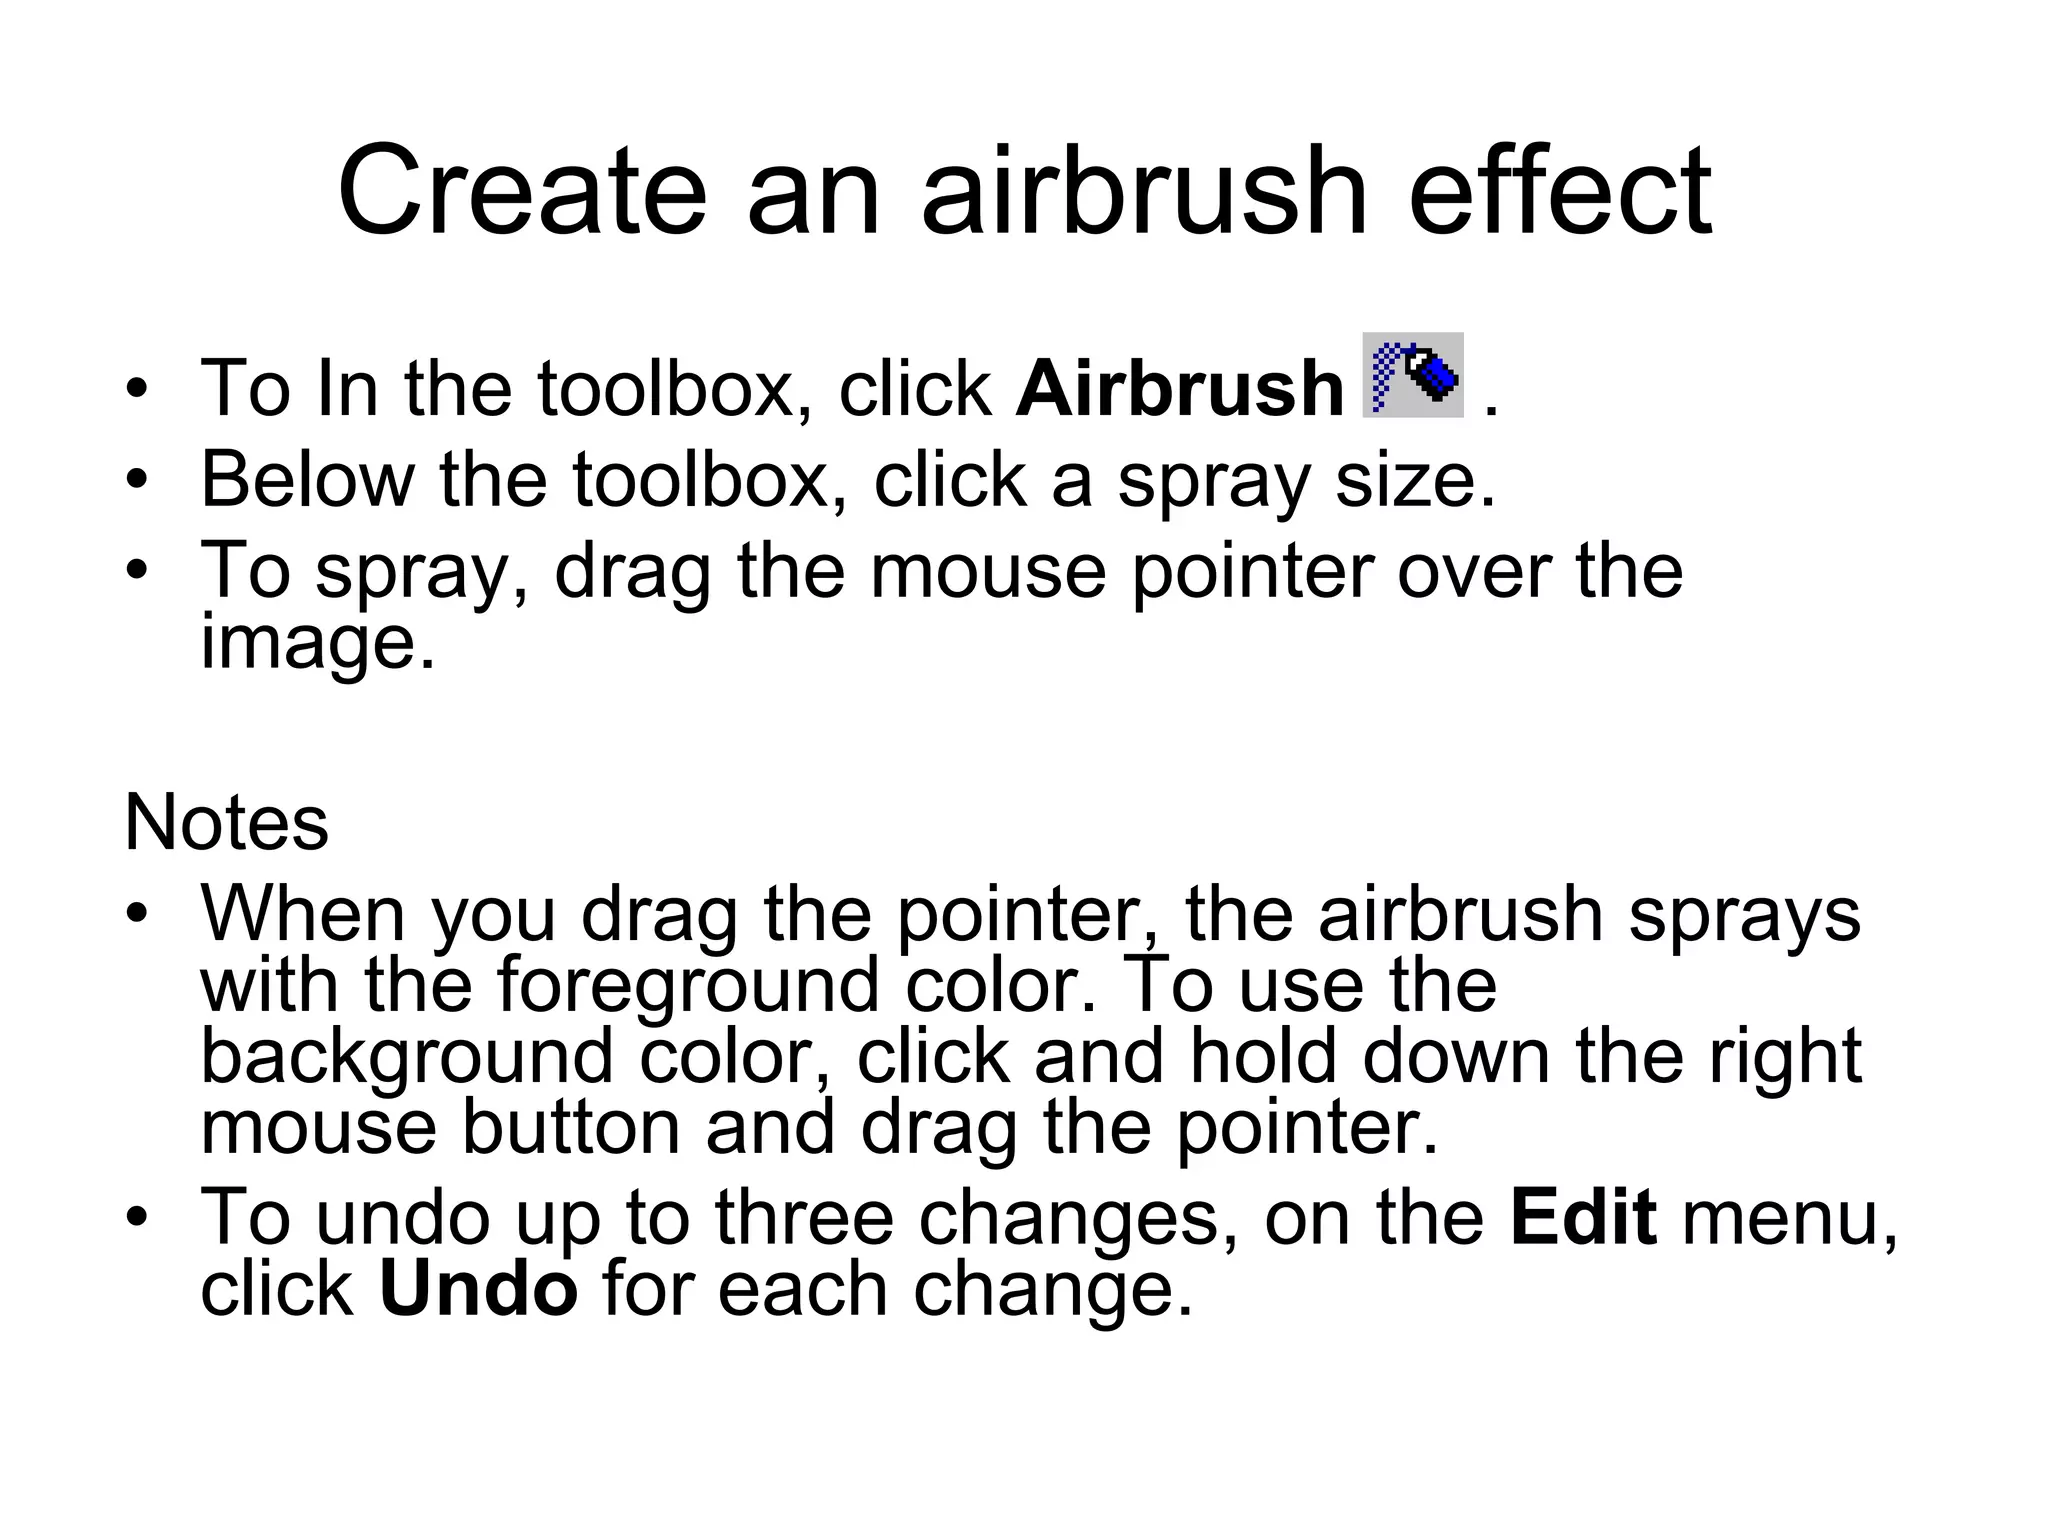
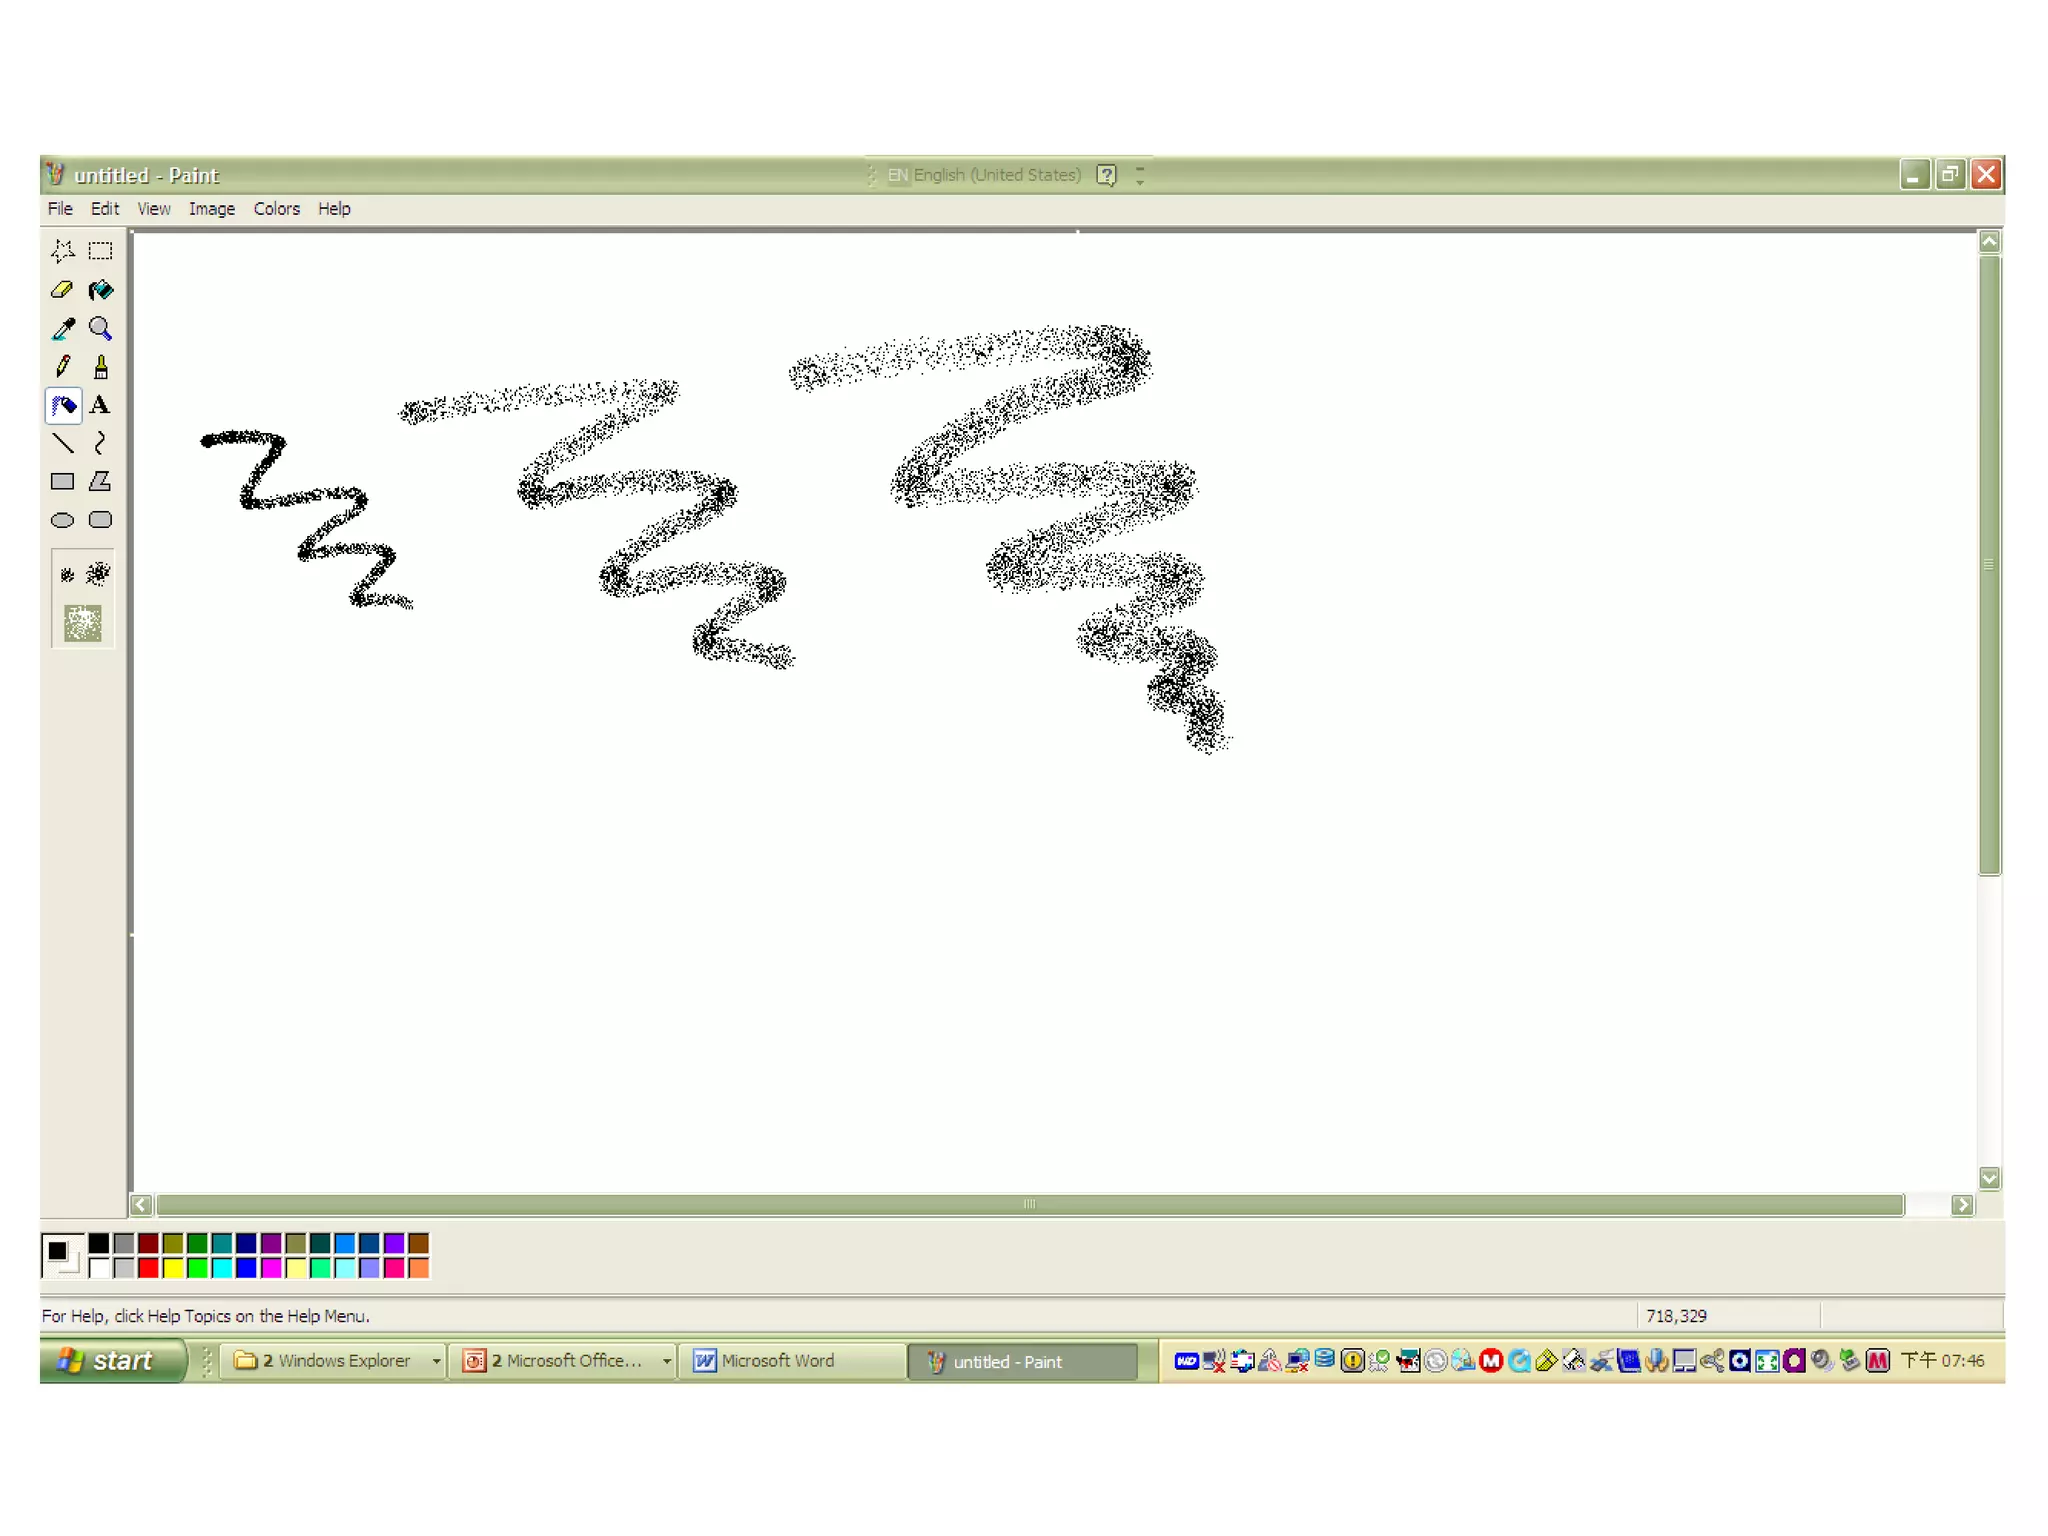
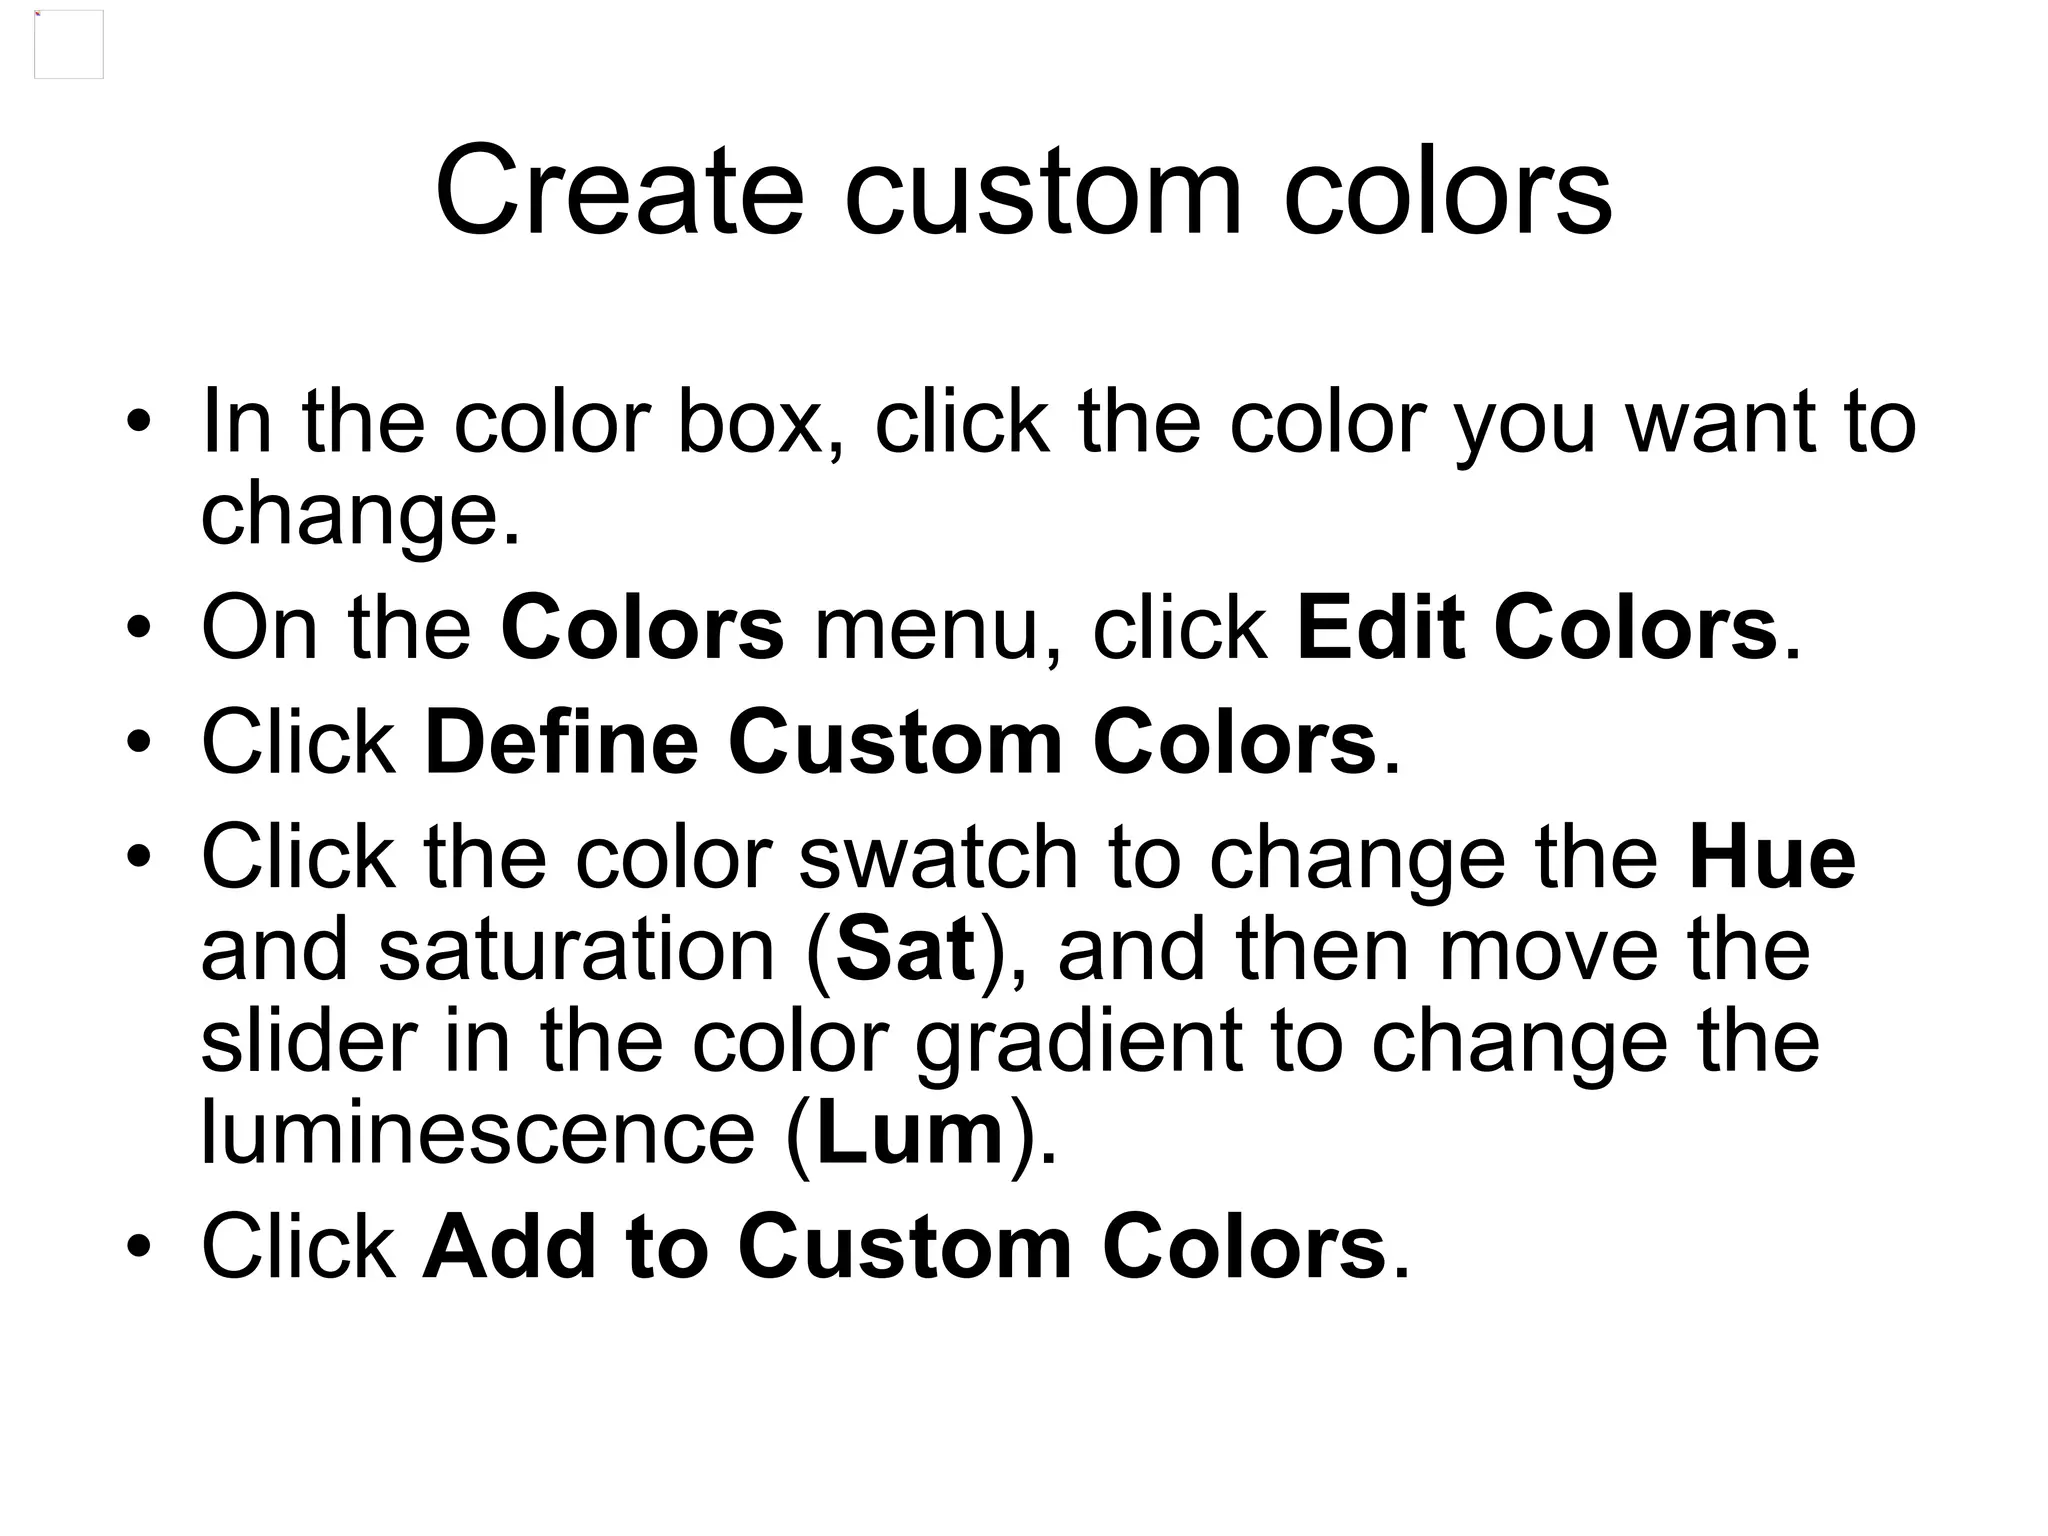
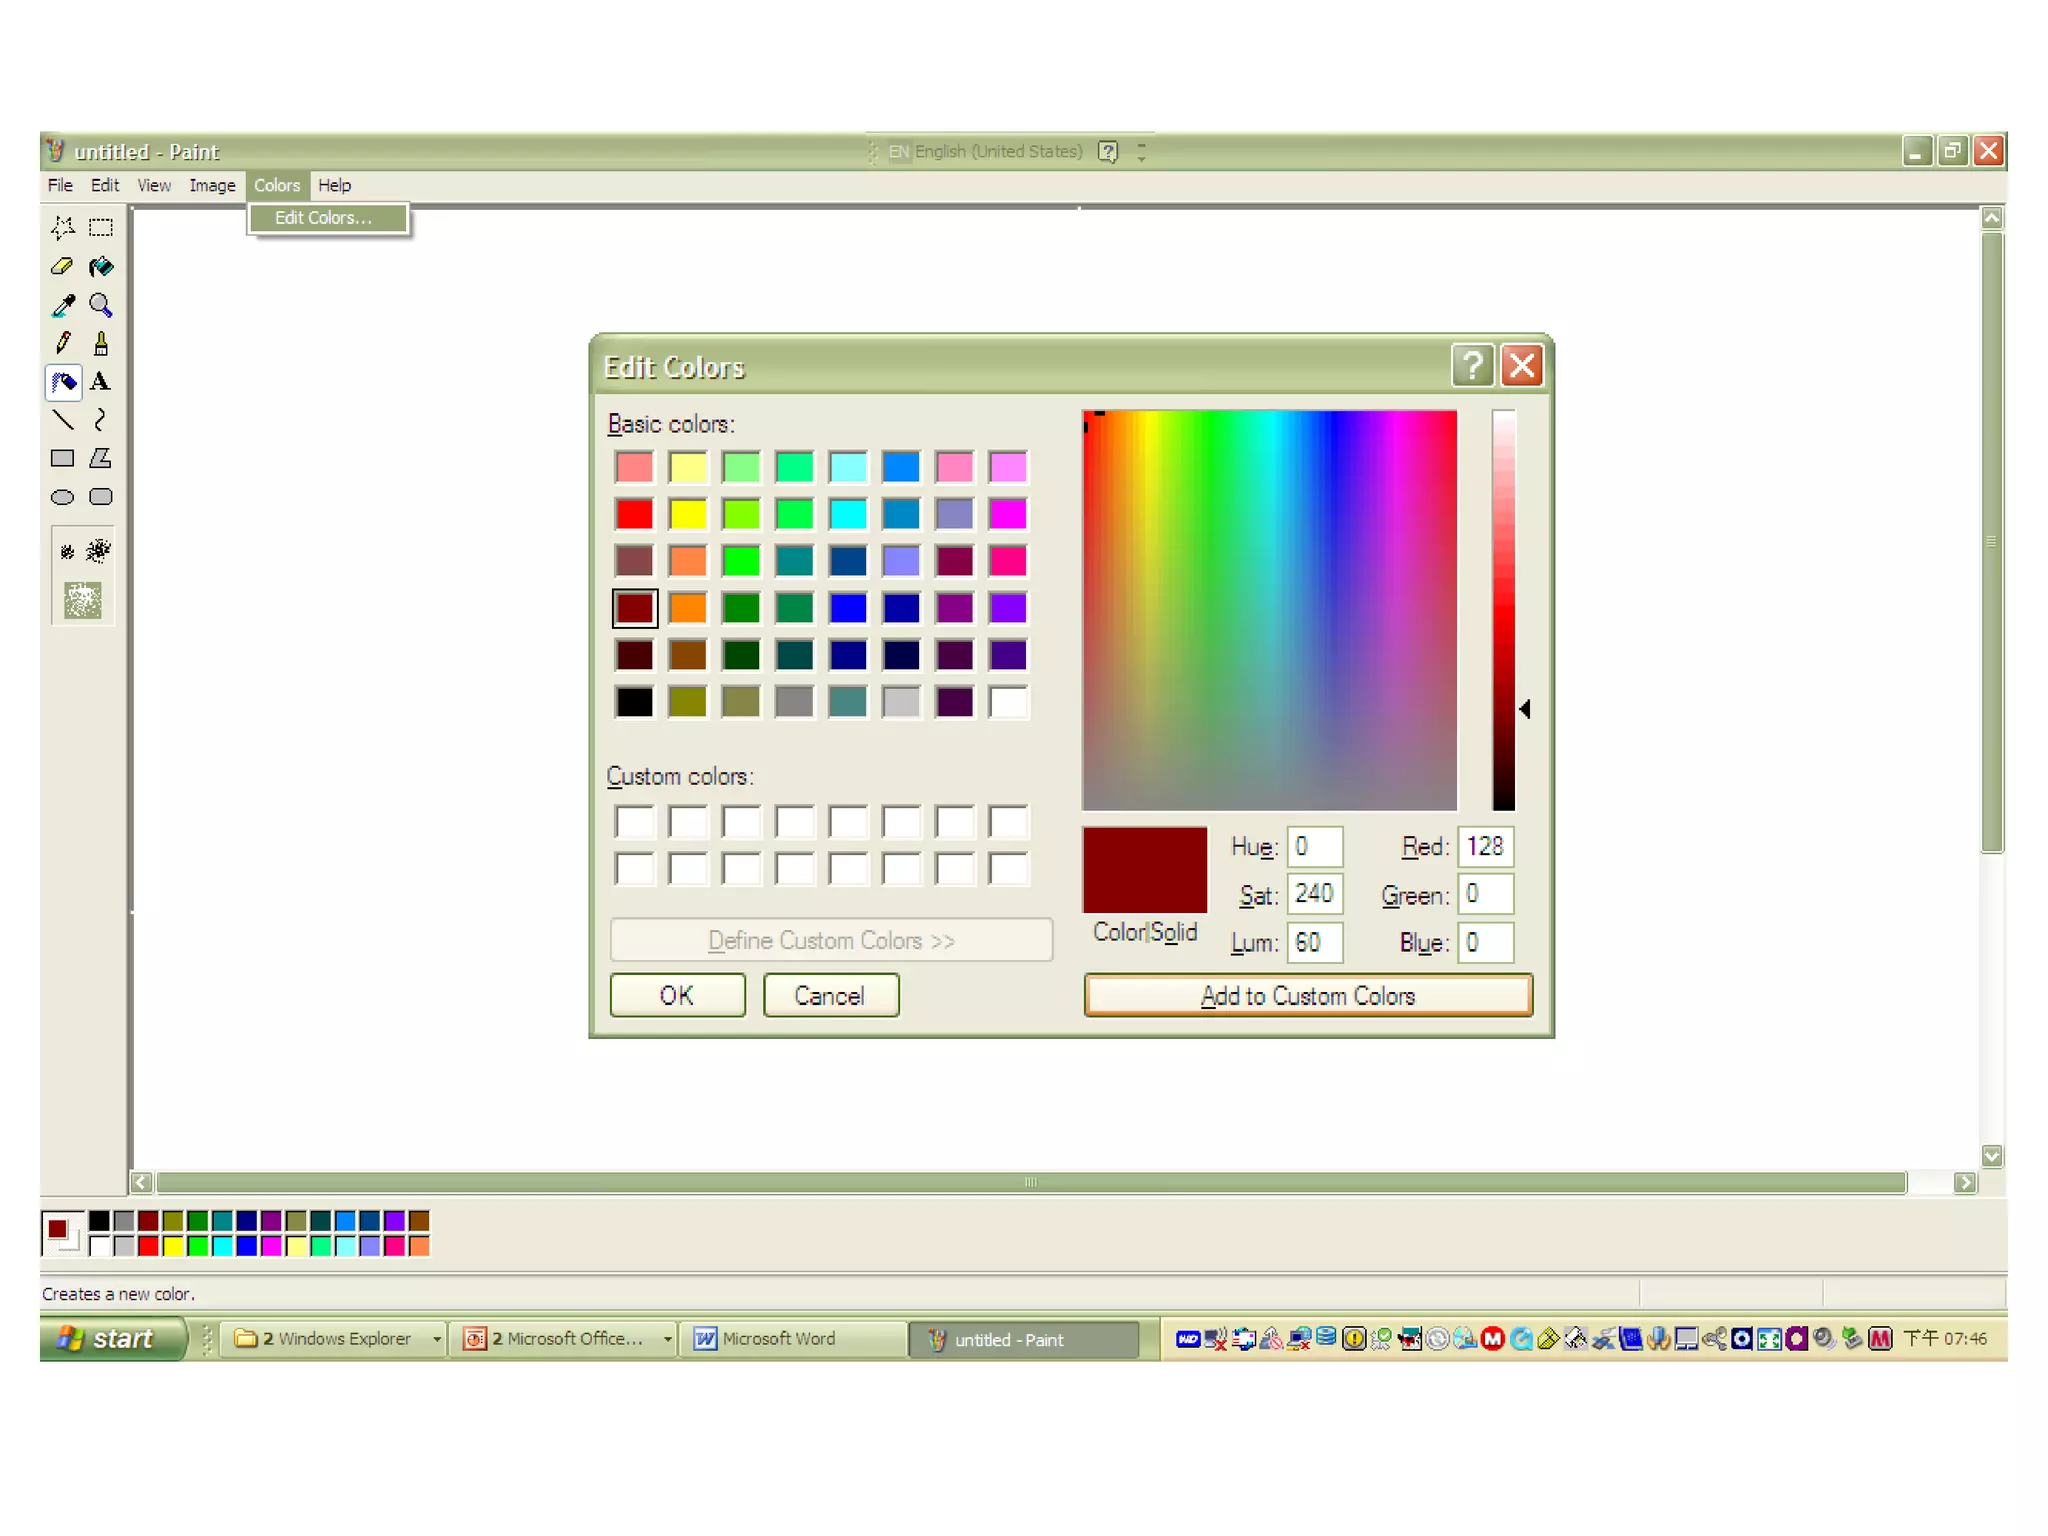
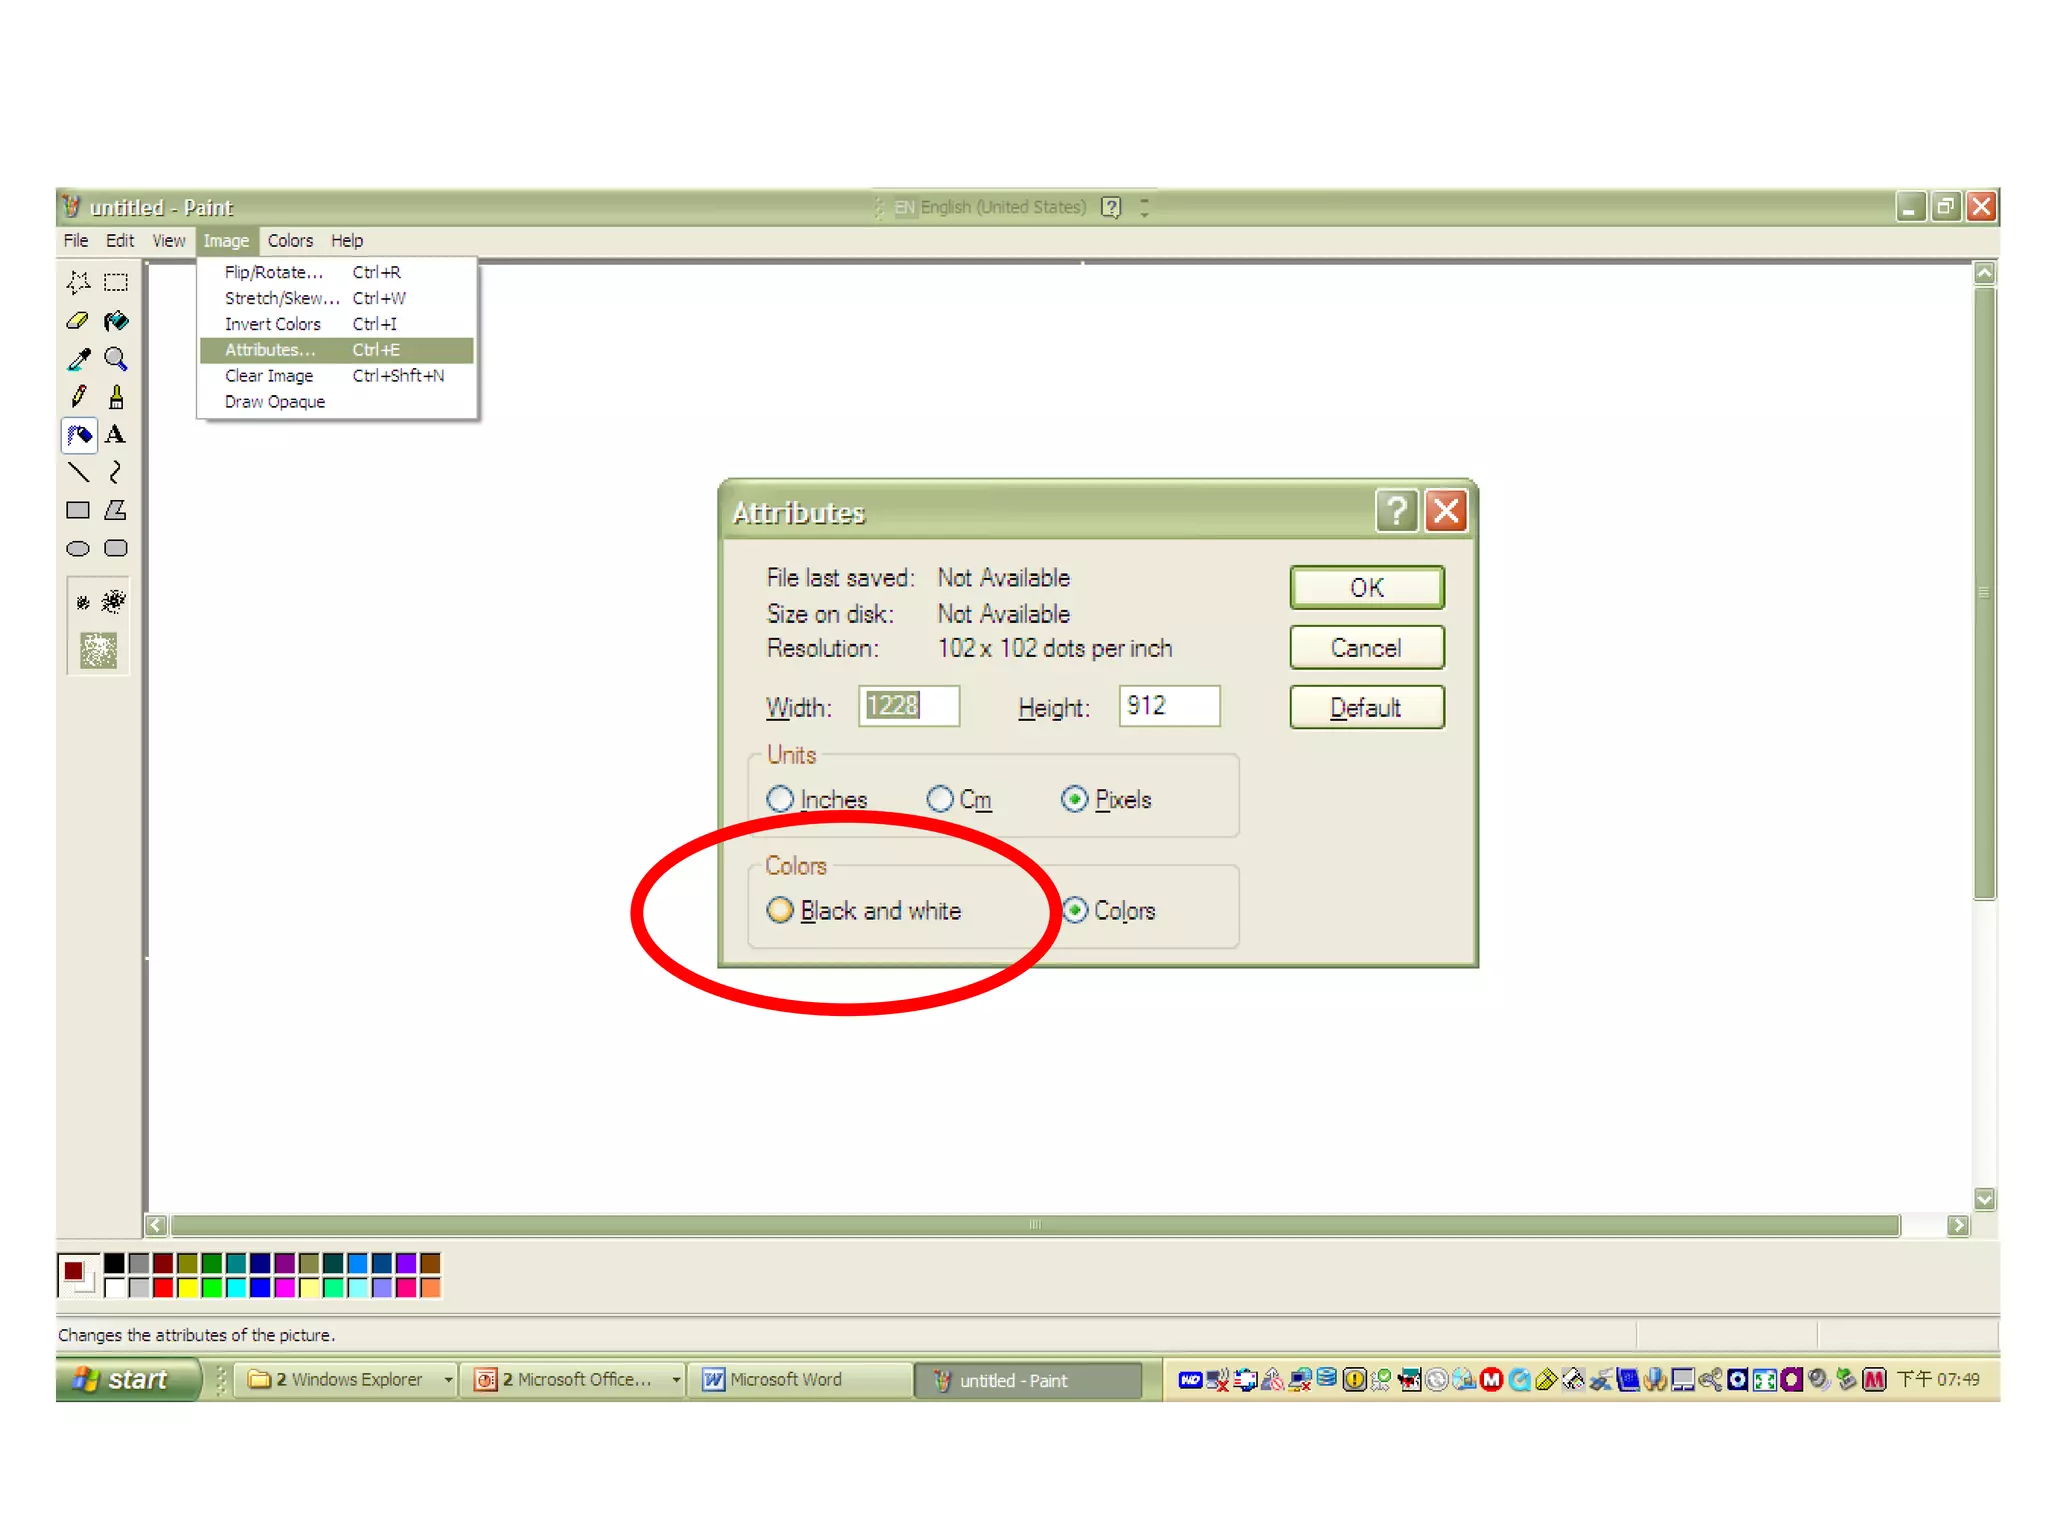
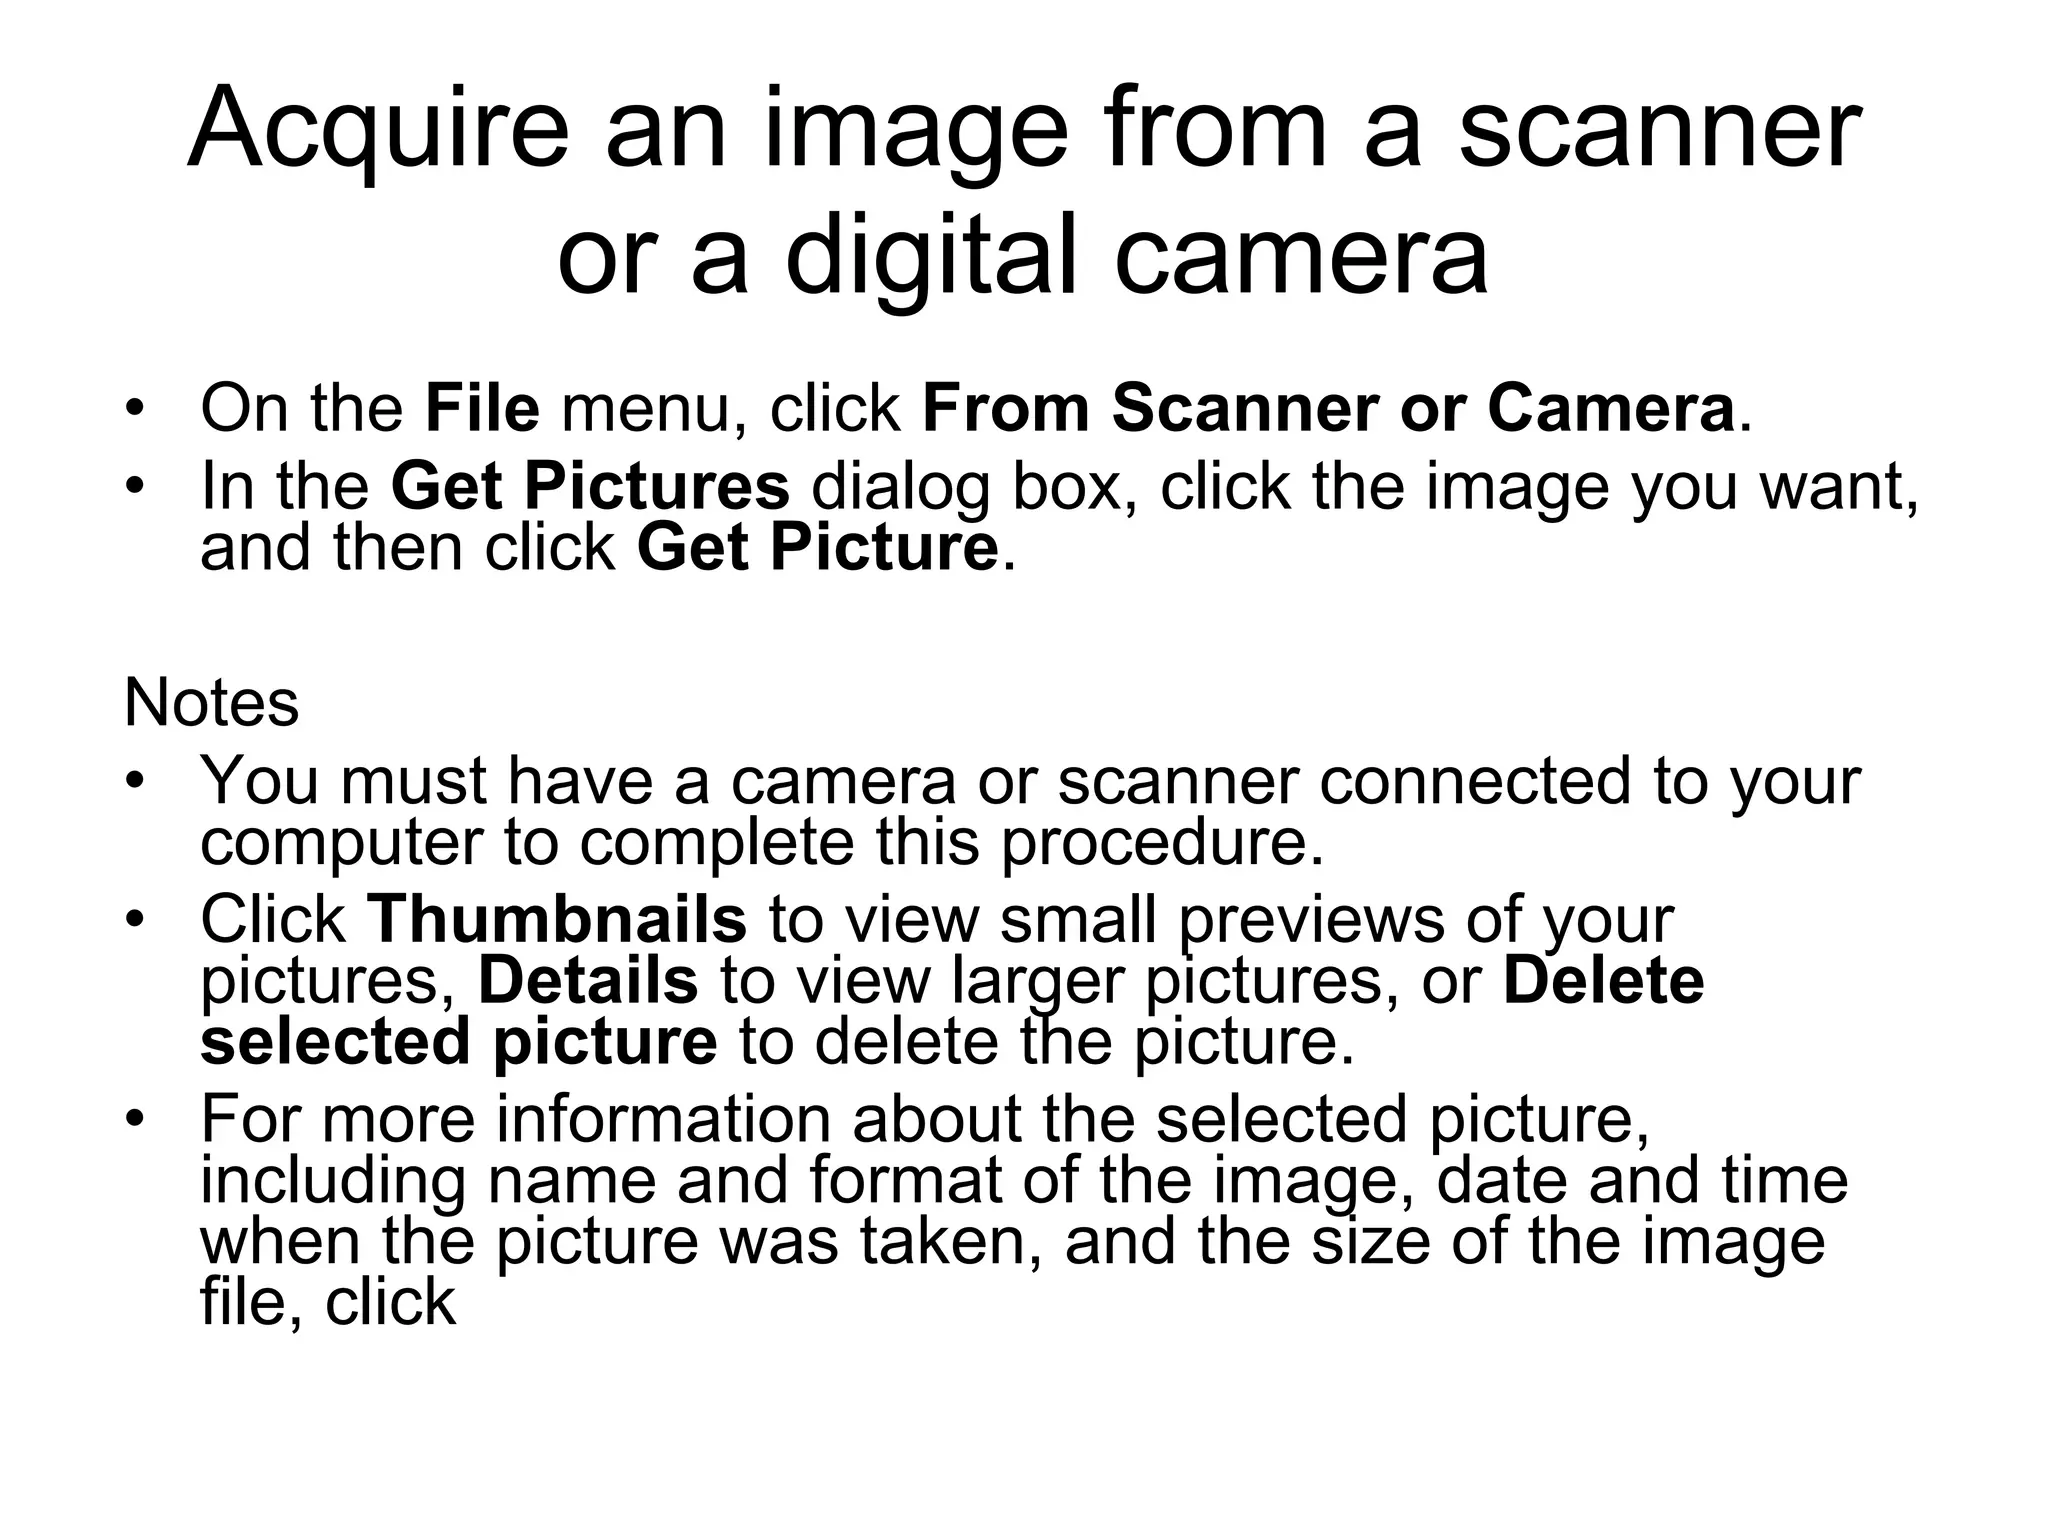
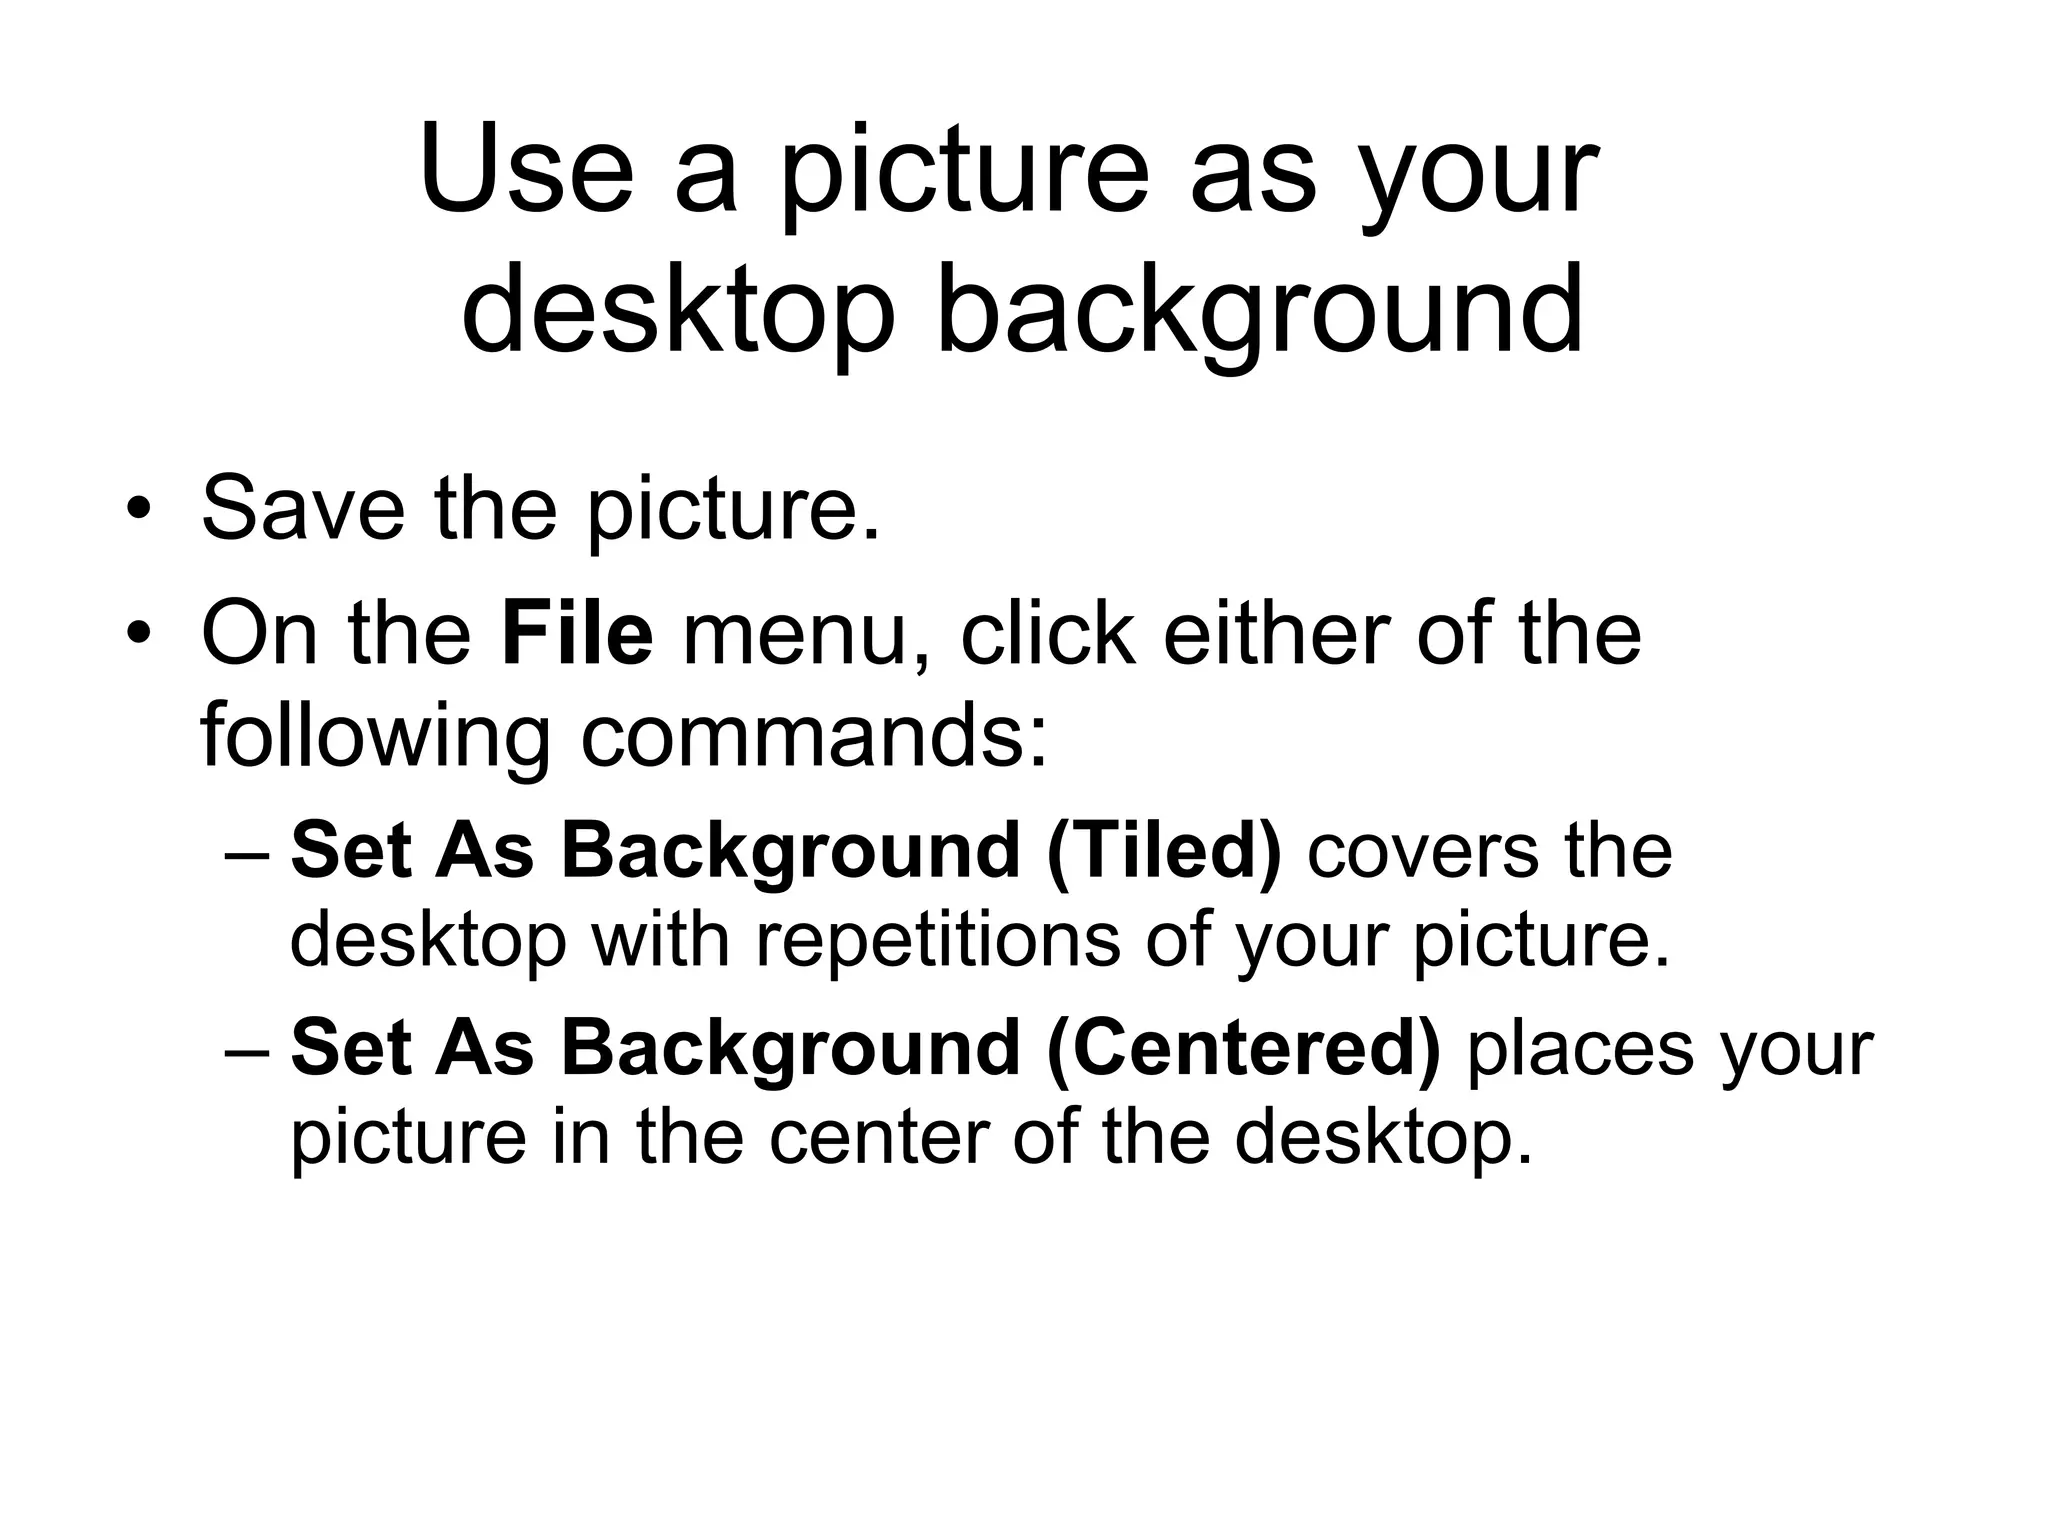
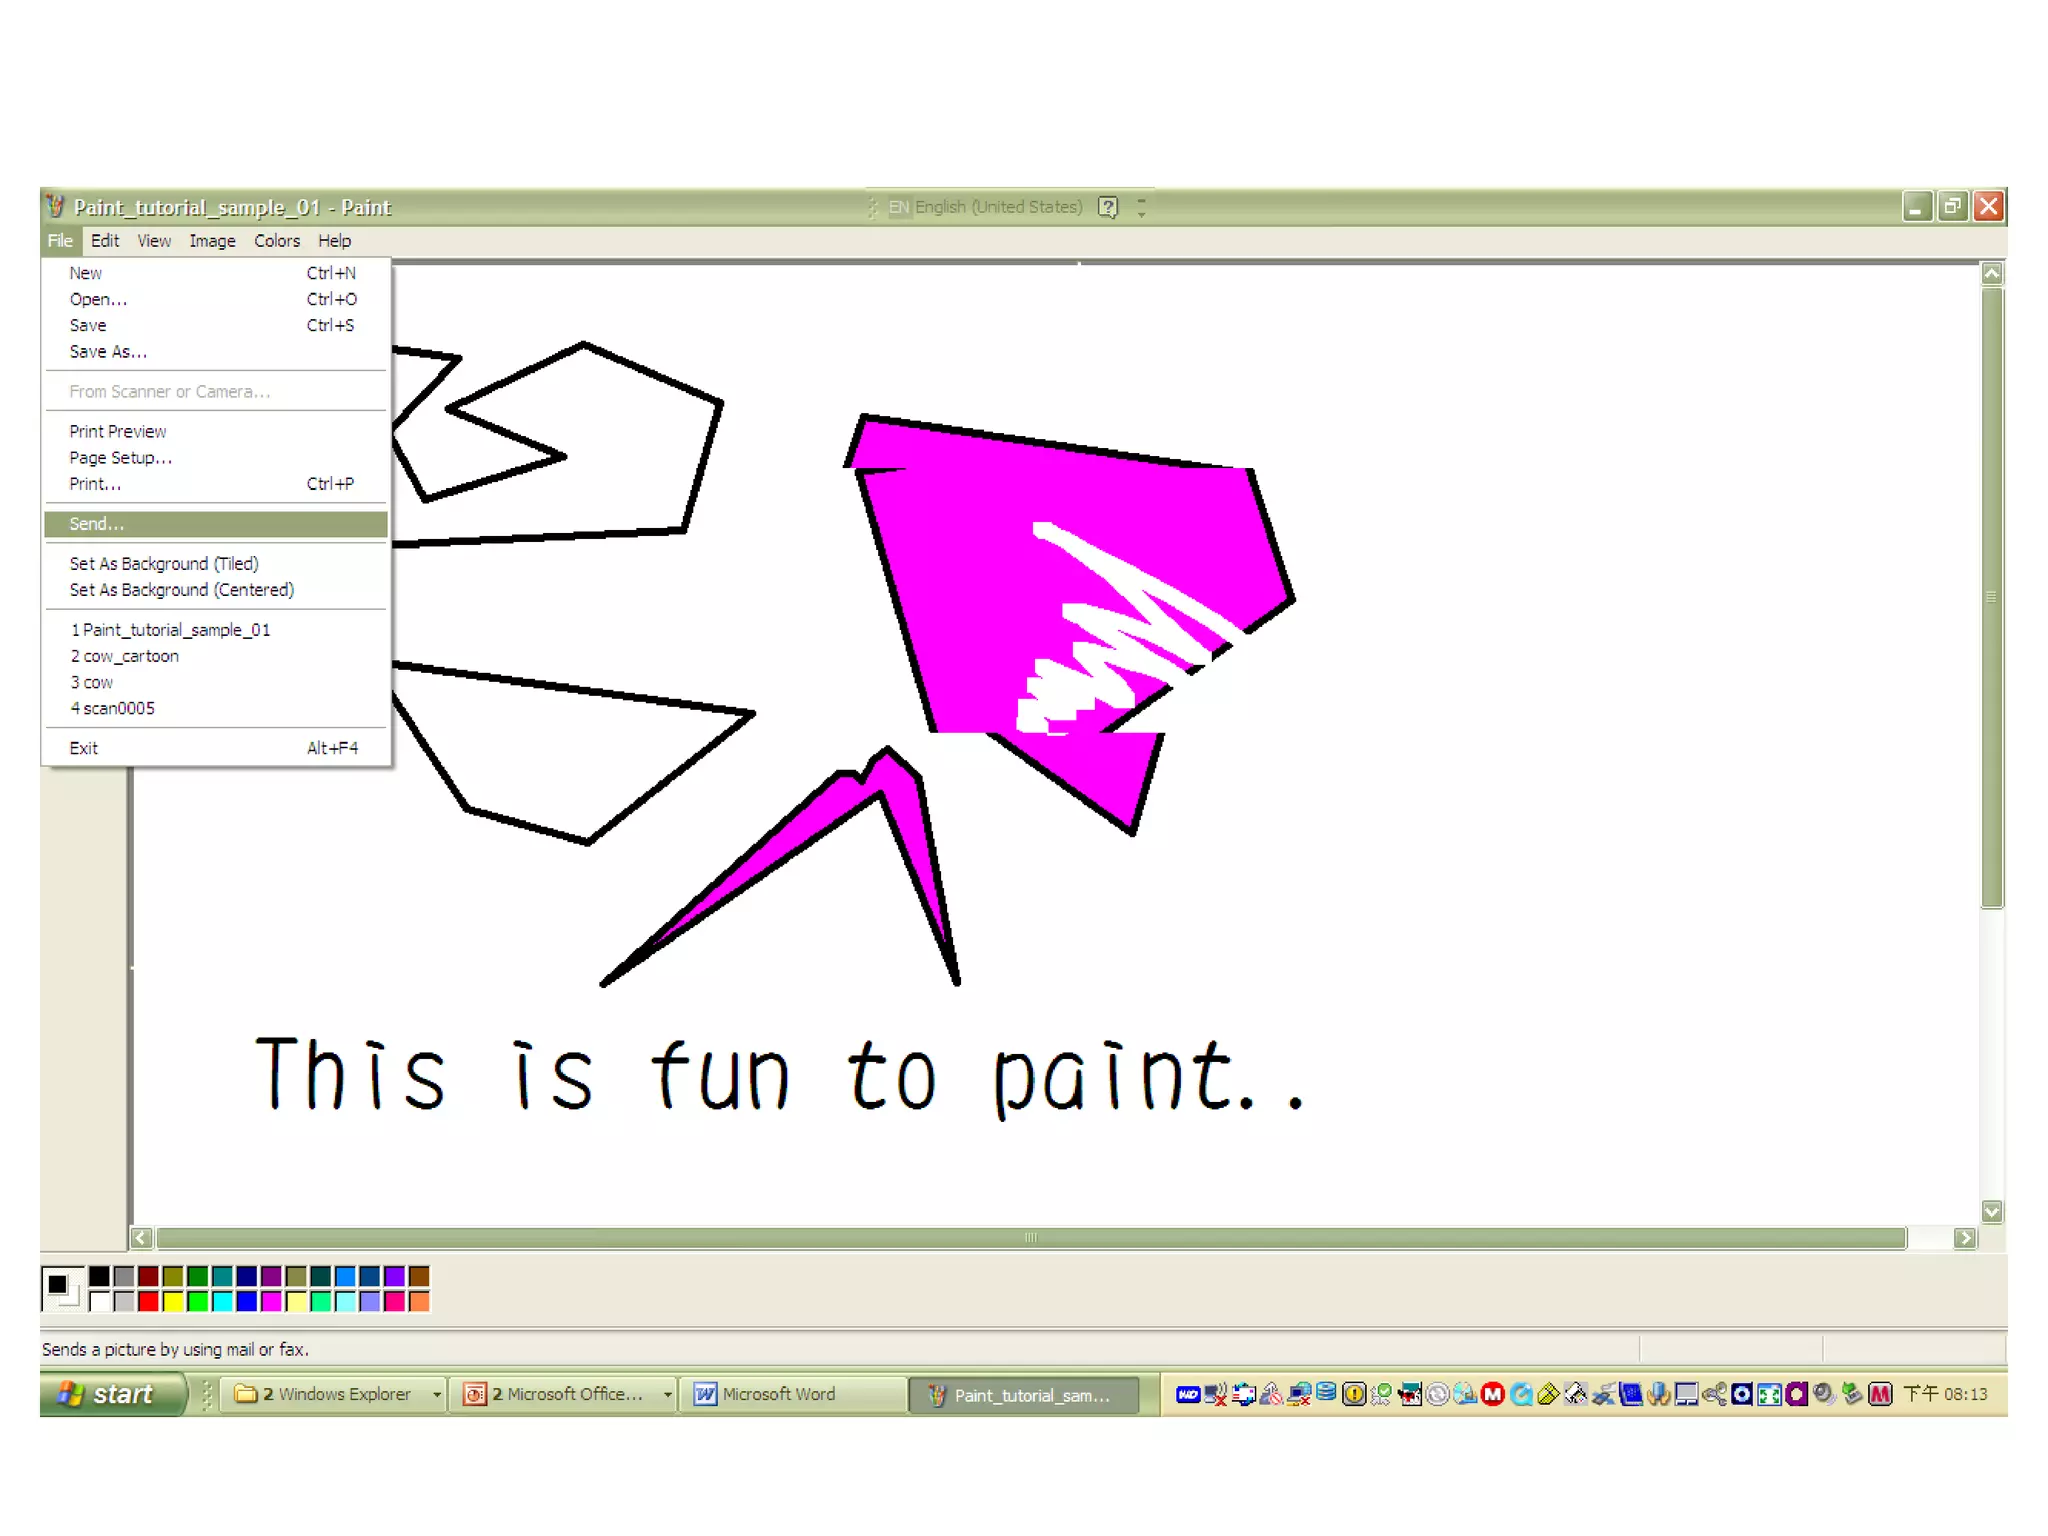
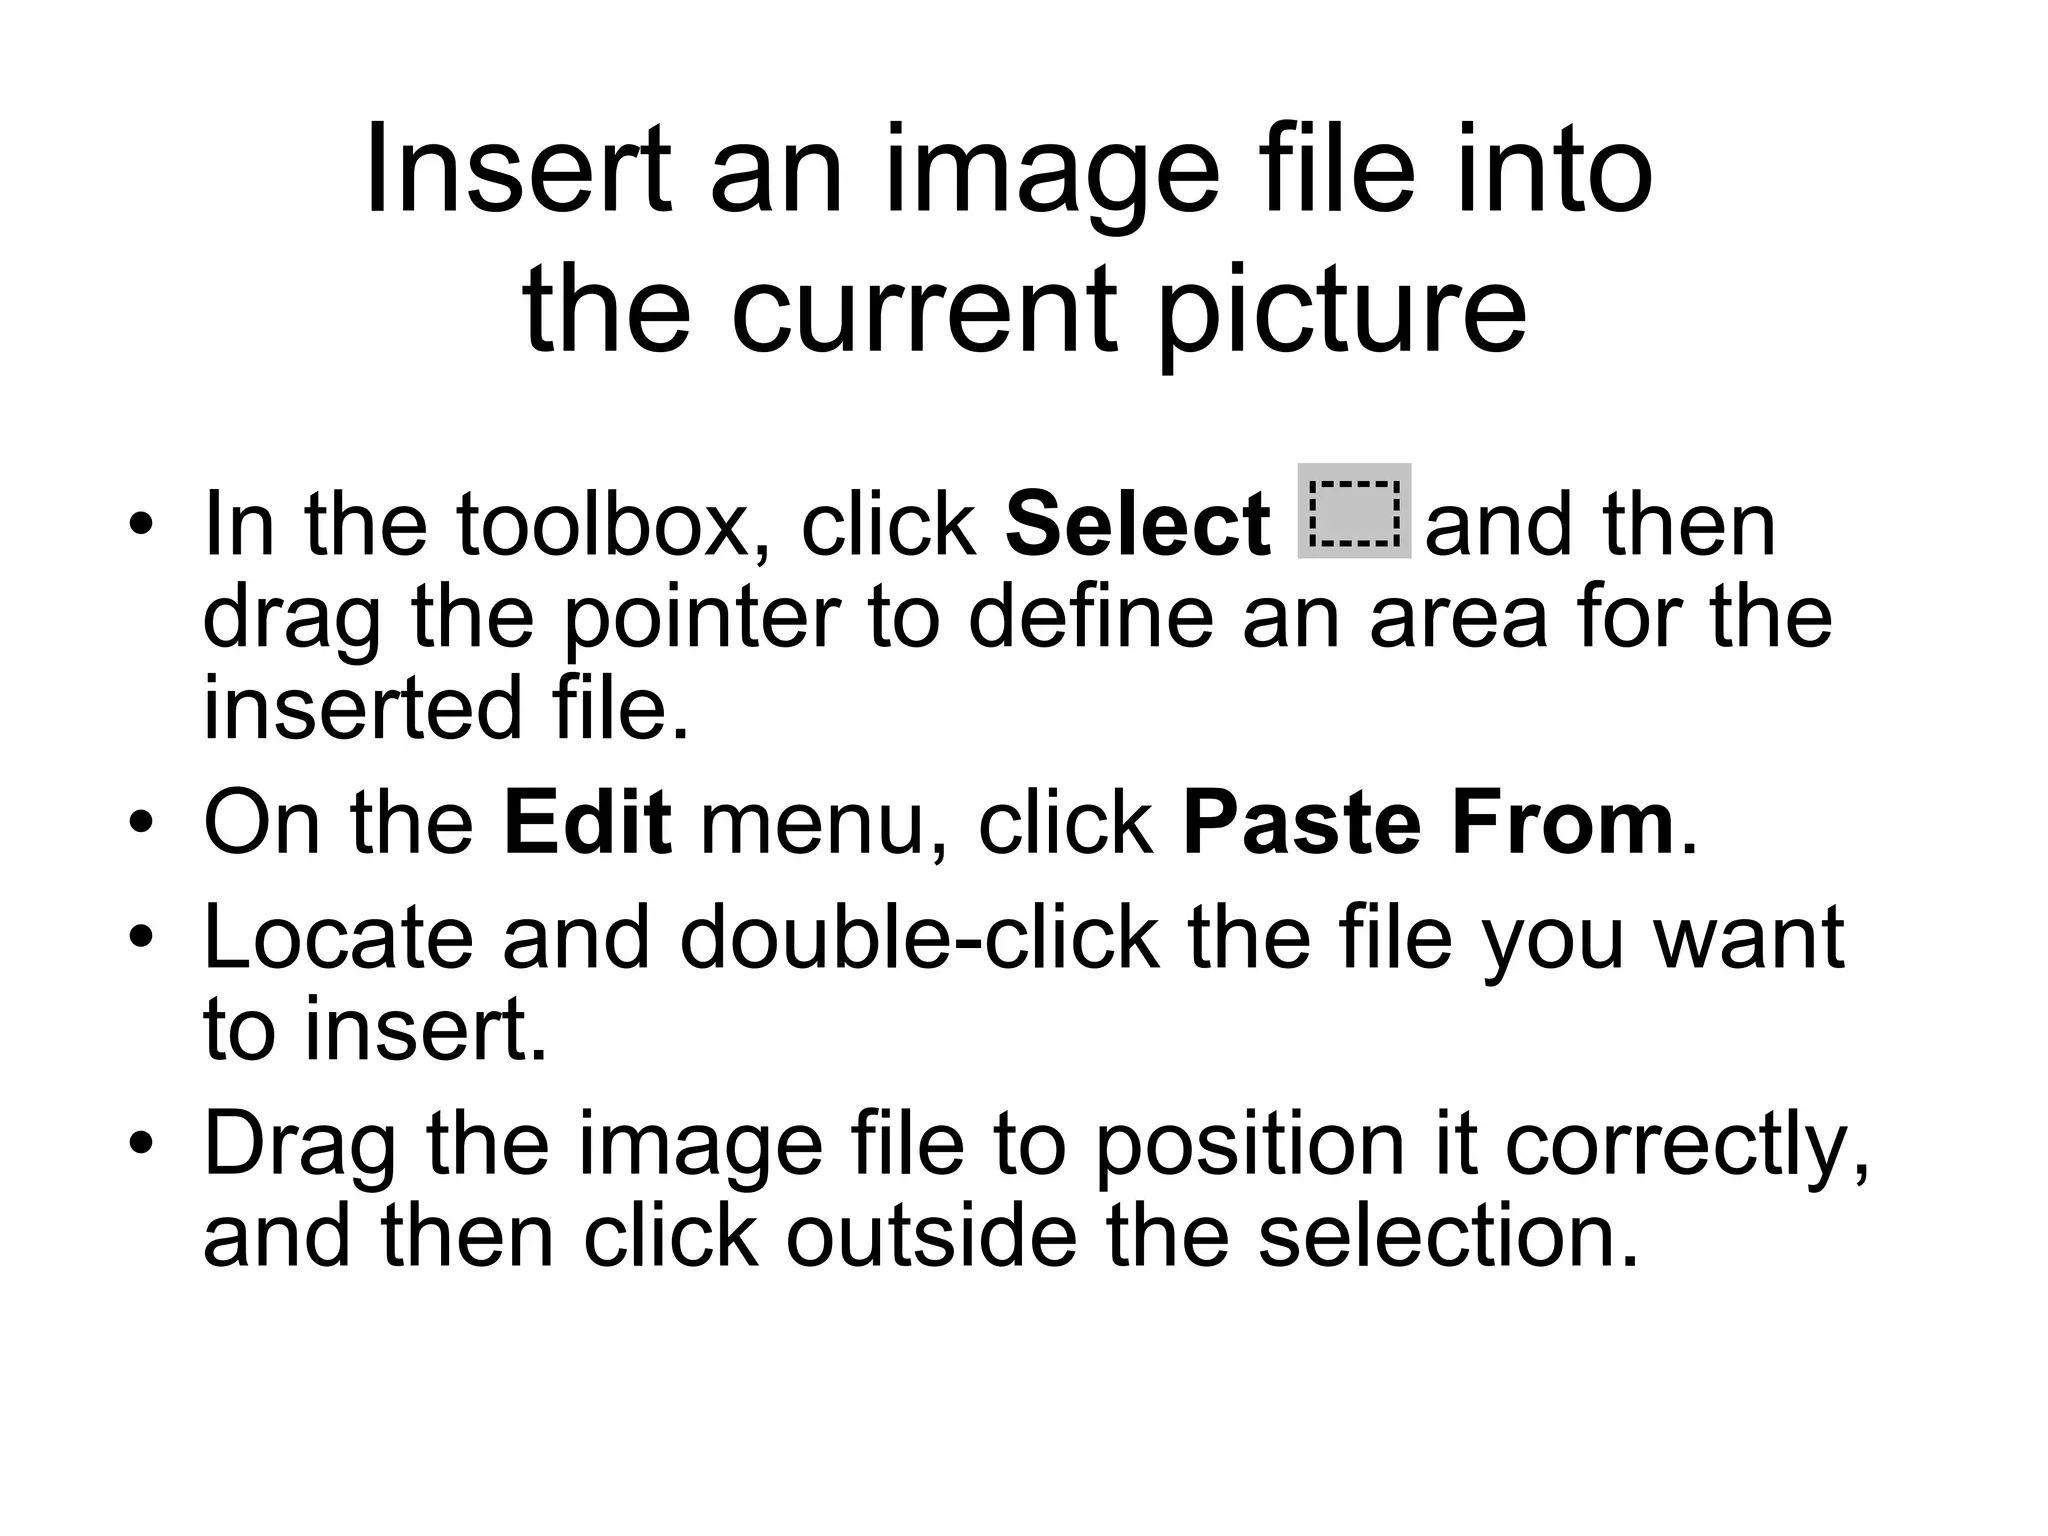
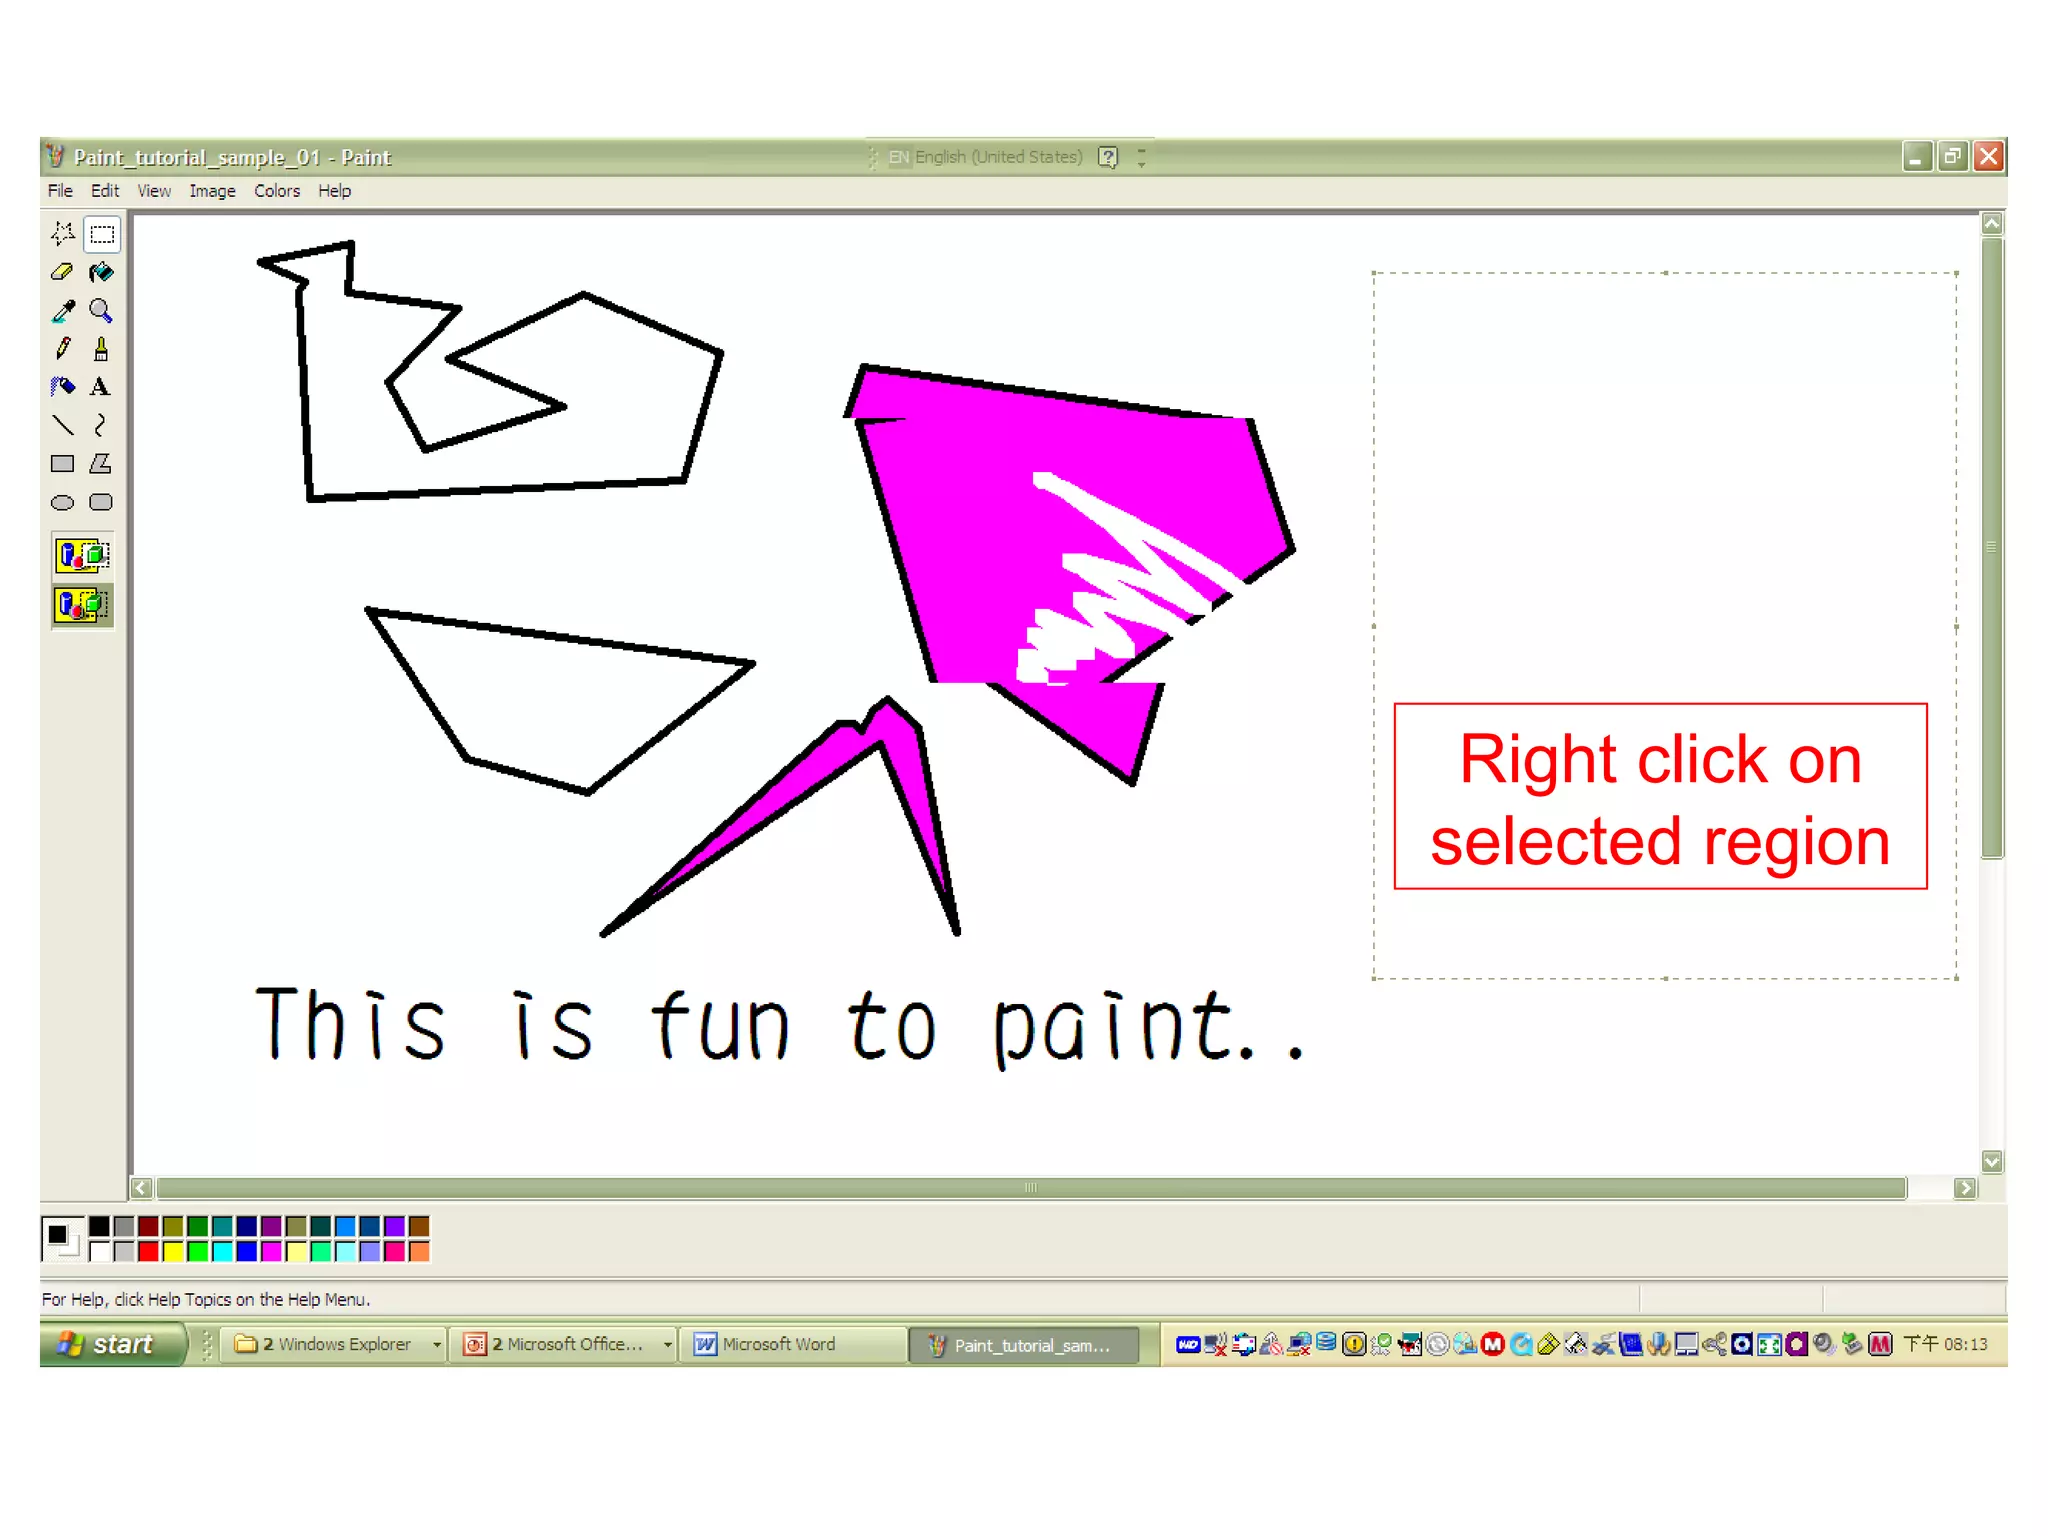
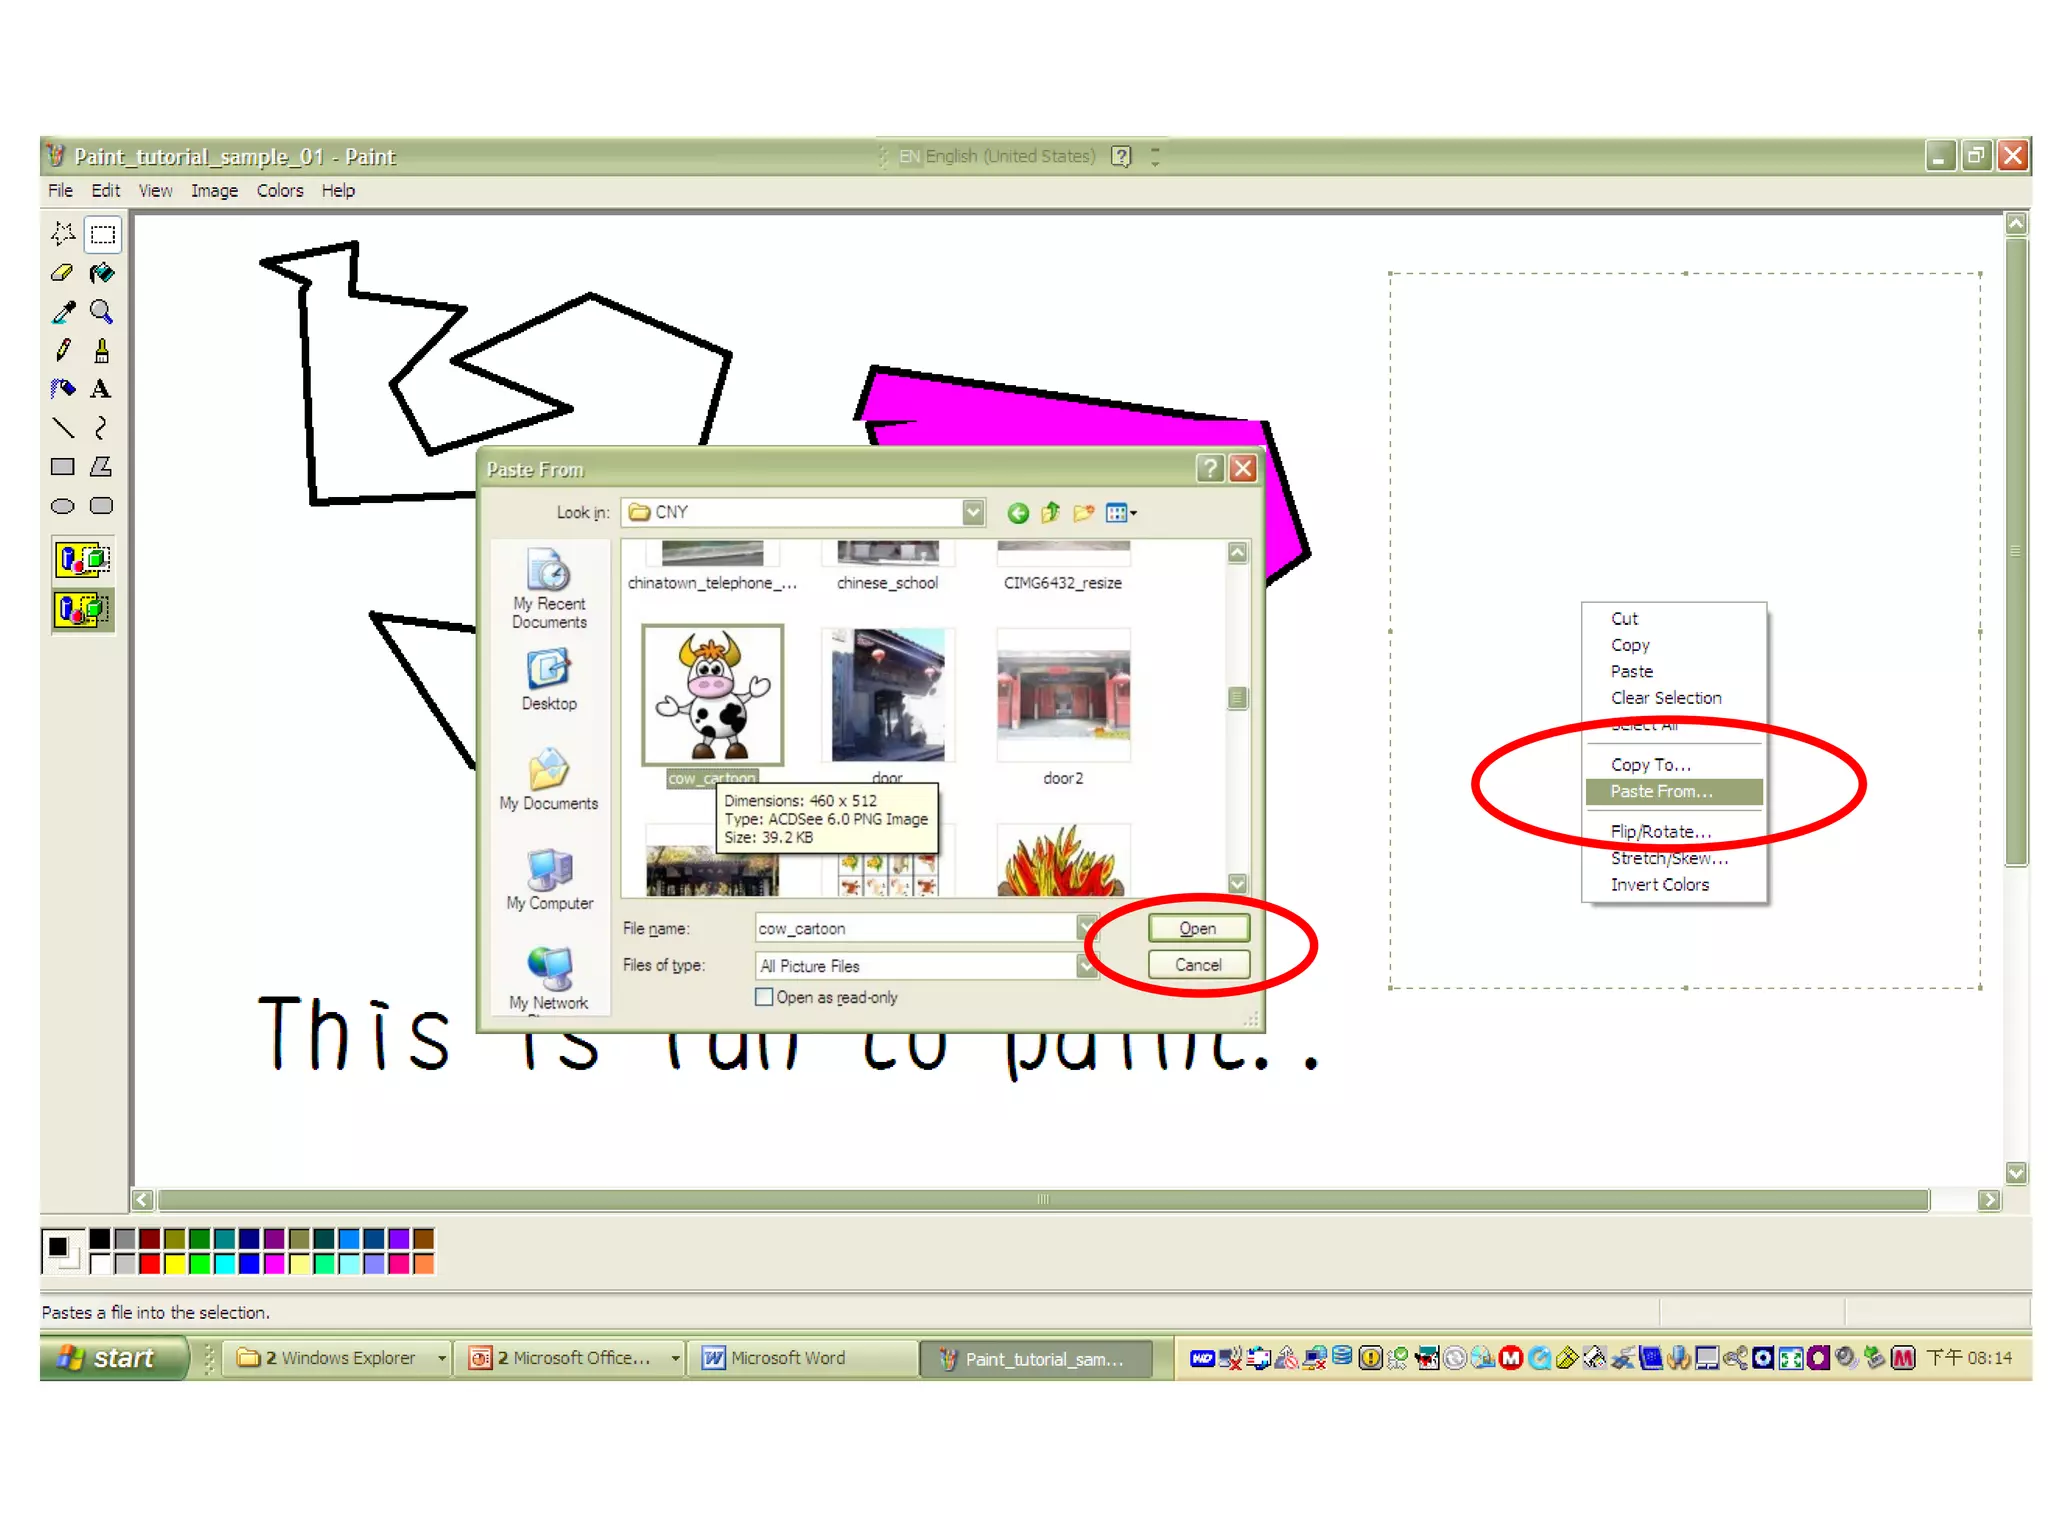
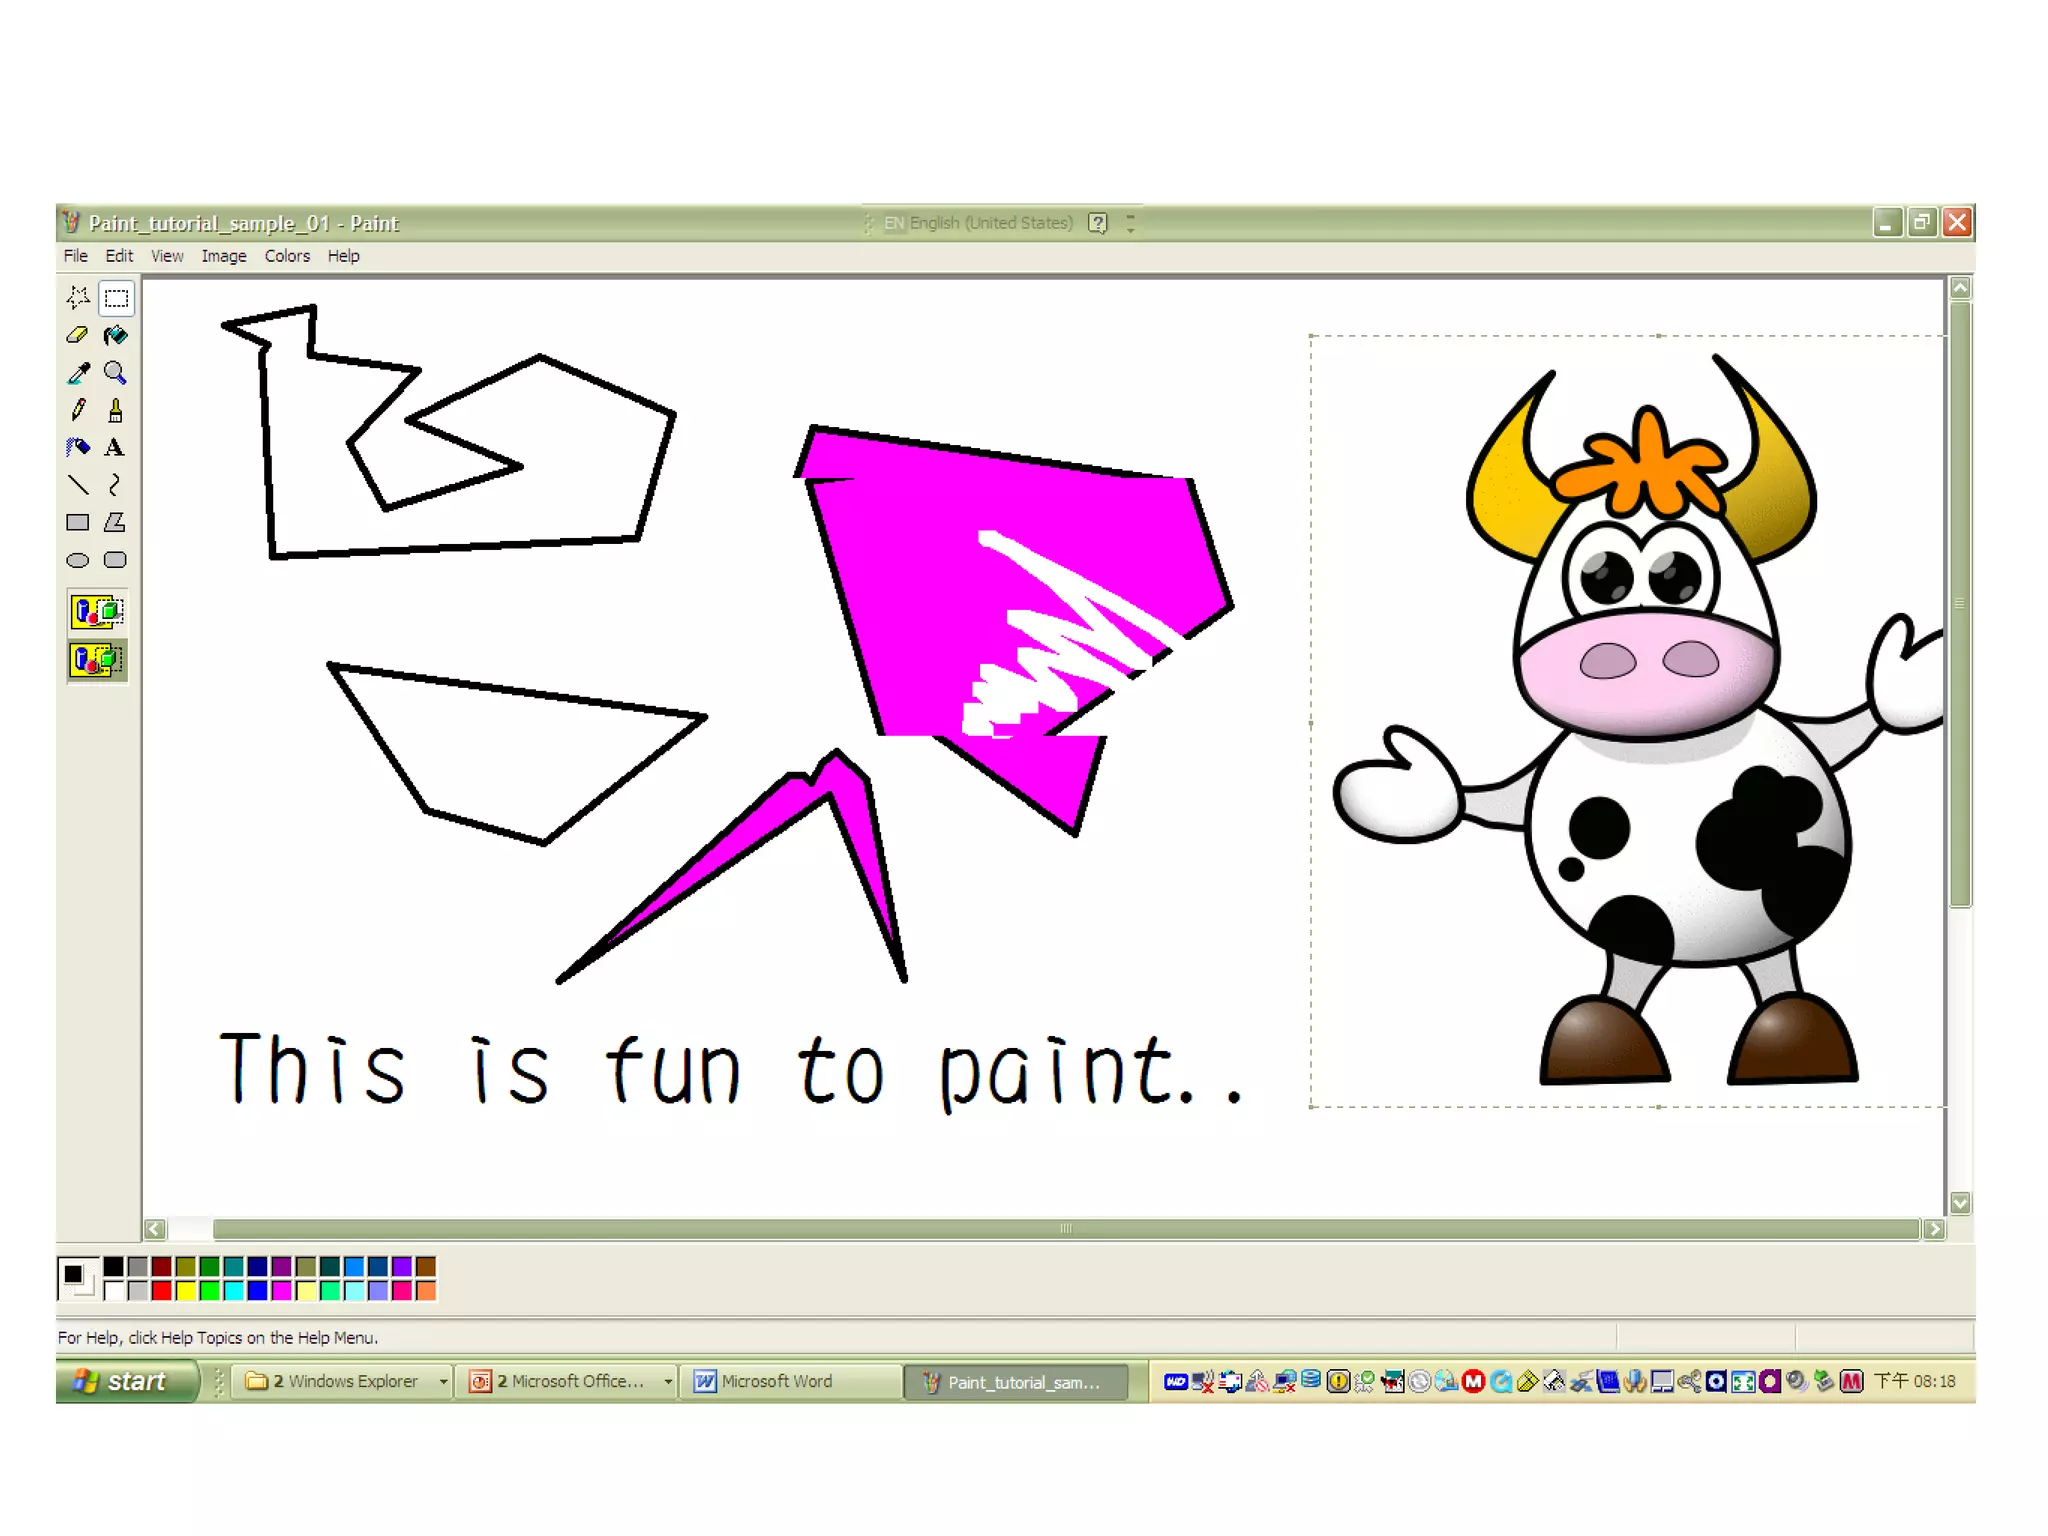
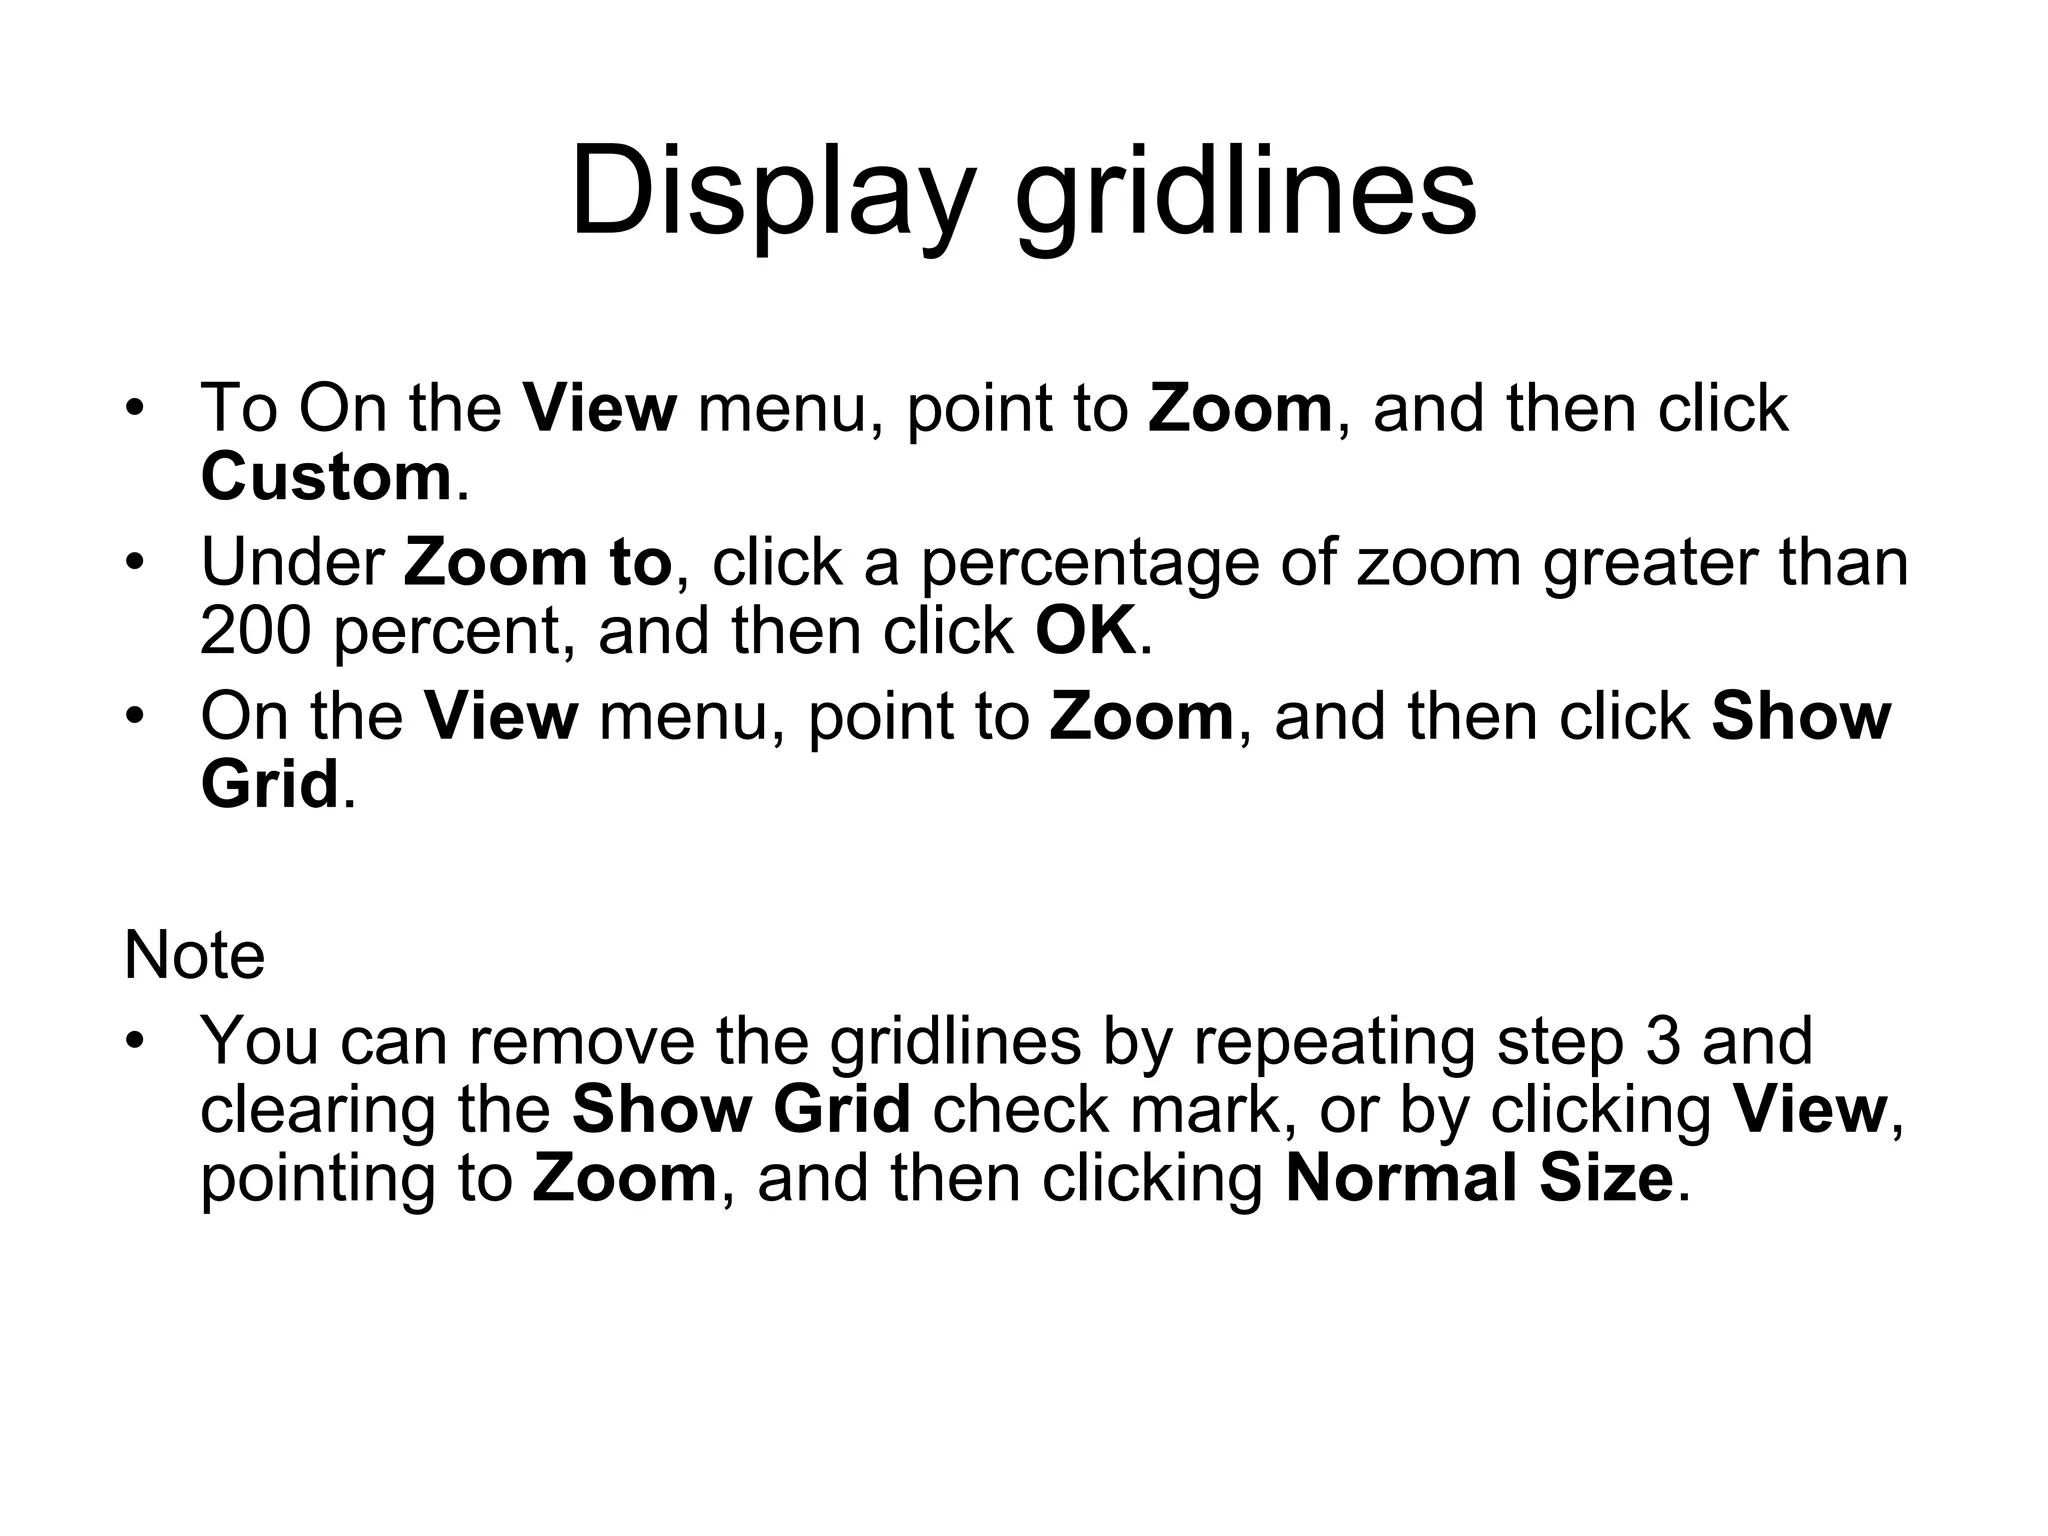
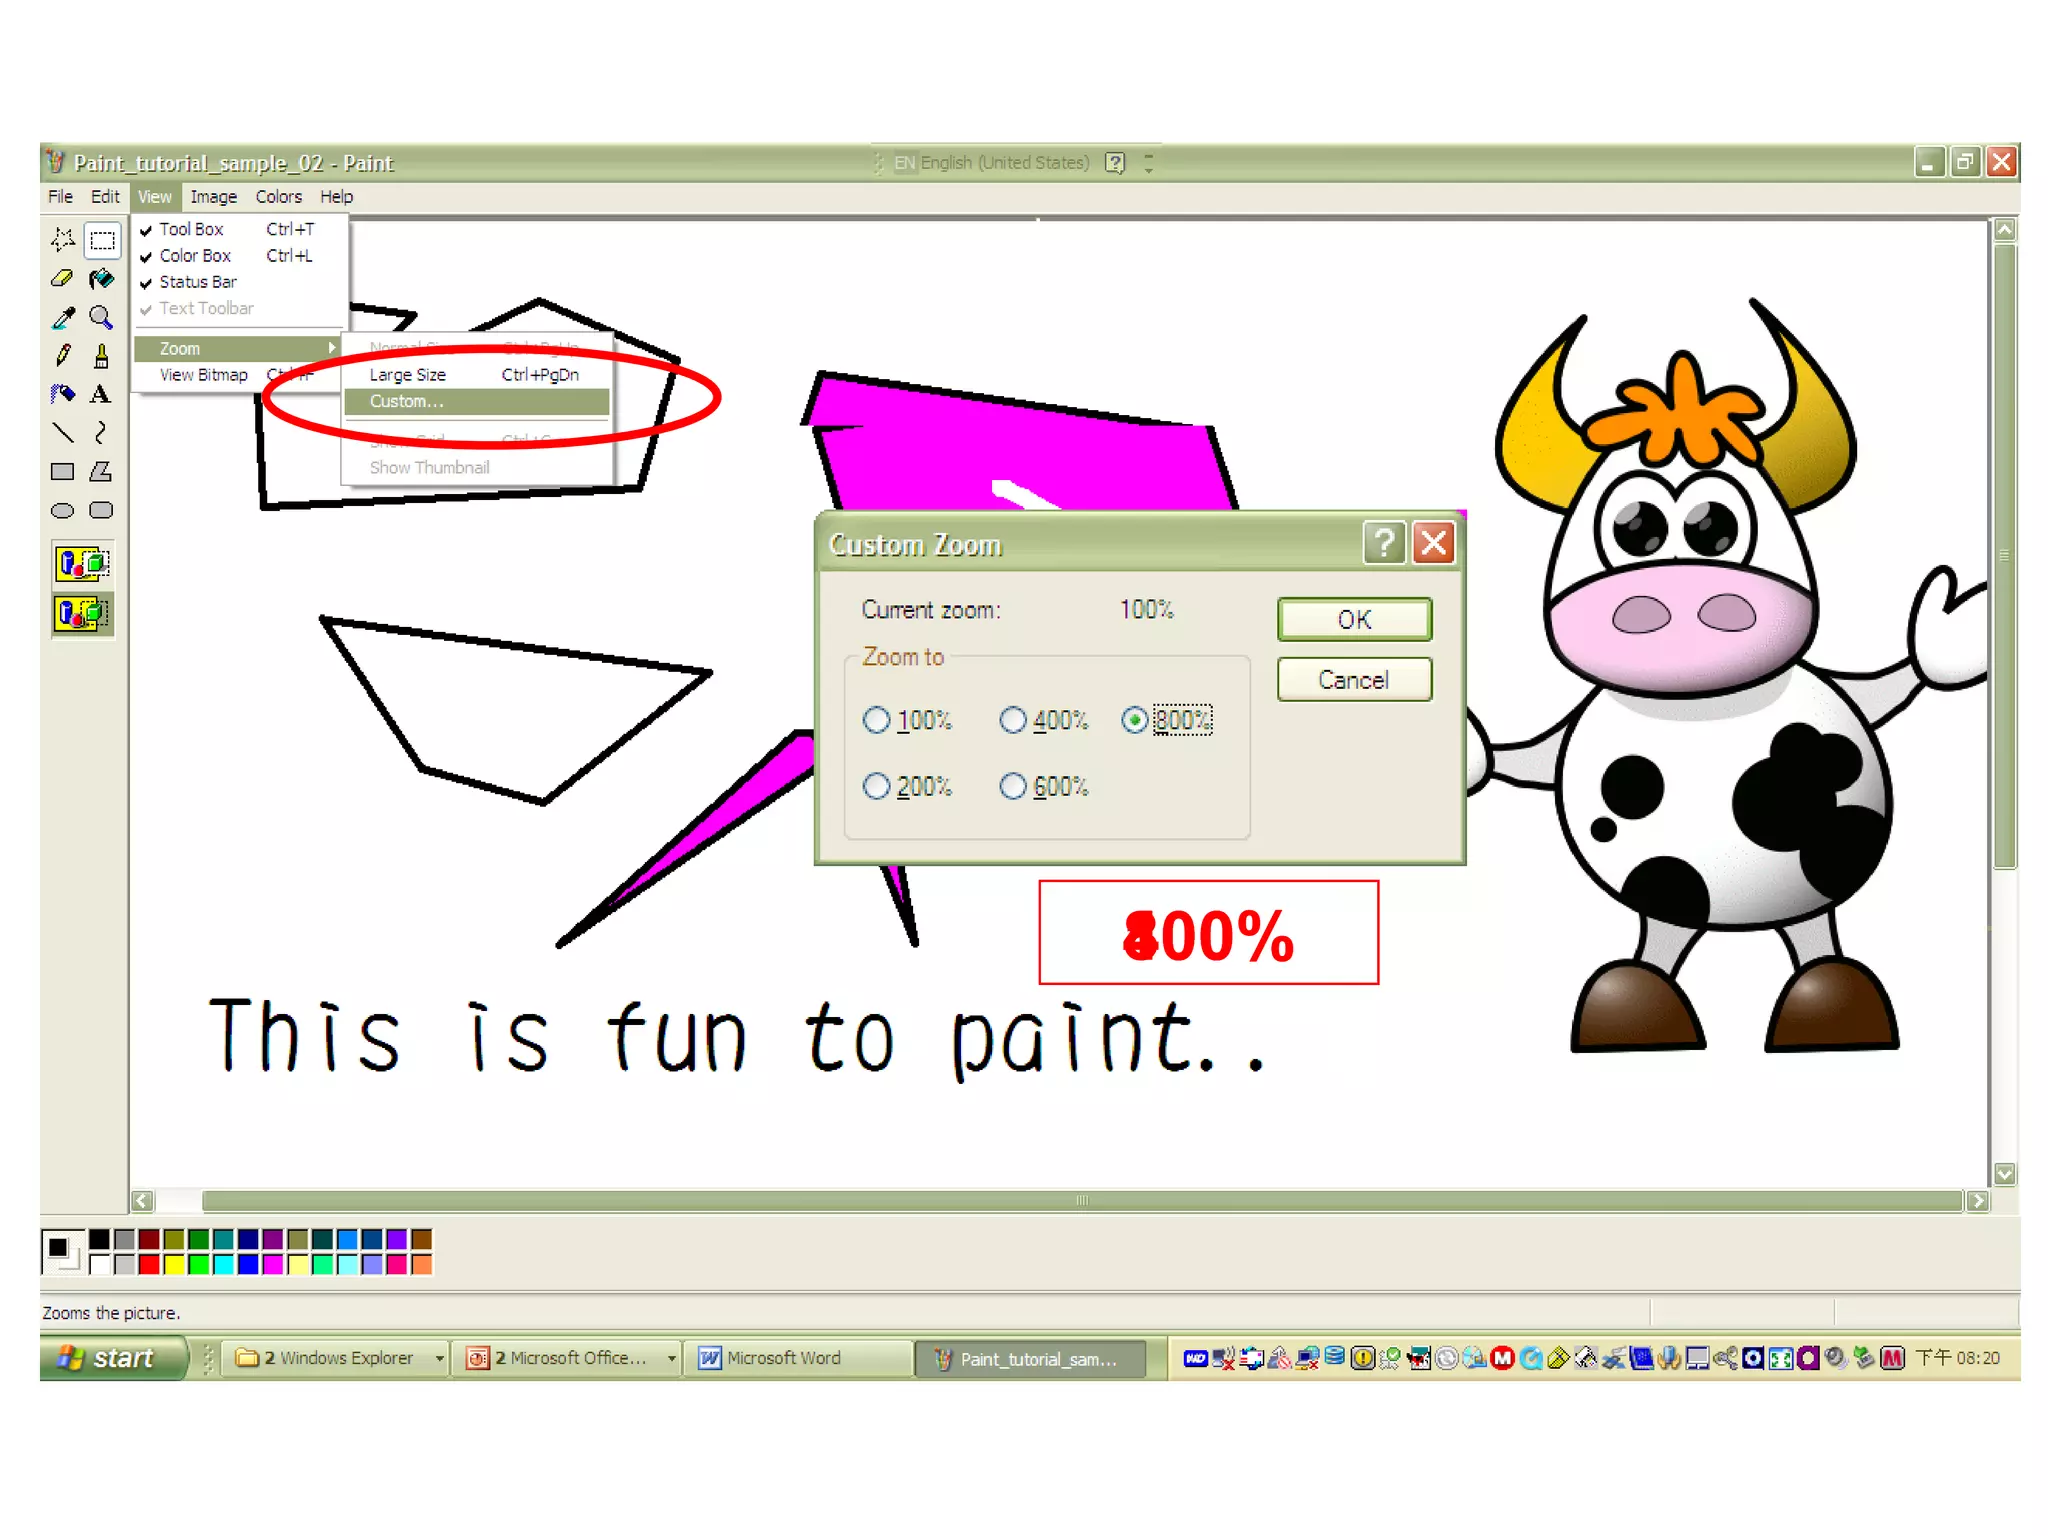
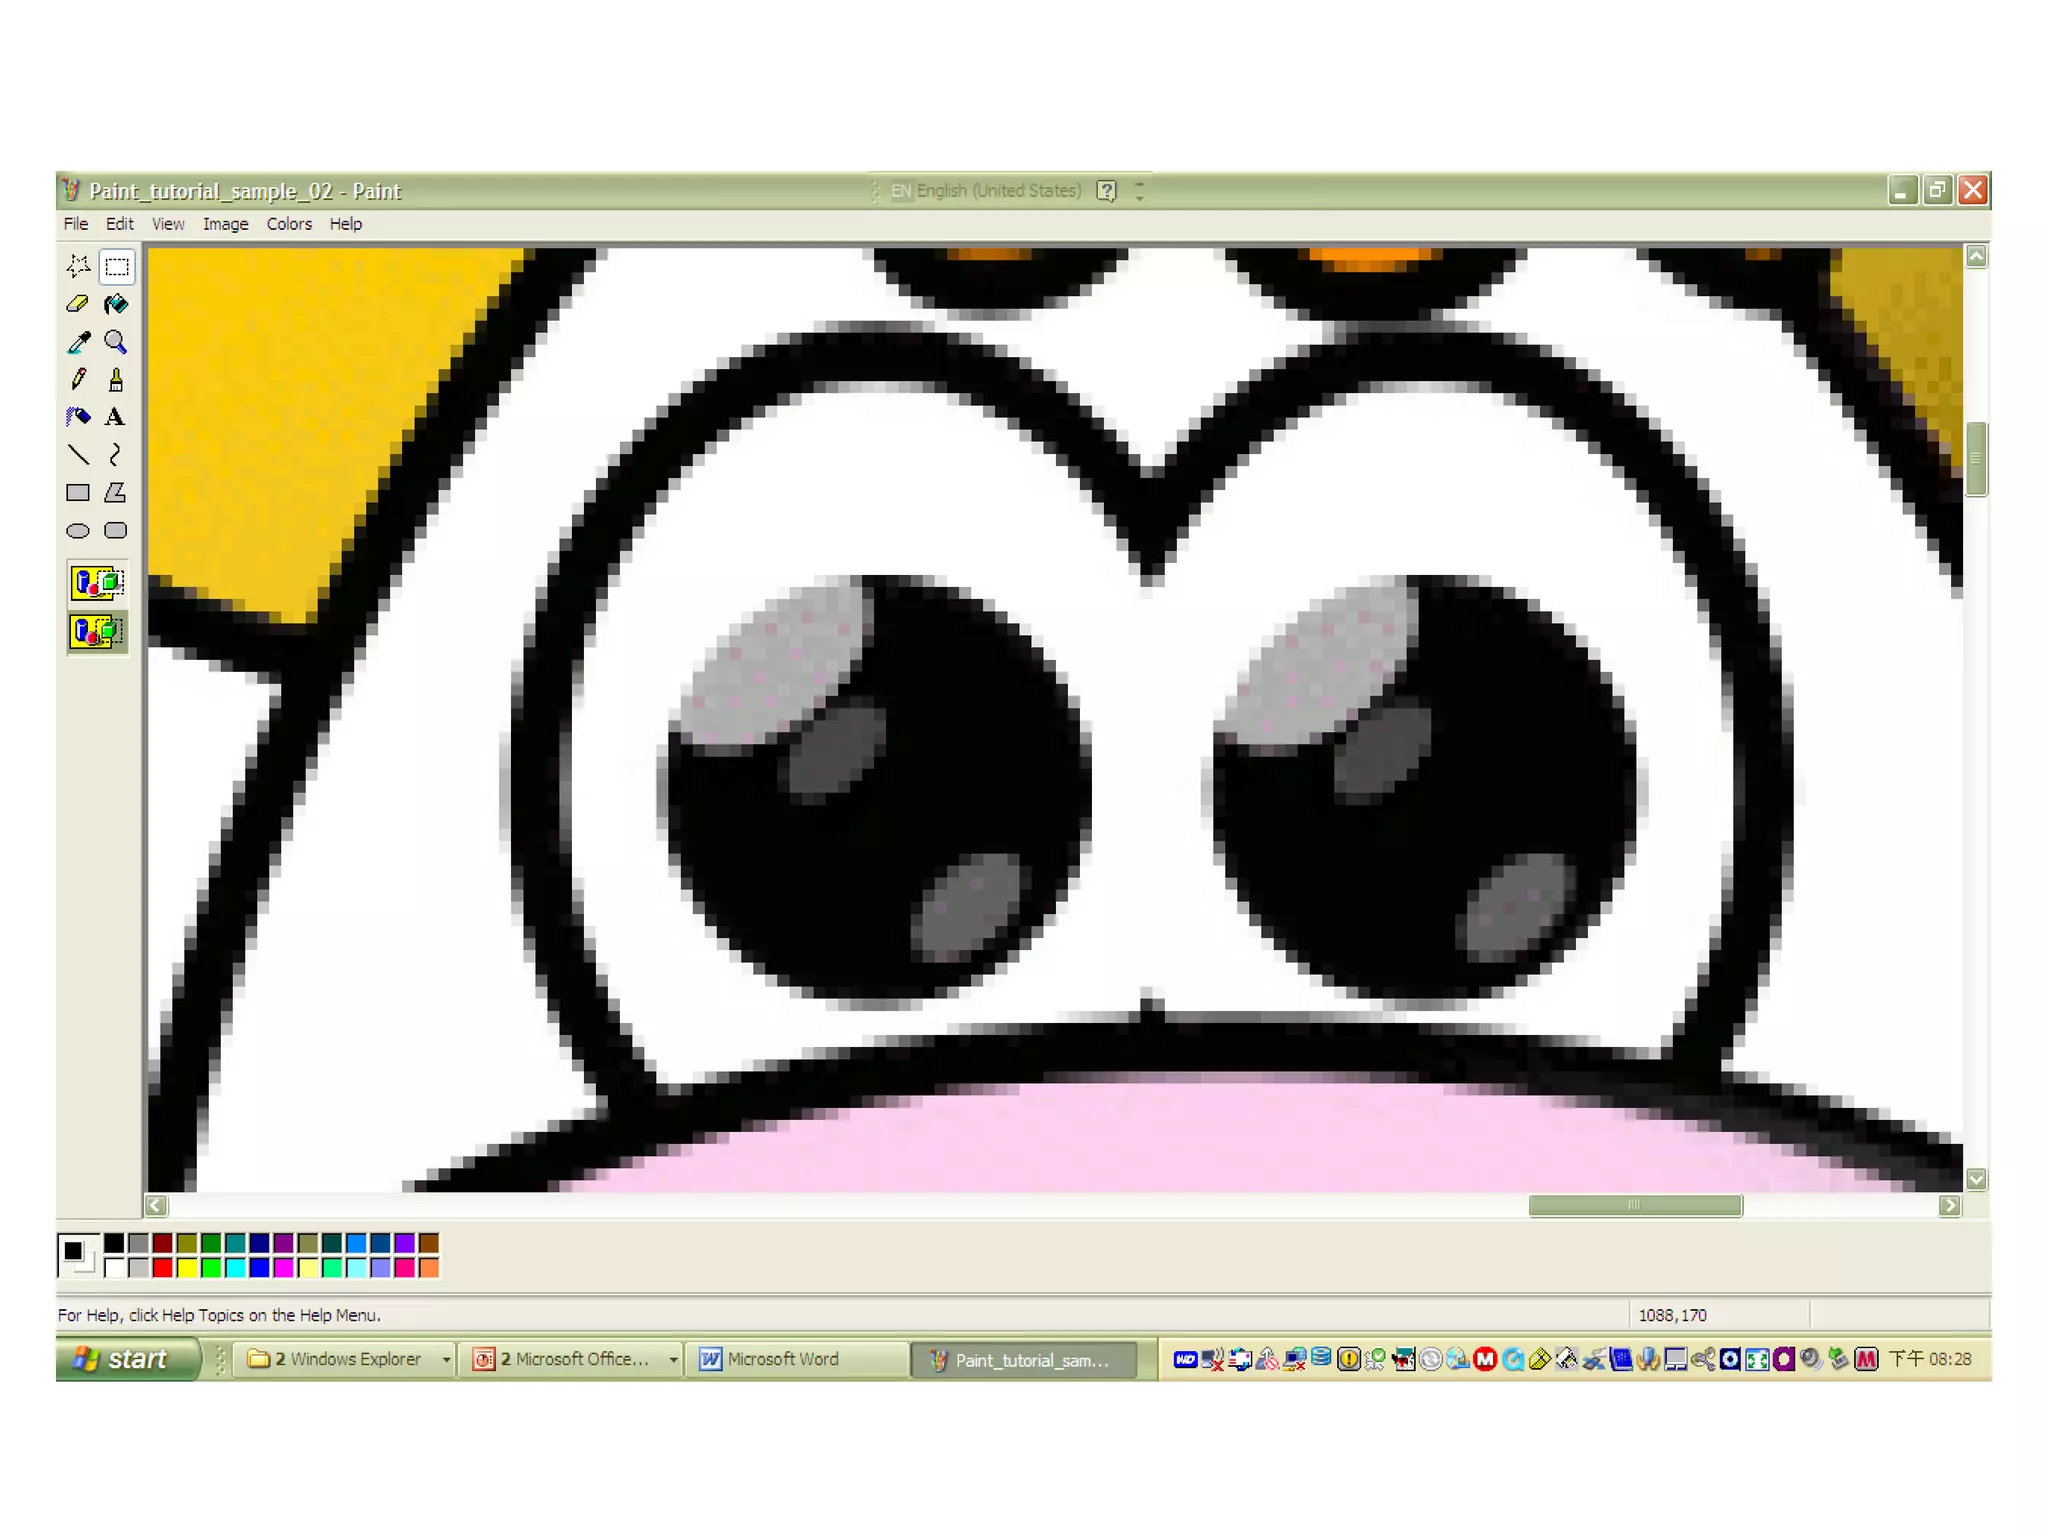
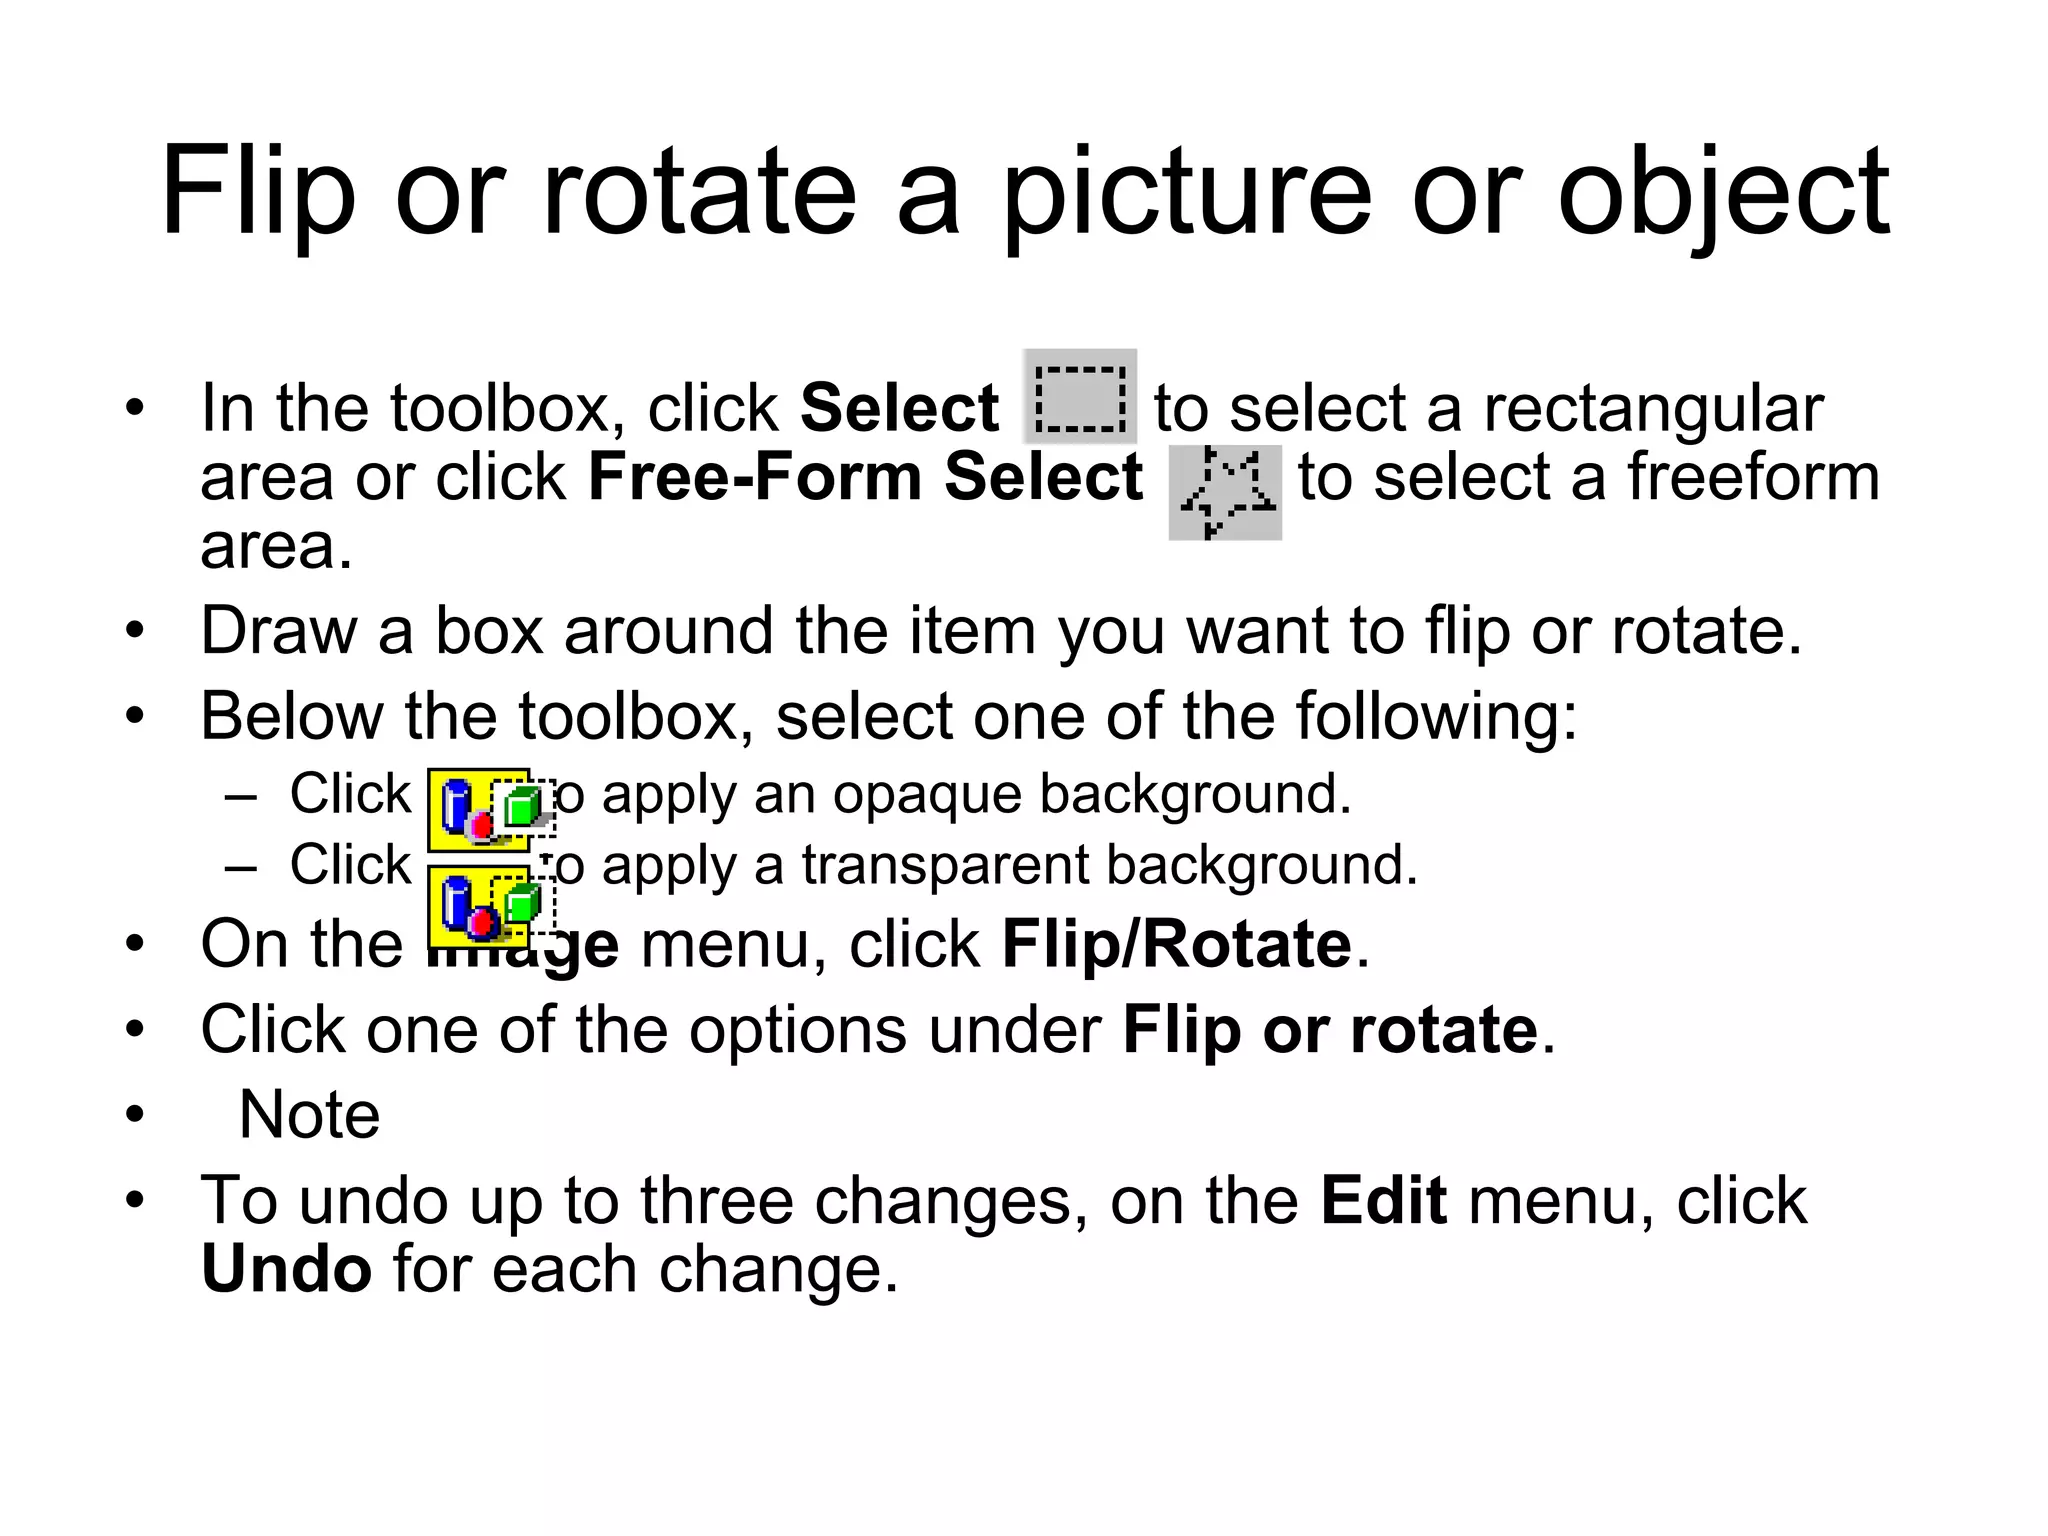
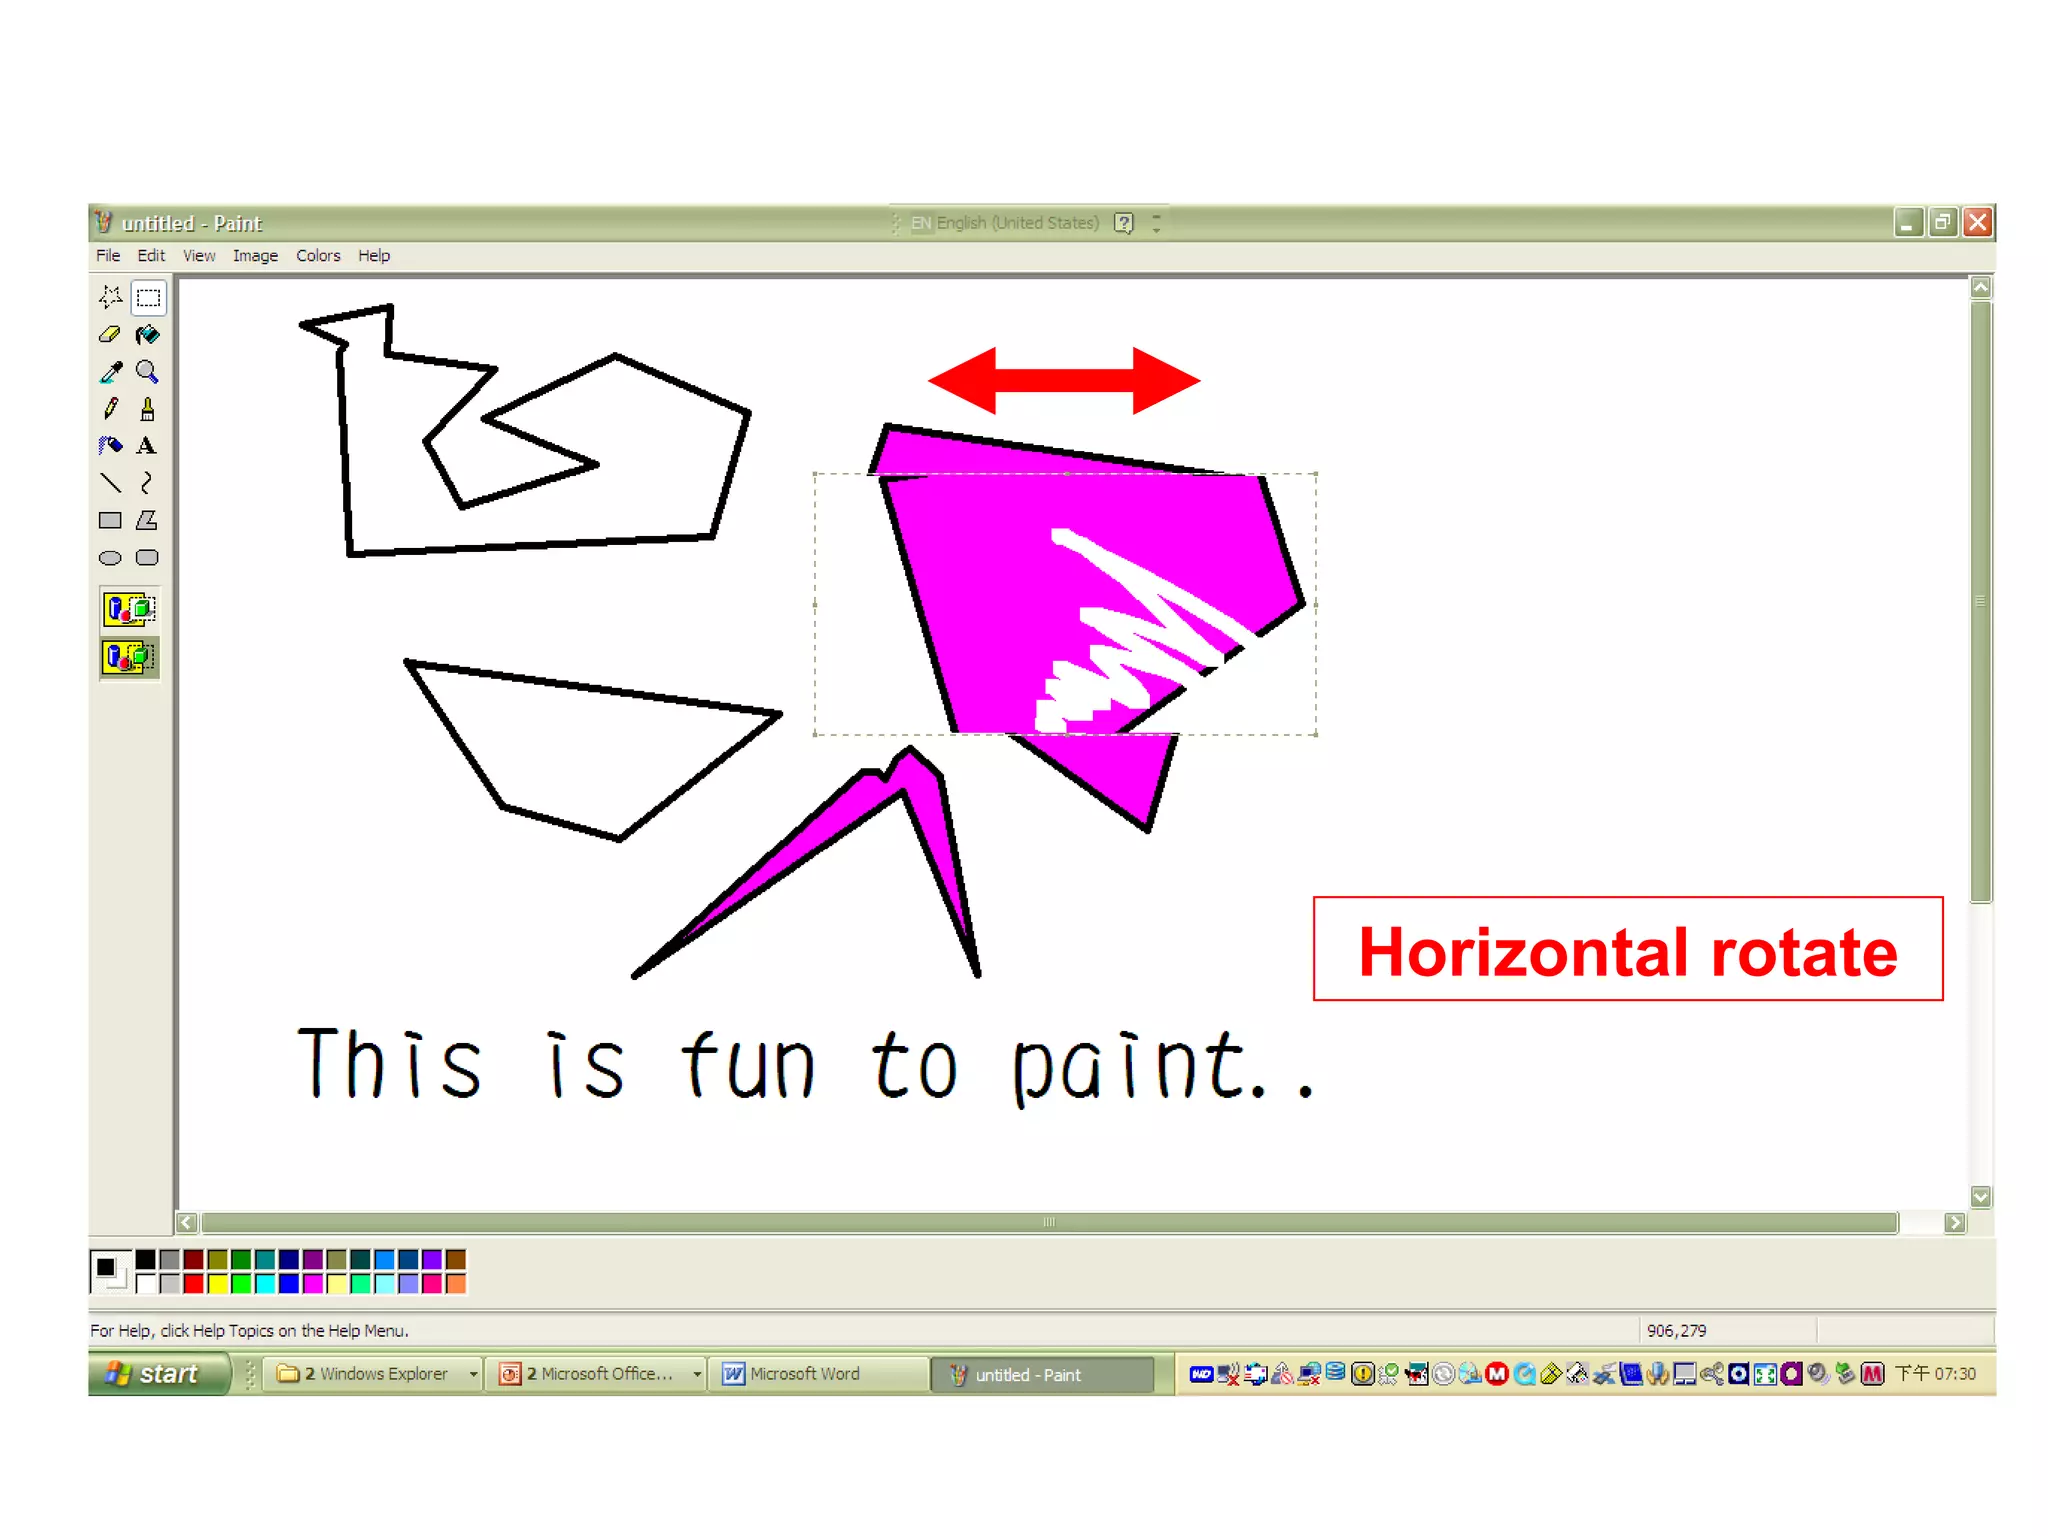
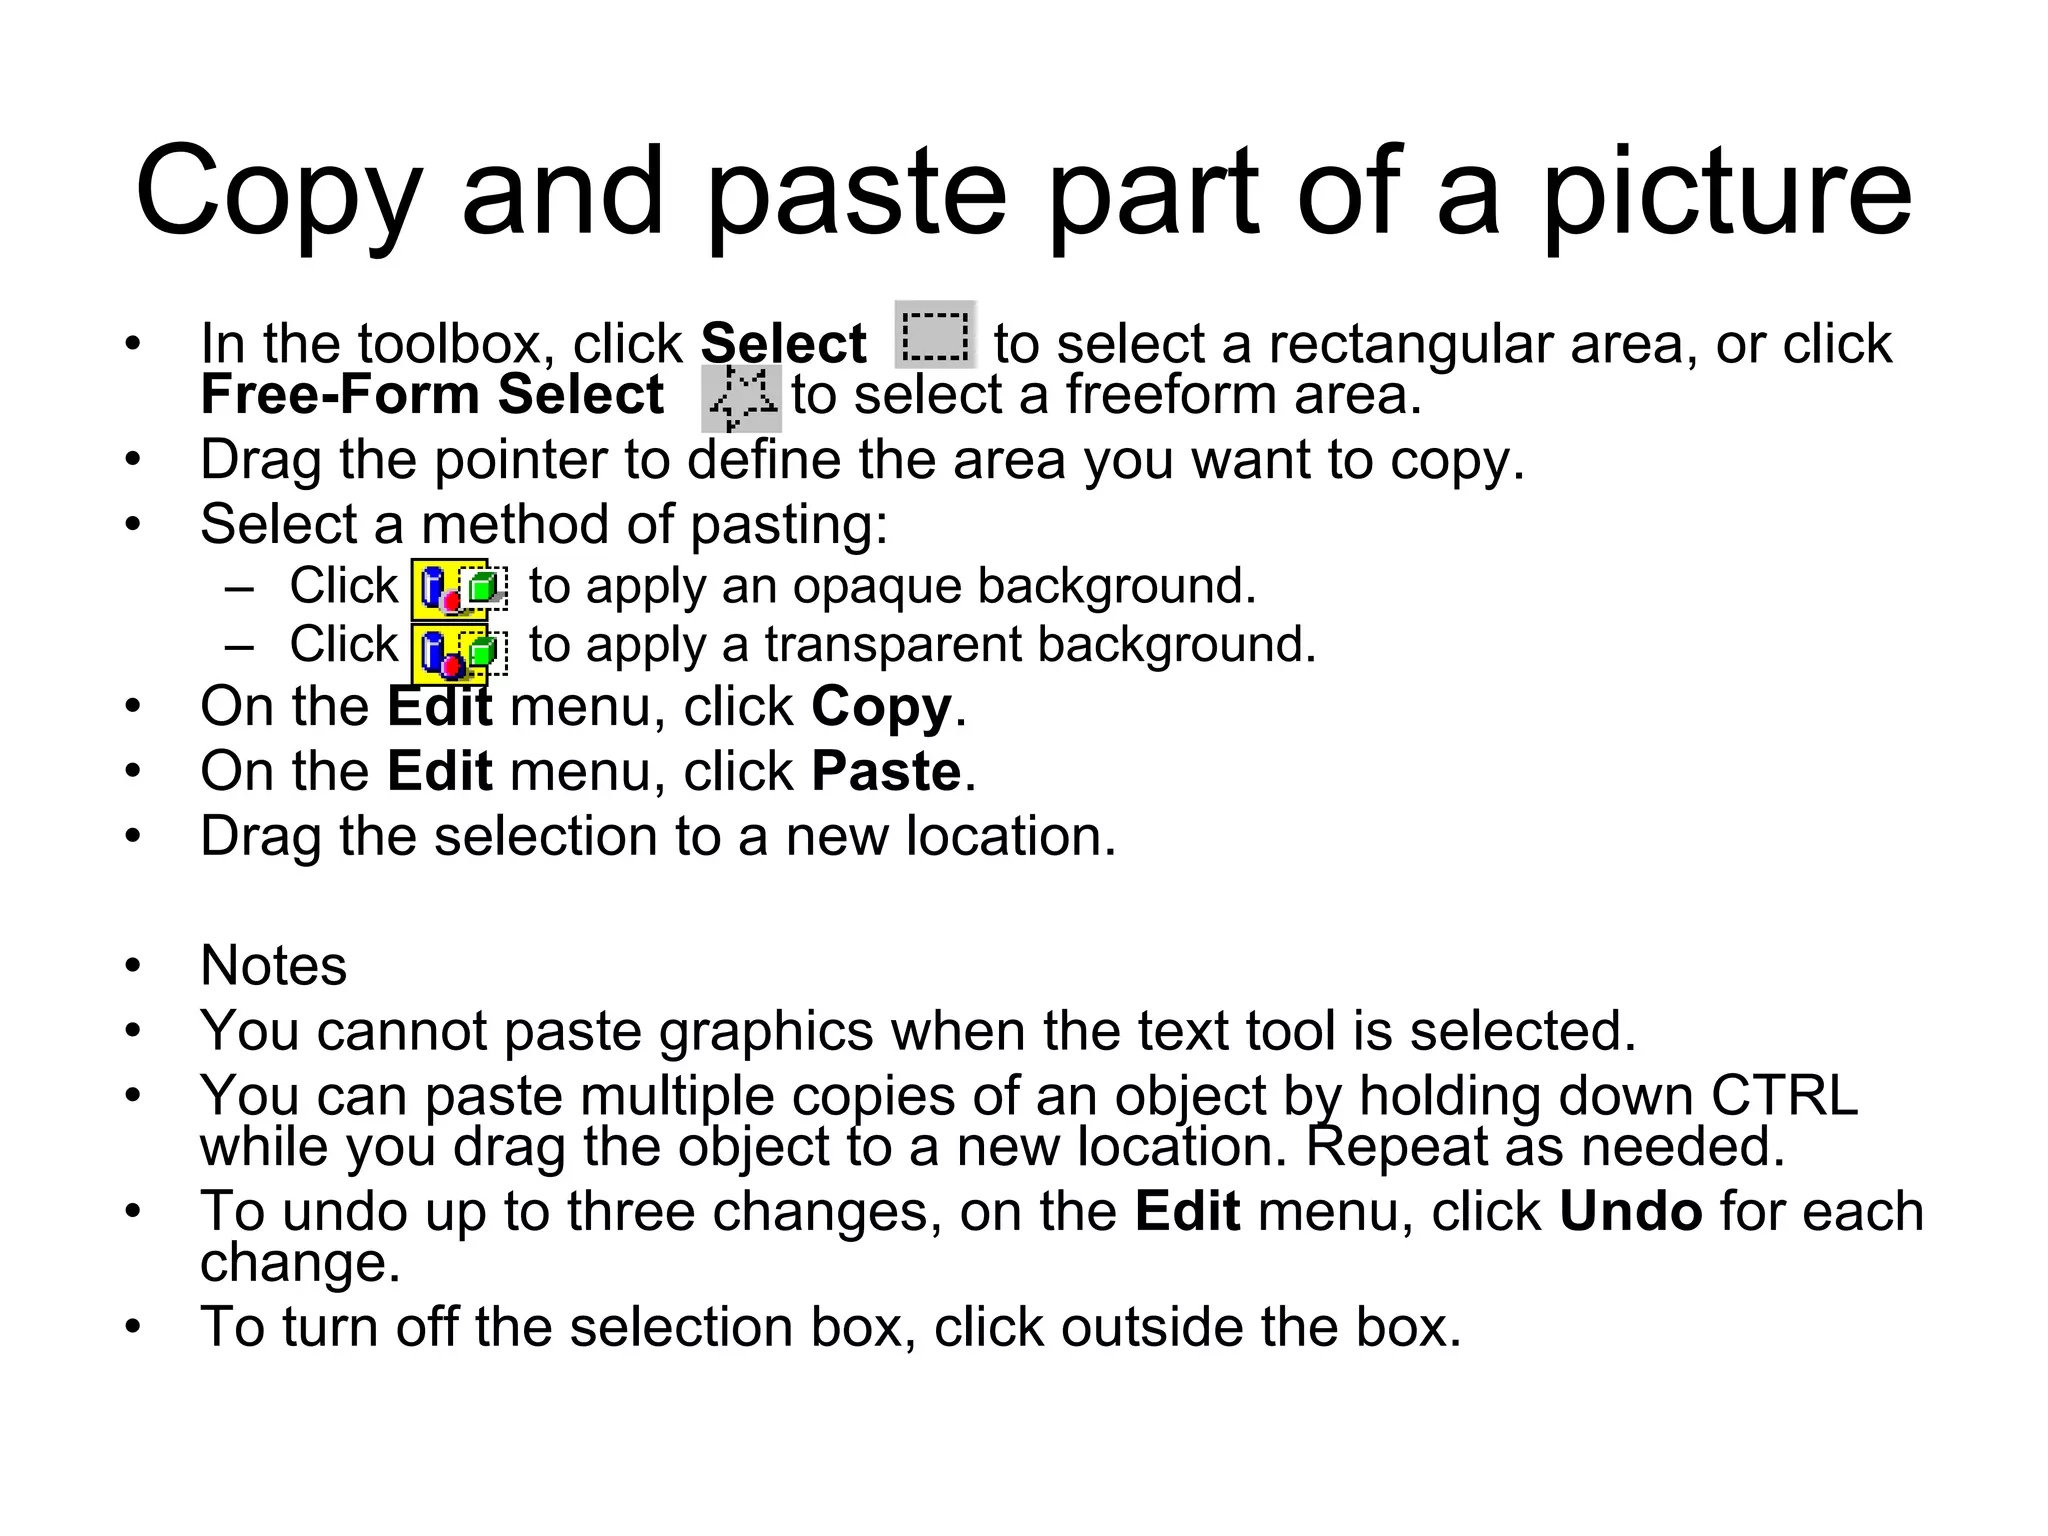
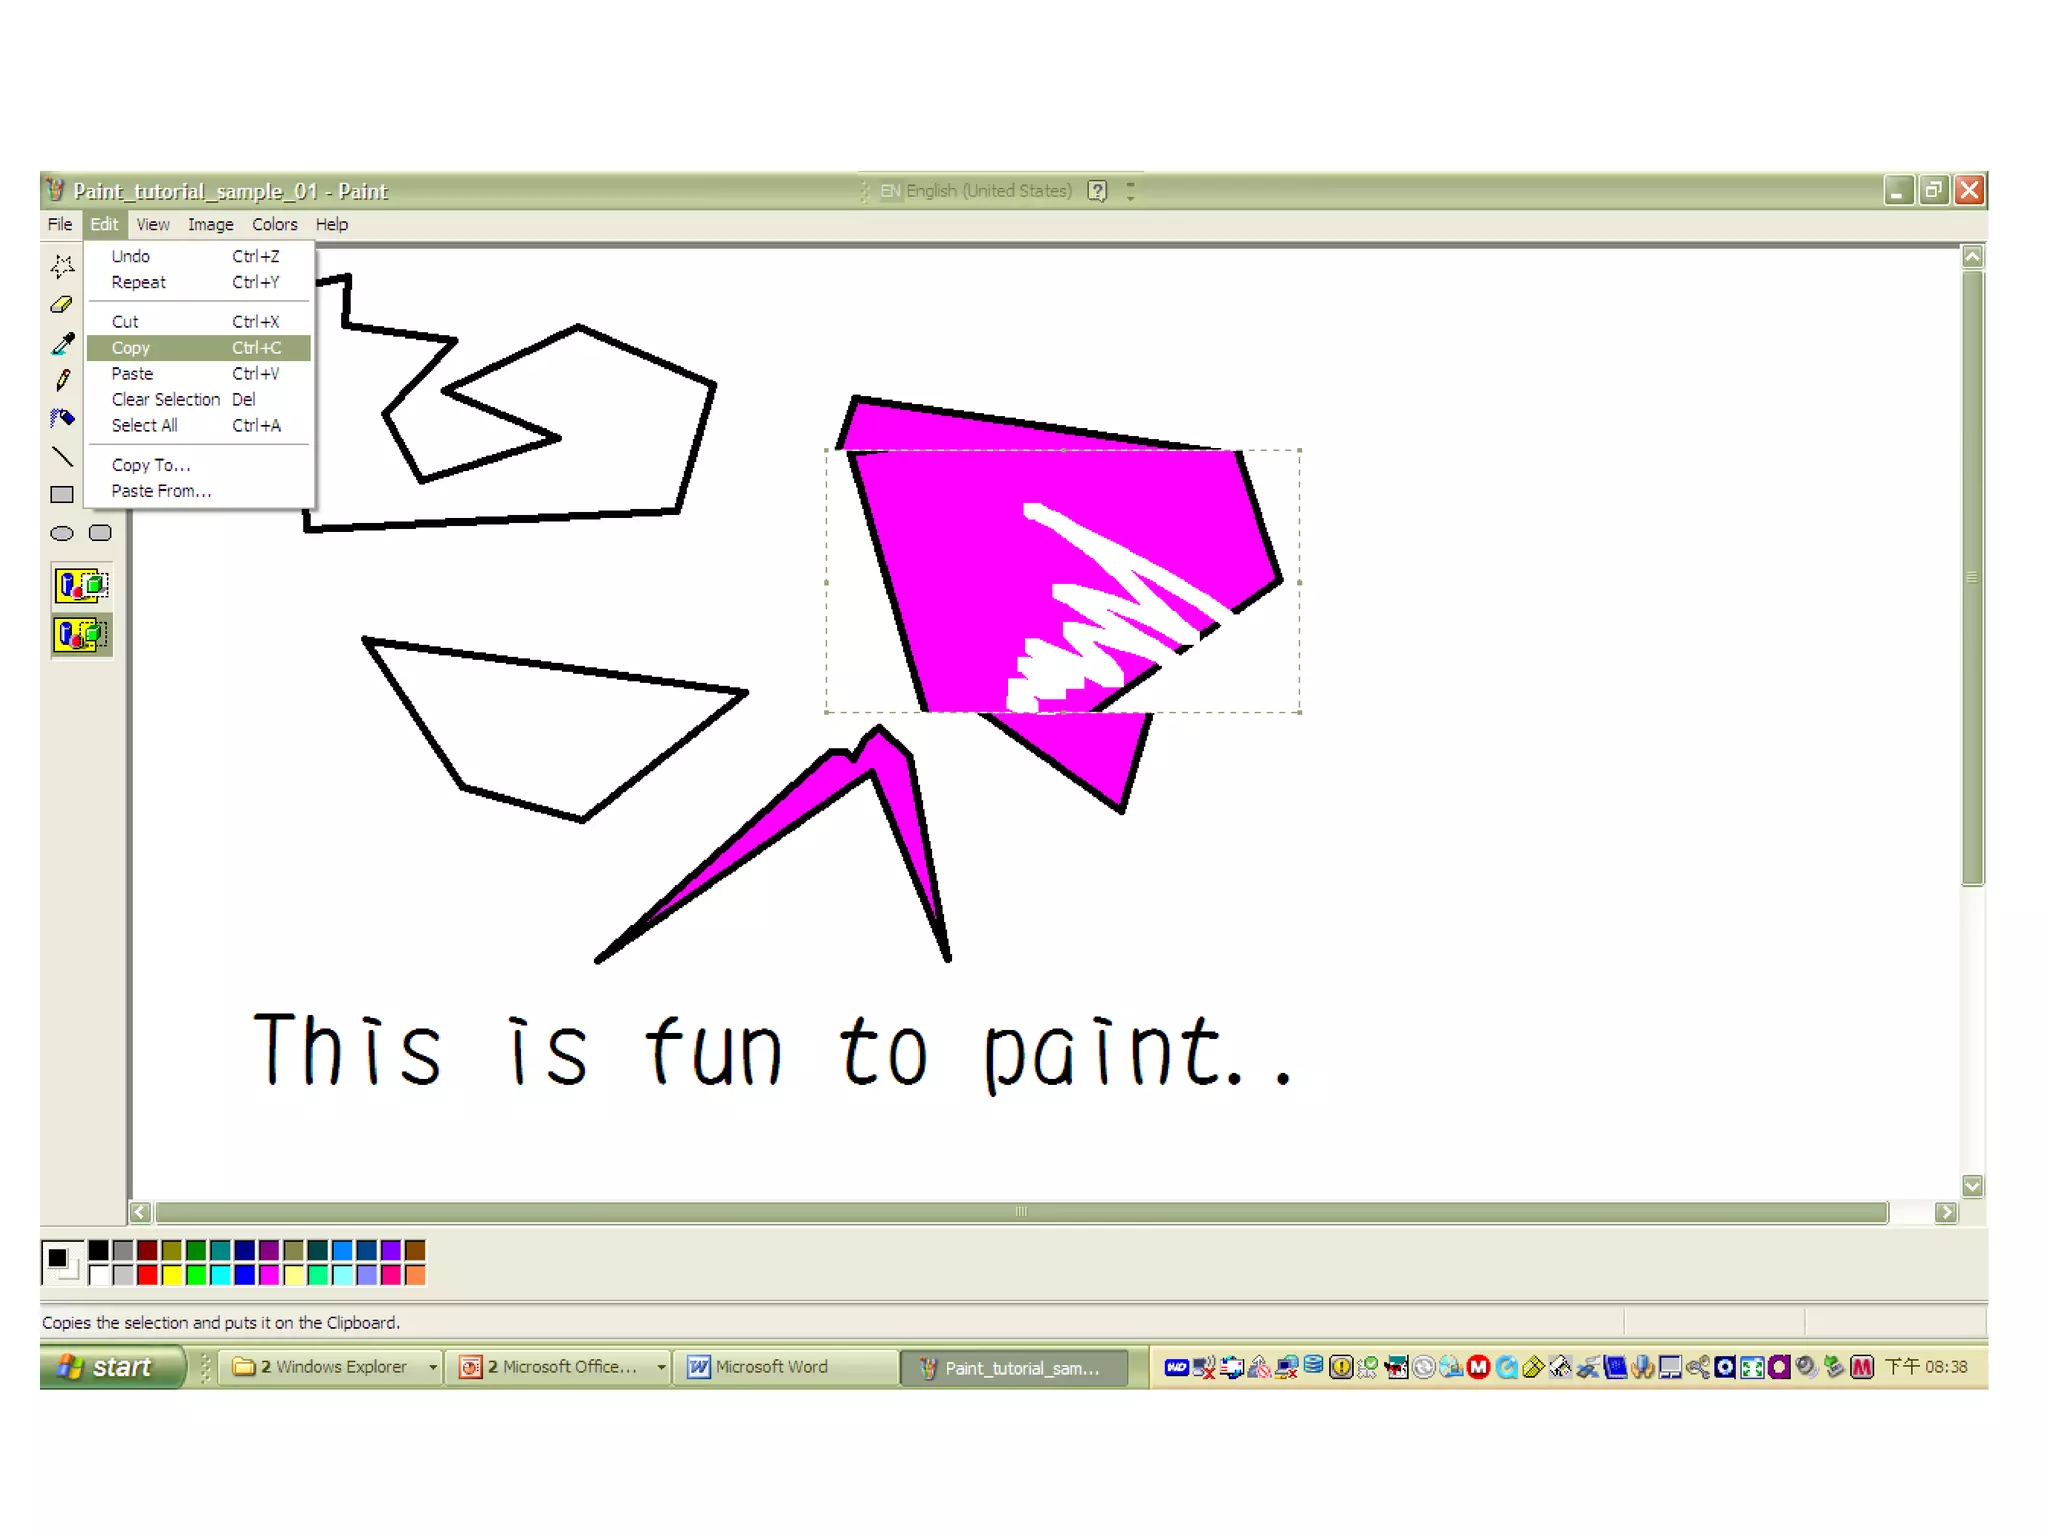
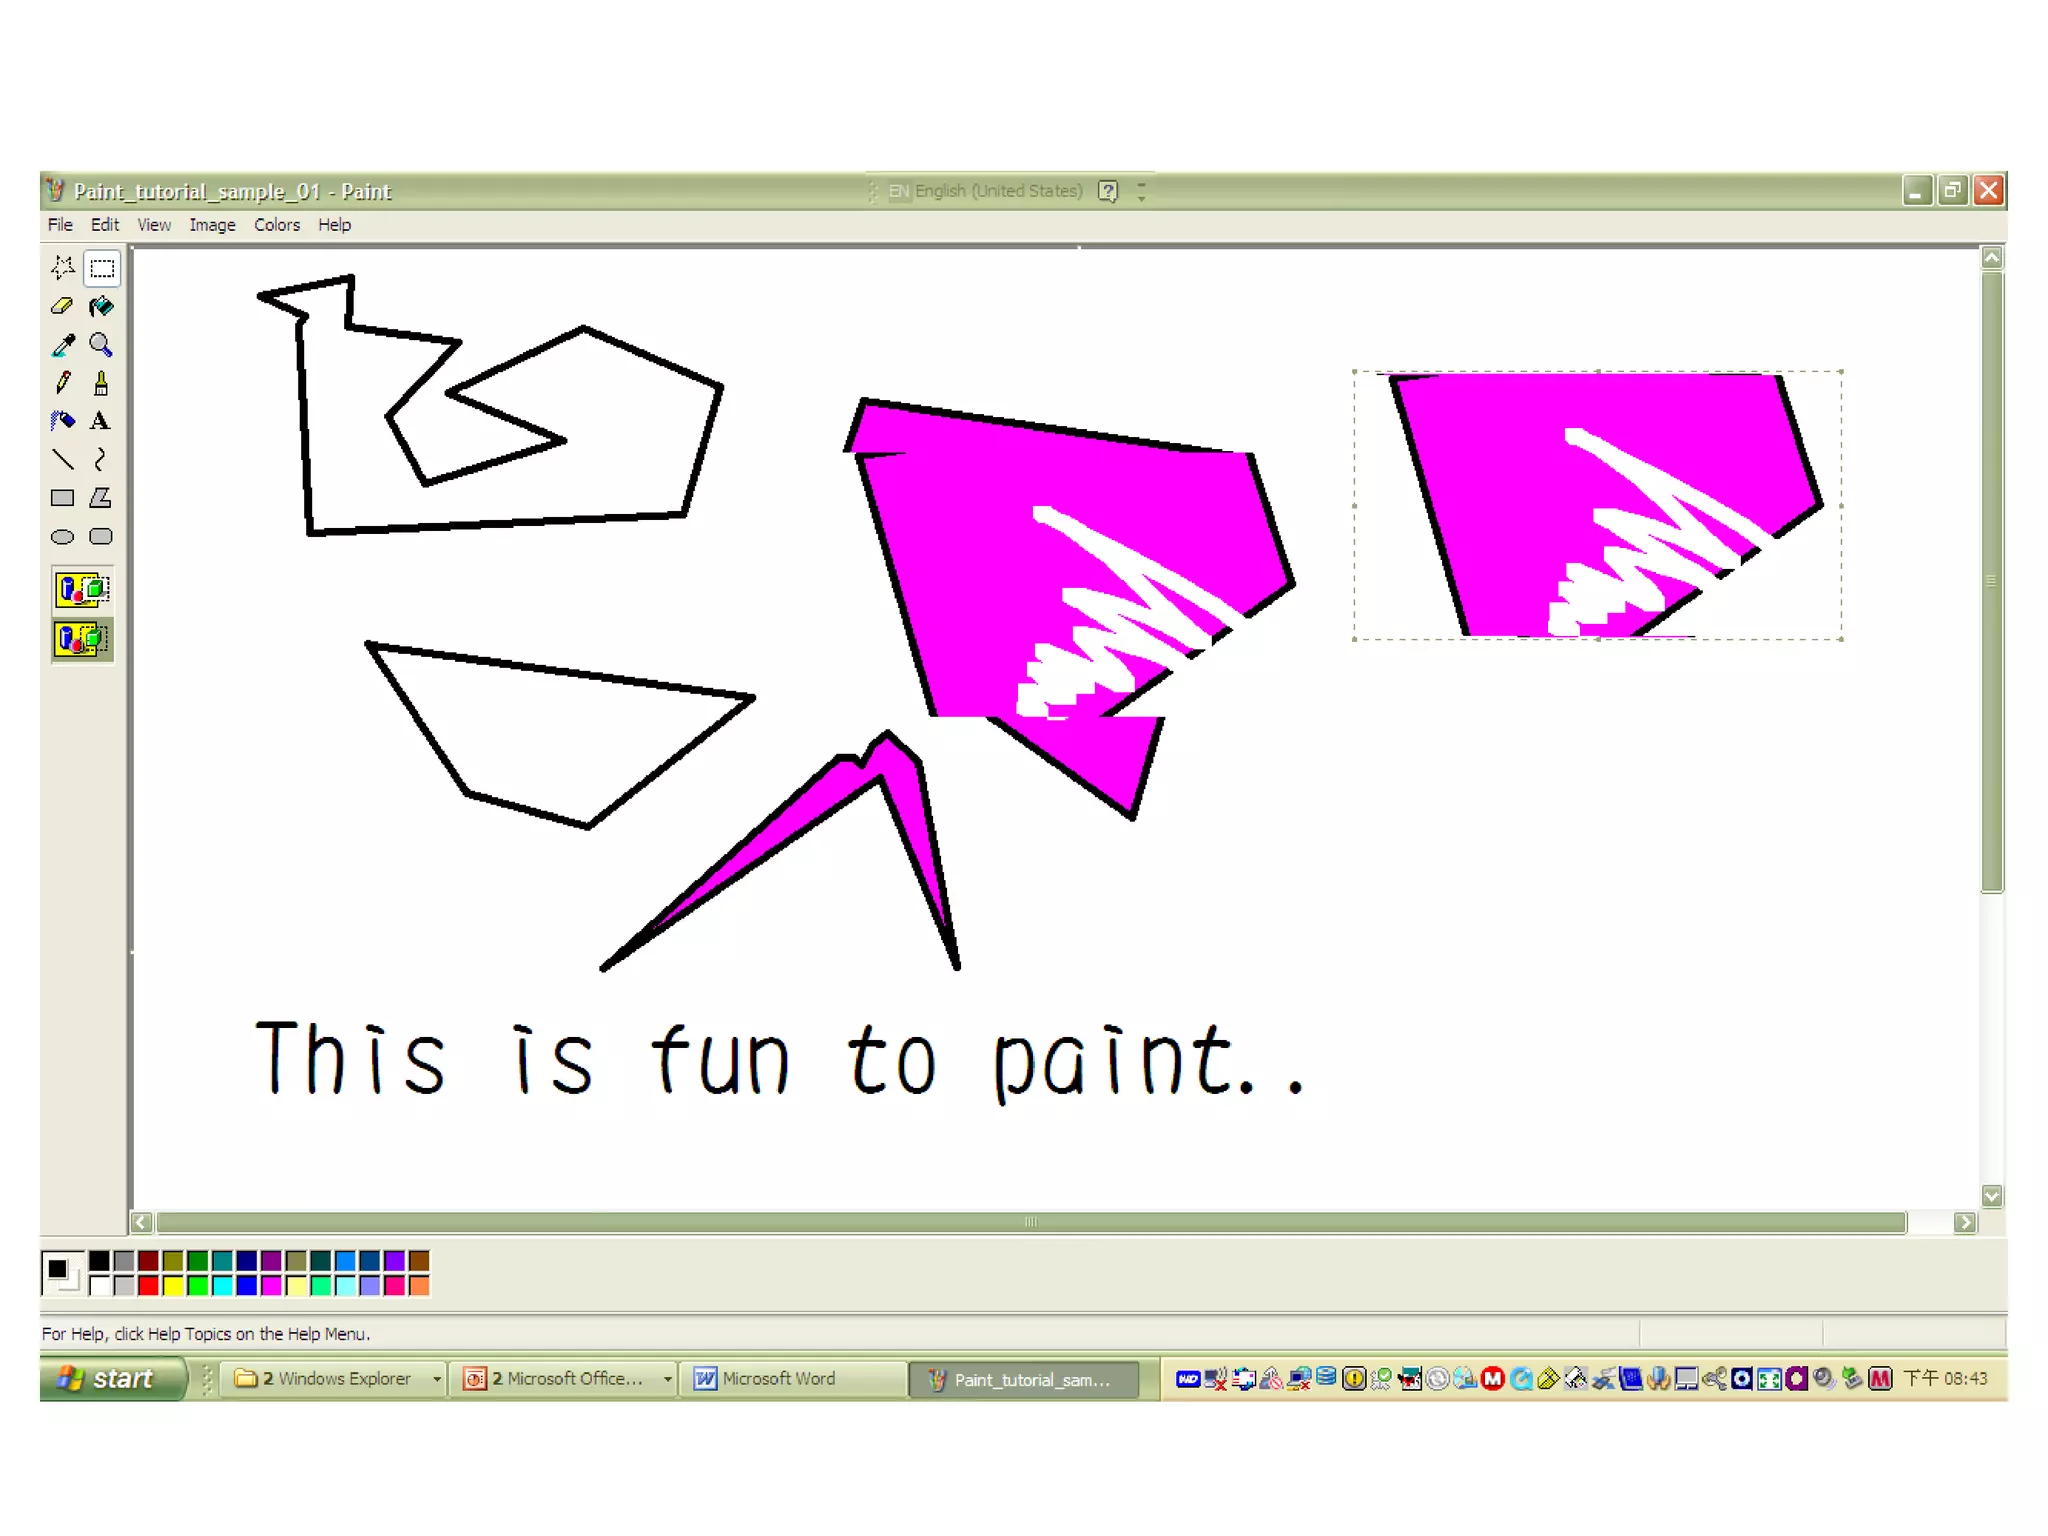
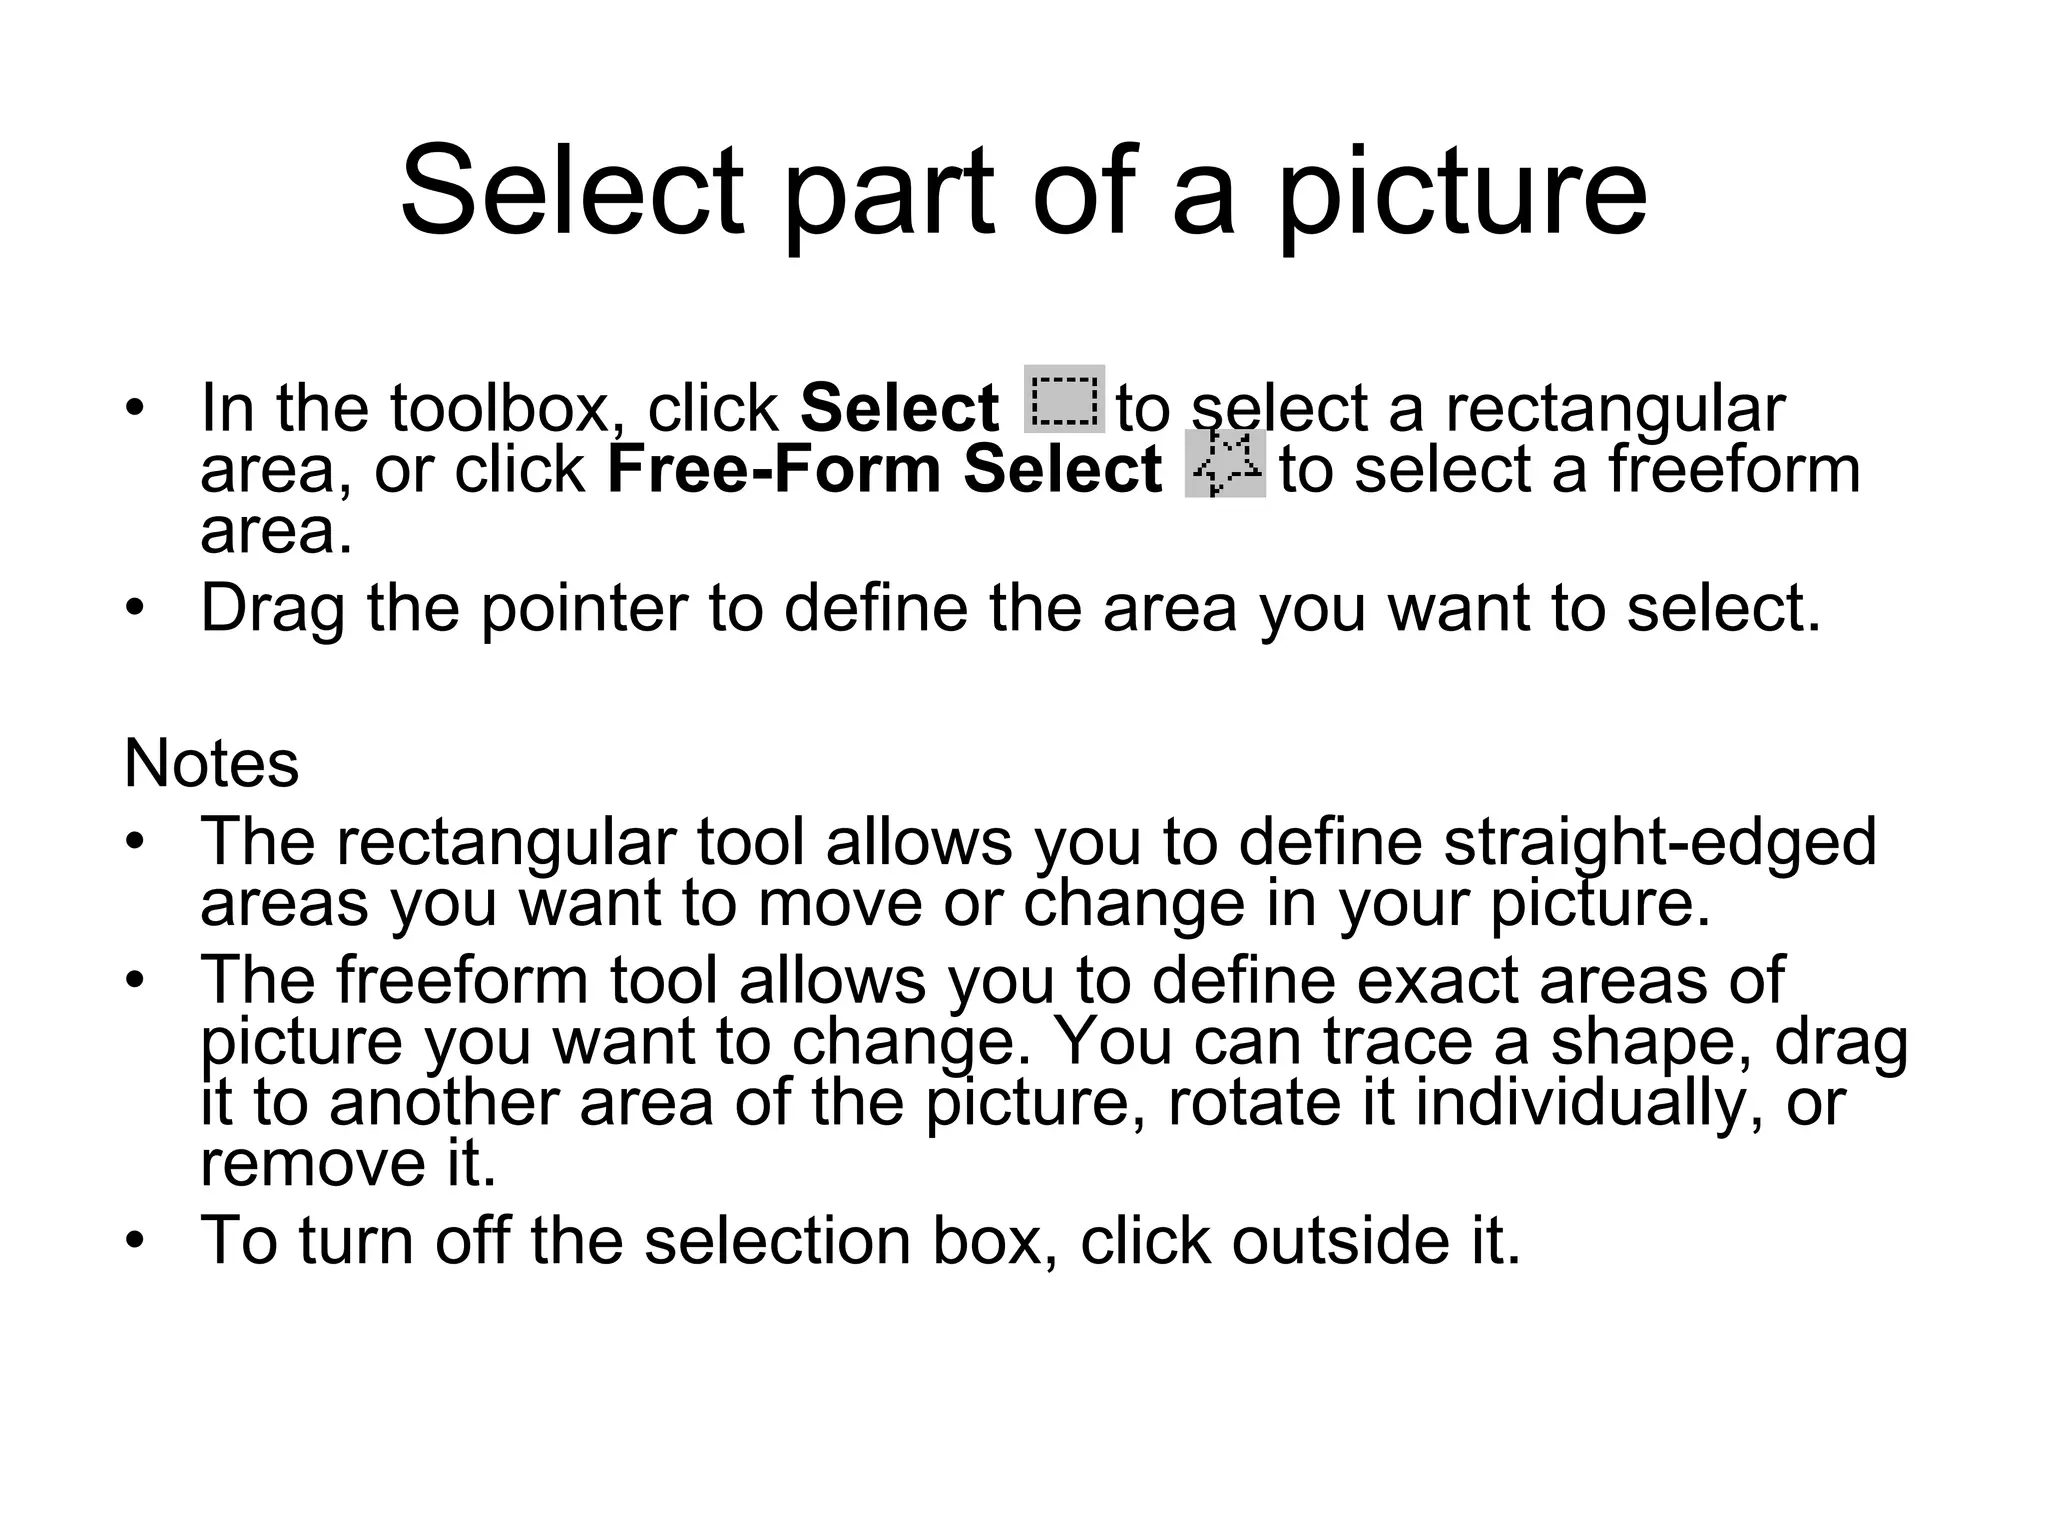
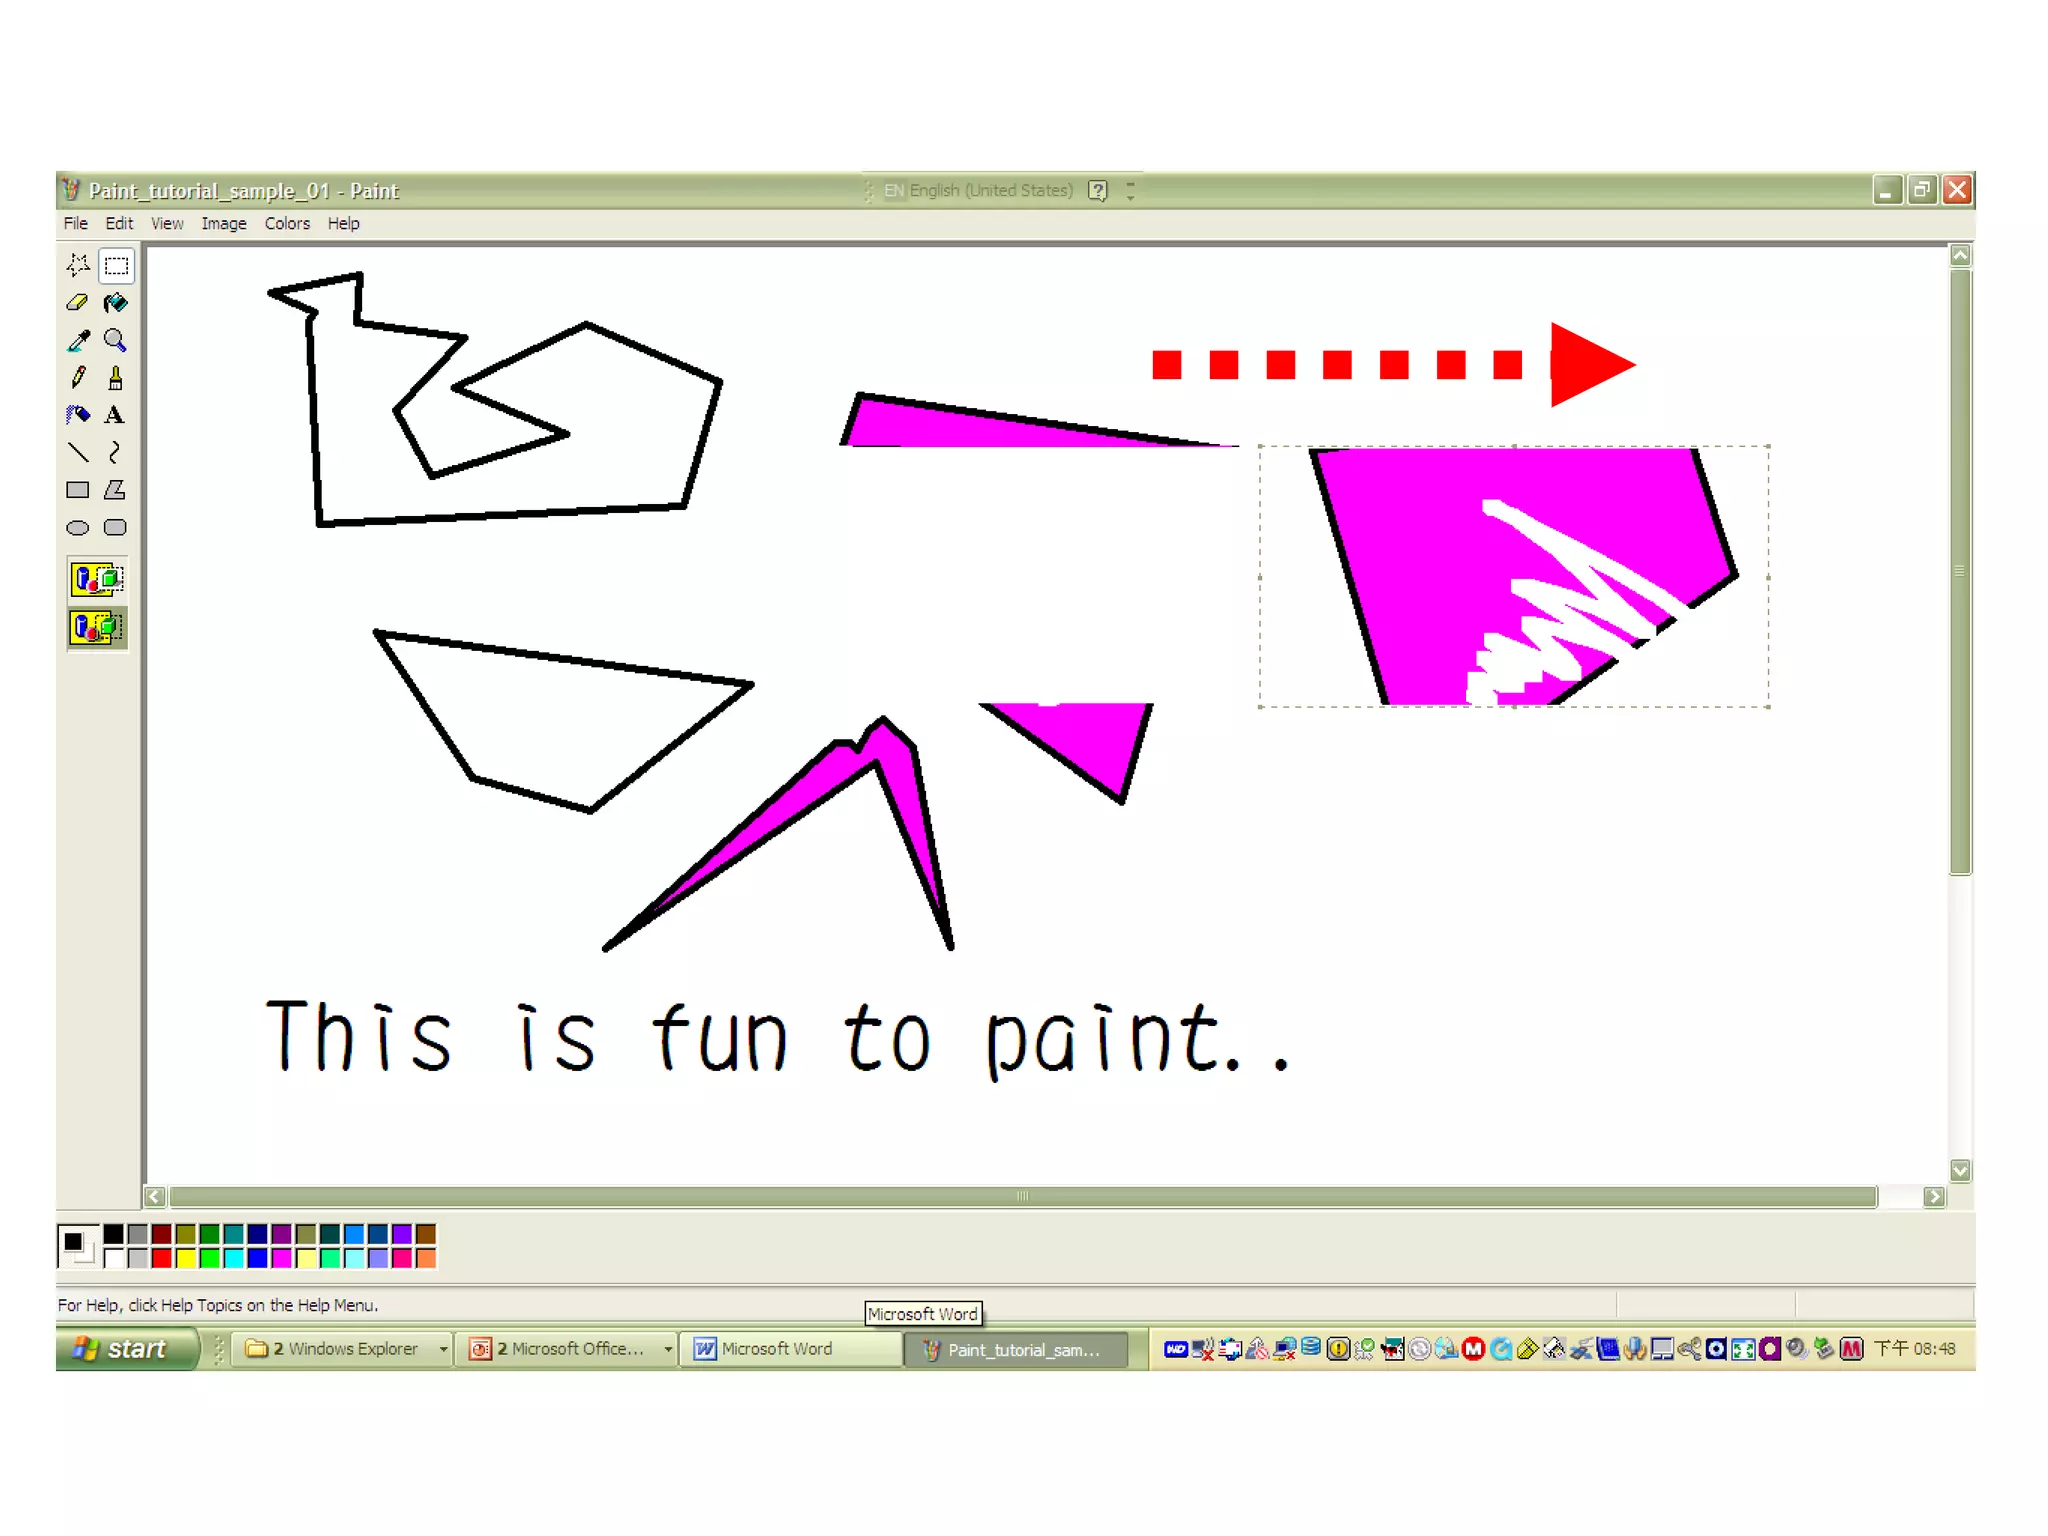
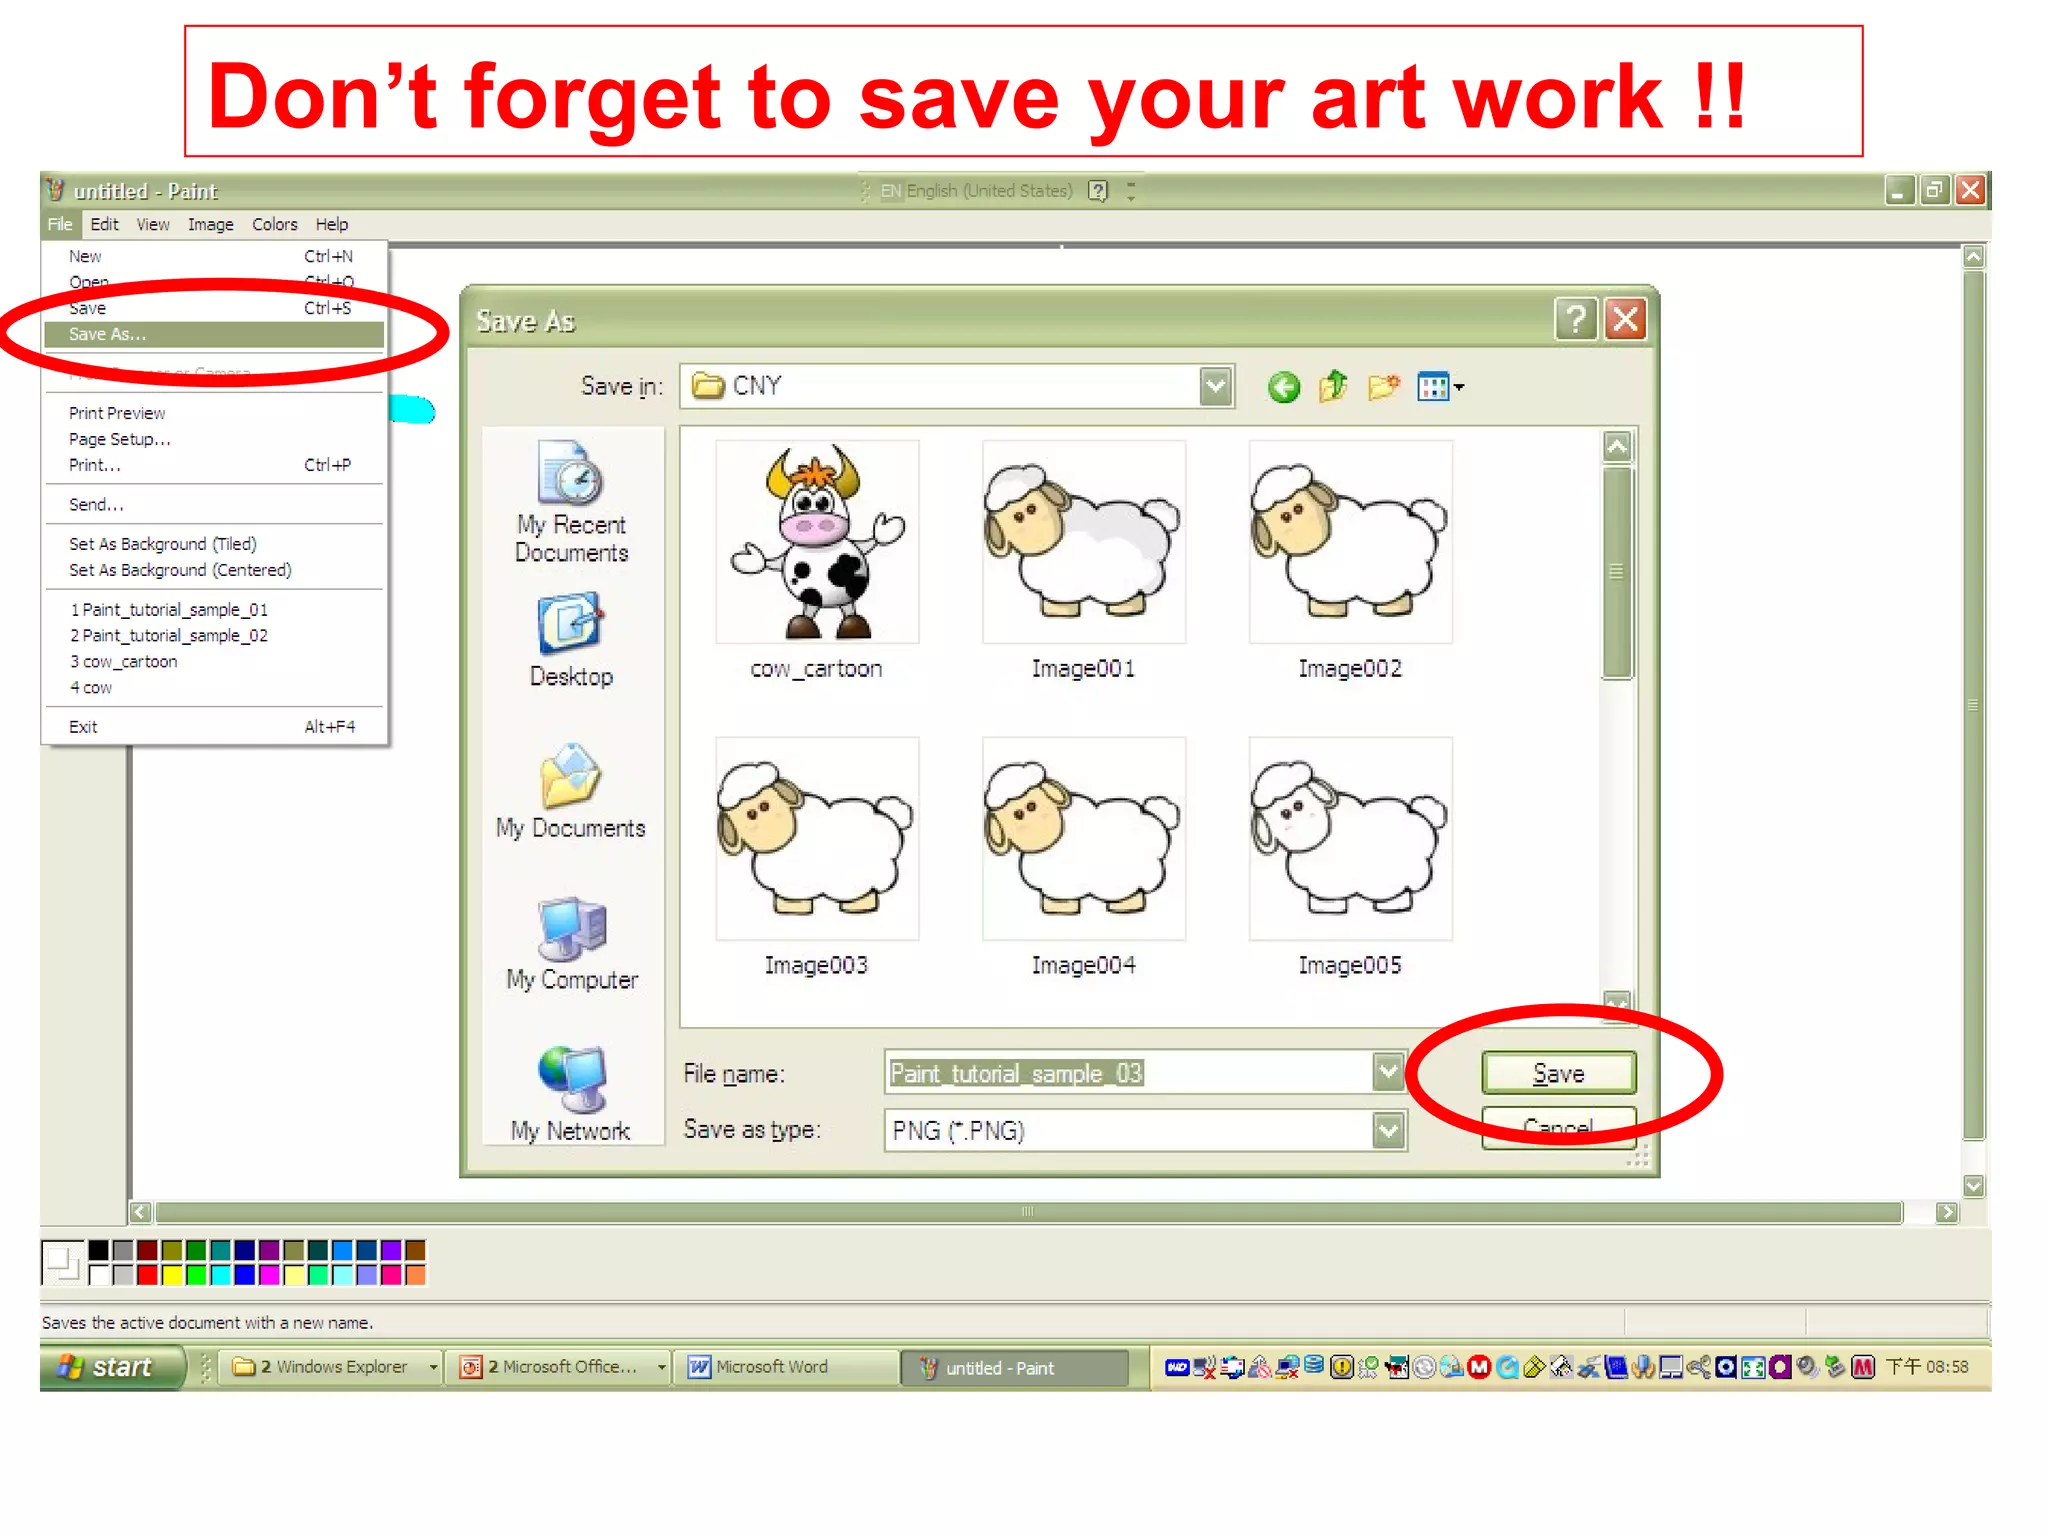
Microsoft Paint
Sean Chien 09.20.09
©
2010 SC
Open Paint application
Paint
• Microsoft Paint overview
• Create pictures
• Work with colors
• Work with pictures
Microsoft Paint overview
• Paint is a drawing tool you can use to create
simple or elaborate drawings. These drawings
can be either black-and-white or color, and can
be saved as bitmap files. You can print your
drawing, use it for your desktop background, or
paste it into another document. You can even
use Paint to view and edit scanned photos.
• You can also use Paint to work with pictures,
such as .jpg, .gif, or .bmp files. You can paste a
Paint picture into another document you've
created, or use it as your desktop background.
Paint
• Microsoft Paint overview
•Create pictures
• Work with colors
• Work with pictures
Draw a straight line
• In the toolbox, click Line .
• Below the toolbox, click a line width.
• Drag the pointer to draw the line.
Notes
• You can draw a perfectly horizontal, vertical, or
45-degree diagonal line by holding down SHIFT
while dragging.
• When you drag the pointer, the foreground color
is used. To use the background color, hold down
the right mouse button and drag the pointer.
• In the toolbox, click Line .
• Drag the pointer to draw the line.
Note
• When you drag the pointer, the foreground
color is used. To use the background
color, hold down the right mouse button
and drag the pointer.
Draw a freeform line
Draw a curved line
• In the toolbox, click Curve .
• Below the toolbox, click a line width.
• Draw a straight line by dragging the pointer.
• Click where you want one arc of the curve to be, and
then drag the pointer to adjust the curve. Repeat this
step for a second arc. You can only create two curves for
each line.
Note
• When you drag the pointer, the foreground color is used.
To use the background color, click and hold down the
right mouse button and drag the pointer.
Draw an ellipse or circle
• In the toolbox, click Ellipse .
• Below the toolbox, click a fill style.
• Drag the pointer to draw the ellipse or circle.
Notes
• When you drag the pointer, the foreground color is used to draw the
line surrounding the shape, and the background color is used to fill
the shape. To use the background color to draw the line
surrounding the shape and the foreground color to fill the shape,
hold down the right mouse button and drag the pointer.
• You can draw a circle by holding down SHIFT while you drag the
pointer.
• The border width of the circle or ellipse is the same as the thickness
selected for the line tools. To change the border thickness, click the
line or curve tool in the toolbox, and then click the thickness you
want in the box below the toolbox.
Left click for foreground, right click for background
Draw a rectangle or square
• In the toolbox, click Rectangle to create a square-cornered
shape, or click Rounded Rectangle to create a round-cornered
shape.
• Below the toolbox, click a fill style.
• To draw a rectangle, drag the pointer diagonally in the direction you
want.
• To draw a square, hold down SHIFT while dragging the pointer.
Notes
• When you drag the pointer, the foreground color is used to draw the
line surrounding the shape, and the background color is used to fill
the shape. To use the background color to draw the line surrounding
the shape and the foreground color to fill the shape, hold down the
right mouse button and drag the pointer.
• The border width of the box is the same as the thickness selected
for the line tools. To change the border thickness, click the line or
curve tool in the toolbox, and then click the thickness you want in
the box below the toolbox.
• To create a colored fill, click a fill style below the toolbox.
Draw a polygon
• In the toolbox, click Polygon .
• Below the toolbox, click a fill style.
• Drag the pointer to draw a straight line.
• Click once at each position where you want a new line segment to
appear.
• Double-click when done.
Notes
• To use only 45-degree and 90-degree angles, hold down the SHIFT
key while dragging the pointer.
• When you drag the pointer, the foreground color is used. To use the
background color, hold down the right mouse button and drag the
pointer.
• The border width of the polygon is the same as the thickness
selected for the line tools. To change the border thickness, click the
line or curve tool in the toolbox, and then click the thickness you
want in the box below the toolbox.
Click to connect to
next angle
Type and format text
• You can only enter text into an image when you are in
normal view. To display the normal view, on the View
menu, point to Zoom, and then click Normal size.
• In the toolbox, click Text .
• To create a text frame, drag the pointer diagonally to the
size you want.
• On the text toolbar, click the font, size, and style you want
for the text. If the text toolbar is not displayed, on the View
menu, click Text Toolbar. You can drag the toolbar to any
location in the window.
• Type your text. You can also paste text into a text box, but
not graphics.
• The color of the text is defined by the foreground color. To
make the background of the text transparent, click . To
make the background opaque and defined by the
background color, click .
Erase a small area
• In the toolbox, click Eraser .
• Below the toolbox, click an eraser size.
• Right-click a color in the color box if the color you want to
erase with is different from the current background color.
• Drag the pointer over the area you want to erase.
Note
• The current background color is the eraser color. You
can change the background color by right-clicking
another color in the color box.
Erase a large area
• In the toolbox, click Select to select a
rectangular area, or click Free-Form
Select to select a freeform area.
• Select the area you want to erase.
• The eraser color is the same as the
background color shown in the color box
below the toolbar. Right-click a color in the
color box to change the background color.
• On the Edit menu, click Clear Selection.
Erase an entire image
• If any part of the image is selected, click outside of the
selected area.
• On the Image menu, click Clear Image.
Notes
• The current background color will be used to fill the
cleared area.
• Choose a different background color by right-clicking a
color in the color box. The background color is used to fill
the inside of enclosed shapes and the background of
text frames. It also appears when you use the eraser.
Stretch or skew an item
• In the toolbox, click Select to select a rectangular
area or click Free-Form Select to select a freeform
area.
• Drag a box around the item you want to change.
• Below the toolbox, click one of the following:
– Click to apply an opaque background.
– Click to apply a transparent background.
• On the Image menu, click Stretch/Skew.
• Under Stretch, type the percent to stretch your picture
horizontally or vertically.
• Under Skew, type the number of degrees to skew your
picture horizontally or vertically.
100%80%50%
Change the size of your picture
• On the Image menu, click Attributes.
• Under Units, click the unit of measurement you want to
use for the width and height.
• Type the measurements in Width and Height.
Notes
• You can also resize your picture by dragging the image
resize handles, located at the lower-right corner and
along the bottom and right sides of your picture. (You
might need to maximize the window to see the square
resize handles.)
• If your current picture is bigger than the new size, the
picture is cut from the right side and bottom to fit within
the smaller area. If your current picture is smaller than
the new size, the extra area is filled with the selected
background color.
Paint
• Microsoft Paint overview
• Create pictures
•Work with colors
• Work with pictures
Set the default foreground and
background colors
• To set the foreground color, click a color in the color box.
• To set the background color, right-click a color in the
color box.
Notes
• The foreground color is used for lines, borders of
shapes, and text. The background color is used to fill the
inside of enclosed shapes and the background of text
frames, and when you use the eraser.
• The default foreground and background colors appear in
the left side of the color box. The top color square
represents the foreground color. The bottom color
square
Left click for foreground, right click for background
Fill an area or object with color
• In the toolbox, click Fill With Color .
• Click or right-click a color in the color box if the color you
want is different from either the current foreground color
or background color.
• Click or right-click the area or object you want to fill.
Notes
• If the shape you want to fill has any breaks in its border,
the fill color spreads to the rest of the drawing area. To
find and close any openings, click the View menu,
pointing to Zoom, and then click Large Size or Custom.
• To fill with the foreground color, click the area; to fill with
the background color, right-click the area.
Click on region for filling in color
Paint with a brush
• In the toolbox, click Brush .
• Below the toolbox, click a brush shape.
• To paint, drag the pointer over the image.
Notes
• When you drag the pointer, the brush uses the
foreground color. To use the background color,
click and hold down the right mouse button
when you drag the pointer.
• To undo up to three changes, on the Edit menu,
click Undo for each change.
Create an airbrush effect
• To In the toolbox, click Airbrush .
• Below the toolbox, click a spray size.
• To spray, drag the mouse pointer over the
image.
Notes
• When you drag the pointer, the airbrush sprays
with the foreground color. To use the
background color, click and hold down the right
mouse button and drag the pointer.
• To undo up to three changes, on the Edit menu,
click Undo for each change.
Create custom colors
• In the color box, click the color you want to
change.
• On the Colors menu, click Edit Colors.
• Click Define Custom Colors.
• Click the color swatch to change the Hue
and saturation (Sat), and then move the
slider in the color gradient to change the
luminescence (Lum).
• Click Add to Custom Colors.
Use black and white instead of color
• On the Image menu, click Attributes.
• Under Colors, click Black and white.
Note
• If you change back to color, only new work
will be in color.
Change the color of an existing line
• In the toolbox, click Fill With Color .
• In the color box, click a different color.
• Click the line you want to change.
Notes
• If the line is part of a shape, any connecting
vertical and horizontal lines will also change to
the new color.
• To make sure you change only the line color and
not the surrounding area, you can zoom the
picture to a larger size by clicking the View
menu, pointing to Zoom, and then clicking
Large Size or Custom.
Click on line
Copy color from one area
or object to another
• In the toolbox, click Pick Color .
• Click the area containing the color you want to copy.
• In the toolbox, click Fill With Color .
• Click the object or area where you want the new color.
Notes
• Copying a color using the eyedropper tool will change
your foreground color.
• If you copy a color with the eyedropper tool by right-
clicking, you will change your background color.
Paint
• Microsoft Paint overview
• Create pictures
• Work with colors
•Work with pictures
Acquire an image from a scanner
or a digital camera
• On the File menu, click From Scanner or Camera.
• In the Get Pictures dialog box, click the image you want,
and then click Get Picture.
Notes
• You must have a camera or scanner connected to your
computer to complete this procedure.
• Click Thumbnails to view small previews of your
pictures, Details to view larger pictures, or Delete
selected picture to delete the picture.
• For more information about the selected picture,
including name and format of the image, date and time
when the picture was taken, and the size of the image
file, click
Use a picture as your
desktop background
• Save the picture.
• On the File menu, click either of the
following commands:
– Set As Background (Tiled) covers the
desktop with repetitions of your picture.
– Set As Background (Centered) places your
picture in the center of the desktop.
Send an image using e-mail
• After you are done working on an image, you can send it to anyone
who has an e-mail account (as long as you also have access to an
e-mail account).
• On the File menu, click Send.
• Your e-mail program will display, with your image included either as
an attachment or as part of the message section of your e-mail.
• Specify your recipient's e-mail address, a subject, and a message;
then send the e-mail as you normally would.
Notes
• You must have an e-mail account on your computer to send an
image.
• If you have not yet set up an e-mail account, the Internet
Connection Wizard will help you set up an e-mail account and send
the e-mail at once.
Insert an image file into
the current picture
• In the toolbox, click Select and then
drag the pointer to define an area for the
inserted file.
• On the Edit menu, click Paste From.
• Locate and double-click the file you want
to insert.
• Drag the image file to position it correctly,
and then click outside the selection.
Right click on
selected region
Display gridlines
• To On the View menu, point to Zoom, and then click
Custom.
• Under Zoom to, click a percentage of zoom greater than
200 percent, and then click OK.
• On the View menu, point to Zoom, and then click Show
Grid.
Note
• You can remove the gridlines by repeating step 3 and
clearing the Show Grid check mark, or by clicking View,
pointing to Zoom, and then clicking Normal Size.
100%400%800%
Flip or rotate a picture or object
• In the toolbox, click Select to select a rectangular
area or click Free-Form Select to select a freeform
area.
• Draw a box around the item you want to flip or rotate.
• Below the toolbox, select one of the following:
– Click to apply an opaque background.
– Click to apply a transparent background.
• On the Image menu, click Flip/Rotate.
• Click one of the options under Flip or rotate.
• Note
• To undo up to three changes, on the Edit menu, click
Undo for each change.
Horizontal rotate
Copy and paste part of a picture
• In the toolbox, click Select to select a rectangular area, or click
Free-Form Select to select a freeform area.
• Drag the pointer to define the area you want to copy.
• Select a method of pasting:
– Click to apply an opaque background.
– Click to apply a transparent background.
• On the Edit menu, click Copy.
• On the Edit menu, click Paste.
• Drag the selection to a new location.
• Notes
• You cannot paste graphics when the text tool is selected.
• You can paste multiple copies of an object by holding down CTRL
while you drag the object to a new location. Repeat as needed.
• To undo up to three changes, on the Edit menu, click Undo for each
change.
• To turn off the selection box, click outside the box.
Select part of a picture
• In the toolbox, click Select to select a rectangular
area, or click Free-Form Select to select a freeform
area.
• Drag the pointer to define the area you want to select.
Notes
• The rectangular tool allows you to define straight-edged
areas you want to move or change in your picture.
• The freeform tool allows you to define exact areas of
picture you want to change. You can trace a shape, drag
it to another area of the picture, rotate it individually, or
remove it.
• To turn off the selection box, click outside it.
Don’t forget to save your art work !!
©
2010 SC

Microsoftpaint2009 090923013045-phpapp02

  • 1.
    Microsoft Paint Sean Chien09.20.09 © 2010 SC
  • 2.
  • 3.
    Paint • Microsoft Paintoverview • Create pictures • Work with colors • Work with pictures
  • 4.
    Microsoft Paint overview •Paint is a drawing tool you can use to create simple or elaborate drawings. These drawings can be either black-and-white or color, and can be saved as bitmap files. You can print your drawing, use it for your desktop background, or paste it into another document. You can even use Paint to view and edit scanned photos. • You can also use Paint to work with pictures, such as .jpg, .gif, or .bmp files. You can paste a Paint picture into another document you've created, or use it as your desktop background.
  • 5.
    Paint • Microsoft Paintoverview •Create pictures • Work with colors • Work with pictures
  • 6.
    Draw a straightline • In the toolbox, click Line . • Below the toolbox, click a line width. • Drag the pointer to draw the line. Notes • You can draw a perfectly horizontal, vertical, or 45-degree diagonal line by holding down SHIFT while dragging. • When you drag the pointer, the foreground color is used. To use the background color, hold down the right mouse button and drag the pointer.
  • 8.
    • In thetoolbox, click Line . • Drag the pointer to draw the line. Note • When you drag the pointer, the foreground color is used. To use the background color, hold down the right mouse button and drag the pointer. Draw a freeform line
  • 10.
    Draw a curvedline • In the toolbox, click Curve . • Below the toolbox, click a line width. • Draw a straight line by dragging the pointer. • Click where you want one arc of the curve to be, and then drag the pointer to adjust the curve. Repeat this step for a second arc. You can only create two curves for each line. Note • When you drag the pointer, the foreground color is used. To use the background color, click and hold down the right mouse button and drag the pointer.
  • 12.
    Draw an ellipseor circle • In the toolbox, click Ellipse . • Below the toolbox, click a fill style. • Drag the pointer to draw the ellipse or circle. Notes • When you drag the pointer, the foreground color is used to draw the line surrounding the shape, and the background color is used to fill the shape. To use the background color to draw the line surrounding the shape and the foreground color to fill the shape, hold down the right mouse button and drag the pointer. • You can draw a circle by holding down SHIFT while you drag the pointer. • The border width of the circle or ellipse is the same as the thickness selected for the line tools. To change the border thickness, click the line or curve tool in the toolbox, and then click the thickness you want in the box below the toolbox.
  • 13.
    Left click forforeground, right click for background
  • 14.
    Draw a rectangleor square • In the toolbox, click Rectangle to create a square-cornered shape, or click Rounded Rectangle to create a round-cornered shape. • Below the toolbox, click a fill style. • To draw a rectangle, drag the pointer diagonally in the direction you want. • To draw a square, hold down SHIFT while dragging the pointer. Notes • When you drag the pointer, the foreground color is used to draw the line surrounding the shape, and the background color is used to fill the shape. To use the background color to draw the line surrounding the shape and the foreground color to fill the shape, hold down the right mouse button and drag the pointer. • The border width of the box is the same as the thickness selected for the line tools. To change the border thickness, click the line or curve tool in the toolbox, and then click the thickness you want in the box below the toolbox. • To create a colored fill, click a fill style below the toolbox.
  • 16.
    Draw a polygon •In the toolbox, click Polygon . • Below the toolbox, click a fill style. • Drag the pointer to draw a straight line. • Click once at each position where you want a new line segment to appear. • Double-click when done. Notes • To use only 45-degree and 90-degree angles, hold down the SHIFT key while dragging the pointer. • When you drag the pointer, the foreground color is used. To use the background color, hold down the right mouse button and drag the pointer. • The border width of the polygon is the same as the thickness selected for the line tools. To change the border thickness, click the line or curve tool in the toolbox, and then click the thickness you want in the box below the toolbox.
  • 17.
    Click to connectto next angle
  • 18.
    Type and formattext • You can only enter text into an image when you are in normal view. To display the normal view, on the View menu, point to Zoom, and then click Normal size. • In the toolbox, click Text . • To create a text frame, drag the pointer diagonally to the size you want. • On the text toolbar, click the font, size, and style you want for the text. If the text toolbar is not displayed, on the View menu, click Text Toolbar. You can drag the toolbar to any location in the window. • Type your text. You can also paste text into a text box, but not graphics. • The color of the text is defined by the foreground color. To make the background of the text transparent, click . To make the background opaque and defined by the background color, click .
  • 20.
    Erase a smallarea • In the toolbox, click Eraser . • Below the toolbox, click an eraser size. • Right-click a color in the color box if the color you want to erase with is different from the current background color. • Drag the pointer over the area you want to erase. Note • The current background color is the eraser color. You can change the background color by right-clicking another color in the color box.
  • 22.
    Erase a largearea • In the toolbox, click Select to select a rectangular area, or click Free-Form Select to select a freeform area. • Select the area you want to erase. • The eraser color is the same as the background color shown in the color box below the toolbar. Right-click a color in the color box to change the background color. • On the Edit menu, click Clear Selection.
  • 25.
    Erase an entireimage • If any part of the image is selected, click outside of the selected area. • On the Image menu, click Clear Image. Notes • The current background color will be used to fill the cleared area. • Choose a different background color by right-clicking a color in the color box. The background color is used to fill the inside of enclosed shapes and the background of text frames. It also appears when you use the eraser.
  • 27.
    Stretch or skewan item • In the toolbox, click Select to select a rectangular area or click Free-Form Select to select a freeform area. • Drag a box around the item you want to change. • Below the toolbox, click one of the following: – Click to apply an opaque background. – Click to apply a transparent background. • On the Image menu, click Stretch/Skew. • Under Stretch, type the percent to stretch your picture horizontally or vertically. • Under Skew, type the number of degrees to skew your picture horizontally or vertically.
  • 28.
  • 30.
    Change the sizeof your picture • On the Image menu, click Attributes. • Under Units, click the unit of measurement you want to use for the width and height. • Type the measurements in Width and Height. Notes • You can also resize your picture by dragging the image resize handles, located at the lower-right corner and along the bottom and right sides of your picture. (You might need to maximize the window to see the square resize handles.) • If your current picture is bigger than the new size, the picture is cut from the right side and bottom to fit within the smaller area. If your current picture is smaller than the new size, the extra area is filled with the selected background color.
  • 32.
    Paint • Microsoft Paintoverview • Create pictures •Work with colors • Work with pictures
  • 33.
    Set the defaultforeground and background colors • To set the foreground color, click a color in the color box. • To set the background color, right-click a color in the color box. Notes • The foreground color is used for lines, borders of shapes, and text. The background color is used to fill the inside of enclosed shapes and the background of text frames, and when you use the eraser. • The default foreground and background colors appear in the left side of the color box. The top color square represents the foreground color. The bottom color square
  • 34.
    Left click forforeground, right click for background
  • 35.
    Fill an areaor object with color • In the toolbox, click Fill With Color . • Click or right-click a color in the color box if the color you want is different from either the current foreground color or background color. • Click or right-click the area or object you want to fill. Notes • If the shape you want to fill has any breaks in its border, the fill color spreads to the rest of the drawing area. To find and close any openings, click the View menu, pointing to Zoom, and then click Large Size or Custom. • To fill with the foreground color, click the area; to fill with the background color, right-click the area.
  • 36.
    Click on regionfor filling in color
  • 38.
    Paint with abrush • In the toolbox, click Brush . • Below the toolbox, click a brush shape. • To paint, drag the pointer over the image. Notes • When you drag the pointer, the brush uses the foreground color. To use the background color, click and hold down the right mouse button when you drag the pointer. • To undo up to three changes, on the Edit menu, click Undo for each change.
  • 40.
    Create an airbrusheffect • To In the toolbox, click Airbrush . • Below the toolbox, click a spray size. • To spray, drag the mouse pointer over the image. Notes • When you drag the pointer, the airbrush sprays with the foreground color. To use the background color, click and hold down the right mouse button and drag the pointer. • To undo up to three changes, on the Edit menu, click Undo for each change.
  • 42.
    Create custom colors •In the color box, click the color you want to change. • On the Colors menu, click Edit Colors. • Click Define Custom Colors. • Click the color swatch to change the Hue and saturation (Sat), and then move the slider in the color gradient to change the luminescence (Lum). • Click Add to Custom Colors.
  • 44.
    Use black andwhite instead of color • On the Image menu, click Attributes. • Under Colors, click Black and white. Note • If you change back to color, only new work will be in color.
  • 46.
    Change the colorof an existing line • In the toolbox, click Fill With Color . • In the color box, click a different color. • Click the line you want to change. Notes • If the line is part of a shape, any connecting vertical and horizontal lines will also change to the new color. • To make sure you change only the line color and not the surrounding area, you can zoom the picture to a larger size by clicking the View menu, pointing to Zoom, and then clicking Large Size or Custom.
  • 47.
  • 49.
    Copy color fromone area or object to another • In the toolbox, click Pick Color . • Click the area containing the color you want to copy. • In the toolbox, click Fill With Color . • Click the object or area where you want the new color. Notes • Copying a color using the eyedropper tool will change your foreground color. • If you copy a color with the eyedropper tool by right- clicking, you will change your background color.
  • 51.
    Paint • Microsoft Paintoverview • Create pictures • Work with colors •Work with pictures
  • 52.
    Acquire an imagefrom a scanner or a digital camera • On the File menu, click From Scanner or Camera. • In the Get Pictures dialog box, click the image you want, and then click Get Picture. Notes • You must have a camera or scanner connected to your computer to complete this procedure. • Click Thumbnails to view small previews of your pictures, Details to view larger pictures, or Delete selected picture to delete the picture. • For more information about the selected picture, including name and format of the image, date and time when the picture was taken, and the size of the image file, click
  • 53.
    Use a pictureas your desktop background • Save the picture. • On the File menu, click either of the following commands: – Set As Background (Tiled) covers the desktop with repetitions of your picture. – Set As Background (Centered) places your picture in the center of the desktop.
  • 55.
    Send an imageusing e-mail • After you are done working on an image, you can send it to anyone who has an e-mail account (as long as you also have access to an e-mail account). • On the File menu, click Send. • Your e-mail program will display, with your image included either as an attachment or as part of the message section of your e-mail. • Specify your recipient's e-mail address, a subject, and a message; then send the e-mail as you normally would. Notes • You must have an e-mail account on your computer to send an image. • If you have not yet set up an e-mail account, the Internet Connection Wizard will help you set up an e-mail account and send the e-mail at once.
  • 57.
    Insert an imagefile into the current picture • In the toolbox, click Select and then drag the pointer to define an area for the inserted file. • On the Edit menu, click Paste From. • Locate and double-click the file you want to insert. • Drag the image file to position it correctly, and then click outside the selection.
  • 58.
  • 61.
    Display gridlines • ToOn the View menu, point to Zoom, and then click Custom. • Under Zoom to, click a percentage of zoom greater than 200 percent, and then click OK. • On the View menu, point to Zoom, and then click Show Grid. Note • You can remove the gridlines by repeating step 3 and clearing the Show Grid check mark, or by clicking View, pointing to Zoom, and then clicking Normal Size.
  • 62.
  • 64.
    Flip or rotatea picture or object • In the toolbox, click Select to select a rectangular area or click Free-Form Select to select a freeform area. • Draw a box around the item you want to flip or rotate. • Below the toolbox, select one of the following: – Click to apply an opaque background. – Click to apply a transparent background. • On the Image menu, click Flip/Rotate. • Click one of the options under Flip or rotate. • Note • To undo up to three changes, on the Edit menu, click Undo for each change.
  • 66.
  • 67.
    Copy and pastepart of a picture • In the toolbox, click Select to select a rectangular area, or click Free-Form Select to select a freeform area. • Drag the pointer to define the area you want to copy. • Select a method of pasting: – Click to apply an opaque background. – Click to apply a transparent background. • On the Edit menu, click Copy. • On the Edit menu, click Paste. • Drag the selection to a new location. • Notes • You cannot paste graphics when the text tool is selected. • You can paste multiple copies of an object by holding down CTRL while you drag the object to a new location. Repeat as needed. • To undo up to three changes, on the Edit menu, click Undo for each change. • To turn off the selection box, click outside the box.
  • 71.
    Select part ofa picture • In the toolbox, click Select to select a rectangular area, or click Free-Form Select to select a freeform area. • Drag the pointer to define the area you want to select. Notes • The rectangular tool allows you to define straight-edged areas you want to move or change in your picture. • The freeform tool allows you to define exact areas of picture you want to change. You can trace a shape, drag it to another area of the picture, rotate it individually, or remove it. • To turn off the selection box, click outside it.
  • 73.
    Don’t forget tosave your art work !!
  • 74.