1
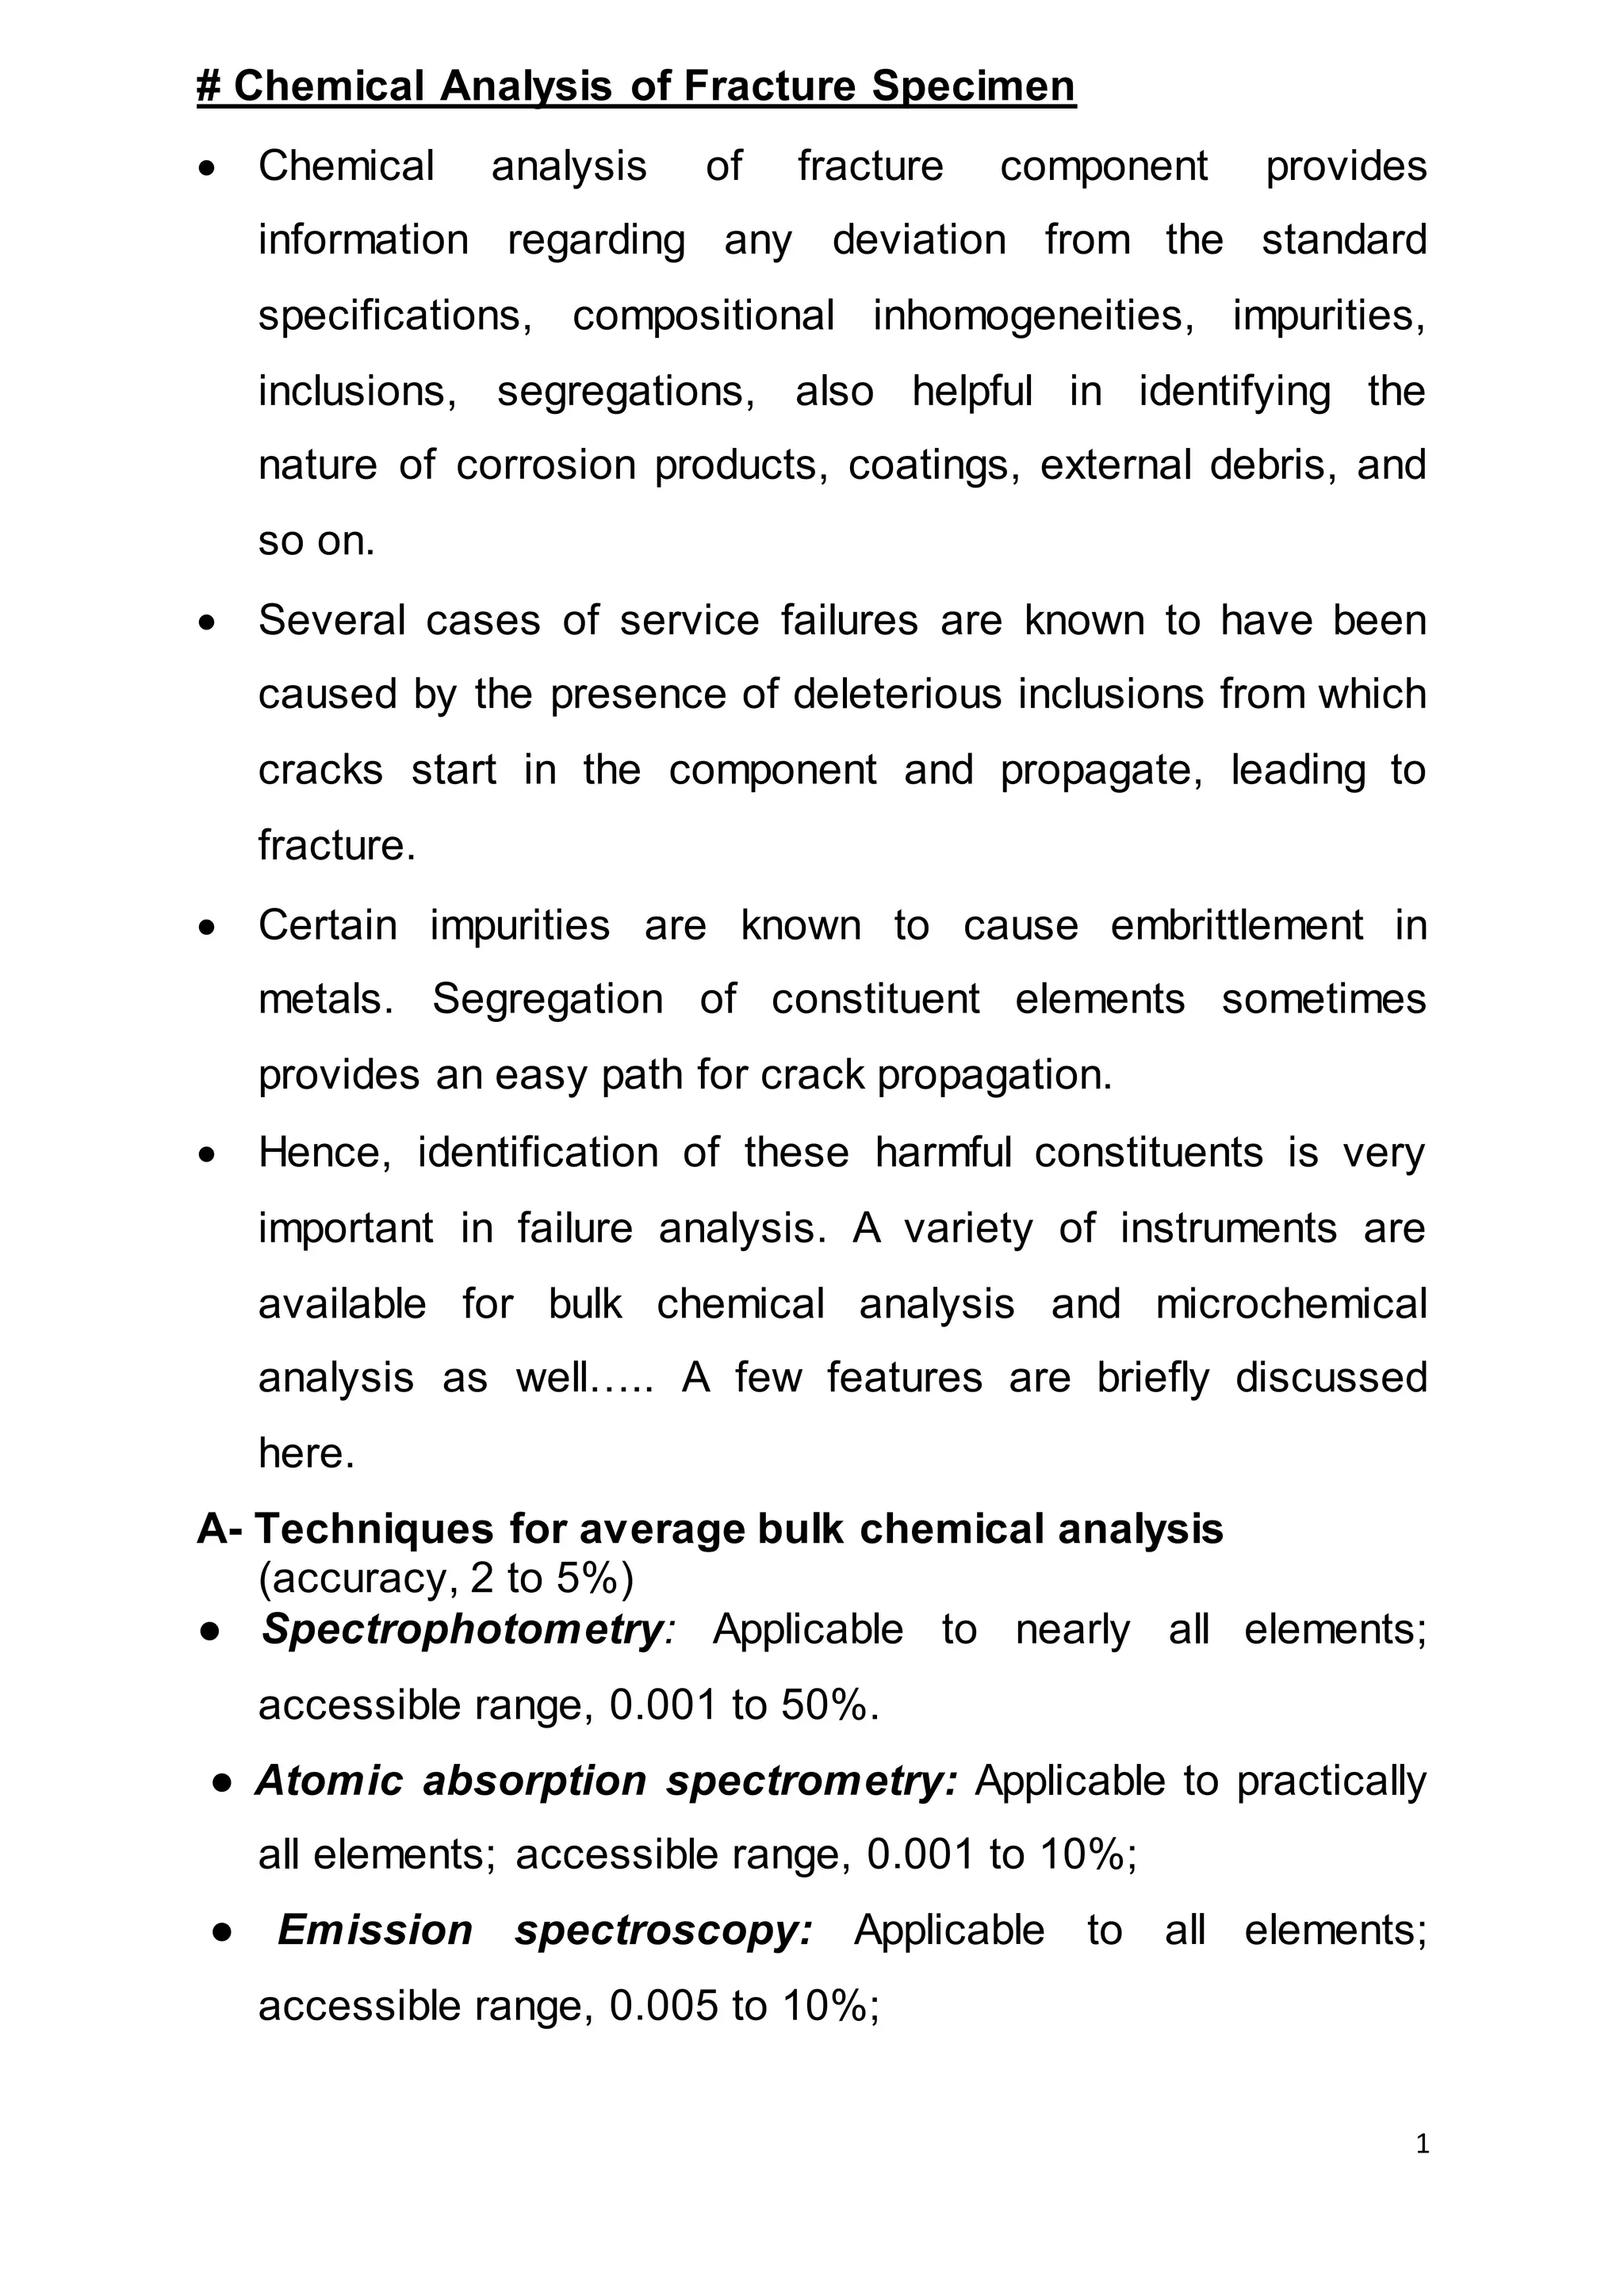
# Chemical Analysis of Fracture Specimen
ď‚· Chemical analysis of fracture component provides
information regarding any deviation from the standard
specifications, compositional inhomogeneities, impurities,
inclusions, segregations, also helpful in identifying the
nature of corrosion products, coatings, external debris, and
so on.
ď‚· Several cases of service failures are known to have been
caused by the presence of deleterious inclusions from which
cracks start in the component and propagate, leading to
fracture.
ď‚· Certain impurities are known to cause embrittlement in
metals. Segregation of constituent elements sometimes
provides an easy path for crack propagation.
ď‚· Hence, identification of these harmful constituents is very
important in failure analysis. A variety of instruments are
available for bulk chemical analysis and microchemical
analysis as well….. A few features are briefly discussed
here.
A- Techniques for average bulk chemical analysis
(accuracy, 2 to 5%)
â—Ź Spectrophotometry: Applicable to nearly all elements;
accessible range, 0.001 to 50%.
â—Ź Atomic absorption spectrometry: Applicable to practically
all elements; accessible range, 0.001 to 10%;
â—Ź Emission spectroscopy: Applicable to all elements;
accessible range, 0.005 to 10%;
2
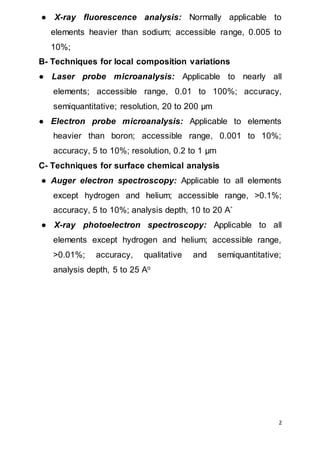
â—Ź X-ray fluorescence analysis: Normally applicable to
elements heavier than sodium; accessible range, 0.005 to
10%;
B- Techniques for local composition variations
â—Ź Laser probe microanalysis: Applicable to nearly all
elements; accessible range, 0.01 to 100%; accuracy,
semiquantitative; resolution, 20 to 200 µm
â—Ź Electron probe microanalysis: Applicable to elements
heavier than boron; accessible range, 0.001 to 10%;
accuracy, 5 to 10%; resolution, 0.2 to 1 µm
C- Techniques for surface chemical analysis
â—Ź Auger electron spectroscopy: Applicable to all elements
except hydrogen and helium; accessible range, >0.1%;
accuracy, 5 to 10%; analysis depth, 10 to 20 AËš
â—Ź X-ray photoelectron spectroscopy: Applicable to all
elements except hydrogen and helium; accessible range,
>0.01%; accuracy, qualitative and semiquantitative;
analysis depth, 5 to 25 Ao
3
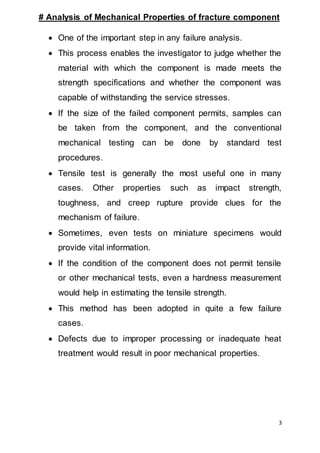
# Analysis of Mechanical Properties of fracture component
ď‚· One of the important step in any failure analysis.
ď‚· This process enables the investigator to judge whether the
material with which the component is made meets the
strength specifications and whether the component was
capable of withstanding the service stresses.
ď‚· If the size of the failed component permits, samples can
be taken from the component, and the conventional
mechanical testing can be done by standard test
procedures.
ď‚· Tensile test is generally the most useful one in many
cases. Other properties such as impact strength,
toughness, and creep rupture provide clues for the
mechanism of failure.
ď‚· Sometimes, even tests on miniature specimens would
provide vital information.
ď‚· If the condition of the component does not permit tensile
or other mechanical tests, even a hardness measurement
would help in estimating the tensile strength.
ď‚· This method has been adopted in quite a few failure
cases.
ď‚· Defects due to improper processing or inadequate heat
treatment would result in poor mechanical properties.
4
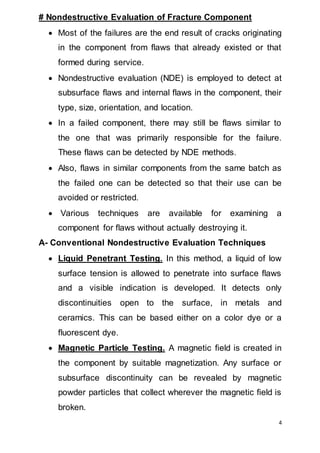
# Nondestructive Evaluation of Fracture Component
ď‚· Most of the failures are the end result of cracks originating
in the component from flaws that already existed or that
formed during service.
ď‚· Nondestructive evaluation (NDE) is employed to detect at
subsurface flaws and internal flaws in the component, their
type, size, orientation, and location.
ď‚· In a failed component, there may still be flaws similar to
the one that was primarily responsible for the failure.
These flaws can be detected by NDE methods.
ď‚· Also, flaws in similar components from the same batch as
the failed one can be detected so that their use can be
avoided or restricted.
ď‚· Various techniques are available for examining a
component for flaws without actually destroying it.
A- Conventional Nondestructive Evaluation Techniques
ď‚· Liquid Penetrant Testing. In this method, a liquid of low
surface tension is allowed to penetrate into surface flaws
and a visible indication is developed. It detects only
discontinuities open to the surface, in metals and
ceramics. This can be based either on a color dye or a
fluorescent dye.
ď‚· Magnetic Particle Testing. A magnetic field is created in
the component by suitable magnetization. Any surface or
subsurface discontinuity can be revealed by magnetic
powder particles that collect wherever the magnetic field is
broken.
5
ď‚· Eddy Current Inspection. Eddy currents are induced in
the component by an electrical coil. Discontinuities in the
component are detected as they alter the path of the
induced current. The method is useful for detecting
surface and subsurface flaws, for sorting dissimilar metals,
for detecting variations in composition and microstructure,
and for measuring the thickness of nonconductive
coatings.
ď‚· Radiography using x-rays, Îł-rays, and neutrons uses
penetrating electromagnetic radiation or particle radiation.
Internal flaws are detected by the difference in absorption
of the radiation by the various regions of the component.
Flaws in the component are recorded permanently on a
film or examined on a fluorescent screen.
ď‚· In x-radiography, the size of the flaw can be estimated by
using penetrameters. Gamma rays have greater
penetrating power than do x-rays and hence can be used
for thicker sections. They are obtained by the radioactive
decay of isotopes such as cobalt 60, cesium 137, thulium
170, or iridium 192. Gamma ray equipment is very useful
for fieldwork.
ď‚· In neutron radiography, thermal neutrons from a reactor
are made to impinge on the component and the emitted β-
rays are made to expose a film. Depth of penetration is
much more than in conventional radiography.
Radiographic techniques are extensively used for the NDE
of castings, weldments, boilers, and pressure vessels.
6
ď‚· Ultrasonic inspection is used for detecting surface and
subsurface flaws in metals, ceramics, and polymers.
Ultrasonic waves are sent through the component. From
the reflected waves, flaws such as cavities, cracks and
inclusions are detected with their locations and size are
determined.
B- Special Techniques
ď‚· In addition to these conventional NDE techniques, there
are certain other techniques that are employed under
special circumstances.
Acoustic Emission.
ď‚· It is a condition-monitoring technique and is very useful in
predicting failures.
ď‚· Conventional UT detects existing flaws in components
whereas Acoustic emissions are stress waves produced in
components and structures when some form of internal
movement of defects takes place under stress. The
movement can be that of dislocations or propagation of
cracks whereas.
ď‚· It has been extensively used in the testing of aircraft,
ground vehicles, buildings, pipelines, rotating machinery,
tanks, pressure vessels, and so on, as well as in
monitoring wear, corrosion, machining, welding, fluid flow,
and so forth.
7
ď‚· Computed Tomography (CT). In this technique, a thin
beam of radiation, generally x-rays, is made to pass
through the component and the image of a thin cross-
sectional slice is detected.
ď‚· The beam, and the detector, which is usually a linear array
of radiation sensors, are in the same plane as the surface
imaged.
ď‚· The attenuation (weekness) of the radiation is related to
the thickness, density, and composition of the material. By
scanning and collecting the attenuation data from different
angles, the image of the component is reconstructed by a
computer.
ď‚· The technique can be used for detecting voids, inclusions,
porosity, density variations, cracks, and machining defects
in metals and delaminations in composites.
ď‚· The electric current perturbation method (ECP) is
suitable for nondestructive examination of surface and
subsurface defects in electrically conducting non-
ferromagnetic materials.
ď‚· When an electric current, either ac or dc, passes through a
component, a magnetic flux is generated. Where there is a
flaw, the current flow is disturbed and the magnetic flux
density is changed.
ď‚· With a magnetic field sensor, this change in flux density is
detected. By scanning the entire surface, the position of
the flaws such as notches and cracks is determined. The
8
technique has been adopted to detect surface flaws in
aircraft engine components.
ď‚· Acoustic Microscopy. High-frequency ultrasound in the
GHz range is passed through the component of interest.
The transmitted wave is detected by a rapidly scanning
laser beam on the opposite surface.
ď‚· Transmission of these waves is interrupted by flaws
present in the material.
ď‚· The attenuation of the ultrasound differs between
homogeneous regions and regions with flaws.
ď‚· The resulting image has characteristic light and dark
features.
ď‚· Variations of this technique include reflection type imaging
by scanning a transducer in a raster pattern over the
sample surface. The method has been successfully
applied to detect flaws in metals, ceramics, composites
and microelectronic components.
ď‚· X-ray diffraction is a common method for identifying
phases in metallic materials, corrosion products, and
surface deposits.
ď‚· Several cases of component failures due to locked-in
residual stresses have been encountered in service.
ď‚· Residual stresses can readily be determined by x-ray
diffraction method.
ď‚· Textures in metals that have a bearing on their mechanical
behavior can be determined through pole figure
computation through x-ray diffraction.

Fracture Mechanics & Failure Analysis: Lecture other fracture analysis techniques

  • 1.
    1 # Chemical Analysisof Fracture Specimen  Chemical analysis of fracture component provides information regarding any deviation from the standard specifications, compositional inhomogeneities, impurities, inclusions, segregations, also helpful in identifying the nature of corrosion products, coatings, external debris, and so on.  Several cases of service failures are known to have been caused by the presence of deleterious inclusions from which cracks start in the component and propagate, leading to fracture.  Certain impurities are known to cause embrittlement in metals. Segregation of constituent elements sometimes provides an easy path for crack propagation.  Hence, identification of these harmful constituents is very important in failure analysis. A variety of instruments are available for bulk chemical analysis and microchemical analysis as well….. A few features are briefly discussed here. A- Techniques for average bulk chemical analysis (accuracy, 2 to 5%) ● Spectrophotometry: Applicable to nearly all elements; accessible range, 0.001 to 50%. ● Atomic absorption spectrometry: Applicable to practically all elements; accessible range, 0.001 to 10%; ● Emission spectroscopy: Applicable to all elements; accessible range, 0.005 to 10%;
  • 2.
    2 ● X-ray fluorescenceanalysis: Normally applicable to elements heavier than sodium; accessible range, 0.005 to 10%; B- Techniques for local composition variations ● Laser probe microanalysis: Applicable to nearly all elements; accessible range, 0.01 to 100%; accuracy, semiquantitative; resolution, 20 to 200 µm ● Electron probe microanalysis: Applicable to elements heavier than boron; accessible range, 0.001 to 10%; accuracy, 5 to 10%; resolution, 0.2 to 1 µm C- Techniques for surface chemical analysis ● Auger electron spectroscopy: Applicable to all elements except hydrogen and helium; accessible range, >0.1%; accuracy, 5 to 10%; analysis depth, 10 to 20 A˚ ● X-ray photoelectron spectroscopy: Applicable to all elements except hydrogen and helium; accessible range, >0.01%; accuracy, qualitative and semiquantitative; analysis depth, 5 to 25 Ao
  • 3.
    3 # Analysis ofMechanical Properties of fracture component ď‚· One of the important step in any failure analysis. ď‚· This process enables the investigator to judge whether the material with which the component is made meets the strength specifications and whether the component was capable of withstanding the service stresses. ď‚· If the size of the failed component permits, samples can be taken from the component, and the conventional mechanical testing can be done by standard test procedures. ď‚· Tensile test is generally the most useful one in many cases. Other properties such as impact strength, toughness, and creep rupture provide clues for the mechanism of failure. ď‚· Sometimes, even tests on miniature specimens would provide vital information. ď‚· If the condition of the component does not permit tensile or other mechanical tests, even a hardness measurement would help in estimating the tensile strength. ď‚· This method has been adopted in quite a few failure cases. ď‚· Defects due to improper processing or inadequate heat treatment would result in poor mechanical properties.
  • 4.
    4 # Nondestructive Evaluationof Fracture Component ď‚· Most of the failures are the end result of cracks originating in the component from flaws that already existed or that formed during service. ď‚· Nondestructive evaluation (NDE) is employed to detect at subsurface flaws and internal flaws in the component, their type, size, orientation, and location. ď‚· In a failed component, there may still be flaws similar to the one that was primarily responsible for the failure. These flaws can be detected by NDE methods. ď‚· Also, flaws in similar components from the same batch as the failed one can be detected so that their use can be avoided or restricted. ď‚· Various techniques are available for examining a component for flaws without actually destroying it. A- Conventional Nondestructive Evaluation Techniques ď‚· Liquid Penetrant Testing. In this method, a liquid of low surface tension is allowed to penetrate into surface flaws and a visible indication is developed. It detects only discontinuities open to the surface, in metals and ceramics. This can be based either on a color dye or a fluorescent dye. ď‚· Magnetic Particle Testing. A magnetic field is created in the component by suitable magnetization. Any surface or subsurface discontinuity can be revealed by magnetic powder particles that collect wherever the magnetic field is broken.
  • 5.
    5  Eddy CurrentInspection. Eddy currents are induced in the component by an electrical coil. Discontinuities in the component are detected as they alter the path of the induced current. The method is useful for detecting surface and subsurface flaws, for sorting dissimilar metals, for detecting variations in composition and microstructure, and for measuring the thickness of nonconductive coatings.  Radiography using x-rays, γ-rays, and neutrons uses penetrating electromagnetic radiation or particle radiation. Internal flaws are detected by the difference in absorption of the radiation by the various regions of the component. Flaws in the component are recorded permanently on a film or examined on a fluorescent screen.  In x-radiography, the size of the flaw can be estimated by using penetrameters. Gamma rays have greater penetrating power than do x-rays and hence can be used for thicker sections. They are obtained by the radioactive decay of isotopes such as cobalt 60, cesium 137, thulium 170, or iridium 192. Gamma ray equipment is very useful for fieldwork.  In neutron radiography, thermal neutrons from a reactor are made to impinge on the component and the emitted β- rays are made to expose a film. Depth of penetration is much more than in conventional radiography. Radiographic techniques are extensively used for the NDE of castings, weldments, boilers, and pressure vessels.
  • 6.
    6 ď‚· Ultrasonic inspectionis used for detecting surface and subsurface flaws in metals, ceramics, and polymers. Ultrasonic waves are sent through the component. From the reflected waves, flaws such as cavities, cracks and inclusions are detected with their locations and size are determined. B- Special Techniques ď‚· In addition to these conventional NDE techniques, there are certain other techniques that are employed under special circumstances. Acoustic Emission. ď‚· It is a condition-monitoring technique and is very useful in predicting failures. ď‚· Conventional UT detects existing flaws in components whereas Acoustic emissions are stress waves produced in components and structures when some form of internal movement of defects takes place under stress. The movement can be that of dislocations or propagation of cracks whereas. ď‚· It has been extensively used in the testing of aircraft, ground vehicles, buildings, pipelines, rotating machinery, tanks, pressure vessels, and so on, as well as in monitoring wear, corrosion, machining, welding, fluid flow, and so forth.
  • 7.
    7 ď‚· Computed Tomography(CT). In this technique, a thin beam of radiation, generally x-rays, is made to pass through the component and the image of a thin cross- sectional slice is detected. ď‚· The beam, and the detector, which is usually a linear array of radiation sensors, are in the same plane as the surface imaged. ď‚· The attenuation (weekness) of the radiation is related to the thickness, density, and composition of the material. By scanning and collecting the attenuation data from different angles, the image of the component is reconstructed by a computer. ď‚· The technique can be used for detecting voids, inclusions, porosity, density variations, cracks, and machining defects in metals and delaminations in composites. ď‚· The electric current perturbation method (ECP) is suitable for nondestructive examination of surface and subsurface defects in electrically conducting non- ferromagnetic materials. ď‚· When an electric current, either ac or dc, passes through a component, a magnetic flux is generated. Where there is a flaw, the current flow is disturbed and the magnetic flux density is changed. ď‚· With a magnetic field sensor, this change in flux density is detected. By scanning the entire surface, the position of the flaws such as notches and cracks is determined. The
  • 8.
    8 technique has beenadopted to detect surface flaws in aircraft engine components. ď‚· Acoustic Microscopy. High-frequency ultrasound in the GHz range is passed through the component of interest. The transmitted wave is detected by a rapidly scanning laser beam on the opposite surface. ď‚· Transmission of these waves is interrupted by flaws present in the material. ď‚· The attenuation of the ultrasound differs between homogeneous regions and regions with flaws. ď‚· The resulting image has characteristic light and dark features. ď‚· Variations of this technique include reflection type imaging by scanning a transducer in a raster pattern over the sample surface. The method has been successfully applied to detect flaws in metals, ceramics, composites and microelectronic components. ď‚· X-ray diffraction is a common method for identifying phases in metallic materials, corrosion products, and surface deposits. ď‚· Several cases of component failures due to locked-in residual stresses have been encountered in service. ď‚· Residual stresses can readily be determined by x-ray diffraction method. ď‚· Textures in metals that have a bearing on their mechanical behavior can be determined through pole figure computation through x-ray diffraction.