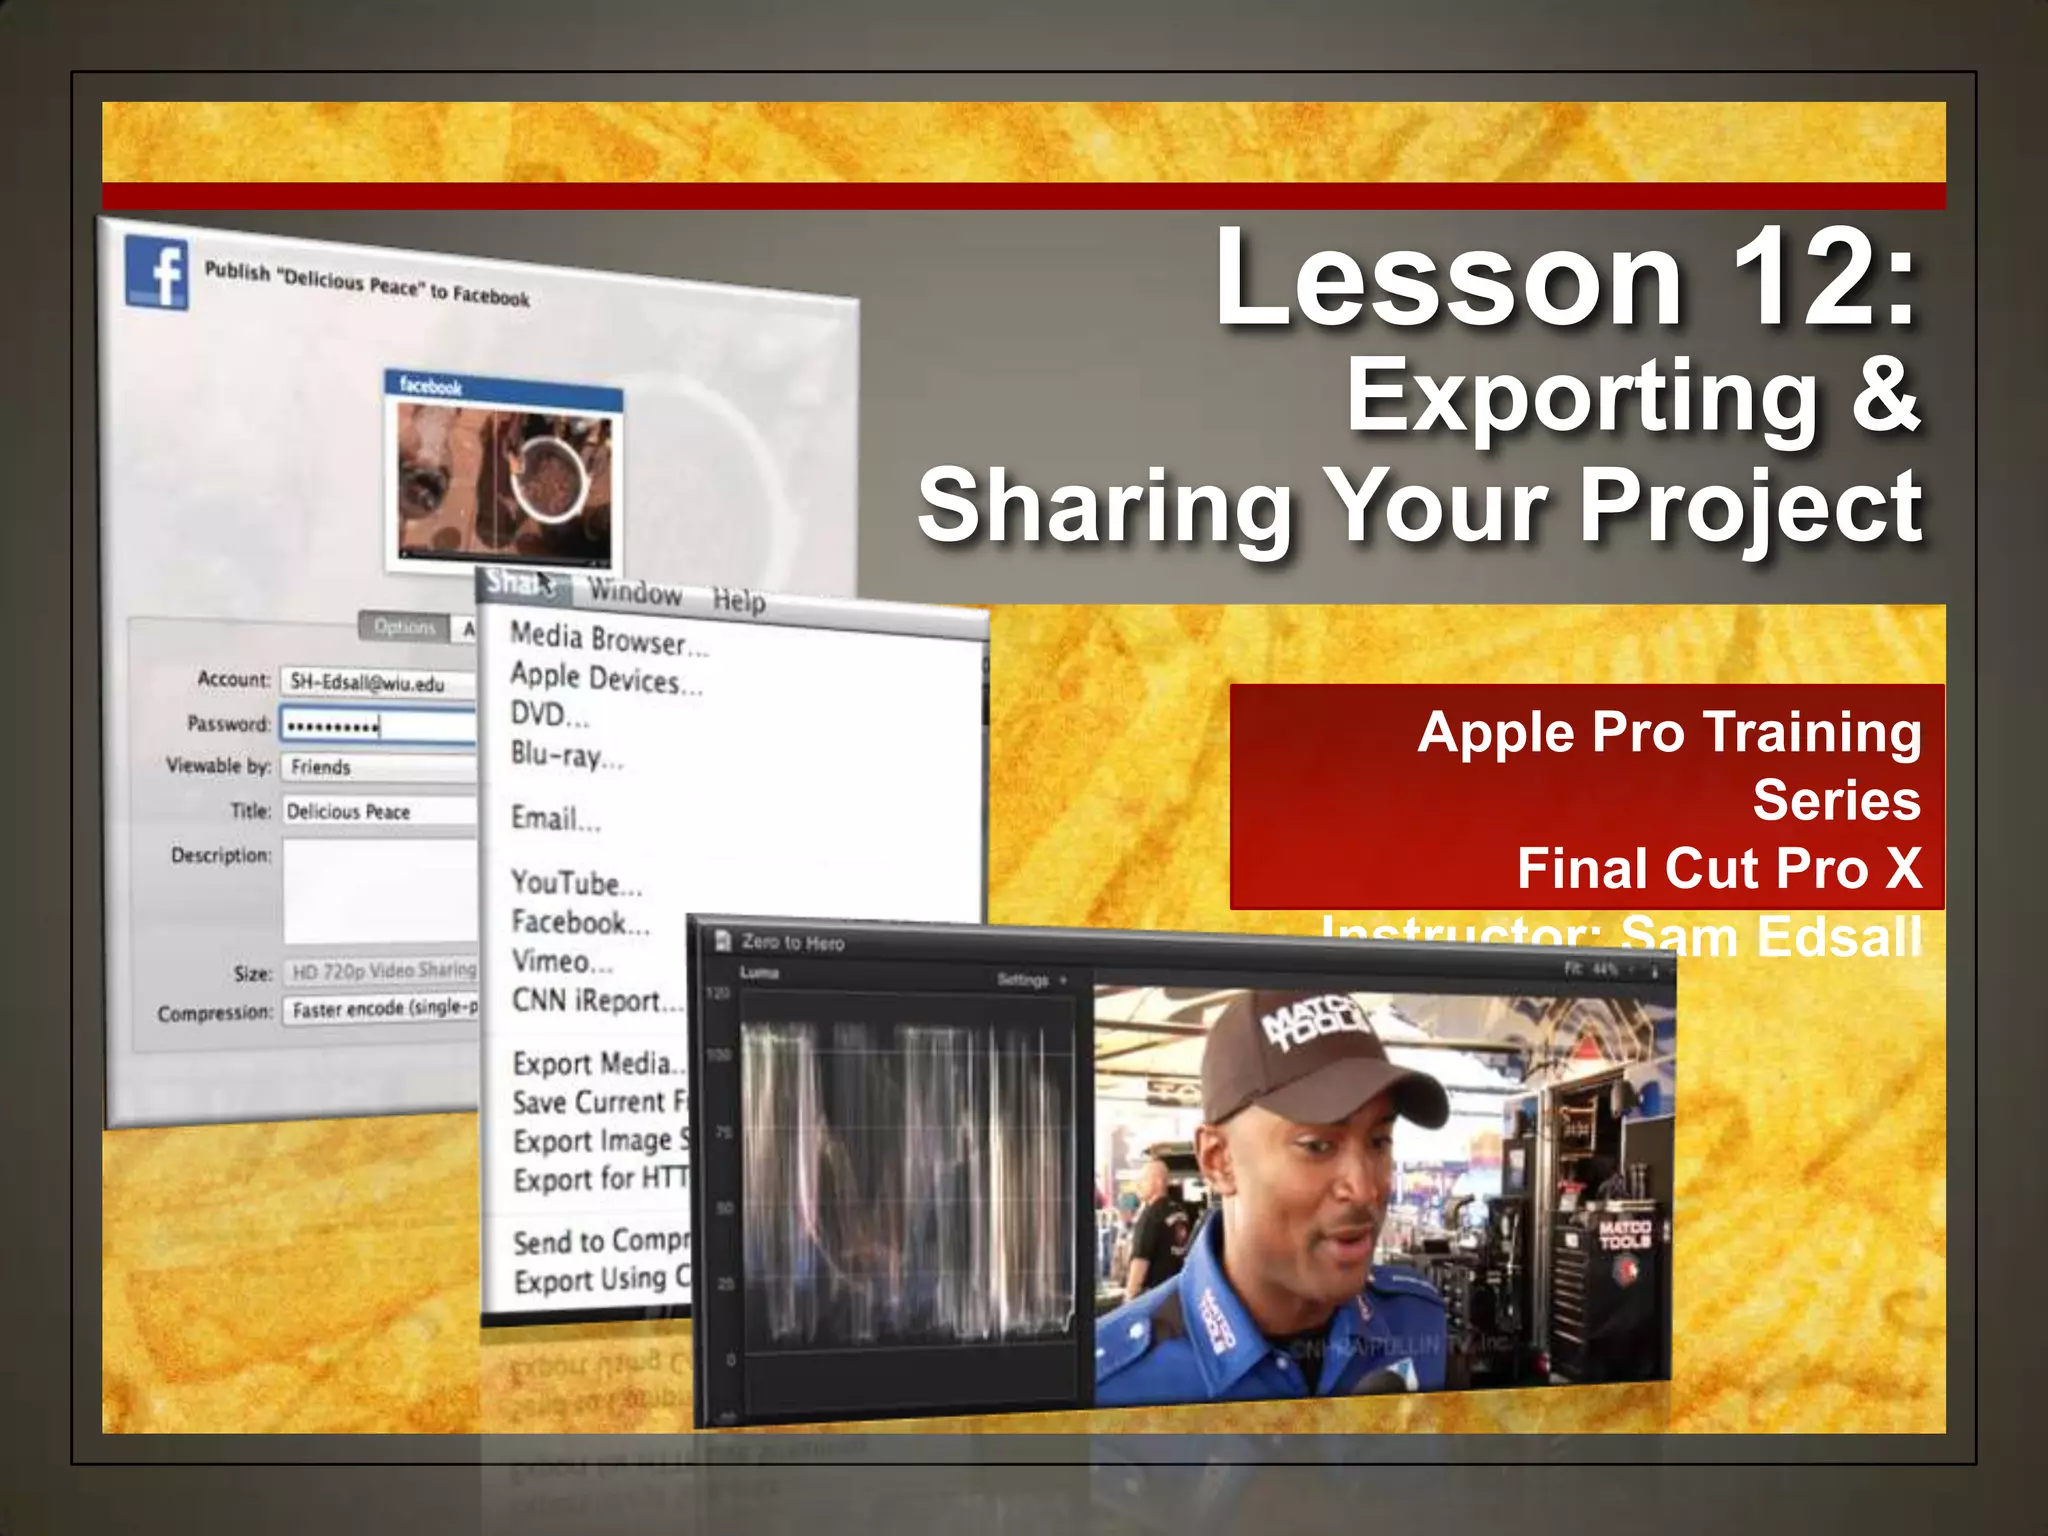
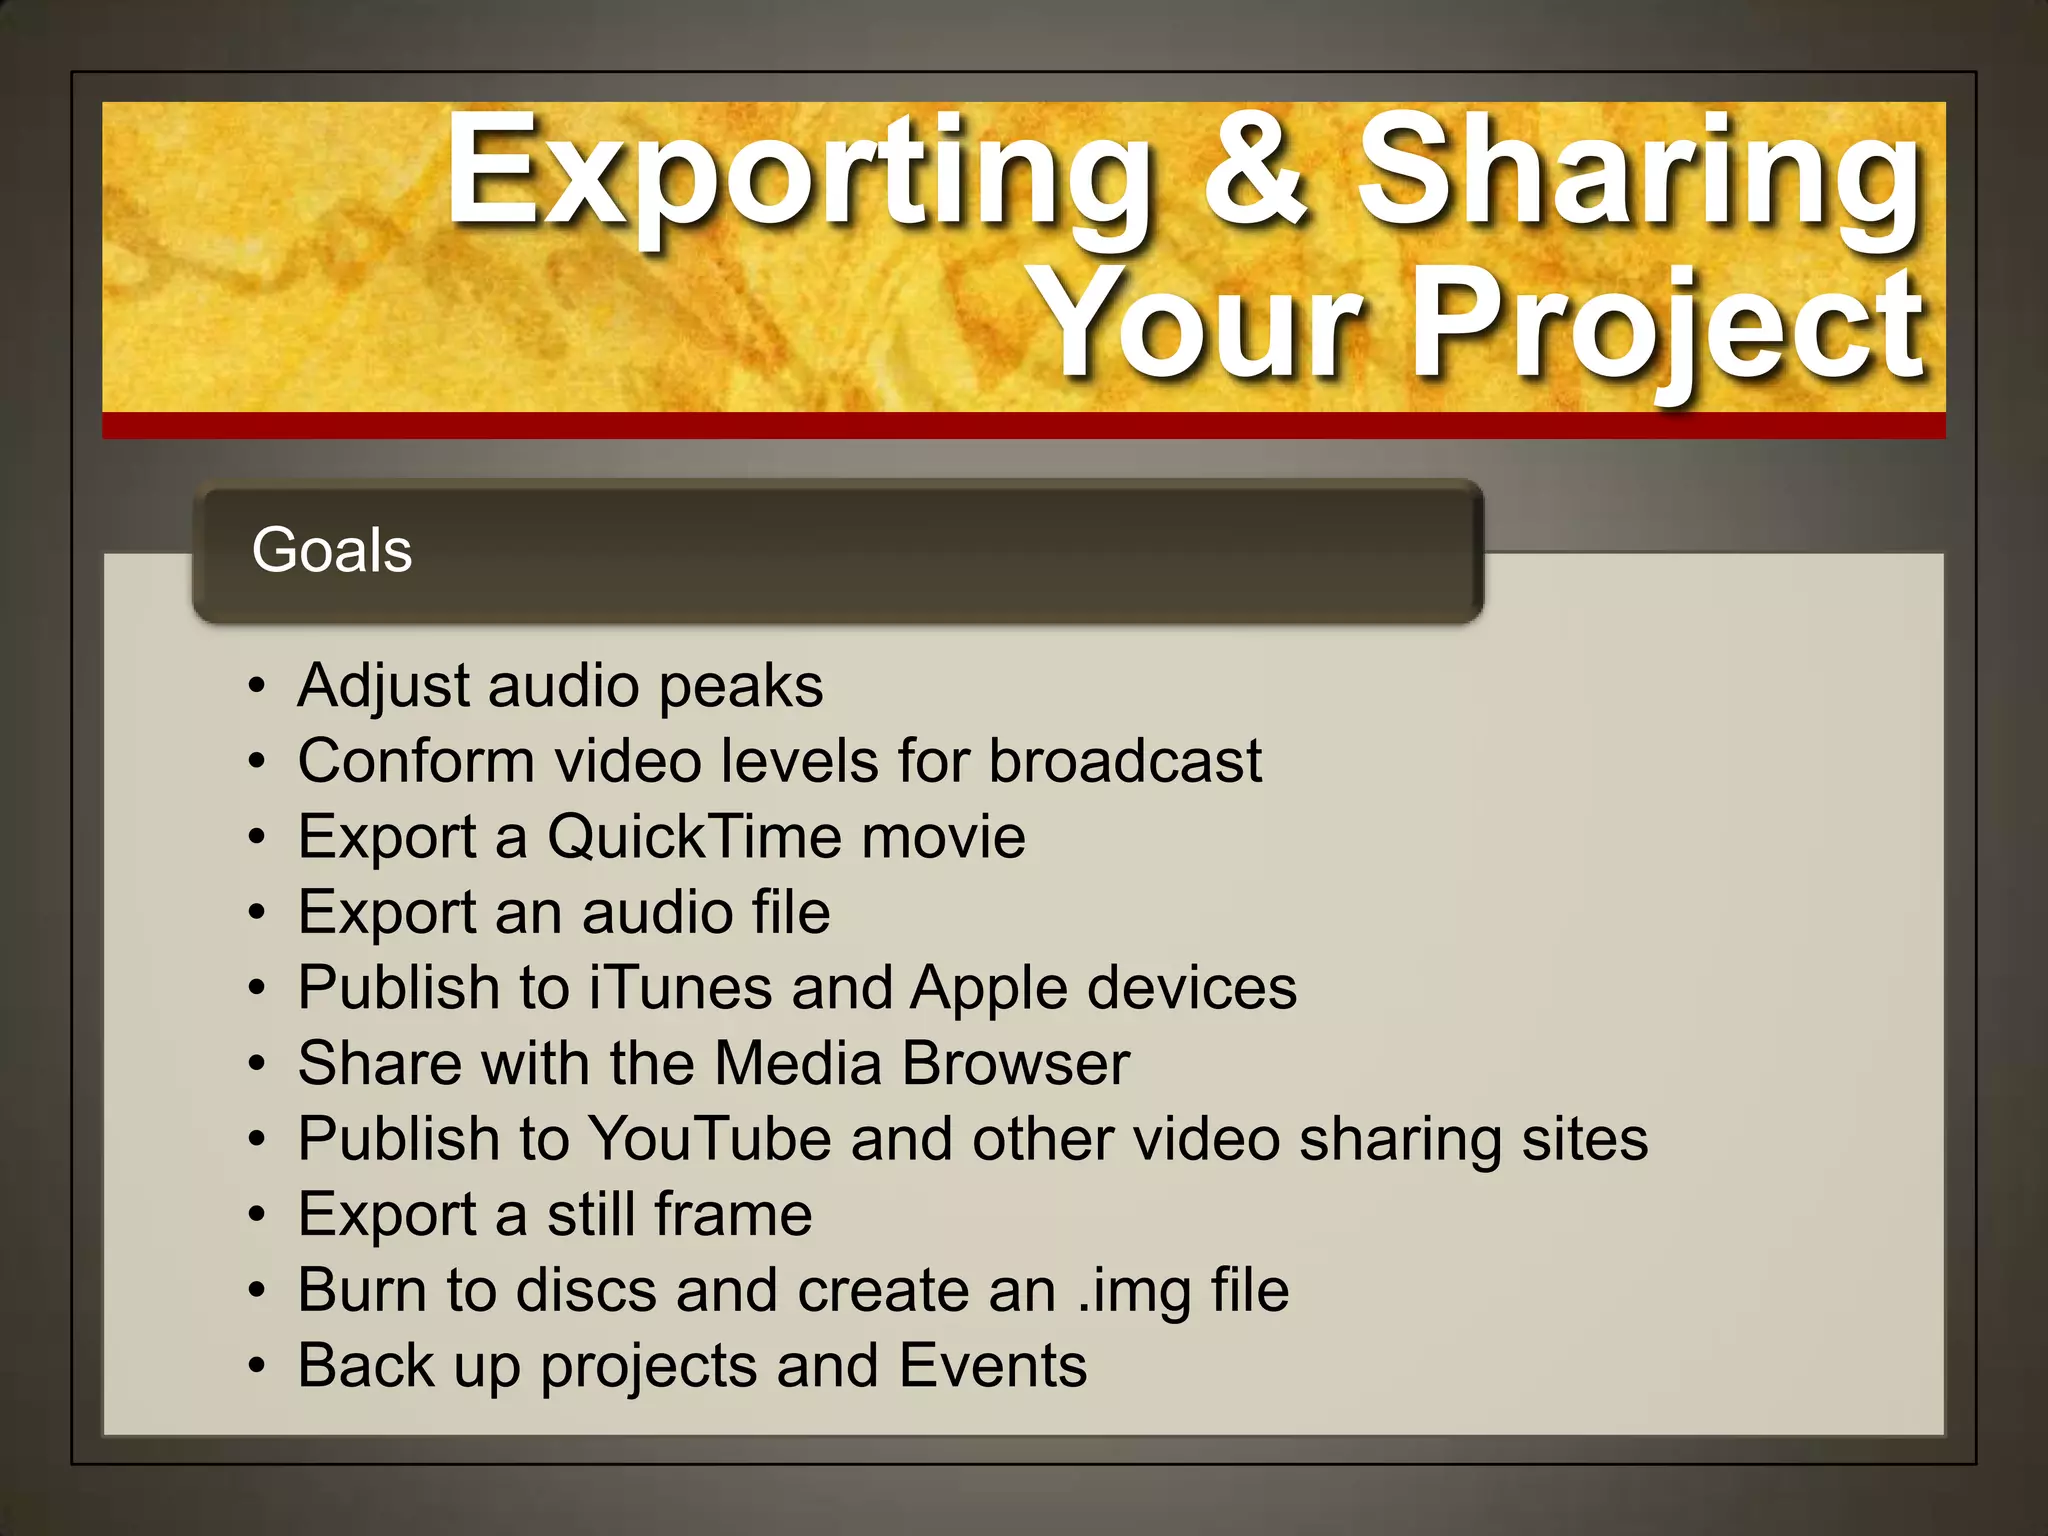
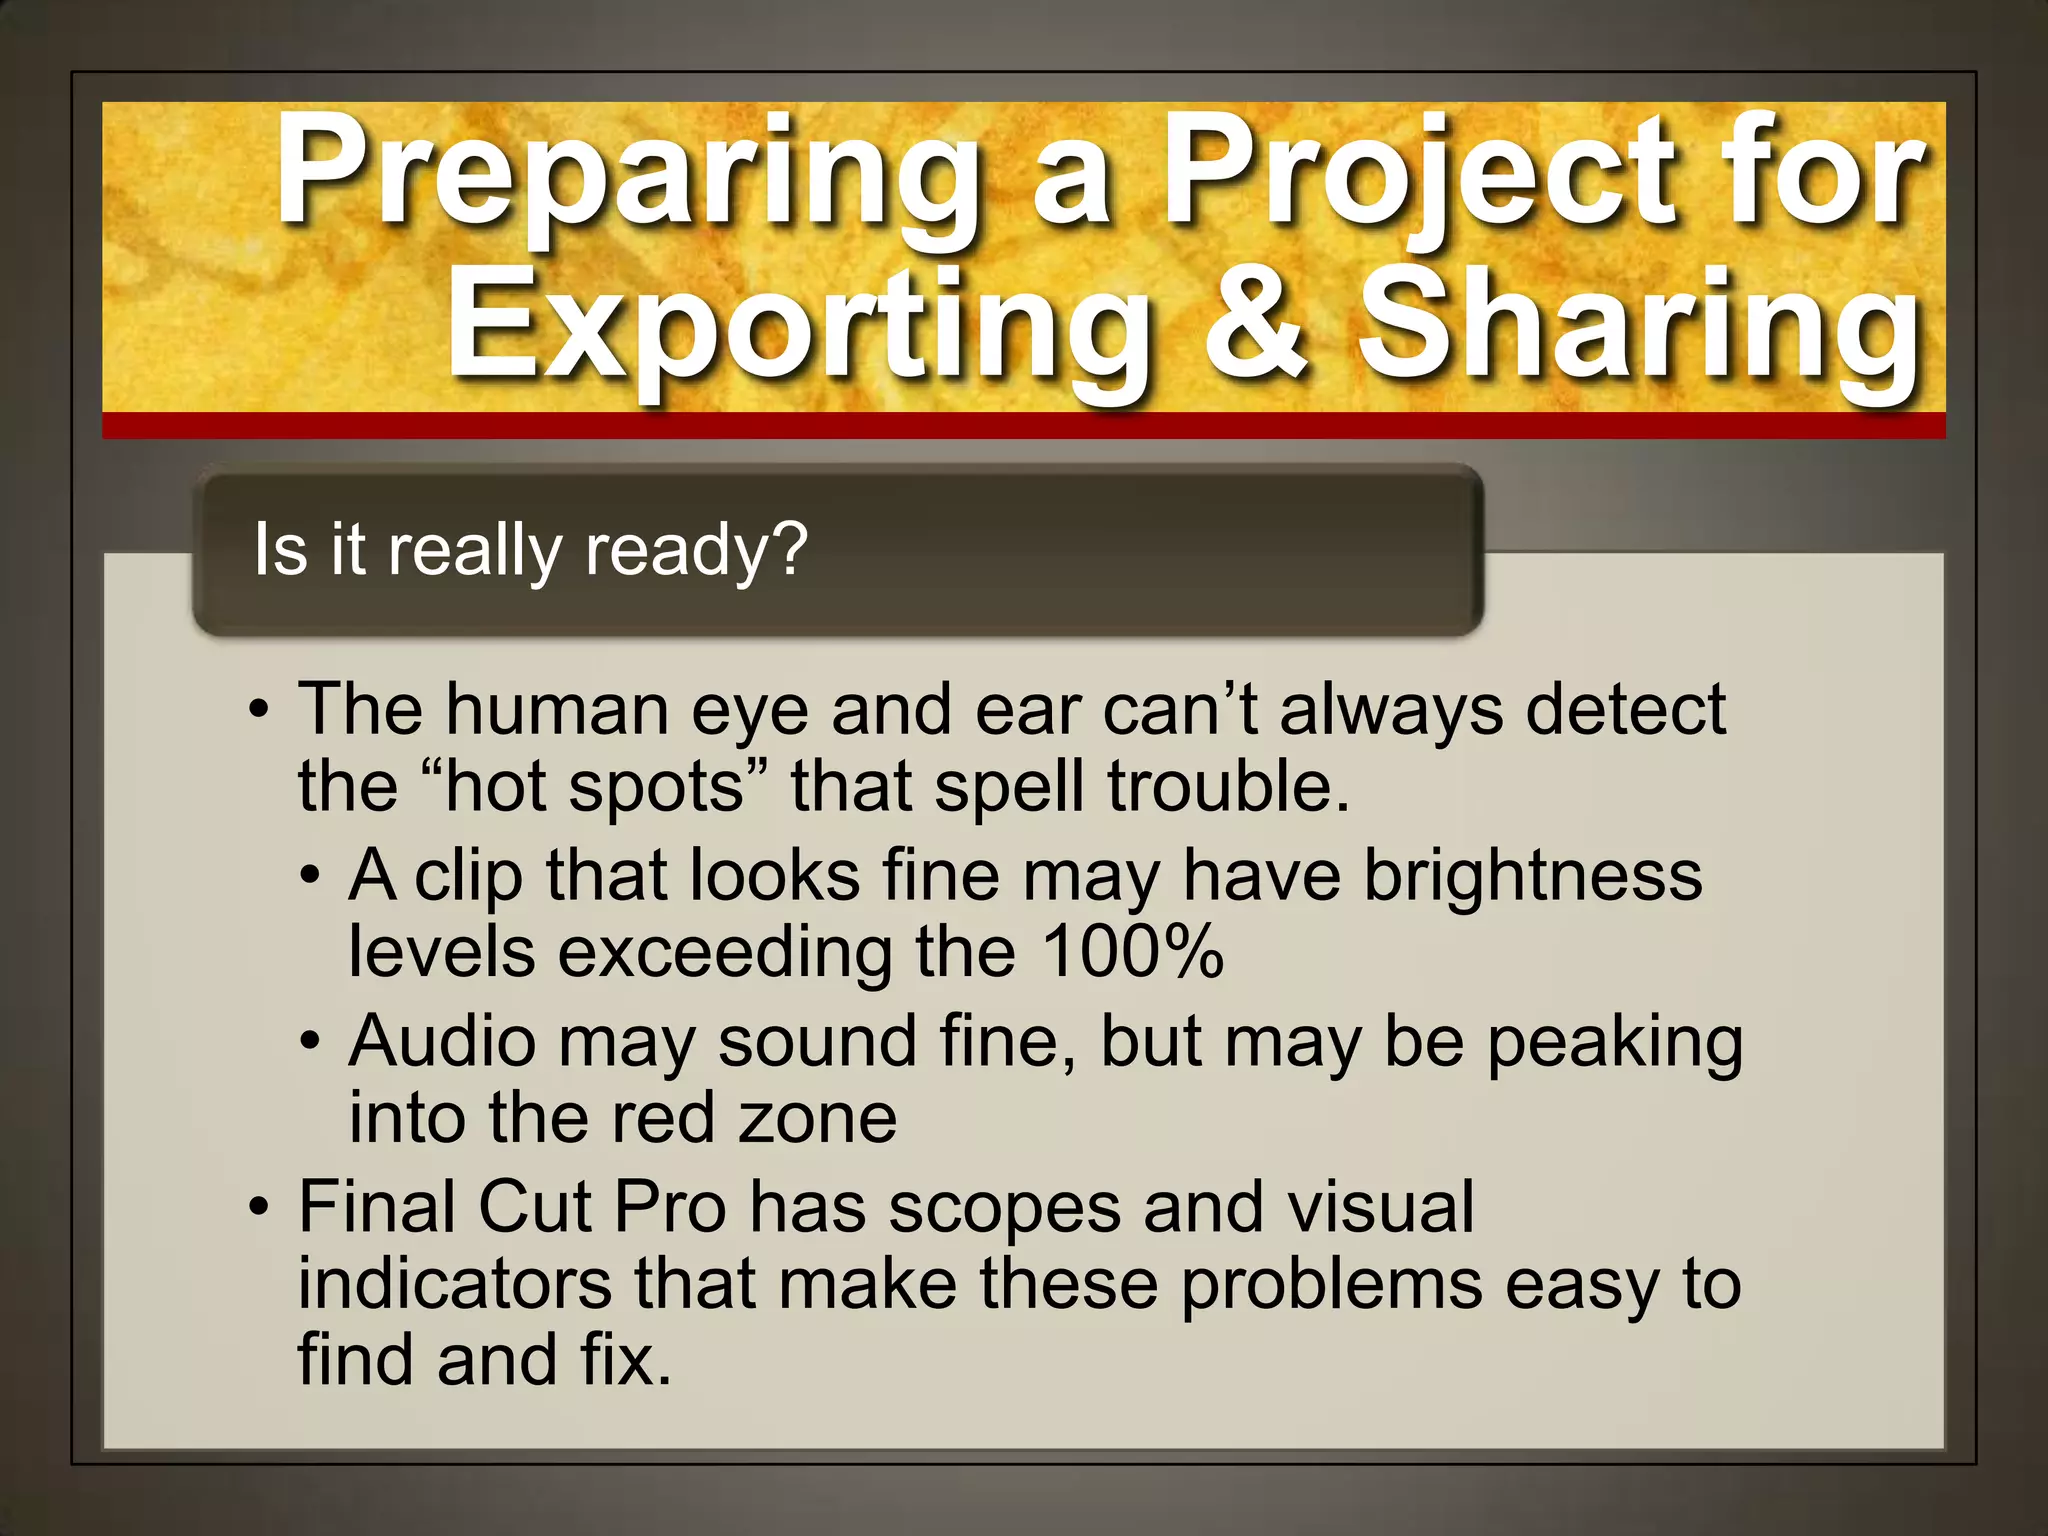
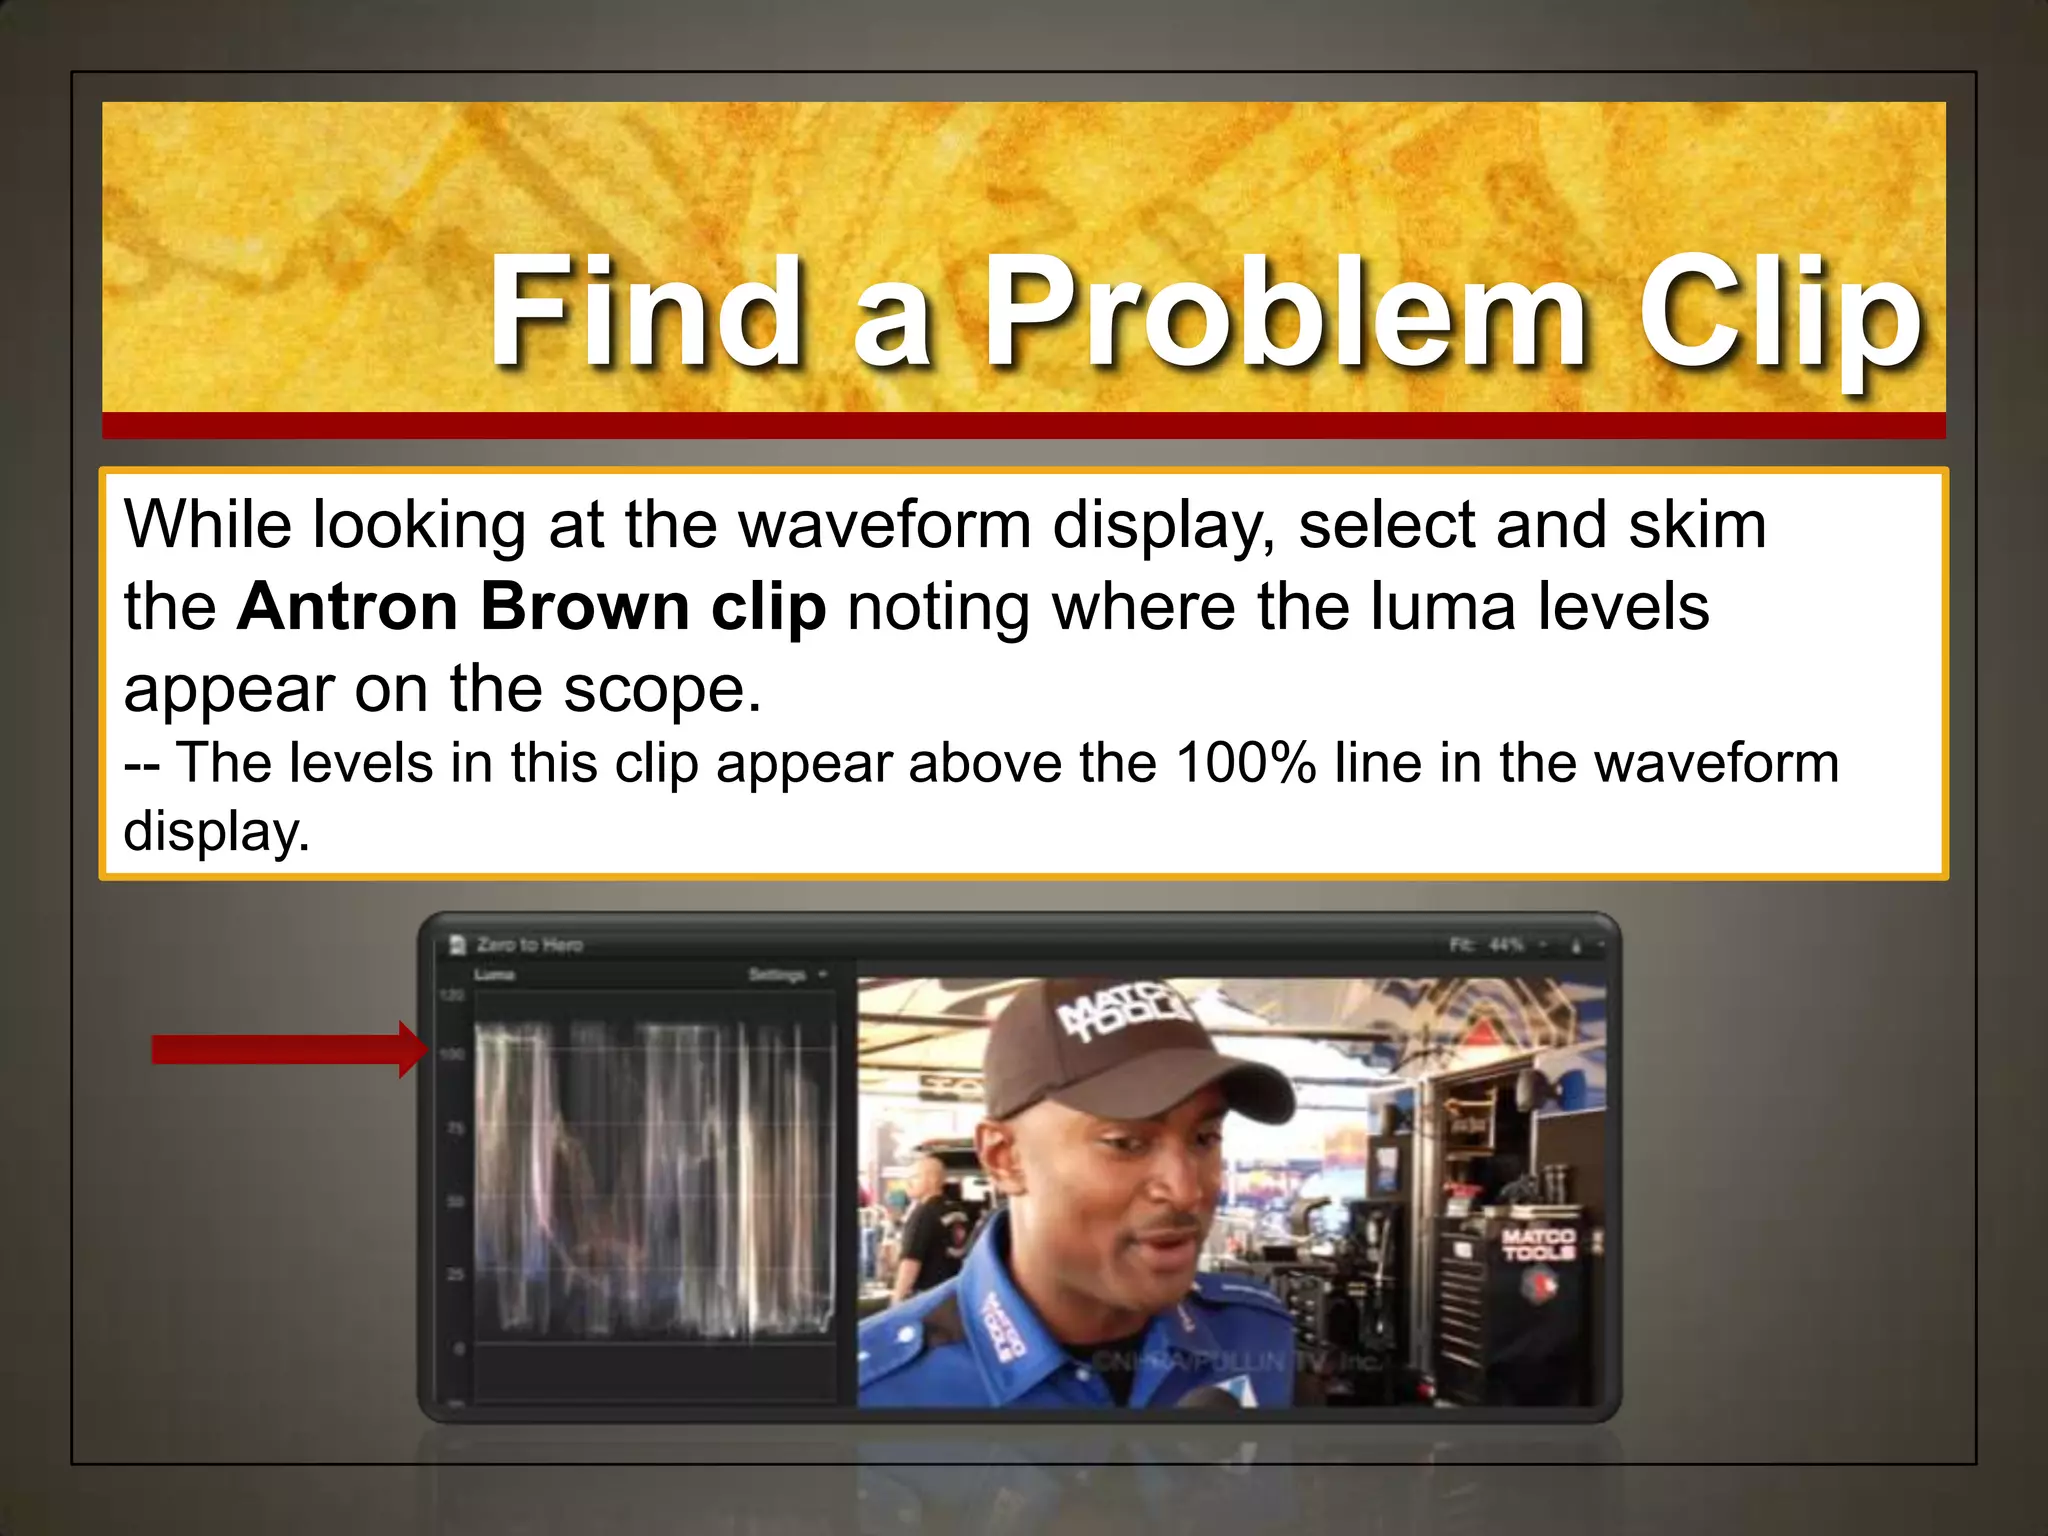
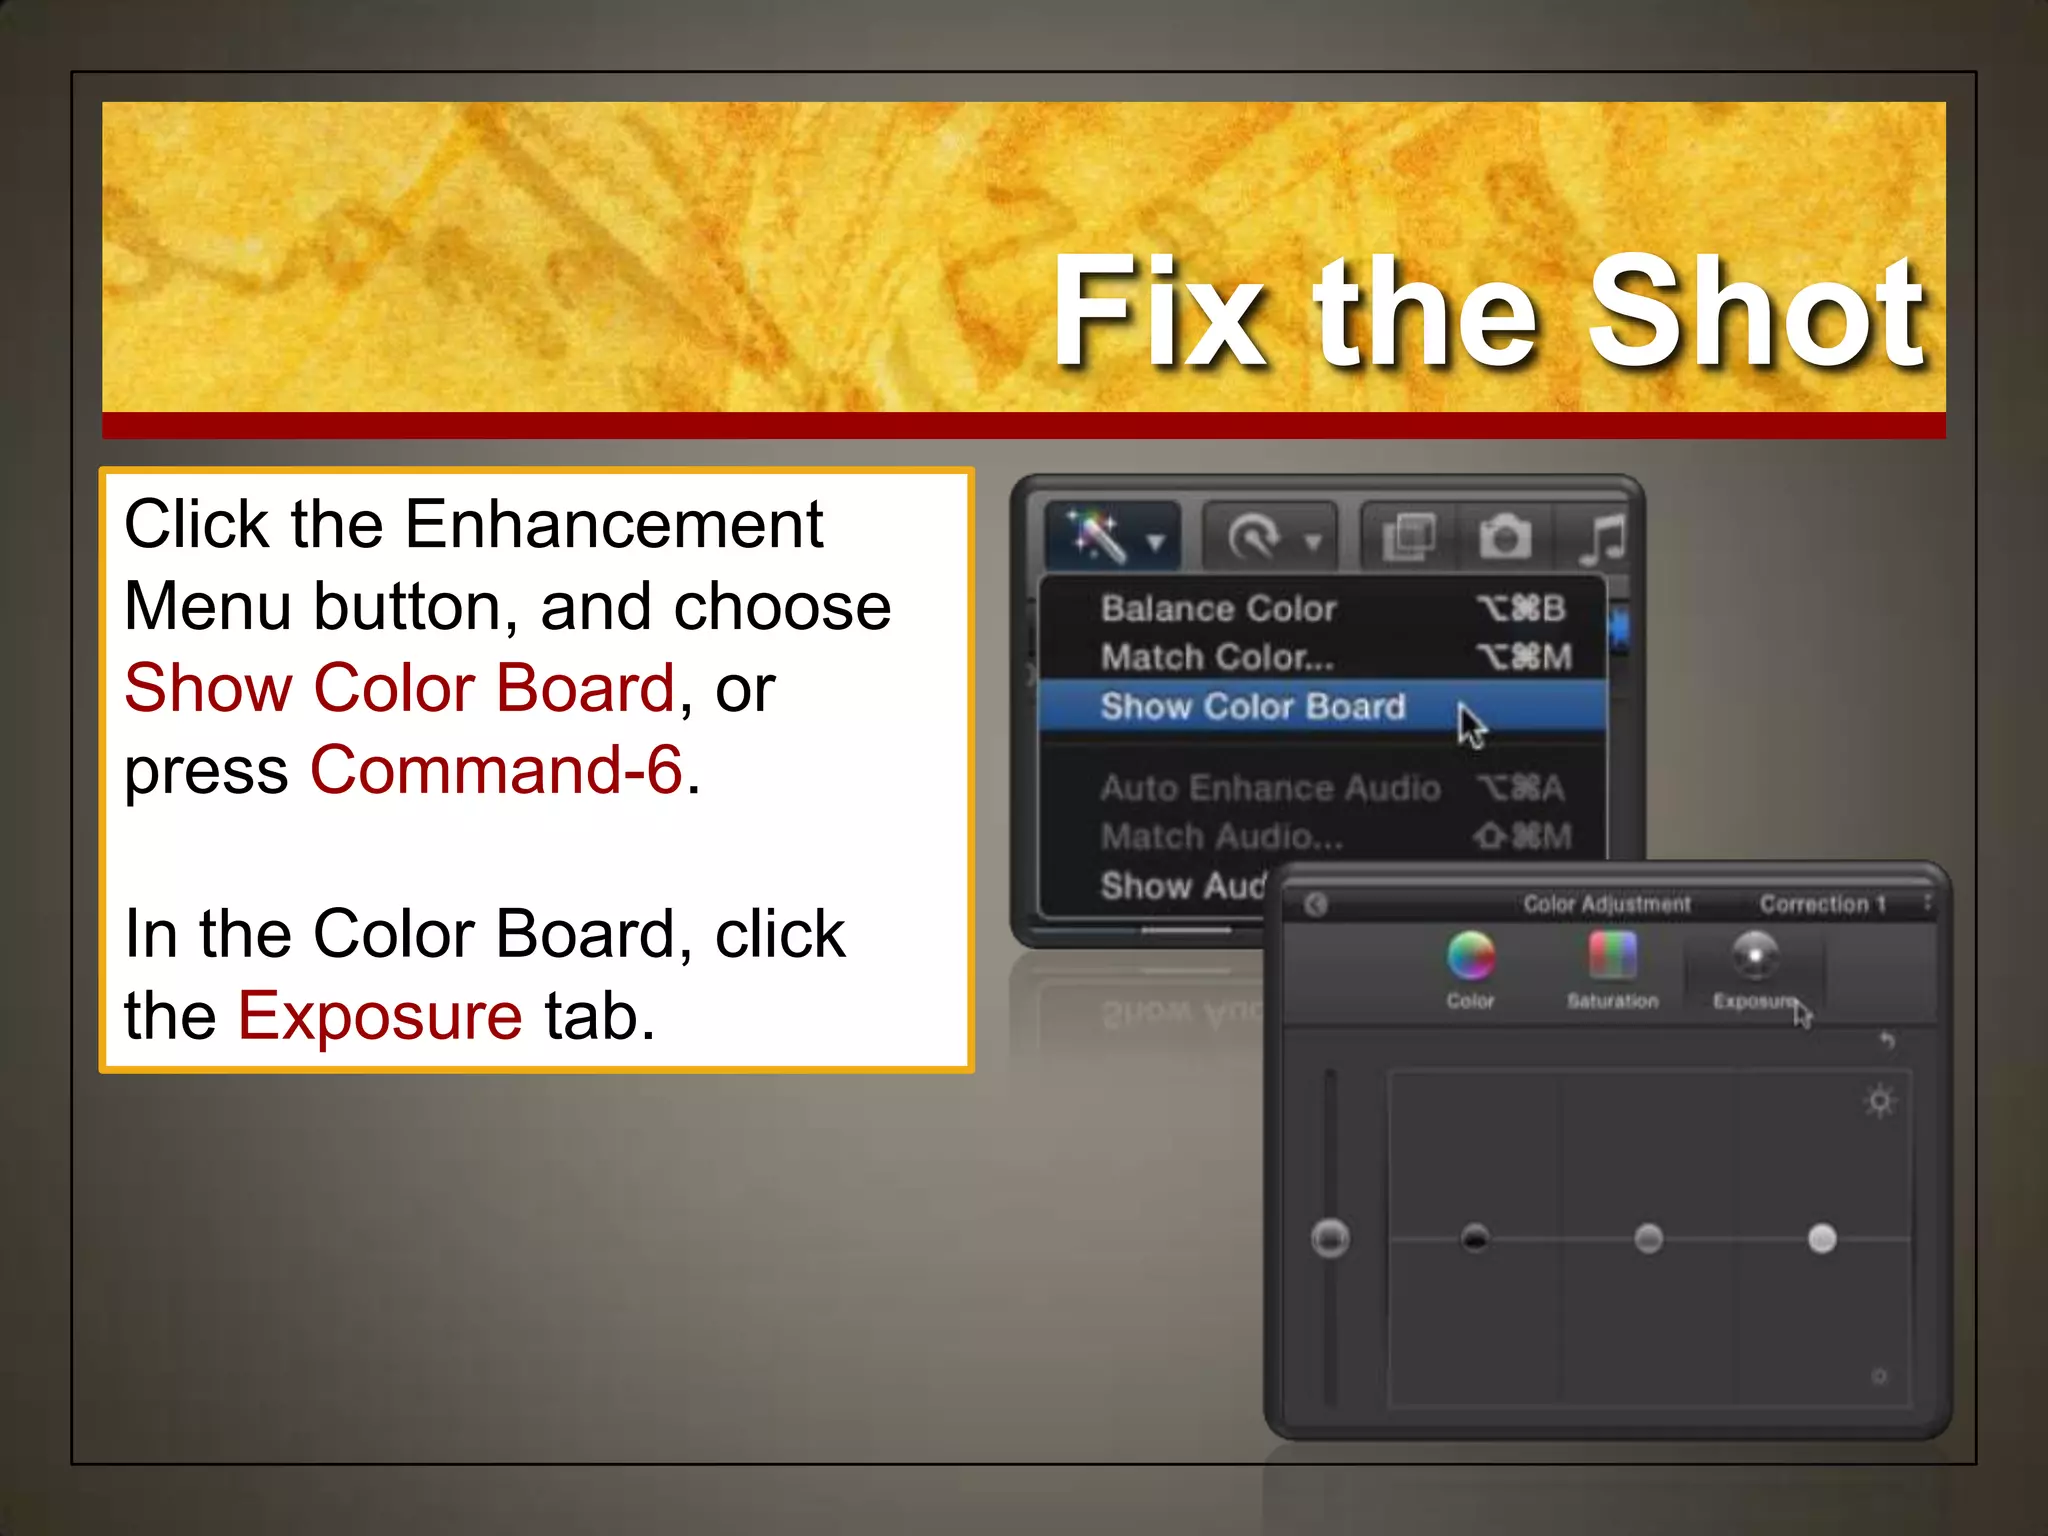
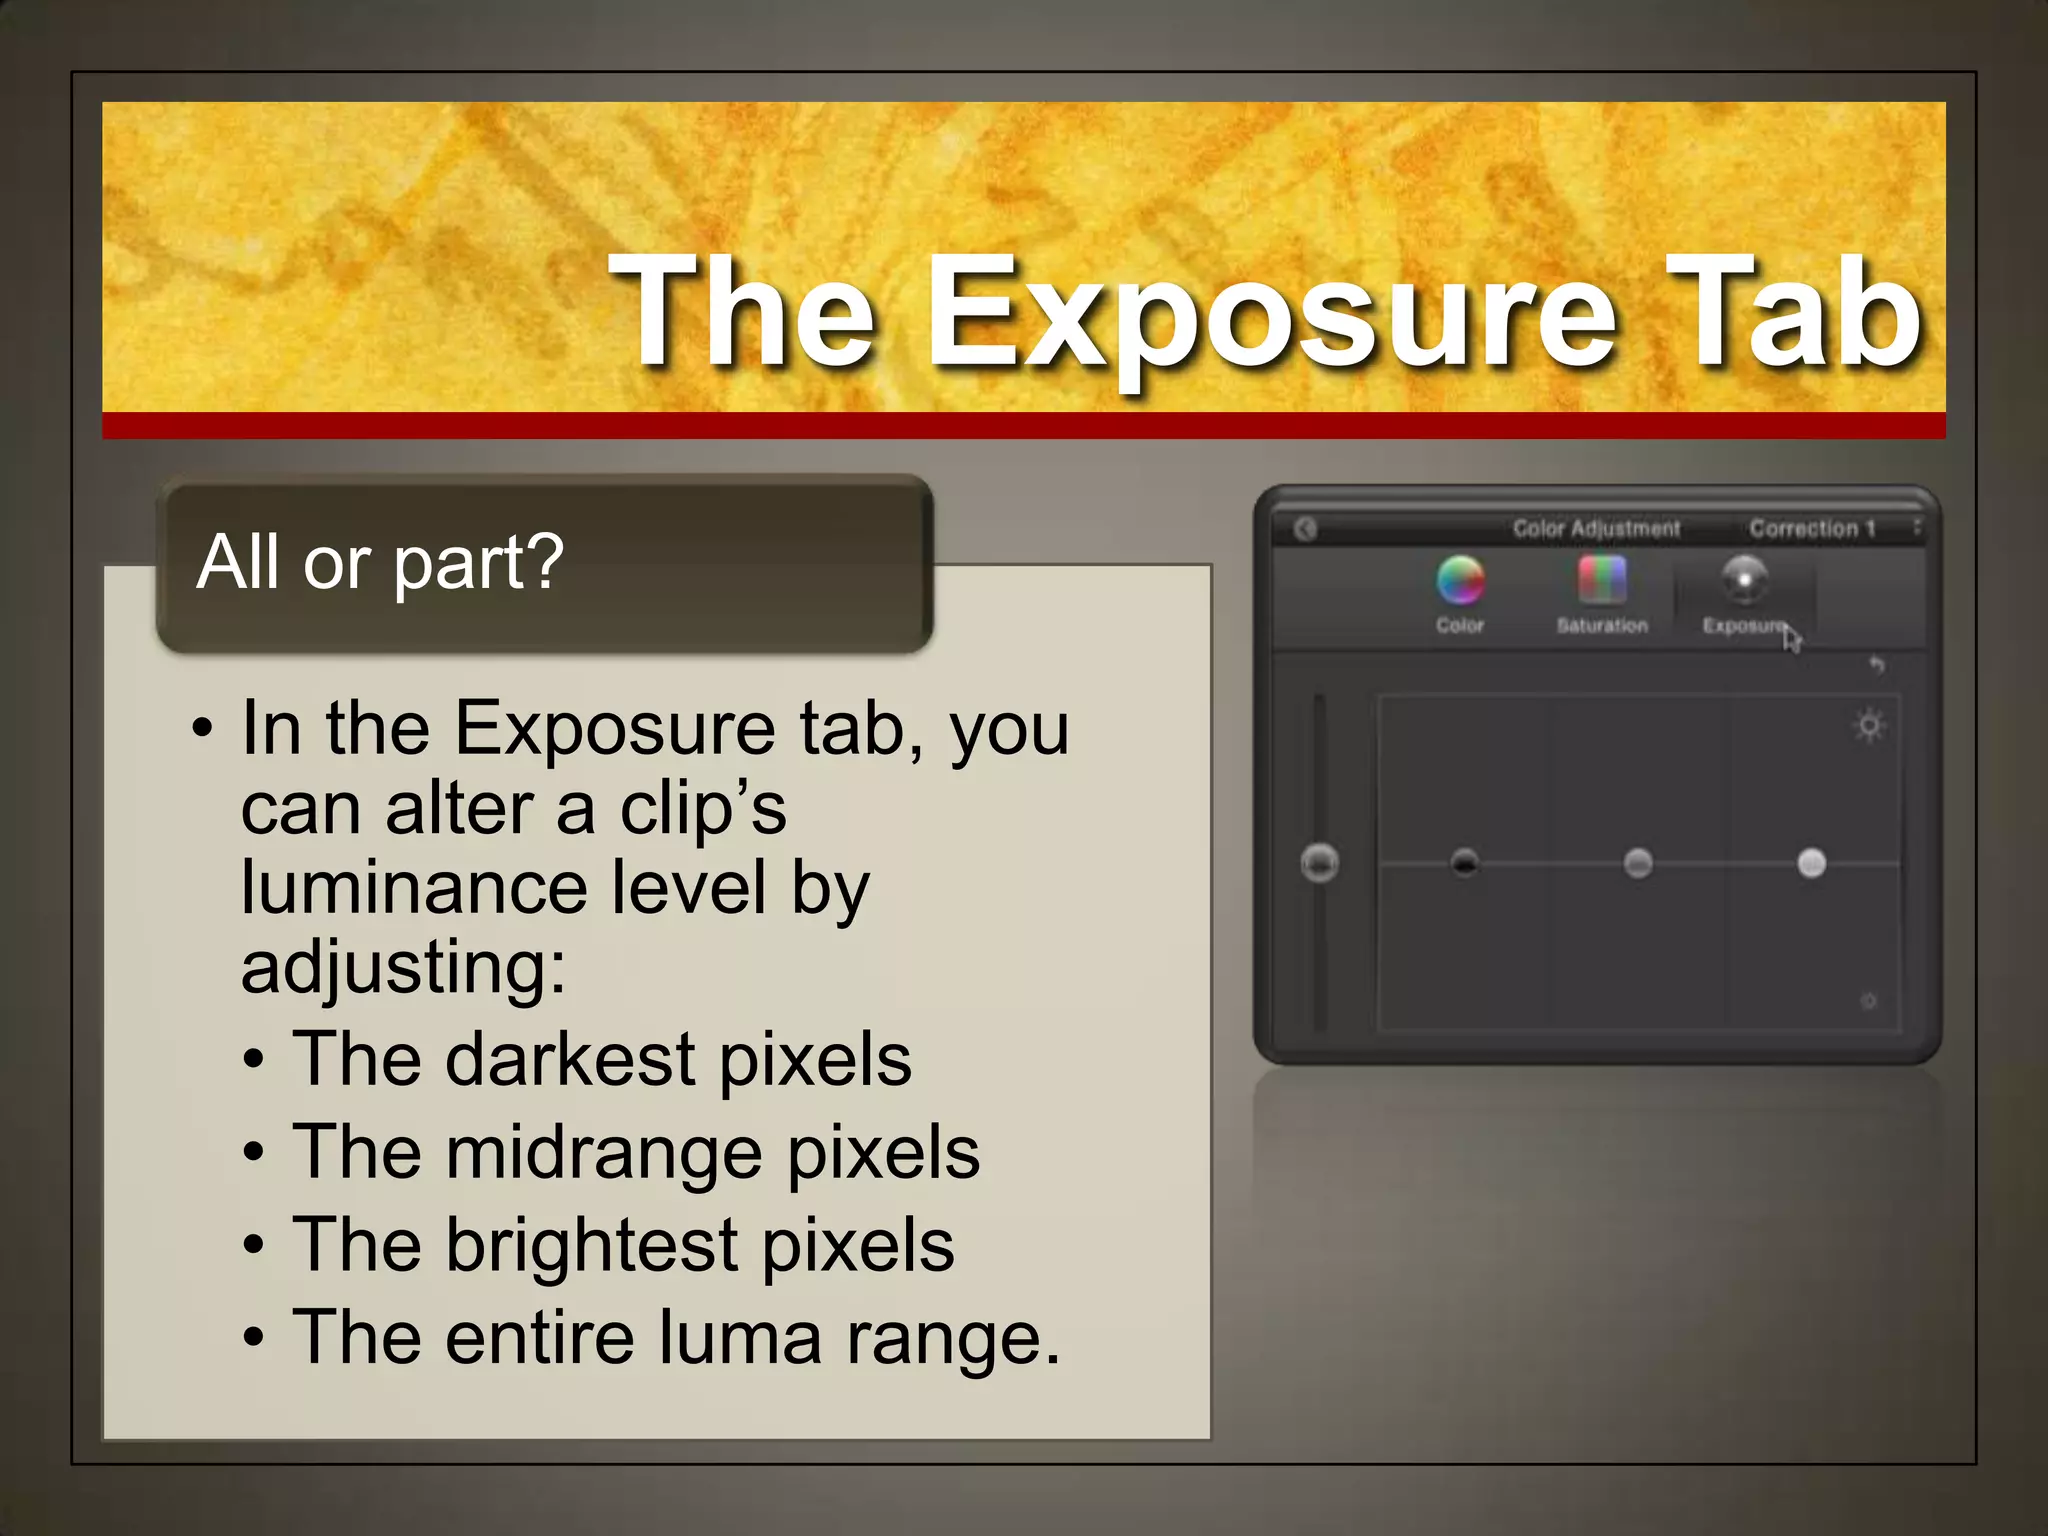
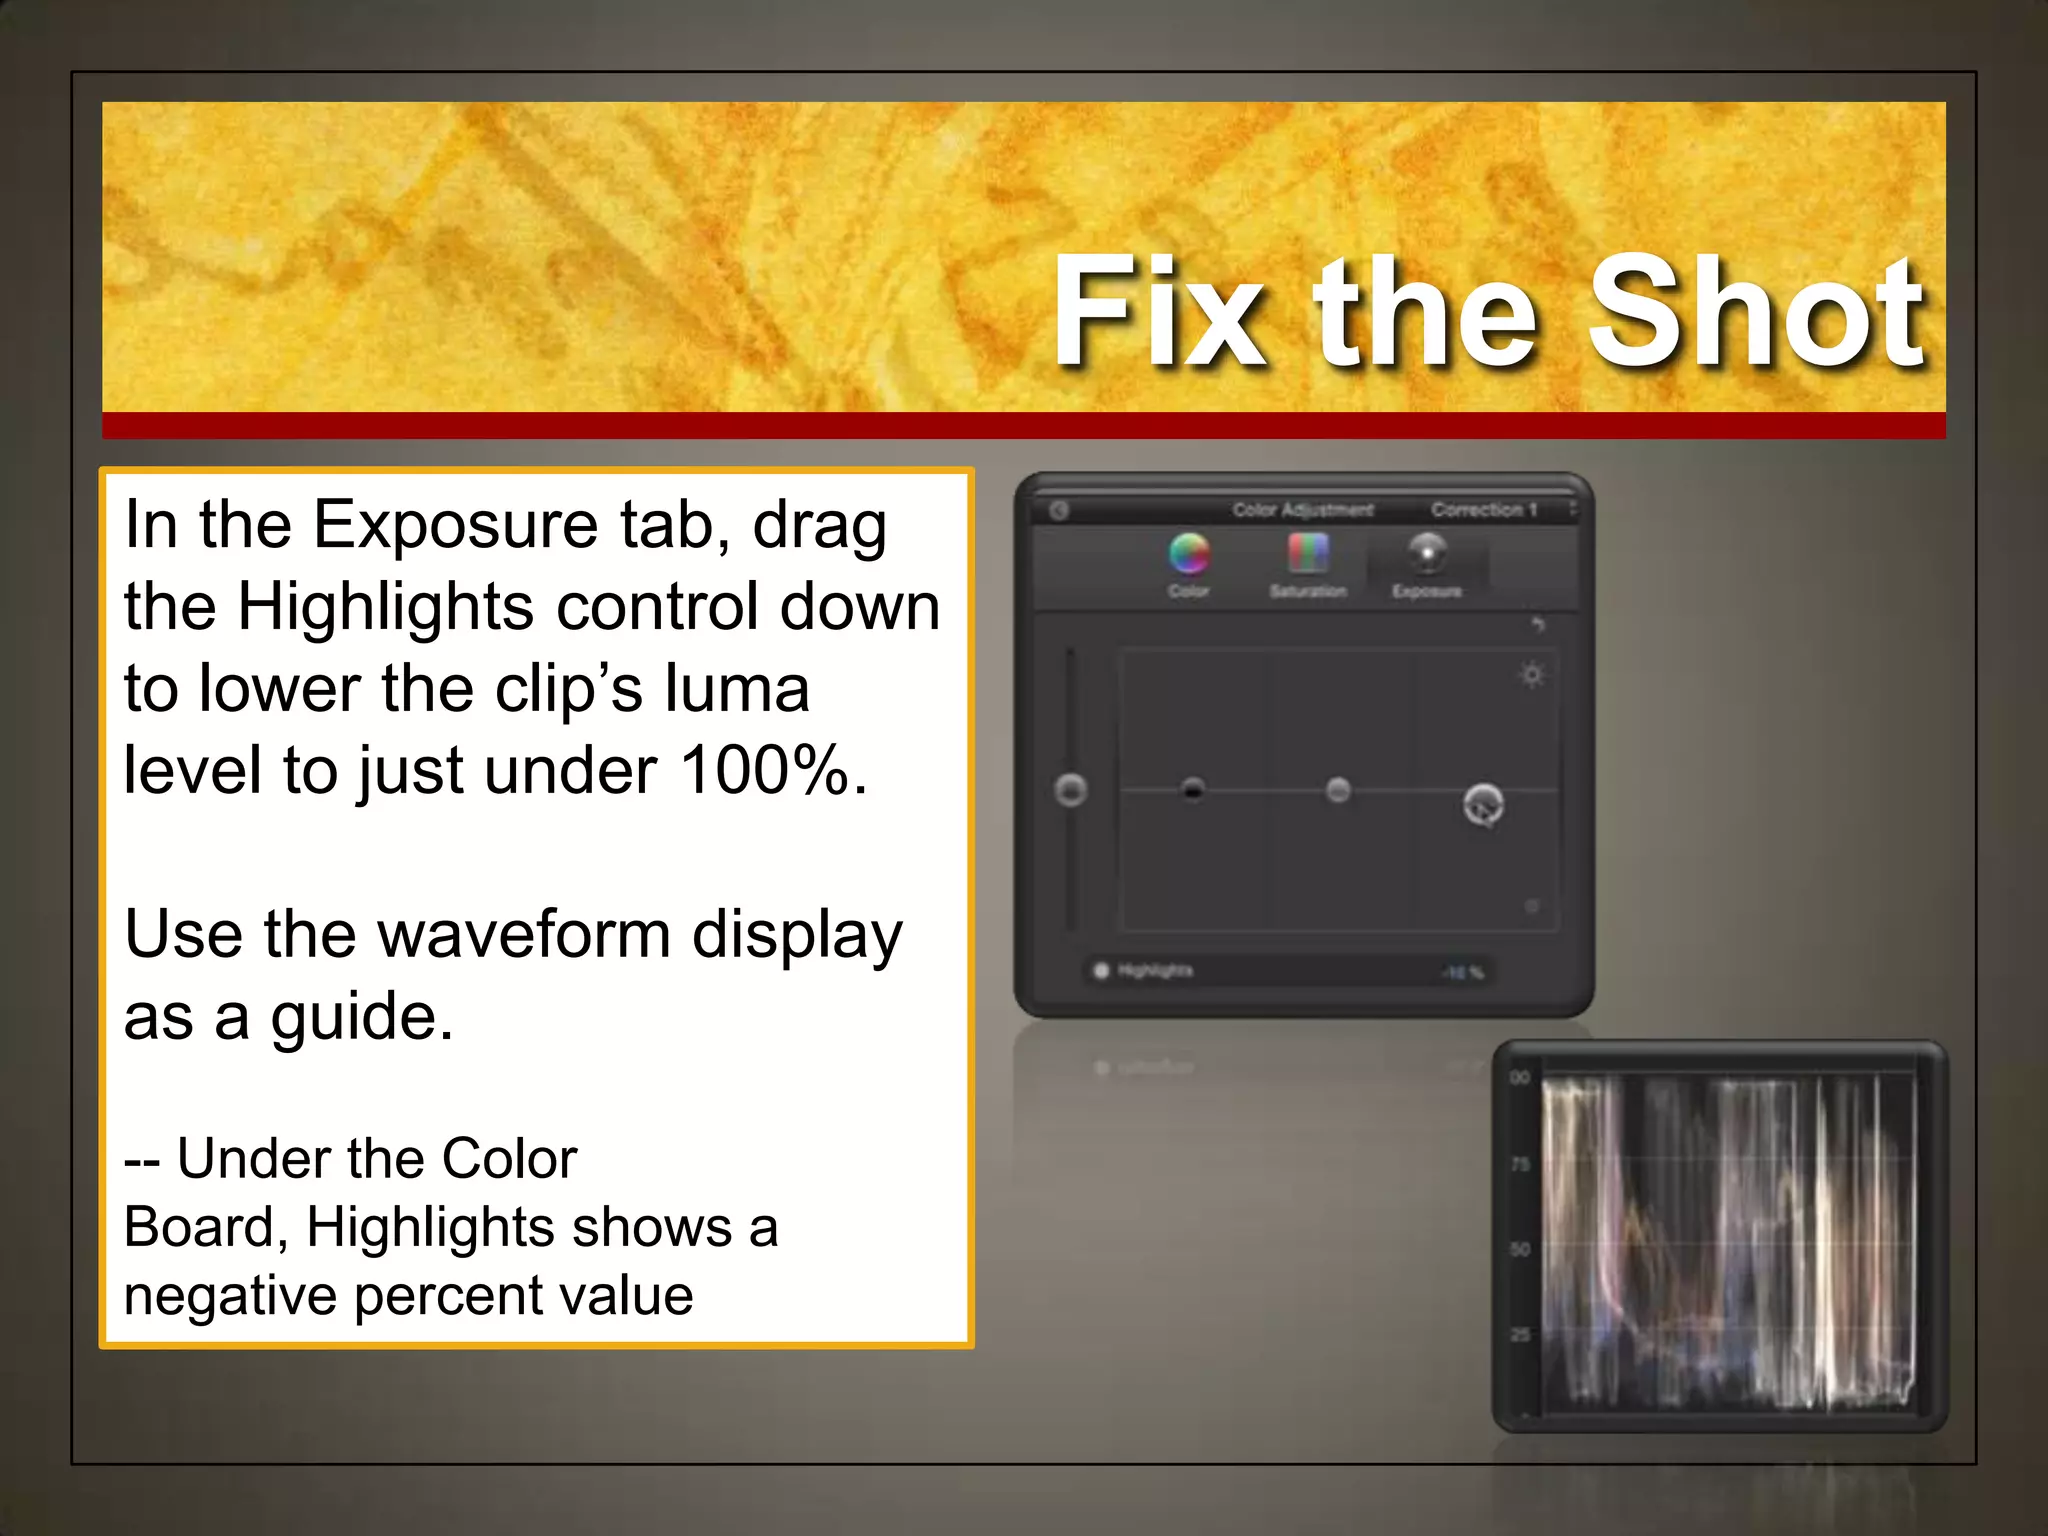
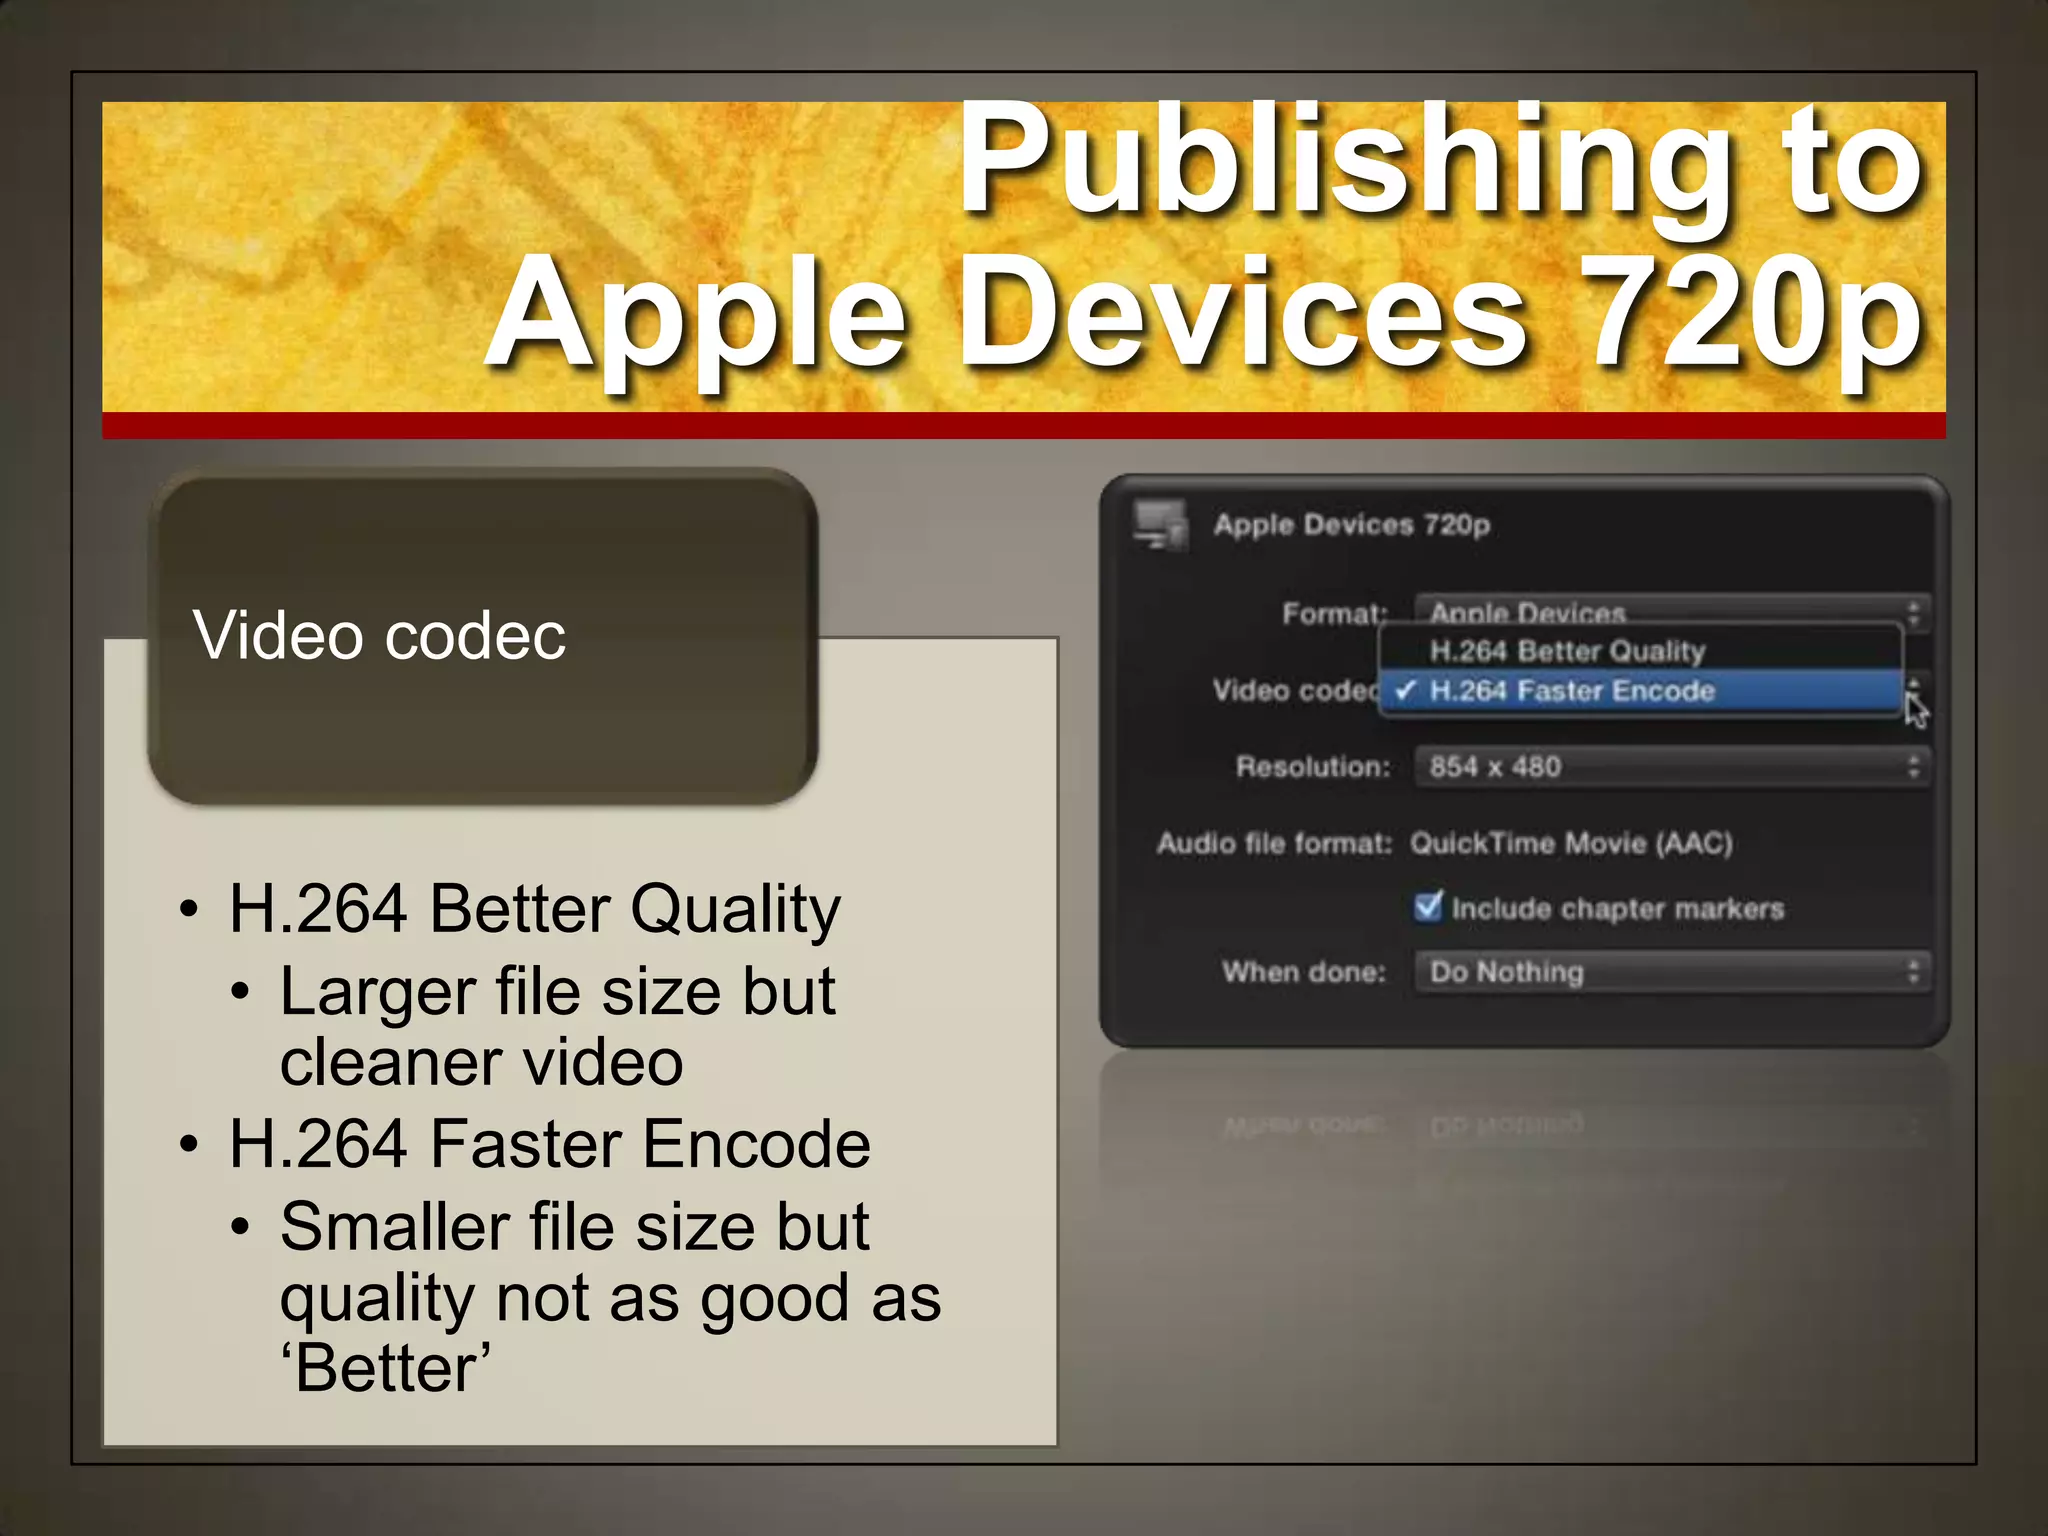
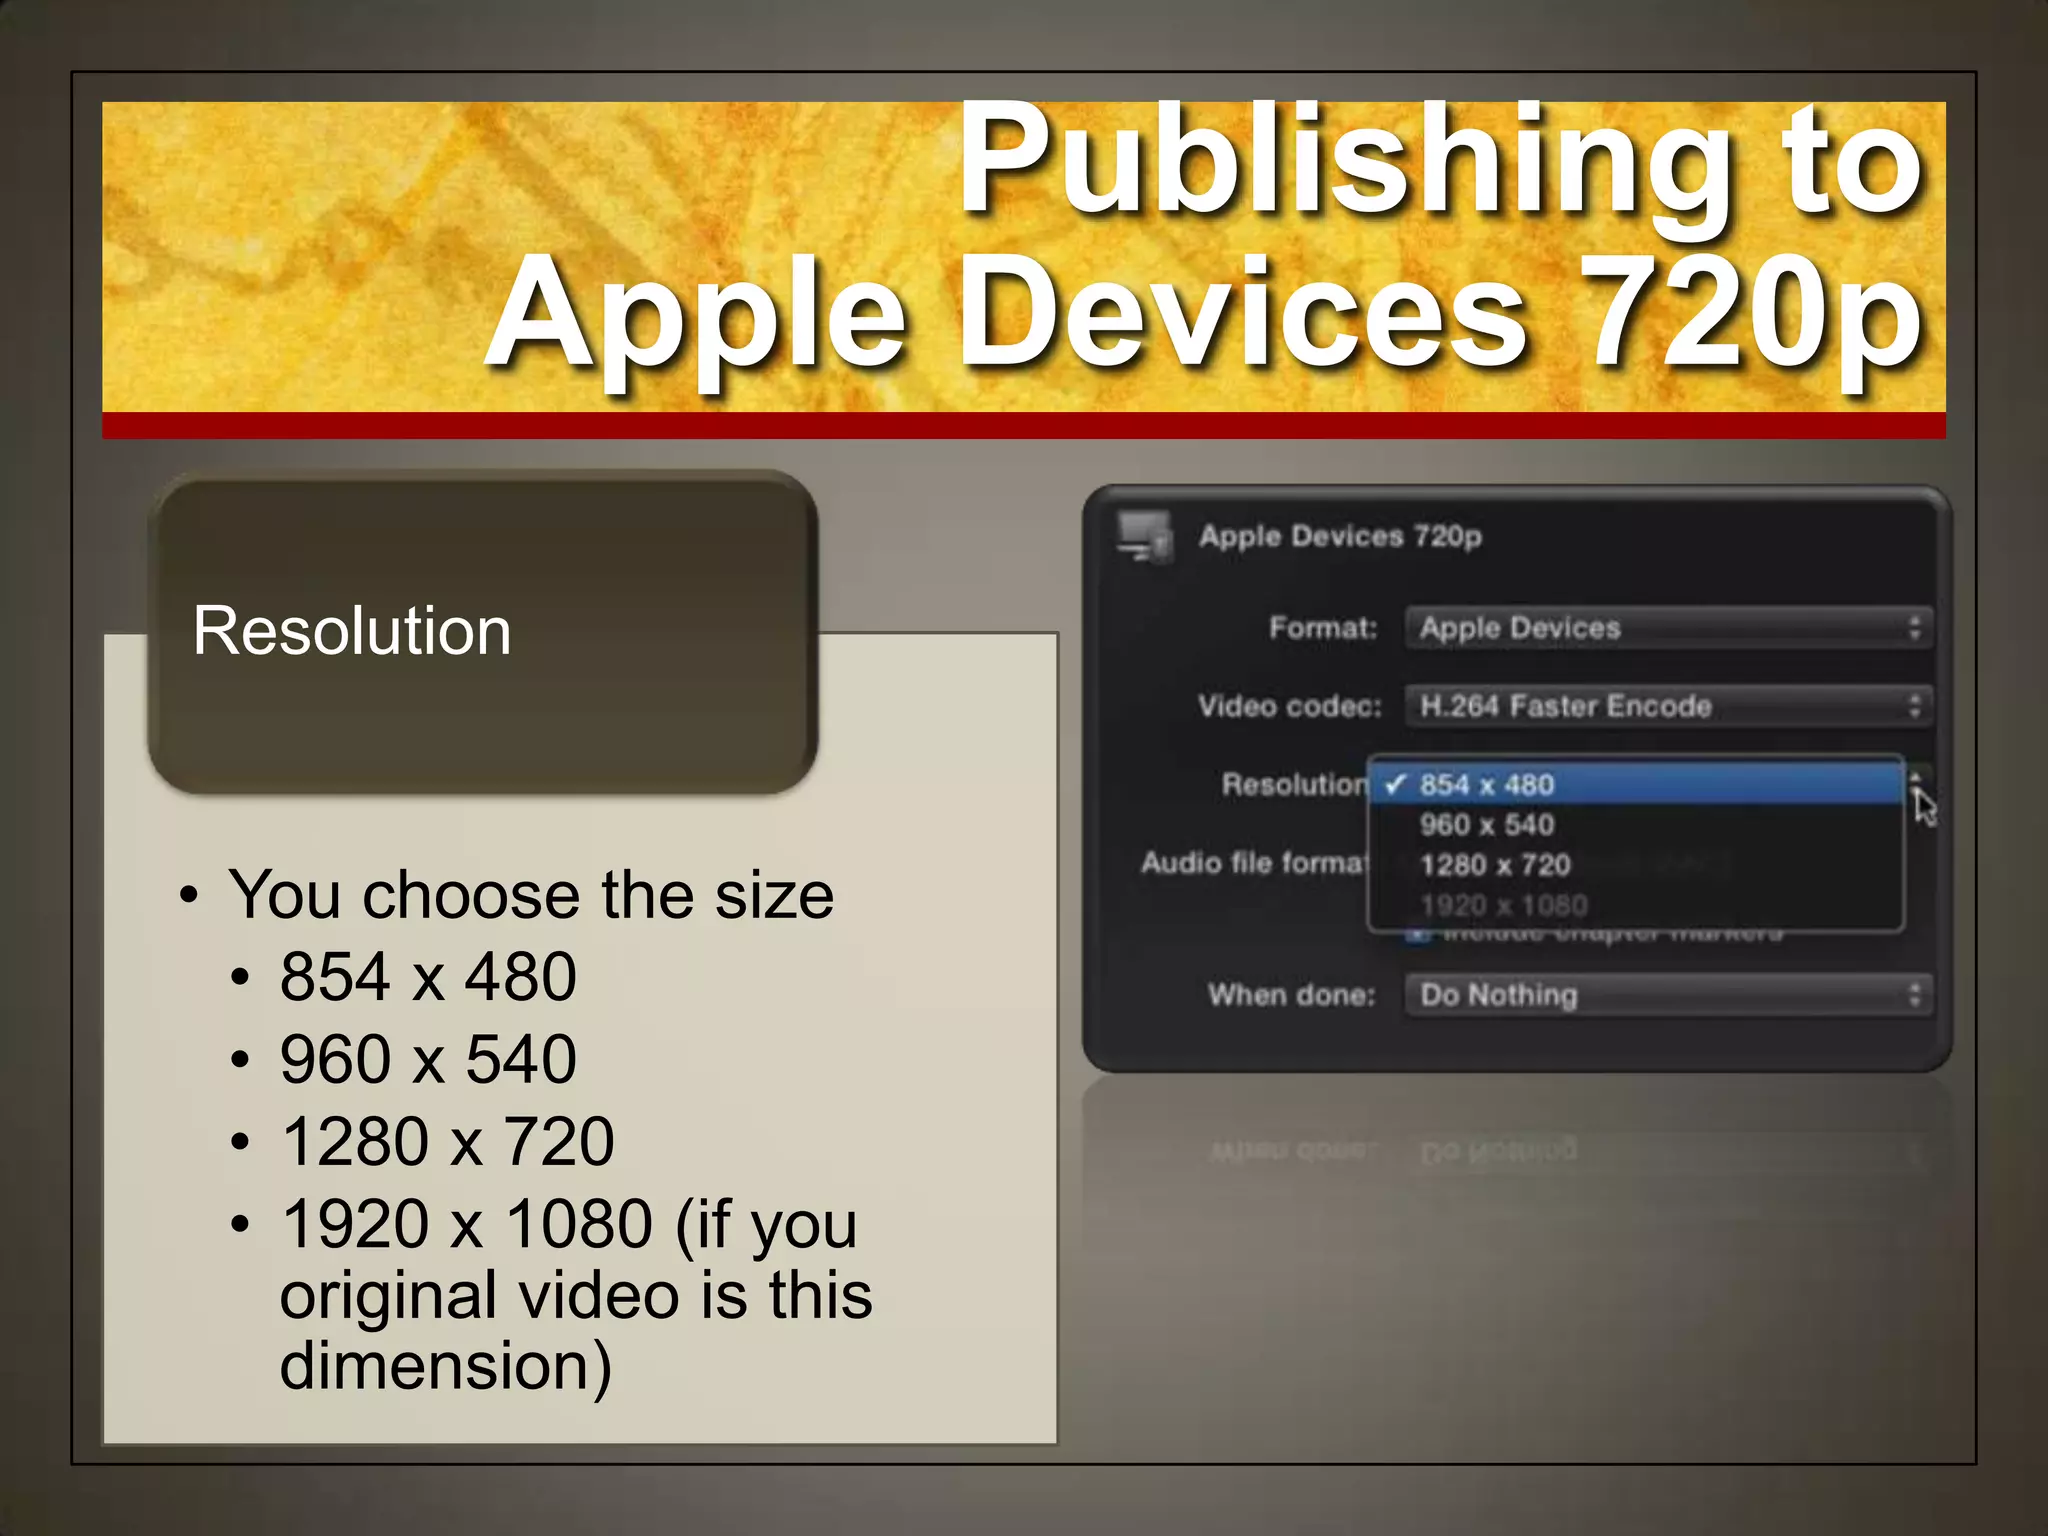
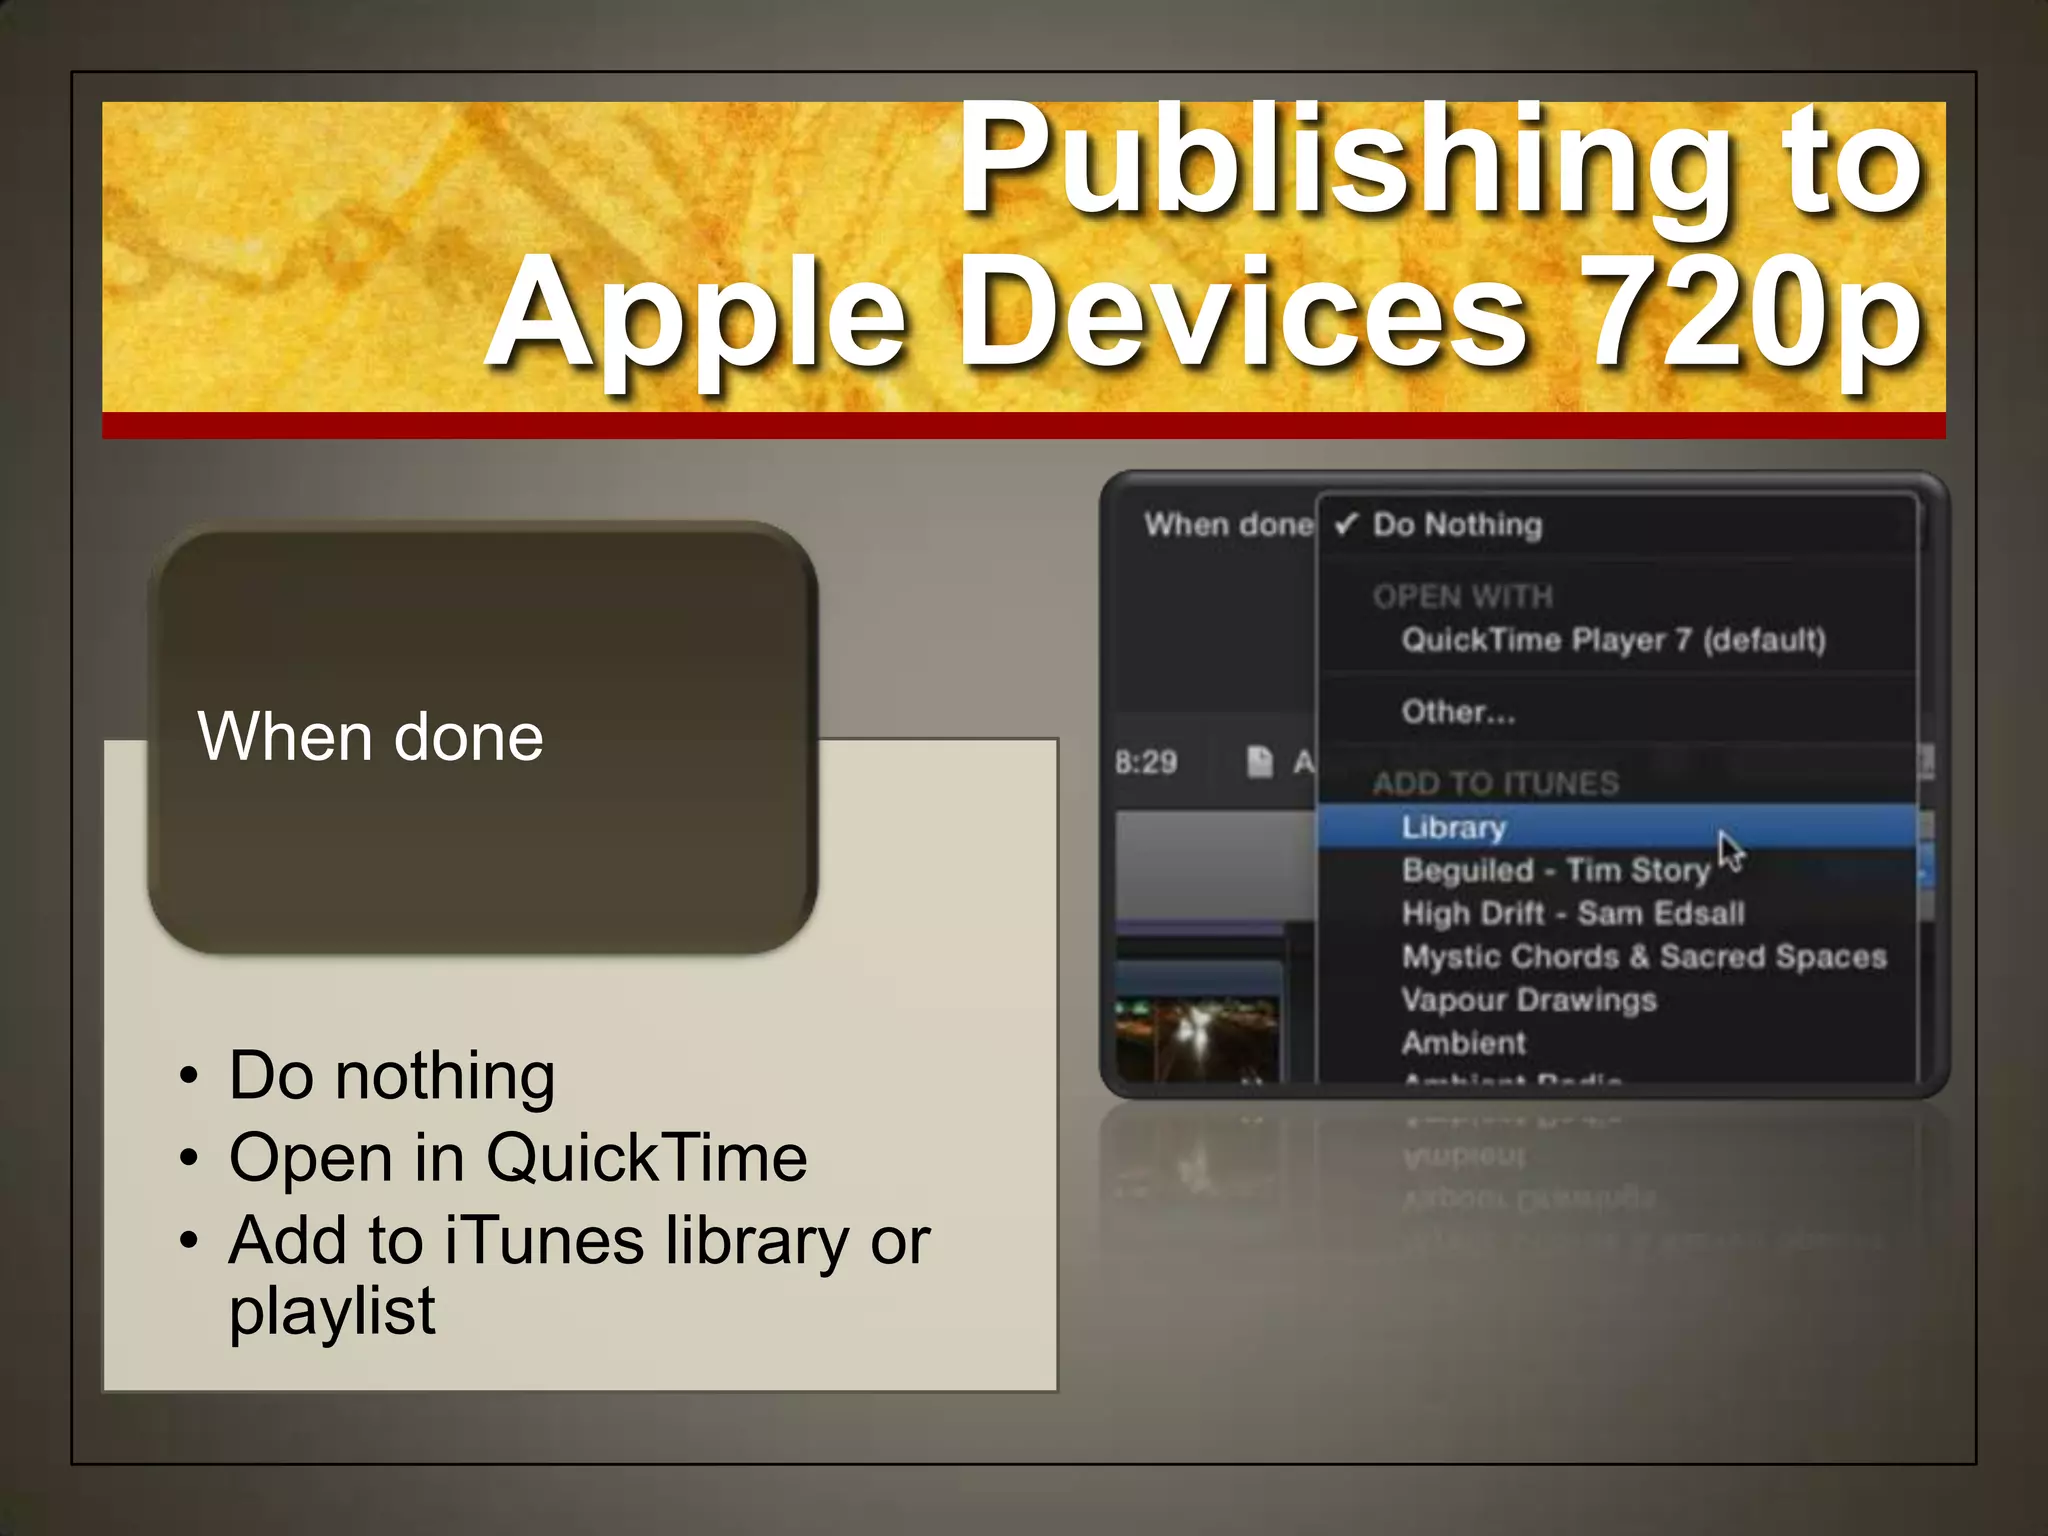
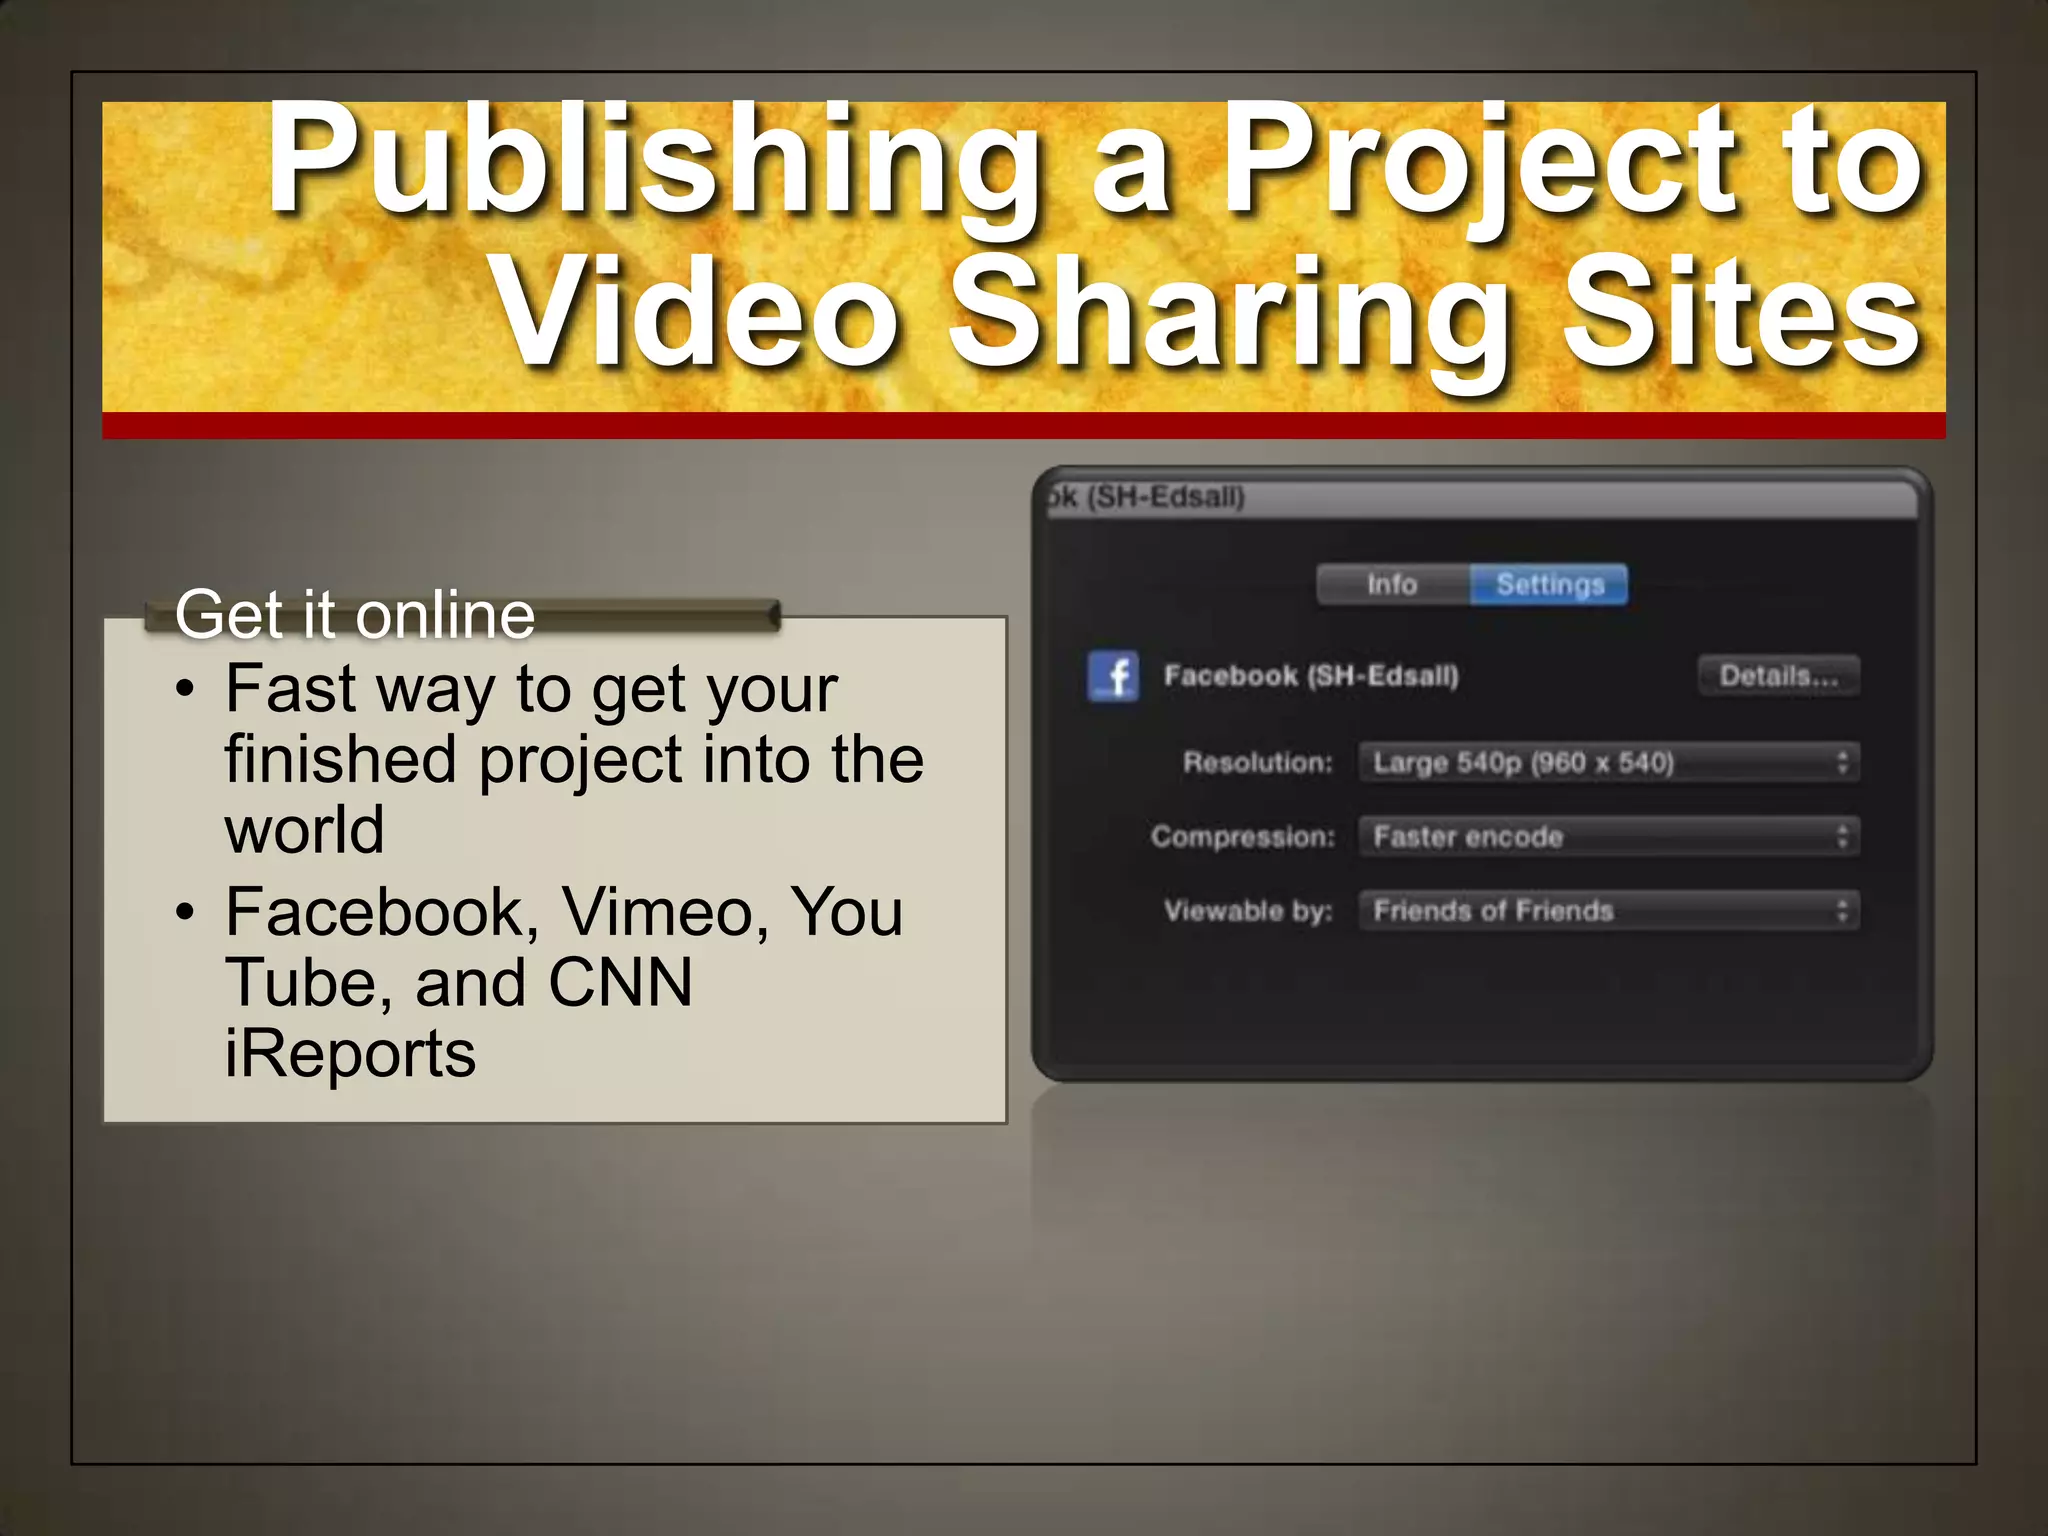
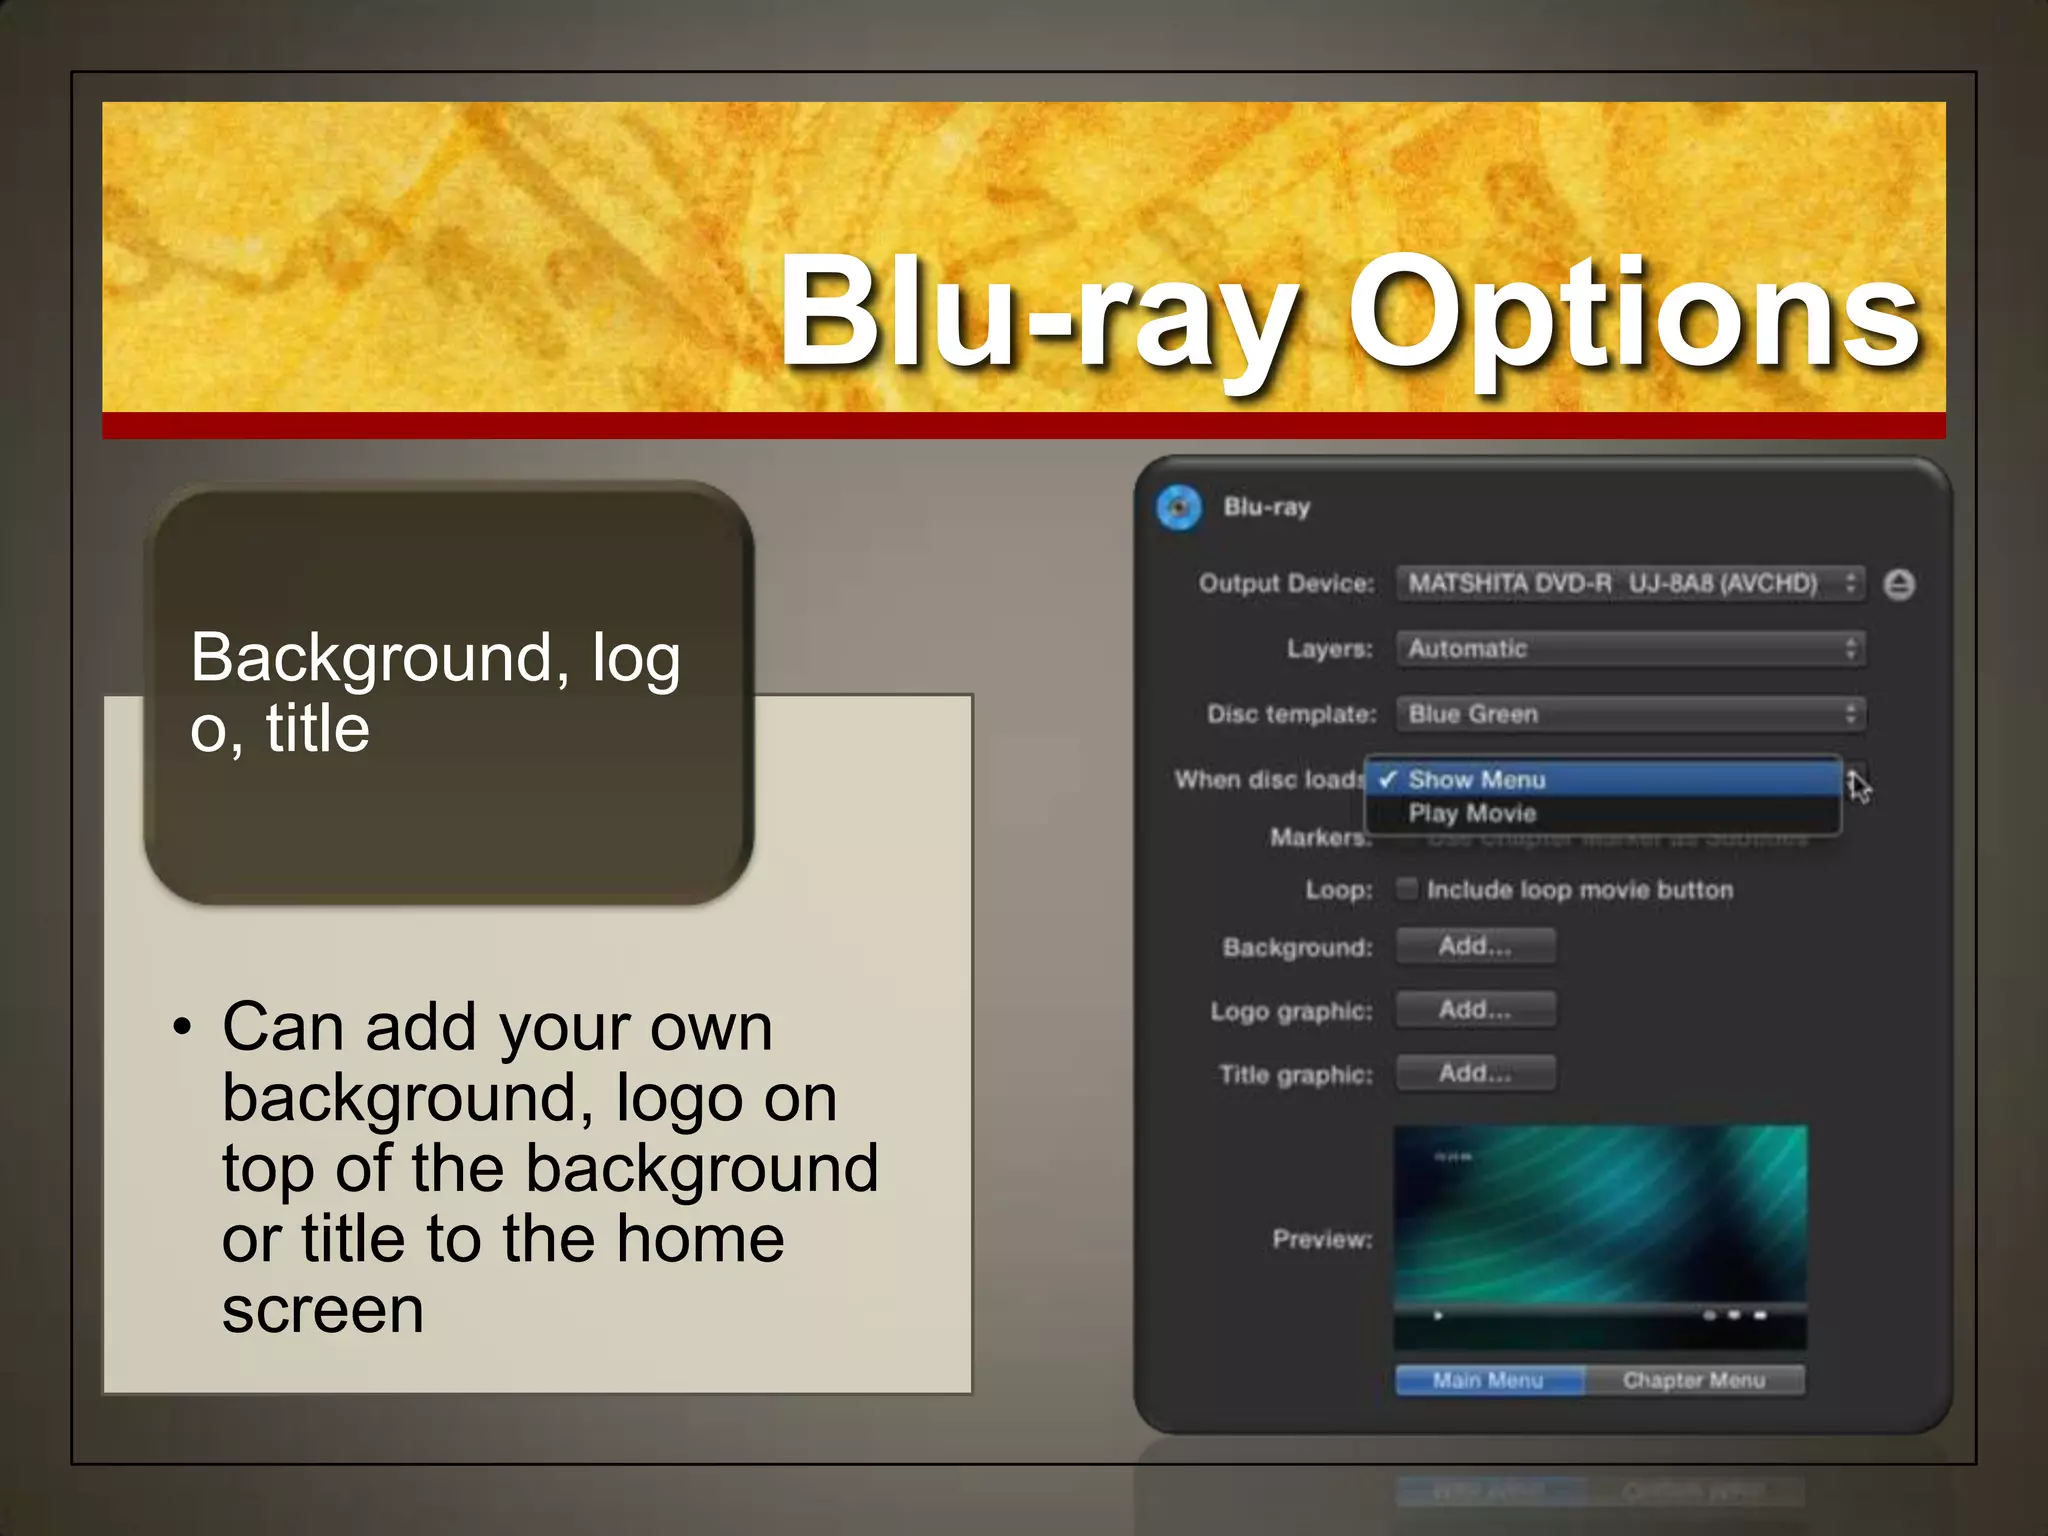
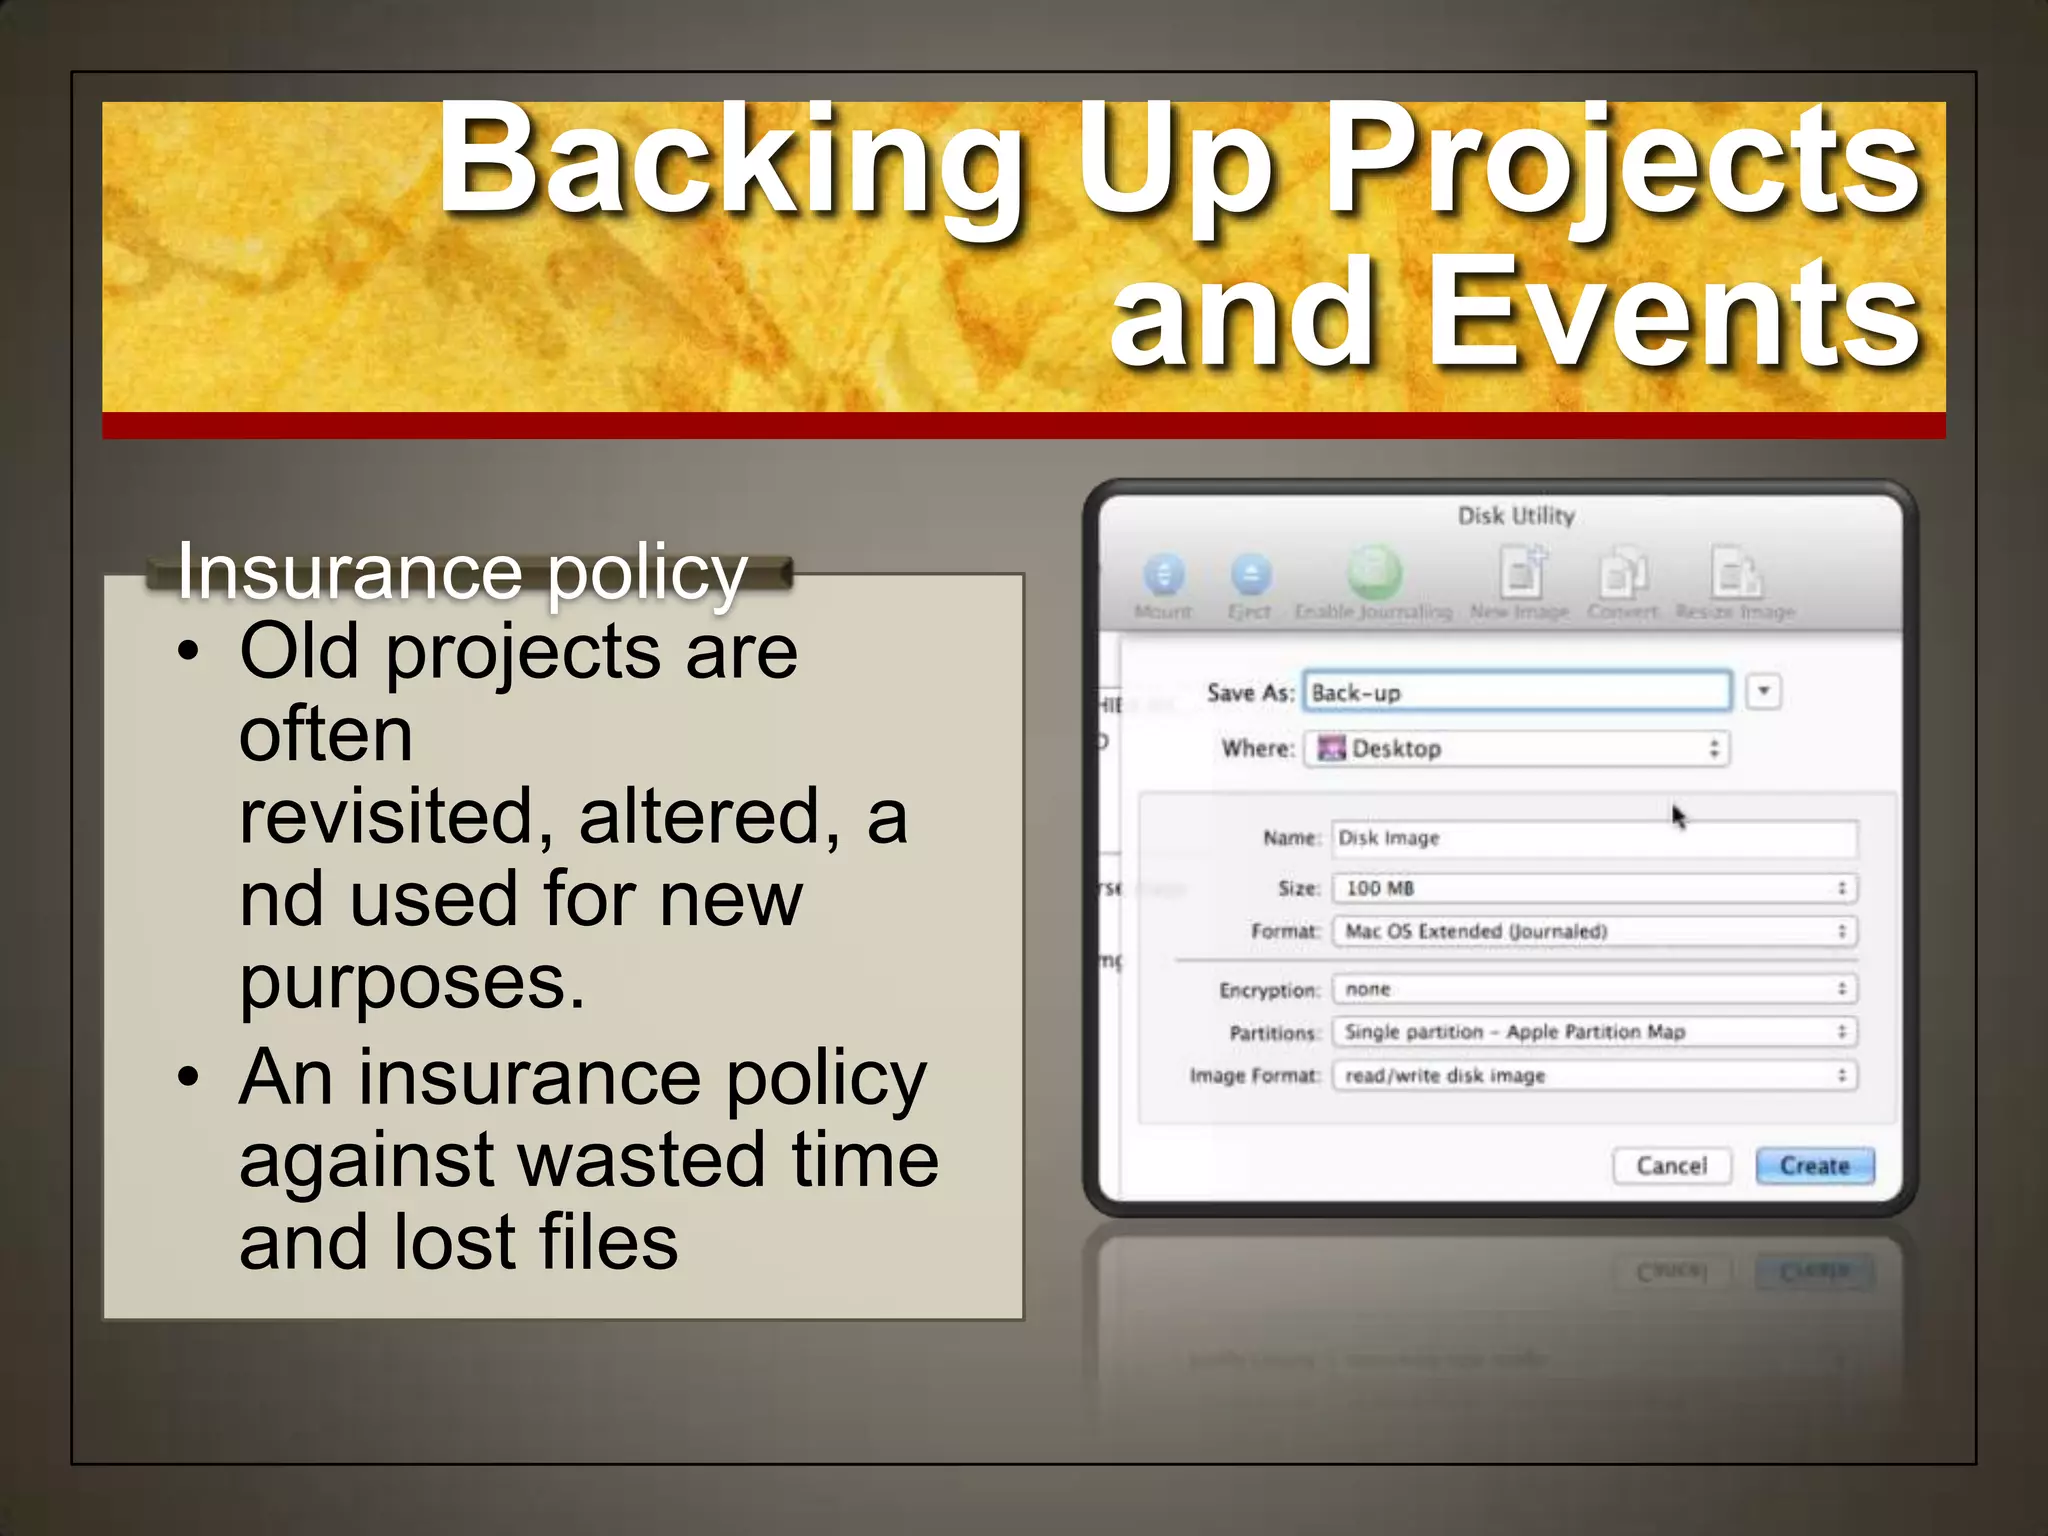
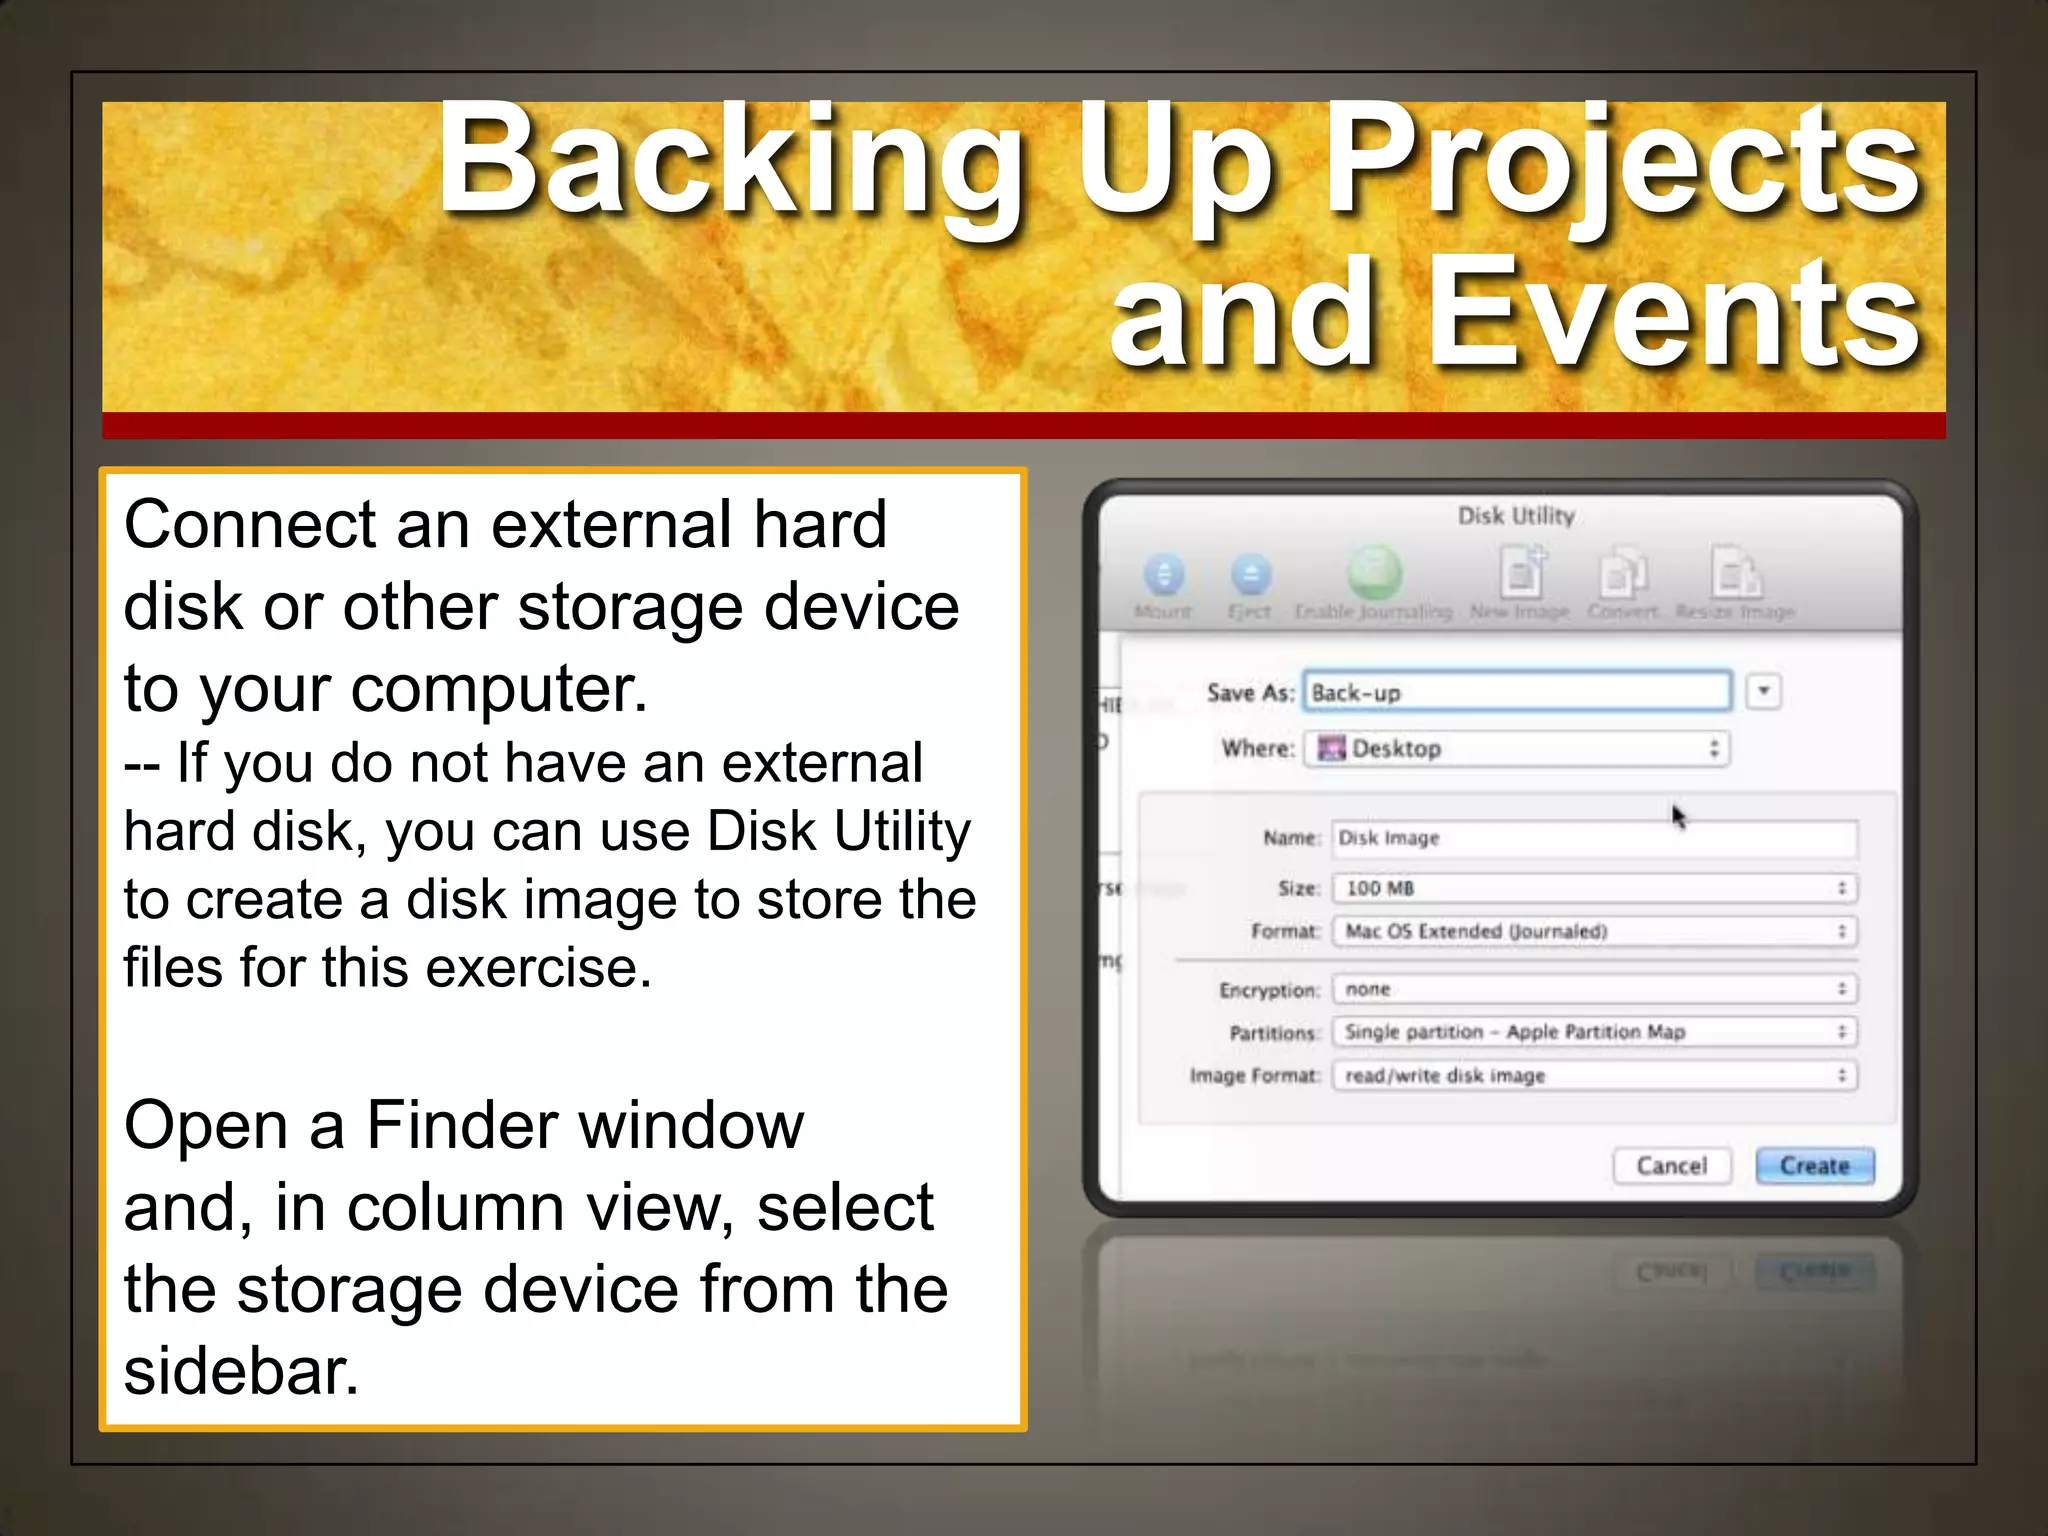
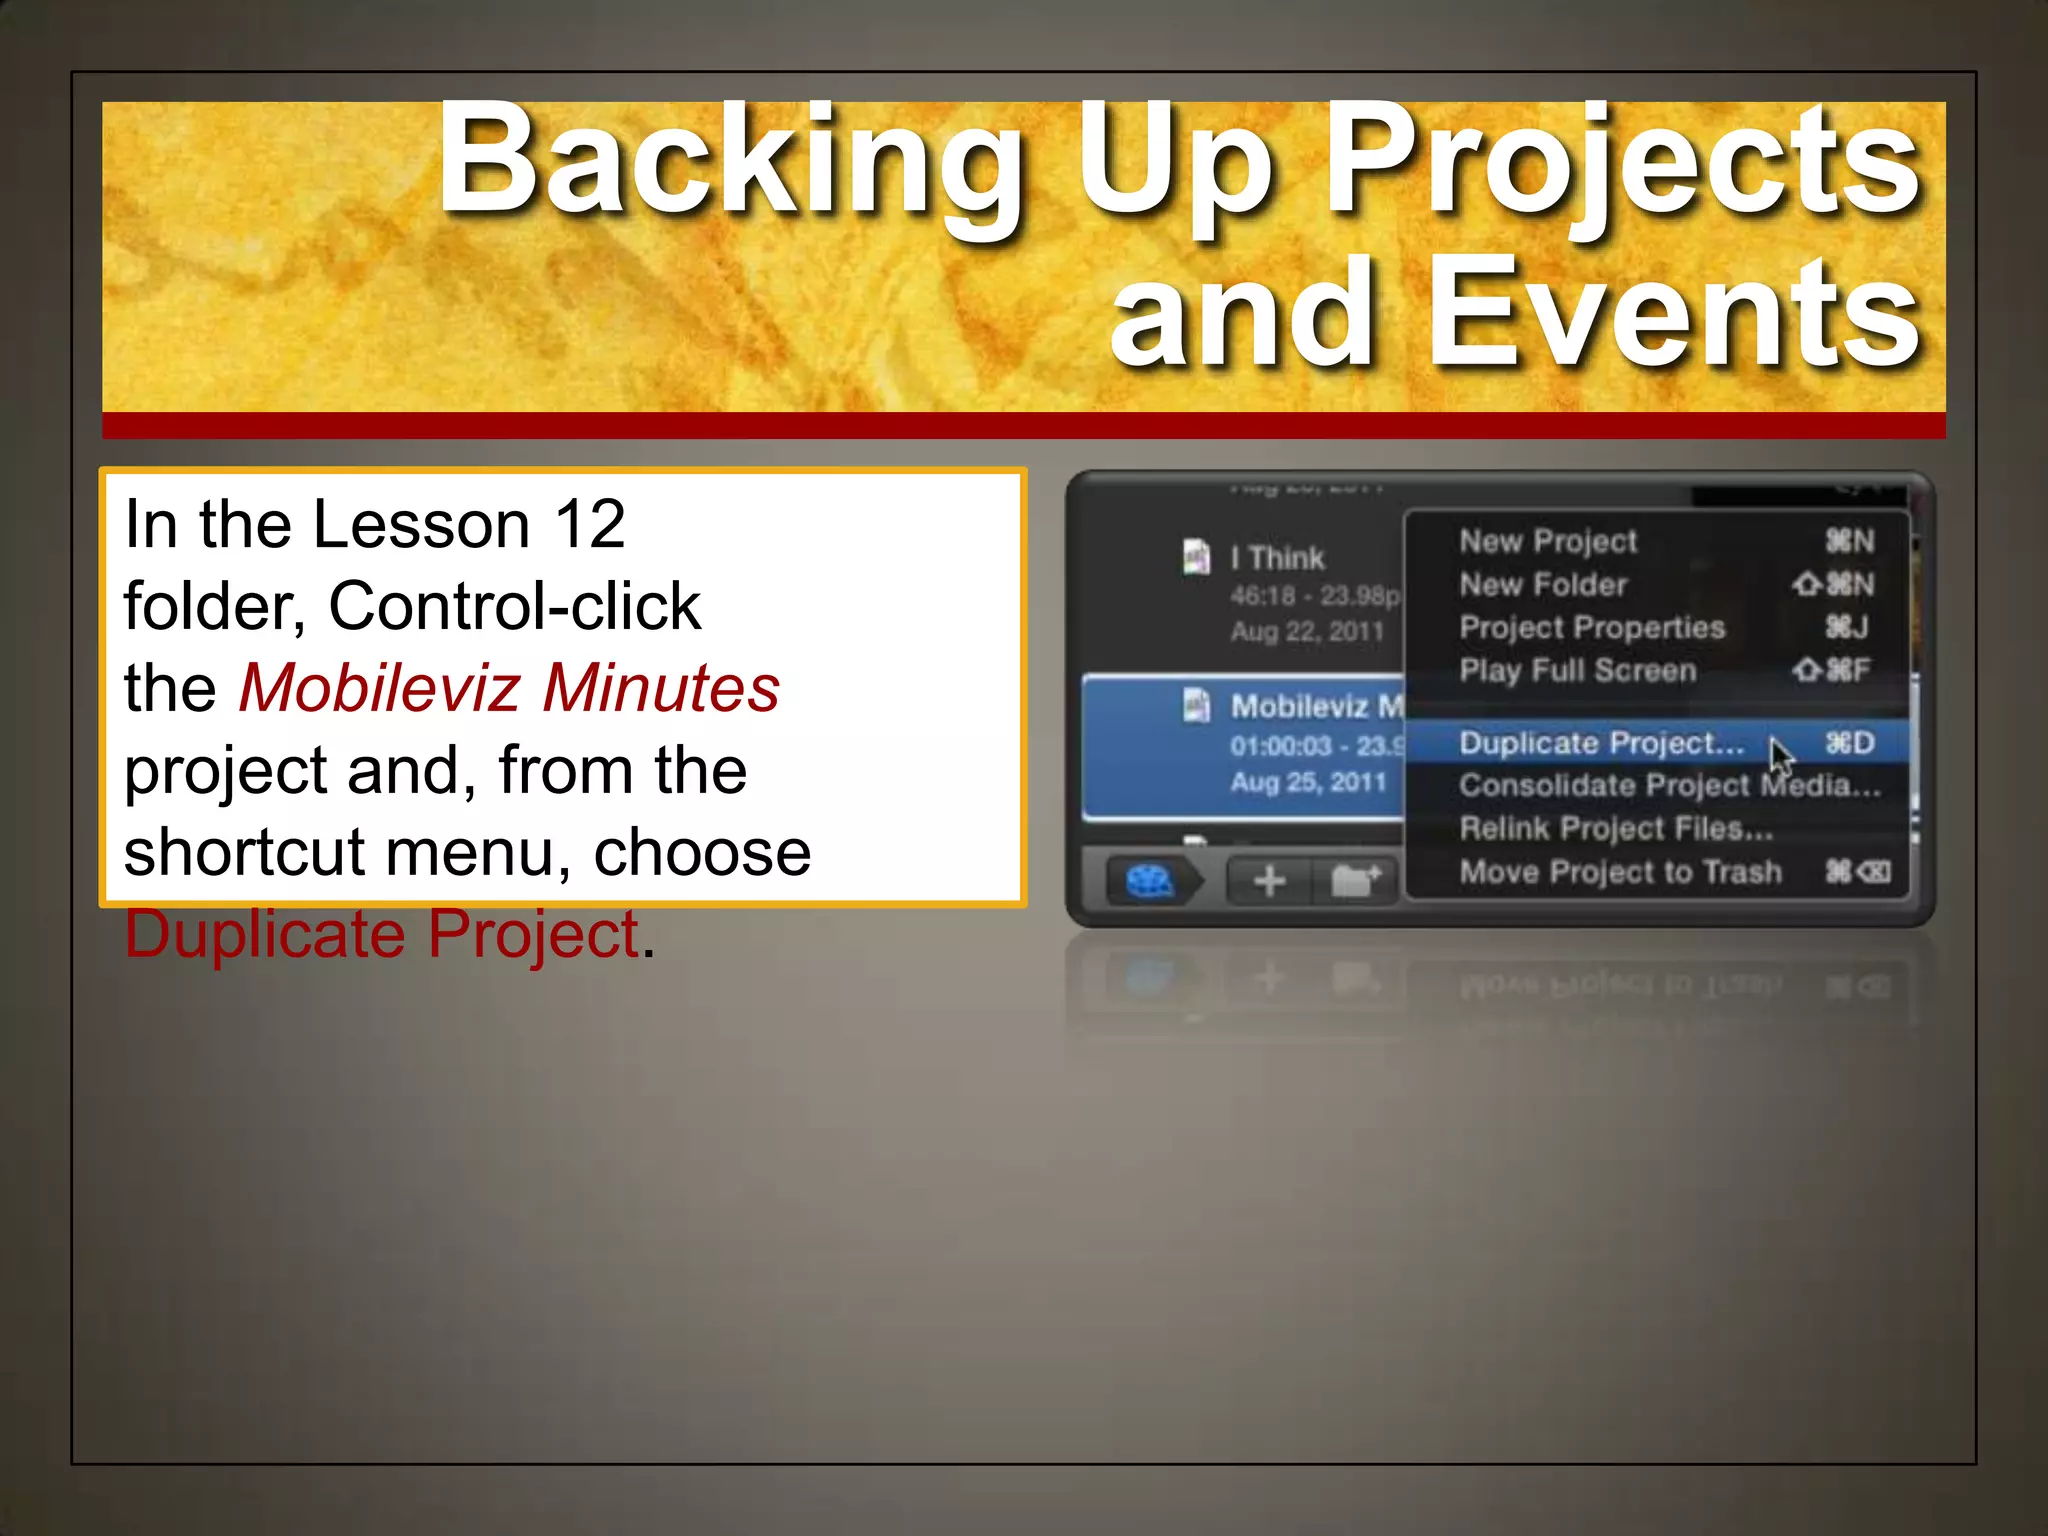
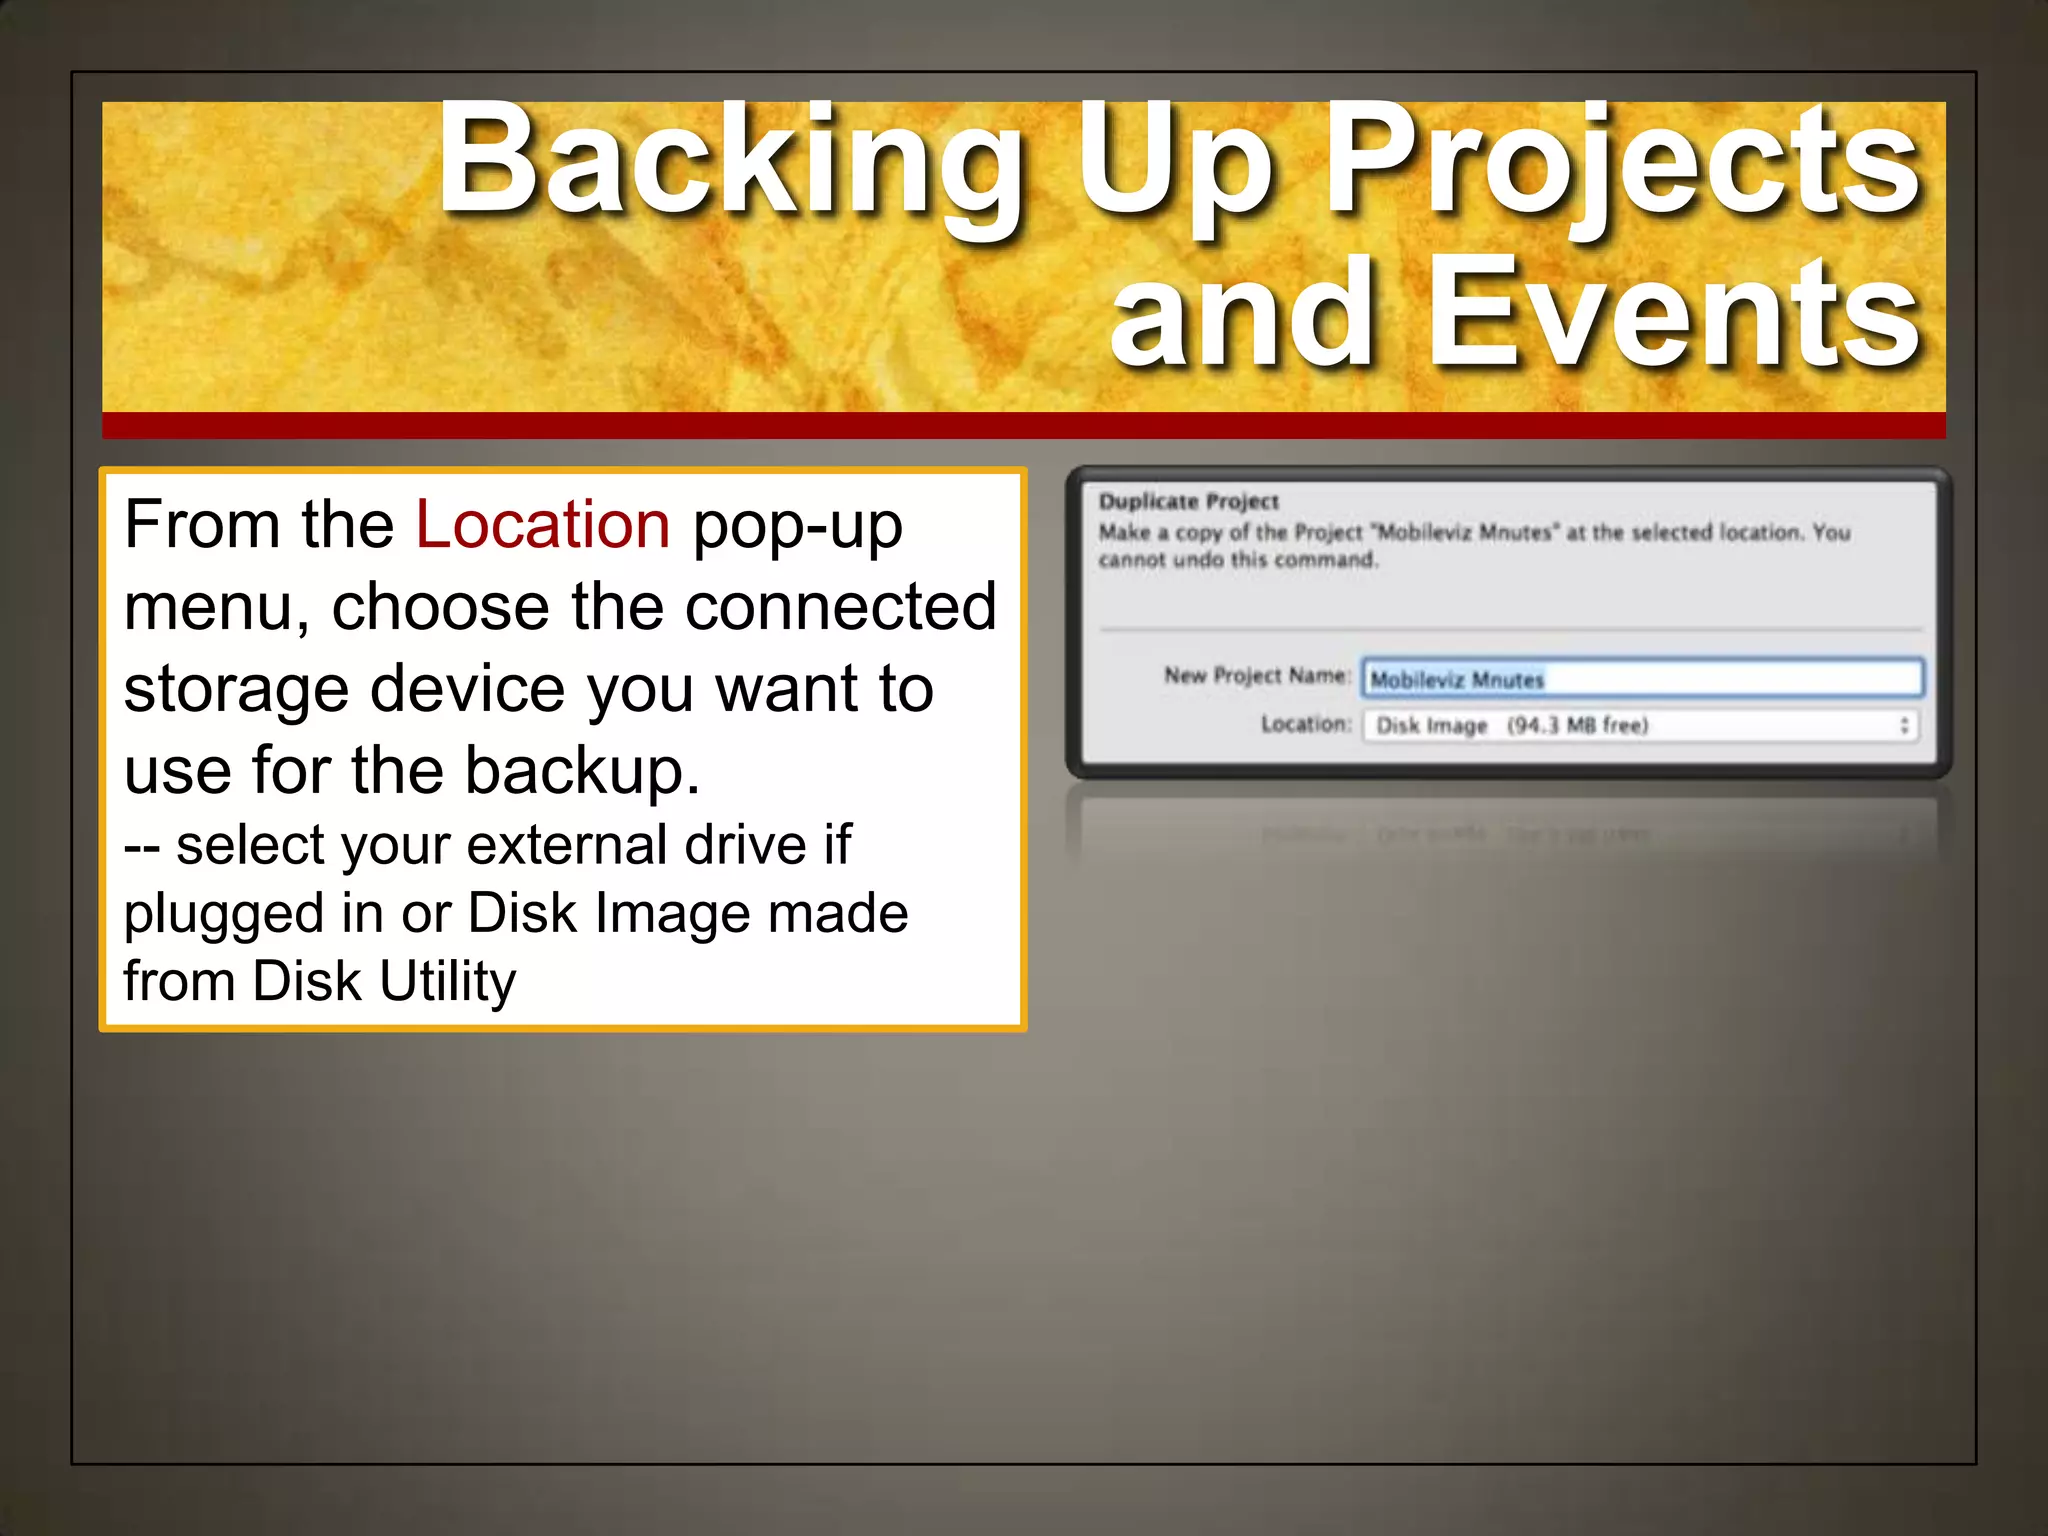
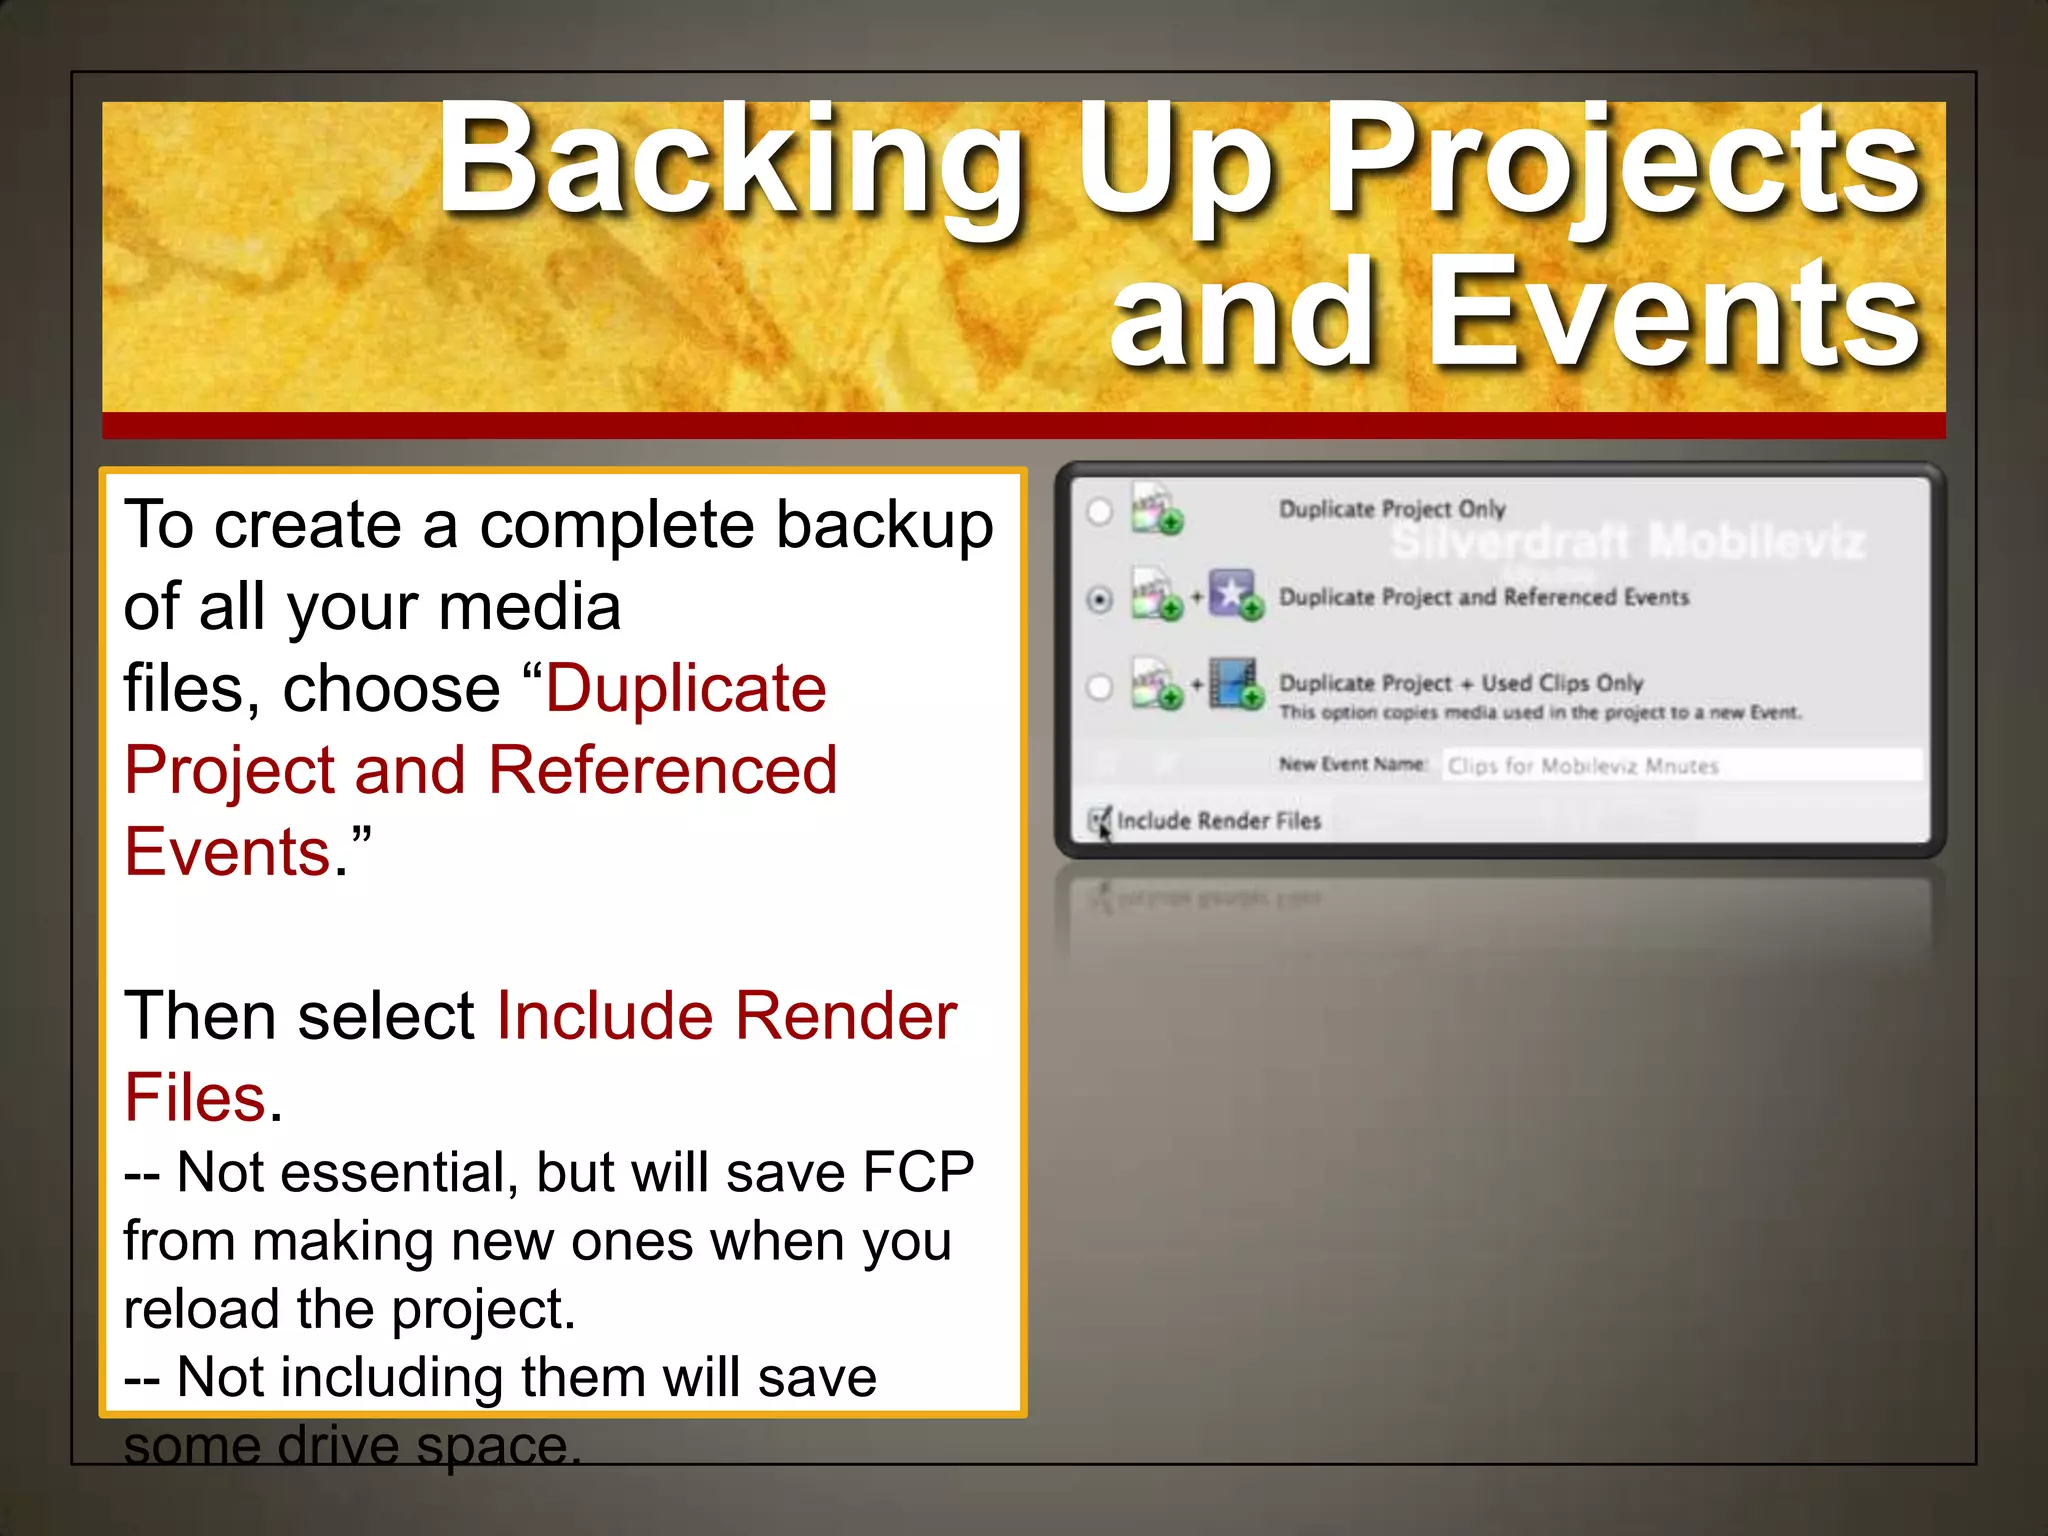
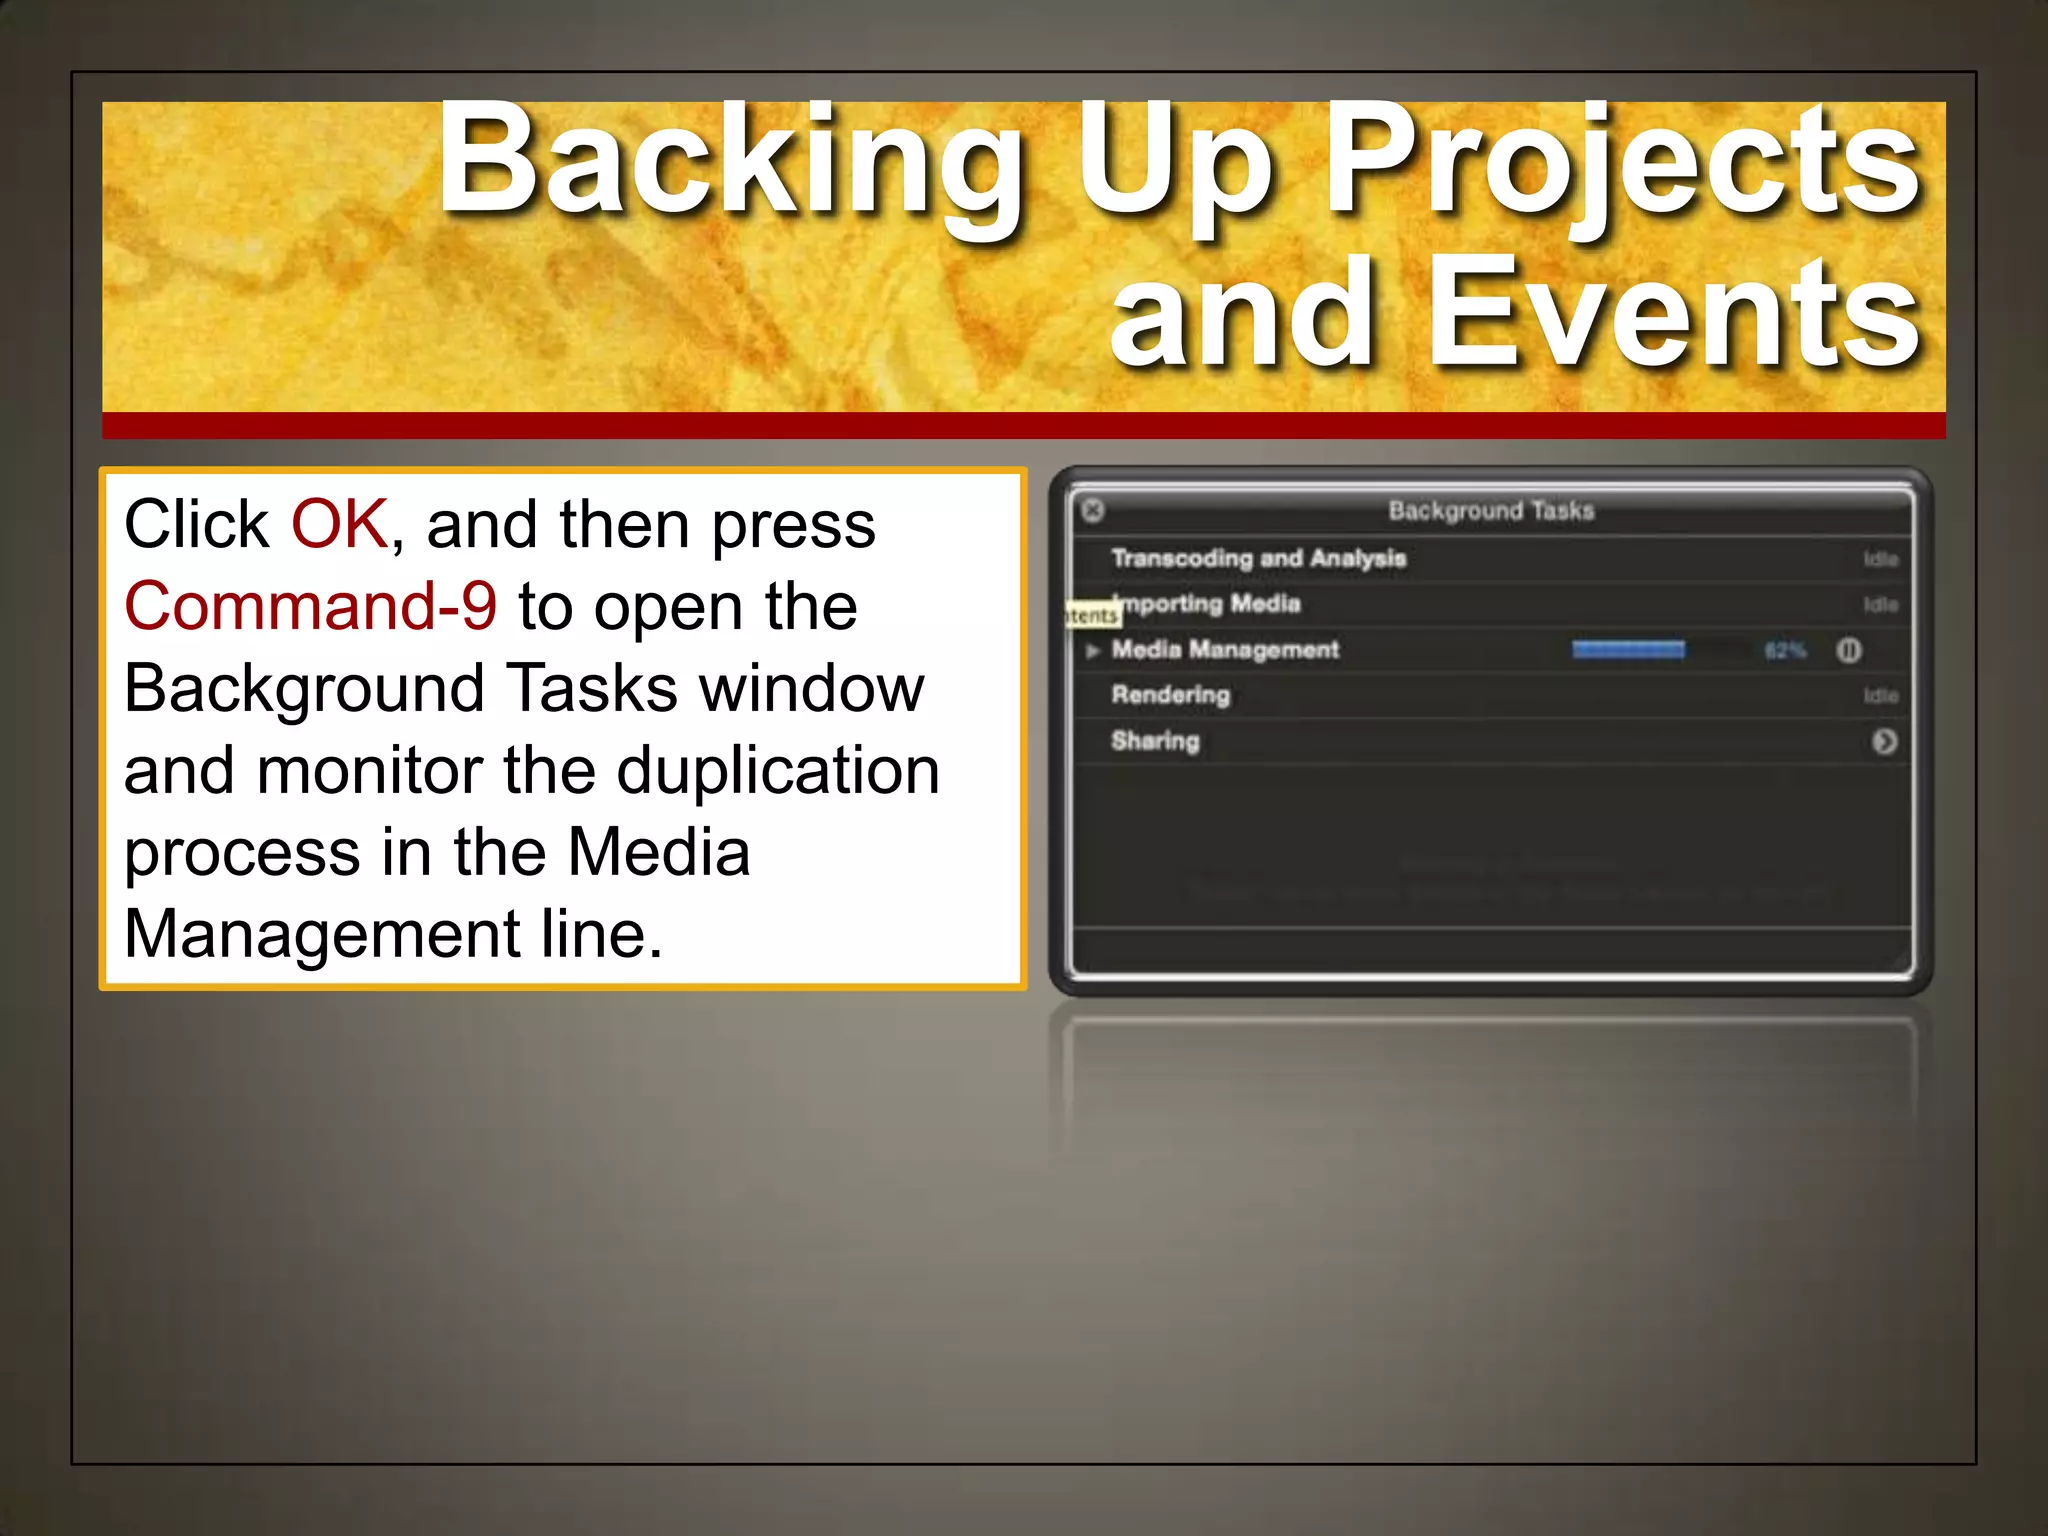
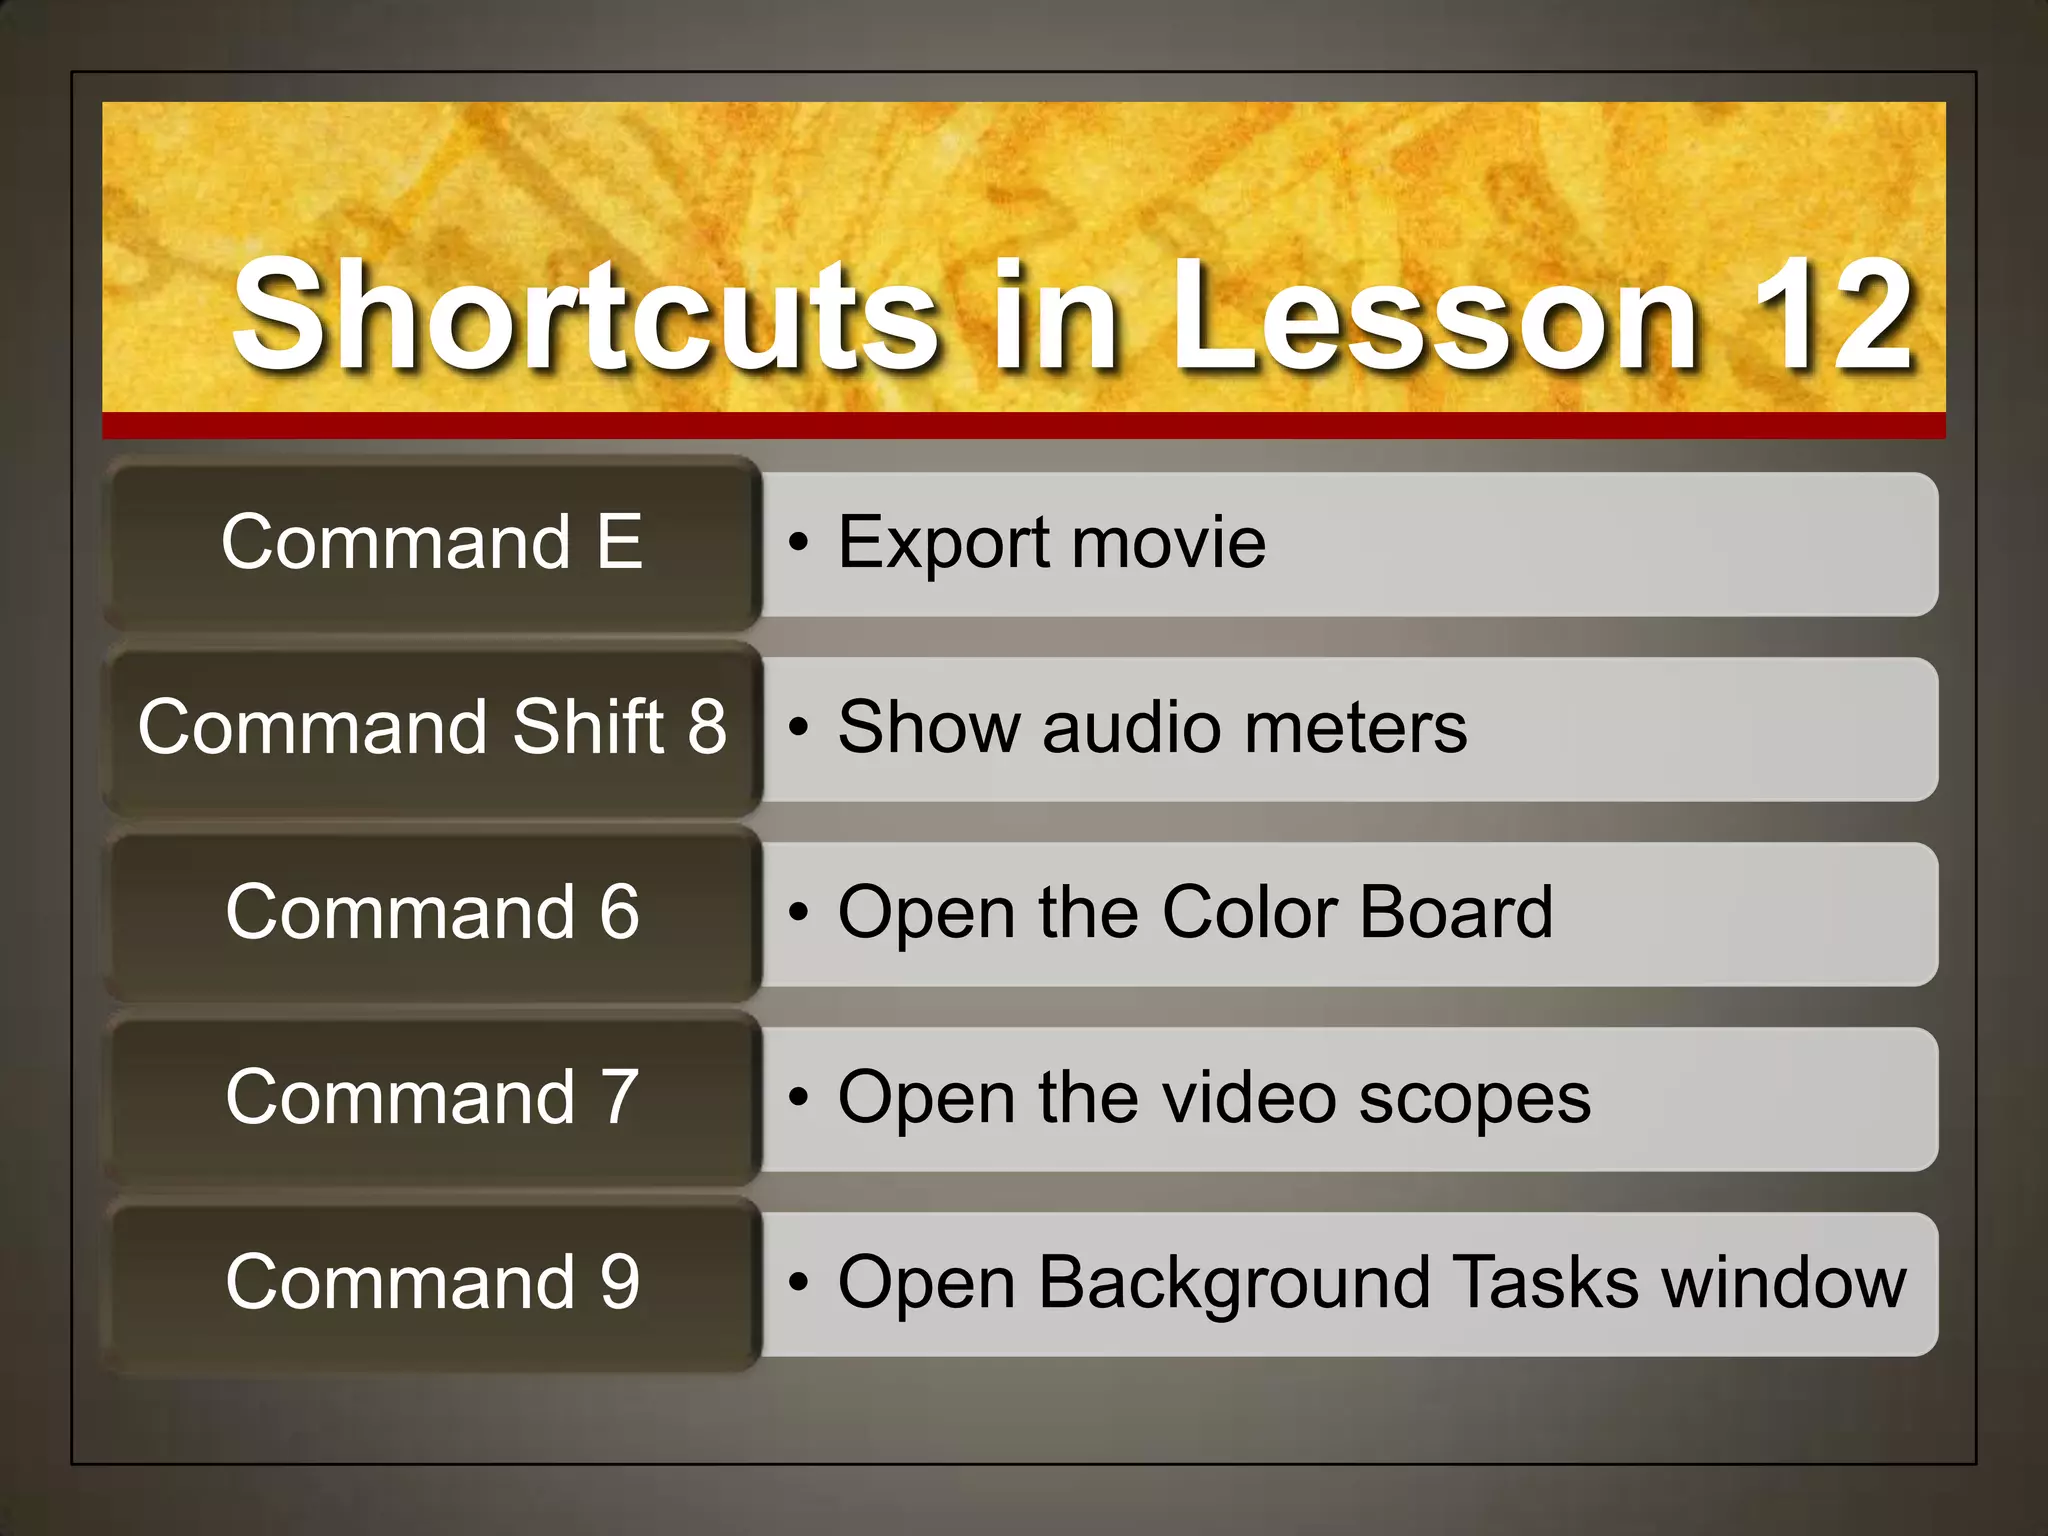
Apple Pro Training
Series
Final Cut Pro X
Instructor: Sam Edsall
Lesson 12:
Exporting &
Sharing Your Project
Exporting & Sharing
Your Project
• Adjust audio peaks
• Conform video levels for broadcast
• Export a QuickTime movie
• Export an audio file
• Publish to iTunes and Apple devices
• Share with the Media Browser
• Publish to YouTube and other video sharing sites
• Export a still frame
• Burn to discs and create an .img file
• Back up projects and Events
Goals
Preparing a Project for
Exporting & Sharing
• The human eye and ear can‟t always detect
the “hot spots” that spell trouble.
• A clip that looks fine may have brightness
levels exceeding the 100%
• Audio may sound fine, but may be peaking
into the red zone
• Final Cut Pro has scopes and visual
indicators that make these problems easy to
find and fix.
Is it really ready?
Preparing the Project
Start up the FCP External
Drive:
Find your APTS FCP X
drive and double click to
start it up.
Set up the Lesson
In the Project Library, from
the Lesson Projects
folder, drag the Lesson
12 project folder onto the
APTS FCP X disk.
Open the folder and
duplicate the „Zero to Hero‟
project to your HD and
open in the Timeline.
• In digital audio, distortion occurs when the
combined audio level of all clips is above 0
dB
The good and the bad
• The primary audio should peak @ -12 dB
• Music and other background audio should
peak @ -18 dB
• The combined audio level of all clips should
peak @ -6 dB or less.
Mixing sound
Getting the Audio Right
Spot the Hot Spot
To display the Audio
meters, click the right side
of the Dashboard, or press
Command-Shift-8.
Play the Zero to
Hero project then play the
area around the Tony
Pedregon clips and notice
that the audio levels peak
above 0 dB, displaying red
peak indicators at the top
of the Audio meters.
Have a Better Look
Click the Clip Appearance
button.
Click the first clip icon, and
drag the Clip Height slider
to the middle.
In the Timeline, notice
which clips display yellow-
or red-tipped waveforms.
Tweak the Audio
In the Tony
Pedregon clip, drag the
audio level overlay down
so that only green peaks
appear in the waveforms.
Then adjust any other
project clips that display
audio that peaks too high.
• Keep the video levels broadcast safe –
no higher than 100 IRE (Institute of
Radio Engineers)
• Audio interference or noise occurs if
video luminance exceeds 100 IRE
during broadcast.
The good and the bad
• Use the scopes to see what‟s happening
• Use the Color Board to get it right
Getting it right
Getting the Video Right
Have a Better Look
Click the Clip Appearance
button.
Select the fifth clip icon to
show only the video
display.
If necessary, adjust the clip
height to see all the clips in
the Timeline.
Turn on the Scopes
To view the project clips in
video scopes, choose
Window > Show Video
Scopes, or press
Command-7.
--The Viewer splits into two
windows, with a smaller Viewer
on the right and the video
scopes window to the left.
Set the Scope
In the upper-right corner of
the video scopes
window, from the Settings
pop-up menu, choose
Display > Waveform.
Then, from the Settings
pop-up menu, choose
Channels > Luma.
Find a Problem Clip
While looking at the waveform display, select and skim
the Antron Brown clip noting where the luma levels
appear on the scope.
-- The levels in this clip appear above the 100% line in the waveform
display.
Fix the Shot
Click the Enhancement
Menu button, and choose
Show Color Board, or
press Command-6.
In the Color Board, click
the Exposure tab.
• In the Exposure tab, you
can alter a clip‟s
luminance level by
adjusting:
• The darkest pixels
• The midrange pixels
• The brightest pixels
• The entire luma range.
All or part?
The Exposure Tab
Fix the Shot
In the Exposure tab, drag
the Highlights control down
to lower the clip‟s luma
level to just under 100%.
Use the waveform display
as a guide.
-- Under the Color
Board, Highlights shows a
negative percent value
Close the Windows
Choose Window > Hide
Inspector, or press
Command-4, to close the
Color Board.
Choose Window > Hide Video
Scopes, or press Command-
7.
Return the clip appearance to
a standard audio and video
configuration.
• Original quality?
• Something for an iPad or
iPod?
• Attachment to an email?
• Straight to your Facebook
or YouTube account?
• Just a frame from the
Timeline play head
position?
What do you need?
Exporting a Movie File
Export the Movie
To make the Timeline window
active, press Command-2.
With the Zero to Hero project still
open, choose File> Share or use
the Share Project icon, and look at
the targets and choices listed in the
menu.
Choose Master File (default)
• Video title
• Estimated file size
• Tags can be added
as metadata
• Current settings on
the bottom
Info tab
Master File Info Window
• Where you can
change the settings
• Format
• Video codec
• Resolution is set
• Options to play the
video when done
Settings tab
Master File Info Window
Export the Movie
Click Next.
Save the video to the
desktop.
The Background Tasks
window will indicate the
progress of the export.
• If your project has been
exported you will see the
„Share‟ icon next to the
project name in the
Timeline & in the Project
Library
• If the project has been
changed since it‟s last
export, an alert triangle
will appear next to the
share icon
The Share icon
Exported Projects
• Share smaller versions
of your video
• Export as M4V to
dimensions and codecs
your specify
• Export directly to
YouTube, Vimeo, etc.
Go mobile
Publishing to
Apple Devices
• H.264 Better Quality
• Larger file size but
cleaner video
• H.264 Faster Encode
• Smaller file size but
quality not as good as
„Better‟
Video codec
Publishing to
Apple Devices 720p
• You choose the size
• 854 x 480
• 960 x 540
• 1280 x 720
• 1920 x 1080 (if you
original video is this
dimension)
Resolution
Publishing to
Apple Devices 720p
• Do nothing
• Open in QuickTime
• Add to iTunes library or
playlist
When done
Publishing to
Apple Devices 720p
• When adding to iTunes
you can send your
movie just to the Library
or to a particular playlist
• Not a bad idea to create
movie playlists for your
projects if you want
iTunes to hold on to your
work
Where would you
like it?
Adding to iTunes
• Fast way to get your
finished project into the
world
• Facebook, Vimeo, You
Tube, and CNN
iReports
Get it online
Publishing a Project to
Video Sharing Sites
Publishing a Project to
Video Sharing Sites
In the Project
Library, select a project
and click on the Share
Project icon and choose
Facebook.
Check out the different
settings you can use.
If you need to, click on
Details to log in to your
account.
Publishing a Project to
Video Sharing Sites
Press Cancel, then click
on the Share Project icon
and choose YouTube.
Check out the different
settings you can use.
-- note the Private
checkbox
If you need to, click on
Details to log in to your
account.
Publishing a Project to
Video Sharing Sites
Press Cancel, then click
on the Share Project icon
and choose Vimeo.
Check out the different
settings you can use.
If you need to, click on
Details to log in to your
account.
• Don‟t borrow other
people‟s video or
audio, including music.
• There‟s plenty of
copyright-free content
you can use without
the need to break
copyright.
Is it yours?
Publishing to Social
Media Sites
Other Options
Press Cancel, then click on the
Share Project icon and choose Add
Destination.
Check out the different settings
you can use.
• If you are an
eyewitness to a news
event you can post
your video here
CNN iReport
• Resolution –
SD, large, HD
• Compression – quality
or fast encode
Parameters
Other Options
• Can burn your project
straight to a DVD
DVD
• Layers – single or
double layer DVD
• Disc template – black
or white background
Parameters
Other Options
• When disc loads
• Play or bring up a
menu
• If you have
chapters, use a menu
• Background – add your
own background
Parameters
Other Options
• Exports then starts
Mail and attaches the
video to the email for
you
Email
• Resolution –
small, medium, large
• Compression – quality
or fast encode
Parameters
Other Options
• Saves the frame
where the play head is
at as a still image
Save current
frame
• Different image
formats
Parameters
Other Options
• Exports each frame of
your project as a
separate image
• Saved in a numbered
sequence
Export Image
Sequence
• Different image
formats
Parameters
Other Options
• Burn straight to a Blu-
ray drive
• If you don‟t have a
Blu-burner, you can
save your file as a
AVCHD file that Blu-
ray players should be
able to play
Blu-ray
Other Options
• Uses a red laser
DVD
• Uses a blue laser
• Shorter wavelength
than red, allowing for
more data to be stored
on a Blu-ray disc than
on DVD‟s
Blu-ray
The Blue in Blu-ray
Discs
• Your Blu-ray burner or
to the hard drive
• Hard drive will hold
the AVCHD file
Output Device
• Single or double layer
Layers
Blu-ray Options
• Use a regular DVD disc
• Will burn a AVCHD file onto the DVD disc
• Advanced Video Coding High Definition
• DVD players cannot play this back, but a Blu-ray
player should be able to
Burning a Blu-ray video with a
standard DVD burner
Blu-ray to my
DVD Burner?
• Some fun, animated
backgrounds for your
DVD home page
Disc template
Blu-ray Options
• Show menu or play
the movie
When disc loads
• If you have chapter
markers in your movie
Markers
Blu-ray Options
• Can add your own
background, logo on
top of the background
or title to the home
screen
Background, log
o, title
Blu-ray Options
• Old projects are
often
revisited, altered, a
nd used for new
purposes.
• An insurance policy
against wasted time
and lost files
Insurance policy
Backing Up Projects
and Events
Backing Up Projects
and Events
Connect an external hard
disk or other storage device
to your computer.
-- If you do not have an external
hard disk, you can use Disk Utility
to create a disk image to store the
files for this exercise.
Open a Finder window
and, in column view, select
the storage device from the
sidebar.
Backing Up Projects
and Events
In the Lesson 12
folder, Control-click
the Mobileviz Minutes
project and, from the
shortcut menu, choose
Duplicate Project.
Backing Up Projects
and Events
From the Location pop-up
menu, choose the connected
storage device you want to
use for the backup.
-- select your external drive if
plugged in or Disk Image made
from Disk Utility
Backing Up Projects
and Events
To create a complete backup
of all your media
files, choose “Duplicate
Project and Referenced
Events.”
Then select Include Render
Files.
-- Not essential, but will save FCP
from making new ones when you
reload the project.
-- Not including them will save
some drive space.
Backing Up Projects
and Events
Click OK, and then press
Command-9 to open the
Background Tasks window
and monitor the duplication
process in the Media
Management line.
Shortcuts in Lesson 12
• Export movieCommand E
• Show audio metersCommand Shift 8
• Open the Color BoardCommand 6
• Open the video scopesCommand 7
• Open Background Tasks windowCommand 9
Apple Pro Training
Series
Final Cut Pro X
Instructor: Sam Edsall
Lesson 12:
Exporting &
Sharing Your Project

Final Cut Pro X Weynand Certification Lesson 12

  • 1.
    Apple Pro Training Series FinalCut Pro X Instructor: Sam Edsall Lesson 12: Exporting & Sharing Your Project
  • 2.
    Exporting & Sharing YourProject • Adjust audio peaks • Conform video levels for broadcast • Export a QuickTime movie • Export an audio file • Publish to iTunes and Apple devices • Share with the Media Browser • Publish to YouTube and other video sharing sites • Export a still frame • Burn to discs and create an .img file • Back up projects and Events Goals
  • 3.
    Preparing a Projectfor Exporting & Sharing • The human eye and ear can‟t always detect the “hot spots” that spell trouble. • A clip that looks fine may have brightness levels exceeding the 100% • Audio may sound fine, but may be peaking into the red zone • Final Cut Pro has scopes and visual indicators that make these problems easy to find and fix. Is it really ready?
  • 4.
    Preparing the Project Startup the FCP External Drive: Find your APTS FCP X drive and double click to start it up.
  • 5.
    Set up theLesson In the Project Library, from the Lesson Projects folder, drag the Lesson 12 project folder onto the APTS FCP X disk. Open the folder and duplicate the „Zero to Hero‟ project to your HD and open in the Timeline.
  • 6.
    • In digitalaudio, distortion occurs when the combined audio level of all clips is above 0 dB The good and the bad • The primary audio should peak @ -12 dB • Music and other background audio should peak @ -18 dB • The combined audio level of all clips should peak @ -6 dB or less. Mixing sound Getting the Audio Right
  • 7.
    Spot the HotSpot To display the Audio meters, click the right side of the Dashboard, or press Command-Shift-8. Play the Zero to Hero project then play the area around the Tony Pedregon clips and notice that the audio levels peak above 0 dB, displaying red peak indicators at the top of the Audio meters.
  • 8.
    Have a BetterLook Click the Clip Appearance button. Click the first clip icon, and drag the Clip Height slider to the middle. In the Timeline, notice which clips display yellow- or red-tipped waveforms.
  • 9.
    Tweak the Audio Inthe Tony Pedregon clip, drag the audio level overlay down so that only green peaks appear in the waveforms. Then adjust any other project clips that display audio that peaks too high.
  • 10.
    • Keep thevideo levels broadcast safe – no higher than 100 IRE (Institute of Radio Engineers) • Audio interference or noise occurs if video luminance exceeds 100 IRE during broadcast. The good and the bad • Use the scopes to see what‟s happening • Use the Color Board to get it right Getting it right Getting the Video Right
  • 11.
    Have a BetterLook Click the Clip Appearance button. Select the fifth clip icon to show only the video display. If necessary, adjust the clip height to see all the clips in the Timeline.
  • 12.
    Turn on theScopes To view the project clips in video scopes, choose Window > Show Video Scopes, or press Command-7. --The Viewer splits into two windows, with a smaller Viewer on the right and the video scopes window to the left.
  • 13.
    Set the Scope Inthe upper-right corner of the video scopes window, from the Settings pop-up menu, choose Display > Waveform. Then, from the Settings pop-up menu, choose Channels > Luma.
  • 14.
    Find a ProblemClip While looking at the waveform display, select and skim the Antron Brown clip noting where the luma levels appear on the scope. -- The levels in this clip appear above the 100% line in the waveform display.
  • 15.
    Fix the Shot Clickthe Enhancement Menu button, and choose Show Color Board, or press Command-6. In the Color Board, click the Exposure tab.
  • 16.
    • In theExposure tab, you can alter a clip‟s luminance level by adjusting: • The darkest pixels • The midrange pixels • The brightest pixels • The entire luma range. All or part? The Exposure Tab
  • 17.
    Fix the Shot Inthe Exposure tab, drag the Highlights control down to lower the clip‟s luma level to just under 100%. Use the waveform display as a guide. -- Under the Color Board, Highlights shows a negative percent value
  • 18.
    Close the Windows ChooseWindow > Hide Inspector, or press Command-4, to close the Color Board. Choose Window > Hide Video Scopes, or press Command- 7. Return the clip appearance to a standard audio and video configuration.
  • 19.
    • Original quality? •Something for an iPad or iPod? • Attachment to an email? • Straight to your Facebook or YouTube account? • Just a frame from the Timeline play head position? What do you need? Exporting a Movie File
  • 20.
    Export the Movie Tomake the Timeline window active, press Command-2. With the Zero to Hero project still open, choose File> Share or use the Share Project icon, and look at the targets and choices listed in the menu. Choose Master File (default)
  • 21.
    • Video title •Estimated file size • Tags can be added as metadata • Current settings on the bottom Info tab Master File Info Window
  • 22.
    • Where youcan change the settings • Format • Video codec • Resolution is set • Options to play the video when done Settings tab Master File Info Window
  • 23.
    Export the Movie ClickNext. Save the video to the desktop. The Background Tasks window will indicate the progress of the export.
  • 24.
    • If yourproject has been exported you will see the „Share‟ icon next to the project name in the Timeline & in the Project Library • If the project has been changed since it‟s last export, an alert triangle will appear next to the share icon The Share icon Exported Projects
  • 25.
    • Share smallerversions of your video • Export as M4V to dimensions and codecs your specify • Export directly to YouTube, Vimeo, etc. Go mobile Publishing to Apple Devices
  • 26.
    • H.264 BetterQuality • Larger file size but cleaner video • H.264 Faster Encode • Smaller file size but quality not as good as „Better‟ Video codec Publishing to Apple Devices 720p
  • 27.
    • You choosethe size • 854 x 480 • 960 x 540 • 1280 x 720 • 1920 x 1080 (if you original video is this dimension) Resolution Publishing to Apple Devices 720p
  • 28.
    • Do nothing •Open in QuickTime • Add to iTunes library or playlist When done Publishing to Apple Devices 720p
  • 29.
    • When addingto iTunes you can send your movie just to the Library or to a particular playlist • Not a bad idea to create movie playlists for your projects if you want iTunes to hold on to your work Where would you like it? Adding to iTunes
  • 30.
    • Fast wayto get your finished project into the world • Facebook, Vimeo, You Tube, and CNN iReports Get it online Publishing a Project to Video Sharing Sites
  • 31.
    Publishing a Projectto Video Sharing Sites In the Project Library, select a project and click on the Share Project icon and choose Facebook. Check out the different settings you can use. If you need to, click on Details to log in to your account.
  • 32.
    Publishing a Projectto Video Sharing Sites Press Cancel, then click on the Share Project icon and choose YouTube. Check out the different settings you can use. -- note the Private checkbox If you need to, click on Details to log in to your account.
  • 33.
    Publishing a Projectto Video Sharing Sites Press Cancel, then click on the Share Project icon and choose Vimeo. Check out the different settings you can use. If you need to, click on Details to log in to your account.
  • 34.
    • Don‟t borrowother people‟s video or audio, including music. • There‟s plenty of copyright-free content you can use without the need to break copyright. Is it yours? Publishing to Social Media Sites
  • 35.
    Other Options Press Cancel,then click on the Share Project icon and choose Add Destination. Check out the different settings you can use.
  • 36.
    • If youare an eyewitness to a news event you can post your video here CNN iReport • Resolution – SD, large, HD • Compression – quality or fast encode Parameters Other Options
  • 37.
    • Can burnyour project straight to a DVD DVD • Layers – single or double layer DVD • Disc template – black or white background Parameters Other Options
  • 38.
    • When discloads • Play or bring up a menu • If you have chapters, use a menu • Background – add your own background Parameters Other Options
  • 39.
    • Exports thenstarts Mail and attaches the video to the email for you Email • Resolution – small, medium, large • Compression – quality or fast encode Parameters Other Options
  • 40.
    • Saves theframe where the play head is at as a still image Save current frame • Different image formats Parameters Other Options
  • 41.
    • Exports eachframe of your project as a separate image • Saved in a numbered sequence Export Image Sequence • Different image formats Parameters Other Options
  • 42.
    • Burn straightto a Blu- ray drive • If you don‟t have a Blu-burner, you can save your file as a AVCHD file that Blu- ray players should be able to play Blu-ray Other Options
  • 43.
    • Uses ared laser DVD • Uses a blue laser • Shorter wavelength than red, allowing for more data to be stored on a Blu-ray disc than on DVD‟s Blu-ray The Blue in Blu-ray Discs
  • 44.
    • Your Blu-rayburner or to the hard drive • Hard drive will hold the AVCHD file Output Device • Single or double layer Layers Blu-ray Options
  • 45.
    • Use aregular DVD disc • Will burn a AVCHD file onto the DVD disc • Advanced Video Coding High Definition • DVD players cannot play this back, but a Blu-ray player should be able to Burning a Blu-ray video with a standard DVD burner Blu-ray to my DVD Burner?
  • 46.
    • Some fun,animated backgrounds for your DVD home page Disc template Blu-ray Options
  • 47.
    • Show menuor play the movie When disc loads • If you have chapter markers in your movie Markers Blu-ray Options
  • 48.
    • Can addyour own background, logo on top of the background or title to the home screen Background, log o, title Blu-ray Options
  • 49.
    • Old projectsare often revisited, altered, a nd used for new purposes. • An insurance policy against wasted time and lost files Insurance policy Backing Up Projects and Events
  • 50.
    Backing Up Projects andEvents Connect an external hard disk or other storage device to your computer. -- If you do not have an external hard disk, you can use Disk Utility to create a disk image to store the files for this exercise. Open a Finder window and, in column view, select the storage device from the sidebar.
  • 51.
    Backing Up Projects andEvents In the Lesson 12 folder, Control-click the Mobileviz Minutes project and, from the shortcut menu, choose Duplicate Project.
  • 52.
    Backing Up Projects andEvents From the Location pop-up menu, choose the connected storage device you want to use for the backup. -- select your external drive if plugged in or Disk Image made from Disk Utility
  • 53.
    Backing Up Projects andEvents To create a complete backup of all your media files, choose “Duplicate Project and Referenced Events.” Then select Include Render Files. -- Not essential, but will save FCP from making new ones when you reload the project. -- Not including them will save some drive space.
  • 54.
    Backing Up Projects andEvents Click OK, and then press Command-9 to open the Background Tasks window and monitor the duplication process in the Media Management line.
  • 55.
    Shortcuts in Lesson12 • Export movieCommand E • Show audio metersCommand Shift 8 • Open the Color BoardCommand 6 • Open the video scopesCommand 7 • Open Background Tasks windowCommand 9
  • 56.
    Apple Pro Training Series FinalCut Pro X Instructor: Sam Edsall Lesson 12: Exporting & Sharing Your Project