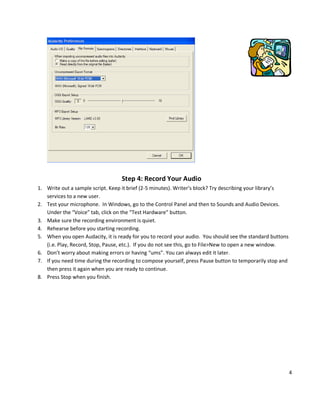
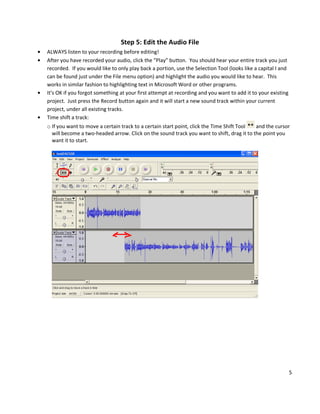
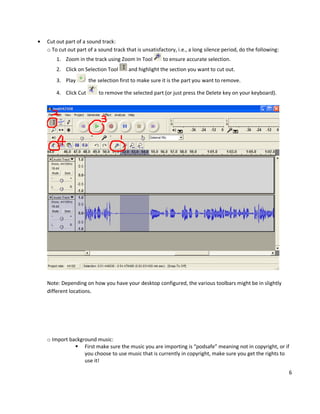
This document provides step-by-step instructions for creating and publishing a podcast using the free audio editing software Audacity and hosting platform Podbean. The instructions cover setting up Audacity preferences, recording and editing audio, importing background music, exporting the final file as an MP3, and uploading it to a new Podbean account along with show details.
OnSong automatically links your chord chart to songs in iTunes. Learn how to playback audio files, and even use a metronome for live performance or practice.
A workshop delivered to students as part of the Information Services Fall 2011 Instructional Series at the Faculty of Information, University of Toronto.
This tutorial will guide you on how to create a funny audio story using Voice Changer Software Diamond 8.0 (VCSD8) and Music Morpher Gold (MMG). There are plenty of jokes at Audio4fun Community that will instantly cheer you up or can be used as script for a funny audio story.
A presentation for the 2/10/10 Pacific Northwest RML Rendezvous webinar. Intended to introduce health sciences librarians to the topic of public health.
Since Audacity is the perfect tool for mixing several tracks together and fading in/out
different tracks, it makes it the perfect tool for podcast or radio show creation.
Marsha Chan demonstrates Audacity, a free, cross-platform, downloadable audio editor-recorder that she uses for language learning. She creates and broadcasts narratives, model dialogs, instructions, songs, and other types of podcasts. She uses recordings to provide students personalized audio feedback and correction on their speaking. She embeds sound files into web pages and multimedia. In this presentation, she shows how to get started.
Create a Romantic Audio for Valentine's Dayaudio4fun
This tutorial will guide you on how to create an audio story for the upcoming Valentine using Voice Changer Software Diamond (VCSD) and Music Morpher Gold (MMG).
How to Use AudioMass.Co (Podcasting 101).pptxgeekhouse.io
AudioMass.co is a free, open-source audio editing software that provides basic audio editing capabilities for podcasting and audio production. This presentation will guide you through the features and functions of AudioMass.co, and demonstrate how to create, edit, and export your podcast. We will cover how to import audio files, navigate the waveform editor, perform basic edits such as cutting, pasting, and trimming, and add audio effects such as volume control and equalization. We will also show you how to mix multiple audio tracks together to create a final podcast and export it in different file formats. Additionally, we will provide tips and best practices for using AudioMass.co effectively and offer resources for further learning and improvement. However, it is important to keep in mind that AudioMass.co is a free, open-source software and may have some limitations compared to more advanced, paid audio editing software.
Key Trends Shaping the Future of Infrastructure.pdfCheryl Hung
Keynote at DIGIT West Expo, Glasgow on 29 May 2024.
Cheryl Hung, ochery.com
Sr Director, Infrastructure Ecosystem, Arm.
The key trends across hardware, cloud and open-source; exploring how these areas are likely to mature and develop over the short and long-term, and then considering how organisations can position themselves to adapt and thrive.
Software Delivery At the Speed of AI: Inflectra Invests In AI-Powered QualityInflectra
In this insightful webinar, Inflectra explores how artificial intelligence (AI) is transforming software development and testing. Discover how AI-powered tools are revolutionizing every stage of the software development lifecycle (SDLC), from design and prototyping to testing, deployment, and monitoring.
Learn about:
• The Future of Testing: How AI is shifting testing towards verification, analysis, and higher-level skills, while reducing repetitive tasks.
• Test Automation: How AI-powered test case generation, optimization, and self-healing tests are making testing more efficient and effective.
• Visual Testing: Explore the emerging capabilities of AI in visual testing and how it's set to revolutionize UI verification.
• Inflectra's AI Solutions: See demonstrations of Inflectra's cutting-edge AI tools like the ChatGPT plugin and Azure Open AI platform, designed to streamline your testing process.
Whether you're a developer, tester, or QA professional, this webinar will give you valuable insights into how AI is shaping the future of software delivery.
The Art of the Pitch: WordPress Relationships and SalesLaura Byrne
Clients don’t know what they don’t know. What web solutions are right for them? How does WordPress come into the picture? How do you make sure you understand scope and timeline? What do you do if sometime changes?
All these questions and more will be explored as we talk about matching clients’ needs with what your agency offers without pulling teeth or pulling your hair out. Practical tips, and strategies for successful relationship building that leads to closing the deal.
Kubernetes & AI - Beauty and the Beast !?! @KCD Istanbul 2024Tobias Schneck
As AI technology is pushing into IT I was wondering myself, as an “infrastructure container kubernetes guy”, how get this fancy AI technology get managed from an infrastructure operational view? Is it possible to apply our lovely cloud native principals as well? What benefit’s both technologies could bring to each other?
Let me take this questions and provide you a short journey through existing deployment models and use cases for AI software. On practical examples, we discuss what cloud/on-premise strategy we may need for applying it to our own infrastructure to get it to work from an enterprise perspective. I want to give an overview about infrastructure requirements and technologies, what could be beneficial or limiting your AI use cases in an enterprise environment. An interactive Demo will give you some insides, what approaches I got already working for real.
State of ICS and IoT Cyber Threat Landscape Report 2024 previewPrayukth K V
The IoT and OT threat landscape report has been prepared by the Threat Research Team at Sectrio using data from Sectrio, cyber threat intelligence farming facilities spread across over 85 cities around the world. In addition, Sectrio also runs AI-based advanced threat and payload engagement facilities that serve as sinks to attract and engage sophisticated threat actors, and newer malware including new variants and latent threats that are at an earlier stage of development.
The latest edition of the OT/ICS and IoT security Threat Landscape Report 2024 also covers:
State of global ICS asset and network exposure
Sectoral targets and attacks as well as the cost of ransom
Global APT activity, AI usage, actor and tactic profiles, and implications
Rise in volumes of AI-powered cyberattacks
Major cyber events in 2024
Malware and malicious payload trends
Cyberattack types and targets
Vulnerability exploit attempts on CVEs
Attacks on counties – USA
Expansion of bot farms – how, where, and why
In-depth analysis of the cyber threat landscape across North America, South America, Europe, APAC, and the Middle East
Why are attacks on smart factories rising?
Cyber risk predictions
Axis of attacks – Europe
Systemic attacks in the Middle East
Download the full report from here:
https://sectrio.com/resources/ot-threat-landscape-reports/sectrio-releases-ot-ics-and-iot-security-threat-landscape-report-2024/
"Impact of front-end architecture on development cost", Viktor TurskyiFwdays
I have heard many times that architecture is not important for the front-end. Also, many times I have seen how developers implement features on the front-end just following the standard rules for a framework and think that this is enough to successfully launch the project, and then the project fails. How to prevent this and what approach to choose? I have launched dozens of complex projects and during the talk we will analyze which approaches have worked for me and which have not.
Essentials of Automations: Optimizing FME Workflows with ParametersSafe Software
Are you looking to streamline your workflows and boost your projects’ efficiency? Do you find yourself searching for ways to add flexibility and control over your FME workflows? If so, you’re in the right place.
Join us for an insightful dive into the world of FME parameters, a critical element in optimizing workflow efficiency. This webinar marks the beginning of our three-part “Essentials of Automation” series. This first webinar is designed to equip you with the knowledge and skills to utilize parameters effectively: enhancing the flexibility, maintainability, and user control of your FME projects.
Here’s what you’ll gain:
- Essentials of FME Parameters: Understand the pivotal role of parameters, including Reader/Writer, Transformer, User, and FME Flow categories. Discover how they are the key to unlocking automation and optimization within your workflows.
- Practical Applications in FME Form: Delve into key user parameter types including choice, connections, and file URLs. Allow users to control how a workflow runs, making your workflows more reusable. Learn to import values and deliver the best user experience for your workflows while enhancing accuracy.
- Optimization Strategies in FME Flow: Explore the creation and strategic deployment of parameters in FME Flow, including the use of deployment and geometry parameters, to maximize workflow efficiency.
- Pro Tips for Success: Gain insights on parameterizing connections and leveraging new features like Conditional Visibility for clarity and simplicity.
We’ll wrap up with a glimpse into future webinars, followed by a Q&A session to address your specific questions surrounding this topic.
Don’t miss this opportunity to elevate your FME expertise and drive your projects to new heights of efficiency.
Let's dive deeper into the world of ODC! Ricardo Alves (OutSystems) will join us to tell all about the new Data Fabric. After that, Sezen de Bruijn (OutSystems) will get into the details on how to best design a sturdy architecture within ODC.
Slack (or Teams) Automation for Bonterra Impact Management (fka Social Soluti...Jeffrey Haguewood
Sidekick Solutions uses Bonterra Impact Management (fka Social Solutions Apricot) and automation solutions to integrate data for business workflows.
We believe integration and automation are essential to user experience and the promise of efficient work through technology. Automation is the critical ingredient to realizing that full vision. We develop integration products and services for Bonterra Case Management software to support the deployment of automations for a variety of use cases.
This video focuses on the notifications, alerts, and approval requests using Slack for Bonterra Impact Management. The solutions covered in this webinar can also be deployed for Microsoft Teams.
Interested in deploying notification automations for Bonterra Impact Management? Contact us at sales@sidekicksolutionsllc.com to discuss next steps.
UiPath Test Automation using UiPath Test Suite series, part 3DianaGray10
Welcome to UiPath Test Automation using UiPath Test Suite series part 3. In this session, we will cover desktop automation along with UI automation.
Topics covered:
UI automation Introduction,
UI automation Sample
Desktop automation flow
Pradeep Chinnala, Senior Consultant Automation Developer @WonderBotz and UiPath MVP
Deepak Rai, Automation Practice Lead, Boundaryless Group and UiPath MVP
1. Can You Hear Me Now? How to Make a Podcast
Part One: Creating a Podcast Using Audacity
Step 1: Things You Need
1. Computer with broadband Internet access.
2. Audacity version 1.2.6 (http://audacity.sourceforge.net/). Download and install it on your computer.
3. LAME encoder. This can be found on the same webpage with the download link for Audacity. Click on
link under “Optional Downloads.” Follow the link for the operating system you use (Mac or Windows).
Click on the download link for your proper operating system. Download, unzip the file and save
lame_enc.dll to a location where you can find it later.
4. A microphone and speakers (or a headset). Connect them to your computer.
Some examples of decent, affordable headsets/mics:
Sennheiser PC 131, Sennheiser 166
Plantronics Audio 90 Multimedia Stereo PC Headset
Verse 524 Desktop Mic
Plantronics Audio 325
(There is a nice summary of equipment recommended here: http://www.how-to-podcast-
tutorial.com/11-basic-podcasting-gear.htm).
Step 2: Familiarize Yourself with the Control Panel
General Control Panel
Skip to Start – Moves the cursor at time 0.
Play – Starts playing audio at the cursor position.
Record – Starts recording when pressing this button.
Pause – Temporarily stops playing or recording until you press Pause again.
Stop – Stops playing or recording. You must do this before editing, saving, or exporting.
Skip to End – Moves the cursor to the end of the track.
Last updated 8.3.09
2. Playback and Recording Meters – For monitoring input and output audio levels.
Mixer Toolbar – For setting volume levels
of your input and output audio device and choosing your input source (i.e., an external mic).
Selection Tool – For selecting the range of audio you want to edit or listen to.
Envelop Tool – For changing the volume over time.
Draw Tool – For modifying individual samples.
Zoom Tool – For zooming in and out.
Time Shift Tool – For sliding tracks left or right.
Multi-Tool Mode.
Zooming Tools.
Undo/Redo.
Cut, Copy, Paste, Trim and Silence Tools.
Track Control
On the left side of each sound track there is the Track Control, which indicates audio format, sample rate, etc.
You can mute a track while playing/recording another from this control panel.
The default name for a new track is “Audio Track”. Click on the drop down triangle next to the track name to
rename it. You can also change its properties from the drop down list.
2
3. Step 3: Set Your Audacity Preferences
It is recommended to set the Audacity preferences before your first recording.
1. Open the Preferences Window: Edit menu Preferences.
2. Audio I/O tab: set the inputs based on your own recording setup. (i.e. Find your devices from the drop
down menus) These are set to default at 44100 Hz for the sample rate and 16-bit for sample format –
these are fine to leave as they are.
3. Quality tab: For CD quality, set Default Sample Rate to 44100 Hz, Default Sample Format to 16-bit.
Tip: 16-bit takes up the least space and is equivalent to audio CD quality. 32-bit float takes up twice as
much space but is much more flexible and the sound quality is better.
4. File Formats tab: for Uncompressed Export Format, choose WAV (for Windows) or AIFF (for Mac).
3
4. Step 4: Record Your Audio
1. Write out a sample script. Keep it brief (2-5 minutes). Writer’s block? Try describing your library’s
services to a new user.
2. Test your microphone. In Windows, go to the Control Panel and then to Sounds and Audio Devices.
Under the “Voice” tab, click on the “Test Hardware” button.
3. Make sure the recording environment is quiet.
4. Rehearse before you starting recording.
5. When you open Audacity, it is ready for you to record your audio. You should see the standard buttons
(i.e. Play, Record, Stop, Pause, etc.). If you do not see this, go to File>New to open a new window.
6. Don’t worry about making errors or having “ums”. You can always edit it later.
7. If you need time during the recording to compose yourself, press Pause button to temporarily stop and
then press it again when you are ready to continue.
8. Press Stop when you finish.
4
5. Step 5: Edit the Audio File
ALWAYS listen to your recording before editing!
After you have recorded your audio, click the “Play” button. You should hear your entire track you just
recorded. If you would like to only play back a portion, use the Selection Tool (looks like a capital I and
can be found just under the File menu option) and highlight the audio you would like to hear. This
works in similar fashion to highlighting text in Microsoft Word or other programs.
It’s OK if you forgot something at your first attempt at recording and you want to add it to your existing
project. Just press the Record button again and it will start a new sound track within your current
project, under all existing tracks.
Time shift a track:
o If you want to move a certain track to a certain start point, click the Time Shift Tool and the cursor
will become a two-headed arrow. Click on the sound track you want to shift, drag it to the point you
want it to start.
5
6. Cut out part of a sound track:
o To cut out part of a sound track that is unsatisfactory, i.e., a long silence period, do the following:
1. Zoom in the track using Zoom In Tool to ensure accurate selection.
2. Click on Selection Tool and highlight the section you want to cut out.
3. Play the selection first to make sure it is the part you want to remove.
4. Click Cut to remove the selected part (or just press the Delete key on your keyboard).
Note: Depending on how you have your desktop configured, the various toolbars might be in slightly
different locations.
o Import background music:
First make sure the music you are importing is “podsafe” meaning not in copyright, or if
you choose to use music that is currently in copyright, make sure you get the rights to
use it!
6
7. Example of a website to find podsafe audio: http://podsafeaudio.com.
To On the right navigation bar, choose “by music genre” and pick your genre. The example
download… below is from the “Indie” category.
To listen before
committing……
Save the file somewhere where you can find it later (e.g. your computer desktop)
Use Project Import Audio
From the pop-up window, browse to the music file that you want to use as background
music
Click Open, and the file will be imported as a separate track under existing sound track(s)
7
8. Fade in the first part of the background music:
o Select the part of the background music that will be faded in using the Selection Tool
o Click Effect Fade In
Following is a comparison before (left) and after (right) using the “Fade In” effect and you can see the
difference. You can repeat the process until you think it’s good to go.
8
9. For most of the “talk” portion of your podcast, you may choose to not have any background audio. You
can use the Fade Out effect to have “outro” music. (Outro is the opposite of Intro).
Fade out the last part of the background music
o Similar to Fade In, but choose Effect Fade Out from the menu.
Step 6: Export as MP3 File
Exporting to MP3 file format reduces file size for easy upload and download, and enables maximum
compatibility on different digital media player. Use File Export as MP3.
The first time you export a file as MP3, Audacity will ask you to locate the LAME encoder (you will be asked to do
this only the first time).
Click Yes and browse to the location where you saved the lame_enc.dll file in Step 1, and click Open.
9
10. A window for “Edit ID3 tags” might pop up for you to fill out the
information of this file, which can be read by digital media players.
You can also do this manually by clicking Project Edit ID3 Tags.
Click OK and the exporting starts!
When exporting as MP3 file, the bit rate used is usually 64 kbps for
voice recording, and 128 kbps for music files. You can change the bit
rate at Edit Preferences File Formats MP3 Export Setup.
Save your final .mp3 file to the desktop so you can find it for the next
steps.
10
11. Part 2: Uploading Your Podcast to Podbean
Step 7: Create Account and Upload files to Podbean
1. Go to http://www.podbean.com and create an account if you do not have one already. Click “Sign Up”
to do this. Choose the Free version. Podbean usually sends you a confirmation email with your
password – so make sure you use a working email account!
2. Enter a member name. This will be your domain name (URL) for your podcast.
3. Once you have created your account, click on “Publish a
podcast.”
4. You will now be on the “Dashboard” for your new
podcast. For blog users, this will look familiar.
5. Click on “Publish a new show.”
6. Enter some tags to help identify your show (ask if you
aren’t sure what a tag is!)
7. Enter a title and write a small post
(description). The post is optional.
8. Add your media file that you
created in Part One, and then click
Publish.
9. View your podcast blog
( http://username.podbean.com)
Anyone can now subscribe to your
podcast blog using RSS. Share your link
with others!
11