This document provides instructions for using Adobe Premiere Pro to edit video clips. It describes opening a new project, importing clips, arranging clips on the timeline, adding video transitions between clips, applying video effects, rendering the project, and exporting the final edited video file.
How to import videos, trim/make clips (excerpts) from long videos, use the storyboard, difference between project files (MWSMM files) and actual movie (WMV files)
Downloading Youtube Videos for Use in Your PresentationAl Bonner
NEW!!!! Have you ever wanted to use a YouTube video in your PowerPoint or Keynote presentation, but couldn’t figure out how to download it to your computer? There’s an easier way that allows you to seamlessly download a copy of the video and then embed it right into your slide. This presentation has been updated with new tools.
Windows Movie Maker is a free and easy-guided movie editing software for beginners. WMM has also been popular in creating ePorfolio and digital storytelling. This tutorial leads users to create a short digital story by using basic functions and a few effects in WMM.
Firecoresoft video converter user guideamalejackie
Firecoresoft video converter convert most of video like VCHD (MTS, M2TS) (H.264), HD FLV, HD MKV (H.264, MPEG-2), HD MOV (MPEG-4, H.264), HD MPG, HD TRP, HD TS, HD WMV (VC-1), MOD, TOD, XAVC, MXF, H.265 to avi, mp4, mov, flv, mkv, 3gp, etc.
Firecoresoft slideshow fairy user guideamalejackie
Firecoresoft Slideshow Fairy for Mac is a powerful and straightforward Flash gallery creator. http://www.firecoresoft.com/flash-photo-slideshow-mac.html
How to use Firecoresoft DVD Maker for Mac burn DVD with all popular videos in formats such as MP4, AVI, HDV, WMV, MOV, FLV, MOV, AVCHD etc. http://www.firecoresoft.com/dvd-maker-mac.html
Welcome to TechSoup New Member Orientation and Q&A (May 2024).pdfTechSoup
In this webinar you will learn how your organization can access TechSoup's wide variety of product discount and donation programs. From hardware to software, we'll give you a tour of the tools available to help your nonprofit with productivity, collaboration, financial management, donor tracking, security, and more.
Read| The latest issue of The Challenger is here! We are thrilled to announce that our school paper has qualified for the NATIONAL SCHOOLS PRESS CONFERENCE (NSPC) 2024. Thank you for your unwavering support and trust. Dive into the stories that made us stand out!
Unit 8 - Information and Communication Technology (Paper I).pdfThiyagu K
This slides describes the basic concepts of ICT, basics of Email, Emerging Technology and Digital Initiatives in Education. This presentations aligns with the UGC Paper I syllabus.
Embracing GenAI - A Strategic ImperativePeter Windle
Artificial Intelligence (AI) technologies such as Generative AI, Image Generators and Large Language Models have had a dramatic impact on teaching, learning and assessment over the past 18 months. The most immediate threat AI posed was to Academic Integrity with Higher Education Institutes (HEIs) focusing their efforts on combating the use of GenAI in assessment. Guidelines were developed for staff and students, policies put in place too. Innovative educators have forged paths in the use of Generative AI for teaching, learning and assessments leading to pockets of transformation springing up across HEIs, often with little or no top-down guidance, support or direction.
This Gasta posits a strategic approach to integrating AI into HEIs to prepare staff, students and the curriculum for an evolving world and workplace. We will highlight the advantages of working with these technologies beyond the realm of teaching, learning and assessment by considering prompt engineering skills, industry impact, curriculum changes, and the need for staff upskilling. In contrast, not engaging strategically with Generative AI poses risks, including falling behind peers, missed opportunities and failing to ensure our graduates remain employable. The rapid evolution of AI technologies necessitates a proactive and strategic approach if we are to remain relevant.
Synthetic Fiber Construction in lab .pptxPavel ( NSTU)
Synthetic fiber production is a fascinating and complex field that blends chemistry, engineering, and environmental science. By understanding these aspects, students can gain a comprehensive view of synthetic fiber production, its impact on society and the environment, and the potential for future innovations. Synthetic fibers play a crucial role in modern society, impacting various aspects of daily life, industry, and the environment. ynthetic fibers are integral to modern life, offering a range of benefits from cost-effectiveness and versatility to innovative applications and performance characteristics. While they pose environmental challenges, ongoing research and development aim to create more sustainable and eco-friendly alternatives. Understanding the importance of synthetic fibers helps in appreciating their role in the economy, industry, and daily life, while also emphasizing the need for sustainable practices and innovation.
Biological screening of herbal drugs: Introduction and Need for
Phyto-Pharmacological Screening, New Strategies for evaluating
Natural Products, In vitro evaluation techniques for Antioxidants, Antimicrobial and Anticancer drugs. In vivo evaluation techniques
for Anti-inflammatory, Antiulcer, Anticancer, Wound healing, Antidiabetic, Hepatoprotective, Cardio protective, Diuretics and
Antifertility, Toxicity studies as per OECD guidelines
The Roman Empire A Historical Colossus.pdfkaushalkr1407
The Roman Empire, a vast and enduring power, stands as one of history's most remarkable civilizations, leaving an indelible imprint on the world. It emerged from the Roman Republic, transitioning into an imperial powerhouse under the leadership of Augustus Caesar in 27 BCE. This transformation marked the beginning of an era defined by unprecedented territorial expansion, architectural marvels, and profound cultural influence.
The empire's roots lie in the city of Rome, founded, according to legend, by Romulus in 753 BCE. Over centuries, Rome evolved from a small settlement to a formidable republic, characterized by a complex political system with elected officials and checks on power. However, internal strife, class conflicts, and military ambitions paved the way for the end of the Republic. Julius Caesar’s dictatorship and subsequent assassination in 44 BCE created a power vacuum, leading to a civil war. Octavian, later Augustus, emerged victorious, heralding the Roman Empire’s birth.
Under Augustus, the empire experienced the Pax Romana, a 200-year period of relative peace and stability. Augustus reformed the military, established efficient administrative systems, and initiated grand construction projects. The empire's borders expanded, encompassing territories from Britain to Egypt and from Spain to the Euphrates. Roman legions, renowned for their discipline and engineering prowess, secured and maintained these vast territories, building roads, fortifications, and cities that facilitated control and integration.
The Roman Empire’s society was hierarchical, with a rigid class system. At the top were the patricians, wealthy elites who held significant political power. Below them were the plebeians, free citizens with limited political influence, and the vast numbers of slaves who formed the backbone of the economy. The family unit was central, governed by the paterfamilias, the male head who held absolute authority.
Culturally, the Romans were eclectic, absorbing and adapting elements from the civilizations they encountered, particularly the Greeks. Roman art, literature, and philosophy reflected this synthesis, creating a rich cultural tapestry. Latin, the Roman language, became the lingua franca of the Western world, influencing numerous modern languages.
Roman architecture and engineering achievements were monumental. They perfected the arch, vault, and dome, constructing enduring structures like the Colosseum, Pantheon, and aqueducts. These engineering marvels not only showcased Roman ingenuity but also served practical purposes, from public entertainment to water supply.
Introduction to AI for Nonprofits with Tapp NetworkTechSoup
Dive into the world of AI! Experts Jon Hill and Tareq Monaur will guide you through AI's role in enhancing nonprofit websites and basic marketing strategies, making it easy to understand and apply.
Introduction to AI for Nonprofits with Tapp Network
Premiere How To Guide
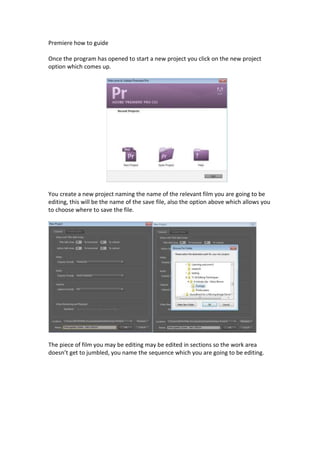
1. Premiere how to guide
Once the program has opened to start a new project you click on the new project
option which comes up.
You create a new project naming the name of the relevant film you are going to be
editing, this will be the name of the save file, also the option above which allows you
to choose where to save the file.
The piece of film you may be editing may be edited in sections so the work area
doesn’t get to jumbled, you name the sequence which you are going to be editing.
2. The empty workspace will now be open for you to add clips, the bottom being the
timeline, left being effects, top left the list of clips which you have imported, middle
is the editing of singular clip and the far right being the video player linked to the
timeline.
Now your ready to import the clips which need to be edited, going to the file tab
then pressing import which takes you to an option looking through your folders on
the computer. Then choosing the clips that are needed.
3. The clips once imported will appear in the far left section with the clips named as
they are named in the folder, best advised to name them in sequence before they
are edited so it makes the editing process a lot easier.
to adjust the individual clip before it is put in the timeline you double click the file
and it will appear in the middle section video player.
4. To select the part of the clip which you would like to paste into the timeline (advised
not to place whole clip in otherwise transitions cannot be added to the end of a clip)
you press ‘I’ for the beginning section of the clip and ‘O’ to stop the amount of clip
being used.
When editing the clips may appear small on the timeline, and the amount of seconds
on the timeline may not be as spread out as you may like making it difficult to see
when to cut, there is an option at the bottom left of the timeline section which
allows you to adjust the timecode on the timeline.
5. Do this for a few clips, once there are a few clips in the timeline your sequence is
starting to come together and without a transition inbetween the clips may look
rough when put together not giving a flow to the sequence. On the bottom left
section on screen this is your list of different effects for audio and video transitions &
effects, to add an effect you click on ‘Video Transitions’ then there are different
options for the change between a clip I would use ‘Dissolve then Additive dissolve or
cross dissolve.
Some clips may ned an adjustment such as black or white, or the shot may be from a
point of view and your trying to make the characters vision look funny you could add
an effect which adjusts the image. To do so on the drop down menu with transitions,
6. video effects is one of the options and in there is a group of different effects which
can be added, for this I wanted to disfigure the characters face so I used bend in the
distort section.
To end a sequence instead of allowing the clip to cut straight to black you can create
a fade into the end of the clip using the Dip to black transition which is in the same
‘Dissolve’ section.
7. When the effects are dragged on to the timeline so you know where they effect your
clip they come up purple on the video section on the timeline.
After the effects have been added the file is unable to be exported, because the
effects added to clip do not make it work, they have to be rendered, this is done by
going to the ‘Sequence’ section on the top task bar then on the drop down menu
pressing ‘Render entire work area’ making sure the film is at the beginning on the
timeline.
8. After the file has been ready it can now be exported, it is made clear that the file is
ready to be watched when the files which may need rendering, on the top part of
the timeline by the timecode is now green, which was before red which signifies that
it needs to be rendered.
To export the file you go to the ‘File’ menu on the taskbar at the top then on the
dropdown menu to export then ‘Media’ if you want to use the keyboard shortcut
you can press ‘Ctrl M’ on computers or ‘cmnd M’ on Apple Macs.
9. Once this is done a page will come up giving you the options for different formats
which you want to use depending on the quality of the film and where it is being
showcased.
10. For a small size and easily compatible video when you xport it choose the option
Microsoft AVI if using computer or for youtube, then Quick time played for mac, or
quick time for both. In this occasion I chose Microsoft AVI.
The file has been chosen where to save but you may want to export it to a different
folder so you click the circled ‘Output name’ option then choose the filder in which
you would like to export it too, then pressing the export button to do so.
11. Using The Media Encoder
The idea of the meida encoder is to change the format of a file, if for some reason
the video file you are wanting to edit is not compatitble with premiere or your
editing software, media encoder allows you to change the format of your files,
leaving the original file then creating a new one.
Once you have opened the media encoder it opens a small window with and empty
box which the files will be imported into.
12. To add files to the media encoder there is a button on the page called ‘Add’ this
allows you to look through your folders hoosing the files to upload.
The files will be imported into what was the empty box now making clear what the
headers at the top of the box meant, the file being split up into sections on screen
for the name, file type, file you want to convert it to, where the file will be exported
13. to and its status as to whether it was exporting on waiting to be exported as it is
now.
Now you have to choose the format which you would like to export your clip to, I
chose Microsoft AVI as I know it is compatible with Microsoft AVI do not export to
this if you are intending on editing with a mac because it is not a compatible format.
14. Now choosing the location that the files need to be saved to making sure you do this
for each individual file otherwise it will not work for all of them unless you opt for it
to do so.
Now the files are ready to be exported to do so, as the files are individually being
converterted they have to be queued, to start the conversion you press the ‘Start
Queue’ button.