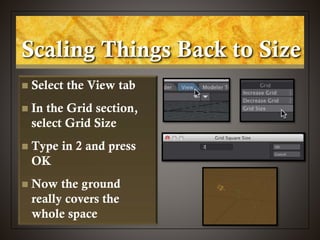
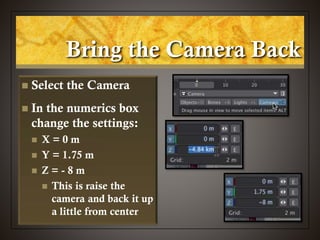
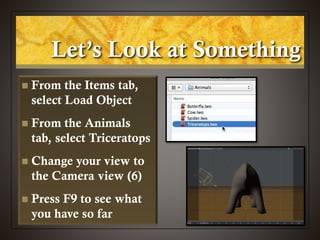
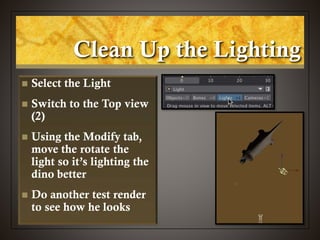
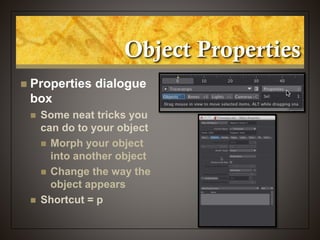
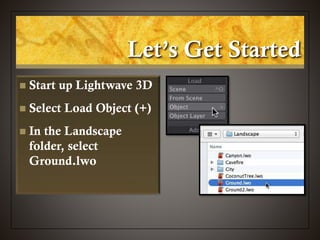
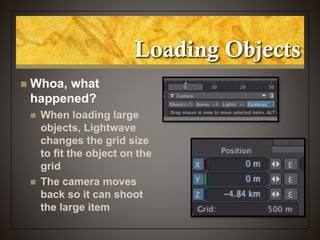
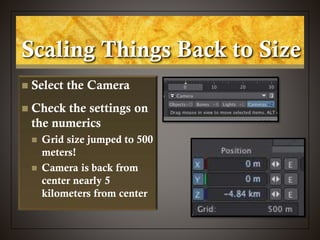
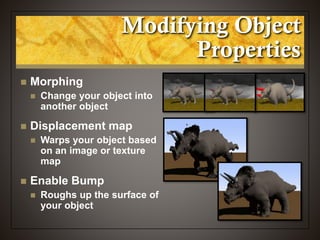
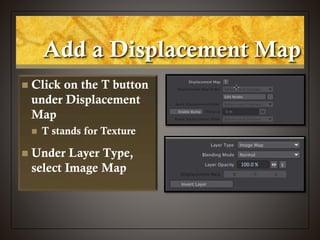
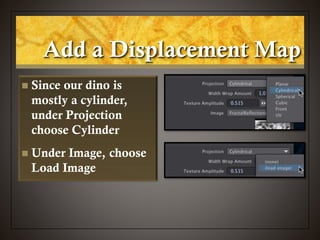
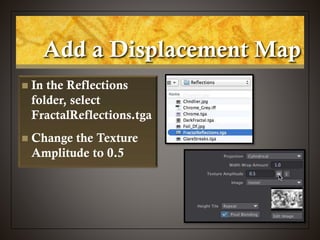
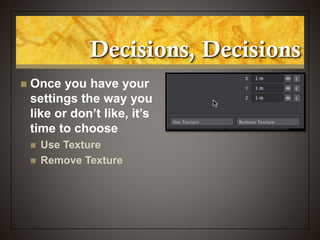
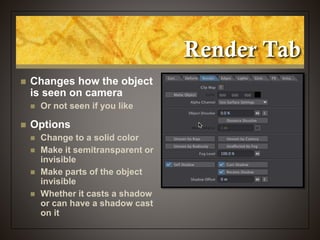
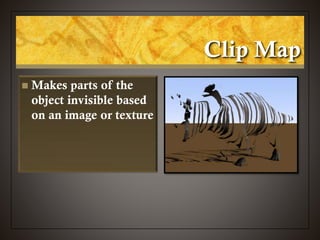
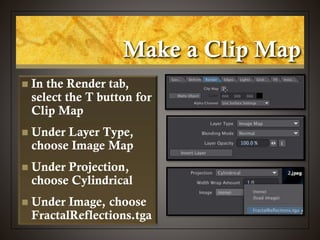
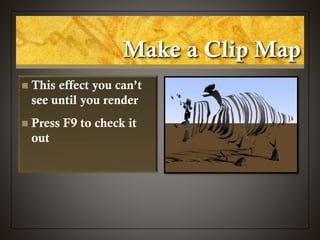
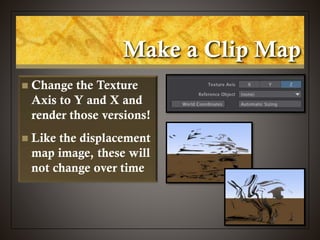
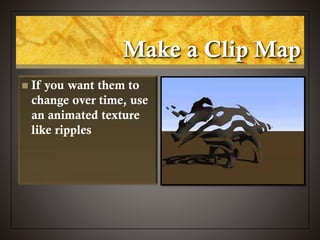
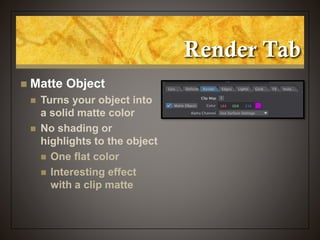
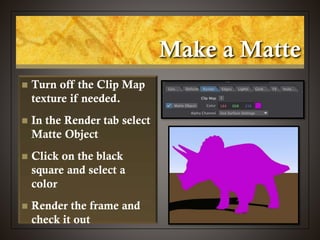
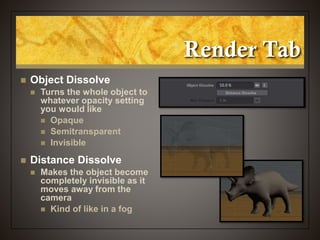
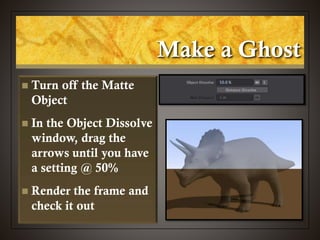
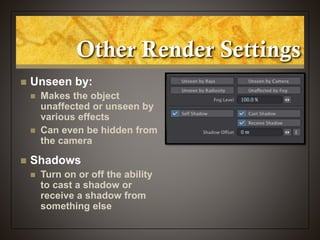
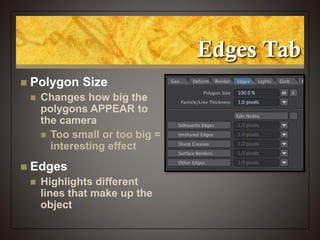
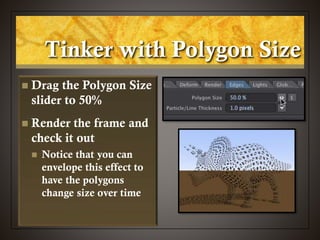
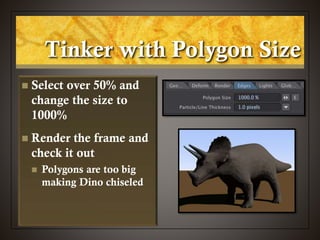
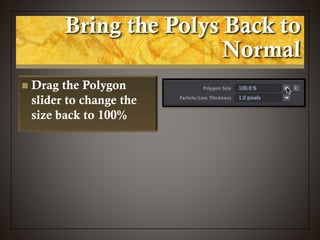
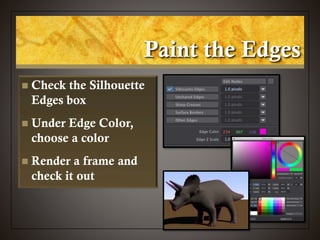
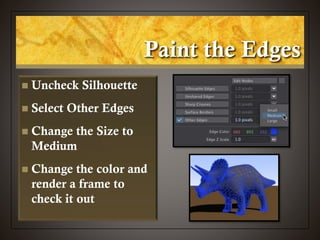
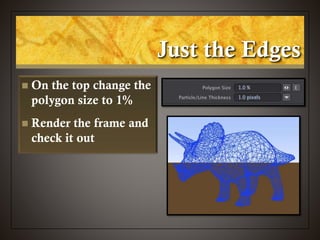
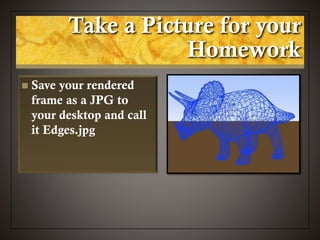
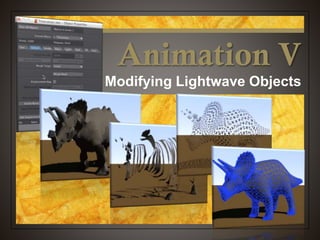
Animation V
Modifying Lightwave Objects
Object Properties
 Properties dialogue
box
 Some neat tricks you
can do to your object
 Morph your object
into another object
 Change the way the
object appears
 Shortcut = p
Let’s Get Started
 Start up Lightwave 3D
 Select Load Object (+)
 In the Landscape
folder, select
Ground.lwo
Loading Objects
 Whoa, what
happened?
 When loading large
objects, Lightwave
changes the grid size
to fit the object on the
grid
 The camera moves
back so it can shoot
the large item
Scaling Things Back to Size
 Select the Camera
 Check the settings on
the numerics
 Grid size jumped to 500
meters!
 Camera is back from
center nearly 5
kilometers from center
Scaling Things Back to Size
 Select the View tab
 In the Grid section,
select Grid Size
 Type in 2 and press
OK
 Now the ground
really covers the
whole space
Bring the Camera Back
 Select the Camera
 In the numerics box
change the settings:
 X = 0 m
 Y = 1.75 m
 Z = - 8 m
 This is raise the
camera and back it up
a little from center
Let’s Look at Something
 From the Items tab,
select Load Object
 From the Animals
tab, select Triceratops
 Change your view to
the Camera view (6)
 Press F9 to see what
you have so far
Clean Up the Lighting
 Select the Light
 Switch to the Top view
(2)
 Using the Modify tab,
move the rotate the
light so it’s lighting the
dino better
 Do another test render
to see how he looks
How About Some
Background?
 Lighting is better, but
he needs a backdrop
 Select Windows >
Backdrop Options
How About Some
Background?
 Lighting is better, but
he needs a backdrop
 Select Windows >
Backdrop Options
 Turn on the gradient
backdrop
 Do another test
render
Modifying Object
Properties
 Under Objects, make
sure Triceratops is
selected
 Click on the
Properties button (p)
Modifying Object
Properties
 Select the 2nd tab
Deform
 Morphing
 Displacement map
 Enable Bump
Modifying Object
Properties
 Morphing
 Change your object into
another object
 Displacement map
 Warps your object based
on an image or texture
map
 Enable Bump
 Roughs up the surface of
your object
Add a Displacement Map
 Click on the T button
under Displacement
Map
 T stands for Texture
 Under Layer Type,
select Image Map
 Since our dino is
mostly a cylinder,
under Projection
choose Cylinder
 Under Image, choose
Load Image
Add a Displacement Map
 In the Reflections
folder, select
FractalReflections.tga
 Change the Texture
Amplitude to 0.5
Add a Displacement Map
 Do another test render
to check him out
 This displacement is
caused by an image and
doesn’t change over time
 Modify the
displacement by
choosing different
Texture Axis
Add a Displacement Map
 Render this frame (F9)
and Save the frame as
Displacement.jpg to
the desktop.
Take a Picture for your
Homework
Animated Displacement
 Change the Layer Type
to Procedural Texture
 Change the Procedural
Type to Ripples
 Press the Play button to
see how this
displacement map
changes over time
Animated Displacement
 Change the settings:
 Texture Value = 0.05
 Wave Sources = 1
 Wavelength = 0.5
 Wave Speed = 0.02
 As you change these
settings, watch what
happens to dino!
Decisions, Decisions
 Once you have your
settings the way you
like or don’t like, it’s
time to choose
 Use Texture
 Remove Texture
Reset the Board
 At the bottom of the
Displacement Map
dialogue box choose
Remove Texture
 This turns it off for
now, but you can go
back and turn it back on
if you like
 We are going to try out
some other tricks for
now
Render Tab
 Changes how the object
is seen on camera
 Or not seen if you like
 Options
 Change to a solid color
 Make it semitransparent or
invisible
 Make parts of the object
invisible
 Whether it casts a shadow
or can have a shadow cast
on it
Clip Map
 Makes parts of the
object invisible based
on an image or texture
Make a Clip Map
 In the Render tab,
select the T button for
Clip Map
 Under Layer Type,
choose Image Map
 Under Projection,
choose Cylindrical
 Under Image, choose
FractalReflections.tga
Make a Clip Map
 This effect you can’t
see until you render
 Press F9 to check it
out
Take a Picture for your
Homework
 Save a JPG of this
render to the desktop
and call it
ClipMap.jpg
Make a Clip Map
 Change the Texture
Axis to Y and X and
render those versions!
 Like the displacement
map image, these will
not change over time
Make a Clip Map
 If you want them to
change over time, use
an animated texture
like ripples
Render Tab
 Matte Object
 Turns your object into
a solid matte color
 No shading or
highlights to the object
 One flat color
 Interesting effect
with a clip matte
Make a Matte
 Turn off the Clip Map
texture if needed.
 In the Render tab select
Matte Object
 Click on the black
square and select a
color
 Render the frame and
check it out
Render Tab
 Object Dissolve
 Turns the whole object to
whatever opacity setting
you would like
 Opaque
 Semitransparent
 Invisible
 Distance Dissolve
 Makes the object become
completely invisible as it
moves away from the
camera
 Kind of like in a fog
Make a Ghost
 Turn off the Matte
Object
 In the Object Dissolve
window, drag the
arrows until you have
a setting @ 50%
 Render the frame and
check it out
Take a Picture for your
Homework
 Save a JPG of your
render to the desktop
and save it as
Dissolve.jpg
Using an Envelope
 Allows you to change
parameters over time
 Key frames for
parameters, rather than
for the object itself
 Any time you see an E
box, that setting can
change over time
Make Dino Vanish
Over Time
 Set the Object
Dissolve to 0%
 Next to the Object
Dissolve box, click on
the E to open the
Envelope
 The Graphic Editor
opens up
 Looks complicated, but
it’s pretty easy
Make Dino Vanish
Over Time
 Click on the Key icon
just under the chart
 At frame 120 click on
the line
 This sets a keyframe for
Dino at 0%
 No transparency
Make Dino Vanish
Over Time
 Click another key
frame at frame 60
 Switch to the Drag
icon
 Now we are going to
change this value
Make Dino Vanish
Over Time
 Drag this key frame up to 100 %
 You should see the opacity ramp up from 0% from
frame 0 to 100% at frame 60, then back down to 0% at
frame 120.
 If not, use the drag tool to make these settings
Make Dino Vanish
Over Time
 Drag the Timeline
slider and notice how
your object fades out
to nothing and then
reappears
 Scary!!
Turning Off Envelopes
 Not as easy as
Textures
 Hold the Command key
and then click on the E
box
 Choose Remove
Envelope
 You can turn it back on
by clicking on the E
again if you want
Make Dino Vanish
Over Time
 Hold down the
Command key and
click on the envelope
box
 Choose Remove
Envelope
 Drag the Dissolve
slider back to 0%
Other Render Settings
 Unseen by:
 Makes the object
unaffected or unseen by
various effects
 Can even be hidden from
the camera
 Shadows
 Turn on or off the ability
to cast a shadow or
receive a shadow from
something else
Edges Tab
 Polygon Size
 Changes how big the
polygons APPEAR to
the camera
 Too small or too big =
interesting effect
 Edges
 Highlights different
lines that make up the
object
Tinker with Polygon Size
 Drag the Polygon Size
slider to 50%
 Render the frame and
check it out
 Notice that you can
envelope this effect to
have the polygons
change size over time
Tinker with Polygon Size
 Select over 50% and
change the size to
1000%
 Render the frame and
check it out
 Polygons are too big
making Dino chiseled
Bring the Polys Back to
Normal
 Drag the Polygon
slider to change the
size back to 100%
Paint the Edges
 Check the Silhouette
Edges box
 Under Edge Color,
choose a color
 Render a frame and
check it out
Paint the Edges
 Uncheck Silhouette
 Select Other Edges
 Change the Size to
Medium
 Change the color and
render a frame to
check it out
Just the Edges
 On the top change the
polygon size to 1%
 Render the frame and
check it out
Take a Picture for your
Homework
 Save your rendered
frame as a JPG to
your desktop and call
it Edges.jpg
Animation V
Modifying Lightwave Objects

NewTek Lightwave 3D: Modifying Lightwave Objects

  • 1.
  • 2.
    Object Properties  Propertiesdialogue box  Some neat tricks you can do to your object  Morph your object into another object  Change the way the object appears  Shortcut = p
  • 3.
    Let’s Get Started Start up Lightwave 3D  Select Load Object (+)  In the Landscape folder, select Ground.lwo
  • 4.
    Loading Objects  Whoa,what happened?  When loading large objects, Lightwave changes the grid size to fit the object on the grid  The camera moves back so it can shoot the large item
  • 5.
    Scaling Things Backto Size  Select the Camera  Check the settings on the numerics  Grid size jumped to 500 meters!  Camera is back from center nearly 5 kilometers from center
  • 6.
    Scaling Things Backto Size  Select the View tab  In the Grid section, select Grid Size  Type in 2 and press OK  Now the ground really covers the whole space
  • 7.
    Bring the CameraBack  Select the Camera  In the numerics box change the settings:  X = 0 m  Y = 1.75 m  Z = - 8 m  This is raise the camera and back it up a little from center
  • 8.
    Let’s Look atSomething  From the Items tab, select Load Object  From the Animals tab, select Triceratops  Change your view to the Camera view (6)  Press F9 to see what you have so far
  • 9.
    Clean Up theLighting  Select the Light  Switch to the Top view (2)  Using the Modify tab, move the rotate the light so it’s lighting the dino better  Do another test render to see how he looks
  • 10.
    How About Some Background? Lighting is better, but he needs a backdrop  Select Windows > Backdrop Options
  • 11.
    How About Some Background? Lighting is better, but he needs a backdrop  Select Windows > Backdrop Options  Turn on the gradient backdrop  Do another test render
  • 12.
    Modifying Object Properties  UnderObjects, make sure Triceratops is selected  Click on the Properties button (p)
  • 13.
    Modifying Object Properties  Selectthe 2nd tab Deform  Morphing  Displacement map  Enable Bump
  • 14.
    Modifying Object Properties  Morphing Change your object into another object  Displacement map  Warps your object based on an image or texture map  Enable Bump  Roughs up the surface of your object
  • 15.
    Add a DisplacementMap  Click on the T button under Displacement Map  T stands for Texture  Under Layer Type, select Image Map
  • 16.
     Since ourdino is mostly a cylinder, under Projection choose Cylinder  Under Image, choose Load Image Add a Displacement Map
  • 17.
     In theReflections folder, select FractalReflections.tga  Change the Texture Amplitude to 0.5 Add a Displacement Map
  • 18.
     Do anothertest render to check him out  This displacement is caused by an image and doesn’t change over time  Modify the displacement by choosing different Texture Axis Add a Displacement Map
  • 19.
     Render thisframe (F9) and Save the frame as Displacement.jpg to the desktop. Take a Picture for your Homework
  • 20.
    Animated Displacement  Changethe Layer Type to Procedural Texture  Change the Procedural Type to Ripples  Press the Play button to see how this displacement map changes over time
  • 21.
    Animated Displacement  Changethe settings:  Texture Value = 0.05  Wave Sources = 1  Wavelength = 0.5  Wave Speed = 0.02  As you change these settings, watch what happens to dino!
  • 22.
    Decisions, Decisions  Onceyou have your settings the way you like or don’t like, it’s time to choose  Use Texture  Remove Texture
  • 23.
    Reset the Board At the bottom of the Displacement Map dialogue box choose Remove Texture  This turns it off for now, but you can go back and turn it back on if you like  We are going to try out some other tricks for now
  • 24.
    Render Tab  Changeshow the object is seen on camera  Or not seen if you like  Options  Change to a solid color  Make it semitransparent or invisible  Make parts of the object invisible  Whether it casts a shadow or can have a shadow cast on it
  • 25.
    Clip Map  Makesparts of the object invisible based on an image or texture
  • 26.
    Make a ClipMap  In the Render tab, select the T button for Clip Map  Under Layer Type, choose Image Map  Under Projection, choose Cylindrical  Under Image, choose FractalReflections.tga
  • 27.
    Make a ClipMap  This effect you can’t see until you render  Press F9 to check it out
  • 28.
    Take a Picturefor your Homework  Save a JPG of this render to the desktop and call it ClipMap.jpg
  • 29.
    Make a ClipMap  Change the Texture Axis to Y and X and render those versions!  Like the displacement map image, these will not change over time
  • 30.
    Make a ClipMap  If you want them to change over time, use an animated texture like ripples
  • 31.
    Render Tab  MatteObject  Turns your object into a solid matte color  No shading or highlights to the object  One flat color  Interesting effect with a clip matte
  • 32.
    Make a Matte Turn off the Clip Map texture if needed.  In the Render tab select Matte Object  Click on the black square and select a color  Render the frame and check it out
  • 33.
    Render Tab  ObjectDissolve  Turns the whole object to whatever opacity setting you would like  Opaque  Semitransparent  Invisible  Distance Dissolve  Makes the object become completely invisible as it moves away from the camera  Kind of like in a fog
  • 34.
    Make a Ghost Turn off the Matte Object  In the Object Dissolve window, drag the arrows until you have a setting @ 50%  Render the frame and check it out
  • 35.
    Take a Picturefor your Homework  Save a JPG of your render to the desktop and save it as Dissolve.jpg
  • 36.
    Using an Envelope Allows you to change parameters over time  Key frames for parameters, rather than for the object itself  Any time you see an E box, that setting can change over time
  • 37.
    Make Dino Vanish OverTime  Set the Object Dissolve to 0%  Next to the Object Dissolve box, click on the E to open the Envelope  The Graphic Editor opens up  Looks complicated, but it’s pretty easy
  • 38.
    Make Dino Vanish OverTime  Click on the Key icon just under the chart  At frame 120 click on the line  This sets a keyframe for Dino at 0%  No transparency
  • 39.
    Make Dino Vanish OverTime  Click another key frame at frame 60  Switch to the Drag icon  Now we are going to change this value
  • 40.
    Make Dino Vanish OverTime  Drag this key frame up to 100 %  You should see the opacity ramp up from 0% from frame 0 to 100% at frame 60, then back down to 0% at frame 120.  If not, use the drag tool to make these settings
  • 41.
    Make Dino Vanish OverTime  Drag the Timeline slider and notice how your object fades out to nothing and then reappears  Scary!!
  • 42.
    Turning Off Envelopes Not as easy as Textures  Hold the Command key and then click on the E box  Choose Remove Envelope  You can turn it back on by clicking on the E again if you want
  • 43.
    Make Dino Vanish OverTime  Hold down the Command key and click on the envelope box  Choose Remove Envelope  Drag the Dissolve slider back to 0%
  • 44.
    Other Render Settings Unseen by:  Makes the object unaffected or unseen by various effects  Can even be hidden from the camera  Shadows  Turn on or off the ability to cast a shadow or receive a shadow from something else
  • 45.
    Edges Tab  PolygonSize  Changes how big the polygons APPEAR to the camera  Too small or too big = interesting effect  Edges  Highlights different lines that make up the object
  • 46.
    Tinker with PolygonSize  Drag the Polygon Size slider to 50%  Render the frame and check it out  Notice that you can envelope this effect to have the polygons change size over time
  • 47.
    Tinker with PolygonSize  Select over 50% and change the size to 1000%  Render the frame and check it out  Polygons are too big making Dino chiseled
  • 48.
    Bring the PolysBack to Normal  Drag the Polygon slider to change the size back to 100%
  • 49.
    Paint the Edges Check the Silhouette Edges box  Under Edge Color, choose a color  Render a frame and check it out
  • 50.
    Paint the Edges Uncheck Silhouette  Select Other Edges  Change the Size to Medium  Change the color and render a frame to check it out
  • 51.
    Just the Edges On the top change the polygon size to 1%  Render the frame and check it out
  • 52.
    Take a Picturefor your Homework  Save your rendered frame as a JPG to your desktop and call it Edges.jpg
  • 53.