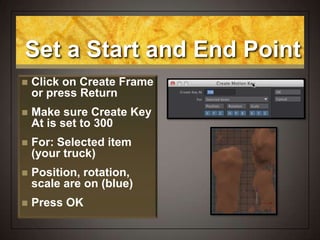
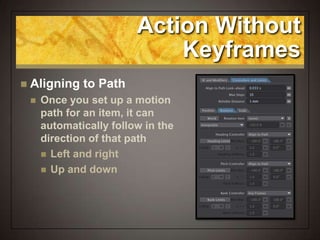
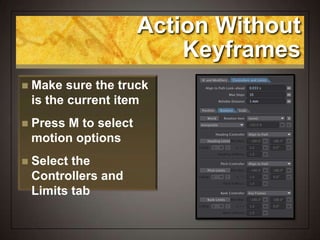
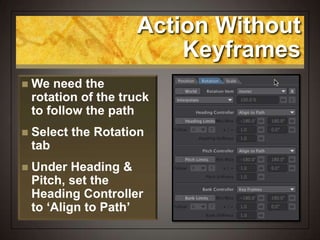
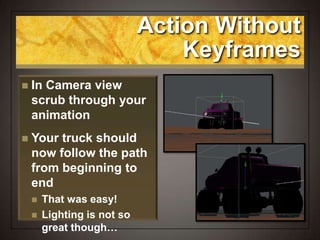
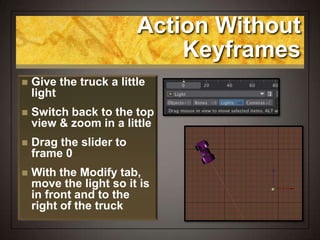
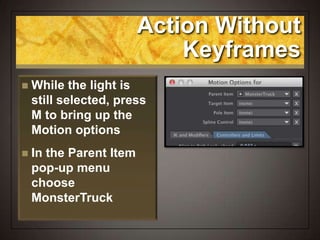
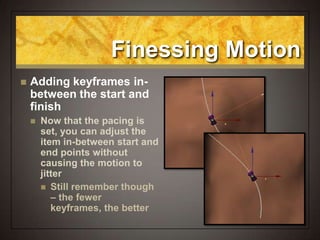
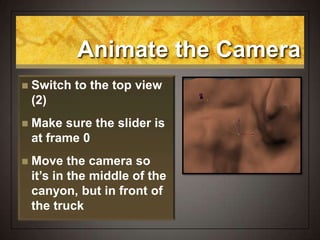
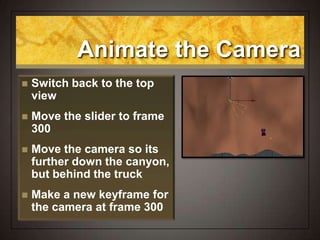
Animation VI
Keyframing in Lightwave
Keyframing
 Do this, do that…
 In order to items to
change over time, you
need to set down
reference points
(keyframes) to tell the
item what to do at a
given point in time
Keyframing
 Start here, end here
 Once you have two or
more
keyframes, Lightwave
will figure out how to
change the item from
its starting point to its
end point
 Called tweaning or
tweens
Keyframing
 Good/bad keyframing
 Usually the fewer the
keyframes, the
smoother the effect
 Don’t try to overthink
the action – let
Lightwave get you
where you want to go
 Too many keyframes
can cause jittery action
Keyframing
 Everybody has one
 Everything in your
scene must have at
least one keyframe
 Some things don’t
need to change so they
only have a keyframe
on the very first frame
(0)
Keyframing
 Frames and Time
 Depends what you are
doing
 NTSC = 30 fps
 PAL = 25 fps
 Film = 24 fps
 Stills = single frame
 We operate at 30 fps
 Think in frames
 300 = 10 seconds
Let’s Get Started
 Start up Lightwave
3D
 Clear the scene if
you need to
 Select Load Object
(+)
 In the Landscape
folder, select
Canyon.lwo
Let’s Get Started
 Select Load Object
(+) again
 In the Vehicles folder
select
MonsterTruck.lwo
 This object lost a
surface image, so we
have to fix…
Let’s Get Started
 Several surface
images got ‘lost’ and
have to be
reconnected.
 Click Yes, then select
FractalReflections.tga
 Repeat this process a
couple more times
until all the surfaces
load and you can see
Let’s Get Started
 Let’s fix the Truck
 While the
MonsterTruck is still
selected choose:
 File > Save > Save
Current Object
 Choose Replace
 That should fix the
problem
Scaling Things in
Porportion
 That canyon is
mighty small!
 Select the Top view
(2)
 Zoom out so there’s
lots of room
 Select the Canyon
as the current object
Scaling Things in
Porportion
 Select the Modify tab
 Under Transform,
select Stretch
 We want to change the
width and depth, but
not the height (at least
for now)
 In the Numerics
section change the X
and Z axis to 35
Keyframing
 See the big picture
 The best way to create
a motion is to set the
starting point and end
point first
 Then tweak parameters
in-between these two
points to what you
need
 This help set a
consistent pace
Set One Keyframe
 Choose Camera view
(6)
 Truck looks like it’s
stuck in the mud
 In the Modify tab
select Translate and
Move
 Drag the Green arrow
and drag the truck up
so it sits on the
Set a Start and End Point
 Make sure the
MonsterTruck is
selected
 Choose the top view
 Zoom out so you can
see the whole canyon
 You can see that some
parts of the canyon are
above the grid while
other parts are below
Set a Start and End Point
 While at frame 0,
move the truck to the
upper left corner
 In the Timeline,
change the last frame
to 300 frames
 Drag the slider to
frame 300 and move
the truck to the lower
right corner
Making a Keyframe
 What do you want to
do?
 Make a keyframe for
what?
 Selected item
 All items
 Selected item and
any other items it
controls
Making a Keyframe
 What should get a
keyframe
 You decide if its
position, rotation
and/or scale gets
locked down or not
 If the item should not
get a keyframe for the
selected frame, just
turn that parameter off
Set a Start and End Point
 Click on Create Frame
or press Return
 Make sure Create Key
At is set to 300
 For: Selected item
(your truck)
 Position, rotation,
scale are on (blue)
 Press OK
Action Without
Keyframes
 Target
 Causes the camera to
always see an item in the
middle of its frame of view
 If the item moves, the
camera pans or tilts to
keep that item in view
 Camera will not MOVE
unless you set keyframes
for its location
 Targeting and moving
the camera can make
very interesting
animations
Have the Camera Keep
an Eye on the Truck
 Select the Camera
as the current item
 Press M to bring up
Motion Options
 In the Target Item
pop-up menu, select
Monster truck
 NOT Parent
Have the Camera Keep
an Eye on the Truck
 Switch to Camera
view and scrub
through your
animation
 Now the camera
follows the truck from
beginning to end
 Truck faces the
wrong way – that’s
OK for now
Action Without
Keyframes
 Aligning to Path
 Once you set up a motion
path for an item, it can
automatically follow in the
direction of that path
 Left and right
 Up and down
Action Without
Keyframes
 Make sure the truck
is the current item
 Press M to select
motion options
 Select the
Controllers and
Limits tab
Action Without
Keyframes
 We need the
rotation of the truck
to follow the path
 Select the Rotation
tab
 Under Heading &
Pitch, set the
Heading Controller
to ‘Align to Path’
Action Without
Keyframes
 In Camera view
scrub through your
animation
 Your truck should
now follow the path
from beginning to
end
 That was easy!
 Lighting is not so
great though…
Action Without
Keyframes
 Parenting
 An item that mimics
what another item
does
 What one airplane
does, all the other
airplanes do
 The controlling item is
called a parent
 The controlled items
are called descendants
Action Without
Keyframes
 Give the truck a little
light
 Switch back to the top
view & zoom in a little
 Drag the slider to
frame 0
 With the Modify tab,
move the light so it is
in front and to the
right of the truck
Action Without
Keyframes
 While the light is
still selected, press
M to bring up the
Motion options
 In the Parent Item
pop-up menu
choose
MonsterTruck
Action Without
Keyframes
 While still in the top
view scrub though
your timeline and
notice how the light
now follows the
truck along its
animation
Finessing Motion
 Adding keyframes in-
between the start and
finish
 Now that the pacing is
set, you can adjust the
item in-between start and
end points without
causing the motion to
jitter
 Still remember though
– the fewer
keyframes, the better
Add Some Character
to the Truck Motion
 Select the top view (2)
 Select the truck as the
current item
 Move the slider to
frame 75
 With the Modify
tab, select Move
Add Some Character
to the Truck Motion
 Using the arrows, drag
the truck down and to
the left to the top of the
hill on the left side of
the canyon
 Make a keyframe for
the truck at frame 75
Add Some Character
to the Truck Motion
 Move the slider to 185
 Using the arrows, drag
the truck to the right so
its on top of the hill on
the right of the canyon
 Make another keyframe
for the truck at frame
185
Animate the Camera
 Switch to the top view
(2)
 Make sure the slider is
at frame 0
 Move the camera so
it’s in the middle of the
canyon, but in front of
the truck
Animate the Camera
 Give the camera a
better view
 While still at frame 0, in
the numerics window,
change the Y value to 6
meters
 Switch to the camera
view to see your new
look at the truck
Animate the Camera
 Switch back to the top
view
 Move the slider to frame
300
 Move the camera so its
further down the canyon,
but behind the truck
 Make a new keyframe for
the camera at frame 300
Add Some Character
to the Canyon
 Select the back view (1)
 Move the slider to frame
0
 Select the Canyon as the
current item
 With the Modify
tab, select the Stretch
tool
 In the numerics
box, change the Y value
Aligning to Motion
 Not just left and
right, but up and
down
 Like the
Mustang, when an item
along the motion path
goes up or down, it
can also point in that
direction with the
‘Align to path’ feature
Unbury the Truck
 Getting things in place
 Using different views we
can get the truck out of
the canyon
 Make sure the truck is
the selected item
 Using the transport
controls, click to the
next keyframe (frame
75)
Unbury the Truck
 Select the back view
 With the move tool, drag
the green arrow to pull
the truck up out of the
hill
 Toggle different views to
get the height correct
 Update the keyframe by
pressing Enter, Enter
Un-levitate the Truck
 Oh, oh – the truck is
following the smoothest
path from the start to the
top of the hill, but the hill
hasn’t started yet
 Move the slider to frame
36
 Move around in
perspective view so you
have a good look at the
truck above the ground
Un-levitate the Truck
 Drag the green arrow
to set the truck back on
the ground
 Create a new keyframe
at frame 36
 Scrub though the
motion to see the truck
now climb the hill
Un-levitate the Truck
 Switch to the back view
and zoom in
 Drag the slider to frame
144
 Drag the green arrow and
move the truck back
down to the ground
 Make a new keyframe for
the truck at frame 144
Un-levitate the Truck
 Select the camera view
and scrub though your
scene
 If the truck is levitating
or buried, try modifying
existing keyframes
 Can also try creating new
keyframes, just make sure
they are not too close to
each other
 If the motion gets jerky, you
need to delete a keyframe
to smooth out the motion
Save Your Scene
 Save your scene to the
My Scenes folder in the
Lightwave content
folder
 Save another copy to
the desktop
 Email the .lws file to
me as an attachment.
Animation VI
Keyframing in Lightwave

NewTek Lightwave 3D: Keyframing in Lightwave

  • 1.
  • 2.
    Keyframing  Do this,do that…  In order to items to change over time, you need to set down reference points (keyframes) to tell the item what to do at a given point in time
  • 3.
    Keyframing  Start here,end here  Once you have two or more keyframes, Lightwave will figure out how to change the item from its starting point to its end point  Called tweaning or tweens
  • 4.
    Keyframing  Good/bad keyframing Usually the fewer the keyframes, the smoother the effect  Don’t try to overthink the action – let Lightwave get you where you want to go  Too many keyframes can cause jittery action
  • 5.
    Keyframing  Everybody hasone  Everything in your scene must have at least one keyframe  Some things don’t need to change so they only have a keyframe on the very first frame (0)
  • 6.
    Keyframing  Frames andTime  Depends what you are doing  NTSC = 30 fps  PAL = 25 fps  Film = 24 fps  Stills = single frame  We operate at 30 fps  Think in frames  300 = 10 seconds
  • 7.
    Let’s Get Started Start up Lightwave 3D  Clear the scene if you need to  Select Load Object (+)  In the Landscape folder, select Canyon.lwo
  • 8.
    Let’s Get Started Select Load Object (+) again  In the Vehicles folder select MonsterTruck.lwo  This object lost a surface image, so we have to fix…
  • 9.
    Let’s Get Started Several surface images got ‘lost’ and have to be reconnected.  Click Yes, then select FractalReflections.tga  Repeat this process a couple more times until all the surfaces load and you can see
  • 10.
    Let’s Get Started Let’s fix the Truck  While the MonsterTruck is still selected choose:  File > Save > Save Current Object  Choose Replace  That should fix the problem
  • 11.
    Scaling Things in Porportion That canyon is mighty small!  Select the Top view (2)  Zoom out so there’s lots of room  Select the Canyon as the current object
  • 12.
    Scaling Things in Porportion Select the Modify tab  Under Transform, select Stretch  We want to change the width and depth, but not the height (at least for now)  In the Numerics section change the X and Z axis to 35
  • 13.
    Keyframing  See thebig picture  The best way to create a motion is to set the starting point and end point first  Then tweak parameters in-between these two points to what you need  This help set a consistent pace
  • 14.
    Set One Keyframe Choose Camera view (6)  Truck looks like it’s stuck in the mud  In the Modify tab select Translate and Move  Drag the Green arrow and drag the truck up so it sits on the
  • 15.
    Set a Startand End Point  Make sure the MonsterTruck is selected  Choose the top view  Zoom out so you can see the whole canyon  You can see that some parts of the canyon are above the grid while other parts are below
  • 16.
    Set a Startand End Point  While at frame 0, move the truck to the upper left corner  In the Timeline, change the last frame to 300 frames  Drag the slider to frame 300 and move the truck to the lower right corner
  • 17.
    Making a Keyframe What do you want to do?  Make a keyframe for what?  Selected item  All items  Selected item and any other items it controls
  • 18.
    Making a Keyframe What should get a keyframe  You decide if its position, rotation and/or scale gets locked down or not  If the item should not get a keyframe for the selected frame, just turn that parameter off
  • 19.
    Set a Startand End Point  Click on Create Frame or press Return  Make sure Create Key At is set to 300  For: Selected item (your truck)  Position, rotation, scale are on (blue)  Press OK
  • 20.
    Action Without Keyframes  Target Causes the camera to always see an item in the middle of its frame of view  If the item moves, the camera pans or tilts to keep that item in view  Camera will not MOVE unless you set keyframes for its location  Targeting and moving the camera can make very interesting animations
  • 21.
    Have the CameraKeep an Eye on the Truck  Select the Camera as the current item  Press M to bring up Motion Options  In the Target Item pop-up menu, select Monster truck  NOT Parent
  • 22.
    Have the CameraKeep an Eye on the Truck  Switch to Camera view and scrub through your animation  Now the camera follows the truck from beginning to end  Truck faces the wrong way – that’s OK for now
  • 23.
    Action Without Keyframes  Aligningto Path  Once you set up a motion path for an item, it can automatically follow in the direction of that path  Left and right  Up and down
  • 24.
    Action Without Keyframes  Makesure the truck is the current item  Press M to select motion options  Select the Controllers and Limits tab
  • 25.
    Action Without Keyframes  Weneed the rotation of the truck to follow the path  Select the Rotation tab  Under Heading & Pitch, set the Heading Controller to ‘Align to Path’
  • 26.
    Action Without Keyframes  InCamera view scrub through your animation  Your truck should now follow the path from beginning to end  That was easy!  Lighting is not so great though…
  • 27.
    Action Without Keyframes  Parenting An item that mimics what another item does  What one airplane does, all the other airplanes do  The controlling item is called a parent  The controlled items are called descendants
  • 28.
    Action Without Keyframes  Givethe truck a little light  Switch back to the top view & zoom in a little  Drag the slider to frame 0  With the Modify tab, move the light so it is in front and to the right of the truck
  • 29.
    Action Without Keyframes  Whilethe light is still selected, press M to bring up the Motion options  In the Parent Item pop-up menu choose MonsterTruck
  • 30.
    Action Without Keyframes  Whilestill in the top view scrub though your timeline and notice how the light now follows the truck along its animation
  • 31.
    Finessing Motion  Addingkeyframes in- between the start and finish  Now that the pacing is set, you can adjust the item in-between start and end points without causing the motion to jitter  Still remember though – the fewer keyframes, the better
  • 32.
    Add Some Character tothe Truck Motion  Select the top view (2)  Select the truck as the current item  Move the slider to frame 75  With the Modify tab, select Move
  • 33.
    Add Some Character tothe Truck Motion  Using the arrows, drag the truck down and to the left to the top of the hill on the left side of the canyon  Make a keyframe for the truck at frame 75
  • 34.
    Add Some Character tothe Truck Motion  Move the slider to 185  Using the arrows, drag the truck to the right so its on top of the hill on the right of the canyon  Make another keyframe for the truck at frame 185
  • 35.
    Animate the Camera Switch to the top view (2)  Make sure the slider is at frame 0  Move the camera so it’s in the middle of the canyon, but in front of the truck
  • 36.
    Animate the Camera Give the camera a better view  While still at frame 0, in the numerics window, change the Y value to 6 meters  Switch to the camera view to see your new look at the truck
  • 37.
    Animate the Camera Switch back to the top view  Move the slider to frame 300  Move the camera so its further down the canyon, but behind the truck  Make a new keyframe for the camera at frame 300
  • 38.
    Add Some Character tothe Canyon  Select the back view (1)  Move the slider to frame 0  Select the Canyon as the current item  With the Modify tab, select the Stretch tool  In the numerics box, change the Y value
  • 39.
    Aligning to Motion Not just left and right, but up and down  Like the Mustang, when an item along the motion path goes up or down, it can also point in that direction with the ‘Align to path’ feature
  • 40.
    Unbury the Truck Getting things in place  Using different views we can get the truck out of the canyon  Make sure the truck is the selected item  Using the transport controls, click to the next keyframe (frame 75)
  • 41.
    Unbury the Truck Select the back view  With the move tool, drag the green arrow to pull the truck up out of the hill  Toggle different views to get the height correct  Update the keyframe by pressing Enter, Enter
  • 42.
    Un-levitate the Truck Oh, oh – the truck is following the smoothest path from the start to the top of the hill, but the hill hasn’t started yet  Move the slider to frame 36  Move around in perspective view so you have a good look at the truck above the ground
  • 43.
    Un-levitate the Truck Drag the green arrow to set the truck back on the ground  Create a new keyframe at frame 36  Scrub though the motion to see the truck now climb the hill
  • 44.
    Un-levitate the Truck Switch to the back view and zoom in  Drag the slider to frame 144  Drag the green arrow and move the truck back down to the ground  Make a new keyframe for the truck at frame 144
  • 45.
    Un-levitate the Truck Select the camera view and scrub though your scene  If the truck is levitating or buried, try modifying existing keyframes  Can also try creating new keyframes, just make sure they are not too close to each other  If the motion gets jerky, you need to delete a keyframe to smooth out the motion
  • 46.
    Save Your Scene Save your scene to the My Scenes folder in the Lightwave content folder  Save another copy to the desktop  Email the .lws file to me as an attachment.
  • 47.