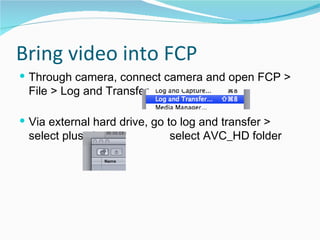
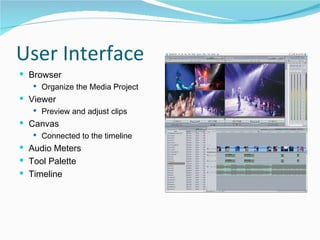
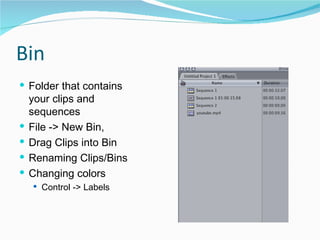
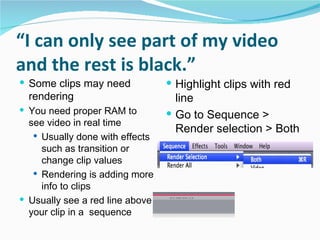
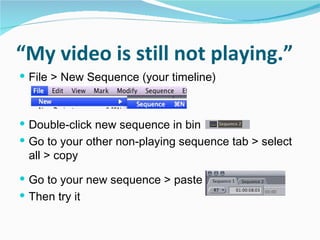
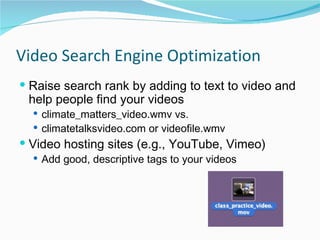
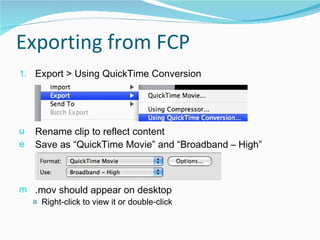
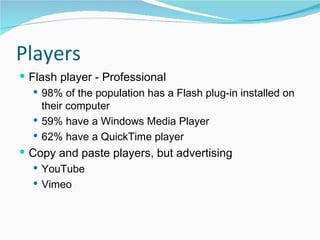
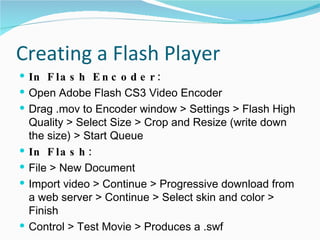
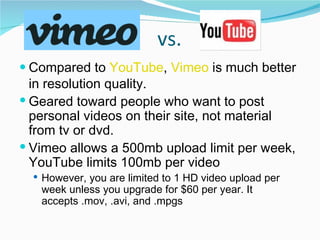
By Serena Carpenter http://serenacarpenter.com
Nonlinear Editing Linear Edit sequentially http://www.scottsimmons.tv/blog/2007/10/01/editing-video-in-the-past/ Nonlinear, nondestructive  Edit shots in different orders, while underlying media is untouched (changes never affect the media)  Deciding what elements to retain, delete, or combine in a logical manner
Adobe Premiere Pro $699 Adobe Premiere Elements $99 Final Cut Pro/Studio $999/$1299 Final Cut Express $249 Avid NewsCutter Avid Xpress $495 Sony Vegas Pro $585  Vegas Movie Studio $80 Pinnacle Ultimate $130  Pinnacle Studio 11 $50 Windows Movie Maker (Free) iMovie (Free)
vs.  $249 vs. $999 No batch capture Keyframe motions, not filters Timecode will not be displayed No three-way color corrector  No audio/video settings
Video Editing Basics Never use the same shot twice Cut on breath Watch out for frames of black Audio must coincide with video Stick to cuts Shots should be related (sequences, cutaways) WS of room MS of person’s body CU of face CU of paper Shots about :04-:05 with the exception of action Let action complete
Lay down audio first! Assembling each shot together or trimming Shot 1, Shot 2, Shot 3, Interview Show interview first and then cover with video
You must save video Delete video in camera before shooting Save entire Sony AVCHD folder from Sony Handicam to external hard drive
Getting to know FCP Double-click FCP icon on dock to open Must SAVE video: When editing, set “scratch disks” (4) to save your project to external hard drive Top and bottom 3 Go to System Settings  to later access Scratch  Disks Save all of your footage from project, .mov, flash export
Bring video into FCP Through camera, connect camera and open FCP > File > Log and Transfer Via external hard drive, go to log and transfer > select plus sign,    select AVC_HD folder
User Interface  Browser  Organize the Media Project  Viewer  Preview and adjust clips  Canvas  Connected to the timeline  Audio Meters  Tool Palette  Timeline
Active Window affects your options
Bin Folder that contains your clips and sequences  File -> New Bin,  Drag Clips into Bin  Renaming Clips/Bins  Changing colors  Control -> Labels
Viewer Double-click clip to view it in Viewer  Move yellow Arrow (playhead)  In = I, Out = O, Space Bar = Play
Canvas and Timeline Canvas  Same as Viewer  JKL - Play backward, stop, play forward  Space bar - play Timeline (Sequence) Space bar to play Mute and Solo  Control Clip Overlay  Track Height Sequence  Settings Track
Bring clip to timeline In the Viewer, Select In (I) and Out (O) points Drag the edited clip from the canvas to the timeline, edit it more precisely on timeline  Drag clip to edit or use razor blade To delete a clip, highlight with mouse, select delete
Editing Insert  Overwrite  Fit to Fill Fill in Gap http://www.ehow.com/video_4442344_overwriting-inserting-clips-final-cut.html
Snapping Tool – Key “N” Here is vid that explains it: http://www.ehow.com/video_4442326_assembling-clips-snapping-final-cut.html
Add different audio or video to clips Highlight clip Unlink clip Deselect clip Highlight and delete unwanted video or audio Drag clip and unlink that clip Shift, re-highlight and re-link
Make a mistake Undo Default (10), can change to 99  User Preferences  Save a copy
Editing audio in FCP Be careful of over-modulated audio Put nats for a few seconds at the beginning Fade nats under sound bites -12dB for narration and interviews Also for primary nats -42dB for secondary nats Select clip overlay tool or mountain Raise pink line to lower or raise audio  Use pen tool to fade audio or tweak loud points
Titles Use Title Safe  No smaller than 25 pt  Sans Serif (Arial)  Pop-up Menu  Control Tab
Freeze Frame Creates a image from your video Place playhead on the timeline to place where you want the video to become a picture Go to Modify > Make Freeze Frame and the freeze frame will appear in the Viewer window http://www.howcast.com/videos/16505-How-To-Create-a-Freeze-Frame-in-Final-Cut-Pro
Trouble-shooting -  “I don’t see my video!” The most common problem is when you see “ No Communication ” when trying to capture your vid First, you should “Log and Transfer,” not “Log and Capture,” log and capture is for tapes  Second, try restarting your computer and shutting off your camera > turn on the computer and then turn on the camera > open FCP Third, try a different computer
“ I see red lines through my clips.” Reconnect Media This means that FCP cannot find your video and you may have not saved appropriately & vid may be lost unless edited on your computer Try finding it by right-clicking clip and looking for it
“ I can only see part of my video and the rest is black.” Some clips may need rendering You need proper RAM to see video in real time Usually done with effects such as transition or change clip values Rendering is adding more info to clips Usually see a red line above your clip in a  sequence  Highlight clips with red line Go to Sequence > Render selection > Both
“ My video is still not playing.” File > New Sequence (your timeline) Double-click new sequence in bin Go to your other non-playing sequence tab > select all > copy  Go to your new sequence > paste  Then try it
Preparing Video for the Web
Video Search Engine Optimization Raise search rank by adding to text to video and help people find your videos climate_matters_video.wmv vs.  climatetalksvideo.com or videofile.wmv Video hosting sites (e.g., YouTube, Vimeo) Add good, descriptive tags to your videos
Exporting from FCP Export > Using QuickTime Conversion Rename clip to reflect content Save as “QuickTime Movie” and “Broadband – High” .mov should appear on desktop  Right-click to view it or double-click
Players Flash player - Professional 98% of the population has a Flash plug-in installed on their computer  59% have a Windows Media Player  62% have a QuickTime player Copy and paste players, but advertising YouTube Vimeo
Creating a Flash Player In Flash Encoder: Open Adobe Flash CS3 Video Encoder Drag .mov to Encoder window > Settings > Flash High Quality > Select Size > Crop and Resize (write down the size) > Start Queue In Flash: File > New Document Import video > Continue > Progressive download from a web server > Continue > Select skin and color > Finish Control > Test Movie > Produces a .swf
vs. Compared to  YouTube ,  Vimeo  is much better in resolution quality.  Geared toward people who want to post personal videos on their site, not material from tv or dvd.  Vimeo allows a 500mb upload limit per week, YouTube limits 100mb per video However, you are limited to 1 HD video upload per week unless you upgrade for $60 per year. It accepts .mov, .avi, and .mpgs
Vimeo Upload a Video > Choose a file to upload  Add a title, description sentences and tags >  You can use tabs on the side to add more elements >  Click Go to Video > When uploaded, click Embed >  Click customize at the bottom to chg size, color, and on-screen info
YouTube Select Upload Add a description in sentences, tags, category Select “Go to my videos” and select image when upload is complete To view your account, you can always click on the “You Tube logo” at the top of the page, then click on My Videos under your user name
OTHER TIPS NOT DISCUSSED IN CLASS
Creating a Transition in FCP Stick to CUTS, rather than dissolves Control click on transition point (between clips) or go to Effects to add video transitions  Drag transition to change length (Cross Dissolve, Fade In and Fade Out)  Audio (add transition)  Cross Fade (+3dB) Volume constant through out fade  Cross Fade (0dB) Fades first clip out while simultaneously fading in
Stereo Pair  vs Mono Audio Left and right ear locate subtle differences  For stereo, need to use two microphones Two different mics placed at two different locations to mimic ears 2 channels does not mean you recorded in stereo. If you use only one microphone to record, it is not stereo. It is mono.  Mono audio takes less space
More Editing Video Tutorials Check out this series if you run into questions http://www.ehow.com/video_4442321_adding-clips-timeline-final-cut.html http://www.ehow.com/video_4442331_basic-editing-final-cut-pro.html
Resources Final Cut Pro Tutorials http://www.kenstone.net/fcp_homepage/fcp_homepage_index.html BBC Training http://www.bbctraining.com/onlineCourses.asp Berkeley Multimedia Reporting and Convergence http://journalism.berkeley.edu/multimedia/ Cyndy Green’s VideoJournalism Blog  http://cyndygreen.wordpress.com/ MultiMedia Shooter Blog http://www.multimediashooter.com/wp/ Angela Grant’s News Videographer Blog http://newsvideographer.com/?page_id=2 Edit Foundry http://blogs.nppa.org/editfoundry/ OR GOOGLE YOUR QUESTION!!!

Video Editing and Encoding

  • 1.
    By Serena Carpenterhttp://serenacarpenter.com
  • 2.
    Nonlinear Editing LinearEdit sequentially http://www.scottsimmons.tv/blog/2007/10/01/editing-video-in-the-past/ Nonlinear, nondestructive Edit shots in different orders, while underlying media is untouched (changes never affect the media) Deciding what elements to retain, delete, or combine in a logical manner
  • 3.
    Adobe Premiere Pro$699 Adobe Premiere Elements $99 Final Cut Pro/Studio $999/$1299 Final Cut Express $249 Avid NewsCutter Avid Xpress $495 Sony Vegas Pro $585 Vegas Movie Studio $80 Pinnacle Ultimate $130 Pinnacle Studio 11 $50 Windows Movie Maker (Free) iMovie (Free)
  • 4.
    vs. $249vs. $999 No batch capture Keyframe motions, not filters Timecode will not be displayed No three-way color corrector No audio/video settings
  • 5.
    Video Editing BasicsNever use the same shot twice Cut on breath Watch out for frames of black Audio must coincide with video Stick to cuts Shots should be related (sequences, cutaways) WS of room MS of person’s body CU of face CU of paper Shots about :04-:05 with the exception of action Let action complete
  • 6.
    Lay down audiofirst! Assembling each shot together or trimming Shot 1, Shot 2, Shot 3, Interview Show interview first and then cover with video
  • 7.
    You must savevideo Delete video in camera before shooting Save entire Sony AVCHD folder from Sony Handicam to external hard drive
  • 8.
    Getting to knowFCP Double-click FCP icon on dock to open Must SAVE video: When editing, set “scratch disks” (4) to save your project to external hard drive Top and bottom 3 Go to System Settings to later access Scratch Disks Save all of your footage from project, .mov, flash export
  • 9.
    Bring video intoFCP Through camera, connect camera and open FCP > File > Log and Transfer Via external hard drive, go to log and transfer > select plus sign, select AVC_HD folder
  • 10.
    User Interface Browser Organize the Media Project Viewer Preview and adjust clips Canvas Connected to the timeline Audio Meters Tool Palette Timeline
  • 11.
  • 12.
    Bin Folder thatcontains your clips and sequences File -> New Bin, Drag Clips into Bin Renaming Clips/Bins Changing colors Control -> Labels
  • 13.
    Viewer Double-click clipto view it in Viewer Move yellow Arrow (playhead) In = I, Out = O, Space Bar = Play
  • 14.
    Canvas and TimelineCanvas Same as Viewer JKL - Play backward, stop, play forward Space bar - play Timeline (Sequence) Space bar to play Mute and Solo Control Clip Overlay Track Height Sequence Settings Track
  • 15.
    Bring clip totimeline In the Viewer, Select In (I) and Out (O) points Drag the edited clip from the canvas to the timeline, edit it more precisely on timeline Drag clip to edit or use razor blade To delete a clip, highlight with mouse, select delete
  • 16.
    Editing Insert Overwrite Fit to Fill Fill in Gap http://www.ehow.com/video_4442344_overwriting-inserting-clips-final-cut.html
  • 17.
    Snapping Tool –Key “N” Here is vid that explains it: http://www.ehow.com/video_4442326_assembling-clips-snapping-final-cut.html
  • 18.
    Add different audioor video to clips Highlight clip Unlink clip Deselect clip Highlight and delete unwanted video or audio Drag clip and unlink that clip Shift, re-highlight and re-link
  • 19.
    Make a mistakeUndo Default (10), can change to 99 User Preferences Save a copy
  • 20.
    Editing audio inFCP Be careful of over-modulated audio Put nats for a few seconds at the beginning Fade nats under sound bites -12dB for narration and interviews Also for primary nats -42dB for secondary nats Select clip overlay tool or mountain Raise pink line to lower or raise audio Use pen tool to fade audio or tweak loud points
  • 21.
    Titles Use TitleSafe No smaller than 25 pt Sans Serif (Arial) Pop-up Menu Control Tab
  • 22.
    Freeze Frame Createsa image from your video Place playhead on the timeline to place where you want the video to become a picture Go to Modify > Make Freeze Frame and the freeze frame will appear in the Viewer window http://www.howcast.com/videos/16505-How-To-Create-a-Freeze-Frame-in-Final-Cut-Pro
  • 23.
    Trouble-shooting - “I don’t see my video!” The most common problem is when you see “ No Communication ” when trying to capture your vid First, you should “Log and Transfer,” not “Log and Capture,” log and capture is for tapes Second, try restarting your computer and shutting off your camera > turn on the computer and then turn on the camera > open FCP Third, try a different computer
  • 24.
    “ I seered lines through my clips.” Reconnect Media This means that FCP cannot find your video and you may have not saved appropriately & vid may be lost unless edited on your computer Try finding it by right-clicking clip and looking for it
  • 25.
    “ I canonly see part of my video and the rest is black.” Some clips may need rendering You need proper RAM to see video in real time Usually done with effects such as transition or change clip values Rendering is adding more info to clips Usually see a red line above your clip in a sequence Highlight clips with red line Go to Sequence > Render selection > Both
  • 26.
    “ My videois still not playing.” File > New Sequence (your timeline) Double-click new sequence in bin Go to your other non-playing sequence tab > select all > copy Go to your new sequence > paste Then try it
  • 27.
  • 28.
    Video Search EngineOptimization Raise search rank by adding to text to video and help people find your videos climate_matters_video.wmv vs. climatetalksvideo.com or videofile.wmv Video hosting sites (e.g., YouTube, Vimeo) Add good, descriptive tags to your videos
  • 29.
    Exporting from FCPExport > Using QuickTime Conversion Rename clip to reflect content Save as “QuickTime Movie” and “Broadband – High” .mov should appear on desktop Right-click to view it or double-click
  • 30.
    Players Flash player- Professional 98% of the population has a Flash plug-in installed on their computer 59% have a Windows Media Player 62% have a QuickTime player Copy and paste players, but advertising YouTube Vimeo
  • 31.
    Creating a FlashPlayer In Flash Encoder: Open Adobe Flash CS3 Video Encoder Drag .mov to Encoder window > Settings > Flash High Quality > Select Size > Crop and Resize (write down the size) > Start Queue In Flash: File > New Document Import video > Continue > Progressive download from a web server > Continue > Select skin and color > Finish Control > Test Movie > Produces a .swf
  • 32.
    vs. Compared to YouTube , Vimeo is much better in resolution quality. Geared toward people who want to post personal videos on their site, not material from tv or dvd. Vimeo allows a 500mb upload limit per week, YouTube limits 100mb per video However, you are limited to 1 HD video upload per week unless you upgrade for $60 per year. It accepts .mov, .avi, and .mpgs
  • 33.
    Vimeo Upload aVideo > Choose a file to upload Add a title, description sentences and tags > You can use tabs on the side to add more elements > Click Go to Video > When uploaded, click Embed > Click customize at the bottom to chg size, color, and on-screen info
  • 34.
    YouTube Select UploadAdd a description in sentences, tags, category Select “Go to my videos” and select image when upload is complete To view your account, you can always click on the “You Tube logo” at the top of the page, then click on My Videos under your user name
  • 35.
    OTHER TIPS NOTDISCUSSED IN CLASS
  • 36.
    Creating a Transitionin FCP Stick to CUTS, rather than dissolves Control click on transition point (between clips) or go to Effects to add video transitions Drag transition to change length (Cross Dissolve, Fade In and Fade Out) Audio (add transition) Cross Fade (+3dB) Volume constant through out fade Cross Fade (0dB) Fades first clip out while simultaneously fading in
  • 37.
    Stereo Pair vs Mono Audio Left and right ear locate subtle differences For stereo, need to use two microphones Two different mics placed at two different locations to mimic ears 2 channels does not mean you recorded in stereo. If you use only one microphone to record, it is not stereo. It is mono. Mono audio takes less space
  • 38.
    More Editing VideoTutorials Check out this series if you run into questions http://www.ehow.com/video_4442321_adding-clips-timeline-final-cut.html http://www.ehow.com/video_4442331_basic-editing-final-cut-pro.html
  • 39.
    Resources Final CutPro Tutorials http://www.kenstone.net/fcp_homepage/fcp_homepage_index.html BBC Training http://www.bbctraining.com/onlineCourses.asp Berkeley Multimedia Reporting and Convergence http://journalism.berkeley.edu/multimedia/ Cyndy Green’s VideoJournalism Blog http://cyndygreen.wordpress.com/ MultiMedia Shooter Blog http://www.multimediashooter.com/wp/ Angela Grant’s News Videographer Blog http://newsvideographer.com/?page_id=2 Edit Foundry http://blogs.nppa.org/editfoundry/ OR GOOGLE YOUR QUESTION!!!