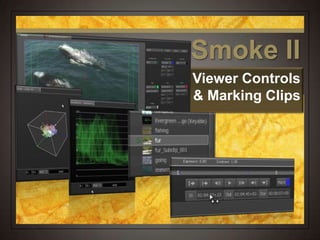
Smoke II
Viewer Controls
& Marking Clips
SmokeII
Fix it in Post Autodesk Smoke Film
Viewer Controls
 The Viewer is a great way to have a closer
look at your clips and decide what you wish
to use for your project.
Having a Look
 Load your 420
lesson project
 Switch to the
Timeline view
 Select the Player
view
 In the media library
select the immersed
clip
What’s Up?
 What’s in your
Viewer?
 The clip that is in your
Viewer is the one in
Media Library with the
Green triangle next to
it
 The name is also on
the Green tab in the
Player view
Getting Around
 Icon Controls
 Go to In point
 Go to beginning of clip
 -1 frame
 Play
 +1 frame
 Go to end of clip
 Go to Out point
 Mark at play head position
Getting Around
 Shortcut controls
 Space key – play / pause
 J – play backwards
 K – pause
 L – play forwards
 JJ/LL shuttle backwards / forwards
   Arrow keys – nudge forward / backward
 Up arrow / Down arrow – beginning / end of clip
Getting Around
 Try out the play
control icons under
immersed to move
around in your clip
 Try out the keyboard
shortcuts to do the
same thing
 Note what KL and KJ
do!
Viewer Tools
 What’s available
 Audio Desk
 Overlays
 Video Scopes
Audio Desk
 Audio Desk
 Allows you to monitor the clip’s audio channels
and apply EQ and basic audio filters
Audio Desk
 Choose Show Audio
Desk from the
Options pop-up menu
 Select the Elysium
music clip from the
Music folder and play
the clip
 Put your cursor over
the level sliders and
drag up and down
Overlays
 Click on the Options
pop-up menu and
select Show
Overlays
 Overlay options
dialogue box displays
next to your clip
Overlays
 Working Area
 Temporarily hides
areas of clip to help
you place other
elements
 CG overlays
Overlays
 Click on the Working
Area Guide pop-up
menu to turn on
 Drag and Width and
Height settings to
change the overlay
 Turn off when done
Overlays
 Free Guide
 Same idea as working
area
 You can add a free
guide to working area
Overlays
 Click on the Free
Guide pop-up menu
to turn on
 Drag the guides out
to 200 pixels on each
side of the clip
 Turn off when done
Overlays
 Letterbox
 Allows you to simulate
what your clip will look
like at various
letterbox (movie)
settings
Overlays
 Click on the
Letterbox pop-up
menu and select
2.35:1
Cinemascope
 Turn off when done
Overlays
 Click on the Safe
menu and choose
Action & Title
 Action safe is on the
outside
 Title safe is on the
inside
 Title Safe
 Guide to keep important
content viewable
Overlays
 Grid
 Helps align content in
composite
compositions
 Several clips playing
together in one
space
 Foreground
elements like CG
placement
Overlays
 Click on the Grid pop-
up menu to turn on
 Change the Width and
Height settings to 100
pixels
 Change the Opacity
settings to see the
changes
 Turn off when done
Overlays
 Centre
 Places a center mark
on your clip
 Handy for
 Applying foreground
elements that need
to be centered on
screen
 Setting quadrants
for a four-clip
composite
Overlays
 Click on the Centre
pop-up menu and
select Medium
Centre
 Red plus appears at
center of clip
 Can be nudged with X
and Y settings below
 Turn off when done
Overlays
 Image Border
 Draws a line around
your clip
 When your clip has
black or alpha
elements where it’s
hard to tell where
your clip ends and
the clip below
begins in a
composite
Overlays
 Click on the Border
button to turn it on
 You can change the
color of the border
(and any other
overlay) by clicking
on the color box
Scopes
 Scopes
 Check the video levels
 Vector scope
 Handy for color
matching
 Waveform monitor
 Check your
luminance values
 Broadcast safe?
Scopes
 Click on the
Options pop-up
menu and select
Vectorscope (or
Waveform Monitor if
there)
 Change the viewer
settings to
Vectorscope
Monochrome
Vectorscope
 Vectorscope
 Six-sided overlay
representing the
additive/subtractive
primary colors that
make up a colorbars
signal
 Green area shows the
amount of color in
these areas
Vectorscope
 Change the viewer
settings to Colour
2D
 Now you can see the
relative amount of
colors that make up
your clip based on
the
additive/subtractive
colors of your clip
Waveform Monitor
 Change the viewer
settings to
Waveforms >
Luminance
 Now you can see the
luminance value of
your clip
 Anything over 100 iu
is FCC illegal
 Click on 1, then click
on a bright area on
your clip and note the
setting on the monitor
Waveform Monitor
 Click on 1, then
click on a bright
area on your clip
and note the setting
on the monitor
Finding / Organizing
 Where’s my clip?
 Can use the search
window to track down
a clip
 Perhaps you need to
find and place
specific clips into
their own folder
Finding / Organizing
 In the Media Library
back up to the top,
right click the library
and select New >
Folder
 Name the Folder
Voiceovers
 Move the window
slider to the bottom
so you can see your
new folder
Finding / Organizing
 In the search
window in the
bottom of the Media
window type in aqe
 A new list under
Search shows you all
the files that contain
the word AQE
Finding / Organizing
 Hold down the
command key and
select all the AQE
Trailer clips
 Drag the clips to the
new Voiceovers
folder
 When done, click on
the X in the search
window to clear your
search
Getting Around
 Icon Controls
 Go to In point
 Go to beginning of
clip
 Nudge back 1 frame
 Play / pause
 Nudge forward 1
frame
 Go to end of clip
 Go to Out point
Getting Around
 Shortcut keys
 Space bar – play / pause
 J – play backwards
 K – pause
 L – play forwards
 JJ / LL – shuttle backwards /
forwards
 Up/Down arrow – go to start
/ end of clip
   - nudge back / forward
1 frame
 Shift   - jump back /
forward 10 frames
Getting Around
 Select the Fur clip
in the media
browser and use
the icon controls to
navigate though
your clip
 Try out the FCP
shortcuts you know
to do the same
thing
Getting Around
 Other ways to get
around
 Grab the scrubber bar
and pull the play head
back and forth
 Place your cursor in
the lower third of the
clip to slomo / fastmo
though your clip
Getting Around
 Click on the scrubber
bar to scrub though
your clip.
 Move your cursor to
the lower third of the
clip in the viewer,
then click and drag to
the left and right
 Slowmo and fastmo
motion
Set Up For Editing
 The best view
 Using the Source –
Sequence view is a
great way to see your
clips while looking at
your timeline at the
same time
Set Up for Editing
 Create a new Folder
from the Media
Library and title it
Sequences
 While the folder is
still selected, right
click and choose New
> Sequence
 A new dialogue comes
up to help you set up
your new sequence
Set Up For Editing
 Sequence dialogue box
 Name your new sequence
 How many video tracks
 Stereo = 3D stereoscopic
editing
 Resolution and Aspect is based
on the settings you made when
you created your project
 How many audio tracks
 You can add more video and
audio tracks later
Set Up for Editing
 Name your sequence
 For now, keep the number
of video and audio tracks
to 1
 Since our video does not
contain audio, leave the
video Stereo button off
 Click the Create button
Set Up for Editing
 Change your view to Source-Sequence
 Select any clip from the Video folder and note
your new layout
 Clip is on the left and your new sequence is on the
right
Getting Around in the
Source-Sequence View
 All the navigational
features work the
same way
 Try J,K,L
 Up and down arrow
keys
  and  arrow keys
 Drag the scrub bar left
and right
MarkingClips
Marking Clips Tutorial
Marking a Clip
 Markers
 Allows you to mark
frames on a clip of
interest
 Beat marks for music
 Potential in/out points
 How it works
 Scrub to the desired
frame and press the
button or press M
Marking a Clip
 Move the play head
to a neat frame in the
fur clip and press the
Mark button
 Move the play head
someplace else and
press M
 Notice that the marked
frames appear in all
views
Marking a Clip
 Setting In and Out
points
 Like you would
expect
 Scrub to the
desired frame
 Press the In button
to mark In or press I
 Press the Out
button to mark Out
or press O
Marking a Clip
 Scrub to a point in the fur clip that would
make a good in point and press the In button
or press I
 Scrub to a point in the clip that would make a
good out point and press the Out button or
press O
Marking a Clip
 What you see
when you set in
and out points
 Viewer – [ and ] on
the scrubber bar
 Timeline with clip
selected – in to out
points highlighted
Marking a Clip
 Change In and Out
points on the fly
 You can scrub to a
new frame and update
your in or out points
by clicking on the
button or pressing I
or O
 Click and drag inside
the In, Out, and
Duration windows
Marking a Clip
 Click inside the In
window and drag left
and right
 Notice how your In
point indicator changes
position
 Click inside the Out
or Dur window and do
the same thing
 Notice now the Out
point indicator now
changes position
Start Over
 Clear your In, Out
or both In and Out
points on a clip
 If you need to clear
your marks and
start over, use the
Viewer Task menu
Start Over
 While the Fur clip
is still
selected, choose
Mark > Clear In
and Out Marks
 Shortcut is Option X
– same as FCP
 Clear out your
markers, too
 Choose Delete All
Markers
Clip Timeline View
 Shows you what tracks make up your clip
 How many audio tracks, for example
 Shows you the markers and In & Out points
of your clip
Clip Timeline View
 Click on the
Green Fur tab in
the Timeline to
show the clip as
a sequence in the
timeline
 Notice that this
clip only has a
video track and no
audio tracks
Clip Timeline View
 While the Fur clip is
still selected, find a
new In point and Out
point for your clip
 Find the spot where
the bear grabs the
salmon and press M
to mark that spot
 Move the play head
off the marker so
you can see it
Clip Timeline View
 After you set your In, Out and Marker, notice
how these changes appear on your clip in
the timeline.
Clip Timeline View
 Double-click inside
the Marker label and
type Salmon Grab
 If you like you can click
on the blue box and
change the color of the
marker
 If you have more than
one marker, click on the
triangle below the
marker in the timeline to
select it, then name it
Auxiliary Playback
Controls
 Some navigational
buttons are
hiding, but worth
using
 Clicking and
holding the play
button gives you
other options
Auxiliary Playback
Controls
 While the Fur clips is still
selected with your In and
Out points, click and hold
the Play button and select
In to Out
 Notice the play head backs
up 1 second before the In
point, plays, and stops 1
second past the Out point
 Default view taking trim and
transition handles into
account
Making a Subclip
 If you would like to
save the clip you
marked with the In
and Out point as
its own clip, you
can save it as a
subclip
 Only the range you
marked becomes a
clip unto itself
Making a Subclip
 Make sure your Fur
clip has an In and
Out point.
 Choose Clip > Create
Subclip (command U)
 Check out your
Media library and
note the fur subclip
right below the
original clip
Homework Assignment
 Take a snapshot of
your interface that
includes:
 Fur subclip in the Media
Library
 Fur clip selected in the
Timeline with the In, Out
and Marker points
indicated
 Post the image in the
Smoke 2 Dropbox
Smoke II
Viewer Controls
& Marking Clips

Smoke 2 marking clips

  • 1.
  • 2.
    SmokeII Fix it inPost Autodesk Smoke Film
  • 3.
    Viewer Controls  TheViewer is a great way to have a closer look at your clips and decide what you wish to use for your project.
  • 4.
    Having a Look Load your 420 lesson project  Switch to the Timeline view  Select the Player view  In the media library select the immersed clip
  • 5.
    What’s Up?  What’sin your Viewer?  The clip that is in your Viewer is the one in Media Library with the Green triangle next to it  The name is also on the Green tab in the Player view
  • 6.
    Getting Around  IconControls  Go to In point  Go to beginning of clip  -1 frame  Play  +1 frame  Go to end of clip  Go to Out point  Mark at play head position
  • 7.
    Getting Around  Shortcutcontrols  Space key – play / pause  J – play backwards  K – pause  L – play forwards  JJ/LL shuttle backwards / forwards    Arrow keys – nudge forward / backward  Up arrow / Down arrow – beginning / end of clip
  • 8.
    Getting Around  Tryout the play control icons under immersed to move around in your clip  Try out the keyboard shortcuts to do the same thing  Note what KL and KJ do!
  • 9.
    Viewer Tools  What’savailable  Audio Desk  Overlays  Video Scopes
  • 10.
    Audio Desk  AudioDesk  Allows you to monitor the clip’s audio channels and apply EQ and basic audio filters
  • 11.
    Audio Desk  ChooseShow Audio Desk from the Options pop-up menu  Select the Elysium music clip from the Music folder and play the clip  Put your cursor over the level sliders and drag up and down
  • 12.
    Overlays  Click onthe Options pop-up menu and select Show Overlays  Overlay options dialogue box displays next to your clip
  • 13.
    Overlays  Working Area Temporarily hides areas of clip to help you place other elements  CG overlays
  • 14.
    Overlays  Click onthe Working Area Guide pop-up menu to turn on  Drag and Width and Height settings to change the overlay  Turn off when done
  • 15.
    Overlays  Free Guide Same idea as working area  You can add a free guide to working area
  • 16.
    Overlays  Click onthe Free Guide pop-up menu to turn on  Drag the guides out to 200 pixels on each side of the clip  Turn off when done
  • 17.
    Overlays  Letterbox  Allowsyou to simulate what your clip will look like at various letterbox (movie) settings
  • 18.
    Overlays  Click onthe Letterbox pop-up menu and select 2.35:1 Cinemascope  Turn off when done
  • 19.
    Overlays  Click onthe Safe menu and choose Action & Title  Action safe is on the outside  Title safe is on the inside  Title Safe  Guide to keep important content viewable
  • 20.
    Overlays  Grid  Helpsalign content in composite compositions  Several clips playing together in one space  Foreground elements like CG placement
  • 21.
    Overlays  Click onthe Grid pop- up menu to turn on  Change the Width and Height settings to 100 pixels  Change the Opacity settings to see the changes  Turn off when done
  • 22.
    Overlays  Centre  Placesa center mark on your clip  Handy for  Applying foreground elements that need to be centered on screen  Setting quadrants for a four-clip composite
  • 23.
    Overlays  Click onthe Centre pop-up menu and select Medium Centre  Red plus appears at center of clip  Can be nudged with X and Y settings below  Turn off when done
  • 24.
    Overlays  Image Border Draws a line around your clip  When your clip has black or alpha elements where it’s hard to tell where your clip ends and the clip below begins in a composite
  • 25.
    Overlays  Click onthe Border button to turn it on  You can change the color of the border (and any other overlay) by clicking on the color box
  • 26.
    Scopes  Scopes  Checkthe video levels  Vector scope  Handy for color matching  Waveform monitor  Check your luminance values  Broadcast safe?
  • 27.
    Scopes  Click onthe Options pop-up menu and select Vectorscope (or Waveform Monitor if there)  Change the viewer settings to Vectorscope Monochrome
  • 28.
    Vectorscope  Vectorscope  Six-sidedoverlay representing the additive/subtractive primary colors that make up a colorbars signal  Green area shows the amount of color in these areas
  • 29.
    Vectorscope  Change theviewer settings to Colour 2D  Now you can see the relative amount of colors that make up your clip based on the additive/subtractive colors of your clip
  • 30.
    Waveform Monitor  Changethe viewer settings to Waveforms > Luminance  Now you can see the luminance value of your clip  Anything over 100 iu is FCC illegal  Click on 1, then click on a bright area on your clip and note the setting on the monitor
  • 31.
    Waveform Monitor  Clickon 1, then click on a bright area on your clip and note the setting on the monitor
  • 32.
    Finding / Organizing Where’s my clip?  Can use the search window to track down a clip  Perhaps you need to find and place specific clips into their own folder
  • 33.
    Finding / Organizing In the Media Library back up to the top, right click the library and select New > Folder  Name the Folder Voiceovers  Move the window slider to the bottom so you can see your new folder
  • 34.
    Finding / Organizing In the search window in the bottom of the Media window type in aqe  A new list under Search shows you all the files that contain the word AQE
  • 35.
    Finding / Organizing Hold down the command key and select all the AQE Trailer clips  Drag the clips to the new Voiceovers folder  When done, click on the X in the search window to clear your search
  • 36.
    Getting Around  IconControls  Go to In point  Go to beginning of clip  Nudge back 1 frame  Play / pause  Nudge forward 1 frame  Go to end of clip  Go to Out point
  • 37.
    Getting Around  Shortcutkeys  Space bar – play / pause  J – play backwards  K – pause  L – play forwards  JJ / LL – shuttle backwards / forwards  Up/Down arrow – go to start / end of clip    - nudge back / forward 1 frame  Shift   - jump back / forward 10 frames
  • 38.
    Getting Around  Selectthe Fur clip in the media browser and use the icon controls to navigate though your clip  Try out the FCP shortcuts you know to do the same thing
  • 39.
    Getting Around  Otherways to get around  Grab the scrubber bar and pull the play head back and forth  Place your cursor in the lower third of the clip to slomo / fastmo though your clip
  • 40.
    Getting Around  Clickon the scrubber bar to scrub though your clip.  Move your cursor to the lower third of the clip in the viewer, then click and drag to the left and right  Slowmo and fastmo motion
  • 41.
    Set Up ForEditing  The best view  Using the Source – Sequence view is a great way to see your clips while looking at your timeline at the same time
  • 42.
    Set Up forEditing  Create a new Folder from the Media Library and title it Sequences  While the folder is still selected, right click and choose New > Sequence  A new dialogue comes up to help you set up your new sequence
  • 43.
    Set Up ForEditing  Sequence dialogue box  Name your new sequence  How many video tracks  Stereo = 3D stereoscopic editing  Resolution and Aspect is based on the settings you made when you created your project  How many audio tracks  You can add more video and audio tracks later
  • 44.
    Set Up forEditing  Name your sequence  For now, keep the number of video and audio tracks to 1  Since our video does not contain audio, leave the video Stereo button off  Click the Create button
  • 45.
    Set Up forEditing  Change your view to Source-Sequence  Select any clip from the Video folder and note your new layout  Clip is on the left and your new sequence is on the right
  • 46.
    Getting Around inthe Source-Sequence View  All the navigational features work the same way  Try J,K,L  Up and down arrow keys   and  arrow keys  Drag the scrub bar left and right
  • 47.
  • 48.
    Marking a Clip Markers  Allows you to mark frames on a clip of interest  Beat marks for music  Potential in/out points  How it works  Scrub to the desired frame and press the button or press M
  • 49.
    Marking a Clip Move the play head to a neat frame in the fur clip and press the Mark button  Move the play head someplace else and press M  Notice that the marked frames appear in all views
  • 50.
    Marking a Clip Setting In and Out points  Like you would expect  Scrub to the desired frame  Press the In button to mark In or press I  Press the Out button to mark Out or press O
  • 51.
    Marking a Clip Scrub to a point in the fur clip that would make a good in point and press the In button or press I  Scrub to a point in the clip that would make a good out point and press the Out button or press O
  • 52.
    Marking a Clip What you see when you set in and out points  Viewer – [ and ] on the scrubber bar  Timeline with clip selected – in to out points highlighted
  • 53.
    Marking a Clip Change In and Out points on the fly  You can scrub to a new frame and update your in or out points by clicking on the button or pressing I or O  Click and drag inside the In, Out, and Duration windows
  • 54.
    Marking a Clip Click inside the In window and drag left and right  Notice how your In point indicator changes position  Click inside the Out or Dur window and do the same thing  Notice now the Out point indicator now changes position
  • 55.
    Start Over  Clearyour In, Out or both In and Out points on a clip  If you need to clear your marks and start over, use the Viewer Task menu
  • 56.
    Start Over  Whilethe Fur clip is still selected, choose Mark > Clear In and Out Marks  Shortcut is Option X – same as FCP  Clear out your markers, too  Choose Delete All Markers
  • 57.
    Clip Timeline View Shows you what tracks make up your clip  How many audio tracks, for example  Shows you the markers and In & Out points of your clip
  • 58.
    Clip Timeline View Click on the Green Fur tab in the Timeline to show the clip as a sequence in the timeline  Notice that this clip only has a video track and no audio tracks
  • 59.
    Clip Timeline View While the Fur clip is still selected, find a new In point and Out point for your clip  Find the spot where the bear grabs the salmon and press M to mark that spot  Move the play head off the marker so you can see it
  • 60.
    Clip Timeline View After you set your In, Out and Marker, notice how these changes appear on your clip in the timeline.
  • 61.
    Clip Timeline View Double-click inside the Marker label and type Salmon Grab  If you like you can click on the blue box and change the color of the marker  If you have more than one marker, click on the triangle below the marker in the timeline to select it, then name it
  • 62.
    Auxiliary Playback Controls  Somenavigational buttons are hiding, but worth using  Clicking and holding the play button gives you other options
  • 63.
    Auxiliary Playback Controls  Whilethe Fur clips is still selected with your In and Out points, click and hold the Play button and select In to Out  Notice the play head backs up 1 second before the In point, plays, and stops 1 second past the Out point  Default view taking trim and transition handles into account
  • 64.
    Making a Subclip If you would like to save the clip you marked with the In and Out point as its own clip, you can save it as a subclip  Only the range you marked becomes a clip unto itself
  • 65.
    Making a Subclip Make sure your Fur clip has an In and Out point.  Choose Clip > Create Subclip (command U)  Check out your Media library and note the fur subclip right below the original clip
  • 66.
    Homework Assignment  Takea snapshot of your interface that includes:  Fur subclip in the Media Library  Fur clip selected in the Timeline with the In, Out and Marker points indicated  Post the image in the Smoke 2 Dropbox
  • 67.