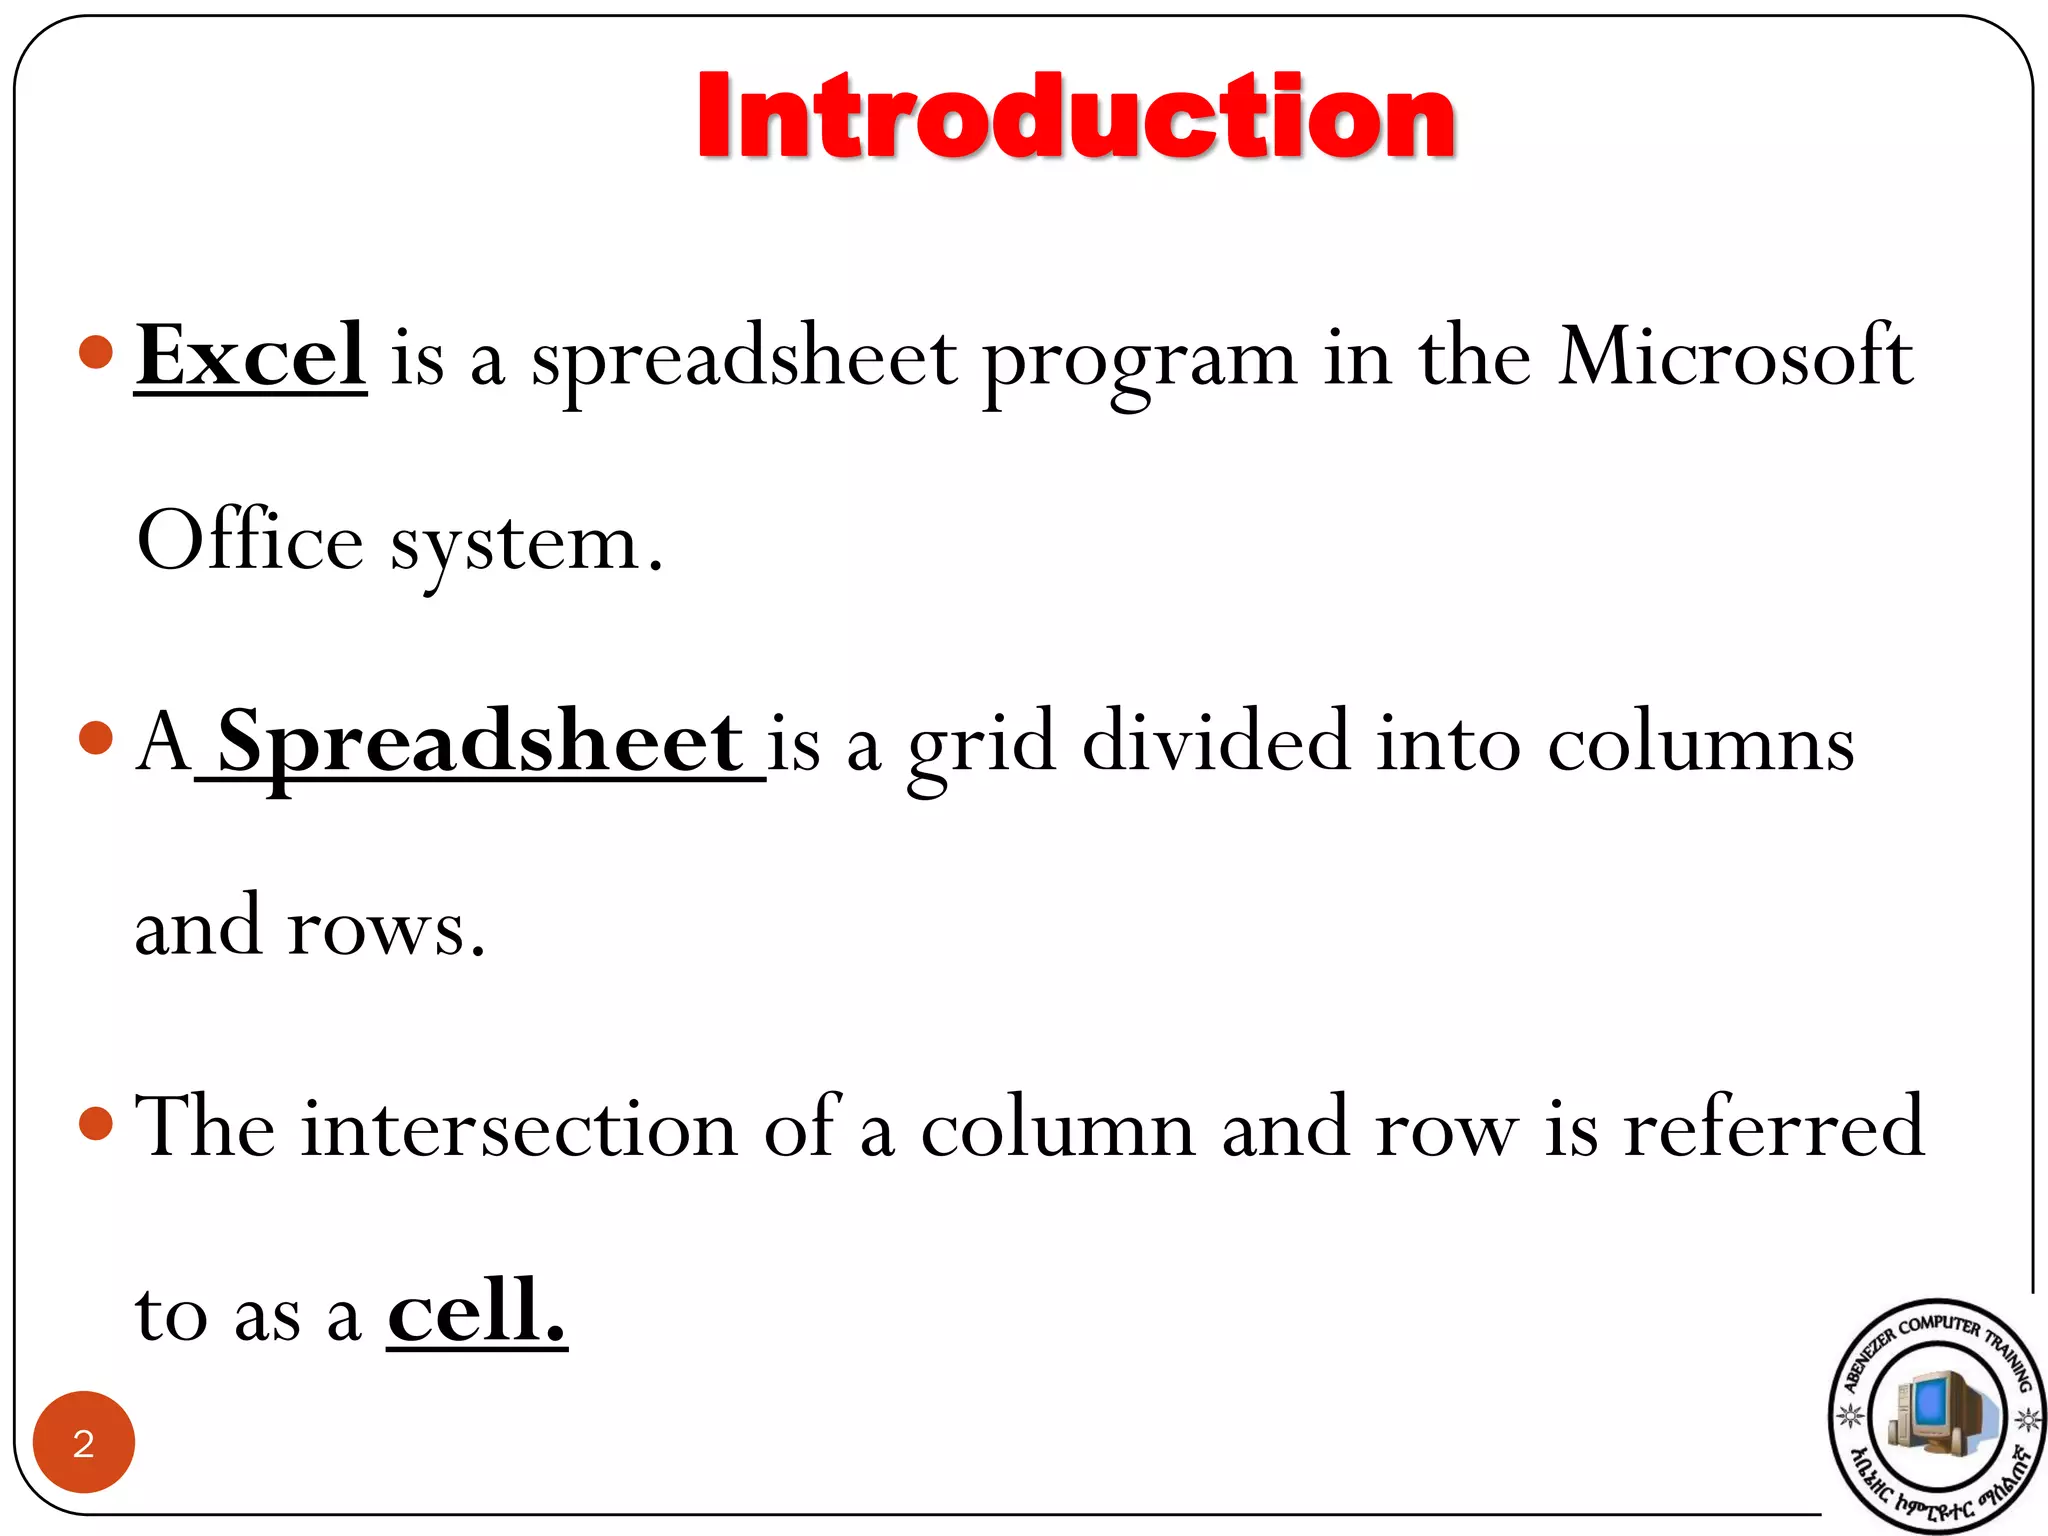
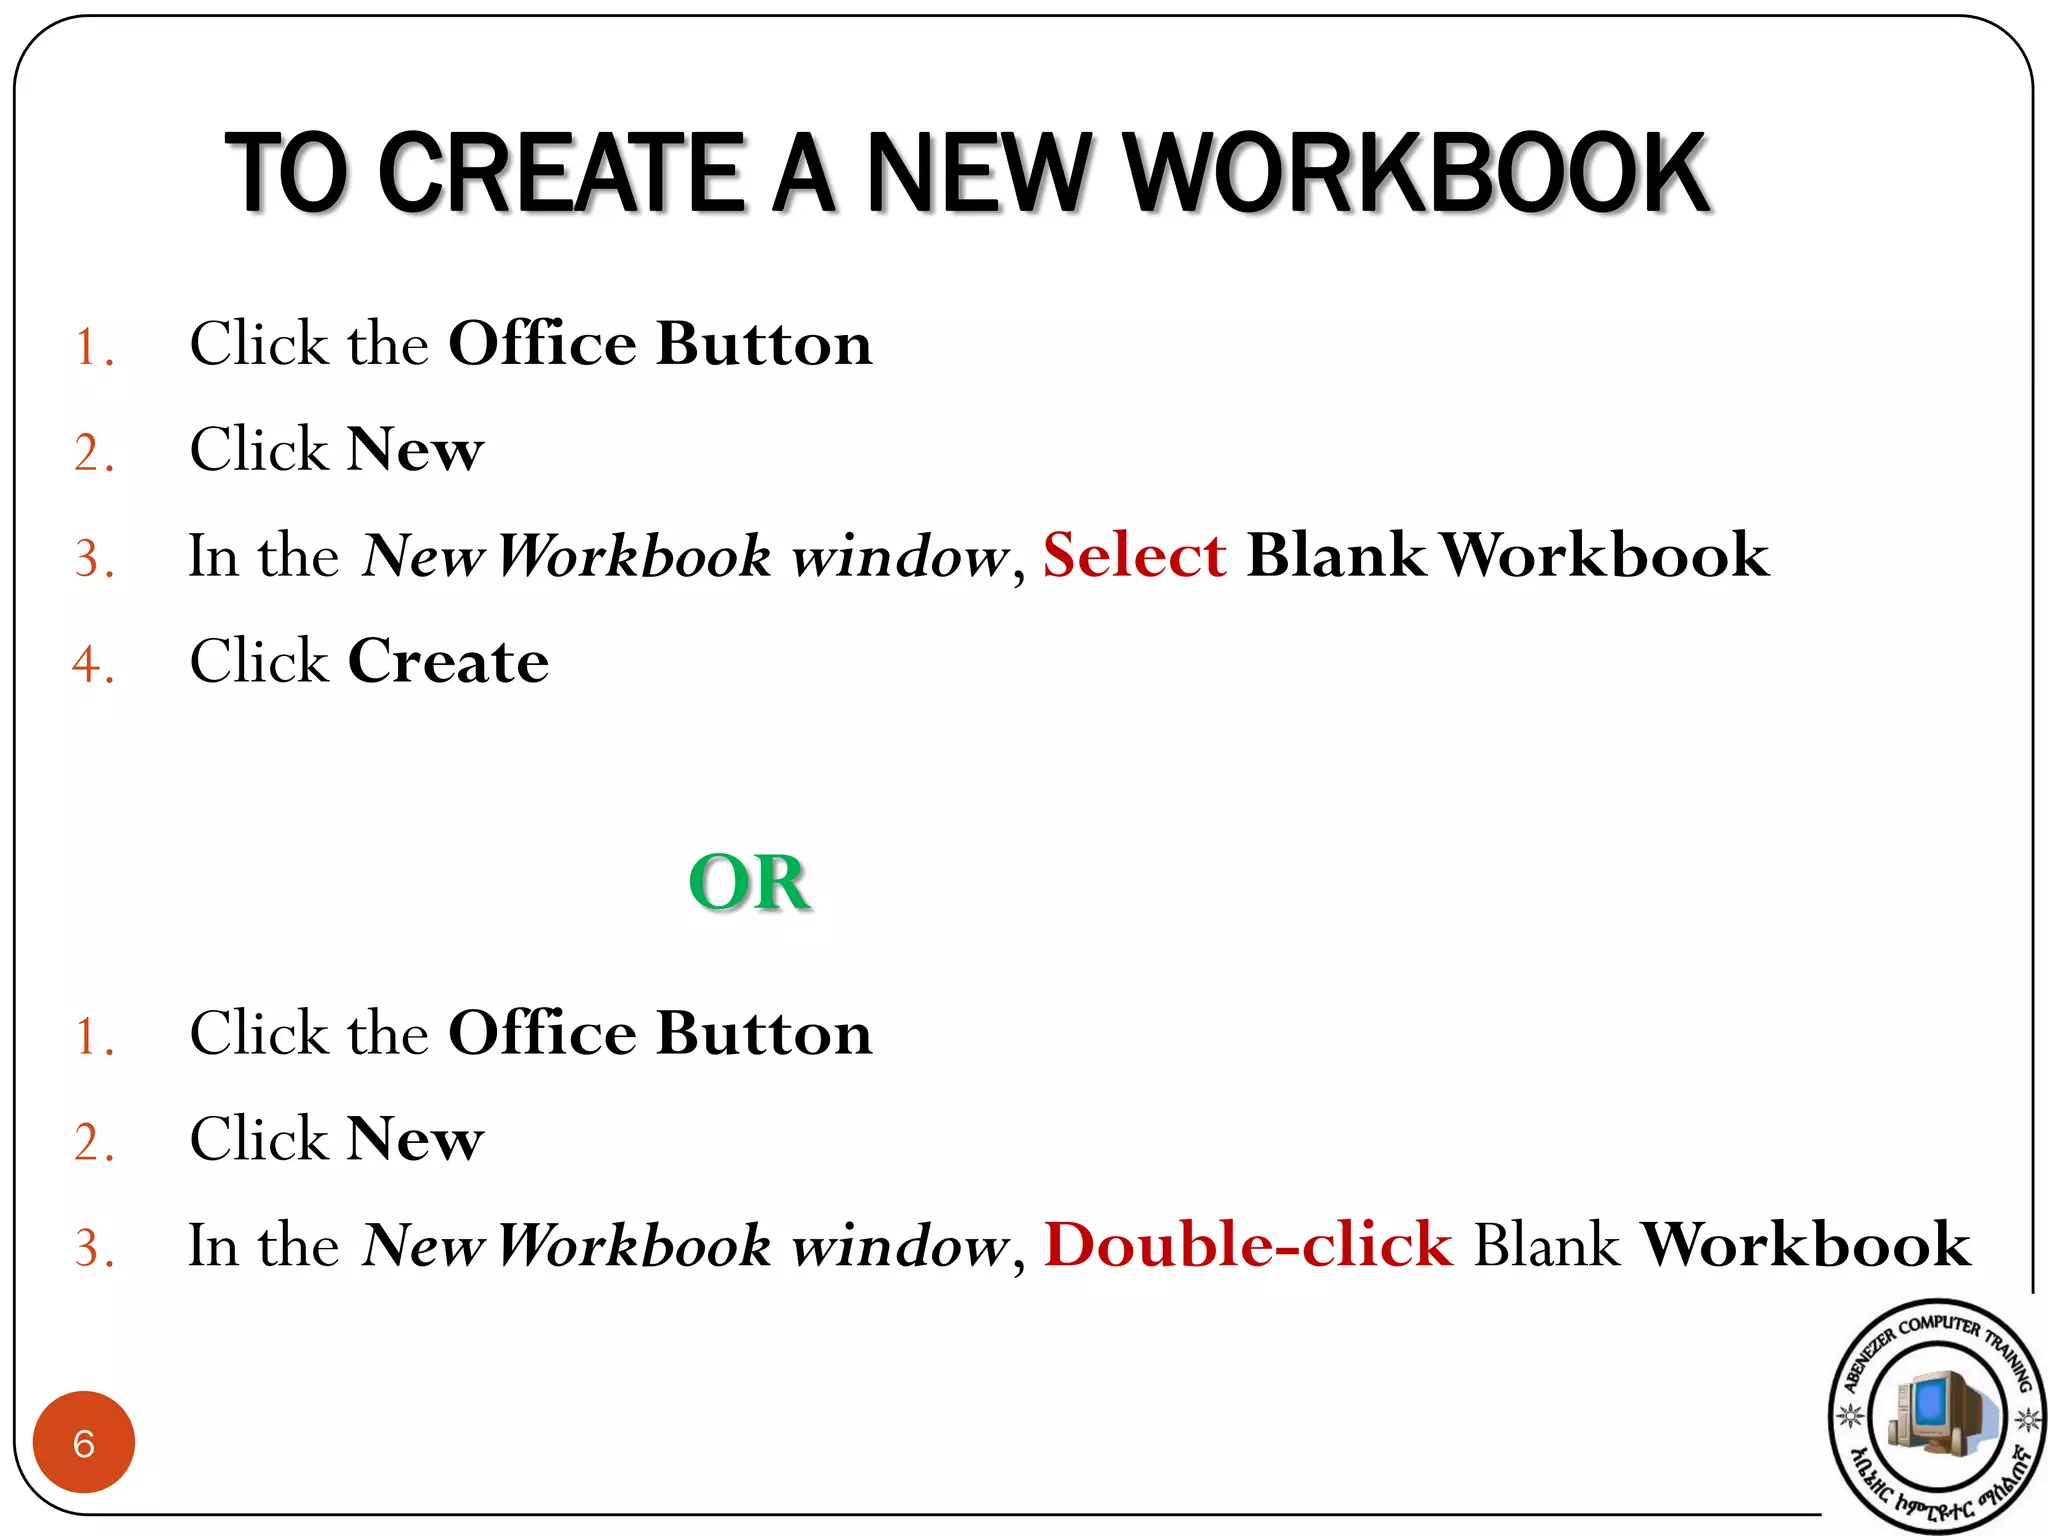
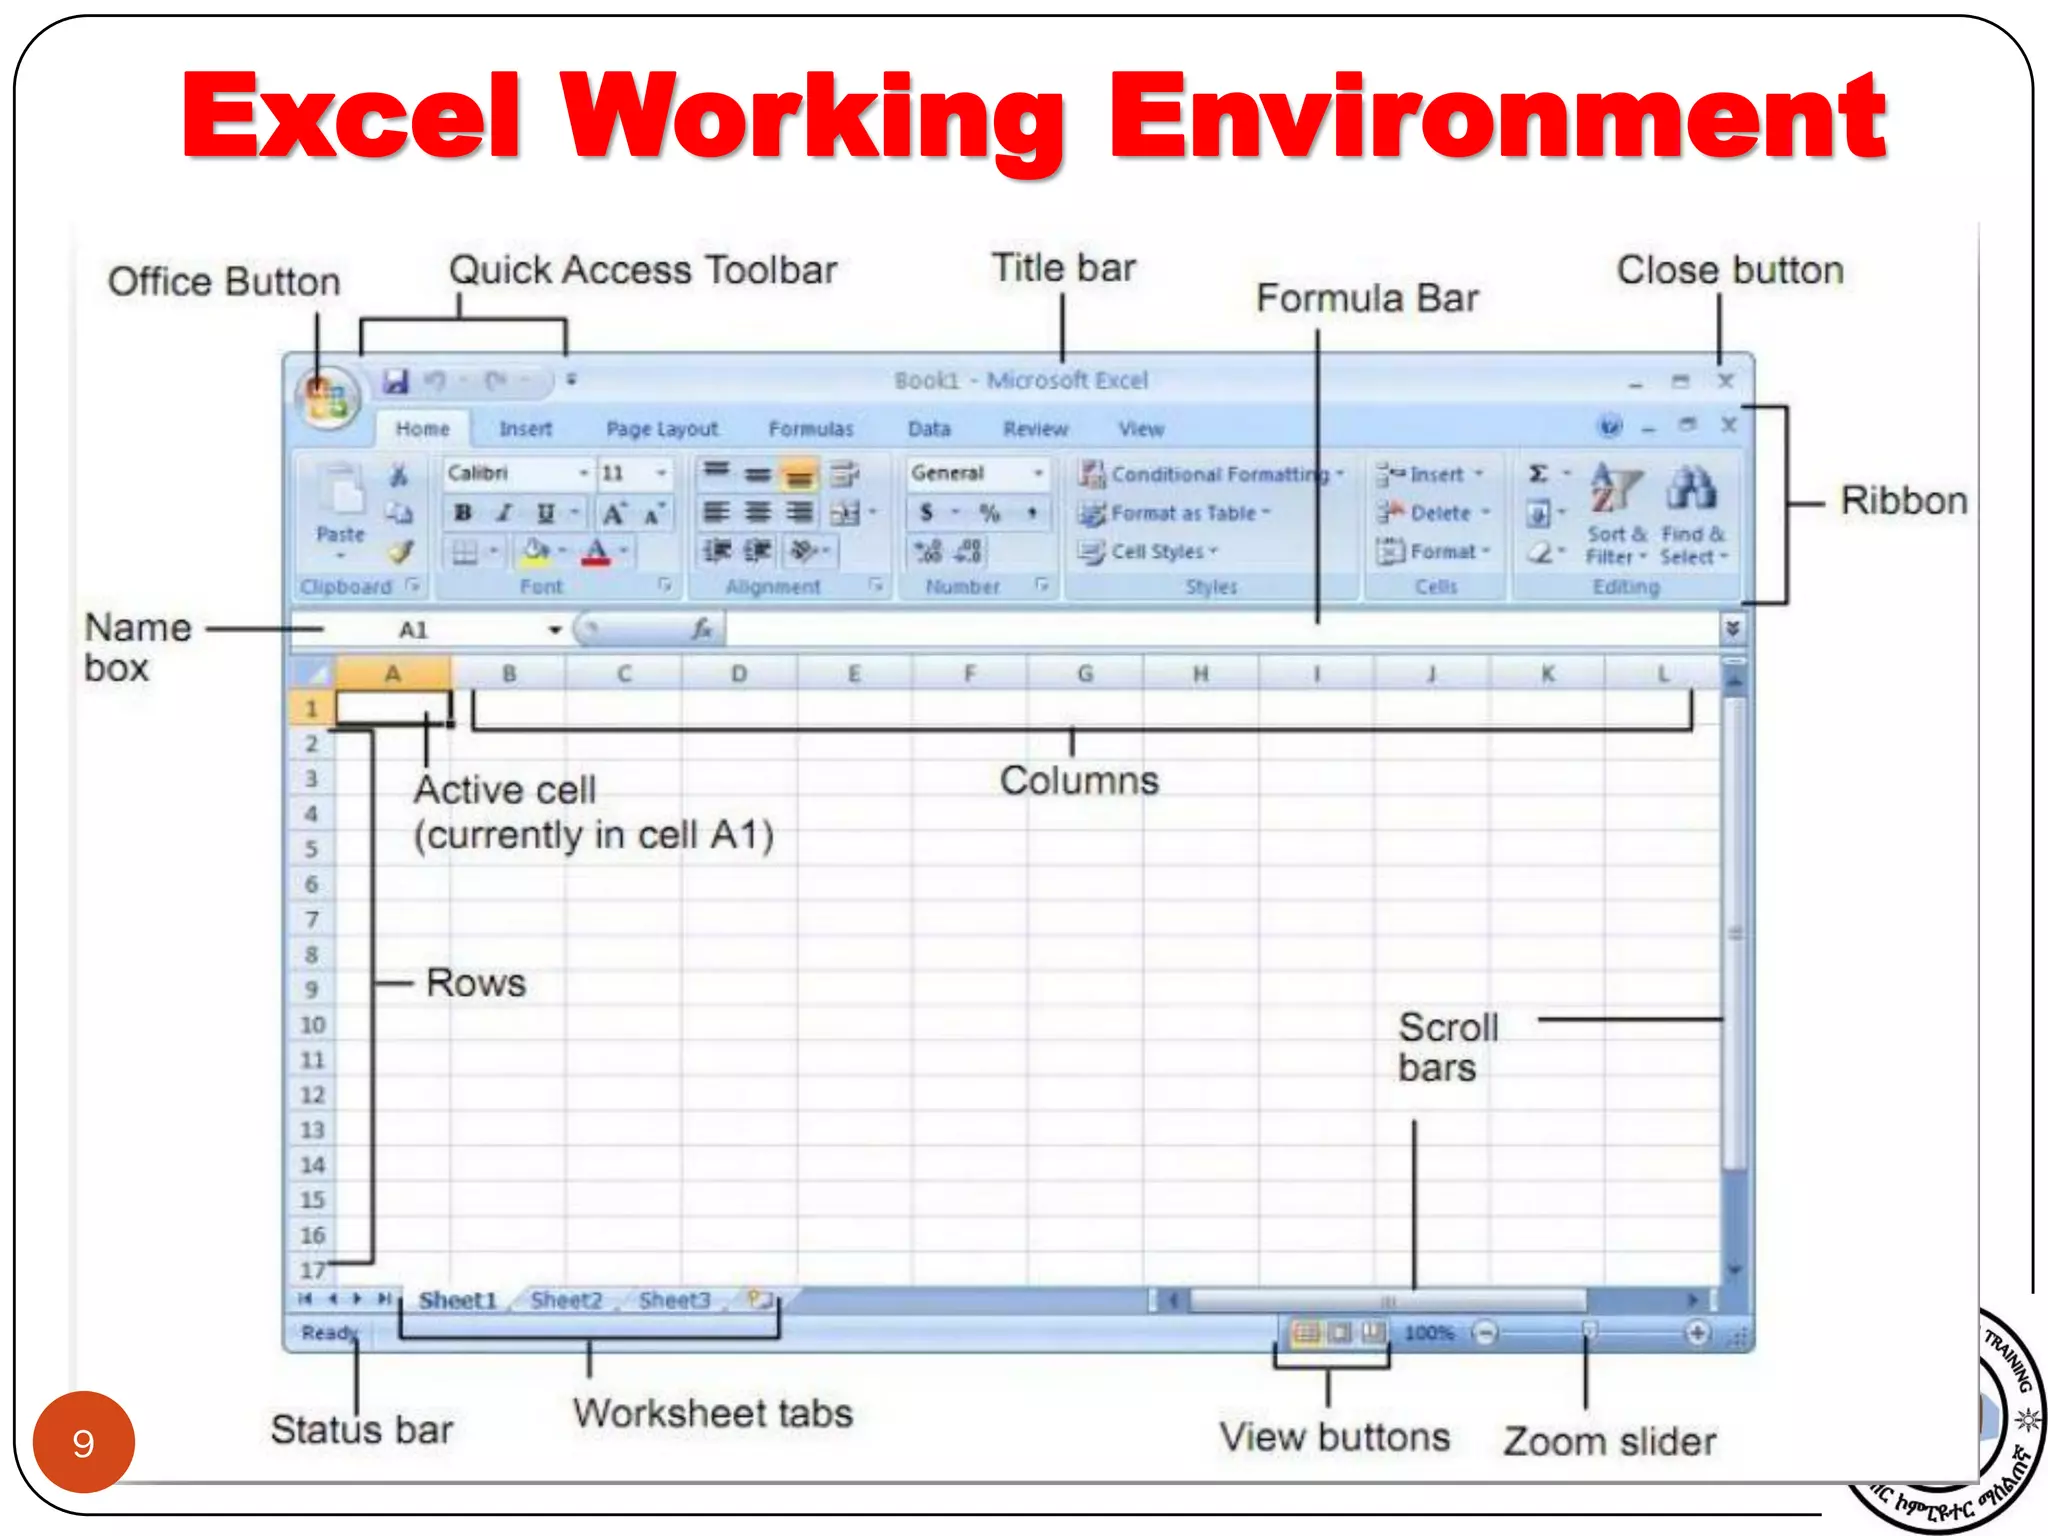
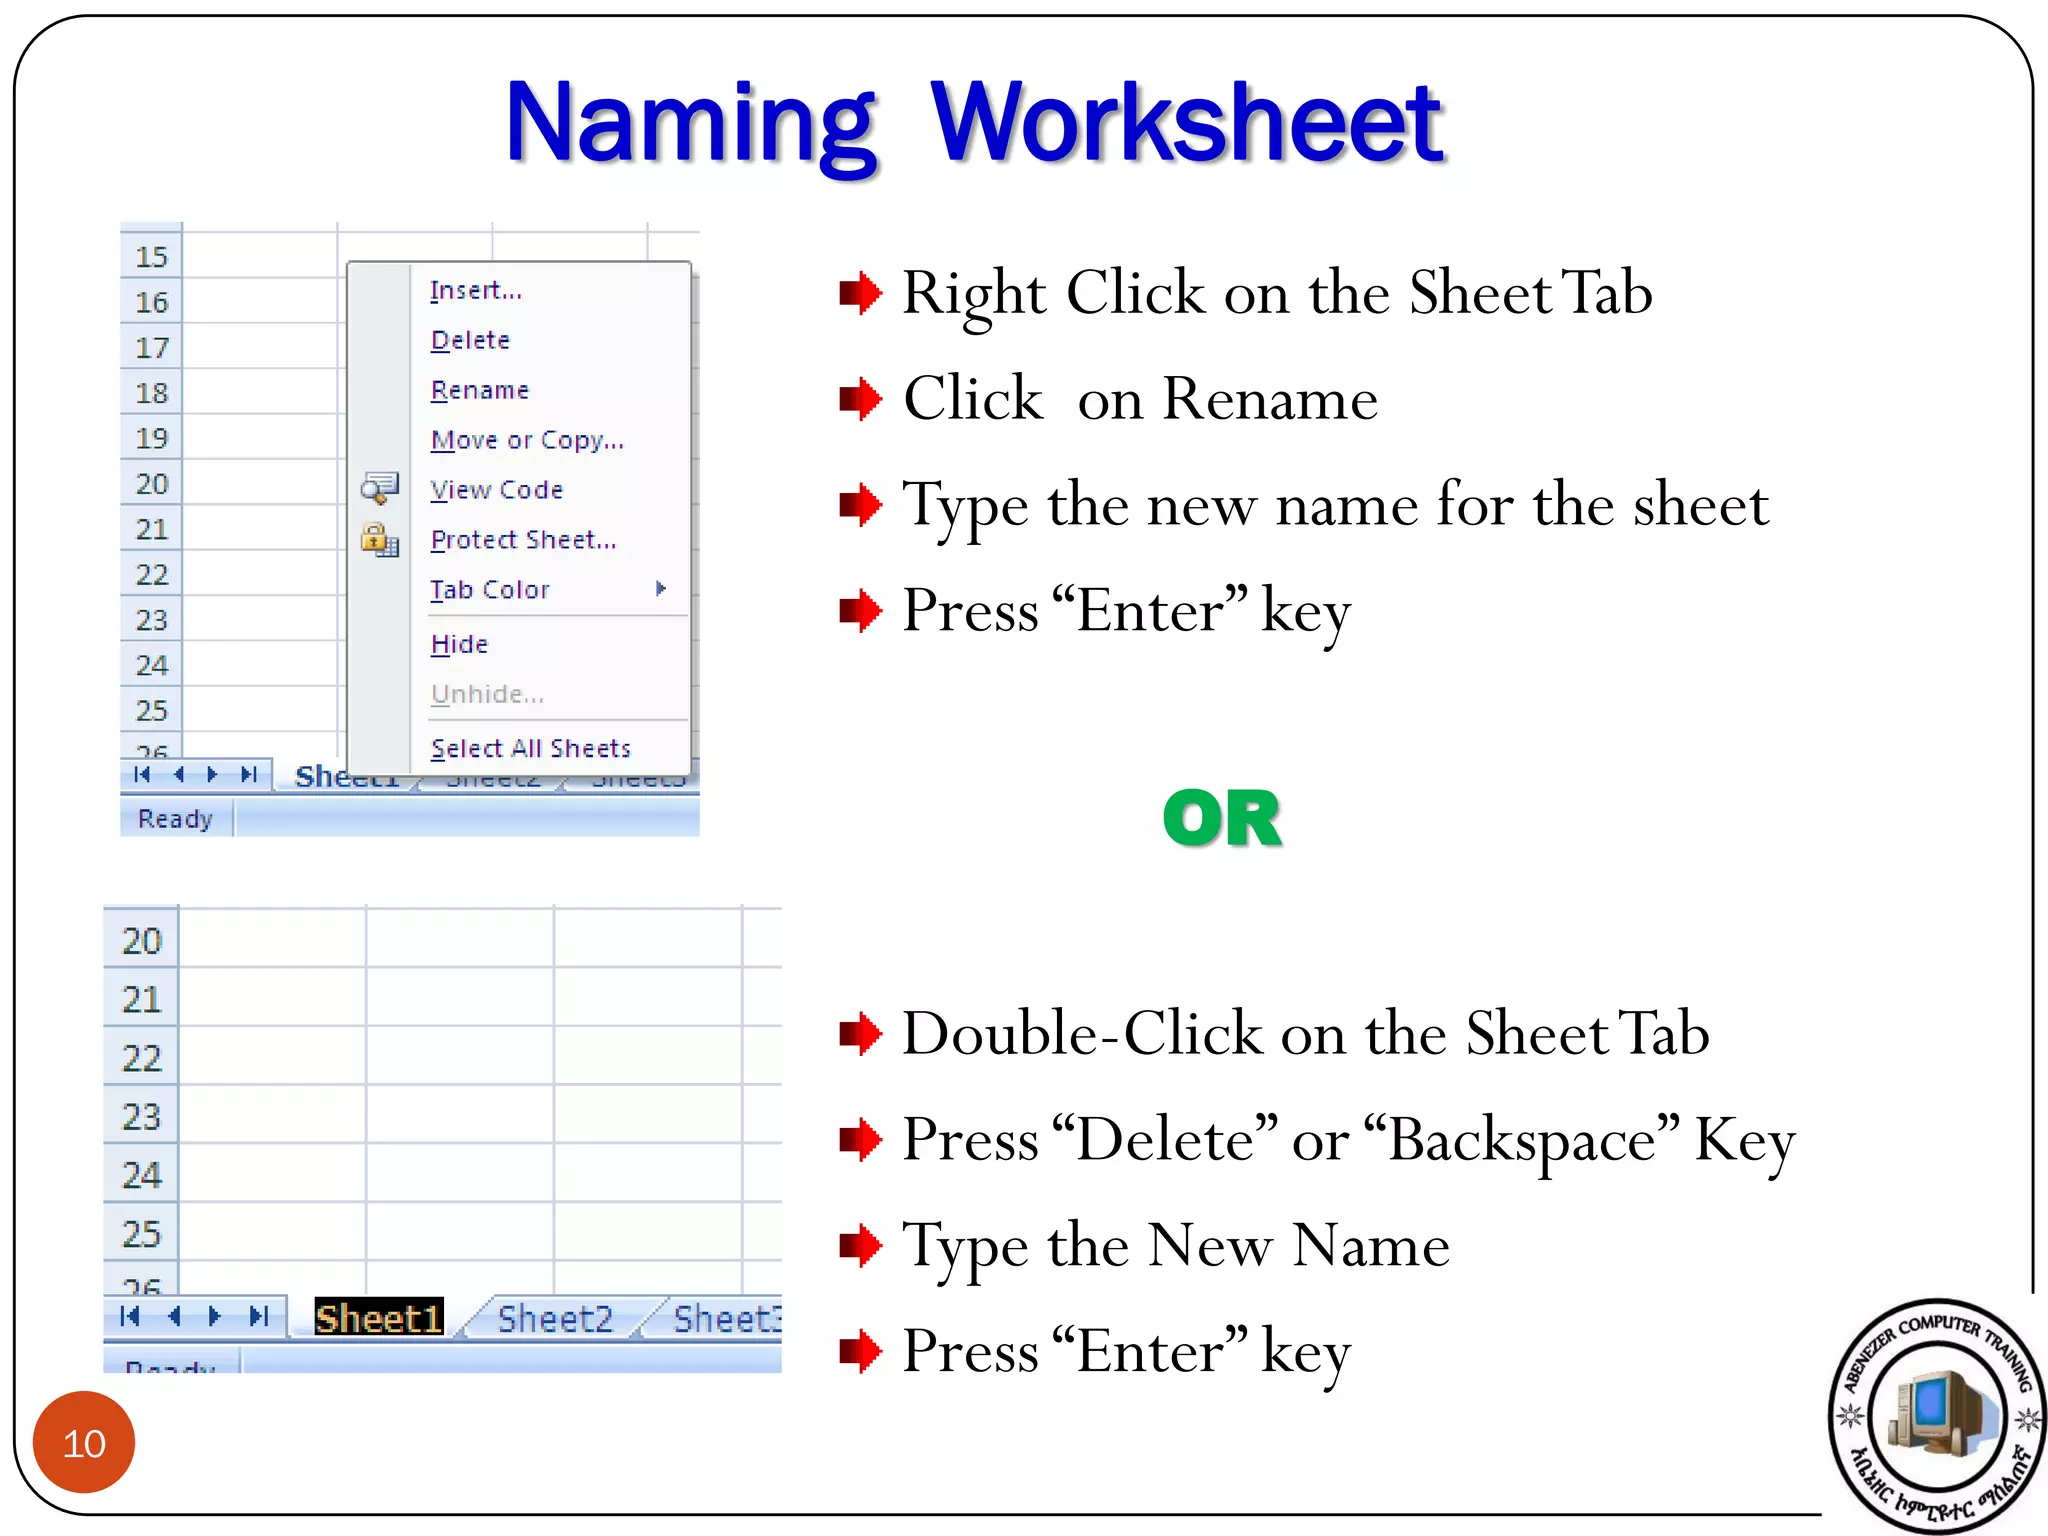
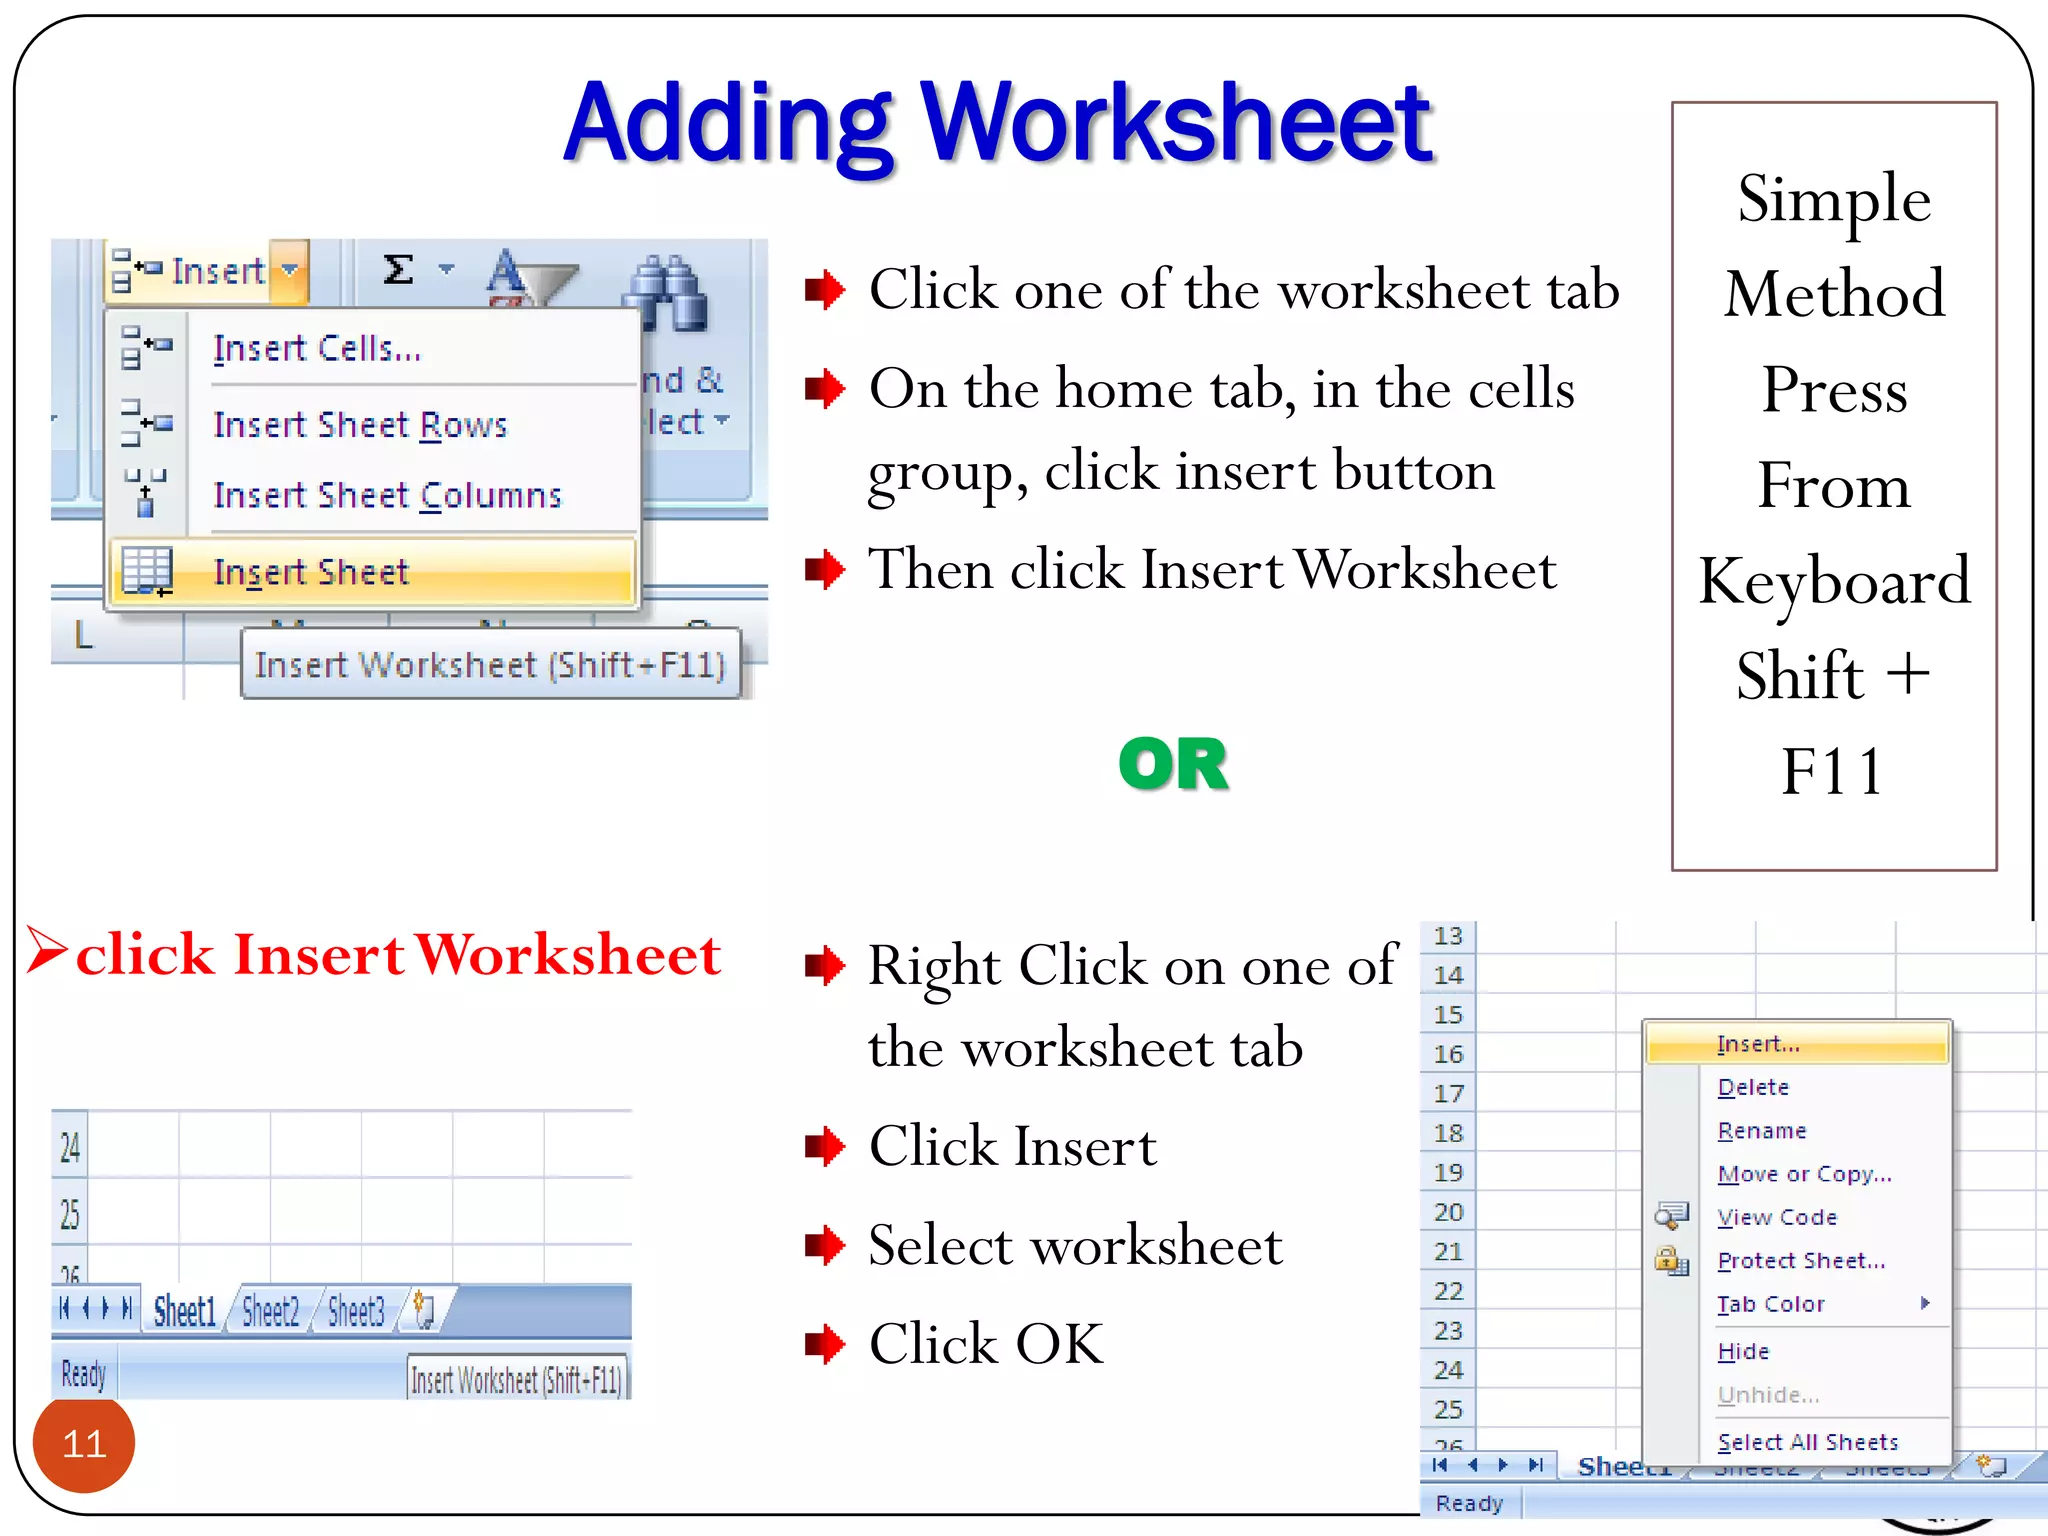
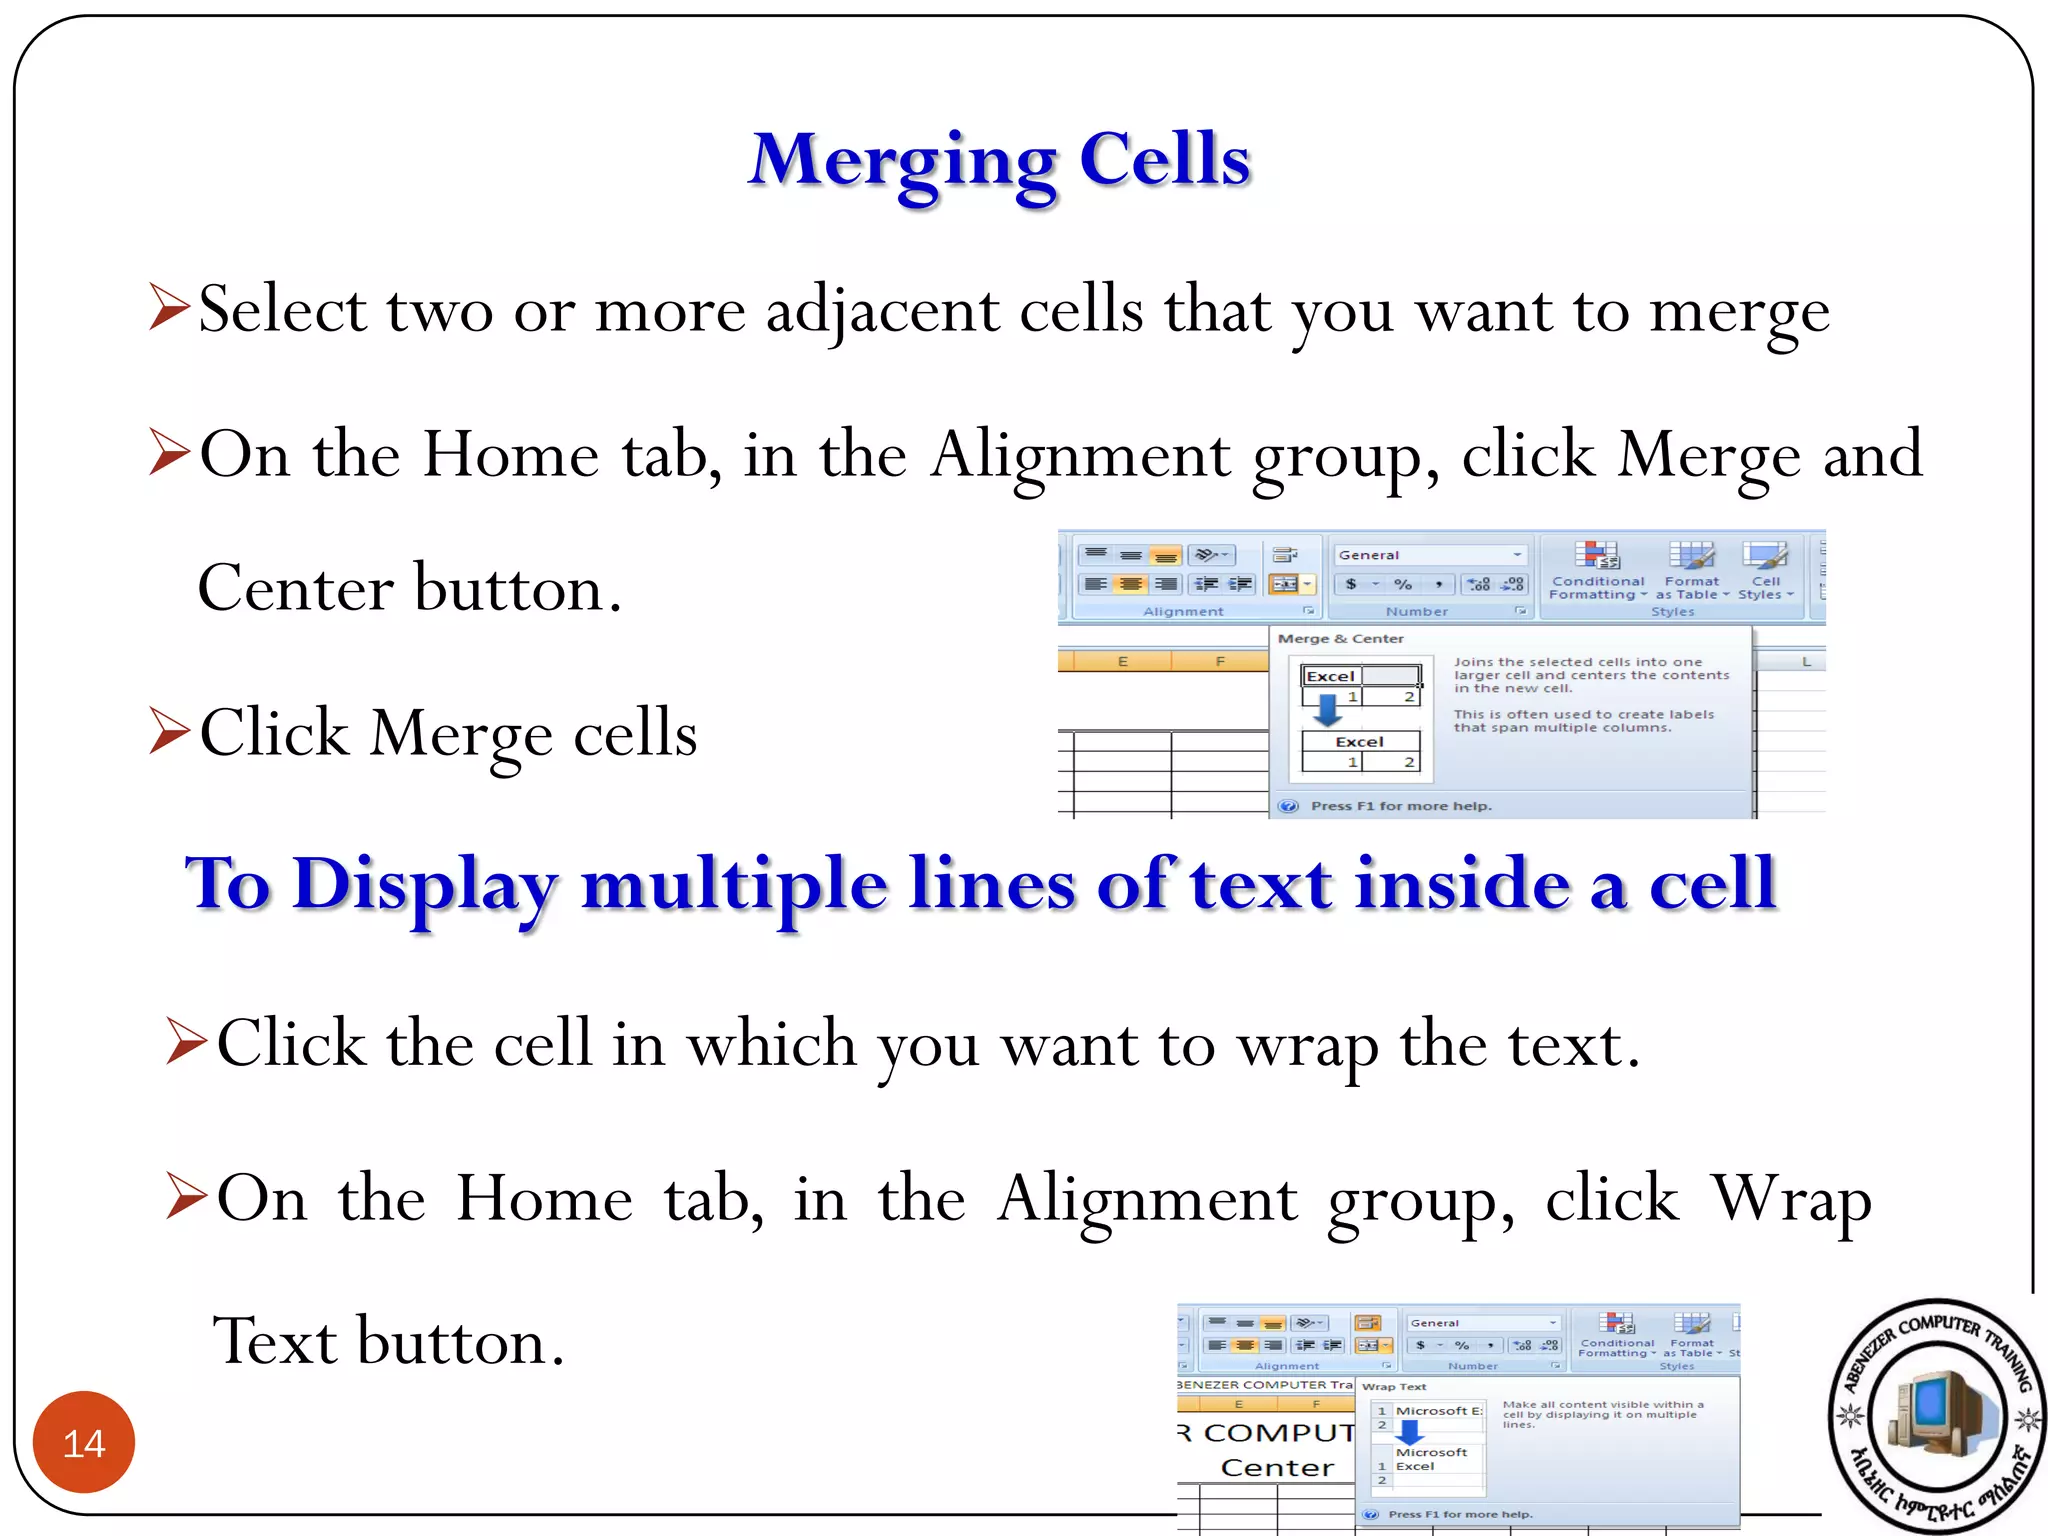
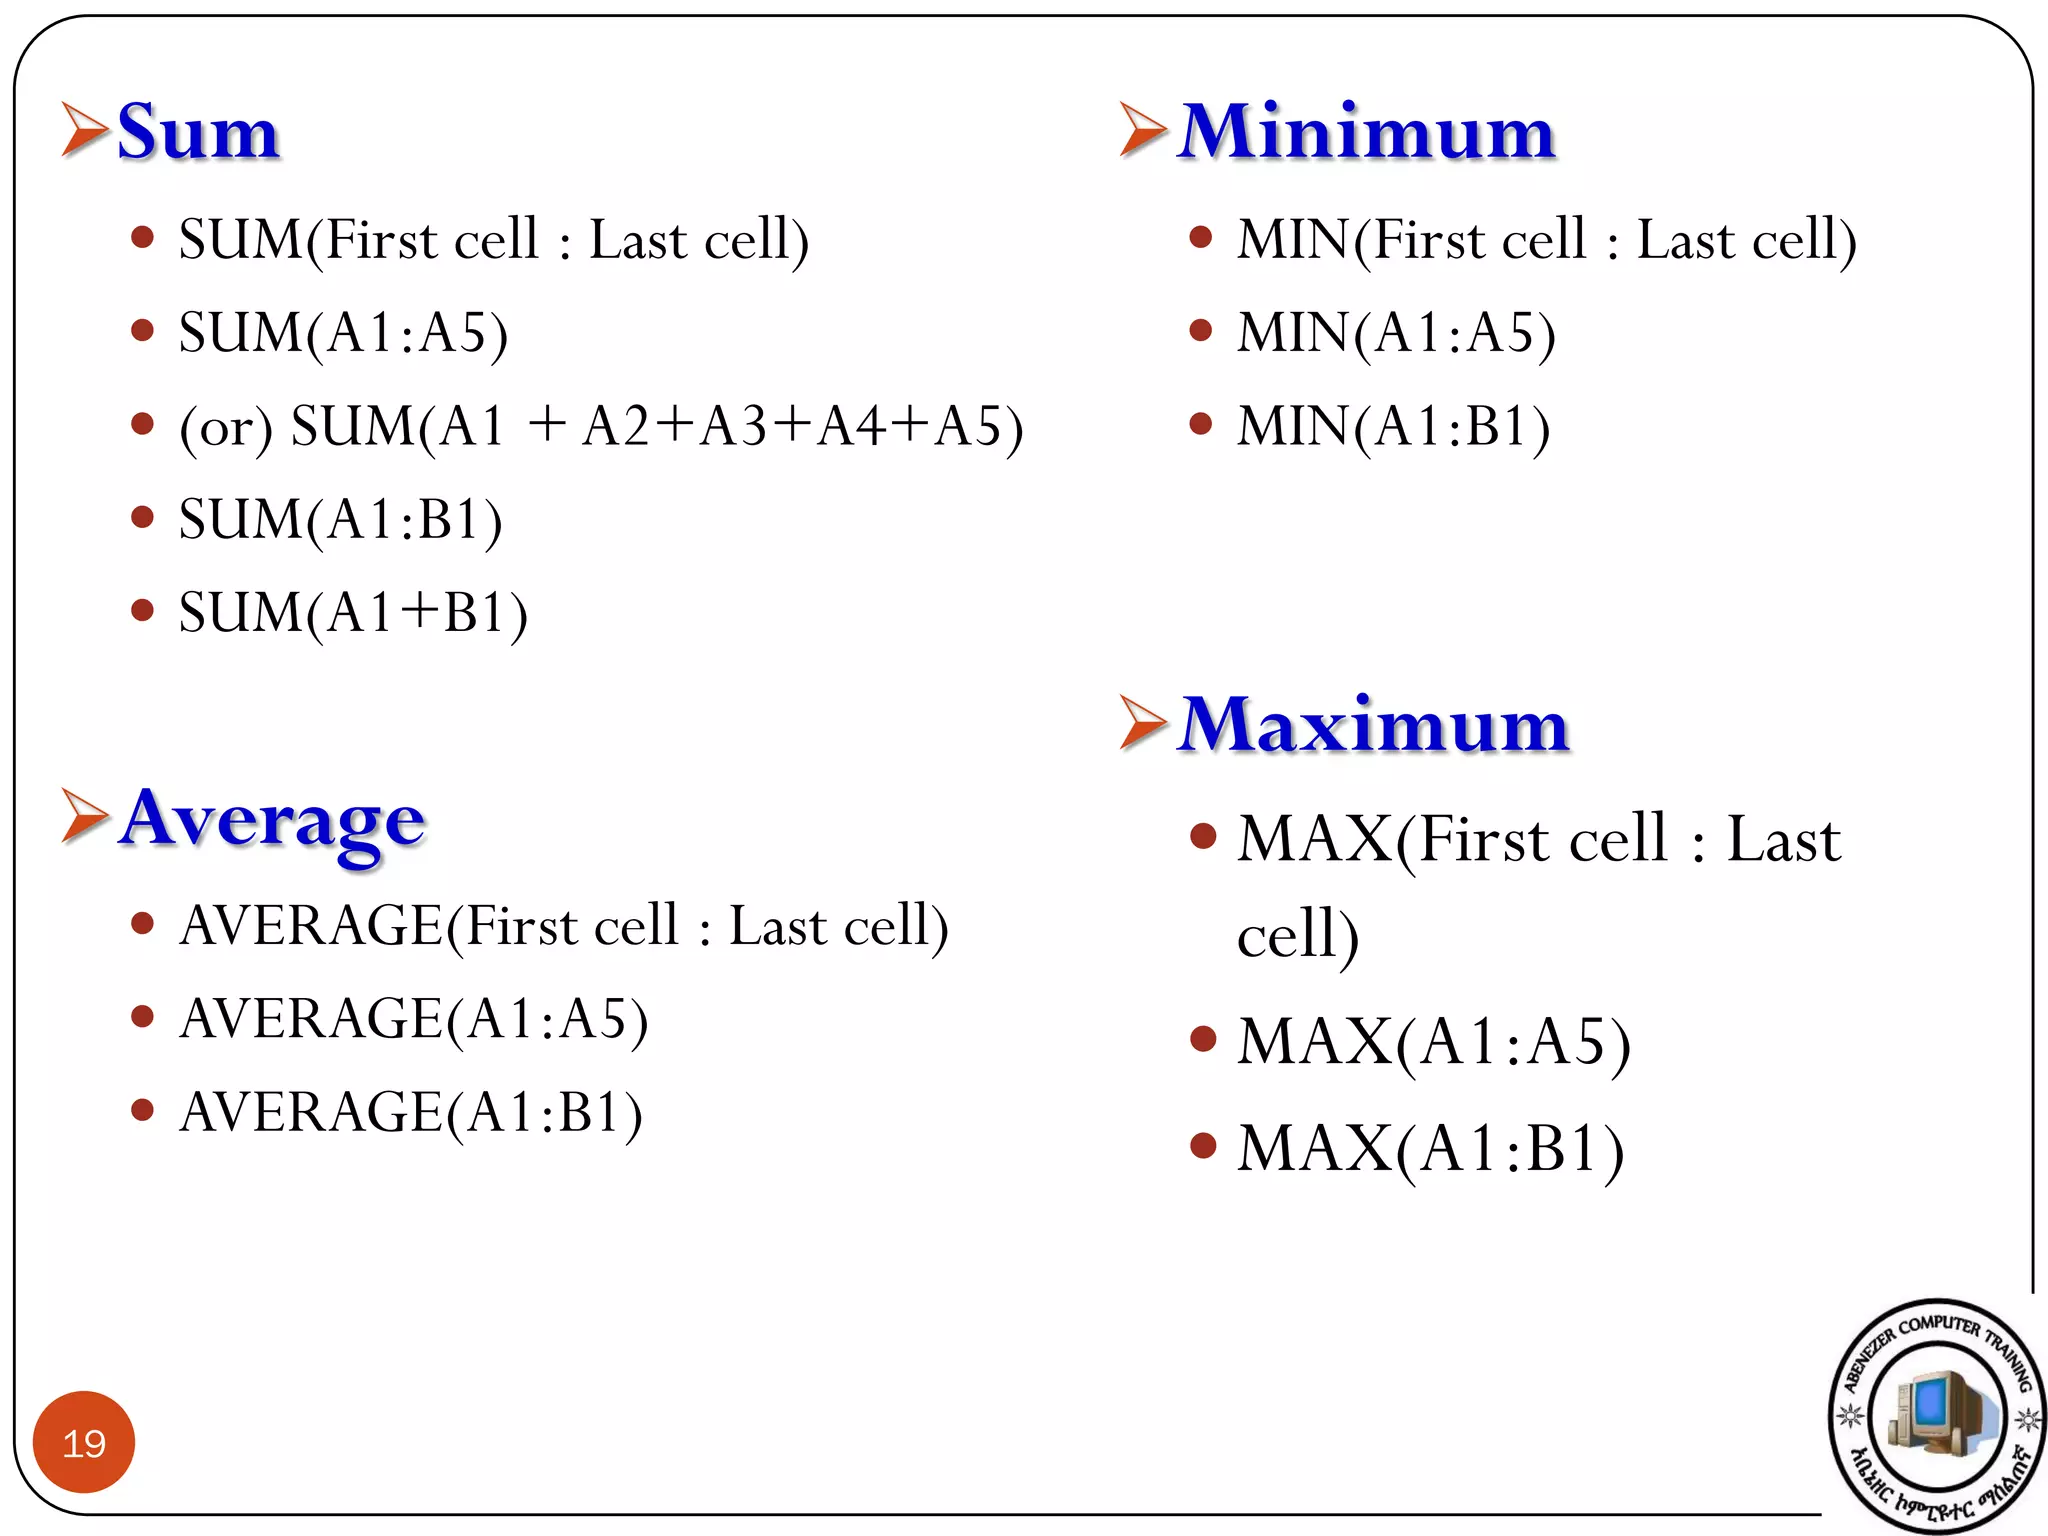
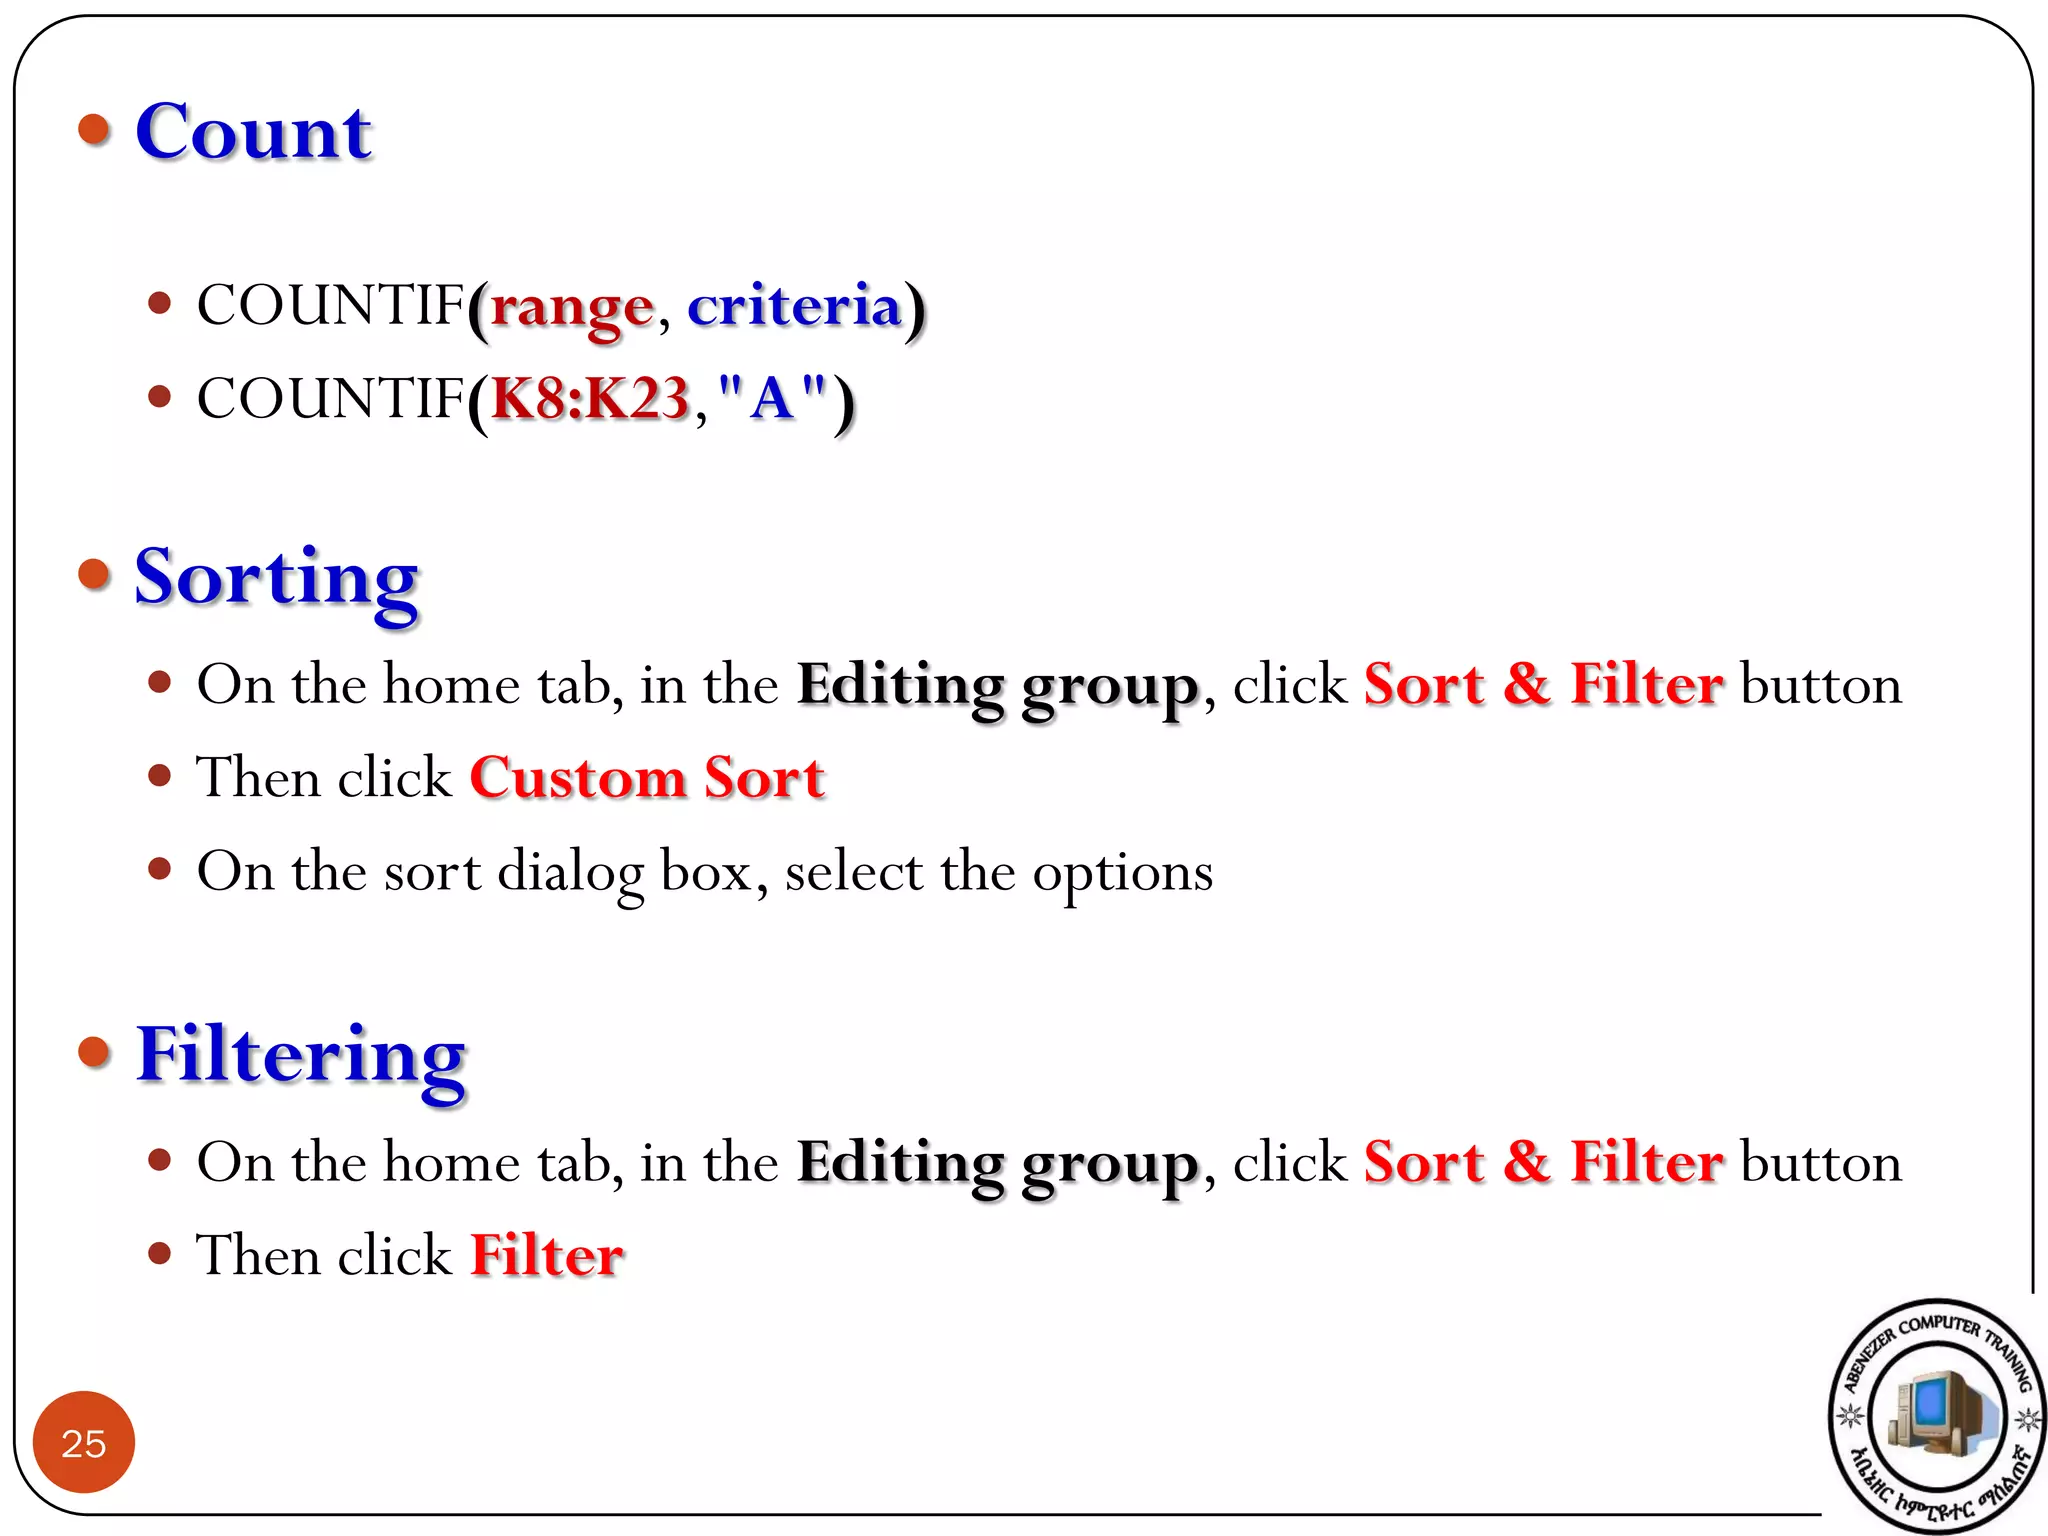
Microsoft Excel
1
Introduction
 Excel is a spreadsheet program in the Microsoft
Office system.
 A Spreadsheet is a grid divided into columns
and rows.
 The intersection of a column and row is referred
to as a cell.
2
Why we use Excel?
 You can use Excel to create and format workbooks (a
collection of spreadsheets) in order to analyze data and
make more informed business decisions.
 Specifically, you can use Excel:
 To build models for analyzing data
 To write formulas to perform calculations on that data
 To pivot the data in numerous ways
 To present data in a variety of professional looking charts
3
Method 1
1. Click the Start button
2. Click All Programs
3. Click Microsoft Office
4. Click Microsoft Office
Excel 2007
4
HOW TO EXPLORE EXCEL 2007?
Method 2
1. Click the Start button
2. On the start menu, Click
Microsoft Office
Excel 2007
Method 3
1. Right click on the Desktop
2. click New
3. Click Microsoft Office
Excel 2007
4. Double click the file
Method 4
1. Press Log + R
2. Write Excel
3. Then Ok.
TO OPEN AN EXISTING FILE
1. Click the Office Button
2. Click Open
3. In the Open dialog box, navigate to the folder that contains the
file you want to open, and then select the file
4. Click Open
OR
1. Click the Office Button
2. Click Open
3. In the Open dialog box, navigate to the folder that contains the
file you want to open, and then Double-click the file
5
TO CREATE A NEW WORKBOOK
1. Click the Office Button
2. Click New
3. In the NewWorkbook window, Select BlankWorkbook
4. Click Create
OR
1. Click the Office Button
2. Click New
3. In the NewWorkbook window, Double-click Blank Workbook
6
TO SAVE A WORKBOOK FOR THE FIRST TIME
1. Click the Office Button
2. Click Save/Save As
3. In the Save As dialog box navigate the location where you want
to save the file
4. In the File name box, type a name for the document
5. Click Save
OR
1. On the Quick AccessToolbar, click the Save button
2. In the Save As dialog box navigate the location where you want
to save the file.
3. In the File name box, type a name for the document
4. Click Save.
7
TO CREATE A NEW FOLDER WHILE SAVING A WORKBOOK
 Click the Office Button
 Click Save As
 In the Save As dialog box, navigate to the folder where you want to
create the new folder
 On the dialog box’s toolbar, click the New Folder button
 Type the name of the new folder, and then press “Enter”key
 Click Open
 In the File name box, type a name for theWorkbook
 Click Save
8
Excel Working Environment
9
Naming Worksheet
Right Click on the SheetTab
Click on Rename
Type the new name for the sheet
Press “Enter” key
OR
Double-Click on the SheetTab
Press “Delete” or “Backspace” Key
Type the New Name
Press “Enter” key
10
11
Adding Worksheet
Click one of the worksheet tab
On the home tab, in the cells
group, click insert button
Then click InsertWorksheet
OR
Right Click on one of
the worksheet tab
Click Insert
Select worksheet
Click OK
click InsertWorksheet
Simple
Method
Press
From
Keyboard
Shift +
F11
12
Deleting Worksheet
Click one of the worksheet tab you
want to Delete
On the home tab, in the cells group,
click Delete button
Then click Delete Sheet
OR
Right Click on one of the worksheet
tab you want to Delete
Click Delete
Adjusting Column width & Row Height
Place the cursor on the line between two rows or columns.
A symbol that looks like a lower case with arrows on the
horizontal line will appear
Drag the boundary on the right side of the column/row
heading until the column/row is the width that you want.
13
14
Merging Cells
Select two or more adjacent cells that you want to merge
On the Home tab, in the Alignment group, click Merge and
Center button.
Click Merge cells
To Display multiple lines of text inside a cell
Click the cell in which you want to wrap the text.
On the Home tab, in the Alignment group, click Wrap
Text button.
15
Cell Borders
Select the cell or range of cells that you want to add a border
On the Home tab, in the Font group, Click the arrow next to
Borders.
Click on the border style you would like toApply
Remove Cell Borders
On the Home tab, in the Font group, Click the arrow next to
Borders.
Click No Border
16
Entering Data to worksheet
Click the cell where you want to enter data
Type the data in the cell
Press Enter orTab key to move to the next cell
Exercise 1
Enter the following Data to your worksheet/Spreadsheet
17
18
Working with
Formula &
Function
Argument
Sum
 SUM(First cell : Last cell)
 SUM(A1:A5)
 (or) SUM(A1 +A2+A3+A4+A5)
 SUM(A1:B1)
 SUM(A1+B1)
Average
 AVERAGE(First cell : Last cell)
 AVERAGE(A1:A5)
 AVERAGE(A1:B1)
19
Minimum
 MIN(First cell : Last cell)
 MIN(A1:A5)
 MIN(A1:B1)
Maximum
 MAX(First cell : Last
cell)
 MAX(A1:A5)
 MAX(A1:B1)
Exercise 2
20
 Rank
RANK(Number, reference)
RANK(A8,$A$8:$A$23)
 =RANK(I8,$I$8:$I$23)
 Logical Function (IF)
IF(Logical test, value if TRUE, value if FALSE)
Grade
IF(A1>=85,"A",IF(A1>=70,"B",IF(A1>=50,"C",IF(A1>=30,"D","F"))))
=IF(I8>=85,"A",IF(I8>=70,"B",IF(I8>=50,"C",IF(I8>=30,"D","F"))))
21
Exercise 3
22
1. Give Rank for the Students
2. Compute Grade of each Students
3. Give Remark
A >=85
B >=70
C >=50
D >=30
F <30
A Excellent
B Very good
C Satisfactory
D Poor
F Fail
23
24
=IF(K8="A","Execellent",IF(K8="B","Very
Good",IF(K8="C","Satisfactory",IF(K8="D","Po
or","Fail"))))
 Count
 COUNTIF(range, criteria)
 COUNTIF(K8:K23,"A")
 Sorting
 On the home tab, in the Editing group, click Sort & Filter button
 Then click Custom Sort
 On the sort dialog box, select the options
 Filtering
 On the home tab, in the Editing group, click Sort & Filter button
 Then click Filter
25
Exercise 4
26
 Calculate:
1. Pension
2. Tax
3. Net salary
 Pension = gross salary * 0.05
 Tax deduction: If gross salary
>=3500, tax = 35%
>=2500, tax = 30%
>=1250, tax = 20%
>=650, tax = 15%
>=150, tax = 10%
< 150, tax = 0%
of each employee
Net Salary
=
gross salary
–
(pension +Tax)
Sort the employees based on their Net Salary
Filter the name of the employees whose net salary is >=2000
Filter/find top 5 highest paid employees
 Filter/find bottom 3 lowest paid employees
27
28
Formatting Cells
29
 FormatText Alignment
 Format a cell value as phone number
 Format cell data as a currency value
 Select a foreign currency symbol
30

Ms excel 2007 pptx

  • 1.
  • 2.
    Introduction  Excel isa spreadsheet program in the Microsoft Office system.  A Spreadsheet is a grid divided into columns and rows.  The intersection of a column and row is referred to as a cell. 2
  • 3.
    Why we useExcel?  You can use Excel to create and format workbooks (a collection of spreadsheets) in order to analyze data and make more informed business decisions.  Specifically, you can use Excel:  To build models for analyzing data  To write formulas to perform calculations on that data  To pivot the data in numerous ways  To present data in a variety of professional looking charts 3
  • 4.
    Method 1 1. Clickthe Start button 2. Click All Programs 3. Click Microsoft Office 4. Click Microsoft Office Excel 2007 4 HOW TO EXPLORE EXCEL 2007? Method 2 1. Click the Start button 2. On the start menu, Click Microsoft Office Excel 2007 Method 3 1. Right click on the Desktop 2. click New 3. Click Microsoft Office Excel 2007 4. Double click the file Method 4 1. Press Log + R 2. Write Excel 3. Then Ok.
  • 5.
    TO OPEN ANEXISTING FILE 1. Click the Office Button 2. Click Open 3. In the Open dialog box, navigate to the folder that contains the file you want to open, and then select the file 4. Click Open OR 1. Click the Office Button 2. Click Open 3. In the Open dialog box, navigate to the folder that contains the file you want to open, and then Double-click the file 5
  • 6.
    TO CREATE ANEW WORKBOOK 1. Click the Office Button 2. Click New 3. In the NewWorkbook window, Select BlankWorkbook 4. Click Create OR 1. Click the Office Button 2. Click New 3. In the NewWorkbook window, Double-click Blank Workbook 6
  • 7.
    TO SAVE AWORKBOOK FOR THE FIRST TIME 1. Click the Office Button 2. Click Save/Save As 3. In the Save As dialog box navigate the location where you want to save the file 4. In the File name box, type a name for the document 5. Click Save OR 1. On the Quick AccessToolbar, click the Save button 2. In the Save As dialog box navigate the location where you want to save the file. 3. In the File name box, type a name for the document 4. Click Save. 7
  • 8.
    TO CREATE ANEW FOLDER WHILE SAVING A WORKBOOK  Click the Office Button  Click Save As  In the Save As dialog box, navigate to the folder where you want to create the new folder  On the dialog box’s toolbar, click the New Folder button  Type the name of the new folder, and then press “Enter”key  Click Open  In the File name box, type a name for theWorkbook  Click Save 8
  • 9.
  • 10.
    Naming Worksheet Right Clickon the SheetTab Click on Rename Type the new name for the sheet Press “Enter” key OR Double-Click on the SheetTab Press “Delete” or “Backspace” Key Type the New Name Press “Enter” key 10
  • 11.
    11 Adding Worksheet Click oneof the worksheet tab On the home tab, in the cells group, click insert button Then click InsertWorksheet OR Right Click on one of the worksheet tab Click Insert Select worksheet Click OK click InsertWorksheet Simple Method Press From Keyboard Shift + F11
  • 12.
    12 Deleting Worksheet Click oneof the worksheet tab you want to Delete On the home tab, in the cells group, click Delete button Then click Delete Sheet OR Right Click on one of the worksheet tab you want to Delete Click Delete
  • 13.
    Adjusting Column width& Row Height Place the cursor on the line between two rows or columns. A symbol that looks like a lower case with arrows on the horizontal line will appear Drag the boundary on the right side of the column/row heading until the column/row is the width that you want. 13
  • 14.
    14 Merging Cells Select twoor more adjacent cells that you want to merge On the Home tab, in the Alignment group, click Merge and Center button. Click Merge cells To Display multiple lines of text inside a cell Click the cell in which you want to wrap the text. On the Home tab, in the Alignment group, click Wrap Text button.
  • 15.
    15 Cell Borders Select thecell or range of cells that you want to add a border On the Home tab, in the Font group, Click the arrow next to Borders. Click on the border style you would like toApply Remove Cell Borders On the Home tab, in the Font group, Click the arrow next to Borders. Click No Border
  • 16.
    16 Entering Data toworksheet Click the cell where you want to enter data Type the data in the cell Press Enter orTab key to move to the next cell Exercise 1 Enter the following Data to your worksheet/Spreadsheet
  • 17.
  • 18.
  • 19.
    Sum  SUM(First cell: Last cell)  SUM(A1:A5)  (or) SUM(A1 +A2+A3+A4+A5)  SUM(A1:B1)  SUM(A1+B1) Average  AVERAGE(First cell : Last cell)  AVERAGE(A1:A5)  AVERAGE(A1:B1) 19 Minimum  MIN(First cell : Last cell)  MIN(A1:A5)  MIN(A1:B1) Maximum  MAX(First cell : Last cell)  MAX(A1:A5)  MAX(A1:B1)
  • 20.
  • 21.
     Rank RANK(Number, reference) RANK(A8,$A$8:$A$23) =RANK(I8,$I$8:$I$23)  Logical Function (IF) IF(Logical test, value if TRUE, value if FALSE) Grade IF(A1>=85,"A",IF(A1>=70,"B",IF(A1>=50,"C",IF(A1>=30,"D","F")))) =IF(I8>=85,"A",IF(I8>=70,"B",IF(I8>=50,"C",IF(I8>=30,"D","F")))) 21
  • 22.
    Exercise 3 22 1. GiveRank for the Students 2. Compute Grade of each Students 3. Give Remark A >=85 B >=70 C >=50 D >=30 F <30 A Excellent B Very good C Satisfactory D Poor F Fail
  • 23.
  • 24.
  • 25.
     Count  COUNTIF(range,criteria)  COUNTIF(K8:K23,"A")  Sorting  On the home tab, in the Editing group, click Sort & Filter button  Then click Custom Sort  On the sort dialog box, select the options  Filtering  On the home tab, in the Editing group, click Sort & Filter button  Then click Filter 25
  • 26.
    Exercise 4 26  Calculate: 1.Pension 2. Tax 3. Net salary  Pension = gross salary * 0.05  Tax deduction: If gross salary >=3500, tax = 35% >=2500, tax = 30% >=1250, tax = 20% >=650, tax = 15% >=150, tax = 10% < 150, tax = 0% of each employee Net Salary = gross salary – (pension +Tax)
  • 27.
    Sort the employeesbased on their Net Salary Filter the name of the employees whose net salary is >=2000 Filter/find top 5 highest paid employees  Filter/find bottom 3 lowest paid employees 27
  • 28.
  • 29.
    Formatting Cells 29  FormatTextAlignment  Format a cell value as phone number  Format cell data as a currency value  Select a foreign currency symbol
  • 30.