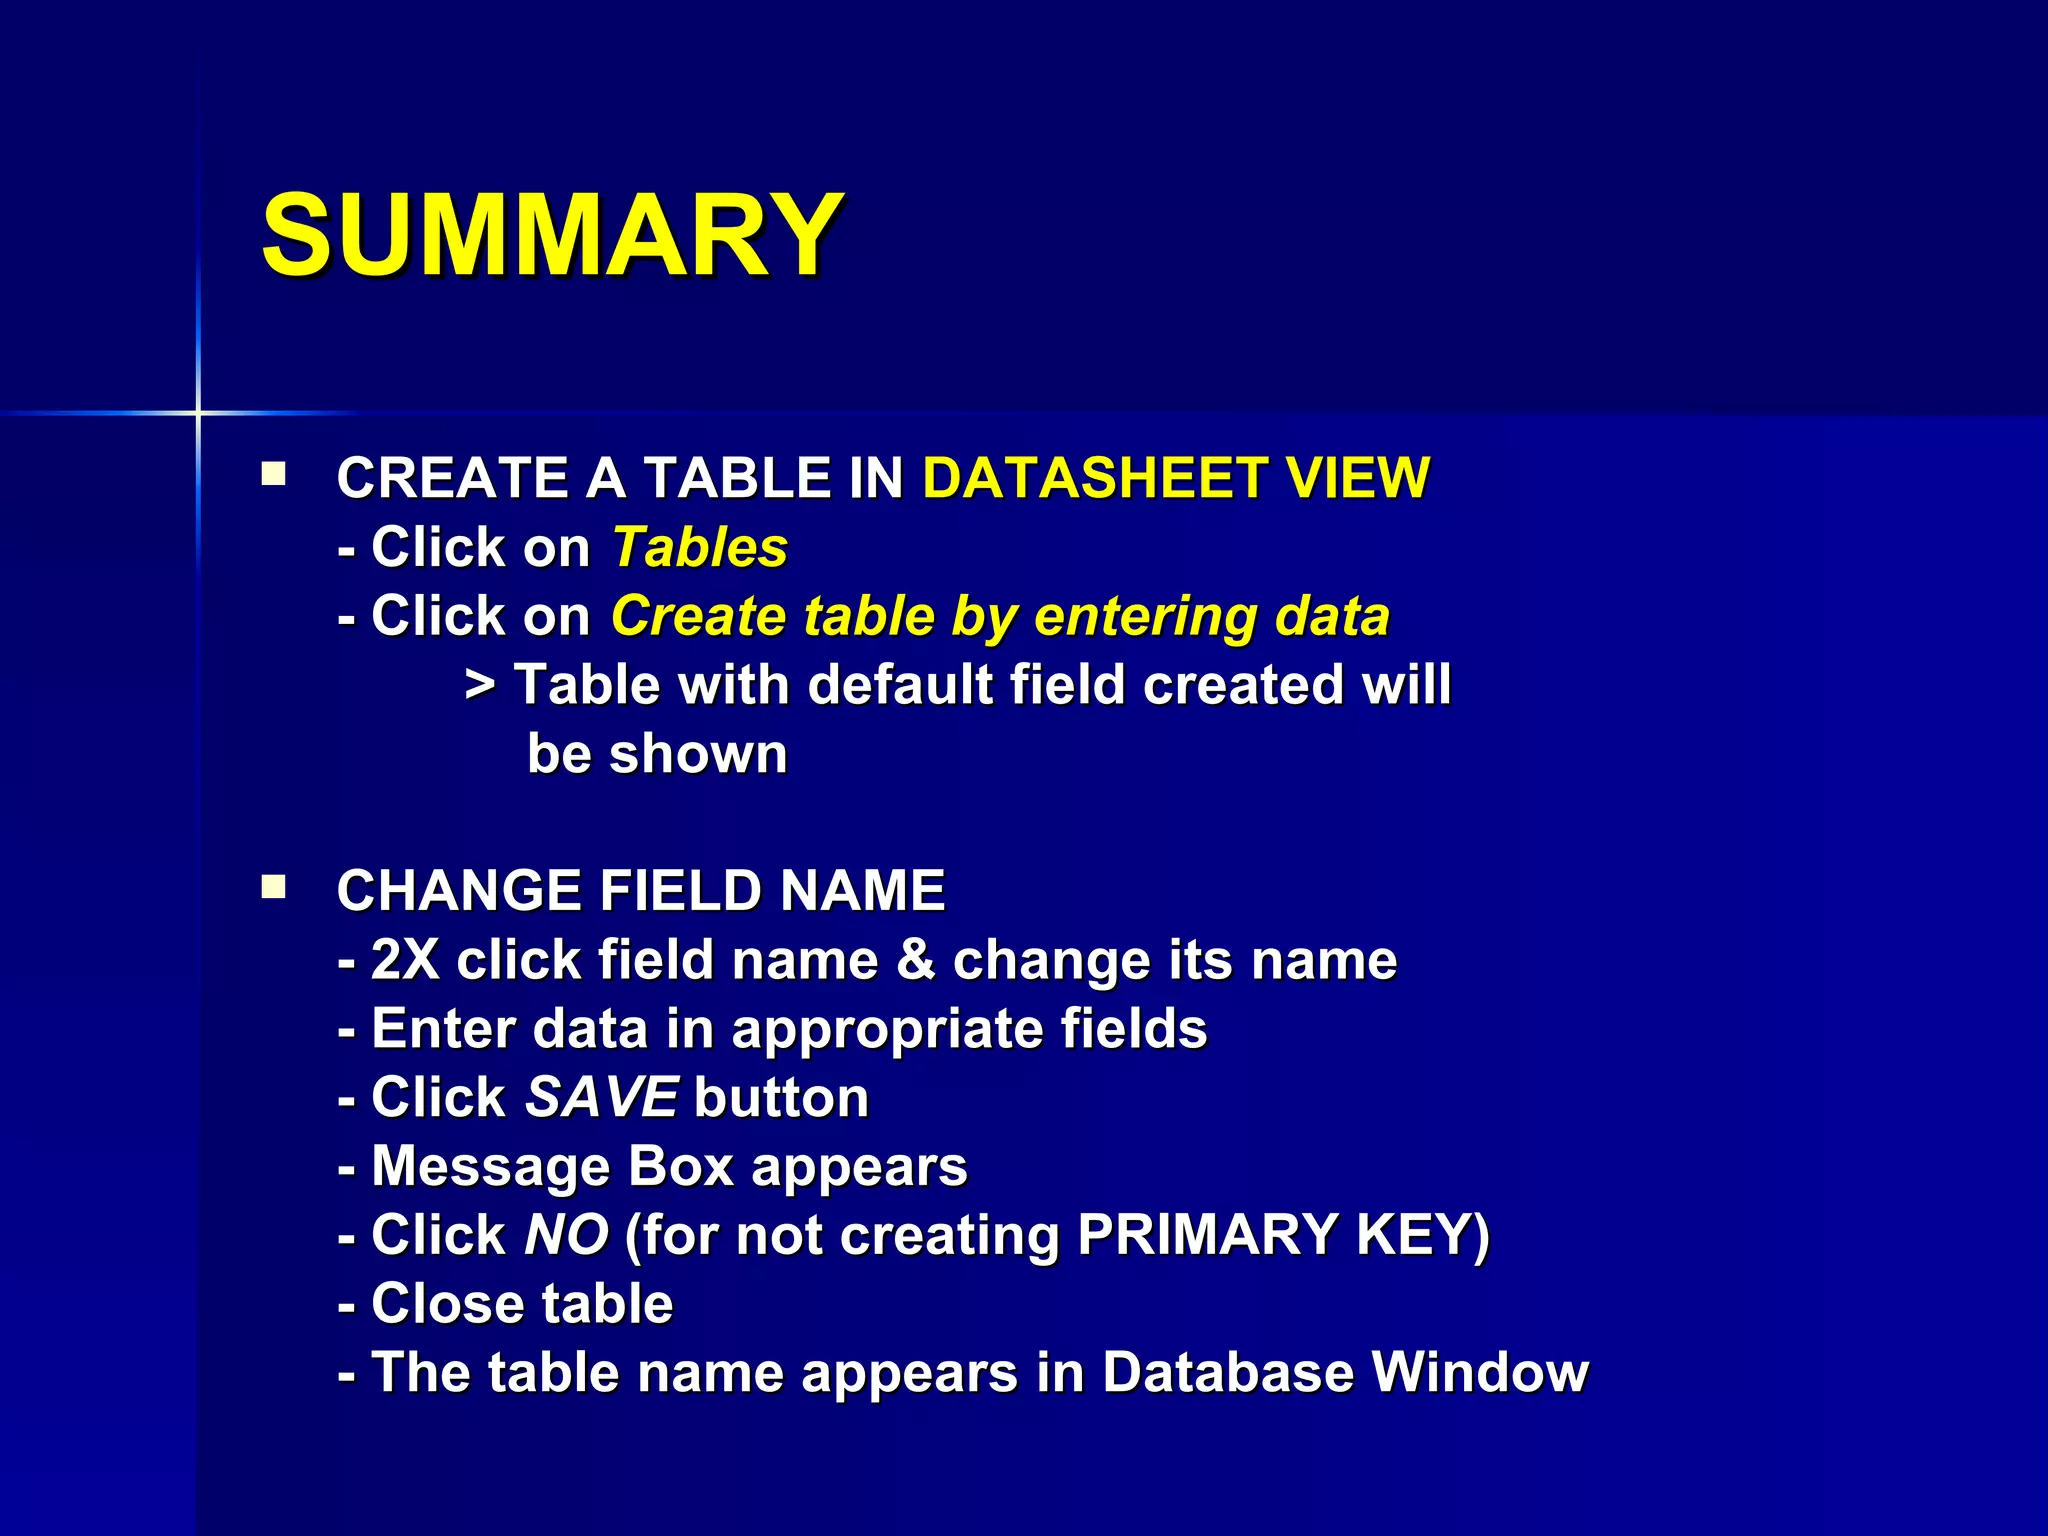
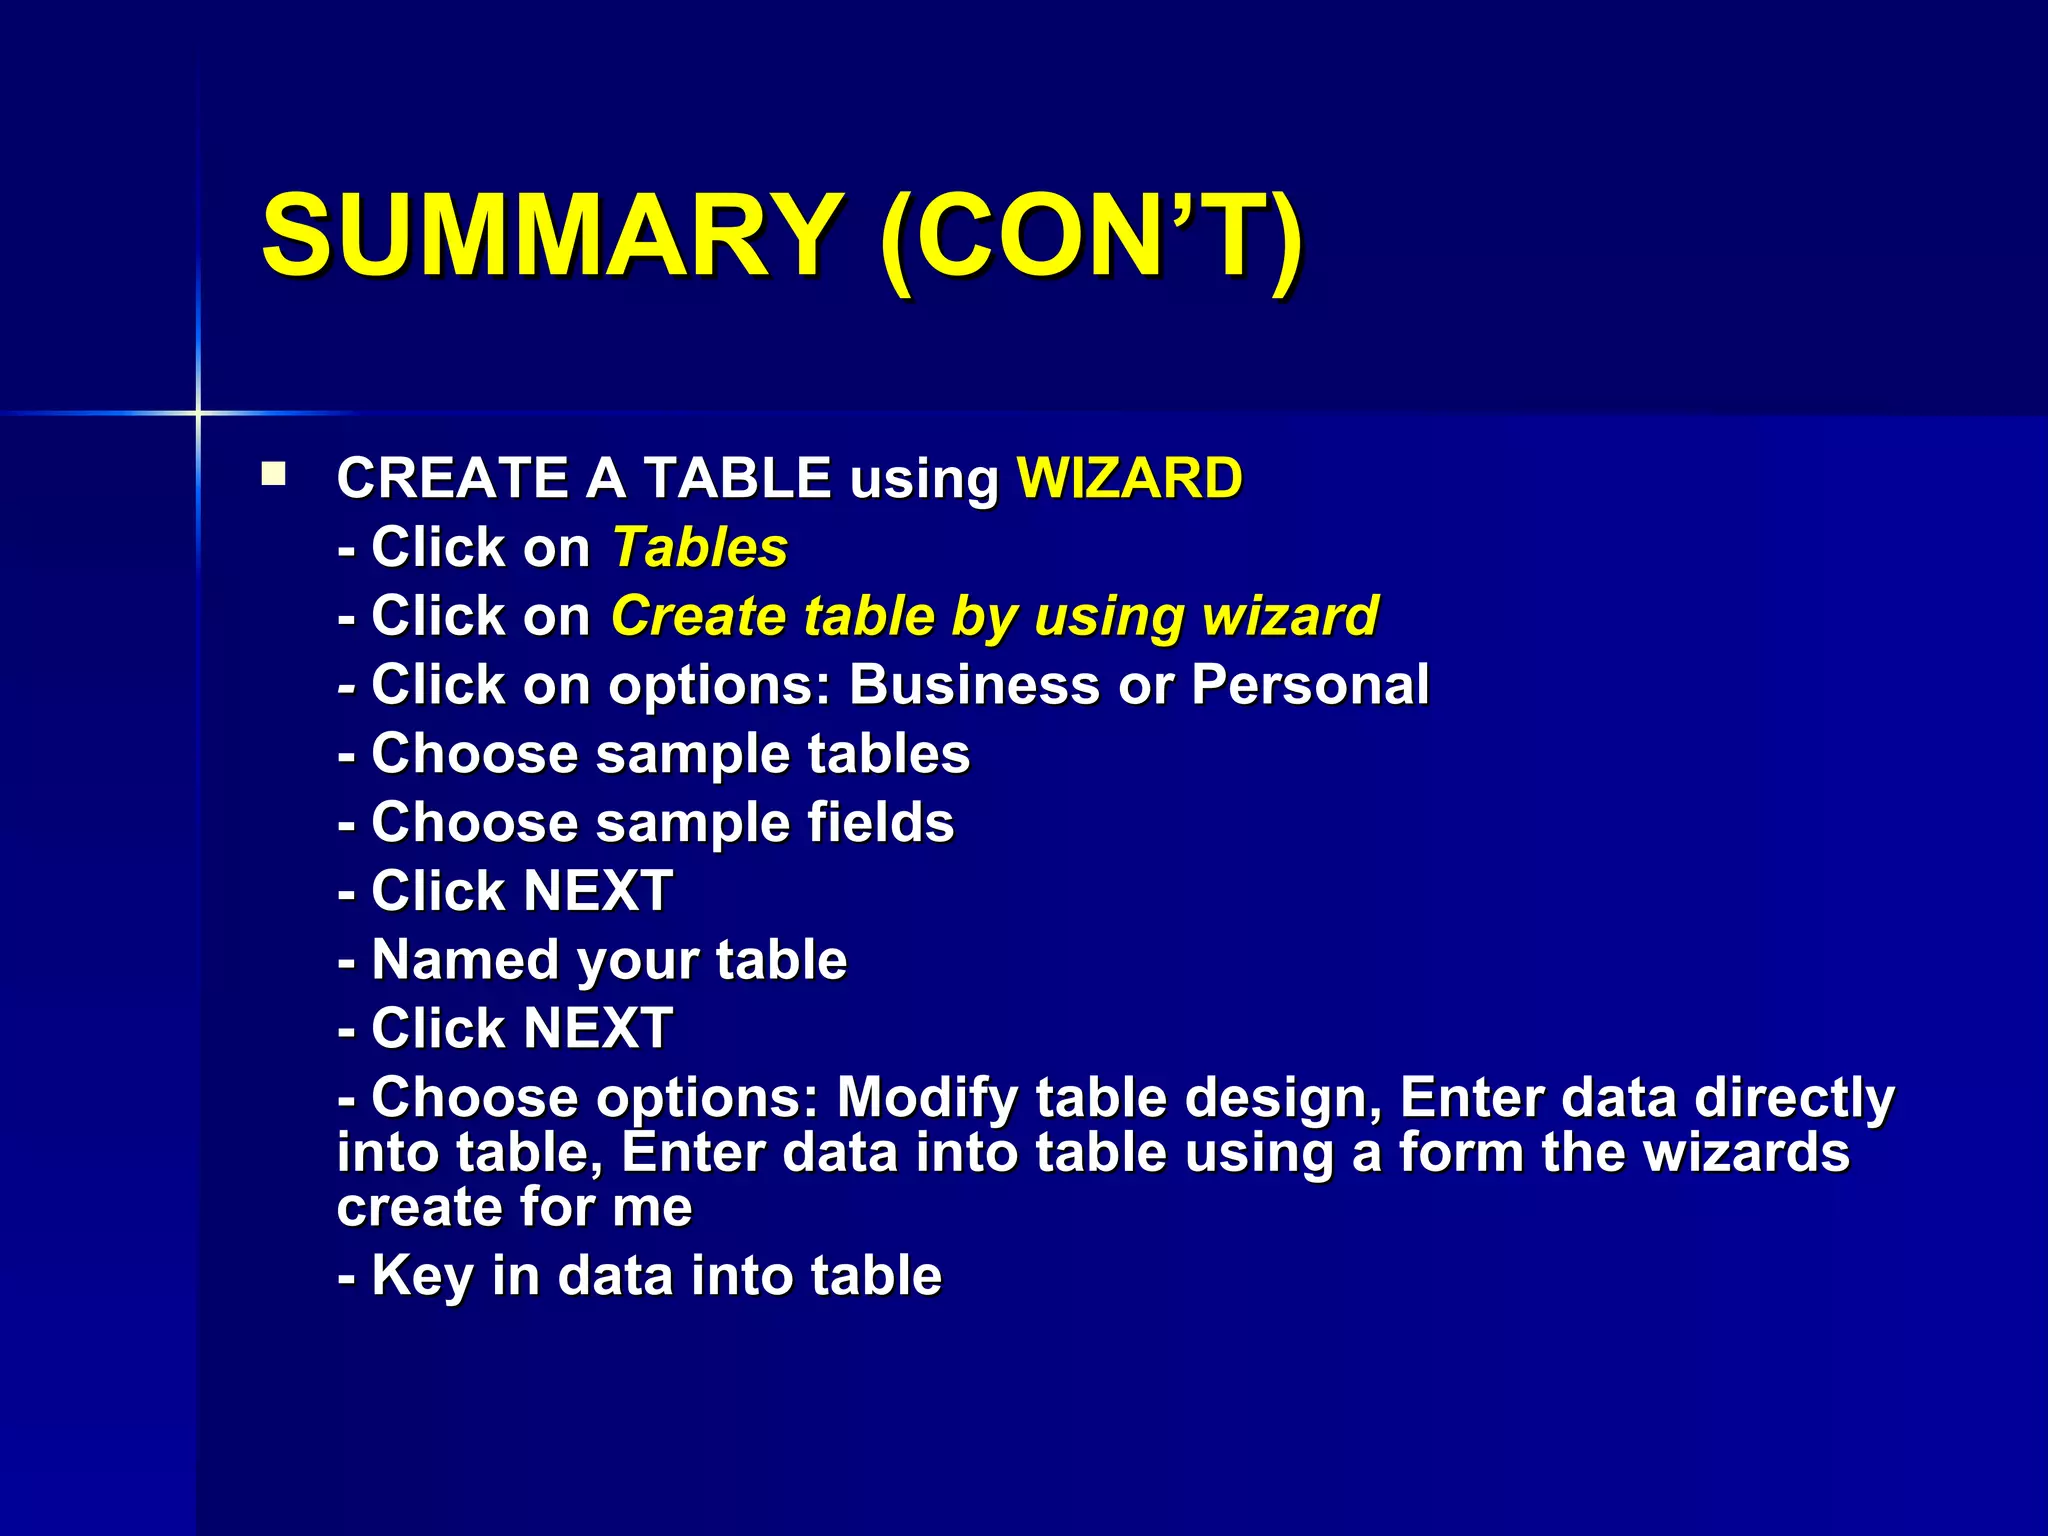
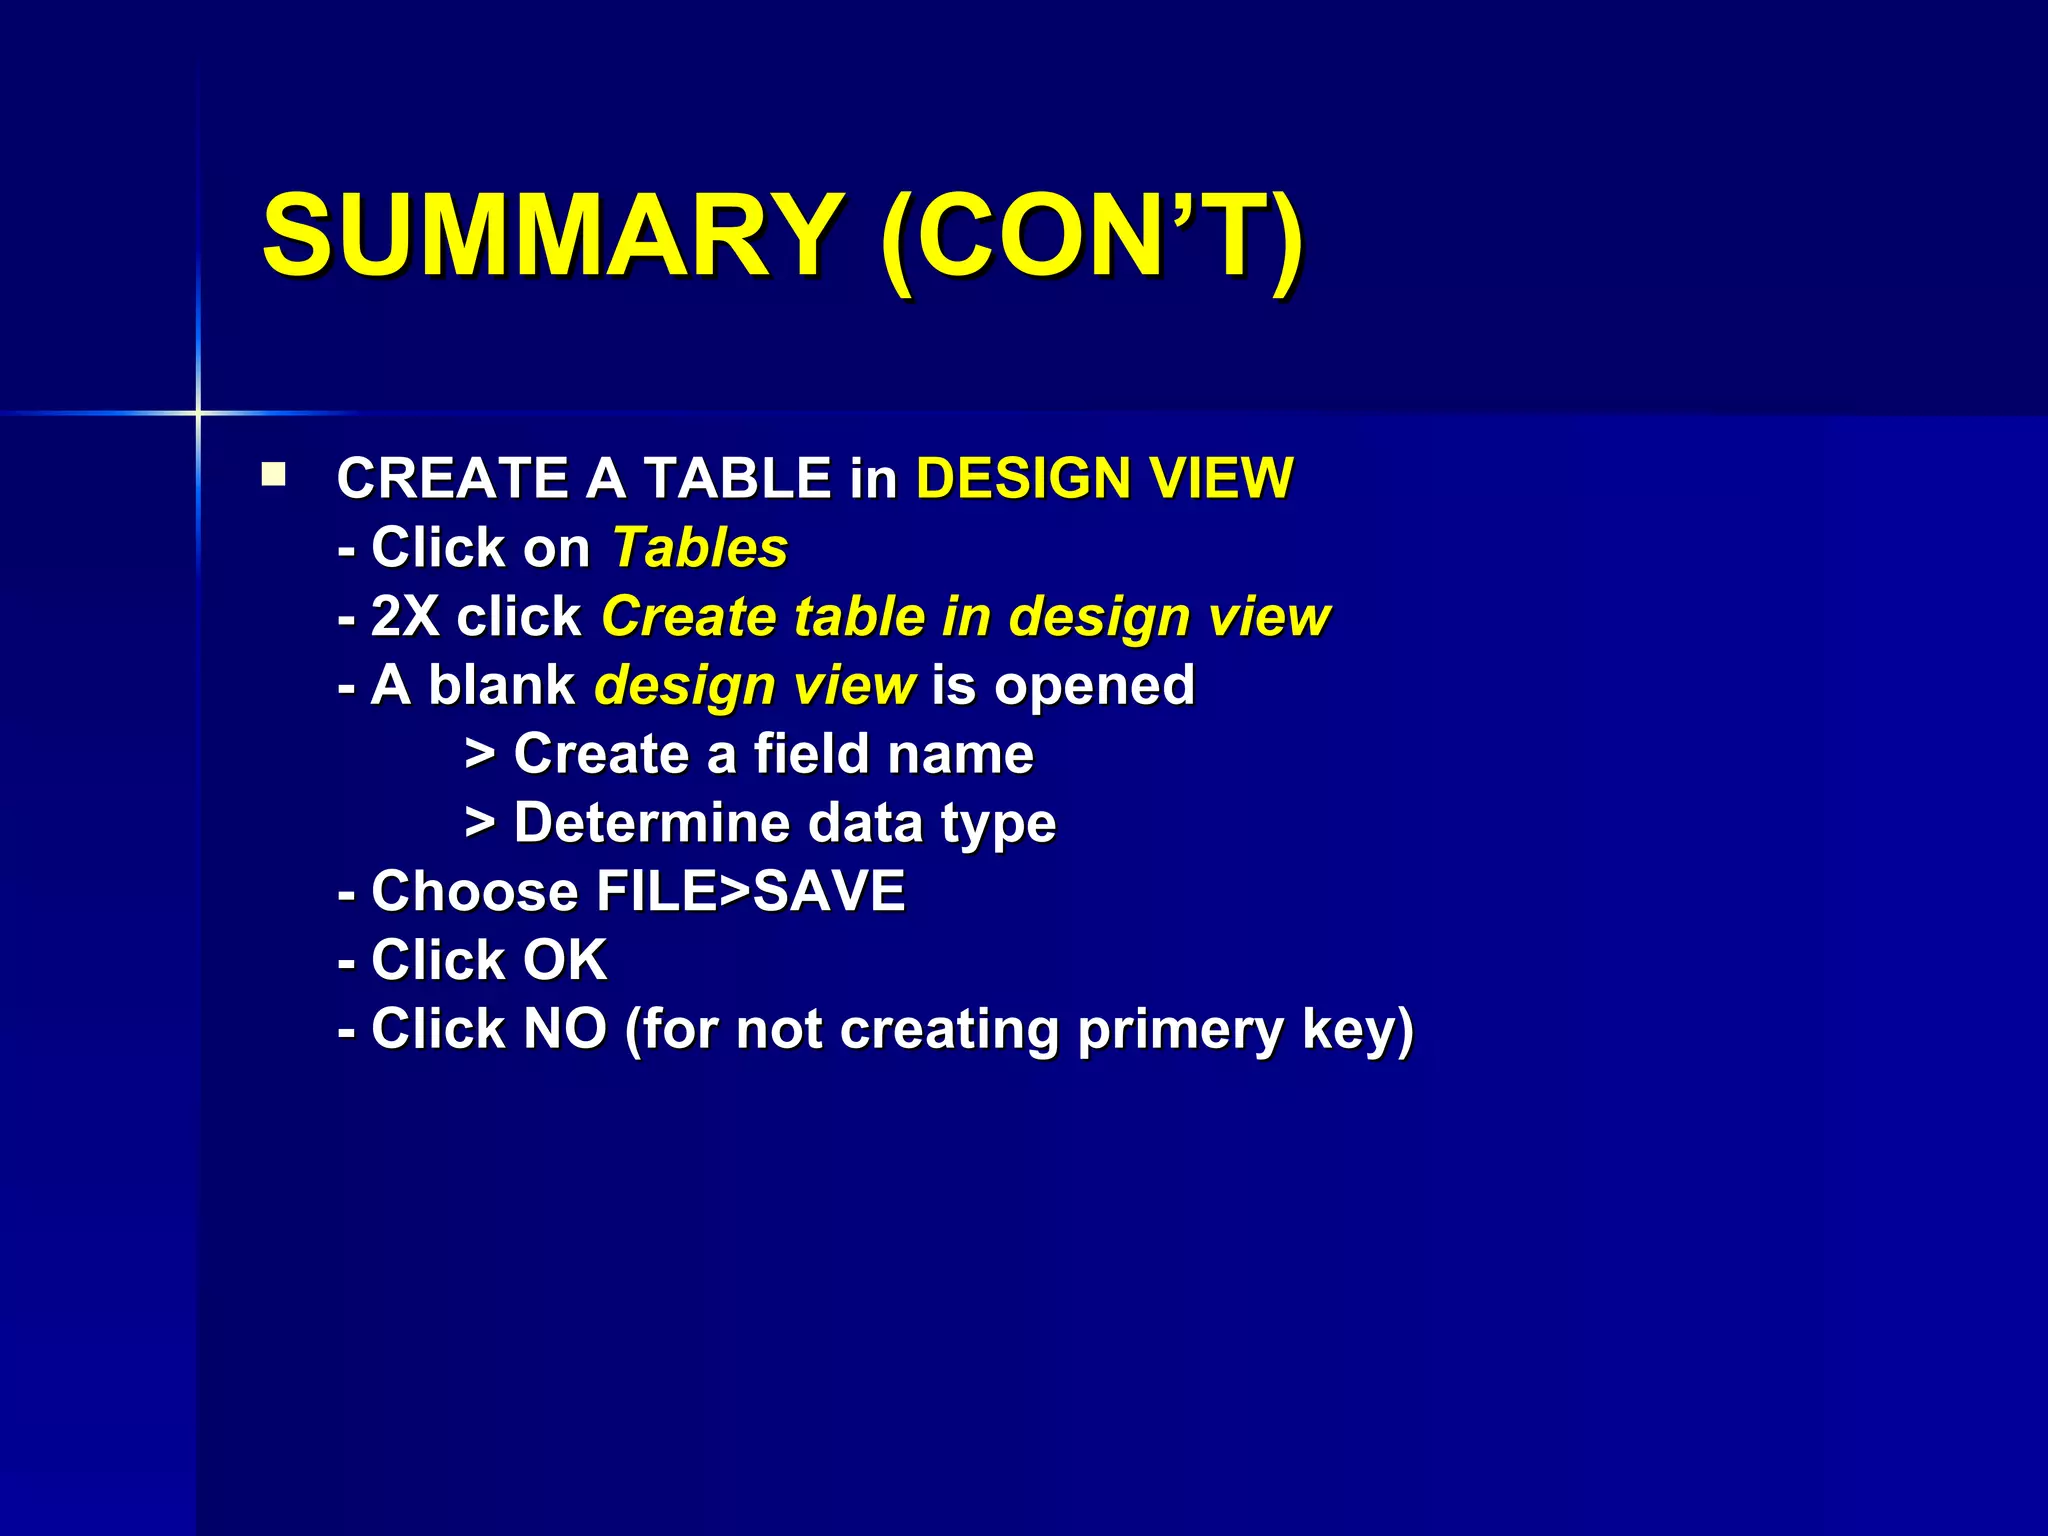
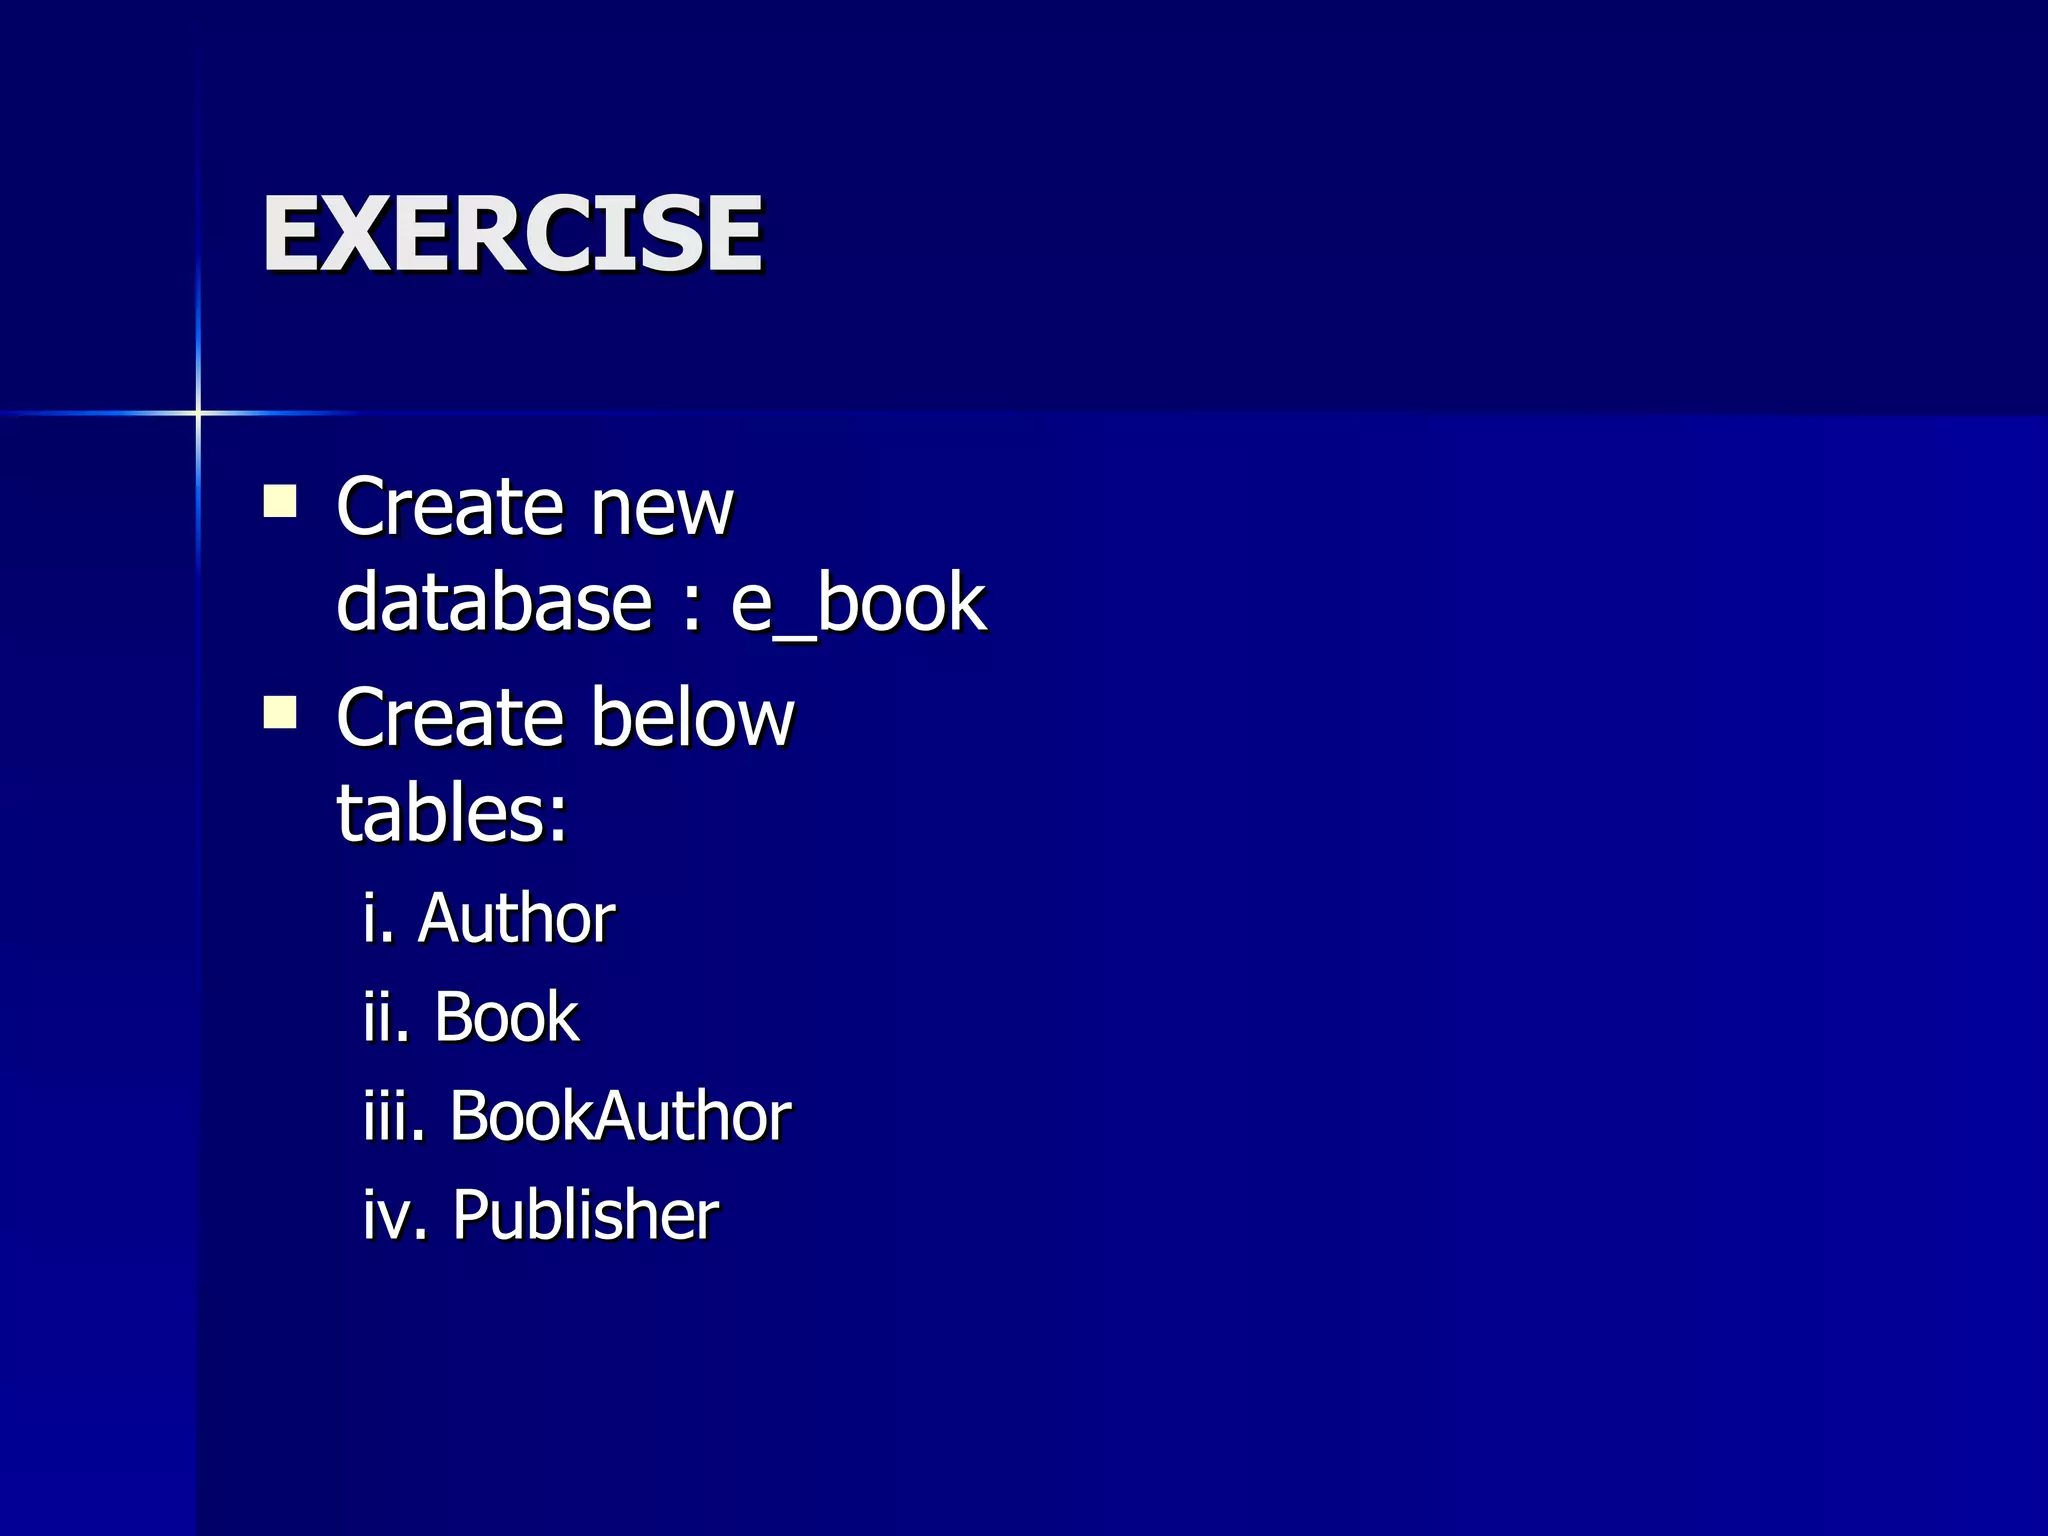
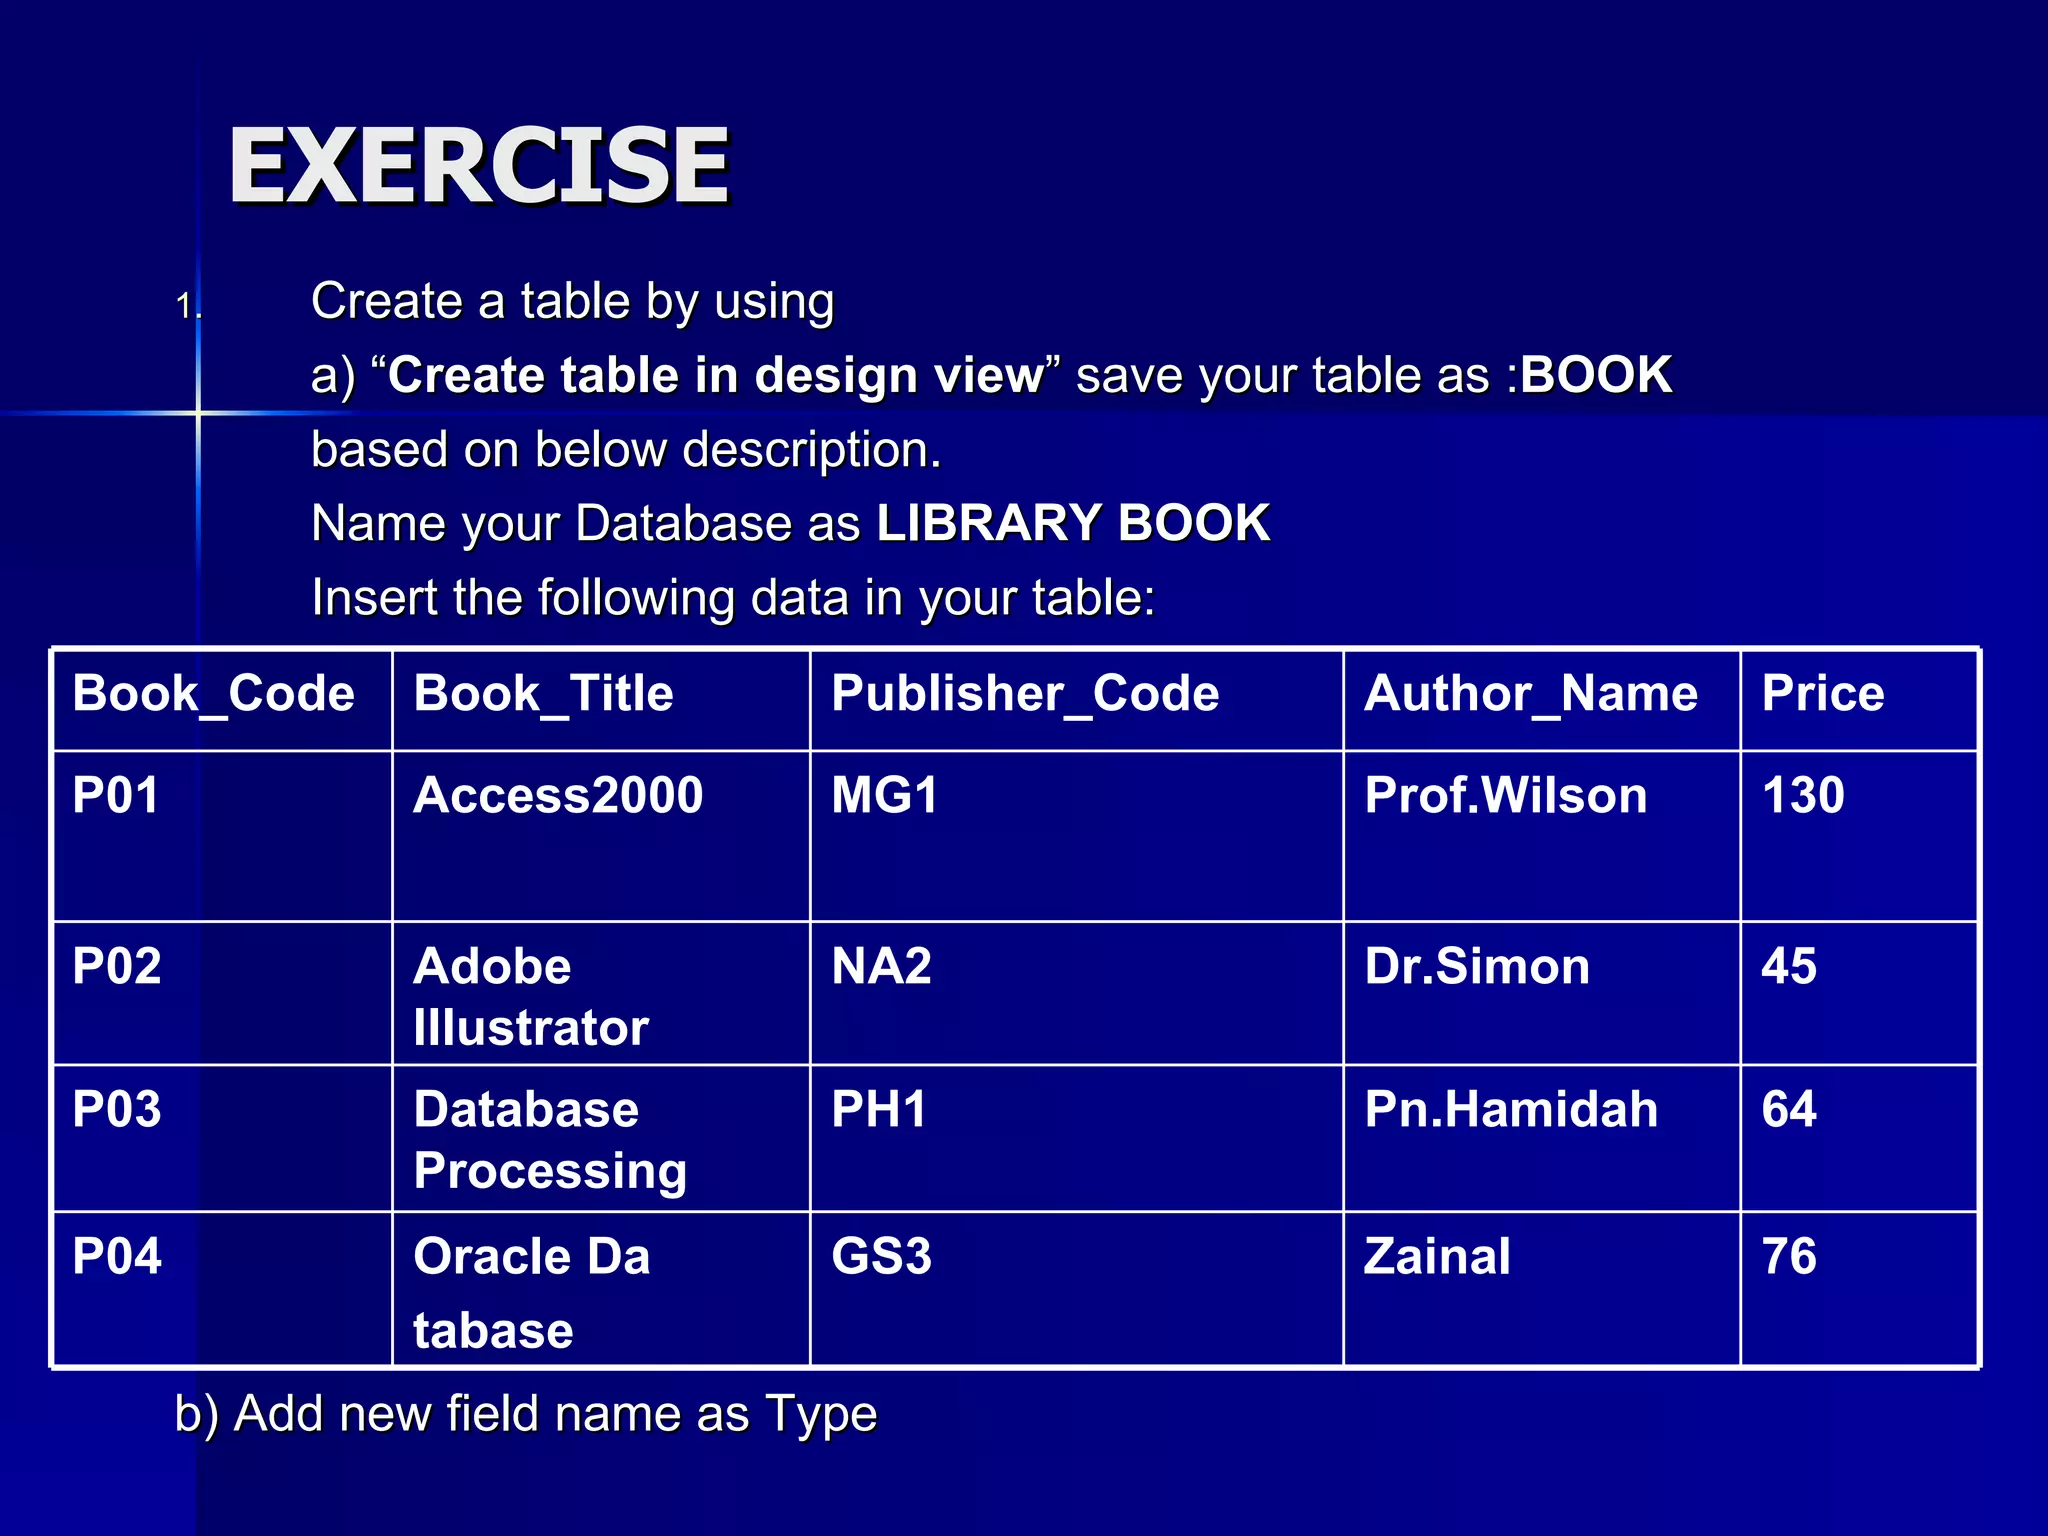
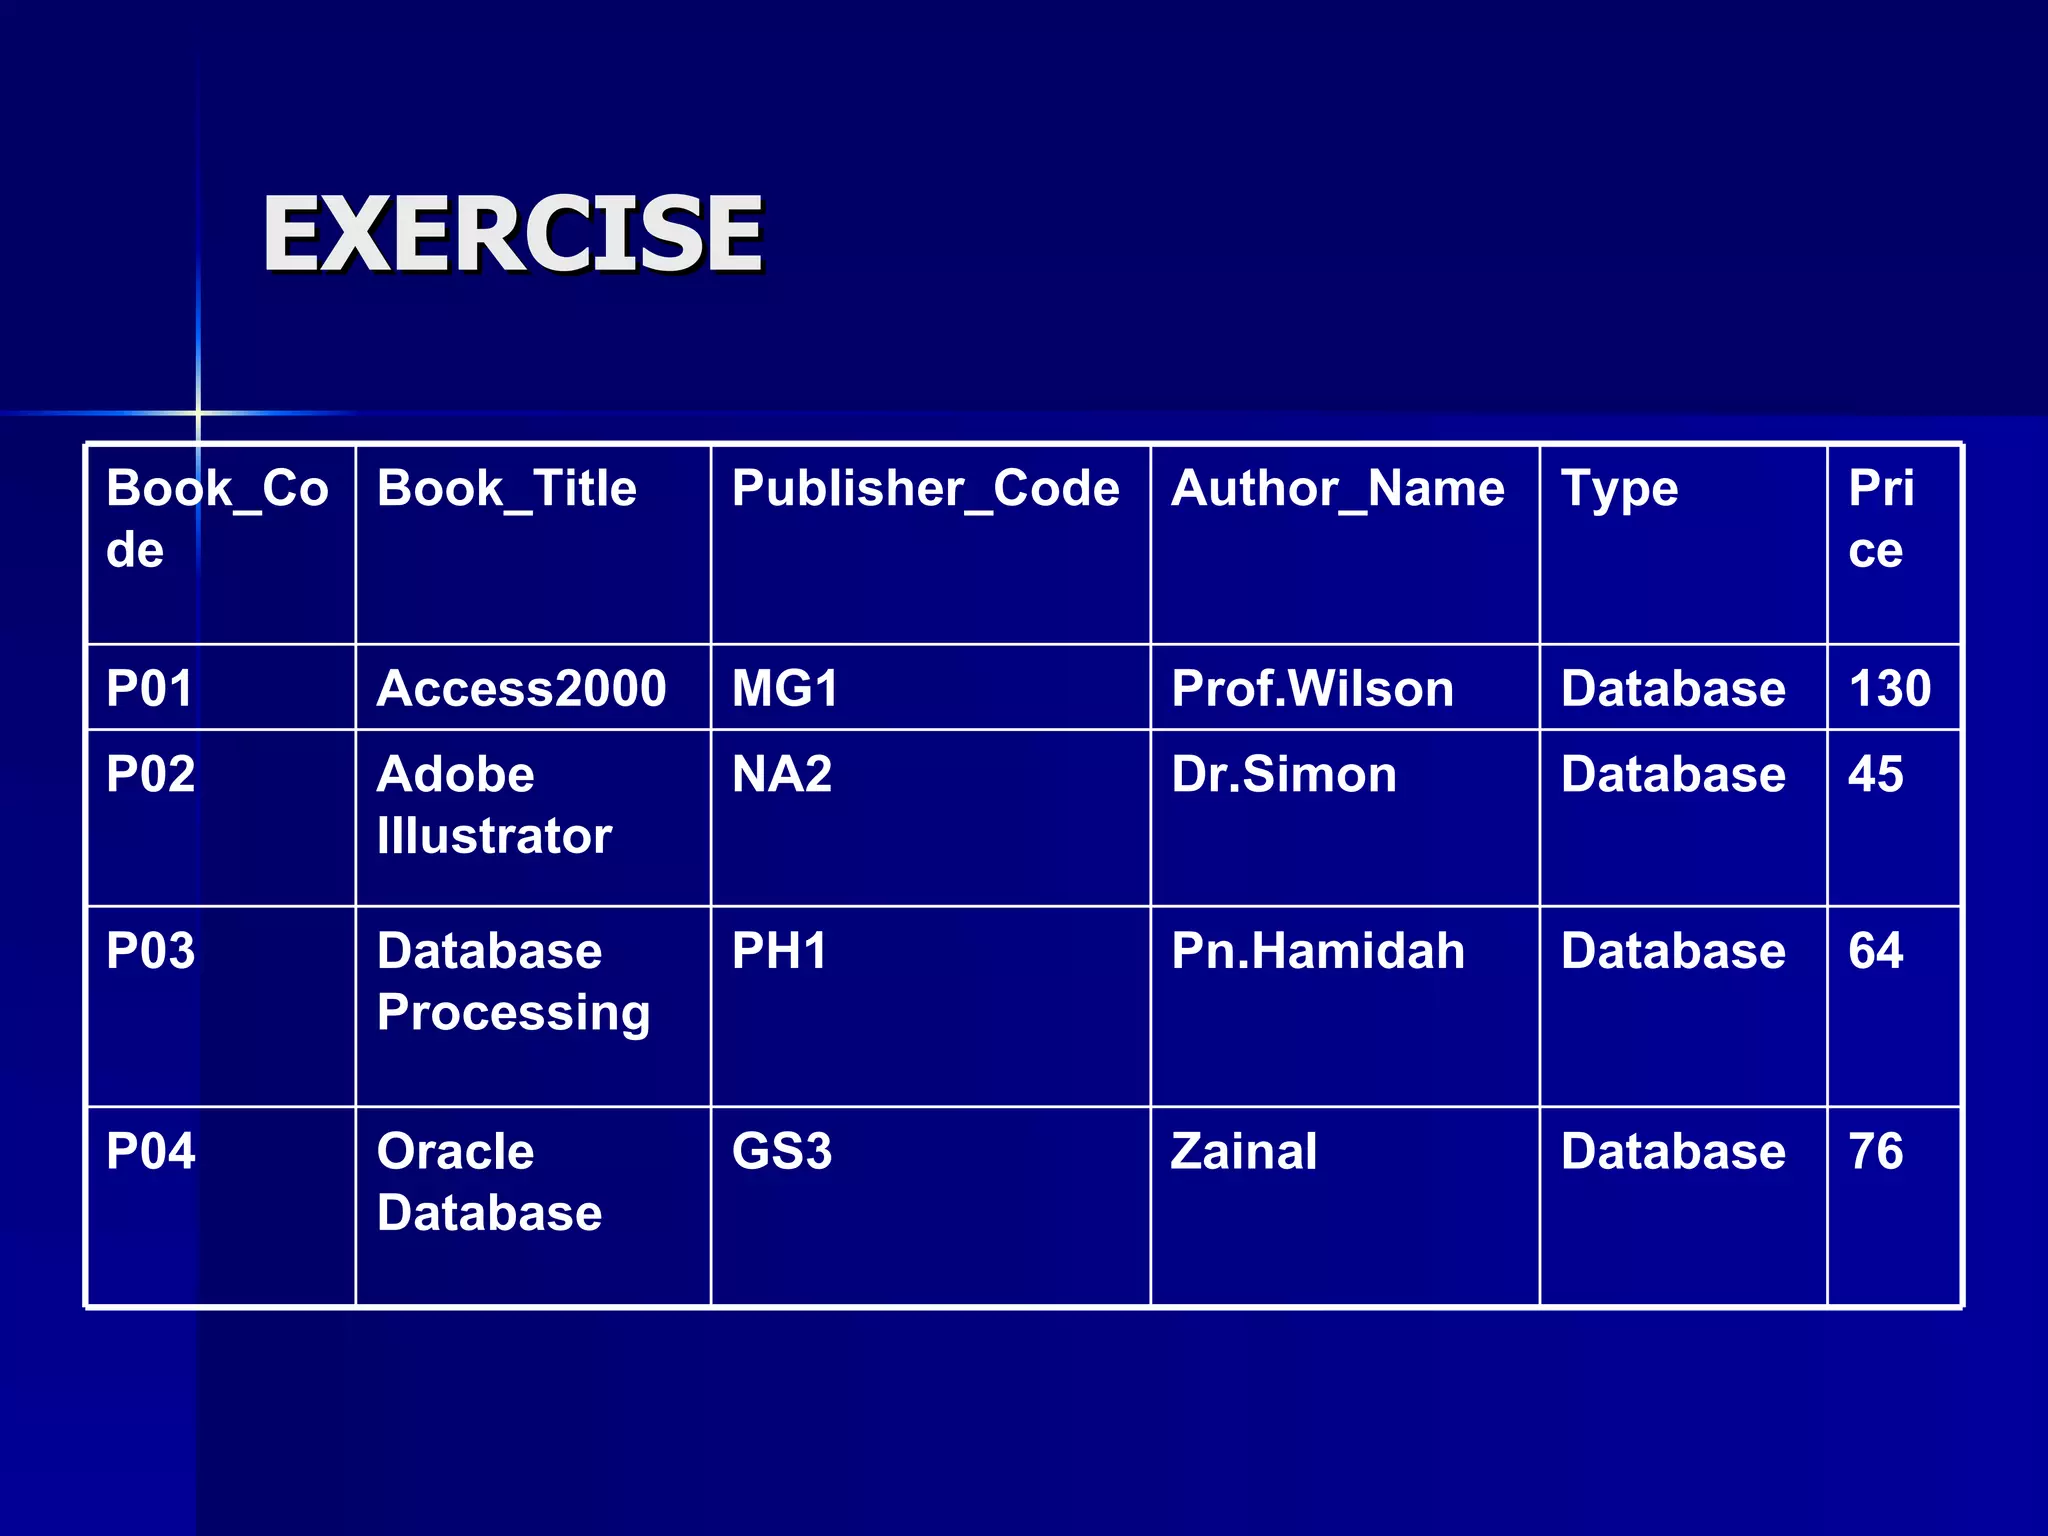
CHAPTER 4 USING DATABASE VIEW
LAB 2: USING DATABASE VIEW 4.1 Create Table in “Datasheet View / by Entering Data” 4.2 Create Table by Using “Create Table by Using Wizard” 4.3 Create Table in Design View 4.3.1 Creating Tables 4.3.2 Open a Table for Changes 4.3.3 Change Column Width 4.3.4 Rename AND Rearrange a Field 4.3.5 Re-arrange a Field 4.3.6 Add a Field 4.3.7 Rename a Table 4.3.8 Delete Table
LAB 2: USING DATABASE VIEW (CON’T) Edit Table Move through Data Select Data Edit Data Zoom into Data Display a Sub Datasheet Move or Copy Data Add a Record Delete a Record Change Font of Data Change Appearance of Data Hide/Unhide a Field
LAB 2: USING DATABASE VIEW (CON’T) Design Table using Field Properties Change Field Size Change Number of Decimal Places Add Caption Set Default Value Data Entry Required Add a Validation Rule Create an Index Create an Input Add a Picture to Record Add Hyperlink to Record Lab Activity 2
SUMMARY CREATE A TABLE IN  DATASHEET VIEW - Click on  Tables - Click on  Create table by entering data > Table with default field created will    be shown CHANGE FIELD NAME - 2X click field name & change its name - Enter data in appropriate fields - Click  SAVE  button - Message Box appears - Click  NO  (for not creating PRIMARY KEY) - Close table - The table name appears in Database Window
SUMMARY (CON’T) CREATE A TABLE using  WIZARD - Click on  Tables - Click on  Create table by using wizard -  Click on options: Business or Personal - Choose sample tables - Choose sample fields - Click NEXT - Named your table - Click NEXT - Choose options: Modify table design, Enter data directly into table, Enter data into table using a form the wizards create for me - Key in data into table
CREATE A TABLE in  DESIGN VIEW - Click on  Tables - 2X click  Create table in design view - A blank  design view  is opened > Create a field name > Determine data type - Choose FILE>SAVE - Click OK - Click NO (for not creating primery key) SUMMARY (CON’T)
EXERCISE Create new database : e_book Create below tables: i. Author ii. Book iii. BookAuthor iv. Publisher
EXERCISE Create a table by using a) “ Create table in design view ” save your table as : BOOK based on below description. Name your Database as  LIBRARY BOOK Insert the following data in your table: b) Add new field name as Type 76 64 45 130 Price Zainal GS3 Oracle Da tabase P04 Pn.Hamidah PH1 Database Processing P03 Dr.Simon NA2 Adobe Illustrator P02 Prof.Wilson MG1 Access2000 P01 Author_Name Publisher_Code Book_Title Book_Code
EXERCISE 76 64 45 130 Price Database Database Database Database Type Zainal GS3 Oracle Database P04 Pn.Hamidah PH1 Database Processing P03 Dr.Simon NA2 Adobe Illustrator P02 Prof.Wilson MG1 Access2000 P01 Author_Name Publisher_Code Book_Title Book_Code

D I T211 Chapter 4 ( Lab 2)

  • 1.
    CHAPTER 4 USINGDATABASE VIEW
  • 2.
    LAB 2: USINGDATABASE VIEW 4.1 Create Table in “Datasheet View / by Entering Data” 4.2 Create Table by Using “Create Table by Using Wizard” 4.3 Create Table in Design View 4.3.1 Creating Tables 4.3.2 Open a Table for Changes 4.3.3 Change Column Width 4.3.4 Rename AND Rearrange a Field 4.3.5 Re-arrange a Field 4.3.6 Add a Field 4.3.7 Rename a Table 4.3.8 Delete Table
  • 3.
    LAB 2: USINGDATABASE VIEW (CON’T) Edit Table Move through Data Select Data Edit Data Zoom into Data Display a Sub Datasheet Move or Copy Data Add a Record Delete a Record Change Font of Data Change Appearance of Data Hide/Unhide a Field
  • 4.
    LAB 2: USINGDATABASE VIEW (CON’T) Design Table using Field Properties Change Field Size Change Number of Decimal Places Add Caption Set Default Value Data Entry Required Add a Validation Rule Create an Index Create an Input Add a Picture to Record Add Hyperlink to Record Lab Activity 2
  • 5.
    SUMMARY CREATE ATABLE IN DATASHEET VIEW - Click on Tables - Click on Create table by entering data > Table with default field created will be shown CHANGE FIELD NAME - 2X click field name & change its name - Enter data in appropriate fields - Click SAVE button - Message Box appears - Click NO (for not creating PRIMARY KEY) - Close table - The table name appears in Database Window
  • 6.
    SUMMARY (CON’T) CREATEA TABLE using WIZARD - Click on Tables - Click on Create table by using wizard - Click on options: Business or Personal - Choose sample tables - Choose sample fields - Click NEXT - Named your table - Click NEXT - Choose options: Modify table design, Enter data directly into table, Enter data into table using a form the wizards create for me - Key in data into table
  • 7.
    CREATE A TABLEin DESIGN VIEW - Click on Tables - 2X click Create table in design view - A blank design view is opened > Create a field name > Determine data type - Choose FILE>SAVE - Click OK - Click NO (for not creating primery key) SUMMARY (CON’T)
  • 8.
    EXERCISE Create newdatabase : e_book Create below tables: i. Author ii. Book iii. BookAuthor iv. Publisher
  • 9.
    EXERCISE Create atable by using a) “ Create table in design view ” save your table as : BOOK based on below description. Name your Database as LIBRARY BOOK Insert the following data in your table: b) Add new field name as Type 76 64 45 130 Price Zainal GS3 Oracle Da tabase P04 Pn.Hamidah PH1 Database Processing P03 Dr.Simon NA2 Adobe Illustrator P02 Prof.Wilson MG1 Access2000 P01 Author_Name Publisher_Code Book_Title Book_Code
  • 10.
    EXERCISE 76 6445 130 Price Database Database Database Database Type Zainal GS3 Oracle Database P04 Pn.Hamidah PH1 Database Processing P03 Dr.Simon NA2 Adobe Illustrator P02 Prof.Wilson MG1 Access2000 P01 Author_Name Publisher_Code Book_Title Book_Code