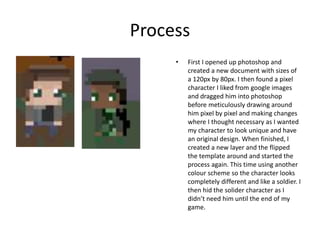
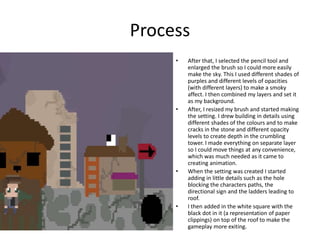
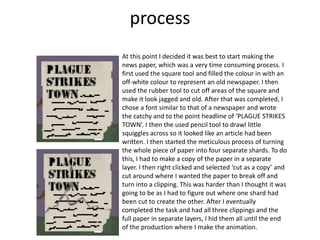
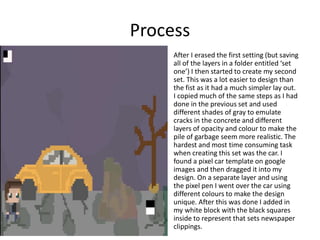
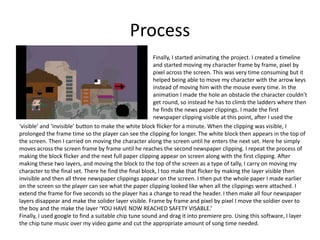
Production Reflection
Allison Hewitt
Process
• First I opened up photoshop and
created a new document with sizes of
a 120px by 80px. I then found a pixel
character I liked from google images
and dragged him into photoshop
before meticulously drawing around
him pixel by pixel and making changes
where I thought necessary as I wanted
my character to look unique and have
an original design. When finished, I
created a new layer and the flipped
the template around and started the
process again. This time using another
colour scheme so the character looks
completely different and like a soldier. I
then hid the solider character as I
didn’t need him until the end of my
game.
Process
• After that, I selected the pencil tool and
enlarged the brush so I could more easily
make the sky. This I used different shades of
purples and different levels of opacities
(with different layers) to make a smoky
affect. I then combined my layers and set it
as my background.
• After, I resized my brush and started making
the setting. I drew building in details using
different shades of the colours and to make
cracks in the stone and different opacity
levels to create depth in the crumbling
tower. I made everything on separate layer
so I could move things at any convenience,
which was much needed as it came to
creating animation.
• When the setting was created I started
adding in little details such as the hole
blocking the characters paths, the
directional sign and the ladders leading to
roof.
• I then added in the white square with the
black dot in it (a representation of paper
clippings) on top of the roof to make the
gameplay more exiting.
process
At this point I decided it was best to start making the
news paper, which was a very time consuming process. I
first used the square tool and filled the colour in with an
off-white colour to represent an old newspaper. I then
used the rubber tool to cut off areas of the square and
make it look jagged and old. After that was completed, I
chose a font similar to that of a newspaper and wrote
the catchy and to the point headline of ‘PLAGUE STRIKES
TOWN’. I then the used pencil tool to drawl little
squiggles across so it looked like an article had been
written. I then started the meticulous process of turning
the whole piece of paper into four separate shards. To do
this, I had to make a copy of the paper in a separate
layer. I then right clicked and selected ‘cut as a copy’ and
cut around where I wanted the paper to break off and
turn into a clipping. This was harder than I thought it was
going to be as I had to figure out where one shard had
been cut to create the other. After I eventually
completed the task and had all three clippings and the
full paper in separate layers, I hid them all until the end
of the production where I make the animation.
Process
After I erased the first setting (but saving
all of the layers in a folder entitled ‘set
one’) I then started to create my second
set. This was a lot easier to design than
the fist as it had a much simpler lay out.
I copied much of the same steps as I had
done in the previous set and used
different shades of gray to emulate
cracks in the concrete and different
layers of opacity and colour to make the
pile of garbage seem more realistic. The
hardest and most time consuming task
when creating this set was the car. I
found a pixel car template on google
images and then dragged it into my
design. On a separate layer and using
the pixel pen I went over the car using
different colours to make the design
unique. After this was done I added in
my white block with the black squares
inside to represent that sets newspaper
clippings.
Process
• The last set was the easiest to
create as it is the least detailed. I
used the pencil too to create the
grass and different shades and
opacity levels to make the grass
have a little more depth to it. I
then created smaller details like
the tree and the neglected swing
set. Here I also added in my final
block with the black squares
inside to represent the newspaper
clippings. I also created the text
‘YOU HAVE REACHED SAFETY’ in a
text box that could appear on
screen in the last few moments of
my video game.
Process
Finally, I started animating the project. I created a timeline
and started moving my character frame by frame, pixel by
pixel across the screen. This was very time consuming but it
helped being able to move my character with the arrow keys
instead of moving him with the mouse every time. In the
animation I made the hole an obstacle the character couldn’t
get round, so instead he has to climb the ladders where then
he finds the news paper clippings. I made the first
newspaper clipping visible at this point, after I used the
‘visible’ and ‘invisible’ button to make the white block flicker for a minute. When the clipping was visible, I
prolonged the frame time so the player can see the clipping for longer. The white block then appears in the top of
the screen. Then I carried on moving the character along the screen until he enters the next set. Here he simply
moves across the screen frame by frame until he reaches the second newspaper clipping. I repeat the process of
making the block flicker and the next full paper clipping appear on screen along with the first clipping. After
making these two layers, and moving the block to the top of the screen as a type of tally, I carry on moving my
character to the final set. There he find the final block, I too make that flicker by making the layer visible then
invisible and then all three newspaper clippings appear on the screen. I then put the whole paper I made earlier
on the screen so the player can see what the paper clipping looked like when all the clippings were attached. I
extend the frame for five seconds so the player has a change to read the header. I then make all four newspaper
layers disappear and make the solider layer visible. Frame by frame and pixel by pixel I move the soldier over to
the boy and the make the layer ‘YOU HAVE NOW REACHED SAFETY VISABLE.’
Finally, I used google to find a suitable chip tune sound and drag it into premiere pro. Using this software, I layer
the chip tune music over my video game and cut the appropriate amount of song time needed.

6. production reflection [comp]

  • 1.
  • 2.
    Process • First Iopened up photoshop and created a new document with sizes of a 120px by 80px. I then found a pixel character I liked from google images and dragged him into photoshop before meticulously drawing around him pixel by pixel and making changes where I thought necessary as I wanted my character to look unique and have an original design. When finished, I created a new layer and the flipped the template around and started the process again. This time using another colour scheme so the character looks completely different and like a soldier. I then hid the solider character as I didn’t need him until the end of my game.
  • 3.
    Process • After that,I selected the pencil tool and enlarged the brush so I could more easily make the sky. This I used different shades of purples and different levels of opacities (with different layers) to make a smoky affect. I then combined my layers and set it as my background. • After, I resized my brush and started making the setting. I drew building in details using different shades of the colours and to make cracks in the stone and different opacity levels to create depth in the crumbling tower. I made everything on separate layer so I could move things at any convenience, which was much needed as it came to creating animation. • When the setting was created I started adding in little details such as the hole blocking the characters paths, the directional sign and the ladders leading to roof. • I then added in the white square with the black dot in it (a representation of paper clippings) on top of the roof to make the gameplay more exiting.
  • 4.
    process At this pointI decided it was best to start making the news paper, which was a very time consuming process. I first used the square tool and filled the colour in with an off-white colour to represent an old newspaper. I then used the rubber tool to cut off areas of the square and make it look jagged and old. After that was completed, I chose a font similar to that of a newspaper and wrote the catchy and to the point headline of ‘PLAGUE STRIKES TOWN’. I then the used pencil tool to drawl little squiggles across so it looked like an article had been written. I then started the meticulous process of turning the whole piece of paper into four separate shards. To do this, I had to make a copy of the paper in a separate layer. I then right clicked and selected ‘cut as a copy’ and cut around where I wanted the paper to break off and turn into a clipping. This was harder than I thought it was going to be as I had to figure out where one shard had been cut to create the other. After I eventually completed the task and had all three clippings and the full paper in separate layers, I hid them all until the end of the production where I make the animation.
  • 5.
    Process After I erasedthe first setting (but saving all of the layers in a folder entitled ‘set one’) I then started to create my second set. This was a lot easier to design than the fist as it had a much simpler lay out. I copied much of the same steps as I had done in the previous set and used different shades of gray to emulate cracks in the concrete and different layers of opacity and colour to make the pile of garbage seem more realistic. The hardest and most time consuming task when creating this set was the car. I found a pixel car template on google images and then dragged it into my design. On a separate layer and using the pixel pen I went over the car using different colours to make the design unique. After this was done I added in my white block with the black squares inside to represent that sets newspaper clippings.
  • 6.
    Process • The lastset was the easiest to create as it is the least detailed. I used the pencil too to create the grass and different shades and opacity levels to make the grass have a little more depth to it. I then created smaller details like the tree and the neglected swing set. Here I also added in my final block with the black squares inside to represent the newspaper clippings. I also created the text ‘YOU HAVE REACHED SAFETY’ in a text box that could appear on screen in the last few moments of my video game.
  • 7.
    Process Finally, I startedanimating the project. I created a timeline and started moving my character frame by frame, pixel by pixel across the screen. This was very time consuming but it helped being able to move my character with the arrow keys instead of moving him with the mouse every time. In the animation I made the hole an obstacle the character couldn’t get round, so instead he has to climb the ladders where then he finds the news paper clippings. I made the first newspaper clipping visible at this point, after I used the ‘visible’ and ‘invisible’ button to make the white block flicker for a minute. When the clipping was visible, I prolonged the frame time so the player can see the clipping for longer. The white block then appears in the top of the screen. Then I carried on moving the character along the screen until he enters the next set. Here he simply moves across the screen frame by frame until he reaches the second newspaper clipping. I repeat the process of making the block flicker and the next full paper clipping appear on screen along with the first clipping. After making these two layers, and moving the block to the top of the screen as a type of tally, I carry on moving my character to the final set. There he find the final block, I too make that flicker by making the layer visible then invisible and then all three newspaper clippings appear on the screen. I then put the whole paper I made earlier on the screen so the player can see what the paper clipping looked like when all the clippings were attached. I extend the frame for five seconds so the player has a change to read the header. I then make all four newspaper layers disappear and make the solider layer visible. Frame by frame and pixel by pixel I move the soldier over to the boy and the make the layer ‘YOU HAVE NOW REACHED SAFETY VISABLE.’ Finally, I used google to find a suitable chip tune sound and drag it into premiere pro. Using this software, I layer the chip tune music over my video game and cut the appropriate amount of song time needed.

Editor's Notes

  • #3 Discuss the tools and processes used in your production. Log your thoughts and feelings about your work.
  • #4 Discuss the tools and processes used in your production. Log your thoughts and feelings about your work.
  • #6 Discuss the tools and processes used in your production. Log your thoughts and feelings about your work.
  • #7 Discuss the tools and processes used in your production. Log your thoughts and feelings about your work.
  • #8 Discuss the tools and processes used in your production. Log your thoughts and feelings about your work.