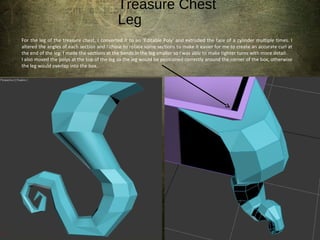
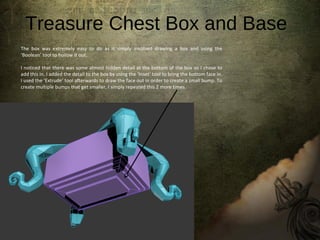
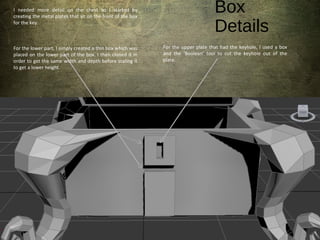
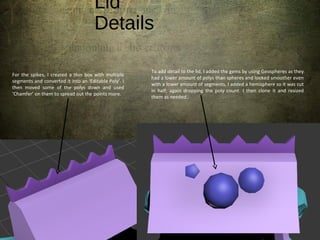
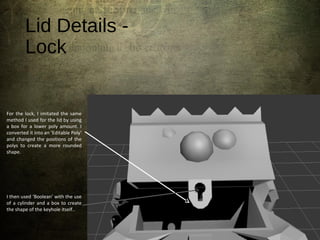
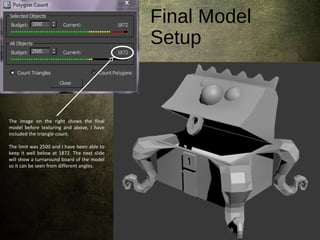
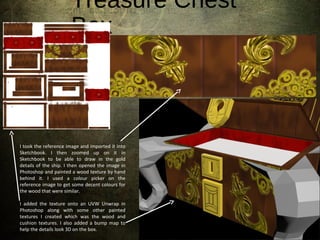
Overview
‱To complete this brief you will need to
develop the following skills:
‱Low polygon modelling.
‱Applying UVs (mapping) to a complex surface.
‱Creating hand draw textures from painted concept reference.
‱High polygon modelling, in Z-Brush, Mudbox or your chosen 3D application (3ds Max).
‱Capturing of normal maps from a high polygon surface to a low polygon surface.
Gantt Chart
The Gantt Chart above shows the plan for the Treasure Chest – Working to a Brief.
This was designed before the project was started.
When the project is almost at completion, I will create a revised Gantt Chart to show
how my timing for the project went, discuss the differences between the two and how I
could do things differently if repeated.
Reference Image
For the assignment, this is the
reference image that I will be
using to create my treasure
chest. I want to be able to be
as accurate as possible to this
image.
Treasure Chest
Leg
For the leg of the treasure chest, I converted it to an ‘Editable Poly’ and extruded the face of a cylinder multiple times. I
altered the angles of each section and I chose to rotate some sections to make it easier for me to create an accurate curl at
the end of the leg. I made the sections at the bends in the leg smaller so I was able to make tighter turns with more detail.
I also moved the polys at the top of the leg so the leg would be positioned correctly around the corner of the box, otherwise
the leg would overlap into the box.
Treasure Chest Box and Base
The box was extremely easy to do as it simply involved drawing a box and using the
‘Boolean’ tool to hollow it out.
I noticed that there was some almost hidden detail at the bottom of the box so I chose to
add this in. I added the detail to the box by using the ‘Inset’ tool to bring the bottom face in.
I used the ‘Extrude’ tool afterwards to draw the face out in order to create a small bump. To
create multiple bumps that get smaller, I simply repeated this 2 more times.
Box
Details
I needed more detail on the chest so I started by
creating the metal plates that sit on the front of the box
for the key.
For the lower part, I simply created a thin box which was
placed on the lower part of the box. I then cloned it in
order to get the same width and depth before scaling it
to get a lower height.
For the upper plate that had the keyhole, I used a box
and the ‘Boolean’ tool to cut the keyhole out of the
plate.
Treasure Chest Lid
Originally, I was going to use a cylinder
to create the lid but I chose to use a
box instead as I decided it would be
more beneficial for my polygon budget.
I added extra segments onto the box
before converting it into an ‘Editable
Poly’’ this allowed me to change the
shape more effectively.
I then moved the polys along the centre
line of the top face to establish how
high the lid would reach. I moved the
other polys along the side faces to
positions that caused the box to curve
in and align correctly as it went up.
Lid
Details
To add detail to the lid, I added the gems by using Geospheres as they
had a lower amount of polys than spheres and looked smoother even
with a lower amount of segments. I added a hemisphere so it was cut
in half; again dropping the poly count. I then clone it and resized
them as needed.
For the spikes, I created a thin box with multiple
segments and converted it into an ‘Editable Poly’. I
then moved some of the polys down and used
‘Chamfer’ on them to spread out the points more.
Lid Details -
Lock
For the lock, I imitated the same
method I used for the lid by using
a box for a lower poly amount. I
converted it into an ‘Editable Poly’
and changed the positions of the
polys to create a more rounded
shape.
I then used ‘Boolean’ with the use
of a cylinder and a box to create
the shape of the keyhole itself..
Final Model
Setup
The image on the right shows the final
model before texturing and above, I have
included the triangle count.
The limit was 2500 and I have been able to
keep it well below at 1872. The next slide
will show a turnaround board of the model
so it can be seen from different angles.
TEXTURING
Treasure Chest
Box
I took the reference image and imported it into
Sketchbook. I then zoomed up on it in
Sketchbook to be able to draw in the gold
details of the ship. I then opened the image in
Photoshop and painted a wood texture by hand
behind it. I used a colour picker on the
reference image to get some decent colours for
the wood that were similar.
I added the texture onto an UVW Unwrap in
Photoshop along with some other painted
textures I created which was the wood and
cushion textures. I also added a bump map to
help the details look 3D on the box.
Treasure Chest Key
Hole
The texture I created in
Photoshop was added to
the lock, but I felt it
looked very flat and
unrealistic so I added a
bump map to make the
detail look carved in.
I created the texture for the lock by adding a painted base colour
of golden yellow. I then used the paintbrush tool to draw in the
detailing on the lock. I wasn’t too specific with the detailing as
this made it look more effective rather than specifically spacing
the patterning out.
Treasure Chest
Lid
The details on the lid were harder to draw because the details
and patterns had to be in the correct positions due to the gems. I
started off with a texture map that only had the circles around
the gems.
Once I had the positioning of the circular detailing correct,
I copied the wood texture I had painted earlier from the
box texture map and pasted it into the lid texture map
and resized it. I then used gold, white and a low opacity
black to paint on the detailing for the rest of the lid.
I then applied a bump map to the lid to bring
out the carvings.
Treasure Chest - Coins
The coins were done by
editing a coin texture using a
brush stroke filter in
Photoshop to give them a
stylized effect. The diffuse
map was then applied to a
plan.
However, it looked extremely
flat so I applied a bump map
to bring the coins up.
Treasure Chest - Leg
I painted the leg texture in Photoshop to follow along
with the same style I’ve been using previously.
The leg required a UVW map that had used the ‘Pelt’
tool. Because there were so many faces on the leg, this
was the hardest to texture as I had to count the faces
where I had to place certain colours.
After I placed the texture onto the model of the leg, I
checked that all the colouring and detailing were in the
correct positions. Once I clarified that they were, I
added a bump map and a specular map in order to bring
out the carvings and bring out some gloss on the legs.
Texture
Map
I took all my textures and
placed them onto one
texture map of 1024 x 1024
pixel square in order to
meet a specifications on the
brief.
First, I saved it as a Targa
(.tga) as this is what I
usually save my texture
maps as. But I resaved it as
a Bitmap (.bmp) as the brief
specified this file format.
Final
Render
The revised Gantt chart is different to my first one because a lot of the sections took a lot longer to
complete than what I expected due to lack of knowledge. However, I do believe that this is also due to
time management. Because of this, some sections of the project such as the lighting and setup of the
camera weren’t completed until later on.
I think that if this project was completed again, I would spend a lot more time on tutorials; especially
to become more familiar with the pelt tool as I had to spend quite a bit of time on this due to lack of
understanding.
This was also my first time working with a higher polygon limit on a more detailed model but unlike
the previous industry-based Blitz trash brief, I enjoyed this brief due to the hand painting in
Photoshop.
Revised Gantt ChaRt
Specification
Style – As close to the reference concept artwork supplied below.
Reference – You have hand drawn/painted reference as a basis for texture production
Scale: centimetres – one unit = one centimetre
Polygon Count Character: 2500 triangles
Texture Space Character: 1 RGB texture @ 1024 x 1024 pixels square. Save as Bitmap (.bmp)
Efficient use of polygon budget – distributed intelligently so areas with more details have more polygons
Orientation and position – centre point must be placed at World (0,0,0)
By evaluating my work based on the brief specification, I can see if I have fulfilled the brief
successfully:
Style – I think that by using the reference image to get the colours for my texture, I think I
have been successful in getting close to the reference artwork.
Reference – I feel that I have met this spec due to the painting I have completed in
Photoshop for the chest textures.
Scale – I met this requirement from the beginning by calculating the size of the chest but I
found this extremely difficult to get right and changing the unit measurement in 3ds Max
to one unit = one centimetre before I started modelling.
Polygon Count – I was able to stay well within the polygon count which allowed me to
add more detail like the spikes on the lid.
Texture Space – To meet this specification, I organized all the textures from my models
onto one Photoshop document at the required size and saved it as a Bitmap (.bmp).
Efficient Use of Polygon Budget – I feel I have met this specification well as I have
focussed the largest amount of polygons in the model that required the most detail,
which was the legs. I had to keep this limited due to the fact that 4 legs are needed in the
scene.
Orientation and Position – I entered the co-ordinates to centre the model as soon as I
Evaluatio
n

Treasure presentation

  • 2.
    Overview ‱To complete thisbrief you will need to develop the following skills: ‱Low polygon modelling. ‱Applying UVs (mapping) to a complex surface. ‱Creating hand draw textures from painted concept reference. ‱High polygon modelling, in Z-Brush, Mudbox or your chosen 3D application (3ds Max). ‱Capturing of normal maps from a high polygon surface to a low polygon surface.
  • 3.
    Gantt Chart The GanttChart above shows the plan for the Treasure Chest – Working to a Brief. This was designed before the project was started. When the project is almost at completion, I will create a revised Gantt Chart to show how my timing for the project went, discuss the differences between the two and how I could do things differently if repeated.
  • 4.
    Reference Image For theassignment, this is the reference image that I will be using to create my treasure chest. I want to be able to be as accurate as possible to this image.
  • 5.
    Treasure Chest Leg For theleg of the treasure chest, I converted it to an ‘Editable Poly’ and extruded the face of a cylinder multiple times. I altered the angles of each section and I chose to rotate some sections to make it easier for me to create an accurate curl at the end of the leg. I made the sections at the bends in the leg smaller so I was able to make tighter turns with more detail. I also moved the polys at the top of the leg so the leg would be positioned correctly around the corner of the box, otherwise the leg would overlap into the box.
  • 6.
    Treasure Chest Boxand Base The box was extremely easy to do as it simply involved drawing a box and using the ‘Boolean’ tool to hollow it out. I noticed that there was some almost hidden detail at the bottom of the box so I chose to add this in. I added the detail to the box by using the ‘Inset’ tool to bring the bottom face in. I used the ‘Extrude’ tool afterwards to draw the face out in order to create a small bump. To create multiple bumps that get smaller, I simply repeated this 2 more times.
  • 7.
    Box Details I needed moredetail on the chest so I started by creating the metal plates that sit on the front of the box for the key. For the lower part, I simply created a thin box which was placed on the lower part of the box. I then cloned it in order to get the same width and depth before scaling it to get a lower height. For the upper plate that had the keyhole, I used a box and the ‘Boolean’ tool to cut the keyhole out of the plate.
  • 8.
    Treasure Chest Lid Originally,I was going to use a cylinder to create the lid but I chose to use a box instead as I decided it would be more beneficial for my polygon budget. I added extra segments onto the box before converting it into an ‘Editable Poly’’ this allowed me to change the shape more effectively. I then moved the polys along the centre line of the top face to establish how high the lid would reach. I moved the other polys along the side faces to positions that caused the box to curve in and align correctly as it went up.
  • 9.
    Lid Details To add detailto the lid, I added the gems by using Geospheres as they had a lower amount of polys than spheres and looked smoother even with a lower amount of segments. I added a hemisphere so it was cut in half; again dropping the poly count. I then clone it and resized them as needed. For the spikes, I created a thin box with multiple segments and converted it into an ‘Editable Poly’. I then moved some of the polys down and used ‘Chamfer’ on them to spread out the points more.
  • 10.
    Lid Details - Lock Forthe lock, I imitated the same method I used for the lid by using a box for a lower poly amount. I converted it into an ‘Editable Poly’ and changed the positions of the polys to create a more rounded shape. I then used ‘Boolean’ with the use of a cylinder and a box to create the shape of the keyhole itself..
  • 11.
    Final Model Setup The imageon the right shows the final model before texturing and above, I have included the triangle count. The limit was 2500 and I have been able to keep it well below at 1872. The next slide will show a turnaround board of the model so it can be seen from different angles.
  • 13.
  • 14.
    Treasure Chest Box I tookthe reference image and imported it into Sketchbook. I then zoomed up on it in Sketchbook to be able to draw in the gold details of the ship. I then opened the image in Photoshop and painted a wood texture by hand behind it. I used a colour picker on the reference image to get some decent colours for the wood that were similar. I added the texture onto an UVW Unwrap in Photoshop along with some other painted textures I created which was the wood and cushion textures. I also added a bump map to help the details look 3D on the box.
  • 15.
    Treasure Chest Key Hole Thetexture I created in Photoshop was added to the lock, but I felt it looked very flat and unrealistic so I added a bump map to make the detail look carved in. I created the texture for the lock by adding a painted base colour of golden yellow. I then used the paintbrush tool to draw in the detailing on the lock. I wasn’t too specific with the detailing as this made it look more effective rather than specifically spacing the patterning out.
  • 16.
    Treasure Chest Lid The detailson the lid were harder to draw because the details and patterns had to be in the correct positions due to the gems. I started off with a texture map that only had the circles around the gems. Once I had the positioning of the circular detailing correct, I copied the wood texture I had painted earlier from the box texture map and pasted it into the lid texture map and resized it. I then used gold, white and a low opacity black to paint on the detailing for the rest of the lid. I then applied a bump map to the lid to bring out the carvings.
  • 17.
    Treasure Chest -Coins The coins were done by editing a coin texture using a brush stroke filter in Photoshop to give them a stylized effect. The diffuse map was then applied to a plan. However, it looked extremely flat so I applied a bump map to bring the coins up.
  • 18.
    Treasure Chest -Leg I painted the leg texture in Photoshop to follow along with the same style I’ve been using previously. The leg required a UVW map that had used the ‘Pelt’ tool. Because there were so many faces on the leg, this was the hardest to texture as I had to count the faces where I had to place certain colours. After I placed the texture onto the model of the leg, I checked that all the colouring and detailing were in the correct positions. Once I clarified that they were, I added a bump map and a specular map in order to bring out the carvings and bring out some gloss on the legs.
  • 19.
    Texture Map I took allmy textures and placed them onto one texture map of 1024 x 1024 pixel square in order to meet a specifications on the brief. First, I saved it as a Targa (.tga) as this is what I usually save my texture maps as. But I resaved it as a Bitmap (.bmp) as the brief specified this file format.
  • 21.
  • 22.
    The revised Ganttchart is different to my first one because a lot of the sections took a lot longer to complete than what I expected due to lack of knowledge. However, I do believe that this is also due to time management. Because of this, some sections of the project such as the lighting and setup of the camera weren’t completed until later on. I think that if this project was completed again, I would spend a lot more time on tutorials; especially to become more familiar with the pelt tool as I had to spend quite a bit of time on this due to lack of understanding. This was also my first time working with a higher polygon limit on a more detailed model but unlike the previous industry-based Blitz trash brief, I enjoyed this brief due to the hand painting in Photoshop. Revised Gantt ChaRt
  • 23.
    Specification Style – Asclose to the reference concept artwork supplied below. Reference – You have hand drawn/painted reference as a basis for texture production Scale: centimetres – one unit = one centimetre Polygon Count Character: 2500 triangles Texture Space Character: 1 RGB texture @ 1024 x 1024 pixels square. Save as Bitmap (.bmp) Efficient use of polygon budget – distributed intelligently so areas with more details have more polygons Orientation and position – centre point must be placed at World (0,0,0) By evaluating my work based on the brief specification, I can see if I have fulfilled the brief successfully: Style – I think that by using the reference image to get the colours for my texture, I think I have been successful in getting close to the reference artwork. Reference – I feel that I have met this spec due to the painting I have completed in Photoshop for the chest textures. Scale – I met this requirement from the beginning by calculating the size of the chest but I found this extremely difficult to get right and changing the unit measurement in 3ds Max to one unit = one centimetre before I started modelling. Polygon Count – I was able to stay well within the polygon count which allowed me to add more detail like the spikes on the lid. Texture Space – To meet this specification, I organized all the textures from my models onto one Photoshop document at the required size and saved it as a Bitmap (.bmp). Efficient Use of Polygon Budget – I feel I have met this specification well as I have focussed the largest amount of polygons in the model that required the most detail, which was the legs. I had to keep this limited due to the fact that 4 legs are needed in the scene. Orientation and Position – I entered the co-ordinates to centre the model as soon as I Evaluatio n