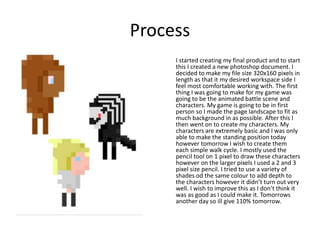
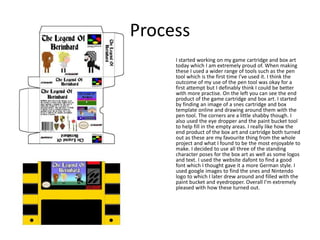
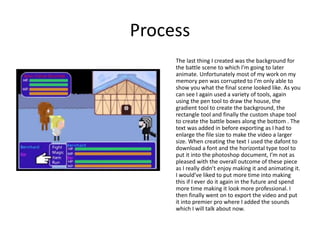
Production Reflection
Your Name
Process
I started creating my final product and to start
this I created a new photoshop document. I
decided to make my file size 320x160 pixels in
length as that it my desired workspace side I
feel most comfortable working with. The first
thing I was going to make for my game was
going to be the animated battle scene and
characters. My game is going to be in first
person so I made the page landscape to fit as
much background in as possible. After this I
then went on to create my characters. My
characters are extremely basic and I was only
able to make the standing position today
however tomorrow I wish to create them
each simple walk cycle. I mostly used the
pencil tool on 1 pixel to draw these characters
however on the larger pixels I used a 2 and 3
pixel size pencil. I tried to use a variety of
shades od the same colour to add depth to
the characters however it didn’t turn out very
well. I wish to improve this as I don’t think it
was as good as I could make it. Tomorrows
another day so ill give 110% tomorrow.
Process
I started working on my game cartridge and box art
today which I am extremely proud of. When making
these I used a wider range of tools such as the pen
tool which is the first time I’ve used it. I think the
outcome of my use of the pen tool was okay for a
first attempt but I definably think I could be better
with more practise. On the left you can see the end
product of the game cartridge and box art. I started
by finding an image of a snes cartridge and box
template online and drawing around them with the
pen tool. The corners are a little shabby though. I
also used the eye dropper and the paint bucket tool
to help fill in the empty areas. I really like how the
end product of the box art and cartridge both turned
out as these are my favourite thing from the whole
project and what I found to be the most enjoyable to
make. I decided to use all three of the standing
character poses for the box art as well as some logos
and text. I used the website dafont to find a good
font which I thought gave it a more German style. I
used google images to find the snes and Nintendo
logo to which I later drew around and filled with the
paint bucket and eyedropper. Overall I’m extremely
pleased with how these turned out.
Process
The last thing I created was the background for
the battle scene to which I’m going to later
animate. Unfortunately most of my work on my
memory pen was corrupted to I’m only able to
show you what the final scene looked like. As you
can see I again used a variety of tools, again
using the pen tool to draw the house, the
gradient tool to create the background, the
rectangle tool and finally the custom shape tool
to create the battle boxes along the bottom . The
text was added in before exporting as I had to
enlarge the file size to make the video a larger
size. When creating the text I used the dafont to
download a font and the horizontal type tool to
put it into the photoshop document, I’m not as
pleased with the overall outcome of these piece
as I really didn’t enjoy making it and animating it.
I would’ve liked to put more time into making
this if I ever do it again in the future and spend
more time making it look more professional. I
then finally went on to export the video and put
it into premier pro where I added the sounds
which I will talk about now.

Production Reflection

  • 1.
  • 2.
    Process I started creatingmy final product and to start this I created a new photoshop document. I decided to make my file size 320x160 pixels in length as that it my desired workspace side I feel most comfortable working with. The first thing I was going to make for my game was going to be the animated battle scene and characters. My game is going to be in first person so I made the page landscape to fit as much background in as possible. After this I then went on to create my characters. My characters are extremely basic and I was only able to make the standing position today however tomorrow I wish to create them each simple walk cycle. I mostly used the pencil tool on 1 pixel to draw these characters however on the larger pixels I used a 2 and 3 pixel size pencil. I tried to use a variety of shades od the same colour to add depth to the characters however it didn’t turn out very well. I wish to improve this as I don’t think it was as good as I could make it. Tomorrows another day so ill give 110% tomorrow.
  • 3.
    Process I started workingon my game cartridge and box art today which I am extremely proud of. When making these I used a wider range of tools such as the pen tool which is the first time I’ve used it. I think the outcome of my use of the pen tool was okay for a first attempt but I definably think I could be better with more practise. On the left you can see the end product of the game cartridge and box art. I started by finding an image of a snes cartridge and box template online and drawing around them with the pen tool. The corners are a little shabby though. I also used the eye dropper and the paint bucket tool to help fill in the empty areas. I really like how the end product of the box art and cartridge both turned out as these are my favourite thing from the whole project and what I found to be the most enjoyable to make. I decided to use all three of the standing character poses for the box art as well as some logos and text. I used the website dafont to find a good font which I thought gave it a more German style. I used google images to find the snes and Nintendo logo to which I later drew around and filled with the paint bucket and eyedropper. Overall I’m extremely pleased with how these turned out.
  • 4.
    Process The last thingI created was the background for the battle scene to which I’m going to later animate. Unfortunately most of my work on my memory pen was corrupted to I’m only able to show you what the final scene looked like. As you can see I again used a variety of tools, again using the pen tool to draw the house, the gradient tool to create the background, the rectangle tool and finally the custom shape tool to create the battle boxes along the bottom . The text was added in before exporting as I had to enlarge the file size to make the video a larger size. When creating the text I used the dafont to download a font and the horizontal type tool to put it into the photoshop document, I’m not as pleased with the overall outcome of these piece as I really didn’t enjoy making it and animating it. I would’ve liked to put more time into making this if I ever do it again in the future and spend more time making it look more professional. I then finally went on to export the video and put it into premier pro where I added the sounds which I will talk about now.

Editor's Notes

  • #3 Discuss the tools and processes used in your production. Log your thoughts and feelings about your work.
  • #4 Discuss the tools and processes used in your production. Log your thoughts and feelings about your work.
  • #5 Discuss the tools and processes used in your production. Log your thoughts and feelings about your work.