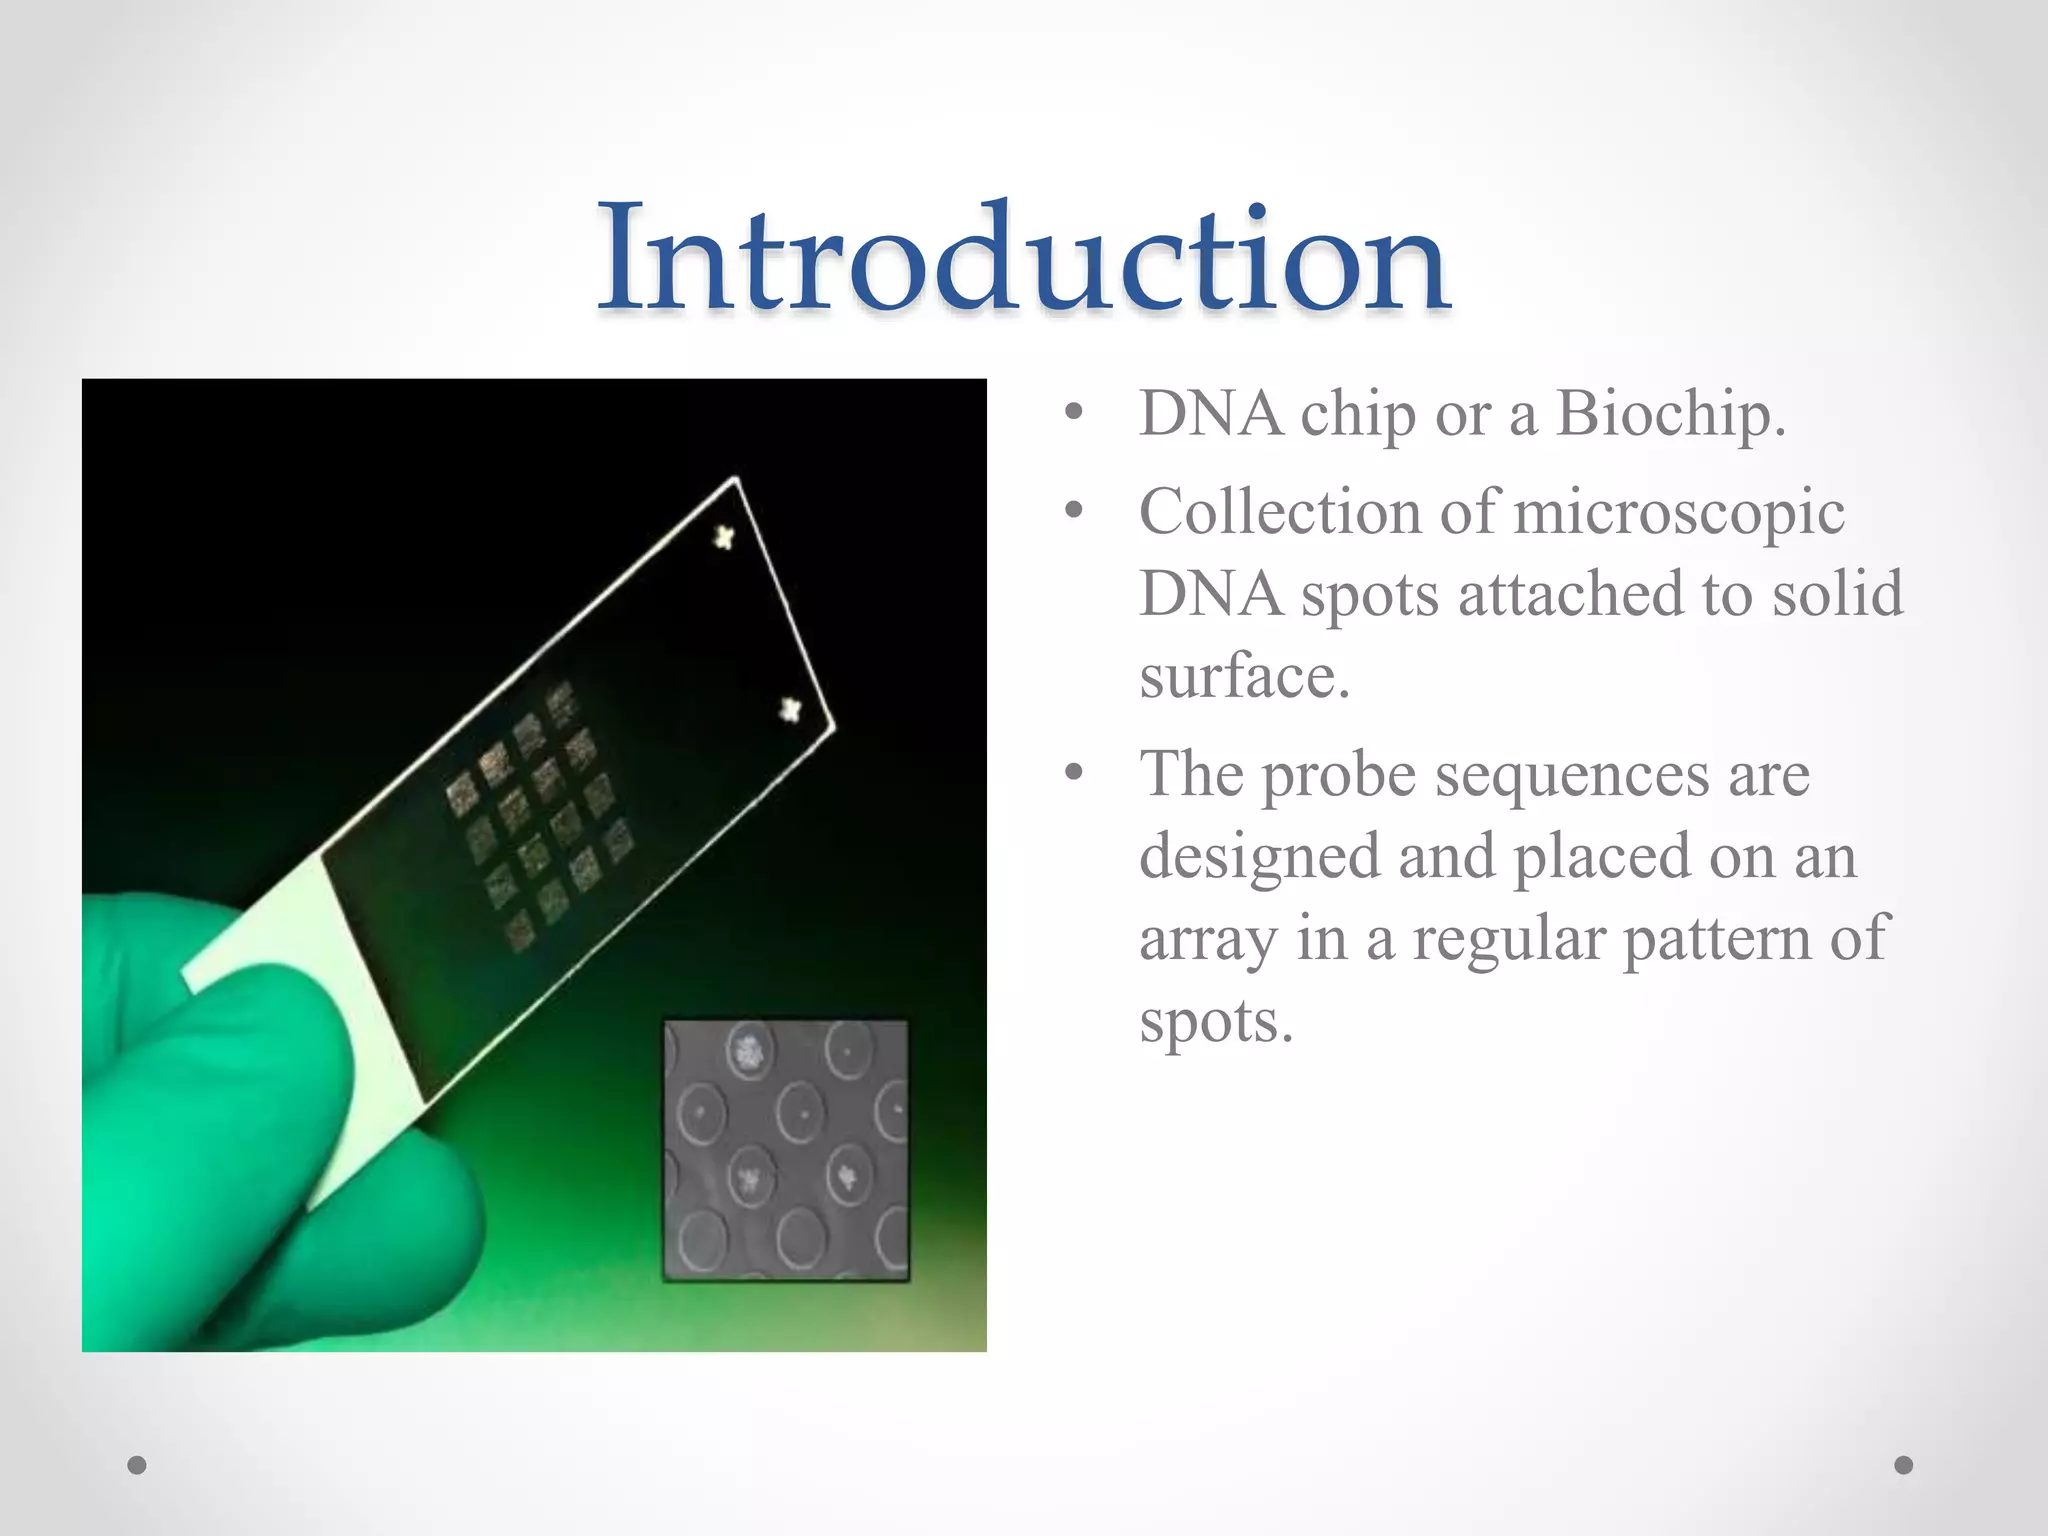
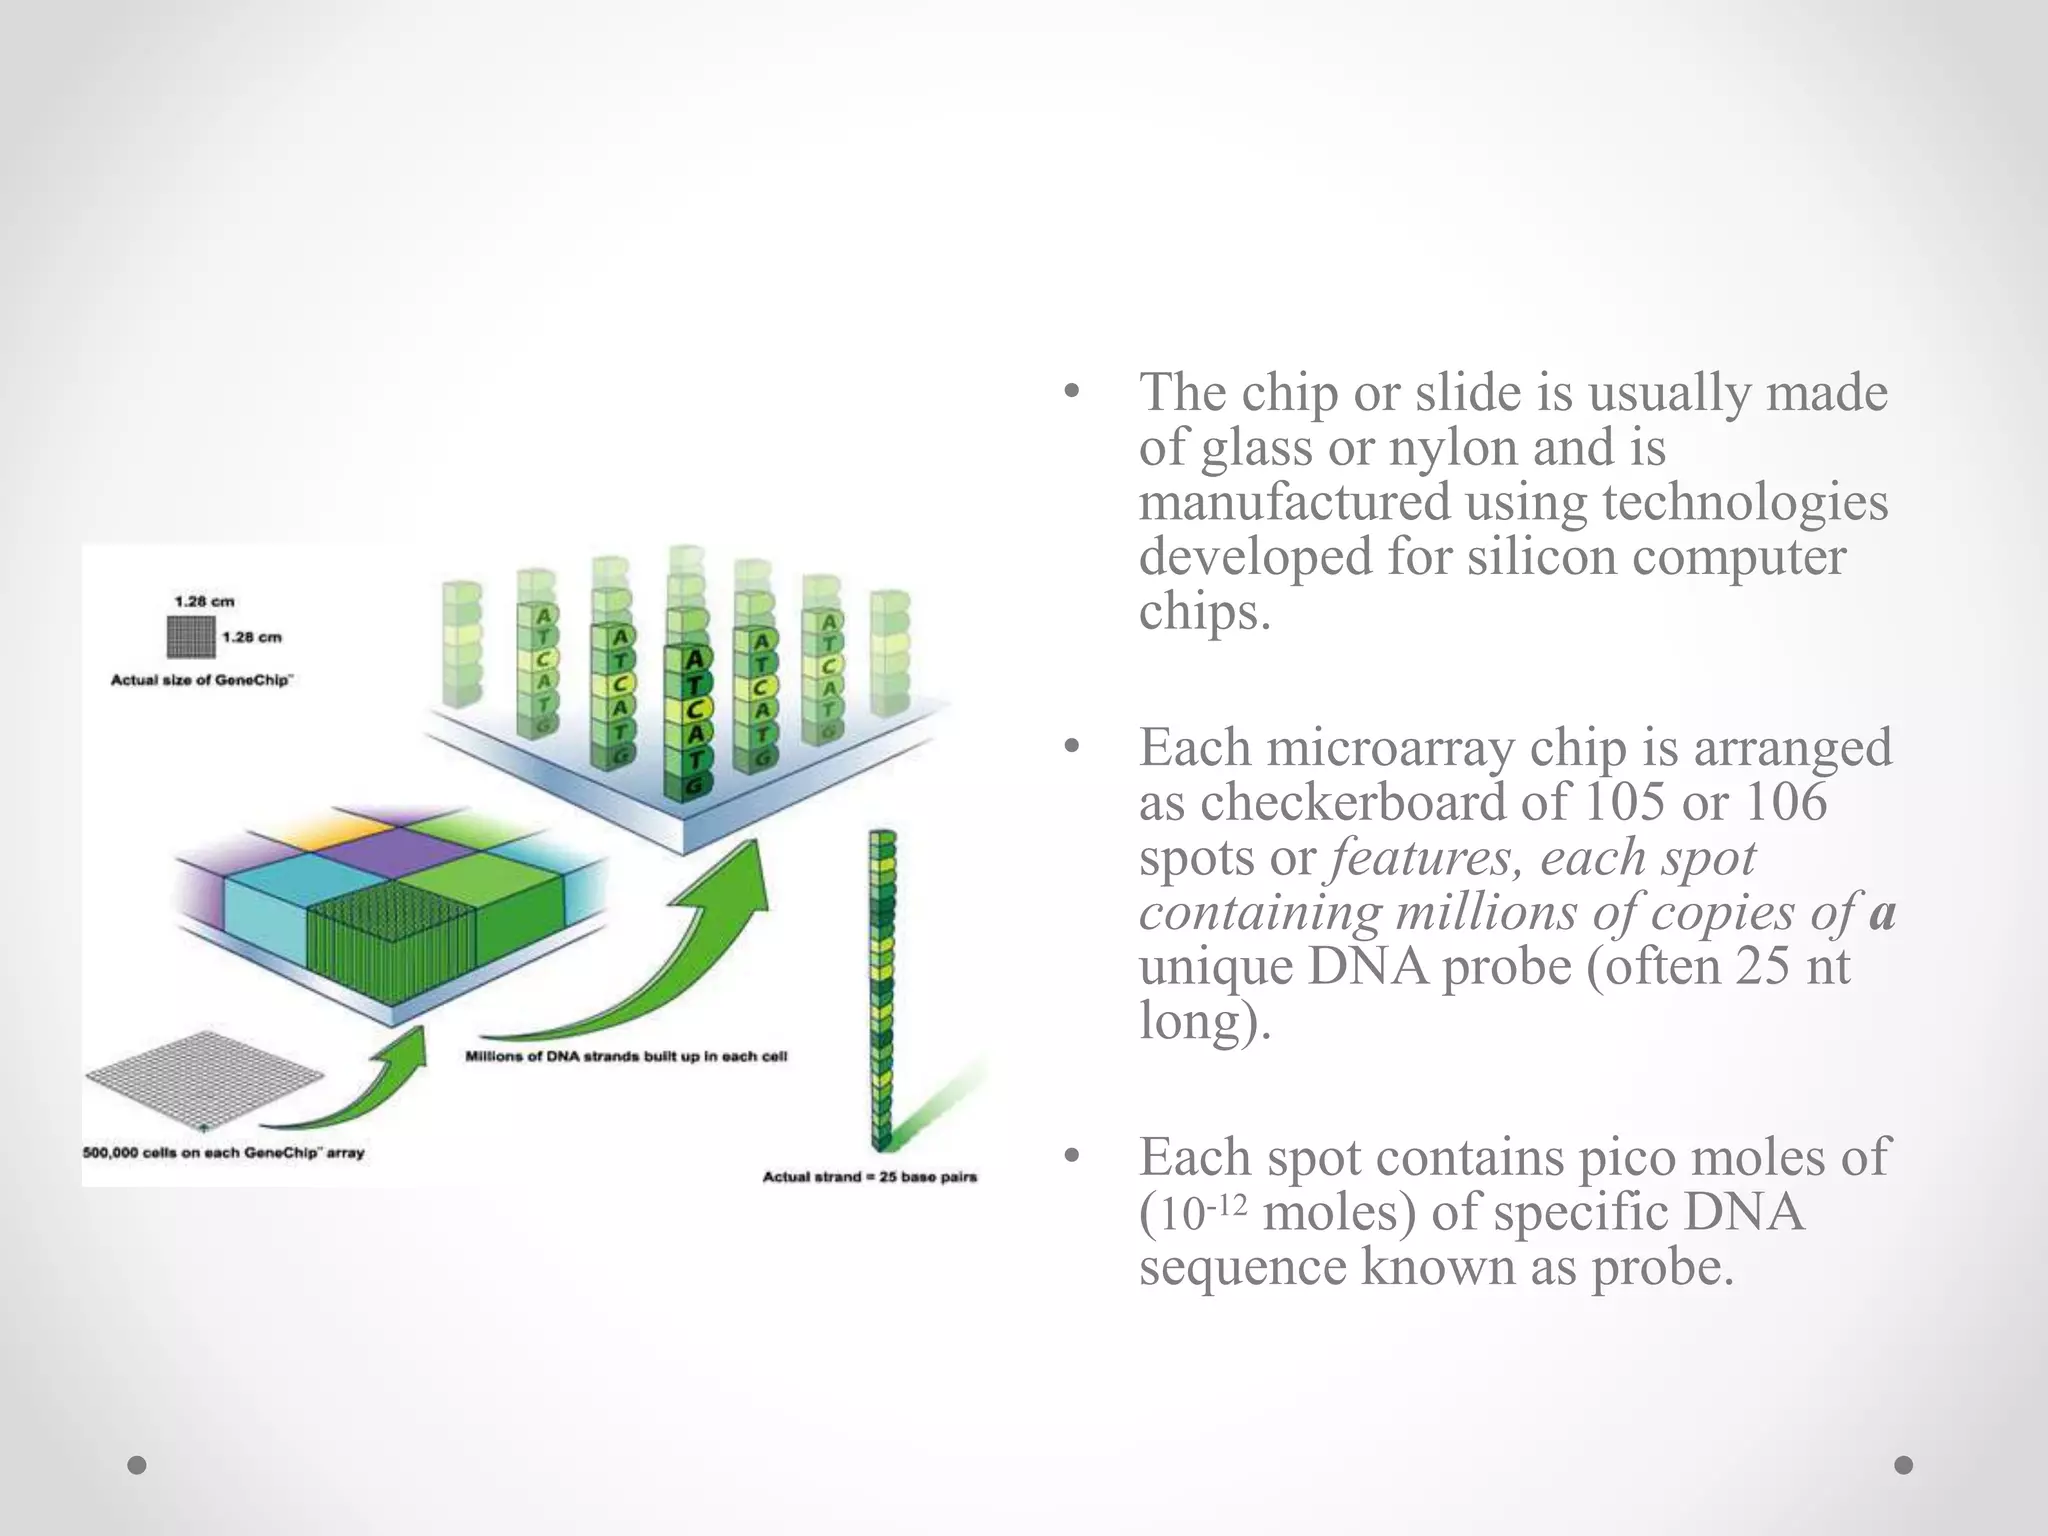
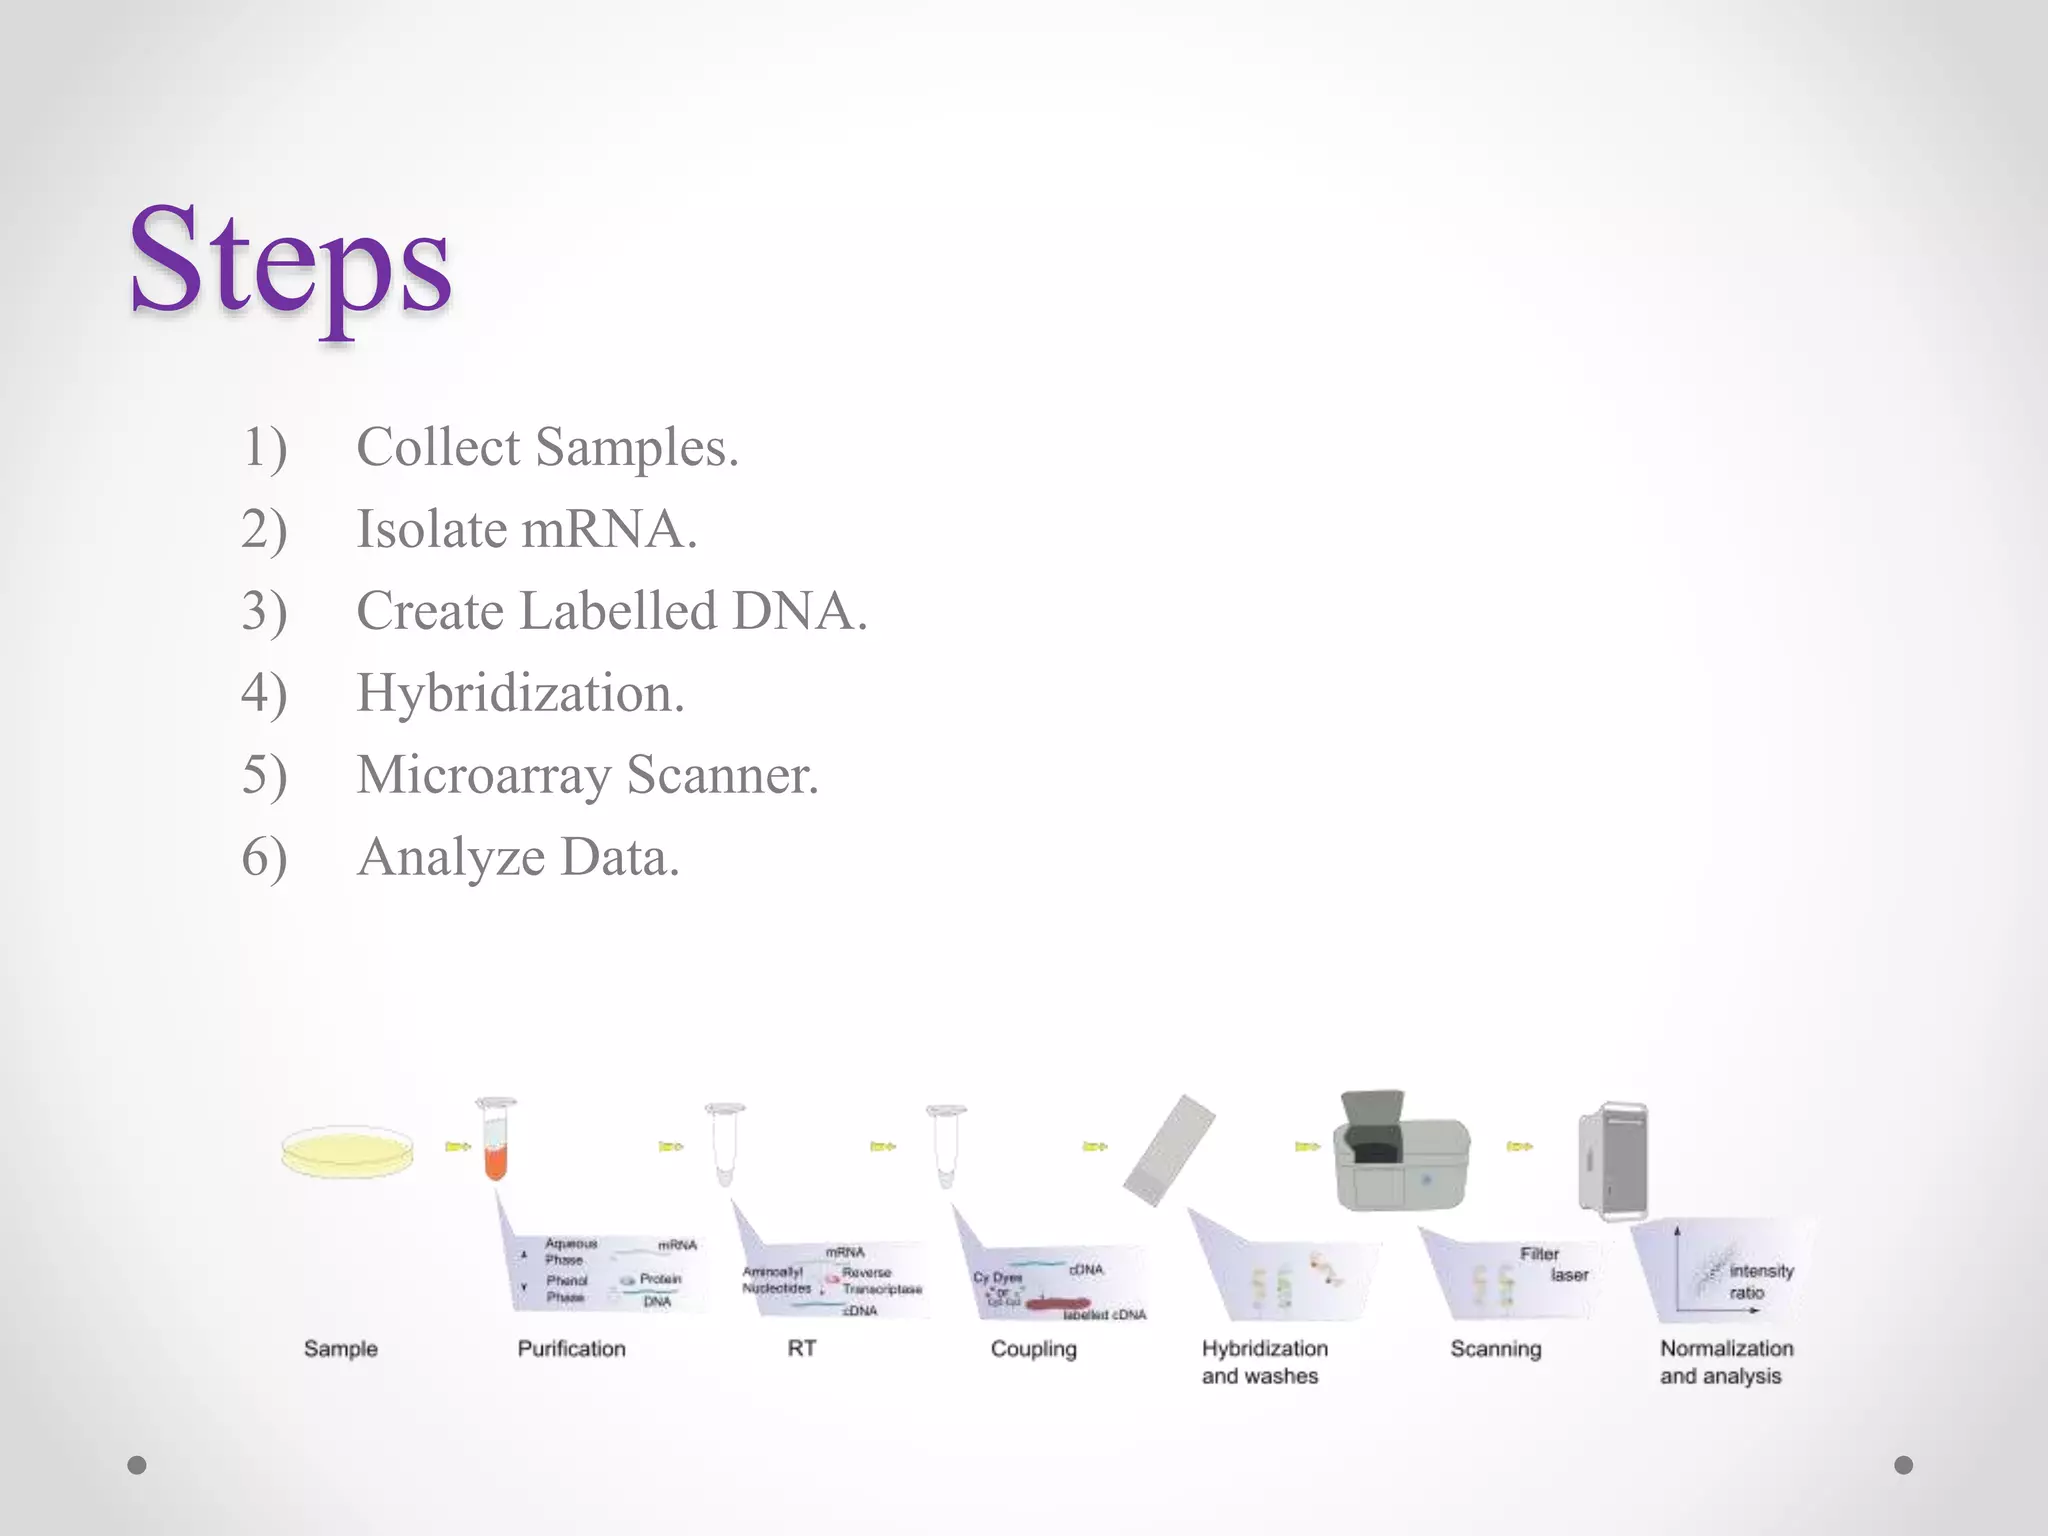
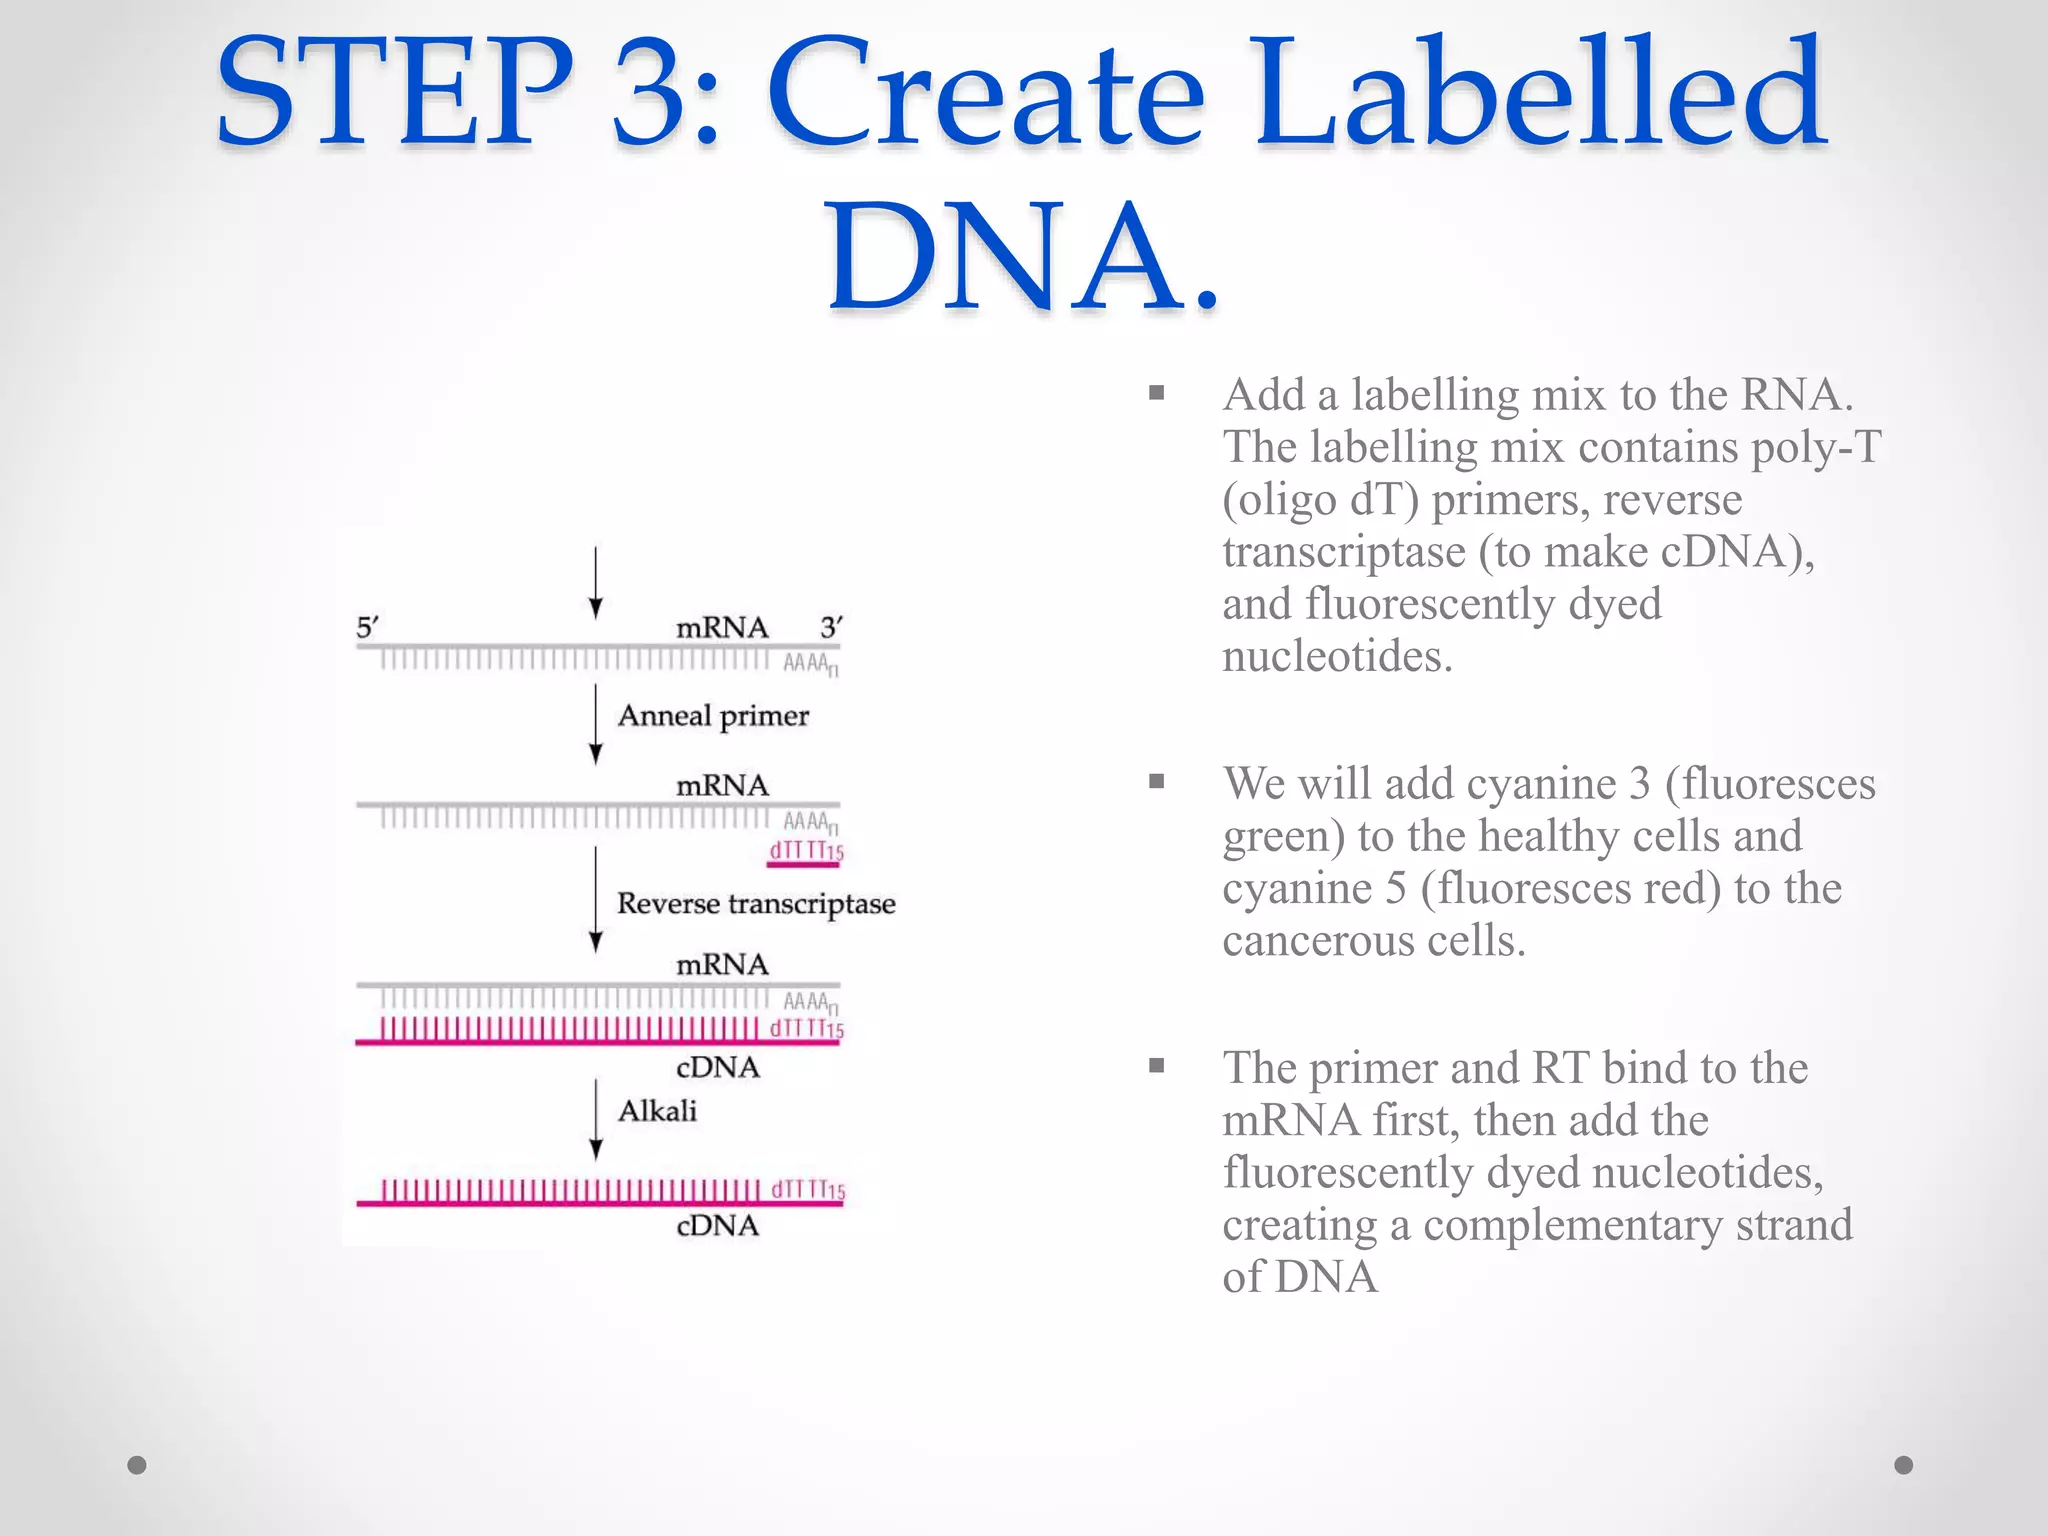
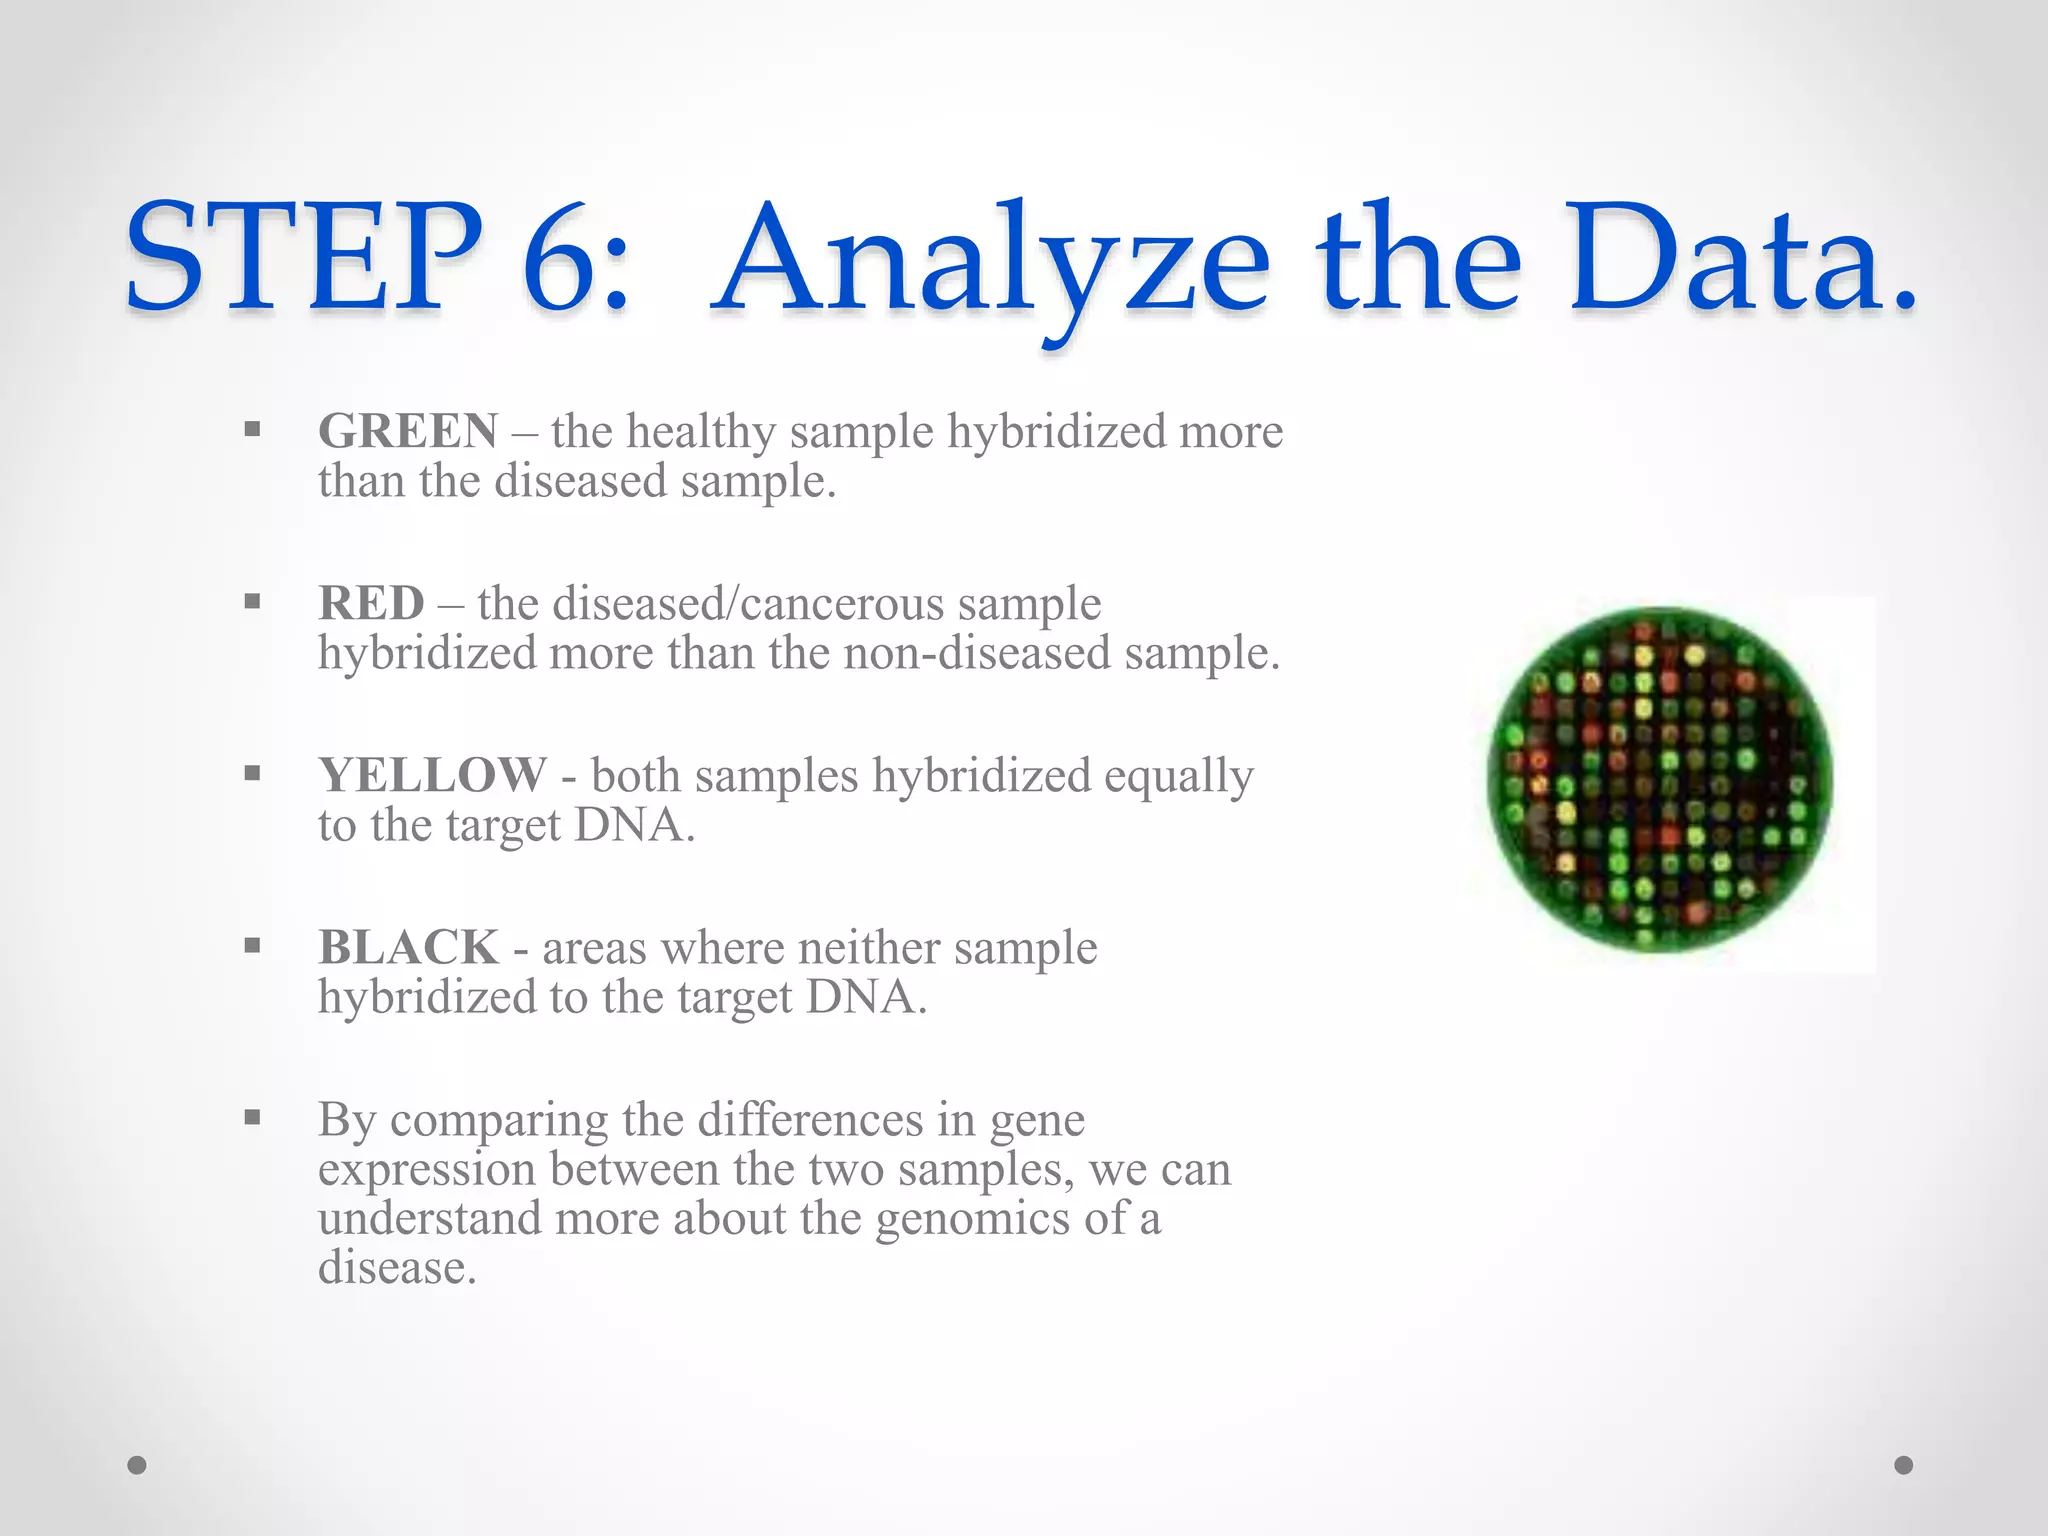
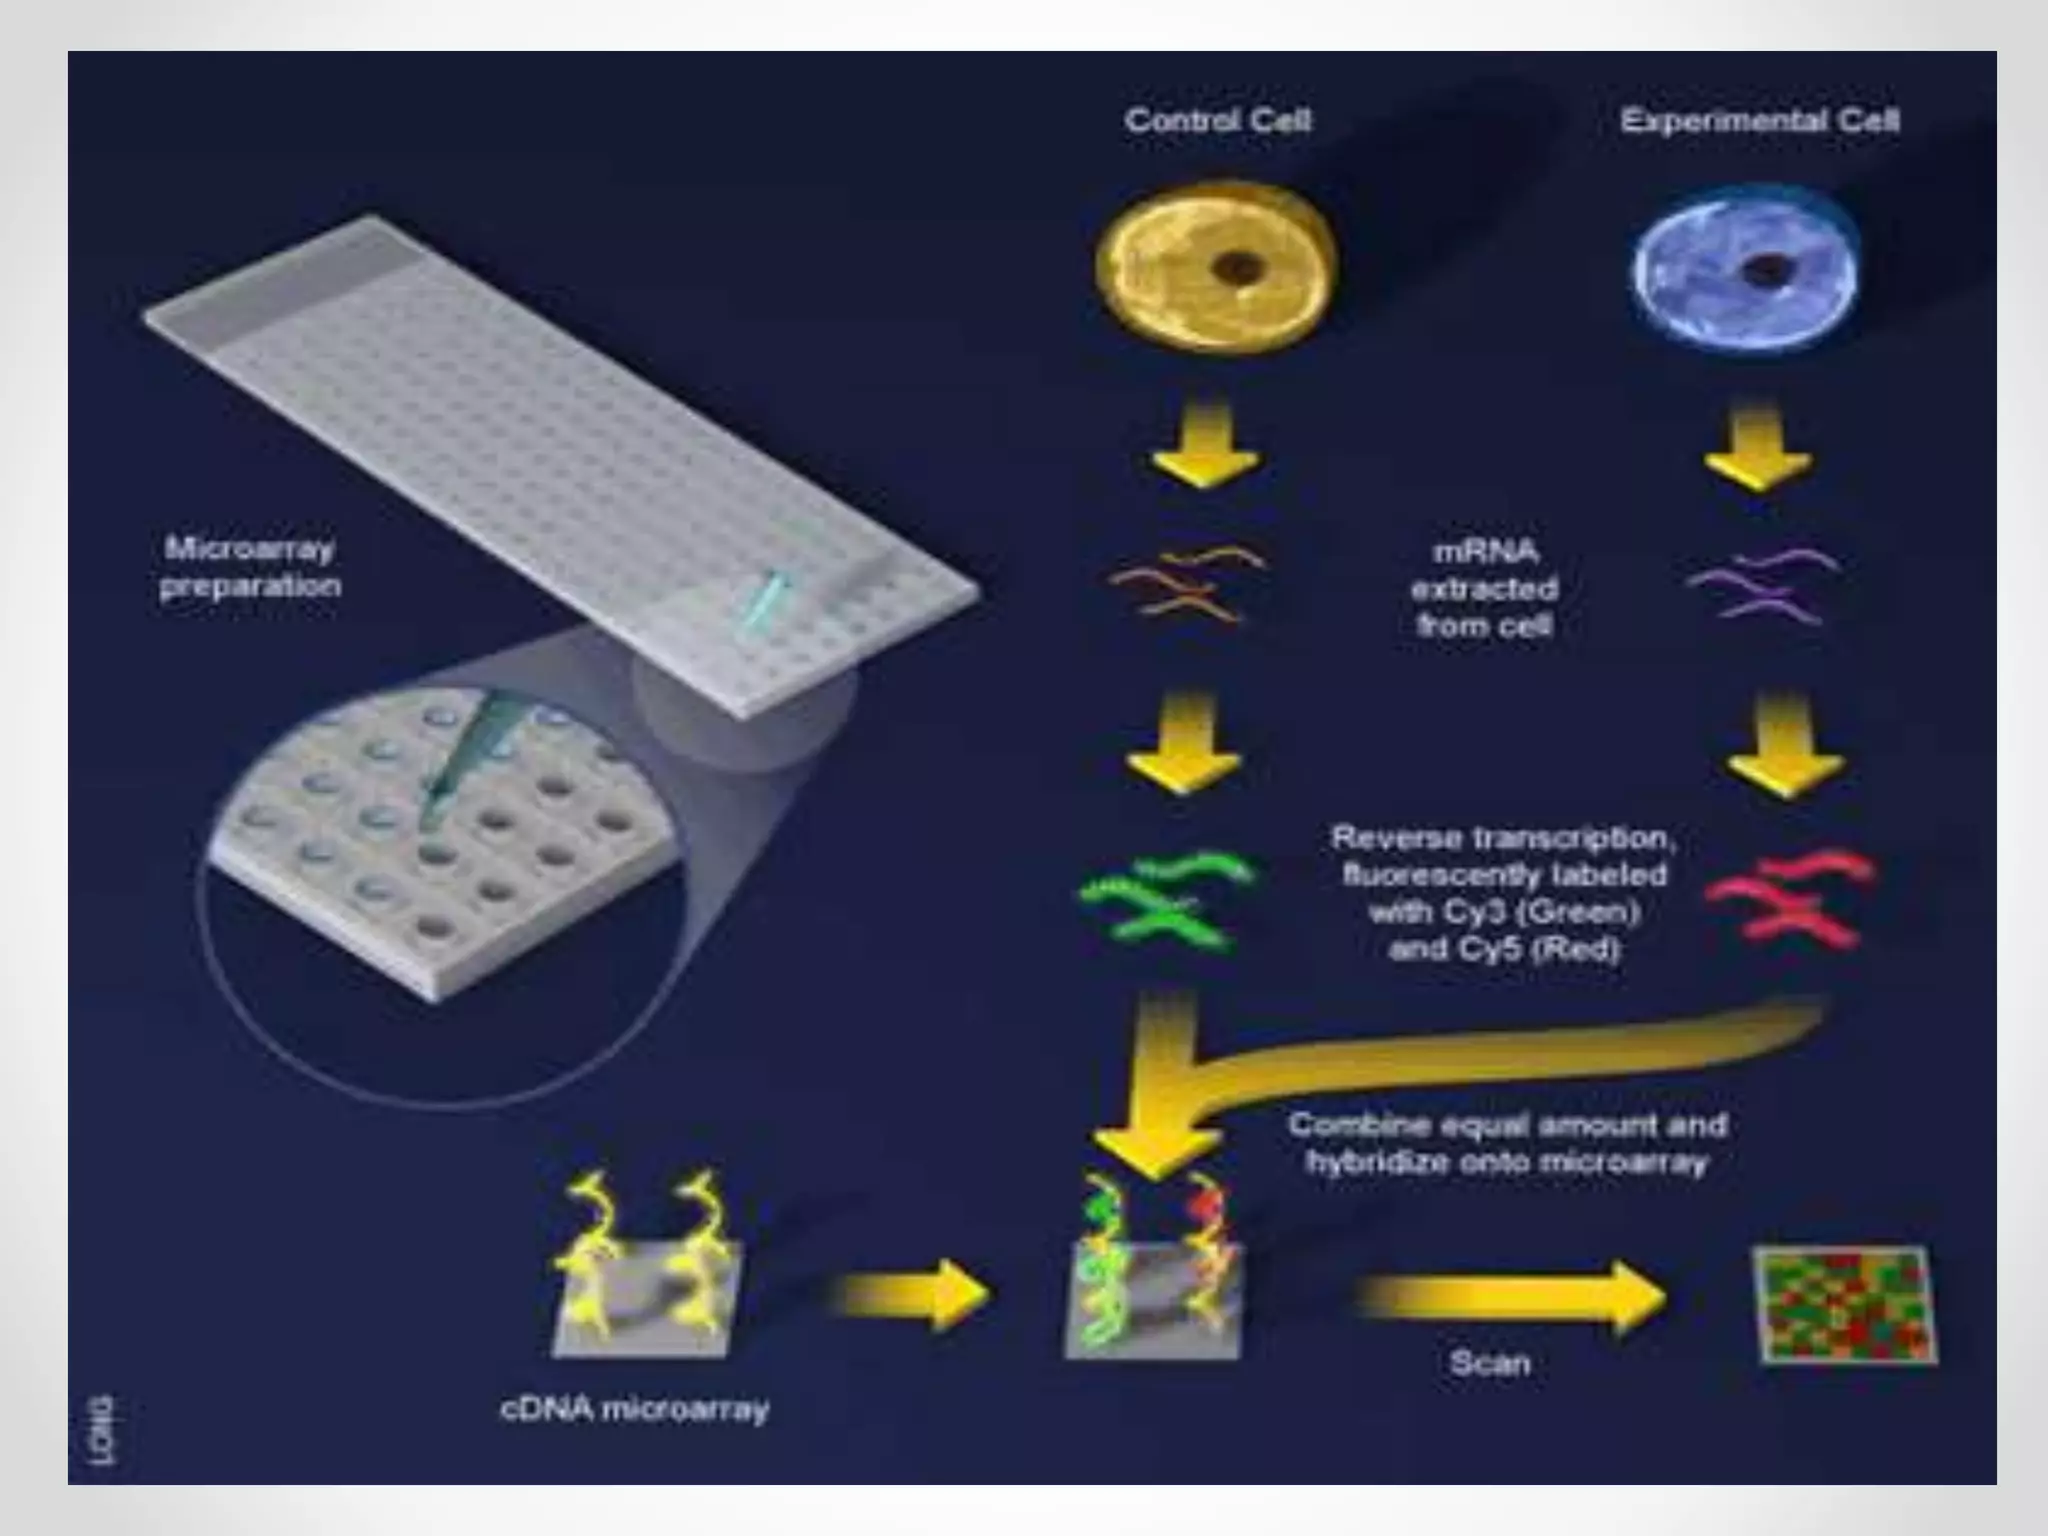
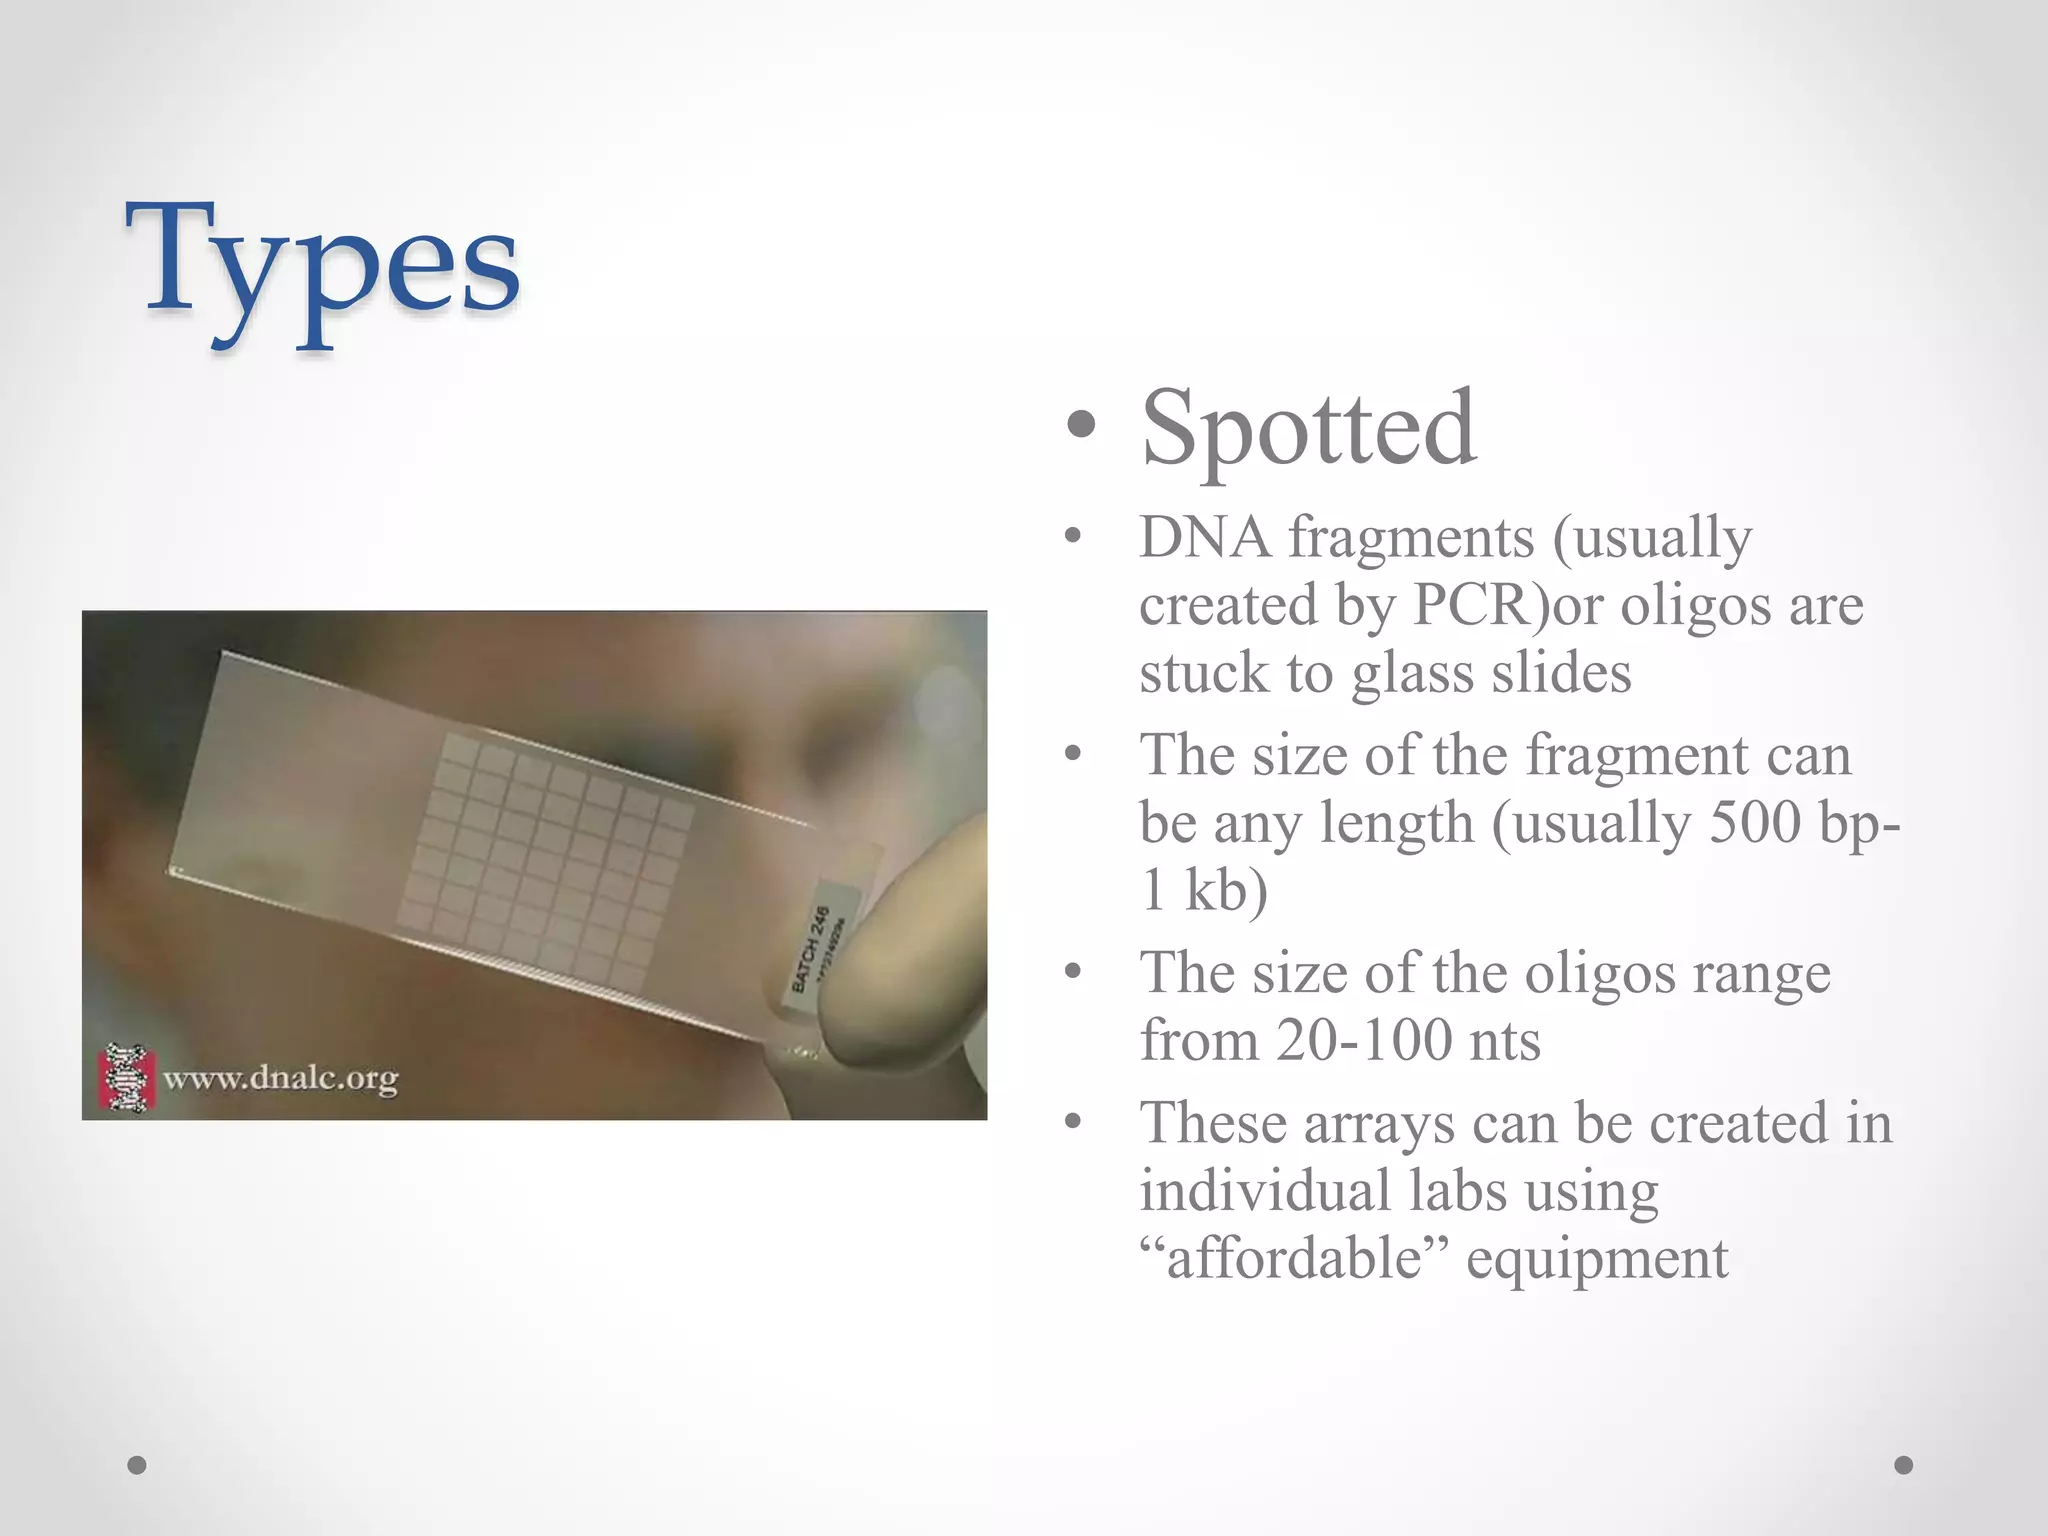
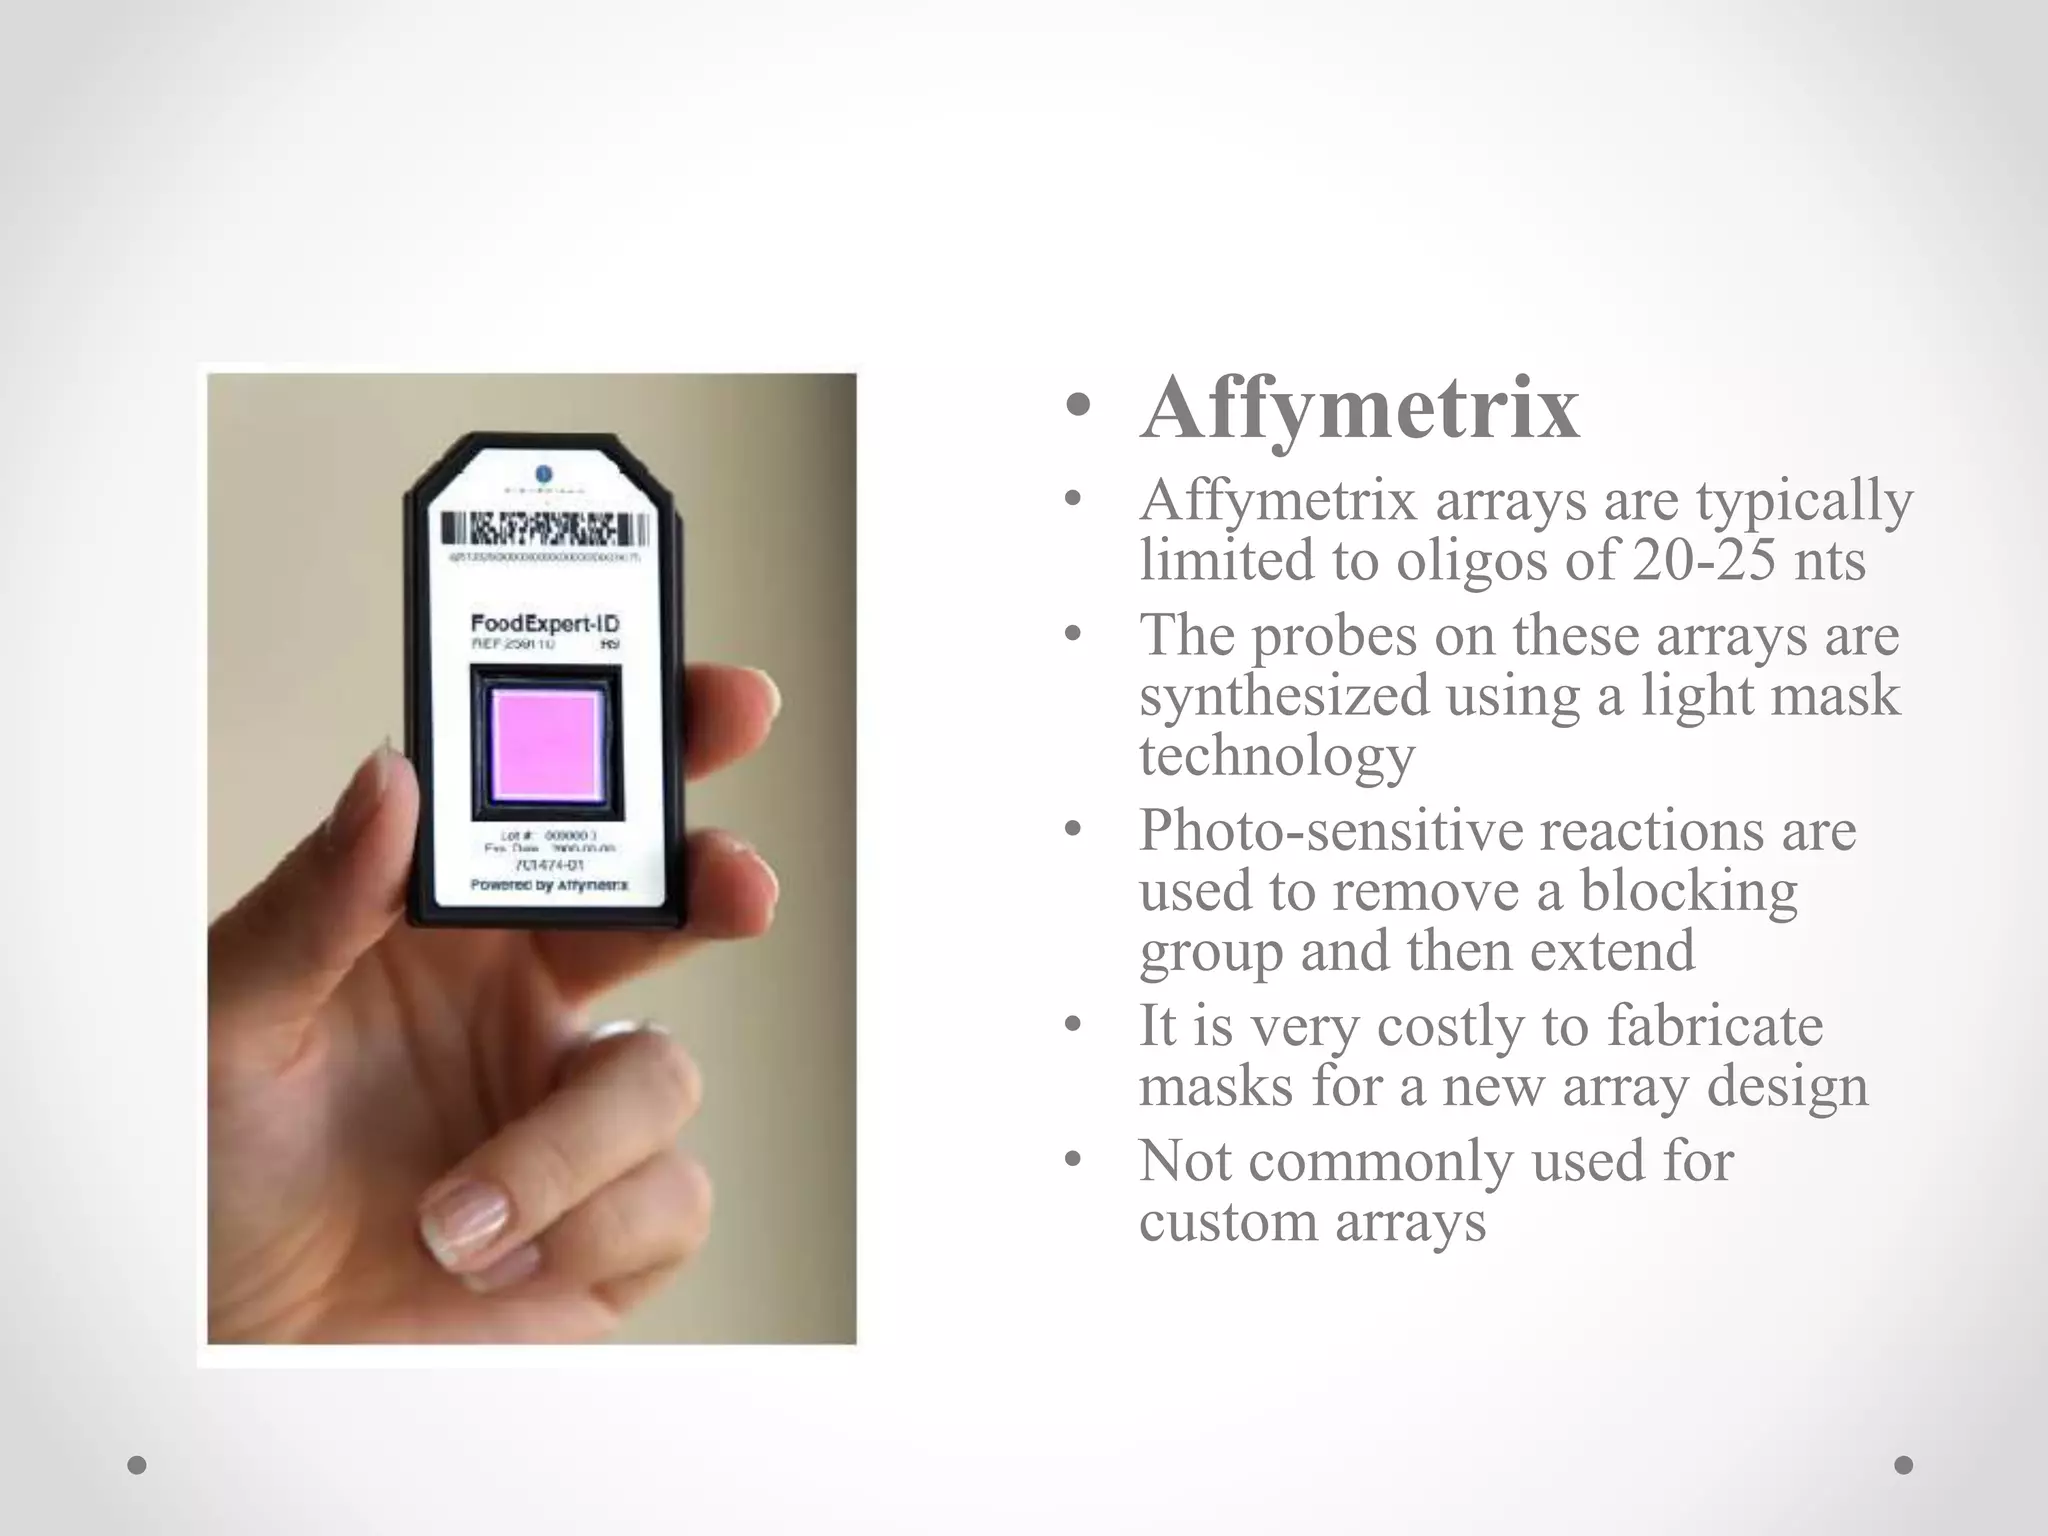
DNA
MICROARRAY
Neeraj Sharma
MSc Medical Microbiology
2nd year
What we will be discussing…
• What is DNA microarray?
• The purpose of using DNA microarray.
• Principle
• Steps to perform a microarray.
• Types
• Applications
Introduction
• DNA chip or a Biochip.
• Collection of microscopic
DNA spots attached to solid
surface.
• The probe sequences are
designed and placed on an
array in a regular pattern of
spots.
• The chip or slide is usually made
of glass or nylon and is
manufactured using technologies
developed for silicon computer
chips.
• Each microarray chip is arranged
as checkerboard of 105 or 106
spots or features, each spot
containing millions of copies of a
unique DNA probe (often 25 nt
long).
• Each spot contains pico moles of
(10-12 moles) of specific DNA
sequence known as probe.
Purposes.
• So why do we use DNA microarray?
o To measure changes in gene expression levels – two samples’ gene
expression can be compared from different samples, such as from cells
of different stages of mitosis.
o To observe genomic gains and losses. Microarray Comparative
Genomic Hybridization (CGH)
o To observe mutations in DNA.
Principle
• The core principle behind microarrays
is hybridization between two DNA
strands, the property of
complementary nucleic acid
sequences to specifically pair with
each other by forming hydrogen
bonds between
complementary nucleotide base pairs.
• A high number of complementary
base pairs in a nucleotide sequence
means tighter non-covalent bonding
between the two strands. After
washing off non-specific bonding
sequences, only strongly paired
strands will remain hybridized.
Steps
1) Collect Samples.
2) Isolate mRNA.
3) Create Labelled DNA.
4) Hybridization.
5) Microarray Scanner.
6) Analyze Data.
STEP 1: Collect Samples.
 This can be from a variety of organisms. We’ll use two
samples – cancerous human skin tissue & healthy human
skin tissue.
STEP 2: Isolate mRNA.
• Extract the RNA from the samples. Using either a column, or a solvent
such as phenol-chloroform.
• After isolating the RNA, we need to isolate the mRNA from the rRNA and
tRNA. mRNA has a poly-A tail, so we can use a column containing beads
with poly-T tails to bind the mRNA.
• Rinse with buffer to release the mRNA from the beads. The buffer disrupts
the pH, disrupting the hybrid bonds.
STEP 3: Create Labelled
DNA.
 Add a labelling mix to the RNA.
The labelling mix contains poly-T
(oligo dT) primers, reverse
transcriptase (to make cDNA),
and fluorescently dyed
nucleotides.
 We will add cyanine 3 (fluoresces
green) to the healthy cells and
cyanine 5 (fluoresces red) to the
cancerous cells.
 The primer and RT bind to the
mRNA first, then add the
fluorescently dyed nucleotides,
creating a complementary strand
of DNA
STEP 4: Hybridization.
• Apply the cDNA we have
just created to a microarray
plate.
• When comparing two
samples, apply both samples
to the same plate.
• The ssDNA will bind to the
cDNA already present on the
plate.
STEP 5: Microarray
Scanner.
 The scanner has a laser, a computer,
and a camera.
 The laser causes the hybrid bonds to
fluoresce.
 The camera records the images
produced when the laser scans the
plate.
 The computer allows us to immediately
view our results and it also stores our
data.
STEP 6: Analyze the Data.
 GREEN – the healthy sample hybridized more
than the diseased sample.
 RED – the diseased/cancerous sample
hybridized more than the non-diseased sample.
 YELLOW - both samples hybridized equally
to the target DNA.
 BLACK - areas where neither sample
hybridized to the target DNA.
 By comparing the differences in gene
expression between the two samples, we can
understand more about the genomics of a
disease.
Types
• Spotted
• DNA fragments (usually
created by PCR)or oligos are
stuck to glass slides
• The size of the fragment can
be any length (usually 500 bp-
1 kb)
• The size of the oligos range
from 20-100 nts
• These arrays can be created in
individual labs using
“affordable” equipment
• Affymetrix
• Affymetrix arrays are typically
limited to oligos of 20-25 nts
• The probes on these arrays are
synthesized using a light mask
technology
• Photo-sensitive reactions are
used to remove a blocking
group and then extend
• It is very costly to fabricate
masks for a new array design
• Not commonly used for
custom arrays
Applications
• Medical field : - Cause of disease
Disease identification
Disease treatment
• Agriculture
• Forensic
• Toxicology
• Detect the presence or absence of specific genes.
• Compare genes from two different sources.
• They can see how the external genes are affecting the external
stimuli.
Printing of the probes in microarray.
Thank You

DNA Microarray introdution and application

  • 1.
  • 2.
    What we willbe discussing… • What is DNA microarray? • The purpose of using DNA microarray. • Principle • Steps to perform a microarray. • Types • Applications
  • 3.
    Introduction • DNA chipor a Biochip. • Collection of microscopic DNA spots attached to solid surface. • The probe sequences are designed and placed on an array in a regular pattern of spots.
  • 4.
    • The chipor slide is usually made of glass or nylon and is manufactured using technologies developed for silicon computer chips. • Each microarray chip is arranged as checkerboard of 105 or 106 spots or features, each spot containing millions of copies of a unique DNA probe (often 25 nt long). • Each spot contains pico moles of (10-12 moles) of specific DNA sequence known as probe.
  • 5.
    Purposes. • So whydo we use DNA microarray? o To measure changes in gene expression levels – two samples’ gene expression can be compared from different samples, such as from cells of different stages of mitosis. o To observe genomic gains and losses. Microarray Comparative Genomic Hybridization (CGH) o To observe mutations in DNA.
  • 6.
    Principle • The coreprinciple behind microarrays is hybridization between two DNA strands, the property of complementary nucleic acid sequences to specifically pair with each other by forming hydrogen bonds between complementary nucleotide base pairs. • A high number of complementary base pairs in a nucleotide sequence means tighter non-covalent bonding between the two strands. After washing off non-specific bonding sequences, only strongly paired strands will remain hybridized.
  • 7.
    Steps 1) Collect Samples. 2)Isolate mRNA. 3) Create Labelled DNA. 4) Hybridization. 5) Microarray Scanner. 6) Analyze Data.
  • 8.
    STEP 1: CollectSamples.  This can be from a variety of organisms. We’ll use two samples – cancerous human skin tissue & healthy human skin tissue.
  • 9.
    STEP 2: IsolatemRNA. • Extract the RNA from the samples. Using either a column, or a solvent such as phenol-chloroform. • After isolating the RNA, we need to isolate the mRNA from the rRNA and tRNA. mRNA has a poly-A tail, so we can use a column containing beads with poly-T tails to bind the mRNA. • Rinse with buffer to release the mRNA from the beads. The buffer disrupts the pH, disrupting the hybrid bonds.
  • 10.
    STEP 3: CreateLabelled DNA.  Add a labelling mix to the RNA. The labelling mix contains poly-T (oligo dT) primers, reverse transcriptase (to make cDNA), and fluorescently dyed nucleotides.  We will add cyanine 3 (fluoresces green) to the healthy cells and cyanine 5 (fluoresces red) to the cancerous cells.  The primer and RT bind to the mRNA first, then add the fluorescently dyed nucleotides, creating a complementary strand of DNA
  • 11.
    STEP 4: Hybridization. •Apply the cDNA we have just created to a microarray plate. • When comparing two samples, apply both samples to the same plate. • The ssDNA will bind to the cDNA already present on the plate.
  • 12.
    STEP 5: Microarray Scanner. The scanner has a laser, a computer, and a camera.  The laser causes the hybrid bonds to fluoresce.  The camera records the images produced when the laser scans the plate.  The computer allows us to immediately view our results and it also stores our data.
  • 13.
    STEP 6: Analyzethe Data.  GREEN – the healthy sample hybridized more than the diseased sample.  RED – the diseased/cancerous sample hybridized more than the non-diseased sample.  YELLOW - both samples hybridized equally to the target DNA.  BLACK - areas where neither sample hybridized to the target DNA.  By comparing the differences in gene expression between the two samples, we can understand more about the genomics of a disease.
  • 15.
    Types • Spotted • DNAfragments (usually created by PCR)or oligos are stuck to glass slides • The size of the fragment can be any length (usually 500 bp- 1 kb) • The size of the oligos range from 20-100 nts • These arrays can be created in individual labs using “affordable” equipment
  • 16.
    • Affymetrix • Affymetrixarrays are typically limited to oligos of 20-25 nts • The probes on these arrays are synthesized using a light mask technology • Photo-sensitive reactions are used to remove a blocking group and then extend • It is very costly to fabricate masks for a new array design • Not commonly used for custom arrays
  • 17.
    Applications • Medical field: - Cause of disease Disease identification Disease treatment • Agriculture • Forensic • Toxicology
  • 18.
    • Detect thepresence or absence of specific genes. • Compare genes from two different sources. • They can see how the external genes are affecting the external stimuli.
  • 19.
    Printing of theprobes in microarray.
  • 20.