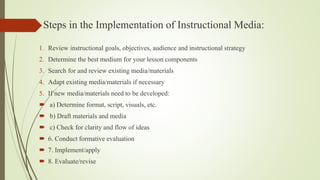
Program: B.Sc Nursing, Second Year
Communication Education And Technology
Unit No. 7 Educational Media
Topic- A V Aids
By-
Prof.Dr. Sudharani B Banappagoudar
Outline
• Introduction to A V Aids
• Meaning, definition ,concept,
• Purpose of A V Aids
• Need of A V Aids
• Drawbacks
• Classification of A V Aids.
• Objective
• Learning Outcomes
• Exercise
• References
Introduction
Audio Visual Aids are also called instructional material. Audio literally means “hearing” and
“visual” means that which is found by seeing. So all such aids, which endeavor to make the
knowledge clear to us through our sense are called “Audio Visual Aids” or Instructional
Material. All these learning material make the learning situations as real as possible and give us
firsthand knowledge through the organs of hearing and seeing. Therefore, any device which can
be used to make the learning experience more concrete and effective, more realistic and dynamic
can be considered audio visual material.
We learn through our sense organs. Senses are the ways of knowledge. All the sense organs help
us in understanding the environment. Most of the knowledge, which we acquire from the school,
comes through our ears and eyes.
Objectives
•Identify and describe the various A V aids.
•Application of AV aids in Teaching.
4
Introduction
 Audio Visual Aids, Audio visual materials, audio visual media, communication technology, educational or
instructional media and learning resources-all these terms, broadly speaking, mean the same thing.
 Earlier the term used was audio visual aid in education.
 With the advancement in the means of communication and technology, educators coined new terms
Meaning of A.V. Aids
 The sensory objects or images which initiate or stimulate and reinforce learning.
 • It helps the process of learning i.e., motivation, classification and stimulation.
 • It makes dynamic learning experience more concrete, realistic and clarity,
establish, co-relate and co-ordinate accurate concepts, interpretations and
appreciation enables him to make learning effective, interesting, inspirational,
meaningful and vivid.
Definitions
 1.“Audio visual aids are any device which can be used to make the teaching experience more
concrete, more realistic and more dynamic.” -Kinder S. James
 2.“Audio visual aids are those sensory objects or images which initiate or stimulate and reinforce
learning”. – Burton
 3.“Audio Visual aids are anything by means of which learning process may be encouraged or
carried on through the sense of hearing or sense of sight.” – Good’s dictionary of education
Concept of A.V. aids
 Audio visual aids are sensitive tools used in teaching and as avenues for learning. These are
planned educational materials that appeal to the senses of the people and quicken learning,
facilitates for clear understanding. A Chinese Proverb: “If I here, I forget; If I see, I remember;
If I do, I know” says the importance of perception in teaching, learning situation.
 Seeing – 87%
 Hearing – 07%
 Odor - 03%
 Touch - 02%
 Taste - 01%
 Audio visual aids enhance clarity in communication.
 Provides diversity in method.
 Increases the forcefulness of the subject being learned or taught.
 Serves in the instructional role in order to supplement and enrich the teacher’s own learning.
Purposes of A.V. aids:
 1.To provide a basis for more effective perceptual and conceptual learning.
 2.To initiate and sustain attention, concentration and personal involvement of the students
in learning
 3. To provide concreteness, realism and life likeness in the teaching- learning situation.
 4. To bring the remote events of either space or time into the classroom.
 5. To increase the meaningfulness of abstract concepts.
 6. To gain practical skill.
 7. To introduce opportunity for situational or field types of learning.
 8. Best Motivation
 9.Clear Images
 10.Vicarious Experience
 11.Varity of stimulation
Purposes of A.V. aids:
 12.Opportunites to handle and manipulate.
 13.Retention
 14.Capture attention.
 15.Meeting individual differences.
 16.Reinforcement
 17.Positive transfer of learning
Need/ Importance of A.V. aids
 Improve and make teaching effective.
 Enable the audience to look, listen and learn.
 Making learning interesting and profitable
 Quicken the phase of learning.
 Economies teacher’s effort.
 Foster/ develop the knowledge.
 Add variety and newness to the lesson. Provide vicarious experience.
 Overcome possible hurdles during the act of teaching.
 Bring expected behavioral changes among the learners.
 Stimulate curiosity.
 Provide concrete experience or direct contact with reality or serves as a source of
information and life likeness in the teaching- learning situation.
Need/ Importance of A.V. aids
 • The student acquires clear, accurate and vivid image during the process of learning.
 • Increase and sustain attention and concentration.
 • Make personal involvement of the student in active learning and meet individual needs of the
learners.
 • Increase the meaningfulness of abstract concepts by stimulating correct thinking.
 • It can serve as an open window through which the student can view the world and its phenomena by
bringing remote events into the classroom.
 • Provide an opportunity for situational type of learning, e.g. Field trips.
 • Provision of active participation of the student and vicarious experiences encourage healthy
interaction for the effective realization of teaching- learning objective. • Facilitate and advance the
process of applying what is learned to realistic performance and to the life situation.
 • They direct, dramatize the experience.
 • Add interest and vitality to any training situation.
 • Positive transfer of learning and training and positive environment for creative discipline.
Need/ Importance of A.V. aids
 Stimulate thinking and motivate action.
 Save time and energy.
 Change attitude or point of view of learners.
 Develop continuity of thought.
 Promotes scientific temper as students observe demonstrations and scientific phenomena.
 Visualize and make teaching more real; acts as an antidote to the disease of verbal instruction.
Drawbacks in using Audio Visual aids
1.These are not essential for all instructional programmes.
2. These are helpful in teaching, but they will not substitute teachers and books.
3. Possible risks of ‘Spectatorism’ instead of attitude of thoughtful enquiry.
4. It requires more time for planning and preparing.
5. Tempts the teachers to narrow down the subject.
6. Audio Visual aids are not ends, but means.
7. Some AV aids needs current power supply.
Problems in using Teaching Aids:
 1.Apathy of the teachers:
Teaching with words alone is very tedious, wasteful and ineffective.
2.Ineffectiveness of the aids:
Preparation, presentation, application and discussion are necessary whenever teacher is using
aids for teaching; but
a)Absence proper planning.
b)Lethargy of the teacher.
c)Without proper preparation.
d)Without correct presentation and appropriate application and discussion.
e)No proper follow up work, etc.
Classification of Audio Visual Aids:
 Instructional media encompasses all the material and physical means of an instructor might use to implement
instruction and facilitate student’s achievement of instructional objectives. The Audio Visual aids can be broadly
classified as two types, they are;
 Projected aids
 The materials coming under projected aids are;
 Films
 Filmstrips
 Opaque projector
 Overhead projector o Slides
 Non projected aids
 The non projected aids are of different types:
 Graphic aids
 Display aids
 3 Dimensional aids
 Audio aids
 Activity aids
Audio Visual Aids
Audio Aids Visual Aids Audio Visual Aids
•Radio
•Tape recorder
•Public address
system
•Telephone
Projected
Non
Projected
Projected
Non
Projected
•Chalk Board
•Bulletin Board
•Picture&
Photograph
•Flannel Graph
•,flash card,flip
chart
•Poster
•Map
•Specimen
•Model
•Diaroma
•Slides
•Flim strips
•Opaque
Projection
•Overhead
Projection
•Motion
Pictures
•Video
•Satellite TV
•Tele
conferencing
•Multimedia
•Computer
•Drama
•Puppet
show
•Folk
songs
•Talking
Dolls
Sources of Audio Visual aids:
Government
Educational institutions
Professional organization
Non-governmental organization
National and international voluntary organization
Commercial producers of educational material.
Characteristics of Good Audio Visual /Teaching aids:
 A good Audio visual aid should be:
1.adapted to the intellectual maturity of the pupils and to the nature and extent of their
previous experience.
2.meaningful and purposeful
3.improvised, i.e., locally available materials should be used in the preparation
4.accurate in every aspect
5.simple
6.cost effective as well as cheap
7.large enough to be properly seen by the whole students in the class
8.up to date
9.easily portable
10.motivate the learners.
Types Of AV aids:
Graphic Aids
1.Cartoons
2. Charts
3. Comics
4. Diagrams
5. Flash cards
6. Graphs
7. Maps
8.
Photographs
9. Pictures
10. Posters
Display aids:
Blackboards
Bulletin
Flannel boards
Magnetic
board
Ped board
3 Dimensional
aids:
1.Diagrams
2.Models
3) Objects
4) Puppets
5) Specimens
Audio aids:
Radio
Recordings
Television
Activity aids:
Computer
assisted
instruction
Demonstrations
Dramatics
Experimentatio
n Field trips
Programmed
instruction
Teaching
machines
Types of Instructional
Media: -Real objects and
models
-Printed text (books,
handouts, worksheets)
-Printed visuals (pictures,
photos, drawings, charts,
graphs)
-Display boards (chalk,
bulletin, multipurpose)
-Interactive whiteboards
-Overhead
transparencies
-Slides and
filmstrips
-Audio (tape,
disc, voice)
-Video and film
(tape, disc)
-Television (live)
-Computer
software, and
- The Web
Uses of Instructional media
 “A good aid is like a window, it should not call attention to itself, it just let in the light.”
Among the implicit goals that media can help achieve are the following:
 Attracting attention
 Developing interest
 Adjusting the learning climate
 Promoting acceptance (of an idea)
Principles in the use of Audio Visual aids:
I. Principle of selection
II. Principle of preparation
III. Principle of physical control
IV. Principle of proper presentation
V. Principle of Response
VI. Principle of Evaluation
Steps in the Implementation of Instructional Media:
1. Review instructional goals, objectives, audience and instructional strategy
2. Determine the best medium for your lesson components
3. Search for and review existing media/materials
4. Adapt existing media/materials if necessary
5. If new media/materials need to be developed:
 a) Determine format, script, visuals, etc.
 b) Draft materials and media
 c) Check for clarity and flow of ideas
 6. Conduct formative evaluation
 7. Implement/apply
 8. Evaluate/revise
Factors in Media Selection
 • Practicality: Is the intended media practical in that the media is available, cost efficient, time
efficient, and understood by the instructor?
 • Student Appropriateness: Is the intended media appropriate for the developmental and
experiential levels of the students?
 • Instructional Appropriateness: Is the intended media appropriate for the planned instructional
strategy? Will the media allow for the presentation of the proposed lesson in an efficient and
effective manner?
GRAPHS
 “ It deplete numerical or quantitative relationship or statistic data are presented in the
form of visual symbols. Exact specification depletes specially quantitative data for
analysis, comparison, and interruption.”
Types Of Graph
Line graph
Bar graph
Simple bar graph
Multiple graph
Component graph
Pie graph
Pictorial graph
LINE GRAPH
 LINE GRAPH:-line graphs are used when a considerable quantity of data is to be plotted or
when the data are continuous.
Bar Graph/Simple Graph/Multiple bar
graph
BAR GRAPH- a bar graph consist of bars arranged in horizontally or vertically form a
“zero”base.
Simple bar graph- may be vertically or horizontally arranged. Suitable scale must be
used to represent bar length
ii) Multiple bar graphs - two or more bars can be grouped together.
Component bar graph
 (iii) Component bar graph- the bar may be divided into two or more parts, each part
presenting a certain item and proportional to the magnitude of that particular item.
iv) Pie graph-the pie graph is usually ,drawn as circle ,the section of which are used to represent
component parts of whole.
Pictorial graph
 Pictorial graph - pictorial graph is an outstanding method of graphic representation.
GRAPHIC AIDS
“A cartoon is a metaptiosical presentation of reality. It means learning more
interesting and effective as it draw a strong appeal to the emotions. In short, a
cartoon is a figurative and suitable graphic aid.”
Itisthe metaphorical presentation of reality. Itmakes the learning more interesting and effective as it
createsastrongappealto emotions.Itusessymbolstoportrayanopinion,ascene,orasituation.
A cartoon isa humorous caricature which gives a subtle message. In a cartoon, the features of
objectsand peopleare exaggeratedalongwithgenerallyrecognizedsymbols.Inshort,acartoonisa
figurativeandsubtilegraphicaid.A cartoonhasan instantaneousvisualandaticklingmessage.
Cartoons:
GRAPHIC AIDS
Many times,Cartoons innewspapers can be sarcasticand ridiculing.The main sources ofcartoons are periodicals.
Newspaper carry cartoon which are either political or social in nature. Special periodicals and magazines carry
cartoonson science, management,economicsandeducation.
Ifa teacher isresourceful he/she can convert certainideasintocartoonswith littlepractice.Nevertheless, he can clipthe
cartoons fromtheperiodicalsandmountthemforclassroom.
Thecartoonmakesuseof
-Personalizedhumor
-Fantasy
-Incongruity
-Satire
-Exaggeration
CARTOONS
ADVANTAGES
A cartoon can be effectively used to initiativecartoon lesson.
A cartoon can be used to motivate students to starta discussion.
A cartoon can be used for making lesson livelyand interesting.
DISADVANTAGES
While using cartoons an instruction aids the lea dives thought to choose.
Cartoons difficulty as certain cartoons can be ensure the personal feeling of students.
Especially the one which are foisted and causative towards certain social groups.
GRAPHIC AIDS
 Advantages:
1)Cartooncanbeeffectivelyusedtoinitiatecertainlesson.
2)Usedtomotivatestudentstostartdiscussion
3)Canbeusedformakinglessonslivelyandinteresting.
 Precautions:
1) While using cartoons as instructional aides, the teacher ought to choose them judiciously and
discriminatelyastheycan injurepersonalfeelingsorsocialgroup.
Graphs Advantages & Disadvantages
 ADVANTAGES
Helps to show numerical statistics.
Helps in explaining, comparison among two.
 DISADVANTAGES
Only some statistical data can be debuted.
Lesson is not effectively grasped by students.
Any simple mistake will change the whole statistics.
CHARTS
CHARTS:
DEFINITION: It defined as combination of graphic and pictorial material designed
for the orderly and logical visualizing of relationships between key facts and ideas.
Chartisthegraphicteachingmaterialincludingdiagrams,posters,maps,andgraphicswhichpresentsa
clearvisual summery.
“Charts are the graphic teaching material defined as illustrative usual media for
defecting a logical relationship between ideas and supporting facts, according kinds
charts are the graphic aids depicting information in the form of tables, pictures,
graphics and diagram.”
Purposes of Charts:
• Showingrelationshipsbymeansof factsand
figures.
• For presenting the materialsymbolically
• Toshowcontinuityinprocess
• Forpresenting abstract ideas invisualform
• For showingdevelopmentof structure
• Forcreating problemsandstimulating thinking
• To show continuity in process
• For showing development of structure
It is used to motivate the students.
It serves as an illustrative visual media.
It depicts logical relationship in between man idea and
supporting facts.
It is useful in teaching situations where breakdown of
facts or a statement is to be listed.
It is useful in showing points of comparison
distinctions and contrast between two or more things.
It is useful in learning situation of
depicting organizational and
hierarchical structures.
It is used for presenting abstract ideas in visual forms.
Charts
 PREPARATION OF CHARTS:
 Materials required:
 Prepare charts are sheets of thick white or light coloured paper.
 Fibre tipped round point and Chisel – Point colour Markers.
 Drawing aids
 Adhesives
 Before making a chart:
 One should plan the content in terms of the objectives and decide the layout.
 The layout should be „balanced‟ and should use the space effectively.
Charts
1. Principles:
 The size of the chart, the size of the letters and the contrast of the display materials should
be such that it is readable by the farthest viewer.
 Standard chart paper in sizes 90x60cm and 70x55cm is suitable for most purposes.
 The size of letters for the Captions, labels and keywords written on a chart should be
between 2 and 3mm.
 The thickness of the lines should be between 2 and 3mm.
 Light colored chart paper should be used eg. Yellow, light green and white are better suited
for dark colored pens. Eg. black, blue, red and orange.
 Simple hand-drawn charts with non- decorative lettering are more effective than elaborately
drawn.
 One chart should convey just one idea or one principle.
 Charts crowded with information are less effective.
 PRESERVATION OF CHARTS:
 Cover the charts with brown paper or old newspaper.
TYPESOFCHARTS
• TreeChart
• StreamChart
• Table
• FlowChart
• Narrative chart
• Tabulation chart
• Chain chart
• Bar chart
• Pie chart
• Evolution chart
• Pull chart
• Line chart
A chart made in the form of several branches from the trunk of a tree such that the trunk
represents various development relationship or supports of the main idea.
A chartmade informofbranchesfromthetrunkofatreesuchthatrepresentsthemainideawhilethe
branchesrepresentsvariousdevelopment,relationshipofsubpartsofthemainideas.E.g.:familytree
Tree Chart
Stream chart
StreamChart:
Itisa graphic aid showing the main thought, idea,concept inthe form of a main riverand itsub parts in the form of
tributariescomingoutofit.E.g.freehanddrawing
A stream chart is the graphic aid showing the main thought idea, concept in the form of a main river.
TableChart:
Table charts are very valuable aid in the teaching situation where breakdown of a factor a statement
contrast between 2 or more things.
Table chartsarevery valuable aidinteaching situationtoshow comparison, distinctionsand constant between
two or more things. Itssize is50x75 cm or <. Itshould caption in bold letters,with different features in different colors. E.g.
numericaldata,descriptiveobservations.
Table chart
Flow Charts: A flow chart is the graphic aids of a system requiring presentation in the form of
connected lower diversion of the system in boxes and lines to show their relative positions in
the system the flow chart must show where the division actually stands in a given
system
Itisa graphic aidofsystem requiringpresentationintheform ofconnected lower divisionsofthe
systemin boxesand linetoshow theirrelativepositionswithrespecttothehigherpositioninthesystem.E.g.
organizationalchart.
Flow charts
GENEALOGY CHART
 GENEALOGY CHART- this is used to represent the growth and development of an empire,
dynasty and historical facts of this nature
Time Chart
 TIME CHART- this provides a chronological framework within which events and development s
may be recorded.
HOW TO USE THE CHARTS EFFECTIVELY
 Students should be involved in the preparation of charts.
 Charts should be so large that every detail depicted should be visible to every pupil in
the class wherever be is sitting.
 Teacher should make sure that there is provision for hanging the chart at a vantage
point.
 A chart should give neat appearance.
 A teacher should have pointer to point out specific factors in the chart
 Straight pins, stables, preboard clips, paper clips may all be used.
 Charts should be carefully stored and preserved for use in future.
Advantages/Disadvantages
ADVANTAGES-
Charts are an effective tool for learning.
They arouse interest in the student.
They are prepared in a very low cost.
They are portable and available for use and reuse.
They are easily prepared and maintained.
They are used to explain , clarify and simplify the complicated subject matter.
They attract attention and reduce the amount of verbal explanation
DISADVANTAGES OF CHART-
Charts cannot be used for a large group.
They cannot be used for illiterate audience.
Comics
A comicstripisthegraphicdepictioninaseriesofpicturesorsketchesofsomecharactersandeventsfull of
actions.Alargenumberofcomicstripsdepictinglongcontinuousepisodesarepublishedinbookforms.
ARGUMENTS INFAVOUR:
Manyeducatorssupporttheuseofcomicstripforclassroominstruction,becausetheybelieve:
1.Comicstripsfiretheimaginationofthechildren.
2.Comicstripbooststhecourageofchildrenandbuildsupthespiritofadventure.
3.Comicstripsmakecommunicationdetailedandvivid.
4.Comicstripstimulatesrealityandthusinvolvement.
ARGUMENTSAGAINST
Manyeducatorsdecrytheuseofcomicstripforclassroominstruction,becausetheybelieve:
1.Comic strip misguides the children by depicting characters with supernatural powers divorced
fromahardrealityof life.
2.Comicstripshamperthedevelopmentoflanguageinchildren.
3.Classicsbroughtoutintheformofcomicsdevelopthetendencyinchildrentoignoreorbypassthe
originalwork.
4.Comicssoonbecomeobsessionwithyoungchildrenandtheytendtoavoidseriousstudy.
Advantages & Disadvantages
Comics
 Precaution:
1.Therefore the tender must use with discrimination and only those related to biographies, social events
scientific interventionsandhistoricaleventsshouldbeusedselectivelyforclassroominstructions.
 “ Diagram is the simplified drawing of an object product appliance or process to explore finer points of
the same. Adiagram is made to show relations with the help of lines and symbols without the pictorial
element.”
 Itisasimplifieddrawingdesignedtoshowinterrelationprimarilybymeansoflinesandsymbols,e.g.stick figures,geometry
drawings,facialexpressions.Drawingscanbedonebyhandtoconveyavarietyofideas,conceptsand situations.Itcanbebetter
usedforsummeryandreview.
Diagrams
STANDARDOFAGOOD DIAGRAM:
1.Technicallycorrect.
2.Neatlydrawninproperproportion.
3.Welllabeledandexplained.
4.Itcanbemovedandseenfromallangles.
Maps
MAPS: A map is a graphic aid presentation the proportionately as a diagram the surface of the
earth, world or part. A map is an accurate representation of plain surface in the form of a diagrams,
drawn to a scale , the details of boundaries of continent , countries etc.
Graphic representation of the earth’ssurface or portions of itare termed as maps. These are flat
representationsofearth’ssurface,whichconveytheinformationbymeans oflines,symbols,words and colors.
IDENTIFICATIONOFVARIOUSASPECTSOFMAPS:
• Understandingandinterpretingthekeyofindex,tints,shadowsandsymbols.
• Thetopeverymapisnotnorth,butthedirectionofnorthernpoleisnorth.
MAPS
TYPESOFMAPS:
Reliefmaps:
A raised-relief map or terrain model is a three-dimensional representation, usually of terrain. When
representingterrain,theelevationdimensionisusuallyexaggeratedby afactorbetween fiveand ten;thisfacilitatesthe visual
recognitionofterrainfeatures.
-these maps show the actual elevation and depression in a place, area, region, country, etc.
MAPS
 POLITICALMAPS- PHYSICAL MAPS
MAPS
Historicalmaps:
Historicalmaps arethosewhich represents graphically a succession of events, states, or an act
Distributionmaps:
Adistributionmapisamapthatusescolorstoshowinformationsuchapopulationorhousing
Geographicalmaps:
Ageographicalmapisthemapwhichshowsgeographicallandmarks.
Physical Map
MAPS
ROAD MAPS POPULATION MAPS
MAPS
 WHEATHER MAPS RAILWAY MAPS
MAPS
 AIR MAPS
Flash Cards
“Flash cards are small cards of generally 25 - 30 cm in size which are shown for a few members
before the class to send across a message or impact an idea .The idea on the flash card should be
brief.”
A flashcard orflash card isasetofcardsbearinginformation,aswords ornumbers, on either
orboth sides,used inclassroomdrillsorinprivatestudy.One writesaquestionon acardand an answer overleaf.
Flashcards can bear vocabulary, historicaldates,formulas or any subjectmatter thatcan be learned viaa question
andanswerformat.Flashcardsare widelyusedasalearningdrilltoaidmemorizationbywayofspacedrepetition.
Illustrationmadeonheavypaperthatisusuallysmallerthan21cmx27cm.theillustrationsarenotbound,butarearranged
insequence.
FLASH CARDS
 FLASH CARDS: Flash cards are small cards of generally 25×30 cm in size which are shown
for a few moments before the class to send across a message or impart an idea.
 Flash cards would be used along with the other graphic aids to make the lesson effective.
 PREPARATION OF FLASHCARDS:
 Cut a chart paper and cut it into four equal parts to get the flash cards.
 Write the content on it either in the free hand or using lettering stencils and sketch pen.
 Also the height of writing on the flash card is to be large enough so that the whole class can
see the flash card properly.
 It is advisable to make a rough card on an ordinary paper first and then transfer it on the
chart paper or cardboard flash cards.
Flash Cards
 STRUCTURE:
 They consist of a series of cards approximately 10x12 inches each with an illustration pertaining to a
story or talk to be given. The message on the cards must be brief and to the point. The flash cards and
the pictures there in should be large enough for a group to 30 to 50. Use colour to make it attractive.
The number of cards should be 10 to 12 in a set.
 USING THE FLASH CARDS:
 Give brief introduction about the lesson to the students. Give instructions to the students about
their actions while you flash the cards. Flash the card in front of the class by holding it high with
both your hands so that all the students can see it. Add more information to the students responses
Flash Cards
AudienceSize:
• 5to15people.Becausetheillustrationsaresmall,nomorethan15peopleshouldbeintheaudience.
Advantages:
Inexpensive,canbehome made fromlocalmaterials.Goodway topresenta“changing”messageinareaswhere
peoplegather.
The flash cards can be used to introduce and present the topics.
Flash cards can be used to review the topic.
Flash cards can be used to develop the cognitive abilities of recognition and recall of students.
Flash Cards
 Disadvantages:
 Ifout ofdoors, weather damage can occur. Constant supply ofgood educational material toput on the
boardisneeded.
FLASH CARDS
 PRINCIPLE-
 For effective use , the group size can range from 5-15.
 The message should be in brief.
 A brief introduction should begiven.
 The number of cards should not benormally more than 15-20.
POINTSTOBEREMEMBERED FORTHETEACHER:
• Thesetofcardscanbepreparedonasingletopic,putinasequentialmanner,beforestartingtheexplanation.
• Thestoryoneachcardmustbefamiliar,insimplewordsandlocalterminology.
• Holdthecardsatthechestlevelwherepeoplecanseeclearly,holditagainstbodyandnotinair,facedifferentparts ofthe
grouptoshowthecardstoall.
• Glancedownatcards,asyouarereadytoexplainandmakesuretogivencorrectinformation.
• Usepointer.Donotcoverthematterwithhands.Beenthusiasticandenjoyexplaining.
• Importantpointshouldbewrittenbackside.
Flash Cards
 ADVANTAGES
Flash cards can be used to introduce and present topics.
Flash cards can be use to apply information already gained by student to new situations.
Flash cards can be use to review the topic.
Used for small groups not over 30 people.
10-12 cards for one talk can be used.
It can be used either individuality or in combination with other charts.
Prepare a picture for each idea, which will give visual impact to the idea.
 MEANING OF FLIP CHART: Individual charts are fixed to some support and as the lesson
progresses. Illustrationmadeonpaperthatisusuallylargerthan21cm*27cm;boundedtogetherwithringsorstring.
Theyflipoverinsequence.
Flip Charts
AudienceSize:15to30people.Itdependsonthesizeoftheflipcharttoo.
Flip Chart
 PREPARATION OF FLIPCHART:
 Write an interesting story or description about the topic which includes all the points
that need to be told.
 Decide which is to be drawing, pictures, illustrations would be appropriate.
 Test the materials before preparing the actual flip chart.
 Cut heavy paper or pieces of cardboard to the desired size for the
 Glue the illustrations on one side of a card, the talking points on the other.
 Number of sheets can range from 8 to 12.
 Drill 2 holes at the top of the plywood board (40x50cms) approximately 13cm from
each end. Drill two matching holders in the wooden strip.
 Place the wooden strip over the sheets and insert the bolts throughout the holes in the
strip as indicated in the margin. Secure firmly with wing nuts.
 Make sure while presentation flip chart to be straight and pictures are not covered by
fingers, scale to be use for explanation
Flip Chart
 Preparation:
 Thefirstcardofbunchshouldbegivingbriefintroductionofthetopic.
 8 to12cardscanbeusedinbunch.
 Eachcardshouldshowapictureillustrationinfrontside,conveyingoneideaatatime.
 Thebriefdescriptionorexplanationofcardnumber 2shouldbewrittenatthebacksideofcardone,which
canbe seenbytheteacherifsheforgets.
 Thepictureusedshouldbeadoptedtolocalconditionandshouldbecolorful.
 Leaveenoughborderssothatitdoesn’tcoverthematterwiththehandwhileholding.
 Usepointerwhileexplainingdetailsofpictureoncard.
Flip Chart
Advantages:
• Inexpensive,canbehome made,andcanbeeasilytransported.Good way togiveinformationinsequence;
because theyarebound,illustrationstayinsequence.
Disadvantage:
• Deterioratewithconstantuse.Someartisticabilityrequiredifmakinghomemadeflipcharts.
POSTERS
 “It is good substitutive for first experience it varies from a simple printed card to a
complicated and artistic design, It should be always a part of Campaign, it wills severe
first to inspire the people and lastly it will serve as a remainder to the group”. A message
onalargesheetofpaper,withanillustrationandasimplewrittenmessageonit.Standardsizeis20”*30”.
 AudienceSize:Nolimit,becauseitisnotnecessaryforeveryonetolookattheposteratthesametime.
ADVANTAGES
Tomake an instant appeal
Toconvey single idea or few ideas.
Tobe Comprehensive at a distance and sufficiently clear.
Suitable for education presenting scientific facts, showing
safety measures or many other facets relating to health.
POSTERS
 POSTERS:
 Posters are simple graphic visual aid which conveys single idea or single subject.
 PRINCIPLES OF POSTER MAKING:
1. Brevity: A poster must be brief, so that it can be read in the shortest time possible not more
than five words is best. The message should be clear.
2. Simplicity: Too many words should not be used on a paper.
 3. Idea:
 A poster must tell its story, at a glance. Hence illustrations and captions should be large
enough.
 4. Layout:
 The poster must be organized properly to convey the idea, Bold simple styled letters will be
easy to read expressive letters also can be used to attract attention and to convey the idea.
 5. Colour:
 Colours when used properly make the poster more attractive. Black or Yellow is recognized
to be the most striking combination.
POSTER
 6. Lettering:
 Letters should be legible and of appropriate size.
 7. Poster size:
 This usually confirm to the paper sizes available such as 10”x15”, 15”x20”, 20”x30” etc. these can be used
horizontally or Vertically
 MATERIALS USED FOR MAKING POSTER:
 Poster papers Stencil pencil brush erasers scale composs picture colours glue
 STEPS IN MAKING POSTER: Selected the topic Select the message Organizing the message conveying a
single idea with minimum words. Prepare a caption. Position the message and caption Tryout different
layouts and colour schemes. Pretest the paper before use.

POSTER
 RULES TO USE POSTER:
It should be planned for the specific people.
It should stop the people and make them to look.
Use pleasing colours.
Must be timely It should be placed where people pass or gather together.
Pictures
 Pictures are the most commonly available graphic aids, pictures includes photographs paintings,
illustration clipped from periodical (magazines, newspaper, newsletter , publicity material and calendar).
It provides an environment of reality from learner‟s point of view which is the main criterion
in the selection of pictures.
It should be relevant to the topic and it should be coloured, accurate and suitable size
watched by all students easily.
Too many pictures should not be displayed in one lesson.
After showing the pictures it should be removed from the view of the students
Pictures
Effectiveuseofpictures:
▪ Thepicturecanbeflashedinfrontoftheclass& relatedquestionedaskedtoinitiatethesections.
▪ A seriesofpicturesrelatedtothelessoncanbedisplayedintheclassroomtoarousethecuriosityand interestbefore
the lessonbegins.
▪ Thepictureshouldbelargeenoughforthewholeclasstoseeitproperly.
▪ Thepicturemusthavecleardetailsforarrestingattentionandinterest.
▪ Thepicturesshouldberelatedtolessonandmeaningfultostudents.
▪ Thepictureshouldbeauthenticandidentifiable.
▪ Thepictureshouldbeabletobuildupproperlearningenvironment.
▪ Thepicturemustleadtheclasstosomepurposefulactivity.
Display board
 Chalk Board-
 It is the most commonly used av aid. It is also known as black board. It gives motivation and
gives instruction concrete and understandable.
“A Chalk board are black is a slightly abrasive writing surface made of wood ply. Hard board
cement, ground glass, ablauts state plaster etc. white chalk slakes is generally used finger writing on
the blacks’ board. Or chalk board at times clouds chalks are used for letters illustrations while using
the Claus chalk. Should kept in mind that coleus must have on aesthetic appeal.”
 TYPES OF CHALK BOARD:
 Fixed
 Portable
BLACKBOARD
 CHARACTERISTICS OF BLACKBOARD:
 Size- 5m-6m
 Surface- rough
 Dull- to eliminate glare
 The writing should be easily eliminated with duster
 The chalkboard should be mounted on an appropriate height within the reach of teacher and
visibility of students
Don’t write everything on chalkboard.
The „STANCE‟ it has been observed that most convenient place to stand is towards the (L)
side of the chalkboard, as this allows you to turn from the chalkboard to the class.
Take half stick of chalk and hold the chalk between the thumb and forefinger.
Write in sequence as head line and
There should be equal gap in between the words. Size of each letter should be equal and
broad.
Gaps between each word should be uniform.
The margin space for the top and bottom of the board should be equal.
Use more pressure for strong line
Try to keep 2/3rd part of the board when drawing.
SKILLS INVOLVED IN EFFECTIVEUSE OF CHALK BOARD:
 Never use fingers in place of duster.
 Use duster from top to bottom and again from top to bottom by lifting rather by rubbing to avoid dust allergy.
 Write in straight rows starting at the top corner.
 Avoid abbreviation
 Plan ahead what you will write on the chalkboard.
 Front row of the students to be at least 8 feet away from it.
 Chalk board that the service is made at least yearly.
 Boards should be cleaned after each class
 Do not talk as you write
 Face the group after writing and continue the discussion.
 Extreme lower corners should not be used.
 Use colored chalks
 Do not stand in front of the board, stand at one side.
PURPOSE OF CHALKBOARD
Toillustrate an ideas by diagrams and scatches, drawing.
Togive examination and test.
As a substitute for still projection,picture.
To illustrate from of charting and to provide opportunity for
nursing students to practice teaching.
ADVANTAGES
It is a convenient usual and for group teaching.
It is economical teaching aid as it can be use over and again.
The chalk board can work as an available supplementary teaching aid.
The chalk board cans wok as a good visual aid for detail and revision.
The chalkboard can be used for drawing enlarge illustration form the textbook.
The chalkboard can be easily used for giving lesson notesto students.
It captures attention
It can be used for drill and revision
Limitations of Chalkboard
It makes student heavily dependent on the teacher.
It makes the lesson teacher paced.
It does not care for the individual.
It makes the lesson a dull routine.
It makes chalk powder to spread and inhaled by the teacher and student.
 It does not care for the individual needs of the students
 Constant use of black board makes it smooth and glare.
Bulletin board
It will be used for both informational and education purposes
It is a board on a wall in which notices can be fixed.
PRINCIPLES FOR EFFECTIVE USE:
Location: information material and notices should be kept separate from those of current events for an
under study.
Placement: near educational administrators office, near library, each classroom, clinical conference room
in wards, in hostel.
Visuability: adequate light natural or electric filled and fixed within the eye level.
Organization: organize around a central theme of content, material should be dated to ensure that it
doesn‟t stay on the board too long.
PRINCIPLES FOR EFFECTIVE USE:
 Appearance: should appear neat, in order and attractive. Arrange mounted materials in S,
Z, or V direction and follow the sequence.
 Board if left blank for a day will create inquisetiveness (eager to know) and will
 Contribution should be well labeled.
 Students should be encouraged by the faculty member to participate in notice board
committee.
 One person should be appointed for editing the board.
 Everyone should be made responsible for its maintenance and helping upto date
information.
TYPES
Flannel Board.
Magnetic Board.
Fixed Type.
Movable Type.
Folded Type.
<SELO: 1,4,9,13> <Reference No.: R1,R3>
PURPOSE OF BULLETIN BOARD
Attract the attention of the students.
Effective communication of then intended message.
Promote the creativity of the student and the teacher.
Use an effective educational media .
Can be used for larger audience.
ADVANTAGES OF BULLETIN BOARD-
Bulletin board works as a good supplementation to normal classroom
teaching.
Bulletin boards arouse students interest inspecific subjects.
Bulletin board displays can be effectively used as follow-up of chalkboard work.
Bulletin board add color and liveliness to the classroom as they have decorative value
along with the educational value.
Bulletin board display can be used to introduced a topic as well as to review it.
DISADVANTAGES-
Bulletin boards cannot be used for all inclusive teaching.
It has to be used only as a supplementary aid.
At times the collection of relevant material for certain specific topics may be
difficult.
Arranging the display material is the challenging task for the teacher, as it requires
artistic and creative potentialities.
If not used properly, may fail in its purpose to convey the central theme.
Flannel Board
 A flannel board is display board made of wood, cardboard or straw-board covered with
colored flannel or woolen cloth. Display material like the cut –outs ,pictures, drawing
and light objects backed with rough surface like sand paper strips, flannel strips etc.
Flannel board is the board where we place the prepared items and
remove them when needed.
Pupils may be often asked to fix these to arouse their creative
interest.
FLANNEL BOARD-
PRINCIPLES OF FLANNELGRAPH:
One piece of rough textured cloth will adhere or stick to another.
The backing material may be wall board, massonite, plywood, softwood, heavy cardboard etc.
Rough textured materials that may be used include cotton, flannel, khadhi.
Any colour of flannel may be used, but slightly dark green or blue seems better than others.
ARTICLES REQUIRED:
Wooden or plywood board
Khaddar cloth or velvette cloth
Flannel pictures
Gum
STEPS OF PREPARATION OF FLANNEL BOARD
 To prepare the flannel graph take a frame, with a firm surface made of any board like
plywood, fiber board, massonite etc. of 30”x40” or any size.
 Tightly stretch a dark coloured background flannel or cloth and fasten securely to the board
with drawing pins. Now the flannel board is ready for use.
 Apply a flannel graph on the board with a slight downward movement with firm pressure to
avoid the material sliding off the surface.
 Stick the flannel in an organized manner and number it properly.
ADVANTAGES OF FLANNEL BOARD-
Flannel board are inexpensive, easily made from local material.
They are flexible, dynamic, portable, convenient and reusable.
Easily maintained and transported to remote areas.
Prepared figures can be reused in various other presentation.
It is ideal for showing sequence of events and reviewing lesson.
Hold attention of students and attractive ifproperly used.
Can be adopted for group participation.
DISADVANTAGES OF FLANNEL BOARD-
Require considerable advance preparation.
Artistic ability is required in making
homemade figures .
Can be used for a small group.
May create confusion if sequences of
pictures is changed.
Not useful for abstract learning.
Magnetic Board
A magnetic chalkboard is framed iron sheet carrying coating in some dark color generally black or
green
PEG BOARD
 Letters and numbers are inserted in the board for the purpose of display.
 It is mostly used in hospitals and government institutions just for displaying census. (Eg.)
number of out patients per day.
 It is also difficult to maintain because dirt accumulates in the holes.
 The numbers and words attached in the board easily gets damaged and
Notice Board
1. CHARACTERISTICS OFNOTICE BOARD:
 Size of notice board:
 The notice board comes in various size and kinds.
 The type and size used will depend on the purpose for which it is used and the approximate number of
people it will serve.
 2. Materials required for NB:
 Wooden board or cardboard or plywood or thermocoal
 Coloured papers
 Flannel cloth or khadi cloth
 Pair of scissors
 Paste or gum or fevicol
 Straight or coloured pins
 Letters, pictures
 Material, notice etc
NOTICE BOARD
 Preparing of NB:
 Prepare one central theme, select the photographs and drawings, arrange them in Z, S,
and V direction and complete the notice board by using pins.
Pamplets
Paper can be folded into two or five, the matter will be printed either single sides or both
side.
BROCHURE
 A small book with pictures and information.
Leaflets
Single sheet of paper folded to make full page of printed matter on single slide.
Handouts/Handbills
The briefing of a session in single sheet.
Use simple , clean language with short sentences.
It needs sketches, graphs should be drawn and labelled.
Give titles, subtitles and underline the key words.
Suitable colours can be used.
Handouts can be given in advance to orient interested group.
The heisting of a session in a single sheet. use simple, clear language with short sentences. If
needed sketches, graphs should be drawn and labelled give titles and sub titles underline the
keywords.
Newspaper
The newspaper furnishes many example swhich can be used to introduce lessons. Health
messages can be published in local languages , which can reach to the public easily. The
information will be available in low cost, easy to reach and understand simple language. The
people may train to read and interrupt the contents along with pictures to enhance easy
grasping.
A PAMPHLET OR LEAFLET SHOULD BE
Colorful
Attractive
Illustrated with pictures.
Simple and precise
Informative
Self –explanatory
Useful
ADVANTAGES-
They are highly,economic,flexible,portable
Facilitates individualized learning.
Can be reported in any language.
Stimulate interest on the part of the learner.
DISADVANTAGES
It can not be used for illiterates.
It can not be preserved for a long time.
Receiving feedback from all those isnot possible
Models
“A Model is a recognizable representation of a real thing three dimensionally. Height, weight and
depth are left as a reality. This makes the understanding of the things easy and better.”
Models are three dimensional recognizable limitations of an object with increase, decrease or exact
size. They are replies of objects, eg. Models of eye, ear or other organs of human body.
TYPES
Solid models.
Cut a way cross sectional.
Working models.
PREPARATION OF MODELS
 Identification of purpose of model
 Being knowledgeable about the model
 Collection of materials to be used
 Proper planning to prepare the model
 Drawing the model with exact measurement
 Preparing the model with exact measurement
 Preparing the model as much as real and attractive
 Pretesting the model to check it.
 Mounting and labeling the model.
MATERIALS USED FOR THEPREPARATION OF MODELS:
 Cardboard: suitable thickness can easily be cut desired shapes could be formed. Pasted and
given a better look by coloured paper.
 Clay, wax: (available in several colours) could be molded easily to desired shape.
 Easily workable materials: thermocole, fevicol, sand paper, water colour and brush
 Plaster of paris: duplicate copies of objects with plaster of paris could be made easily.
 Wood: hard wood, light wood and easily workable balsa wood.
 Metal: in the form of sheets, rods, tubes, angles, wires, etc.
 Plastic: PVC, Aery materials, etc.
 Thermocole models: thermocole could be easily cut with a knife or an electricity heated wire.
ESSENTIAL QUALITIES OFA MODEL
Accuracy
Simplicity
Utility
Solidity
Ingenuity.
Useful
TYPES OF MODEL
 SCALE MODEL - correct idea of anobject can be displayed ,egad dam
project.
to demonstratein simple way of an operation or process.eg. fetal circulation.
WORKING MODEL -
CROSS SECTION MODEL
Inside of an object is visible.
SIMPLIFIED MODEL -
 gives an ideaof an external from of an object, egg.- animals, birds
FUNCTIONS OF MODEL-
It simplifies reality.
Concretizes abstract concept.
Enable use to reduce or enlarge object toan observable size.
It provide the correct concept of real object.
Promote creative interest among pupils
ADV
ANTAGES-
Models are help in simulating a real situation a real situation .
The size can be adjusted as needed.
Distance and time do not become a limitation.
It gives the learner visual , tactic and oral stimuli which increase the learning experience.
It can explain the concepts , structure and working of parts.
It enable to have a correct concept of an object.
Working model will secure immediate attention and serve as motivation to learn.
DISADVANTAGES-
Models are quiet costly
Need more storage space.
They are useful only for teaching small groups.
Requires skill and talent to prepare.
Objects & Specimen
 “Collection of the real things before for instructional use reflex to object on the other
Hand specimen is any typical object and specimens are the real things and use for
classroom teaching imparts a direct learning experience of student.”
OBJECTS: Brought from its natural settings into the class room to supply the type of sensory
experience that will make the instruction more meaningful and impressive. (Eg) thermometer,
forceps etc.
SPECIMEN: Part of real objects taken from the natural settings. It is simple and shows quality or
structure. (Eg) section of lung
Objects & Specimen
 Rules of using objects and specimens:
 Plan your teaching with certain simple and direct observations of the object or
specimen referred to.
 Ask questions from the students to elicit more details and features of the object or
specimen under observation.
 Clarify and emphasize important structural details of the object or specimen under
observation.
Objects & Specimen
 ADVANTAGES:
 Collection of objects and specimen by students requires interaction with others leading to
development of social skills and values.
 Students when collect and display objects and specimen derive satisfaction of contributing
to the school and teacher something worthwhile.
 Student's power of observation and first hand experience is enhanced by collection of
objects and specimens.
 Collection of objects and specimen can become an interesting educational pursuit of the
teachers and students alike.
Puppetry
“Puppetry is an education cum entertaining aid in which puppets manipulated by the performer is
a person termed as characters in a story to be depicted.
A puppet is a manipulative doll dressed as a character & the performer is a person termed as
puppeteer. A good puppeteer has to blend his art with dramatization to produce the desire effect. A
puppet show combinesall the performing & fine arts.”
MEANING: A puppet is a manipulative doll dressed as a character and the performer is a person.
TYPES OF PUPPETS: Stick puppet String puppet Finger/ Glove puppet Shadow puppet
Puppetry
STICK PUPPET FINGURE PUPPET
STRING PUPPET SHADOW PUPPET
PRINCIPLES:
 PRINCIPLES:
 Puppet actions should be accompanied by short dialogues which are easily understandable.
 Plays must be based on action rather than words.
 Need to have skill in the use of puppets.
 Need special training in the preparation
 Prepare according to pupil‟s experience
 It should have adequate preparation.
 The teacher should prepare herself before using to the students
 It should be appropriate to the age and intelligence.
 Not more than 4 characters are recommended.
 Questions introduced at the beginning and answer comes out at the end.
PREPARATION OF PUPPETS
 PREPARATION OF PUPPETS:
 Stick puppets:
 Prepare drawings, colour them with paints or pens.
 Each figure should have two faces, one for each side of the puppets.
 The expressions on each side should be very different.
 Paste the illustrations onto a piece of thick poster paper or cardboard.
 Cut out the figures.
 Paste two sides of each face together, inserting a flat wooden stick between the two pieces of thick
paper.
 Glove puppets:
 Glove puppets can be made by tracing the outline of your hand on piece of cloth and stitching along the
outline.
 The face, hands, dress can be painted after this.
PREPARATION FOR PUPPET PLAY:
 Prepare a script for the play.
 The story should involve conversation between the character, it should be humorous and
entertaining.
 Each message, idea or point of view should be introduced and developed in a logical order.
 Have a commentator introduce the characters and make comments on the points brought out
in the play
 Keep the story simple and suitable to the audience.
 Prepare puppets of the different characters identified for the play.
 Have the puppeteers who will handle the puppets practice the play until they are
comfortable with their puppets.
 Finished the play with the commentator asking questions to the audience such as „what do
you think? „who do you think is right?.
Exhibition
 A department of the school or a class puts up their work for showing it to the people
outside the school and such a show is called exhibition. The piece of the work done
by the students for an exhibition is called exhibits.
Museum
A museum is a building displaying a collection of historical relics, antiques, curiosities, work of
art, works of science, work of literature and other arts facts of general interest. Museum can be
useful both for public education and specific classroom instruction.
SLIDE PROJECTOR
 A slide is a small piece of transparent material on which a single pictorial image or scene or
a graphic image has been photographed or reproduced otherwise.
 Moderate slides range in size from 2×2 or 4.5×4 inches.
 Slide projector:
 Slides can be made from photographs and pictures by the teachers and pupils by taking
photographs and snapshots when they go on the fieldtrips for historical, geographical or
scientific excursions.
 The arrangement of the slides are in sequence order.
 A teacher needs to use imaginatively and creatively to make the best use of
ADVANTAGES:
Help in retention of the material taught in the minds of the pupils.
Attract attention.
Arouse interest.
Assist lesson development
Test student understanding.
Review instruction.
Facilitate student teacher participation.
SLIDE PROJECTOR
MICROSCOPE
 It is a piece of equipment that makes very small objects look big enough for you to be able to see
them.
 PURPOSES:
 Magnification of an object.
 Maximization of resolution.
 Optimization of the contrast between structures, organisms and background.
RADIO
 The most common form of public education and entertainment is radio receivers.
 “The most common form of public education and entertainment is radio. The radio mission serve as
a vital agency of mass education if used effectively.
 USING RADIO FORCLASSROOM TEACHING:
 Procure and study in advance the nature and contact of the radio lesson.
 Prepare the students for the radio lesson by informing them about the background of the lesson.
 Allow the students for radio lesson and use as a teacher note down the important points covered by it.
 Follow up session is must.
 It can be recorded for clarification.
CHARACTERISTICS -
 IMMEDIACY
 EMOTIONALIMPACTS
 AUTHENTICITY
 CONQUEST OF TIME ANDSPACE
 ONE WAYCOMMUNICATION
RADIO
Advantages:
Good for mass education.
Effective for distant education.
Can arouse positive emotions.
Used for introduction or review of lesson.
Can be recorded
 Increased skills in listening
 A good radio lesson can be recorded for use at any appropriate time.
 Disadvantages
The radio programme may or may not beheard by students.
The programme may not seek attention as the person not having any eye to eye contact.
The person isn’t able to assess the ability of the student.
RADIO
Kinds of radio lesson
Talk
Discussion
Dramatization
TAPE RECORDER
 A tape recorder is a portable electronic gadget to record, reproduce, erase and re-record sound.
 This device can be used without much fuss by anybody by operating the following press buttons attached
to the recorder, i.e. stop, play, rewind, forward, pause and eject.
 Do‟s for using tape recorder:
 Adequate practice and familiar with the equipment.
 Prepare before the class.
 It should be recorded from the sources such as radio programmes, sound tracks, TV programmes etc.
 It can be used for recording the interviews, talks and discussions of various experts.
ADVANTEGES OF TAPRECORDER-
Tape recorder is commonly available aids which are economical to use as recording can be
erased and the tap reused.
Being common household equipment, the tape recorder is easy to operate as it has only few
controls.
Tape recording providing flexibility for the teacher to edit and evaluate material.
On the spot events can be recorded and played at an appropriate time for classroom
instruction.
Tap record can make lesson enjoyable when used along with other visual aids.
For teaching music, phonics, oral reading, poetry and recitation etc
RECORDING DEVICES
 Devices which can record and reproduce sound are called recording devices and can be used to
augment teaching in a classroom.
TYPES OF RECORDING
Phonograph record or
disc record.
Wire recording
Tape recording
16
ADVANTAGES OF RECORDING
Recordings are two way communications. It eliminates the time
adjustment problems of radio.
Recording can be made to play atdesire and teaching need.
Recording offer a wide range ofhelpful material.
The school can have its own recording.
17
DISADVANTAGES
May not be possible in every setting.
Individual ability may not be evaluated by the teacher.
Eye to eye contact is not there.
It is difficult for teacher to control the classroom.
It will seek less attention of the students.
18
OVERHEAD PROJECTOR
 “It project transparencies with brilliant
screen images suitable for use in a lighted room.
The teacher faces the class as he uses OHP & class view projection.”
PARTS OF OVER HEAD PROJECTOR.-
Projection head lens and mirror
Focus wheel
Projection handle
Glass plate
Fresnel lens switch to intense or dimmer
Switch for cooling fan
Adjustment feet
Metal box with a 1000w/600w halogen lamp.
5
OVERHEAD PROJECTOR:
 METHODS OF USING OVERHEAD PROJECTOR:
 The projector should not be subjected to mechanical vibrations.
 Provision for voltage fluctuation should be taken care of by using a voltage stabilizer or by
having a suitable choke in series.
 Halogen lamps particularly will not with stand heavy surge in voltage. The lamp should not be
touched by hand.
 OHP should not be kept on continuously for long periods. Otherwise the projector may get very
hot inspite of the cooling arrangements.
 The Fresnel lens is protected by a glass plate on top. It is necessary to remove dust or dirt on the
protecting glass and also from the outside lens surface.
 The OHP should be kept necessarily in a fixed place so that the rotated projection axis meets the
screen normally.
 Transparencies are tri-acetate sheets of dimension 20x25 or 25x25cms square, leaving the margin
of 2- 3cm, matter clearly written over the surface can be suitable mounted on suitable cartboard
mounts and presented on the screen.
6
OVERHEAD PROJECTOR:
 USING AN OHP:
 Place an OHP on a stable table with the objective lens facing the screen behind the teachers
 Put the cord plug into a power wall socket switch on the blower first and then the bulb
 Place the acetate or cellophane transparency on the glass top.
 Move the objective lens and mirror to assembly up and down to get the image in focus on the
screen.
 Explain about the material on the transparency sitting behind the OHP with a small pointer
 Do not keep the OHP too low as it will make a image distorted i.e image will get wider at the top
and narrower at the bottom. This distortion is called key stoning.
 Do not keep the bulb for a long time. It can overheat the projector and damage the acetate
transparencies as well as the bulb.
7
OVERHEAD PROJECTOR:
 ADVANTAGES:
 It permits the teacher to stand in front of the class while using the projector thus enabling
her to point out features appearing on the screen .
 It can be used in a fairly lighted room
 Material projected can be changed easily and quickly
 To make marginal notes on transparencies for the use of
 teachers
8
Transparency
 “Single image that is seen by means of a light passing through a projectile is usually
given to those materials which are projected in the OHP.”
Slide Projector
 “ A slide is a small piece of transparent material on which a single pectoral image
or seen, graphic image has been photograph or reproducing otherwise the
arrangement slide in proper sequence according to proper topic is an important
aspect of teaching. A teacher is imaginatively & creative to make the best use of
them.”
POWER POINT
 USING POWER POINT:
 Practice with equipment
 Slides should be concurrent with verbal content
 Pause to allow audience to redirect attention
 Talk to audience/don‟t read slides
 Explain graphics
 Use verbal cues for next slide
 One topic per slide
 3-7 bullets/slide
 Key words
 32 point for text/ 40 point for headings
 Follow rule of six
POWER POINT
 ERRORS:
 Use “special effects” sparingly
 They rarely add anything to the presentation
 And can be extremely annoying and distracting!
 Font Errors:
 Selection funky fonts are distracting and hard to read this is a ink free font
 Font Errors:
 Size too small is hard to see, and this is smaller that the minimum resolvable acuity for most of the audience
 beyond minimum resolvable acuity
 make big enough to see easily
 Font Size
 titles - 40 to 72 pt
 text - 28 to 40 pt
 NEVER smaller than 28 pt
POWER POINT
 Font Errors: Case Selection
 ALL CAPS IS NOT VERY READABLE FOR LONG PASSAGES; AVOID THIS EXCEPT FOR
SHORT TITLES AND ABBREVIATIONS
 Sentence case is much more readable!
 Alignment This passage is more difficult for you to read because it is centered, instead of left
justified. Don‟t do this.
 This passage is left justified and easier for you to read. Do this.
 Font Colors
 chromatic aberration of the eye causes different colors in the slide to appear to be at different
depths; and makes it hard to read don’t do it!
POWER POINT
 Avoid this.
 This section has lower contrast than what comes next and is harder to read
 Do this. White on black is easy to see.
 Busy backgrounds are distracting all the stuff distracts you from my message and the picture you
are having trouble seeing this keep it simple
 Simple backgrounds •not distracting • text easier to read
ADVANTAGES OF SLIDES-
 They can be projected in a partially darkened room thus facilitating further classroom
teaching interesting.
 They are convenient aids for making classroom teaching interesting.
 The slide repeated use is quite cheaper.
 They save the time of teacher.
DISADVANTAGES OF SLIDES-
They are comparatively expensive.
They easily dirty.
They required skill in operation.
The teacher may not have eye contact ordirect interaction with the student.
Television
 TELEVISION: Television is being acknowledged as a powerful medium of mass education.
 Using a television as a classroom instructional aids:
 Procure in advance the information from the programme manual about the background and objectives
of educational programme.
 Collect other instructional materials that relate to the program with you and instruct students to watch
in the classroom.
 Discuss about the programme topic and build up a background of the students to have a meaning of
the programme.
 Motivate students to watch the program critically and for specific details.
 During the programme, draw attention of students to certain important aspects with short phrases.
 After the programme follow up session should be carried out and other instructional aids used to
reinforce learning.
 Finally, test the students on their learning gains after the program and its application.
 Before the program, starts make the necessary adjustments of colour, contrast, brightness, volume, to
ne, treble and tuning.
Film strips
“It is a continuous strip of film containing of individual frames or pictures
arranged in sequence, usually with explanatory titles.
 Each strip contains from 12- 18 or more pictures. It is fixed sequence of related
skills on a read of 35 mm or 8mm film.”
Mobile
A mobile phone (also known as a cellular phone, cell phone, and
a hand phone) is a phone that can make and receive telephone calls over a radio link while
moving around a wide geographic area
Tablets
Video
Video cassette recorder
DVD Player
Television
Demonstration
Computer
Mobile
Television
 ADVANTAGES:
 Television appeals to eyes, ear and emotion.
 It can directly show the current happening and live shows happening even in the remote parts.
 A television equipment is the compact piece of equipment which is easy and convenient to
handle.
 The TV can work as a powerful medium of mass education.
 It can impart experiences which are out of physical reach.
 In television programs, well planned verbal descriptions are aided with audio visual
presentations also.
 TV programs can easily be made to include the latest information and findings to update the
knowledge of students and teachers both.
FILM PROJECTOR
 FILM STRIP:
 Film strip is a continuous strip of film consist inf of individual frames or pictures arranged in sequence usually
with explanatory titles.
 Each strip contains from 12 to 18 or more picture. It is a fixed sequence of related still on a roll of 35 mm
film or 8 mm film.
 ADVANTAGES:
 It is an economical visual material.
 It is easy to make and convenient to handle and carry.
 Takes up little space and can be easily stored.
 Provides a logical sequence to the teaching procedure and the individual picture on the strip can be kept before
the students for a length of time.
 Filmstrip can be projected on the screen or wall or paper screen as the convenience .
FILM PROJECTOR
 INSTRUCTIONS FORUSING:
 Preview film strip before using them and selected carefully to meet the needs of the topic to
be taught.
 Show again any part of the filmstrip needing more specific study.
 Use filmstrips to stimulate emotions, build attitudes and to point up problem.
 Follow up session and summary is essential.
BNSG 403

Unit 7 educational media

  • 1.
    Program: B.Sc Nursing,Second Year Communication Education And Technology Unit No. 7 Educational Media Topic- A V Aids By- Prof.Dr. Sudharani B Banappagoudar
  • 2.
    Outline • Introduction toA V Aids • Meaning, definition ,concept, • Purpose of A V Aids • Need of A V Aids • Drawbacks • Classification of A V Aids. • Objective • Learning Outcomes • Exercise • References
  • 3.
    Introduction Audio Visual Aidsare also called instructional material. Audio literally means “hearing” and “visual” means that which is found by seeing. So all such aids, which endeavor to make the knowledge clear to us through our sense are called “Audio Visual Aids” or Instructional Material. All these learning material make the learning situations as real as possible and give us firsthand knowledge through the organs of hearing and seeing. Therefore, any device which can be used to make the learning experience more concrete and effective, more realistic and dynamic can be considered audio visual material. We learn through our sense organs. Senses are the ways of knowledge. All the sense organs help us in understanding the environment. Most of the knowledge, which we acquire from the school, comes through our ears and eyes.
  • 4.
    Objectives •Identify and describethe various A V aids. •Application of AV aids in Teaching. 4
  • 5.
    Introduction  Audio VisualAids, Audio visual materials, audio visual media, communication technology, educational or instructional media and learning resources-all these terms, broadly speaking, mean the same thing.  Earlier the term used was audio visual aid in education.  With the advancement in the means of communication and technology, educators coined new terms
  • 6.
    Meaning of A.V.Aids  The sensory objects or images which initiate or stimulate and reinforce learning.  • It helps the process of learning i.e., motivation, classification and stimulation.  • It makes dynamic learning experience more concrete, realistic and clarity, establish, co-relate and co-ordinate accurate concepts, interpretations and appreciation enables him to make learning effective, interesting, inspirational, meaningful and vivid.
  • 7.
    Definitions  1.“Audio visualaids are any device which can be used to make the teaching experience more concrete, more realistic and more dynamic.” -Kinder S. James  2.“Audio visual aids are those sensory objects or images which initiate or stimulate and reinforce learning”. – Burton  3.“Audio Visual aids are anything by means of which learning process may be encouraged or carried on through the sense of hearing or sense of sight.” – Good’s dictionary of education
  • 8.
    Concept of A.V.aids  Audio visual aids are sensitive tools used in teaching and as avenues for learning. These are planned educational materials that appeal to the senses of the people and quicken learning, facilitates for clear understanding. A Chinese Proverb: “If I here, I forget; If I see, I remember; If I do, I know” says the importance of perception in teaching, learning situation.  Seeing – 87%  Hearing – 07%  Odor - 03%  Touch - 02%  Taste - 01%  Audio visual aids enhance clarity in communication.  Provides diversity in method.  Increases the forcefulness of the subject being learned or taught.  Serves in the instructional role in order to supplement and enrich the teacher’s own learning.
  • 9.
    Purposes of A.V.aids:  1.To provide a basis for more effective perceptual and conceptual learning.  2.To initiate and sustain attention, concentration and personal involvement of the students in learning  3. To provide concreteness, realism and life likeness in the teaching- learning situation.  4. To bring the remote events of either space or time into the classroom.  5. To increase the meaningfulness of abstract concepts.  6. To gain practical skill.  7. To introduce opportunity for situational or field types of learning.  8. Best Motivation  9.Clear Images  10.Vicarious Experience  11.Varity of stimulation
  • 10.
    Purposes of A.V.aids:  12.Opportunites to handle and manipulate.  13.Retention  14.Capture attention.  15.Meeting individual differences.  16.Reinforcement  17.Positive transfer of learning
  • 11.
    Need/ Importance ofA.V. aids  Improve and make teaching effective.  Enable the audience to look, listen and learn.  Making learning interesting and profitable  Quicken the phase of learning.  Economies teacher’s effort.  Foster/ develop the knowledge.  Add variety and newness to the lesson. Provide vicarious experience.  Overcome possible hurdles during the act of teaching.  Bring expected behavioral changes among the learners.  Stimulate curiosity.  Provide concrete experience or direct contact with reality or serves as a source of information and life likeness in the teaching- learning situation.
  • 12.
    Need/ Importance ofA.V. aids  • The student acquires clear, accurate and vivid image during the process of learning.  • Increase and sustain attention and concentration.  • Make personal involvement of the student in active learning and meet individual needs of the learners.  • Increase the meaningfulness of abstract concepts by stimulating correct thinking.  • It can serve as an open window through which the student can view the world and its phenomena by bringing remote events into the classroom.  • Provide an opportunity for situational type of learning, e.g. Field trips.  • Provision of active participation of the student and vicarious experiences encourage healthy interaction for the effective realization of teaching- learning objective. • Facilitate and advance the process of applying what is learned to realistic performance and to the life situation.  • They direct, dramatize the experience.  • Add interest and vitality to any training situation.  • Positive transfer of learning and training and positive environment for creative discipline.
  • 13.
    Need/ Importance ofA.V. aids  Stimulate thinking and motivate action.  Save time and energy.  Change attitude or point of view of learners.  Develop continuity of thought.  Promotes scientific temper as students observe demonstrations and scientific phenomena.  Visualize and make teaching more real; acts as an antidote to the disease of verbal instruction.
  • 14.
    Drawbacks in usingAudio Visual aids 1.These are not essential for all instructional programmes. 2. These are helpful in teaching, but they will not substitute teachers and books. 3. Possible risks of ‘Spectatorism’ instead of attitude of thoughtful enquiry. 4. It requires more time for planning and preparing. 5. Tempts the teachers to narrow down the subject. 6. Audio Visual aids are not ends, but means. 7. Some AV aids needs current power supply.
  • 15.
    Problems in usingTeaching Aids:  1.Apathy of the teachers: Teaching with words alone is very tedious, wasteful and ineffective. 2.Ineffectiveness of the aids: Preparation, presentation, application and discussion are necessary whenever teacher is using aids for teaching; but a)Absence proper planning. b)Lethargy of the teacher. c)Without proper preparation. d)Without correct presentation and appropriate application and discussion. e)No proper follow up work, etc.
  • 16.
    Classification of AudioVisual Aids:  Instructional media encompasses all the material and physical means of an instructor might use to implement instruction and facilitate student’s achievement of instructional objectives. The Audio Visual aids can be broadly classified as two types, they are;  Projected aids  The materials coming under projected aids are;  Films  Filmstrips  Opaque projector  Overhead projector o Slides  Non projected aids  The non projected aids are of different types:  Graphic aids  Display aids  3 Dimensional aids  Audio aids  Activity aids
  • 17.
    Audio Visual Aids AudioAids Visual Aids Audio Visual Aids •Radio •Tape recorder •Public address system •Telephone Projected Non Projected Projected Non Projected •Chalk Board •Bulletin Board •Picture& Photograph •Flannel Graph •,flash card,flip chart •Poster •Map •Specimen •Model •Diaroma •Slides •Flim strips •Opaque Projection •Overhead Projection •Motion Pictures •Video •Satellite TV •Tele conferencing •Multimedia •Computer •Drama •Puppet show •Folk songs •Talking Dolls
  • 18.
    Sources of AudioVisual aids: Government Educational institutions Professional organization Non-governmental organization National and international voluntary organization Commercial producers of educational material.
  • 19.
    Characteristics of GoodAudio Visual /Teaching aids:  A good Audio visual aid should be: 1.adapted to the intellectual maturity of the pupils and to the nature and extent of their previous experience. 2.meaningful and purposeful 3.improvised, i.e., locally available materials should be used in the preparation 4.accurate in every aspect 5.simple 6.cost effective as well as cheap 7.large enough to be properly seen by the whole students in the class 8.up to date 9.easily portable 10.motivate the learners.
  • 20.
    Types Of AVaids: Graphic Aids 1.Cartoons 2. Charts 3. Comics 4. Diagrams 5. Flash cards 6. Graphs 7. Maps 8. Photographs 9. Pictures 10. Posters Display aids: Blackboards Bulletin Flannel boards Magnetic board Ped board 3 Dimensional aids: 1.Diagrams 2.Models 3) Objects 4) Puppets 5) Specimens Audio aids: Radio Recordings Television Activity aids: Computer assisted instruction Demonstrations Dramatics Experimentatio n Field trips Programmed instruction Teaching machines Types of Instructional Media: -Real objects and models -Printed text (books, handouts, worksheets) -Printed visuals (pictures, photos, drawings, charts, graphs) -Display boards (chalk, bulletin, multipurpose) -Interactive whiteboards -Overhead transparencies -Slides and filmstrips -Audio (tape, disc, voice) -Video and film (tape, disc) -Television (live) -Computer software, and - The Web
  • 21.
    Uses of Instructionalmedia  “A good aid is like a window, it should not call attention to itself, it just let in the light.” Among the implicit goals that media can help achieve are the following:  Attracting attention  Developing interest  Adjusting the learning climate  Promoting acceptance (of an idea)
  • 22.
    Principles in theuse of Audio Visual aids: I. Principle of selection II. Principle of preparation III. Principle of physical control IV. Principle of proper presentation V. Principle of Response VI. Principle of Evaluation
  • 23.
    Steps in theImplementation of Instructional Media: 1. Review instructional goals, objectives, audience and instructional strategy 2. Determine the best medium for your lesson components 3. Search for and review existing media/materials 4. Adapt existing media/materials if necessary 5. If new media/materials need to be developed:  a) Determine format, script, visuals, etc.  b) Draft materials and media  c) Check for clarity and flow of ideas  6. Conduct formative evaluation  7. Implement/apply  8. Evaluate/revise
  • 24.
    Factors in MediaSelection  • Practicality: Is the intended media practical in that the media is available, cost efficient, time efficient, and understood by the instructor?  • Student Appropriateness: Is the intended media appropriate for the developmental and experiential levels of the students?  • Instructional Appropriateness: Is the intended media appropriate for the planned instructional strategy? Will the media allow for the presentation of the proposed lesson in an efficient and effective manner?
  • 25.
    GRAPHS  “ Itdeplete numerical or quantitative relationship or statistic data are presented in the form of visual symbols. Exact specification depletes specially quantitative data for analysis, comparison, and interruption.” Types Of Graph Line graph Bar graph Simple bar graph Multiple graph Component graph Pie graph Pictorial graph
  • 26.
    LINE GRAPH  LINEGRAPH:-line graphs are used when a considerable quantity of data is to be plotted or when the data are continuous.
  • 27.
    Bar Graph/Simple Graph/Multiplebar graph BAR GRAPH- a bar graph consist of bars arranged in horizontally or vertically form a “zero”base. Simple bar graph- may be vertically or horizontally arranged. Suitable scale must be used to represent bar length ii) Multiple bar graphs - two or more bars can be grouped together.
  • 28.
    Component bar graph (iii) Component bar graph- the bar may be divided into two or more parts, each part presenting a certain item and proportional to the magnitude of that particular item. iv) Pie graph-the pie graph is usually ,drawn as circle ,the section of which are used to represent component parts of whole.
  • 29.
    Pictorial graph  Pictorialgraph - pictorial graph is an outstanding method of graphic representation.
  • 30.
    GRAPHIC AIDS “A cartoonis a metaptiosical presentation of reality. It means learning more interesting and effective as it draw a strong appeal to the emotions. In short, a cartoon is a figurative and suitable graphic aid.” Itisthe metaphorical presentation of reality. Itmakes the learning more interesting and effective as it createsastrongappealto emotions.Itusessymbolstoportrayanopinion,ascene,orasituation. A cartoon isa humorous caricature which gives a subtle message. In a cartoon, the features of objectsand peopleare exaggeratedalongwithgenerallyrecognizedsymbols.Inshort,acartoonisa figurativeandsubtilegraphicaid.A cartoonhasan instantaneousvisualandaticklingmessage. Cartoons:
  • 31.
    GRAPHIC AIDS Many times,Cartoonsinnewspapers can be sarcasticand ridiculing.The main sources ofcartoons are periodicals. Newspaper carry cartoon which are either political or social in nature. Special periodicals and magazines carry cartoonson science, management,economicsandeducation. Ifa teacher isresourceful he/she can convert certainideasintocartoonswith littlepractice.Nevertheless, he can clipthe cartoons fromtheperiodicalsandmountthemforclassroom. Thecartoonmakesuseof -Personalizedhumor -Fantasy -Incongruity -Satire -Exaggeration
  • 32.
    CARTOONS ADVANTAGES A cartoon canbe effectively used to initiativecartoon lesson. A cartoon can be used to motivate students to starta discussion. A cartoon can be used for making lesson livelyand interesting. DISADVANTAGES While using cartoons an instruction aids the lea dives thought to choose. Cartoons difficulty as certain cartoons can be ensure the personal feeling of students. Especially the one which are foisted and causative towards certain social groups.
  • 33.
    GRAPHIC AIDS  Advantages: 1)Cartooncanbeeffectivelyusedtoinitiatecertainlesson. 2)Usedtomotivatestudentstostartdiscussion 3)Canbeusedformakinglessonslivelyandinteresting. Precautions: 1) While using cartoons as instructional aides, the teacher ought to choose them judiciously and discriminatelyastheycan injurepersonalfeelingsorsocialgroup.
  • 34.
    Graphs Advantages &Disadvantages  ADVANTAGES Helps to show numerical statistics. Helps in explaining, comparison among two.  DISADVANTAGES Only some statistical data can be debuted. Lesson is not effectively grasped by students. Any simple mistake will change the whole statistics.
  • 35.
    CHARTS CHARTS: DEFINITION: It definedas combination of graphic and pictorial material designed for the orderly and logical visualizing of relationships between key facts and ideas. Chartisthegraphicteachingmaterialincludingdiagrams,posters,maps,andgraphicswhichpresentsa clearvisual summery. “Charts are the graphic teaching material defined as illustrative usual media for defecting a logical relationship between ideas and supporting facts, according kinds charts are the graphic aids depicting information in the form of tables, pictures, graphics and diagram.”
  • 36.
    Purposes of Charts: •Showingrelationshipsbymeansof factsand figures. • For presenting the materialsymbolically • Toshowcontinuityinprocess • Forpresenting abstract ideas invisualform • For showingdevelopmentof structure • Forcreating problemsandstimulating thinking • To show continuity in process • For showing development of structure It is used to motivate the students. It serves as an illustrative visual media. It depicts logical relationship in between man idea and supporting facts. It is useful in teaching situations where breakdown of facts or a statement is to be listed. It is useful in showing points of comparison distinctions and contrast between two or more things. It is useful in learning situation of depicting organizational and hierarchical structures. It is used for presenting abstract ideas in visual forms.
  • 37.
    Charts  PREPARATION OFCHARTS:  Materials required:  Prepare charts are sheets of thick white or light coloured paper.  Fibre tipped round point and Chisel – Point colour Markers.  Drawing aids  Adhesives  Before making a chart:  One should plan the content in terms of the objectives and decide the layout.  The layout should be „balanced‟ and should use the space effectively.
  • 38.
    Charts 1. Principles:  Thesize of the chart, the size of the letters and the contrast of the display materials should be such that it is readable by the farthest viewer.  Standard chart paper in sizes 90x60cm and 70x55cm is suitable for most purposes.  The size of letters for the Captions, labels and keywords written on a chart should be between 2 and 3mm.  The thickness of the lines should be between 2 and 3mm.  Light colored chart paper should be used eg. Yellow, light green and white are better suited for dark colored pens. Eg. black, blue, red and orange.  Simple hand-drawn charts with non- decorative lettering are more effective than elaborately drawn.  One chart should convey just one idea or one principle.  Charts crowded with information are less effective.  PRESERVATION OF CHARTS:  Cover the charts with brown paper or old newspaper.
  • 39.
    TYPESOFCHARTS • TreeChart • StreamChart •Table • FlowChart • Narrative chart • Tabulation chart • Chain chart • Bar chart • Pie chart • Evolution chart • Pull chart • Line chart
  • 40.
    A chart madein the form of several branches from the trunk of a tree such that the trunk represents various development relationship or supports of the main idea. A chartmade informofbranchesfromthetrunkofatreesuchthatrepresentsthemainideawhilethe branchesrepresentsvariousdevelopment,relationshipofsubpartsofthemainideas.E.g.:familytree Tree Chart
  • 41.
    Stream chart StreamChart: Itisa graphicaid showing the main thought, idea,concept inthe form of a main riverand itsub parts in the form of tributariescomingoutofit.E.g.freehanddrawing A stream chart is the graphic aid showing the main thought idea, concept in the form of a main river.
  • 42.
    TableChart: Table charts arevery valuable aid in the teaching situation where breakdown of a factor a statement contrast between 2 or more things. Table chartsarevery valuable aidinteaching situationtoshow comparison, distinctionsand constant between two or more things. Itssize is50x75 cm or <. Itshould caption in bold letters,with different features in different colors. E.g. numericaldata,descriptiveobservations. Table chart
  • 43.
    Flow Charts: Aflow chart is the graphic aids of a system requiring presentation in the form of connected lower diversion of the system in boxes and lines to show their relative positions in the system the flow chart must show where the division actually stands in a given system Itisa graphic aidofsystem requiringpresentationintheform ofconnected lower divisionsofthe systemin boxesand linetoshow theirrelativepositionswithrespecttothehigherpositioninthesystem.E.g. organizationalchart. Flow charts
  • 44.
    GENEALOGY CHART  GENEALOGYCHART- this is used to represent the growth and development of an empire, dynasty and historical facts of this nature
  • 45.
    Time Chart  TIMECHART- this provides a chronological framework within which events and development s may be recorded.
  • 46.
    HOW TO USETHE CHARTS EFFECTIVELY  Students should be involved in the preparation of charts.  Charts should be so large that every detail depicted should be visible to every pupil in the class wherever be is sitting.  Teacher should make sure that there is provision for hanging the chart at a vantage point.  A chart should give neat appearance.  A teacher should have pointer to point out specific factors in the chart  Straight pins, stables, preboard clips, paper clips may all be used.  Charts should be carefully stored and preserved for use in future.
  • 47.
    Advantages/Disadvantages ADVANTAGES- Charts are aneffective tool for learning. They arouse interest in the student. They are prepared in a very low cost. They are portable and available for use and reuse. They are easily prepared and maintained. They are used to explain , clarify and simplify the complicated subject matter. They attract attention and reduce the amount of verbal explanation DISADVANTAGES OF CHART- Charts cannot be used for a large group. They cannot be used for illiterate audience.
  • 48.
  • 49.
    ARGUMENTS INFAVOUR: Manyeducatorssupporttheuseofcomicstripforclassroominstruction,becausetheybelieve: 1.Comicstripsfiretheimaginationofthechildren. 2.Comicstripbooststhecourageofchildrenandbuildsupthespiritofadventure. 3.Comicstripsmakecommunicationdetailedandvivid. 4.Comicstripstimulatesrealityandthusinvolvement. ARGUMENTSAGAINST Manyeducatorsdecrytheuseofcomicstripforclassroominstruction,becausetheybelieve: 1.Comic stripmisguides the children by depicting characters with supernatural powers divorced fromahardrealityof life. 2.Comicstripshamperthedevelopmentoflanguageinchildren. 3.Classicsbroughtoutintheformofcomicsdevelopthetendencyinchildrentoignoreorbypassthe originalwork. 4.Comicssoonbecomeobsessionwithyoungchildrenandtheytendtoavoidseriousstudy. Advantages & Disadvantages
  • 50.
    Comics  Precaution: 1.Therefore thetender must use with discrimination and only those related to biographies, social events scientific interventionsandhistoricaleventsshouldbeusedselectivelyforclassroominstructions.
  • 51.
     “ Diagramis the simplified drawing of an object product appliance or process to explore finer points of the same. Adiagram is made to show relations with the help of lines and symbols without the pictorial element.”  Itisasimplifieddrawingdesignedtoshowinterrelationprimarilybymeansoflinesandsymbols,e.g.stick figures,geometry drawings,facialexpressions.Drawingscanbedonebyhandtoconveyavarietyofideas,conceptsand situations.Itcanbebetter usedforsummeryandreview. Diagrams STANDARDOFAGOOD DIAGRAM: 1.Technicallycorrect. 2.Neatlydrawninproperproportion. 3.Welllabeledandexplained. 4.Itcanbemovedandseenfromallangles.
  • 52.
    Maps MAPS: A mapis a graphic aid presentation the proportionately as a diagram the surface of the earth, world or part. A map is an accurate representation of plain surface in the form of a diagrams, drawn to a scale , the details of boundaries of continent , countries etc. Graphic representation of the earth’ssurface or portions of itare termed as maps. These are flat representationsofearth’ssurface,whichconveytheinformationbymeans oflines,symbols,words and colors. IDENTIFICATIONOFVARIOUSASPECTSOFMAPS: • Understandingandinterpretingthekeyofindex,tints,shadowsandsymbols. • Thetopeverymapisnotnorth,butthedirectionofnorthernpoleisnorth.
  • 53.
    MAPS TYPESOFMAPS: Reliefmaps: A raised-relief mapor terrain model is a three-dimensional representation, usually of terrain. When representingterrain,theelevationdimensionisusuallyexaggeratedby afactorbetween fiveand ten;thisfacilitatesthe visual recognitionofterrainfeatures. -these maps show the actual elevation and depression in a place, area, region, country, etc.
  • 54.
  • 55.
    MAPS Historicalmaps: Historicalmaps arethosewhich representsgraphically a succession of events, states, or an act Distributionmaps: Adistributionmapisamapthatusescolorstoshowinformationsuchapopulationorhousing Geographicalmaps: Ageographicalmapisthemapwhichshowsgeographicallandmarks. Physical Map
  • 56.
  • 57.
  • 58.
  • 59.
    Flash Cards “Flash cardsare small cards of generally 25 - 30 cm in size which are shown for a few members before the class to send across a message or impact an idea .The idea on the flash card should be brief.” A flashcard orflash card isasetofcardsbearinginformation,aswords ornumbers, on either orboth sides,used inclassroomdrillsorinprivatestudy.One writesaquestionon acardand an answer overleaf. Flashcards can bear vocabulary, historicaldates,formulas or any subjectmatter thatcan be learned viaa question andanswerformat.Flashcardsare widelyusedasalearningdrilltoaidmemorizationbywayofspacedrepetition. Illustrationmadeonheavypaperthatisusuallysmallerthan21cmx27cm.theillustrationsarenotbound,butarearranged insequence.
  • 60.
    FLASH CARDS  FLASHCARDS: Flash cards are small cards of generally 25×30 cm in size which are shown for a few moments before the class to send across a message or impart an idea.  Flash cards would be used along with the other graphic aids to make the lesson effective.  PREPARATION OF FLASHCARDS:  Cut a chart paper and cut it into four equal parts to get the flash cards.  Write the content on it either in the free hand or using lettering stencils and sketch pen.  Also the height of writing on the flash card is to be large enough so that the whole class can see the flash card properly.  It is advisable to make a rough card on an ordinary paper first and then transfer it on the chart paper or cardboard flash cards.
  • 61.
    Flash Cards  STRUCTURE: They consist of a series of cards approximately 10x12 inches each with an illustration pertaining to a story or talk to be given. The message on the cards must be brief and to the point. The flash cards and the pictures there in should be large enough for a group to 30 to 50. Use colour to make it attractive. The number of cards should be 10 to 12 in a set.  USING THE FLASH CARDS:  Give brief introduction about the lesson to the students. Give instructions to the students about their actions while you flash the cards. Flash the card in front of the class by holding it high with both your hands so that all the students can see it. Add more information to the students responses
  • 62.
    Flash Cards AudienceSize: • 5to15people.Becausetheillustrationsaresmall,nomorethan15peopleshouldbeintheaudience. Advantages: Inexpensive,canbehomemade fromlocalmaterials.Goodway topresenta“changing”messageinareaswhere peoplegather. The flash cards can be used to introduce and present the topics. Flash cards can be used to review the topic. Flash cards can be used to develop the cognitive abilities of recognition and recall of students.
  • 63.
    Flash Cards  Disadvantages: Ifout ofdoors, weather damage can occur. Constant supply ofgood educational material toput on the boardisneeded.
  • 64.
    FLASH CARDS  PRINCIPLE- For effective use , the group size can range from 5-15.  The message should be in brief.  A brief introduction should begiven.  The number of cards should not benormally more than 15-20. POINTSTOBEREMEMBERED FORTHETEACHER: • Thesetofcardscanbepreparedonasingletopic,putinasequentialmanner,beforestartingtheexplanation. • Thestoryoneachcardmustbefamiliar,insimplewordsandlocalterminology. • Holdthecardsatthechestlevelwherepeoplecanseeclearly,holditagainstbodyandnotinair,facedifferentparts ofthe grouptoshowthecardstoall. • Glancedownatcards,asyouarereadytoexplainandmakesuretogivencorrectinformation. • Usepointer.Donotcoverthematterwithhands.Beenthusiasticandenjoyexplaining. • Importantpointshouldbewrittenbackside.
  • 65.
    Flash Cards  ADVANTAGES Flashcards can be used to introduce and present topics. Flash cards can be use to apply information already gained by student to new situations. Flash cards can be use to review the topic. Used for small groups not over 30 people. 10-12 cards for one talk can be used. It can be used either individuality or in combination with other charts. Prepare a picture for each idea, which will give visual impact to the idea.
  • 66.
     MEANING OFFLIP CHART: Individual charts are fixed to some support and as the lesson progresses. Illustrationmadeonpaperthatisusuallylargerthan21cm*27cm;boundedtogetherwithringsorstring. Theyflipoverinsequence. Flip Charts AudienceSize:15to30people.Itdependsonthesizeoftheflipcharttoo.
  • 67.
    Flip Chart  PREPARATIONOF FLIPCHART:  Write an interesting story or description about the topic which includes all the points that need to be told.  Decide which is to be drawing, pictures, illustrations would be appropriate.  Test the materials before preparing the actual flip chart.  Cut heavy paper or pieces of cardboard to the desired size for the  Glue the illustrations on one side of a card, the talking points on the other.  Number of sheets can range from 8 to 12.  Drill 2 holes at the top of the plywood board (40x50cms) approximately 13cm from each end. Drill two matching holders in the wooden strip.  Place the wooden strip over the sheets and insert the bolts throughout the holes in the strip as indicated in the margin. Secure firmly with wing nuts.  Make sure while presentation flip chart to be straight and pictures are not covered by fingers, scale to be use for explanation
  • 68.
    Flip Chart  Preparation: Thefirstcardofbunchshouldbegivingbriefintroductionofthetopic.  8 to12cardscanbeusedinbunch.  Eachcardshouldshowapictureillustrationinfrontside,conveyingoneideaatatime.  Thebriefdescriptionorexplanationofcardnumber 2shouldbewrittenatthebacksideofcardone,which canbe seenbytheteacherifsheforgets.  Thepictureusedshouldbeadoptedtolocalconditionandshouldbecolorful.  Leaveenoughborderssothatitdoesn’tcoverthematterwiththehandwhileholding.  Usepointerwhileexplainingdetailsofpictureoncard.
  • 69.
    Flip Chart Advantages: • Inexpensive,canbehomemade,andcanbeeasilytransported.Good way togiveinformationinsequence; because theyarebound,illustrationstayinsequence. Disadvantage: • Deterioratewithconstantuse.Someartisticabilityrequiredifmakinghomemadeflipcharts.
  • 70.
    POSTERS  “It isgood substitutive for first experience it varies from a simple printed card to a complicated and artistic design, It should be always a part of Campaign, it wills severe first to inspire the people and lastly it will serve as a remainder to the group”. A message onalargesheetofpaper,withanillustrationandasimplewrittenmessageonit.Standardsizeis20”*30”.  AudienceSize:Nolimit,becauseitisnotnecessaryforeveryonetolookattheposteratthesametime. ADVANTAGES Tomake an instant appeal Toconvey single idea or few ideas. Tobe Comprehensive at a distance and sufficiently clear. Suitable for education presenting scientific facts, showing safety measures or many other facets relating to health.
  • 71.
    POSTERS  POSTERS:  Postersare simple graphic visual aid which conveys single idea or single subject.  PRINCIPLES OF POSTER MAKING: 1. Brevity: A poster must be brief, so that it can be read in the shortest time possible not more than five words is best. The message should be clear. 2. Simplicity: Too many words should not be used on a paper.  3. Idea:  A poster must tell its story, at a glance. Hence illustrations and captions should be large enough.  4. Layout:  The poster must be organized properly to convey the idea, Bold simple styled letters will be easy to read expressive letters also can be used to attract attention and to convey the idea.  5. Colour:  Colours when used properly make the poster more attractive. Black or Yellow is recognized to be the most striking combination.
  • 72.
    POSTER  6. Lettering: Letters should be legible and of appropriate size.  7. Poster size:  This usually confirm to the paper sizes available such as 10”x15”, 15”x20”, 20”x30” etc. these can be used horizontally or Vertically  MATERIALS USED FOR MAKING POSTER:  Poster papers Stencil pencil brush erasers scale composs picture colours glue  STEPS IN MAKING POSTER: Selected the topic Select the message Organizing the message conveying a single idea with minimum words. Prepare a caption. Position the message and caption Tryout different layouts and colour schemes. Pretest the paper before use. 
  • 73.
    POSTER  RULES TOUSE POSTER: It should be planned for the specific people. It should stop the people and make them to look. Use pleasing colours. Must be timely It should be placed where people pass or gather together.
  • 74.
    Pictures  Pictures arethe most commonly available graphic aids, pictures includes photographs paintings, illustration clipped from periodical (magazines, newspaper, newsletter , publicity material and calendar). It provides an environment of reality from learner‟s point of view which is the main criterion in the selection of pictures. It should be relevant to the topic and it should be coloured, accurate and suitable size watched by all students easily. Too many pictures should not be displayed in one lesson. After showing the pictures it should be removed from the view of the students
  • 75.
    Pictures Effectiveuseofpictures: ▪ Thepicturecanbeflashedinfrontoftheclass& relatedquestionedaskedtoinitiatethesections. ▪A seriesofpicturesrelatedtothelessoncanbedisplayedintheclassroomtoarousethecuriosityand interestbefore the lessonbegins. ▪ Thepictureshouldbelargeenoughforthewholeclasstoseeitproperly. ▪ Thepicturemusthavecleardetailsforarrestingattentionandinterest. ▪ Thepicturesshouldberelatedtolessonandmeaningfultostudents. ▪ Thepictureshouldbeauthenticandidentifiable. ▪ Thepictureshouldbeabletobuildupproperlearningenvironment. ▪ Thepicturemustleadtheclasstosomepurposefulactivity.
  • 76.
    Display board  ChalkBoard-  It is the most commonly used av aid. It is also known as black board. It gives motivation and gives instruction concrete and understandable. “A Chalk board are black is a slightly abrasive writing surface made of wood ply. Hard board cement, ground glass, ablauts state plaster etc. white chalk slakes is generally used finger writing on the blacks’ board. Or chalk board at times clouds chalks are used for letters illustrations while using the Claus chalk. Should kept in mind that coleus must have on aesthetic appeal.”  TYPES OF CHALK BOARD:  Fixed  Portable
  • 77.
    BLACKBOARD  CHARACTERISTICS OFBLACKBOARD:  Size- 5m-6m  Surface- rough  Dull- to eliminate glare  The writing should be easily eliminated with duster  The chalkboard should be mounted on an appropriate height within the reach of teacher and visibility of students
  • 78.
    Don’t write everythingon chalkboard. The „STANCE‟ it has been observed that most convenient place to stand is towards the (L) side of the chalkboard, as this allows you to turn from the chalkboard to the class. Take half stick of chalk and hold the chalk between the thumb and forefinger. Write in sequence as head line and There should be equal gap in between the words. Size of each letter should be equal and broad. Gaps between each word should be uniform. The margin space for the top and bottom of the board should be equal. Use more pressure for strong line Try to keep 2/3rd part of the board when drawing. SKILLS INVOLVED IN EFFECTIVEUSE OF CHALK BOARD:
  • 79.
    SKILLS INVOLVED INEFFECTIVEUSE OF CHALK BOARD:  Never use fingers in place of duster.  Use duster from top to bottom and again from top to bottom by lifting rather by rubbing to avoid dust allergy.  Write in straight rows starting at the top corner.  Avoid abbreviation  Plan ahead what you will write on the chalkboard.  Front row of the students to be at least 8 feet away from it.  Chalk board that the service is made at least yearly.  Boards should be cleaned after each class  Do not talk as you write  Face the group after writing and continue the discussion.  Extreme lower corners should not be used.  Use colored chalks  Do not stand in front of the board, stand at one side.
  • 80.
    PURPOSE OF CHALKBOARD Toillustratean ideas by diagrams and scatches, drawing. Togive examination and test. As a substitute for still projection,picture. To illustrate from of charting and to provide opportunity for nursing students to practice teaching.
  • 81.
    ADVANTAGES It is aconvenient usual and for group teaching. It is economical teaching aid as it can be use over and again. The chalk board can work as an available supplementary teaching aid. The chalk board cans wok as a good visual aid for detail and revision. The chalkboard can be used for drawing enlarge illustration form the textbook. The chalkboard can be easily used for giving lesson notesto students. It captures attention It can be used for drill and revision
  • 82.
    Limitations of Chalkboard Itmakes student heavily dependent on the teacher. It makes the lesson teacher paced. It does not care for the individual. It makes the lesson a dull routine. It makes chalk powder to spread and inhaled by the teacher and student.  It does not care for the individual needs of the students  Constant use of black board makes it smooth and glare.
  • 83.
    Bulletin board It willbe used for both informational and education purposes It is a board on a wall in which notices can be fixed. PRINCIPLES FOR EFFECTIVE USE: Location: information material and notices should be kept separate from those of current events for an under study. Placement: near educational administrators office, near library, each classroom, clinical conference room in wards, in hostel. Visuability: adequate light natural or electric filled and fixed within the eye level. Organization: organize around a central theme of content, material should be dated to ensure that it doesn‟t stay on the board too long.
  • 84.
    PRINCIPLES FOR EFFECTIVEUSE:  Appearance: should appear neat, in order and attractive. Arrange mounted materials in S, Z, or V direction and follow the sequence.  Board if left blank for a day will create inquisetiveness (eager to know) and will  Contribution should be well labeled.  Students should be encouraged by the faculty member to participate in notice board committee.  One person should be appointed for editing the board.  Everyone should be made responsible for its maintenance and helping upto date information.
  • 85.
    TYPES Flannel Board. Magnetic Board. FixedType. Movable Type. Folded Type. <SELO: 1,4,9,13> <Reference No.: R1,R3>
  • 86.
    PURPOSE OF BULLETINBOARD Attract the attention of the students. Effective communication of then intended message. Promote the creativity of the student and the teacher. Use an effective educational media . Can be used for larger audience.
  • 87.
    ADVANTAGES OF BULLETINBOARD- Bulletin board works as a good supplementation to normal classroom teaching. Bulletin boards arouse students interest inspecific subjects. Bulletin board displays can be effectively used as follow-up of chalkboard work. Bulletin board add color and liveliness to the classroom as they have decorative value along with the educational value. Bulletin board display can be used to introduced a topic as well as to review it.
  • 88.
    DISADVANTAGES- Bulletin boards cannotbe used for all inclusive teaching. It has to be used only as a supplementary aid. At times the collection of relevant material for certain specific topics may be difficult. Arranging the display material is the challenging task for the teacher, as it requires artistic and creative potentialities. If not used properly, may fail in its purpose to convey the central theme.
  • 89.
    Flannel Board  Aflannel board is display board made of wood, cardboard or straw-board covered with colored flannel or woolen cloth. Display material like the cut –outs ,pictures, drawing and light objects backed with rough surface like sand paper strips, flannel strips etc. Flannel board is the board where we place the prepared items and remove them when needed. Pupils may be often asked to fix these to arouse their creative interest.
  • 90.
    FLANNEL BOARD- PRINCIPLES OFFLANNELGRAPH: One piece of rough textured cloth will adhere or stick to another. The backing material may be wall board, massonite, plywood, softwood, heavy cardboard etc. Rough textured materials that may be used include cotton, flannel, khadhi. Any colour of flannel may be used, but slightly dark green or blue seems better than others. ARTICLES REQUIRED: Wooden or plywood board Khaddar cloth or velvette cloth Flannel pictures Gum
  • 91.
    STEPS OF PREPARATIONOF FLANNEL BOARD  To prepare the flannel graph take a frame, with a firm surface made of any board like plywood, fiber board, massonite etc. of 30”x40” or any size.  Tightly stretch a dark coloured background flannel or cloth and fasten securely to the board with drawing pins. Now the flannel board is ready for use.  Apply a flannel graph on the board with a slight downward movement with firm pressure to avoid the material sliding off the surface.  Stick the flannel in an organized manner and number it properly.
  • 92.
    ADVANTAGES OF FLANNELBOARD- Flannel board are inexpensive, easily made from local material. They are flexible, dynamic, portable, convenient and reusable. Easily maintained and transported to remote areas. Prepared figures can be reused in various other presentation. It is ideal for showing sequence of events and reviewing lesson. Hold attention of students and attractive ifproperly used. Can be adopted for group participation.
  • 93.
    DISADVANTAGES OF FLANNELBOARD- Require considerable advance preparation. Artistic ability is required in making homemade figures . Can be used for a small group. May create confusion if sequences of pictures is changed. Not useful for abstract learning.
  • 94.
    Magnetic Board A magneticchalkboard is framed iron sheet carrying coating in some dark color generally black or green
  • 95.
    PEG BOARD  Lettersand numbers are inserted in the board for the purpose of display.  It is mostly used in hospitals and government institutions just for displaying census. (Eg.) number of out patients per day.  It is also difficult to maintain because dirt accumulates in the holes.  The numbers and words attached in the board easily gets damaged and
  • 96.
    Notice Board 1. CHARACTERISTICSOFNOTICE BOARD:  Size of notice board:  The notice board comes in various size and kinds.  The type and size used will depend on the purpose for which it is used and the approximate number of people it will serve.  2. Materials required for NB:  Wooden board or cardboard or plywood or thermocoal  Coloured papers  Flannel cloth or khadi cloth  Pair of scissors  Paste or gum or fevicol  Straight or coloured pins  Letters, pictures  Material, notice etc
  • 97.
    NOTICE BOARD  Preparingof NB:  Prepare one central theme, select the photographs and drawings, arrange them in Z, S, and V direction and complete the notice board by using pins.
  • 98.
    Pamplets Paper can befolded into two or five, the matter will be printed either single sides or both side.
  • 99.
    BROCHURE  A smallbook with pictures and information.
  • 100.
    Leaflets Single sheet ofpaper folded to make full page of printed matter on single slide.
  • 101.
    Handouts/Handbills The briefing ofa session in single sheet. Use simple , clean language with short sentences. It needs sketches, graphs should be drawn and labelled. Give titles, subtitles and underline the key words. Suitable colours can be used. Handouts can be given in advance to orient interested group. The heisting of a session in a single sheet. use simple, clear language with short sentences. If needed sketches, graphs should be drawn and labelled give titles and sub titles underline the keywords.
  • 102.
    Newspaper The newspaper furnishesmany example swhich can be used to introduce lessons. Health messages can be published in local languages , which can reach to the public easily. The information will be available in low cost, easy to reach and understand simple language. The people may train to read and interrupt the contents along with pictures to enhance easy grasping.
  • 103.
    A PAMPHLET ORLEAFLET SHOULD BE Colorful Attractive Illustrated with pictures. Simple and precise Informative Self –explanatory Useful
  • 104.
    ADVANTAGES- They are highly,economic,flexible,portable Facilitatesindividualized learning. Can be reported in any language. Stimulate interest on the part of the learner.
  • 105.
    DISADVANTAGES It can notbe used for illiterates. It can not be preserved for a long time. Receiving feedback from all those isnot possible
  • 106.
    Models “A Model isa recognizable representation of a real thing three dimensionally. Height, weight and depth are left as a reality. This makes the understanding of the things easy and better.” Models are three dimensional recognizable limitations of an object with increase, decrease or exact size. They are replies of objects, eg. Models of eye, ear or other organs of human body. TYPES Solid models. Cut a way cross sectional. Working models.
  • 107.
    PREPARATION OF MODELS Identification of purpose of model  Being knowledgeable about the model  Collection of materials to be used  Proper planning to prepare the model  Drawing the model with exact measurement  Preparing the model with exact measurement  Preparing the model as much as real and attractive  Pretesting the model to check it.  Mounting and labeling the model.
  • 108.
    MATERIALS USED FORTHEPREPARATION OF MODELS:  Cardboard: suitable thickness can easily be cut desired shapes could be formed. Pasted and given a better look by coloured paper.  Clay, wax: (available in several colours) could be molded easily to desired shape.  Easily workable materials: thermocole, fevicol, sand paper, water colour and brush  Plaster of paris: duplicate copies of objects with plaster of paris could be made easily.  Wood: hard wood, light wood and easily workable balsa wood.  Metal: in the form of sheets, rods, tubes, angles, wires, etc.  Plastic: PVC, Aery materials, etc.  Thermocole models: thermocole could be easily cut with a knife or an electricity heated wire.
  • 109.
    ESSENTIAL QUALITIES OFAMODEL Accuracy Simplicity Utility Solidity Ingenuity. Useful
  • 110.
    TYPES OF MODEL SCALE MODEL - correct idea of anobject can be displayed ,egad dam project.
  • 111.
    to demonstratein simpleway of an operation or process.eg. fetal circulation. WORKING MODEL -
  • 112.
    CROSS SECTION MODEL Insideof an object is visible.
  • 113.
    SIMPLIFIED MODEL - gives an ideaof an external from of an object, egg.- animals, birds
  • 114.
    FUNCTIONS OF MODEL- Itsimplifies reality. Concretizes abstract concept. Enable use to reduce or enlarge object toan observable size. It provide the correct concept of real object. Promote creative interest among pupils
  • 115.
    ADV ANTAGES- Models are helpin simulating a real situation a real situation . The size can be adjusted as needed. Distance and time do not become a limitation. It gives the learner visual , tactic and oral stimuli which increase the learning experience. It can explain the concepts , structure and working of parts. It enable to have a correct concept of an object. Working model will secure immediate attention and serve as motivation to learn.
  • 116.
    DISADVANTAGES- Models are quietcostly Need more storage space. They are useful only for teaching small groups. Requires skill and talent to prepare.
  • 117.
    Objects & Specimen “Collection of the real things before for instructional use reflex to object on the other Hand specimen is any typical object and specimens are the real things and use for classroom teaching imparts a direct learning experience of student.” OBJECTS: Brought from its natural settings into the class room to supply the type of sensory experience that will make the instruction more meaningful and impressive. (Eg) thermometer, forceps etc. SPECIMEN: Part of real objects taken from the natural settings. It is simple and shows quality or structure. (Eg) section of lung
  • 118.
    Objects & Specimen Rules of using objects and specimens:  Plan your teaching with certain simple and direct observations of the object or specimen referred to.  Ask questions from the students to elicit more details and features of the object or specimen under observation.  Clarify and emphasize important structural details of the object or specimen under observation.
  • 119.
    Objects & Specimen ADVANTAGES:  Collection of objects and specimen by students requires interaction with others leading to development of social skills and values.  Students when collect and display objects and specimen derive satisfaction of contributing to the school and teacher something worthwhile.  Student's power of observation and first hand experience is enhanced by collection of objects and specimens.  Collection of objects and specimen can become an interesting educational pursuit of the teachers and students alike.
  • 120.
    Puppetry “Puppetry is aneducation cum entertaining aid in which puppets manipulated by the performer is a person termed as characters in a story to be depicted. A puppet is a manipulative doll dressed as a character & the performer is a person termed as puppeteer. A good puppeteer has to blend his art with dramatization to produce the desire effect. A puppet show combinesall the performing & fine arts.” MEANING: A puppet is a manipulative doll dressed as a character and the performer is a person. TYPES OF PUPPETS: Stick puppet String puppet Finger/ Glove puppet Shadow puppet
  • 121.
    Puppetry STICK PUPPET FINGUREPUPPET STRING PUPPET SHADOW PUPPET
  • 122.
    PRINCIPLES:  PRINCIPLES:  Puppetactions should be accompanied by short dialogues which are easily understandable.  Plays must be based on action rather than words.  Need to have skill in the use of puppets.  Need special training in the preparation  Prepare according to pupil‟s experience  It should have adequate preparation.  The teacher should prepare herself before using to the students  It should be appropriate to the age and intelligence.  Not more than 4 characters are recommended.  Questions introduced at the beginning and answer comes out at the end.
  • 123.
    PREPARATION OF PUPPETS PREPARATION OF PUPPETS:  Stick puppets:  Prepare drawings, colour them with paints or pens.  Each figure should have two faces, one for each side of the puppets.  The expressions on each side should be very different.  Paste the illustrations onto a piece of thick poster paper or cardboard.  Cut out the figures.  Paste two sides of each face together, inserting a flat wooden stick between the two pieces of thick paper.  Glove puppets:  Glove puppets can be made by tracing the outline of your hand on piece of cloth and stitching along the outline.  The face, hands, dress can be painted after this.
  • 124.
    PREPARATION FOR PUPPETPLAY:  Prepare a script for the play.  The story should involve conversation between the character, it should be humorous and entertaining.  Each message, idea or point of view should be introduced and developed in a logical order.  Have a commentator introduce the characters and make comments on the points brought out in the play  Keep the story simple and suitable to the audience.  Prepare puppets of the different characters identified for the play.  Have the puppeteers who will handle the puppets practice the play until they are comfortable with their puppets.  Finished the play with the commentator asking questions to the audience such as „what do you think? „who do you think is right?.
  • 125.
    Exhibition  A departmentof the school or a class puts up their work for showing it to the people outside the school and such a show is called exhibition. The piece of the work done by the students for an exhibition is called exhibits.
  • 126.
    Museum A museum isa building displaying a collection of historical relics, antiques, curiosities, work of art, works of science, work of literature and other arts facts of general interest. Museum can be useful both for public education and specific classroom instruction.
  • 127.
    SLIDE PROJECTOR  Aslide is a small piece of transparent material on which a single pictorial image or scene or a graphic image has been photographed or reproduced otherwise.  Moderate slides range in size from 2×2 or 4.5×4 inches.  Slide projector:  Slides can be made from photographs and pictures by the teachers and pupils by taking photographs and snapshots when they go on the fieldtrips for historical, geographical or scientific excursions.  The arrangement of the slides are in sequence order.  A teacher needs to use imaginatively and creatively to make the best use of
  • 128.
    ADVANTAGES: Help in retentionof the material taught in the minds of the pupils. Attract attention. Arouse interest. Assist lesson development Test student understanding. Review instruction. Facilitate student teacher participation. SLIDE PROJECTOR
  • 129.
    MICROSCOPE  It isa piece of equipment that makes very small objects look big enough for you to be able to see them.  PURPOSES:  Magnification of an object.  Maximization of resolution.  Optimization of the contrast between structures, organisms and background.
  • 130.
    RADIO  The mostcommon form of public education and entertainment is radio receivers.  “The most common form of public education and entertainment is radio. The radio mission serve as a vital agency of mass education if used effectively.  USING RADIO FORCLASSROOM TEACHING:  Procure and study in advance the nature and contact of the radio lesson.  Prepare the students for the radio lesson by informing them about the background of the lesson.  Allow the students for radio lesson and use as a teacher note down the important points covered by it.  Follow up session is must.  It can be recorded for clarification.
  • 131.
    CHARACTERISTICS -  IMMEDIACY EMOTIONALIMPACTS  AUTHENTICITY  CONQUEST OF TIME ANDSPACE  ONE WAYCOMMUNICATION
  • 132.
    RADIO Advantages: Good for masseducation. Effective for distant education. Can arouse positive emotions. Used for introduction or review of lesson. Can be recorded  Increased skills in listening  A good radio lesson can be recorded for use at any appropriate time.  Disadvantages The radio programme may or may not beheard by students. The programme may not seek attention as the person not having any eye to eye contact. The person isn’t able to assess the ability of the student.
  • 133.
    RADIO Kinds of radiolesson Talk Discussion Dramatization
  • 134.
    TAPE RECORDER  Atape recorder is a portable electronic gadget to record, reproduce, erase and re-record sound.  This device can be used without much fuss by anybody by operating the following press buttons attached to the recorder, i.e. stop, play, rewind, forward, pause and eject.  Do‟s for using tape recorder:  Adequate practice and familiar with the equipment.  Prepare before the class.  It should be recorded from the sources such as radio programmes, sound tracks, TV programmes etc.  It can be used for recording the interviews, talks and discussions of various experts.
  • 135.
    ADVANTEGES OF TAPRECORDER- Taperecorder is commonly available aids which are economical to use as recording can be erased and the tap reused. Being common household equipment, the tape recorder is easy to operate as it has only few controls. Tape recording providing flexibility for the teacher to edit and evaluate material. On the spot events can be recorded and played at an appropriate time for classroom instruction. Tap record can make lesson enjoyable when used along with other visual aids. For teaching music, phonics, oral reading, poetry and recitation etc
  • 136.
    RECORDING DEVICES  Deviceswhich can record and reproduce sound are called recording devices and can be used to augment teaching in a classroom.
  • 137.
    TYPES OF RECORDING Phonographrecord or disc record. Wire recording Tape recording 16
  • 138.
    ADVANTAGES OF RECORDING Recordingsare two way communications. It eliminates the time adjustment problems of radio. Recording can be made to play atdesire and teaching need. Recording offer a wide range ofhelpful material. The school can have its own recording. 17
  • 139.
    DISADVANTAGES May not bepossible in every setting. Individual ability may not be evaluated by the teacher. Eye to eye contact is not there. It is difficult for teacher to control the classroom. It will seek less attention of the students. 18
  • 140.
    OVERHEAD PROJECTOR  “Itproject transparencies with brilliant screen images suitable for use in a lighted room. The teacher faces the class as he uses OHP & class view projection.” PARTS OF OVER HEAD PROJECTOR.- Projection head lens and mirror Focus wheel Projection handle Glass plate Fresnel lens switch to intense or dimmer Switch for cooling fan Adjustment feet Metal box with a 1000w/600w halogen lamp. 5
  • 141.
    OVERHEAD PROJECTOR:  METHODSOF USING OVERHEAD PROJECTOR:  The projector should not be subjected to mechanical vibrations.  Provision for voltage fluctuation should be taken care of by using a voltage stabilizer or by having a suitable choke in series.  Halogen lamps particularly will not with stand heavy surge in voltage. The lamp should not be touched by hand.  OHP should not be kept on continuously for long periods. Otherwise the projector may get very hot inspite of the cooling arrangements.  The Fresnel lens is protected by a glass plate on top. It is necessary to remove dust or dirt on the protecting glass and also from the outside lens surface.  The OHP should be kept necessarily in a fixed place so that the rotated projection axis meets the screen normally.  Transparencies are tri-acetate sheets of dimension 20x25 or 25x25cms square, leaving the margin of 2- 3cm, matter clearly written over the surface can be suitable mounted on suitable cartboard mounts and presented on the screen. 6
  • 142.
    OVERHEAD PROJECTOR:  USINGAN OHP:  Place an OHP on a stable table with the objective lens facing the screen behind the teachers  Put the cord plug into a power wall socket switch on the blower first and then the bulb  Place the acetate or cellophane transparency on the glass top.  Move the objective lens and mirror to assembly up and down to get the image in focus on the screen.  Explain about the material on the transparency sitting behind the OHP with a small pointer  Do not keep the OHP too low as it will make a image distorted i.e image will get wider at the top and narrower at the bottom. This distortion is called key stoning.  Do not keep the bulb for a long time. It can overheat the projector and damage the acetate transparencies as well as the bulb. 7
  • 143.
    OVERHEAD PROJECTOR:  ADVANTAGES: It permits the teacher to stand in front of the class while using the projector thus enabling her to point out features appearing on the screen .  It can be used in a fairly lighted room  Material projected can be changed easily and quickly  To make marginal notes on transparencies for the use of  teachers 8
  • 144.
    Transparency  “Single imagethat is seen by means of a light passing through a projectile is usually given to those materials which are projected in the OHP.”
  • 145.
    Slide Projector  “A slide is a small piece of transparent material on which a single pectoral image or seen, graphic image has been photograph or reproducing otherwise the arrangement slide in proper sequence according to proper topic is an important aspect of teaching. A teacher is imaginatively & creative to make the best use of them.”
  • 146.
    POWER POINT  USINGPOWER POINT:  Practice with equipment  Slides should be concurrent with verbal content  Pause to allow audience to redirect attention  Talk to audience/don‟t read slides  Explain graphics  Use verbal cues for next slide  One topic per slide  3-7 bullets/slide  Key words  32 point for text/ 40 point for headings  Follow rule of six
  • 147.
    POWER POINT  ERRORS: Use “special effects” sparingly  They rarely add anything to the presentation  And can be extremely annoying and distracting!  Font Errors:  Selection funky fonts are distracting and hard to read this is a ink free font  Font Errors:  Size too small is hard to see, and this is smaller that the minimum resolvable acuity for most of the audience  beyond minimum resolvable acuity  make big enough to see easily  Font Size  titles - 40 to 72 pt  text - 28 to 40 pt  NEVER smaller than 28 pt
  • 148.
    POWER POINT  FontErrors: Case Selection  ALL CAPS IS NOT VERY READABLE FOR LONG PASSAGES; AVOID THIS EXCEPT FOR SHORT TITLES AND ABBREVIATIONS  Sentence case is much more readable!  Alignment This passage is more difficult for you to read because it is centered, instead of left justified. Don‟t do this.  This passage is left justified and easier for you to read. Do this.  Font Colors  chromatic aberration of the eye causes different colors in the slide to appear to be at different depths; and makes it hard to read don’t do it!
  • 149.
    POWER POINT  Avoidthis.  This section has lower contrast than what comes next and is harder to read  Do this. White on black is easy to see.  Busy backgrounds are distracting all the stuff distracts you from my message and the picture you are having trouble seeing this keep it simple  Simple backgrounds •not distracting • text easier to read
  • 150.
    ADVANTAGES OF SLIDES- They can be projected in a partially darkened room thus facilitating further classroom teaching interesting.  They are convenient aids for making classroom teaching interesting.  The slide repeated use is quite cheaper.  They save the time of teacher.
  • 151.
    DISADVANTAGES OF SLIDES- Theyare comparatively expensive. They easily dirty. They required skill in operation. The teacher may not have eye contact ordirect interaction with the student.
  • 152.
    Television  TELEVISION: Televisionis being acknowledged as a powerful medium of mass education.  Using a television as a classroom instructional aids:  Procure in advance the information from the programme manual about the background and objectives of educational programme.  Collect other instructional materials that relate to the program with you and instruct students to watch in the classroom.  Discuss about the programme topic and build up a background of the students to have a meaning of the programme.  Motivate students to watch the program critically and for specific details.  During the programme, draw attention of students to certain important aspects with short phrases.  After the programme follow up session should be carried out and other instructional aids used to reinforce learning.  Finally, test the students on their learning gains after the program and its application.  Before the program, starts make the necessary adjustments of colour, contrast, brightness, volume, to ne, treble and tuning.
  • 153.
    Film strips “It isa continuous strip of film containing of individual frames or pictures arranged in sequence, usually with explanatory titles.  Each strip contains from 12- 18 or more pictures. It is fixed sequence of related skills on a read of 35 mm or 8mm film.”
  • 154.
    Mobile A mobile phone(also known as a cellular phone, cell phone, and a hand phone) is a phone that can make and receive telephone calls over a radio link while moving around a wide geographic area
  • 155.
    Tablets Video Video cassette recorder DVDPlayer Television Demonstration Computer Mobile
  • 156.
    Television  ADVANTAGES:  Televisionappeals to eyes, ear and emotion.  It can directly show the current happening and live shows happening even in the remote parts.  A television equipment is the compact piece of equipment which is easy and convenient to handle.  The TV can work as a powerful medium of mass education.  It can impart experiences which are out of physical reach.  In television programs, well planned verbal descriptions are aided with audio visual presentations also.  TV programs can easily be made to include the latest information and findings to update the knowledge of students and teachers both.
  • 157.
    FILM PROJECTOR  FILMSTRIP:  Film strip is a continuous strip of film consist inf of individual frames or pictures arranged in sequence usually with explanatory titles.  Each strip contains from 12 to 18 or more picture. It is a fixed sequence of related still on a roll of 35 mm film or 8 mm film.  ADVANTAGES:  It is an economical visual material.  It is easy to make and convenient to handle and carry.  Takes up little space and can be easily stored.  Provides a logical sequence to the teaching procedure and the individual picture on the strip can be kept before the students for a length of time.  Filmstrip can be projected on the screen or wall or paper screen as the convenience .
  • 158.
    FILM PROJECTOR  INSTRUCTIONSFORUSING:  Preview film strip before using them and selected carefully to meet the needs of the topic to be taught.  Show again any part of the filmstrip needing more specific study.  Use filmstrips to stimulate emotions, build attitudes and to point up problem.  Follow up session and summary is essential.
  • 159.