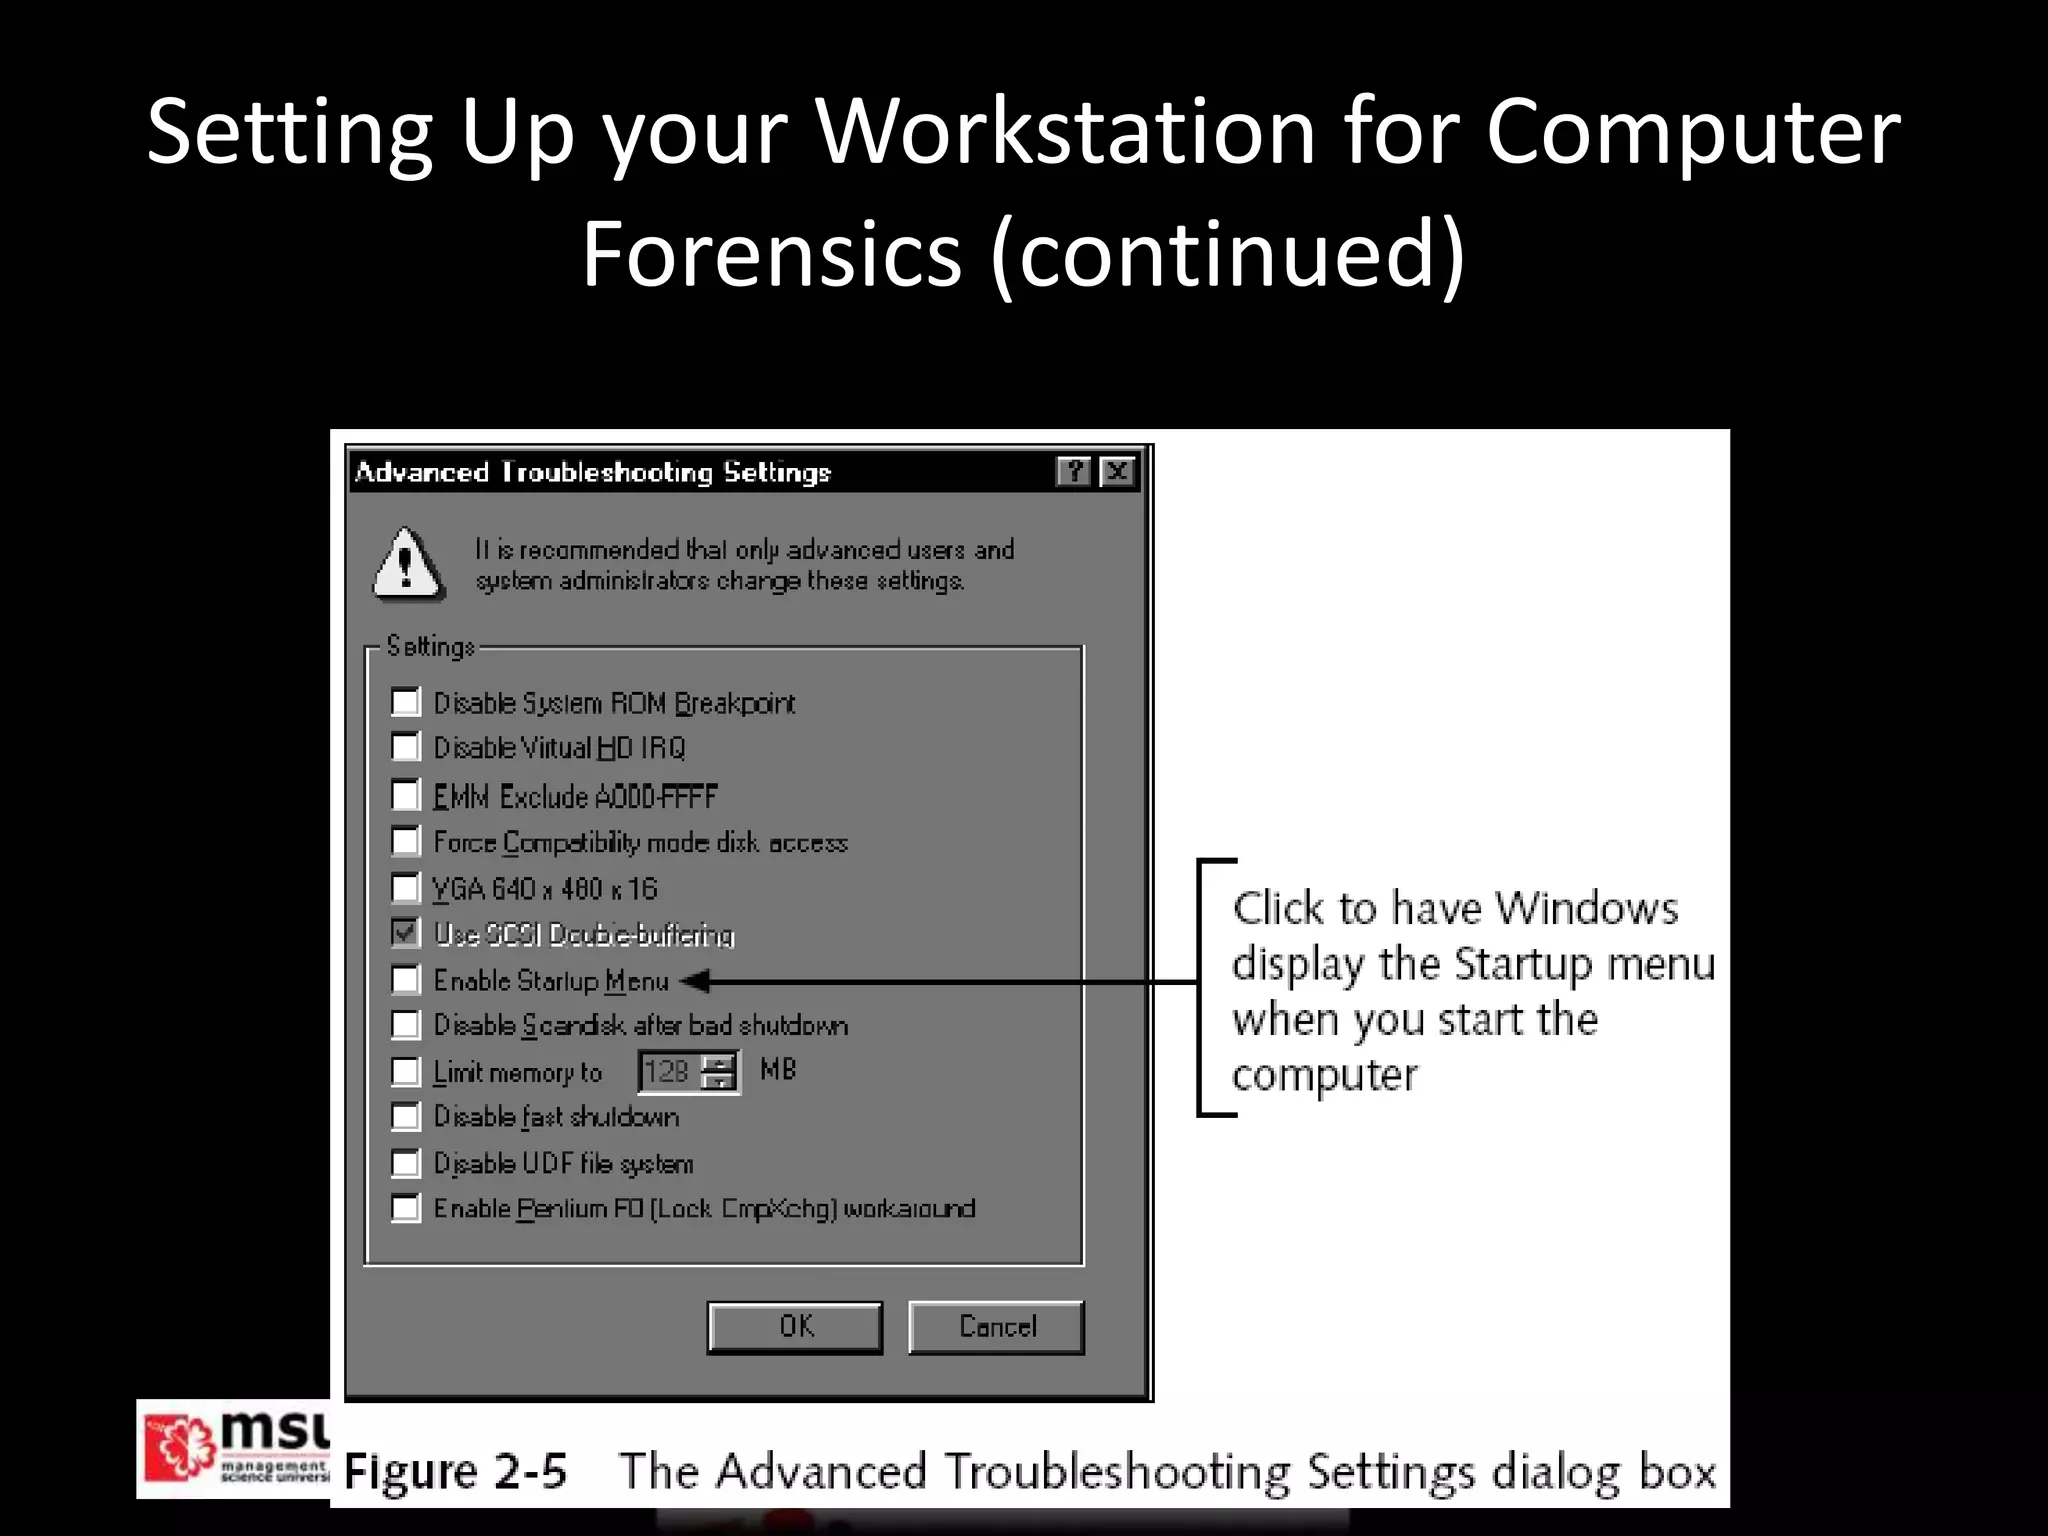
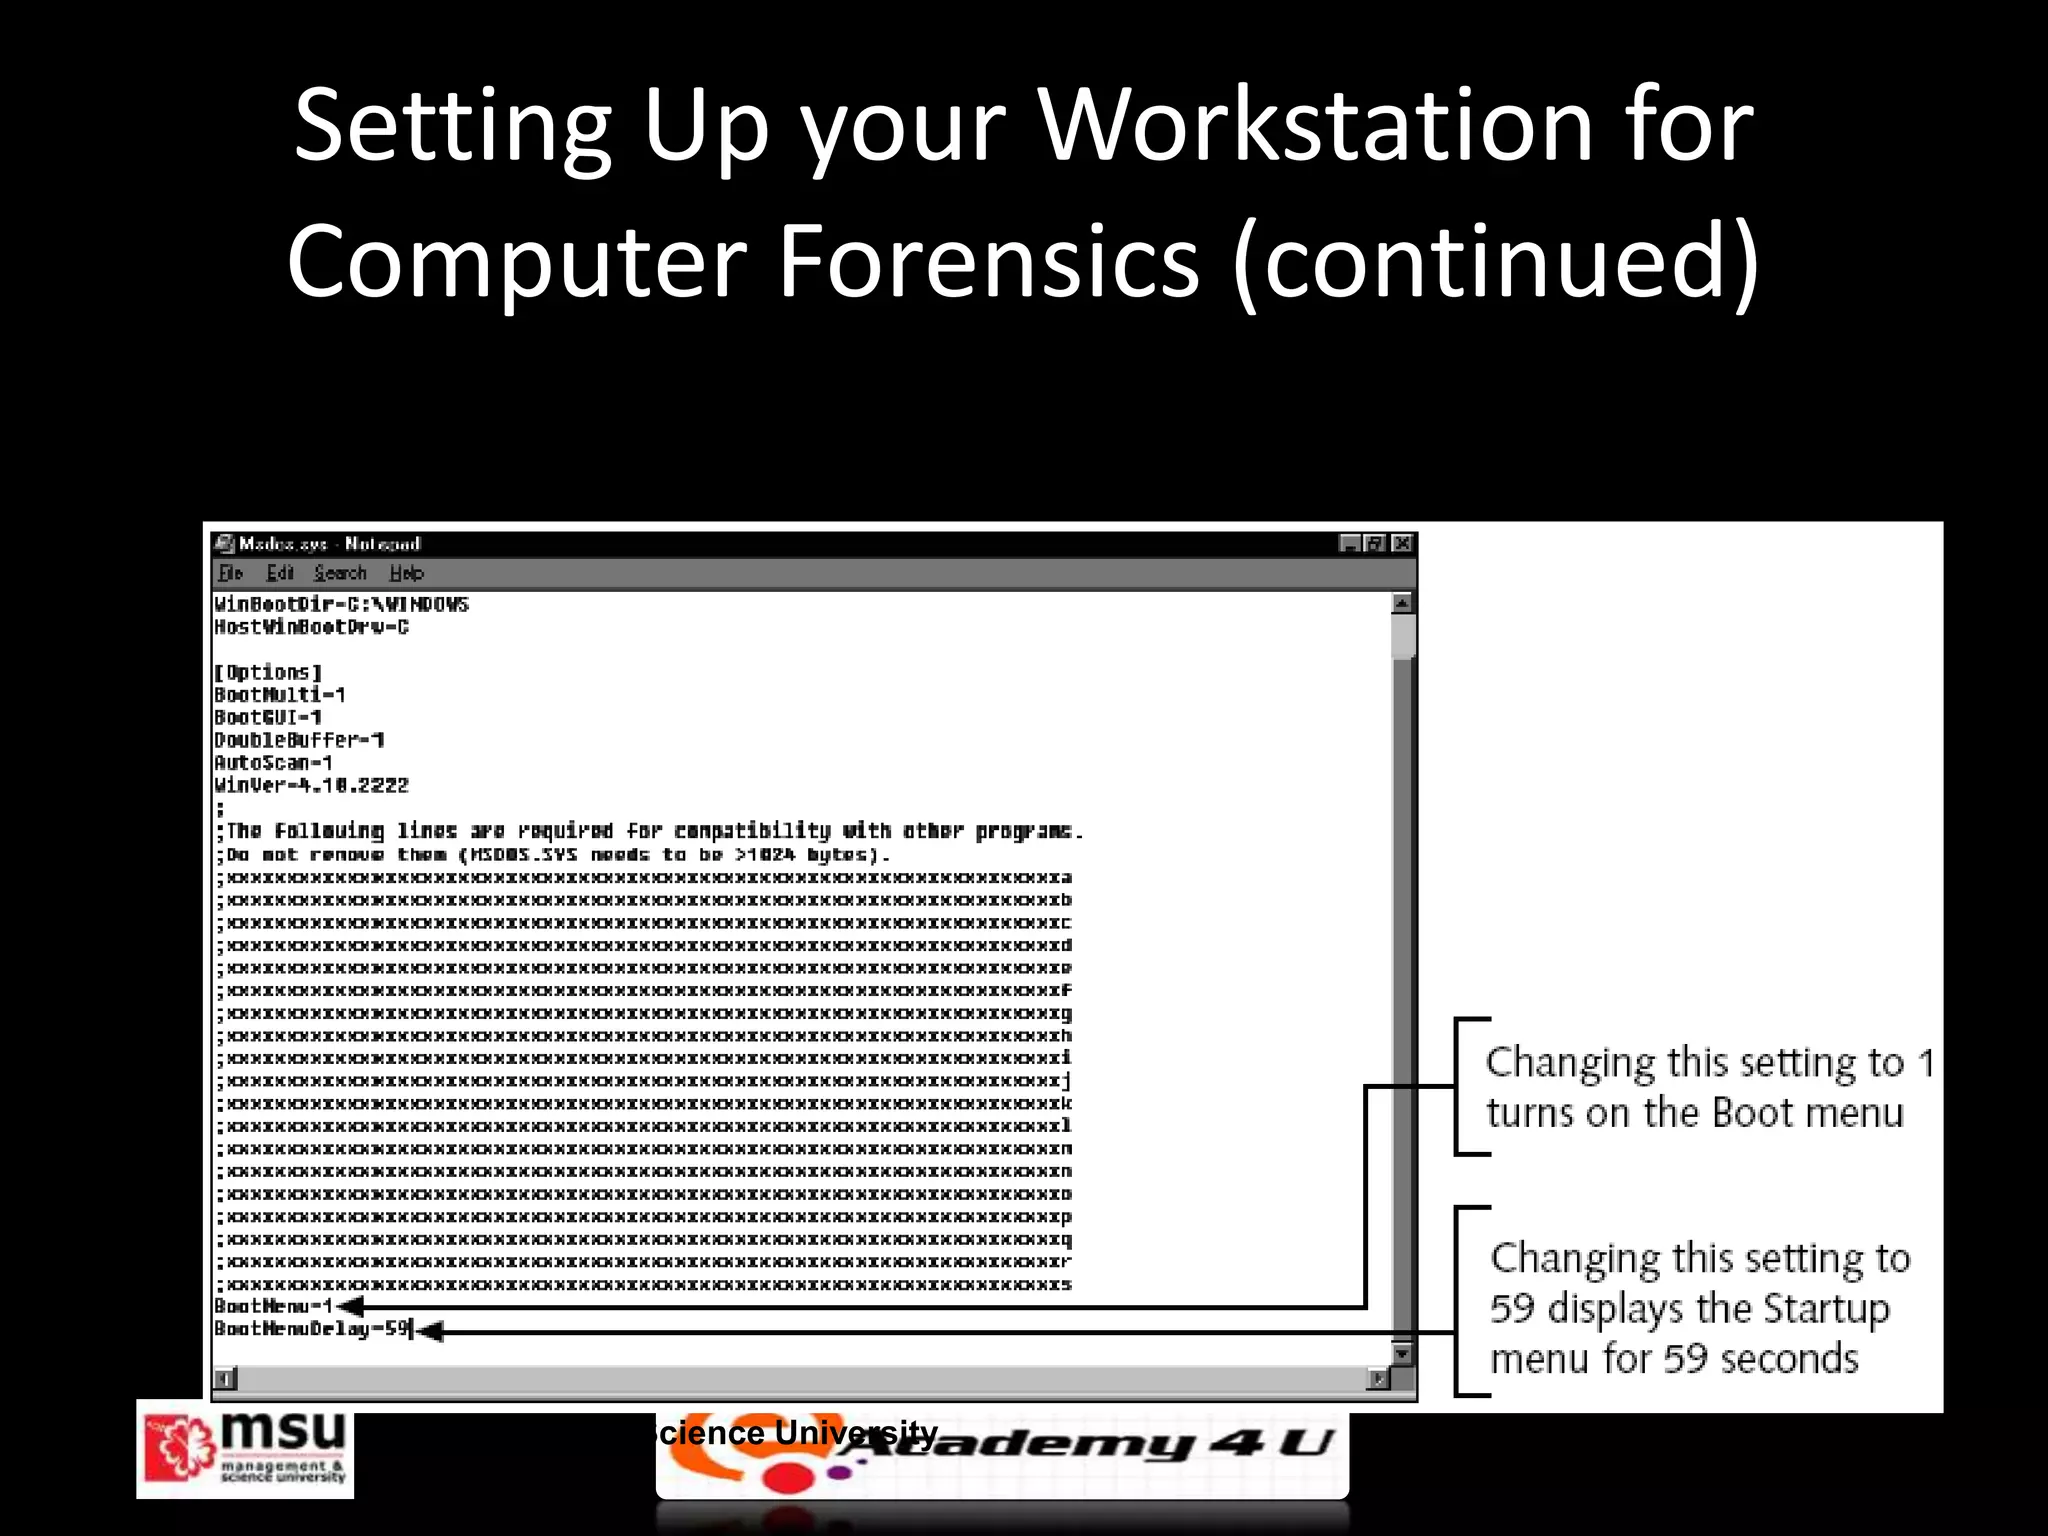
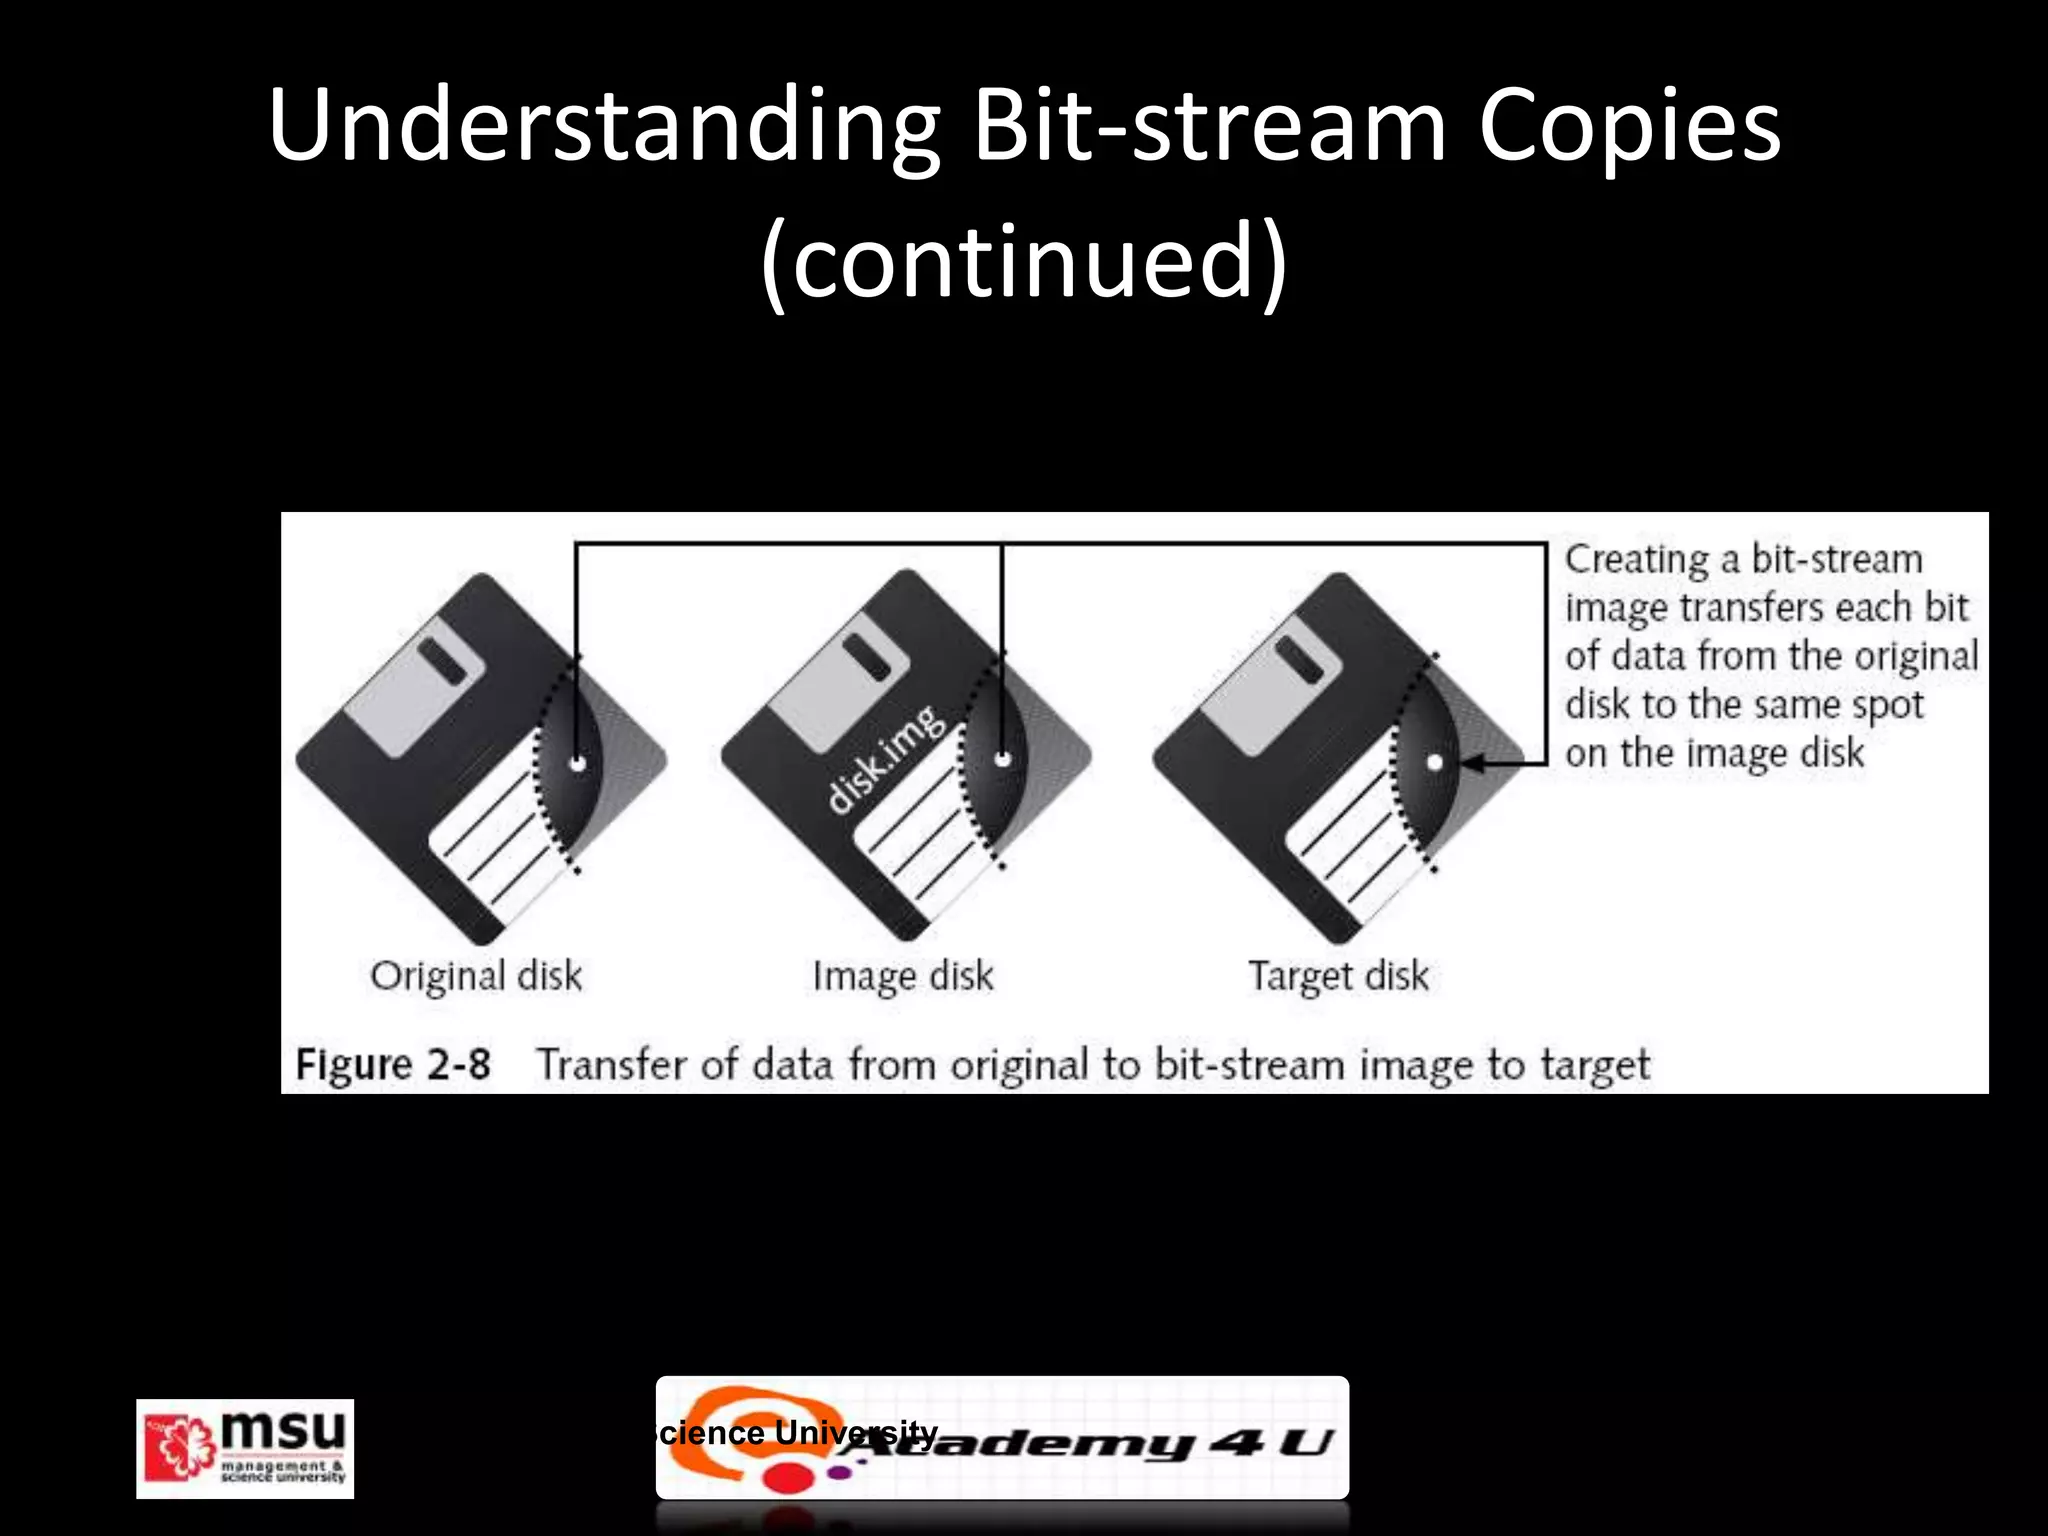
Understanding Computer
     Investigation
Objectives
• Prepare a case
• Begin an investigation
• Understand computer forensics workstations
  and software


      Management & Science University          © FISE
Objectives (continued)
• Conduct an investigation
• Complete a case
• Critique a case


      Management & Science University   © FISE
Preparing a Computer Investigation

  • Role of computer forensics professional:
    gather evidence to prove a suspect
    committed a crime or violated a company
    policy
  • Collect evidence that can be offered in
    court or at a corporate inquiry
    – Investigate the suspect’s computer
    – Preserve the evidence on a different computer

    Management & Science University               © FISE
Preparing a Computer Investigation
                          (continued)

• Follow an accepted procedure to prepare a case
• The U.S. Department of Justice has a document you can
  download that reviews proper acquisition of electronic
  evidence
• Searching and Seizing Computers
• Chain of custody
   – Route the evidence takes from the time you find it
     until the case is closed or goes to court


        Management & Science University                    © FISE
Examining a Computer Crime
• Computers can contain information that helps law
  enforcement determine:
   – Chain of events leading to a crime
   – Evidence that can lead to a conviction
• Law enforcement officers should follow proper
  procedure when acquiring the evidence
   – Digital evidence can be easily altered by an
     overeager investigator


       Management & Science University               © FISE
Examining a Computer Crime


 Management & Science University   © FISE
Examining a Company Policy Violation

• Companies often establish policies for
  computer use by employees.
• Employees misusing resources can cost
  companies millions of dollars
• Misuse includes:
  – Surfing the Internet
  – Sending personal e-mails
  – Using company computers for personal tasks
      Management & Science University            © FISE
Taking a Systematic Approach
• Steps for problem solving:
  – Make an initial assessment about the type of case
    you are investigating
  – Determine a preliminary design or approach to
    the case
  – Create a detailed design
  – Determine the resources you need
  – Obtain and copy an evidence disk drive

      Management & Science University                   © FISE
Taking a Systematic Approach
            (continued)
• Steps for problem solving (continued):
  – Identify the risks
  – Mitigate or minimize the risks
  – Test the design
  – Analyze and recover the digital evidence
  – Investigate the data you recovered
  – Complete the case report
  – Critique the case

      Management & Science University          © FISE
Assessing the Case

• Systematically outline the case details:
  – Situation
  – Nature of the case
  – Specifics about the case
  – Type of evidence
  – OS
  – Known disk format
  – Location of evidence
     Management & Science University         © FISE
Assessing the Case (continued)

• Based on case details, you can determine
  the case requirements:
  – Type of evidence
  – Computer forensics tools
  – Special OSs


   Management & Science University           © FISE
Planning your Investigation
• A basic investigation plan should include the
  following activities:
  – Acquire the evidence
  – Complete an evidence form and establish a chain
    of custody
  – Transport evidence to a computer forensics lab
  – Secure evidence in an approved secure container


       Management & Science University                © FISE
Planning your Investigation
            (continued)
• A basic investigation plan (continued):
  – Prepare a forensics workstation
  – Obtain the evidence from the secure container
  – Make a forensic copy of the evidence
  – Return the evidence to the secure container
  – Process the copied evidence with computer
    forensics tools


       Management & Science University              © FISE
Planning your Investigation
              (continued)
• An evidence custody form helps you
  document what has been done with the
  original evidence and its forensics copies
• There are two types:
  – Single-evidence form
  – Multi-evidence form


   Management & Science University             © FISE
Planning your Investigation
           (continued)


Management & Science University   © FISE
Planning your Investigation
           (continued)


Management & Science University   © FISE
Securing your Evidence
• Use evidence bags to secure and catalog the
  evidence
• Use computer safe products
  – Antistatic bags
  – Antistatic pads
• Use well-padded containers


       Management & Science University          © FISE
Securing your Evidence (continued)
• Use evidence tape to seal all openings
  – Floppy disk or CD drives
  – Power supply electrical cord
• Write your initials on tape to prove that
  evidence has not been tampered
• Consider computer-specific temperature and
  humidity ranges


       Management & Science University         © FISE
Understanding Data-Recovery
 Workstations and Software
• Investigations are conducted on a computer
  forensics lab (or data-recovery lab)
• Computer forensics and data-recovery are
  related but different
• Computer forensics workstation
  – Specially configured personal computer
• To avoid altering the evidence, use:
  – Forensics boot floppy disk
  – Write-blockers devices
  Management & Science University            © FISE
Setting Up your Workstation for
        Computer Forensics
• Set up Windows 98 workstation to boot into
  MS-DOS
  – Display a Startup menu
  – Modify Msdos.sys file using any text editor
• Install a computer forensics tool
  – DriveSpy and Image


       Management & Science University            © FISE
Setting Up your Workstation for Computer
          Forensics (continued)


     Management & Science University       © FISE
Setting Up your Workstation for
Computer Forensics (continued)


  Management & Science University   © FISE
Conducting an Investigation
• Begin by copying the evidence using a variety
  of methods
  – Recall that no single method retrieves all data
  – The more methods you use, the better


       Management & Science University                © FISE
Gathering the Evidence

• Take all necessary measures to avoid
  damaging the evidence
  – Place the evidence in a secure container
• Complete the evidence custody form
• Transport the evidence to the computer
  forensics lab
• Create forensics copies (if possible)
• Secure evidence by locking the container
  Management & Science University              © FISE
Understanding Bit-stream Copies
• Bit-by-bit copy of the original storage medium
• Exact copy of the original disk
• Different from a simple backup copy
  – Backup software only copy known files
  – Backup software cannot copy deleted files or e-
    mail messages, or recover file fragments


       Management & Science University                © FISE
Understanding Bit-stream Copies
          (continued)
• A bit-stream image file contains the bit-stream
  copy of all data on a disk or partition
• Preferable to copy the image file to a target
  disk that matches the original disk’s
  manufacturer, size, and model


       Management & Science University          © FISE
Understanding Bit-stream Copies
         (continued)


  Management & Science University   © FISE
Creating a Forensic Boot Floppy
               Disk
• Goal is not to alter the original data on a disk
• Preferred way to preserve the original data is to
  never examine it
   – Make forensic copies
   – Create a special boot floppy disk that prevents
      OS from altering the data when the computer
      starts up
   – Windows 9x can also alter other
      files, especially if DriveSpace is implemented
      on a file allocation table (FAT) 16 disk
   Management & Science University                   © FISE
Assembling the Tools for a Forensic
        Boot Floppy Disk
• Tools:
  – Disk editor such as Norton Disk Edit or Hex
    Workshop
  – Floppy disk
  – MS-DOS OS
  – Computer that can boot to a true MS-DOS level
  – Forensics acquisition tool
  – Write-block tool

       Management & Science University              © FISE
Assembling the Tools for a Forensic Boot
         Floppy Disk (continued)
• Steps:
   – Make the floppy disk bootable
   – Update the OS files to remove any reference to the hard
     disk (using Hex Workshop or Norton Disk Edit)
      • Modify the command.com file on the floppy disk
      • Modify the Io.sys file on the floppy disk
   – Add computer forensic tools
   – Test your floppy disk
   – Create several backup copies


         Management & Science University                       © FISE
Assembling the Tools for a Forensic Boot
       Floppy Disk (continued)


 Management & Science University      © FISE
Retrieving Evidence Data Using a Remote
          Network Connection

  • Bit-stream image copies can also be retrieved
    from a workstation’s network connection
  • Software:
     – SnapBack
     – EnCase
     – R-Tools
  • Can be a time-consuming process even with a
    1000-Mb connection
  • It takes less using a NIC-to-NIC connection
    Management & Science University                 © FISE
Copying the Evidence Disk
• A forensic copy is an exact duplicate of the
  original data
• Create a forensic copy using:
  – MS-DOS
  – Specialized tool such as Digital Intelligence’s Image
     • First, create a bit-stream image
     • Then, copy the image to a target disk


       Management & Science University                  © FISE
Creating a Bit-stream Image
           with FTK Imager

• Start Forensic Toolkit (FTK) Imager by double-
  clicking the icon on your desktop
• Click File, Image Drive from the menu; insert
  floppy disk labeled “Domain Name working
  copy #2”
• In the dialog box that opens, click the A: drive
  to select a local drive, then click OK
      Management & Science University                © FISE
Creating a Bit-stream Image
    with FTK Imager (continued)
• A wizard walks you through the steps
  – Accept all the defaults
  – Specify the destination folder
  – If necessary, create a folder called Forensics Files
  – Name the file Bootimage.1


       Management & Science University                     © FISE
Analyzing Your Digital Evidence
• Your job is to recover data from:
   – Deleted files
   – File fragments
   – Complete files
• Deleted files linger on the disk until new data is
  saved on the same physical location
• Tools:
   – Digital Intelligence’s DriveSpy
   – AccessData’s FTK

        Management & Science University                © FISE
Analyzing Your Digital Evidence
           (continued)
• DriveSpy is a powerful tool that recovers and
  analyzes data on FAT12, FAT16, and FAT32 disks
   – Can search for altered files and keywords
• FTK is an easy-to-use GUI application for
  FAT12, FAT16, FAT32, and new technology file
  system (NTFS) disks
   – FTK Imager
   – Registry Viewer
   – Password Recovery Toolkit
  Management & Science University                  © FISE
Analyzing Your Digital Evidence
         (continued)


  Management & Science University   © FISE
Analyzing Your Digital Evidence
         (continued)


  Management & Science University   © FISE
Completing the Case
• You need to produce a final report
  – State what you did and what you found
• You can even include logs from the forensic
  tools you used
• If required, use a report template
• The report should show conclusive
  evidence that the suspect did or did not
  commit a crime or violate a company policy
  Management & Science University           © FISE
Critiquing the Case
• Ask yourself the following questions:
  – How could you improve your participation in the
    case?
  – Did you expect the results you found?
  – Did the case develop in ways you did not expect?
  – Was the documentation as thorough as it could
    have been?


       Management & Science University                 © FISE
Critiquing the Case (continued)
• Questions continued:
  – What feedback has been received from the
    requesting source?
  – Did you discover any new problems? What are
    they?
  – Did you use new techniques during the case or
    during research?


      Management & Science University               © FISE
Summary

• Use a systematic approach to investigations
• Plan a case by taking into account:
   – Nature of the case
   – Case requirements
   – Gathering evidence techniques
• Do not forget that every case can go to court
• Apply standard problem-solving techniques

     Management & Science University              © FISE
Summary (continued)

• Keep track of the chain of custody of your evidence
• Create bit-stream copies of the original data
• Use the duplicates whenever possible
• Some tools: DriveSpy and Image, FTK, MS-DOS
  commands
• Produce a final report detailing what you did and
  found


     Management & Science University                © FISE
Summary (continued)

• Always critique your work as a way of
  improving it
• Apply these lessons to future cases


     Management & Science University      © FISE

Understanding computer investigation

  • 1.
  • 2.
    Objectives • Prepare acase • Begin an investigation • Understand computer forensics workstations and software Management & Science University © FISE
  • 3.
    Objectives (continued) • Conductan investigation • Complete a case • Critique a case Management & Science University © FISE
  • 4.
    Preparing a ComputerInvestigation • Role of computer forensics professional: gather evidence to prove a suspect committed a crime or violated a company policy • Collect evidence that can be offered in court or at a corporate inquiry – Investigate the suspect’s computer – Preserve the evidence on a different computer Management & Science University © FISE
  • 5.
    Preparing a ComputerInvestigation (continued) • Follow an accepted procedure to prepare a case • The U.S. Department of Justice has a document you can download that reviews proper acquisition of electronic evidence • Searching and Seizing Computers • Chain of custody – Route the evidence takes from the time you find it until the case is closed or goes to court Management & Science University © FISE
  • 6.
    Examining a ComputerCrime • Computers can contain information that helps law enforcement determine: – Chain of events leading to a crime – Evidence that can lead to a conviction • Law enforcement officers should follow proper procedure when acquiring the evidence – Digital evidence can be easily altered by an overeager investigator Management & Science University © FISE
  • 7.
    Examining a ComputerCrime Management & Science University © FISE
  • 8.
    Examining a CompanyPolicy Violation • Companies often establish policies for computer use by employees. • Employees misusing resources can cost companies millions of dollars • Misuse includes: – Surfing the Internet – Sending personal e-mails – Using company computers for personal tasks Management & Science University © FISE
  • 9.
    Taking a SystematicApproach • Steps for problem solving: – Make an initial assessment about the type of case you are investigating – Determine a preliminary design or approach to the case – Create a detailed design – Determine the resources you need – Obtain and copy an evidence disk drive Management & Science University © FISE
  • 10.
    Taking a SystematicApproach (continued) • Steps for problem solving (continued): – Identify the risks – Mitigate or minimize the risks – Test the design – Analyze and recover the digital evidence – Investigate the data you recovered – Complete the case report – Critique the case Management & Science University © FISE
  • 11.
    Assessing the Case •Systematically outline the case details: – Situation – Nature of the case – Specifics about the case – Type of evidence – OS – Known disk format – Location of evidence Management & Science University © FISE
  • 12.
    Assessing the Case(continued) • Based on case details, you can determine the case requirements: – Type of evidence – Computer forensics tools – Special OSs Management & Science University © FISE
  • 13.
    Planning your Investigation •A basic investigation plan should include the following activities: – Acquire the evidence – Complete an evidence form and establish a chain of custody – Transport evidence to a computer forensics lab – Secure evidence in an approved secure container Management & Science University © FISE
  • 14.
    Planning your Investigation (continued) • A basic investigation plan (continued): – Prepare a forensics workstation – Obtain the evidence from the secure container – Make a forensic copy of the evidence – Return the evidence to the secure container – Process the copied evidence with computer forensics tools Management & Science University © FISE
  • 15.
    Planning your Investigation (continued) • An evidence custody form helps you document what has been done with the original evidence and its forensics copies • There are two types: – Single-evidence form – Multi-evidence form Management & Science University © FISE
  • 16.
    Planning your Investigation (continued) Management & Science University © FISE
  • 17.
    Planning your Investigation (continued) Management & Science University © FISE
  • 18.
    Securing your Evidence •Use evidence bags to secure and catalog the evidence • Use computer safe products – Antistatic bags – Antistatic pads • Use well-padded containers Management & Science University © FISE
  • 19.
    Securing your Evidence(continued) • Use evidence tape to seal all openings – Floppy disk or CD drives – Power supply electrical cord • Write your initials on tape to prove that evidence has not been tampered • Consider computer-specific temperature and humidity ranges Management & Science University © FISE
  • 20.
    Understanding Data-Recovery Workstationsand Software • Investigations are conducted on a computer forensics lab (or data-recovery lab) • Computer forensics and data-recovery are related but different • Computer forensics workstation – Specially configured personal computer • To avoid altering the evidence, use: – Forensics boot floppy disk – Write-blockers devices Management & Science University © FISE
  • 21.
    Setting Up yourWorkstation for Computer Forensics • Set up Windows 98 workstation to boot into MS-DOS – Display a Startup menu – Modify Msdos.sys file using any text editor • Install a computer forensics tool – DriveSpy and Image Management & Science University © FISE
  • 22.
    Setting Up yourWorkstation for Computer Forensics (continued) Management & Science University © FISE
  • 23.
    Setting Up yourWorkstation for Computer Forensics (continued) Management & Science University © FISE
  • 24.
    Conducting an Investigation •Begin by copying the evidence using a variety of methods – Recall that no single method retrieves all data – The more methods you use, the better Management & Science University © FISE
  • 25.
    Gathering the Evidence •Take all necessary measures to avoid damaging the evidence – Place the evidence in a secure container • Complete the evidence custody form • Transport the evidence to the computer forensics lab • Create forensics copies (if possible) • Secure evidence by locking the container Management & Science University © FISE
  • 26.
    Understanding Bit-stream Copies •Bit-by-bit copy of the original storage medium • Exact copy of the original disk • Different from a simple backup copy – Backup software only copy known files – Backup software cannot copy deleted files or e- mail messages, or recover file fragments Management & Science University © FISE
  • 27.
    Understanding Bit-stream Copies (continued) • A bit-stream image file contains the bit-stream copy of all data on a disk or partition • Preferable to copy the image file to a target disk that matches the original disk’s manufacturer, size, and model Management & Science University © FISE
  • 28.
    Understanding Bit-stream Copies (continued) Management & Science University © FISE
  • 29.
    Creating a ForensicBoot Floppy Disk • Goal is not to alter the original data on a disk • Preferred way to preserve the original data is to never examine it – Make forensic copies – Create a special boot floppy disk that prevents OS from altering the data when the computer starts up – Windows 9x can also alter other files, especially if DriveSpace is implemented on a file allocation table (FAT) 16 disk Management & Science University © FISE
  • 30.
    Assembling the Toolsfor a Forensic Boot Floppy Disk • Tools: – Disk editor such as Norton Disk Edit or Hex Workshop – Floppy disk – MS-DOS OS – Computer that can boot to a true MS-DOS level – Forensics acquisition tool – Write-block tool Management & Science University © FISE
  • 31.
    Assembling the Toolsfor a Forensic Boot Floppy Disk (continued) • Steps: – Make the floppy disk bootable – Update the OS files to remove any reference to the hard disk (using Hex Workshop or Norton Disk Edit) • Modify the command.com file on the floppy disk • Modify the Io.sys file on the floppy disk – Add computer forensic tools – Test your floppy disk – Create several backup copies Management & Science University © FISE
  • 32.
    Assembling the Toolsfor a Forensic Boot Floppy Disk (continued) Management & Science University © FISE
  • 33.
    Retrieving Evidence DataUsing a Remote Network Connection • Bit-stream image copies can also be retrieved from a workstation’s network connection • Software: – SnapBack – EnCase – R-Tools • Can be a time-consuming process even with a 1000-Mb connection • It takes less using a NIC-to-NIC connection Management & Science University © FISE
  • 34.
    Copying the EvidenceDisk • A forensic copy is an exact duplicate of the original data • Create a forensic copy using: – MS-DOS – Specialized tool such as Digital Intelligence’s Image • First, create a bit-stream image • Then, copy the image to a target disk Management & Science University © FISE
  • 35.
    Creating a Bit-streamImage with FTK Imager • Start Forensic Toolkit (FTK) Imager by double- clicking the icon on your desktop • Click File, Image Drive from the menu; insert floppy disk labeled “Domain Name working copy #2” • In the dialog box that opens, click the A: drive to select a local drive, then click OK Management & Science University © FISE
  • 36.
    Creating a Bit-streamImage with FTK Imager (continued) • A wizard walks you through the steps – Accept all the defaults – Specify the destination folder – If necessary, create a folder called Forensics Files – Name the file Bootimage.1 Management & Science University © FISE
  • 37.
    Analyzing Your DigitalEvidence • Your job is to recover data from: – Deleted files – File fragments – Complete files • Deleted files linger on the disk until new data is saved on the same physical location • Tools: – Digital Intelligence’s DriveSpy – AccessData’s FTK Management & Science University © FISE
  • 38.
    Analyzing Your DigitalEvidence (continued) • DriveSpy is a powerful tool that recovers and analyzes data on FAT12, FAT16, and FAT32 disks – Can search for altered files and keywords • FTK is an easy-to-use GUI application for FAT12, FAT16, FAT32, and new technology file system (NTFS) disks – FTK Imager – Registry Viewer – Password Recovery Toolkit Management & Science University © FISE
  • 39.
    Analyzing Your DigitalEvidence (continued) Management & Science University © FISE
  • 40.
    Analyzing Your DigitalEvidence (continued) Management & Science University © FISE
  • 41.
    Completing the Case •You need to produce a final report – State what you did and what you found • You can even include logs from the forensic tools you used • If required, use a report template • The report should show conclusive evidence that the suspect did or did not commit a crime or violate a company policy Management & Science University © FISE
  • 42.
    Critiquing the Case •Ask yourself the following questions: – How could you improve your participation in the case? – Did you expect the results you found? – Did the case develop in ways you did not expect? – Was the documentation as thorough as it could have been? Management & Science University © FISE
  • 43.
    Critiquing the Case(continued) • Questions continued: – What feedback has been received from the requesting source? – Did you discover any new problems? What are they? – Did you use new techniques during the case or during research? Management & Science University © FISE
  • 44.
    Summary • Use asystematic approach to investigations • Plan a case by taking into account: – Nature of the case – Case requirements – Gathering evidence techniques • Do not forget that every case can go to court • Apply standard problem-solving techniques Management & Science University © FISE
  • 45.
    Summary (continued) • Keeptrack of the chain of custody of your evidence • Create bit-stream copies of the original data • Use the duplicates whenever possible • Some tools: DriveSpy and Image, FTK, MS-DOS commands • Produce a final report detailing what you did and found Management & Science University © FISE
  • 46.
    Summary (continued) • Alwayscritique your work as a way of improving it • Apply these lessons to future cases Management & Science University © FISE