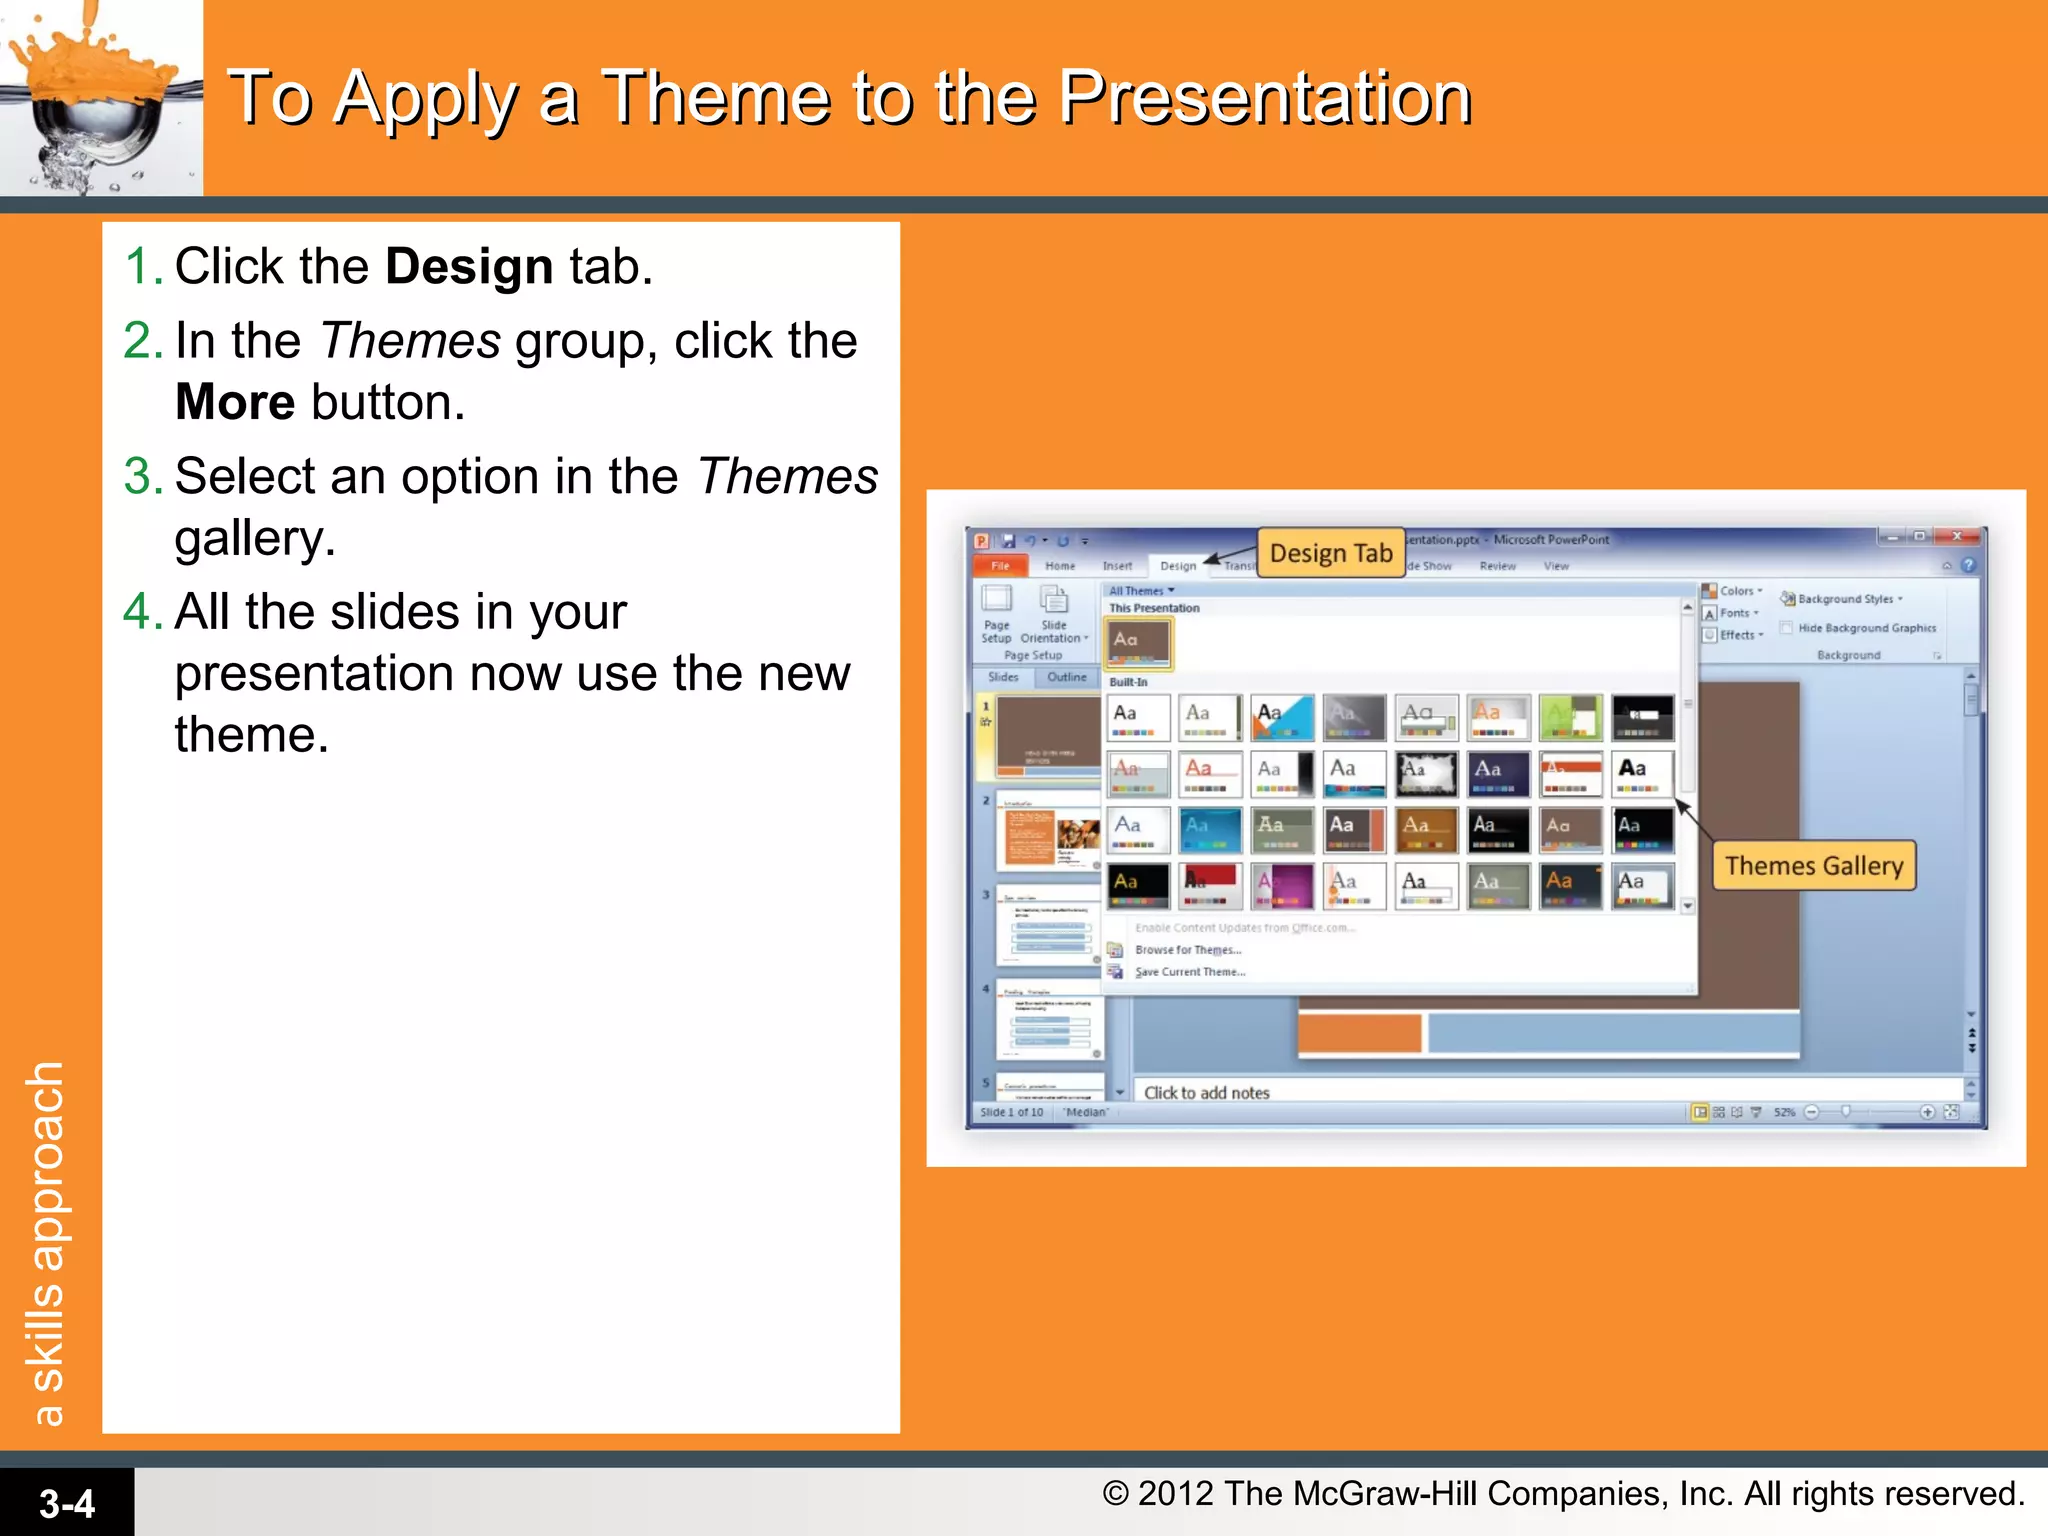
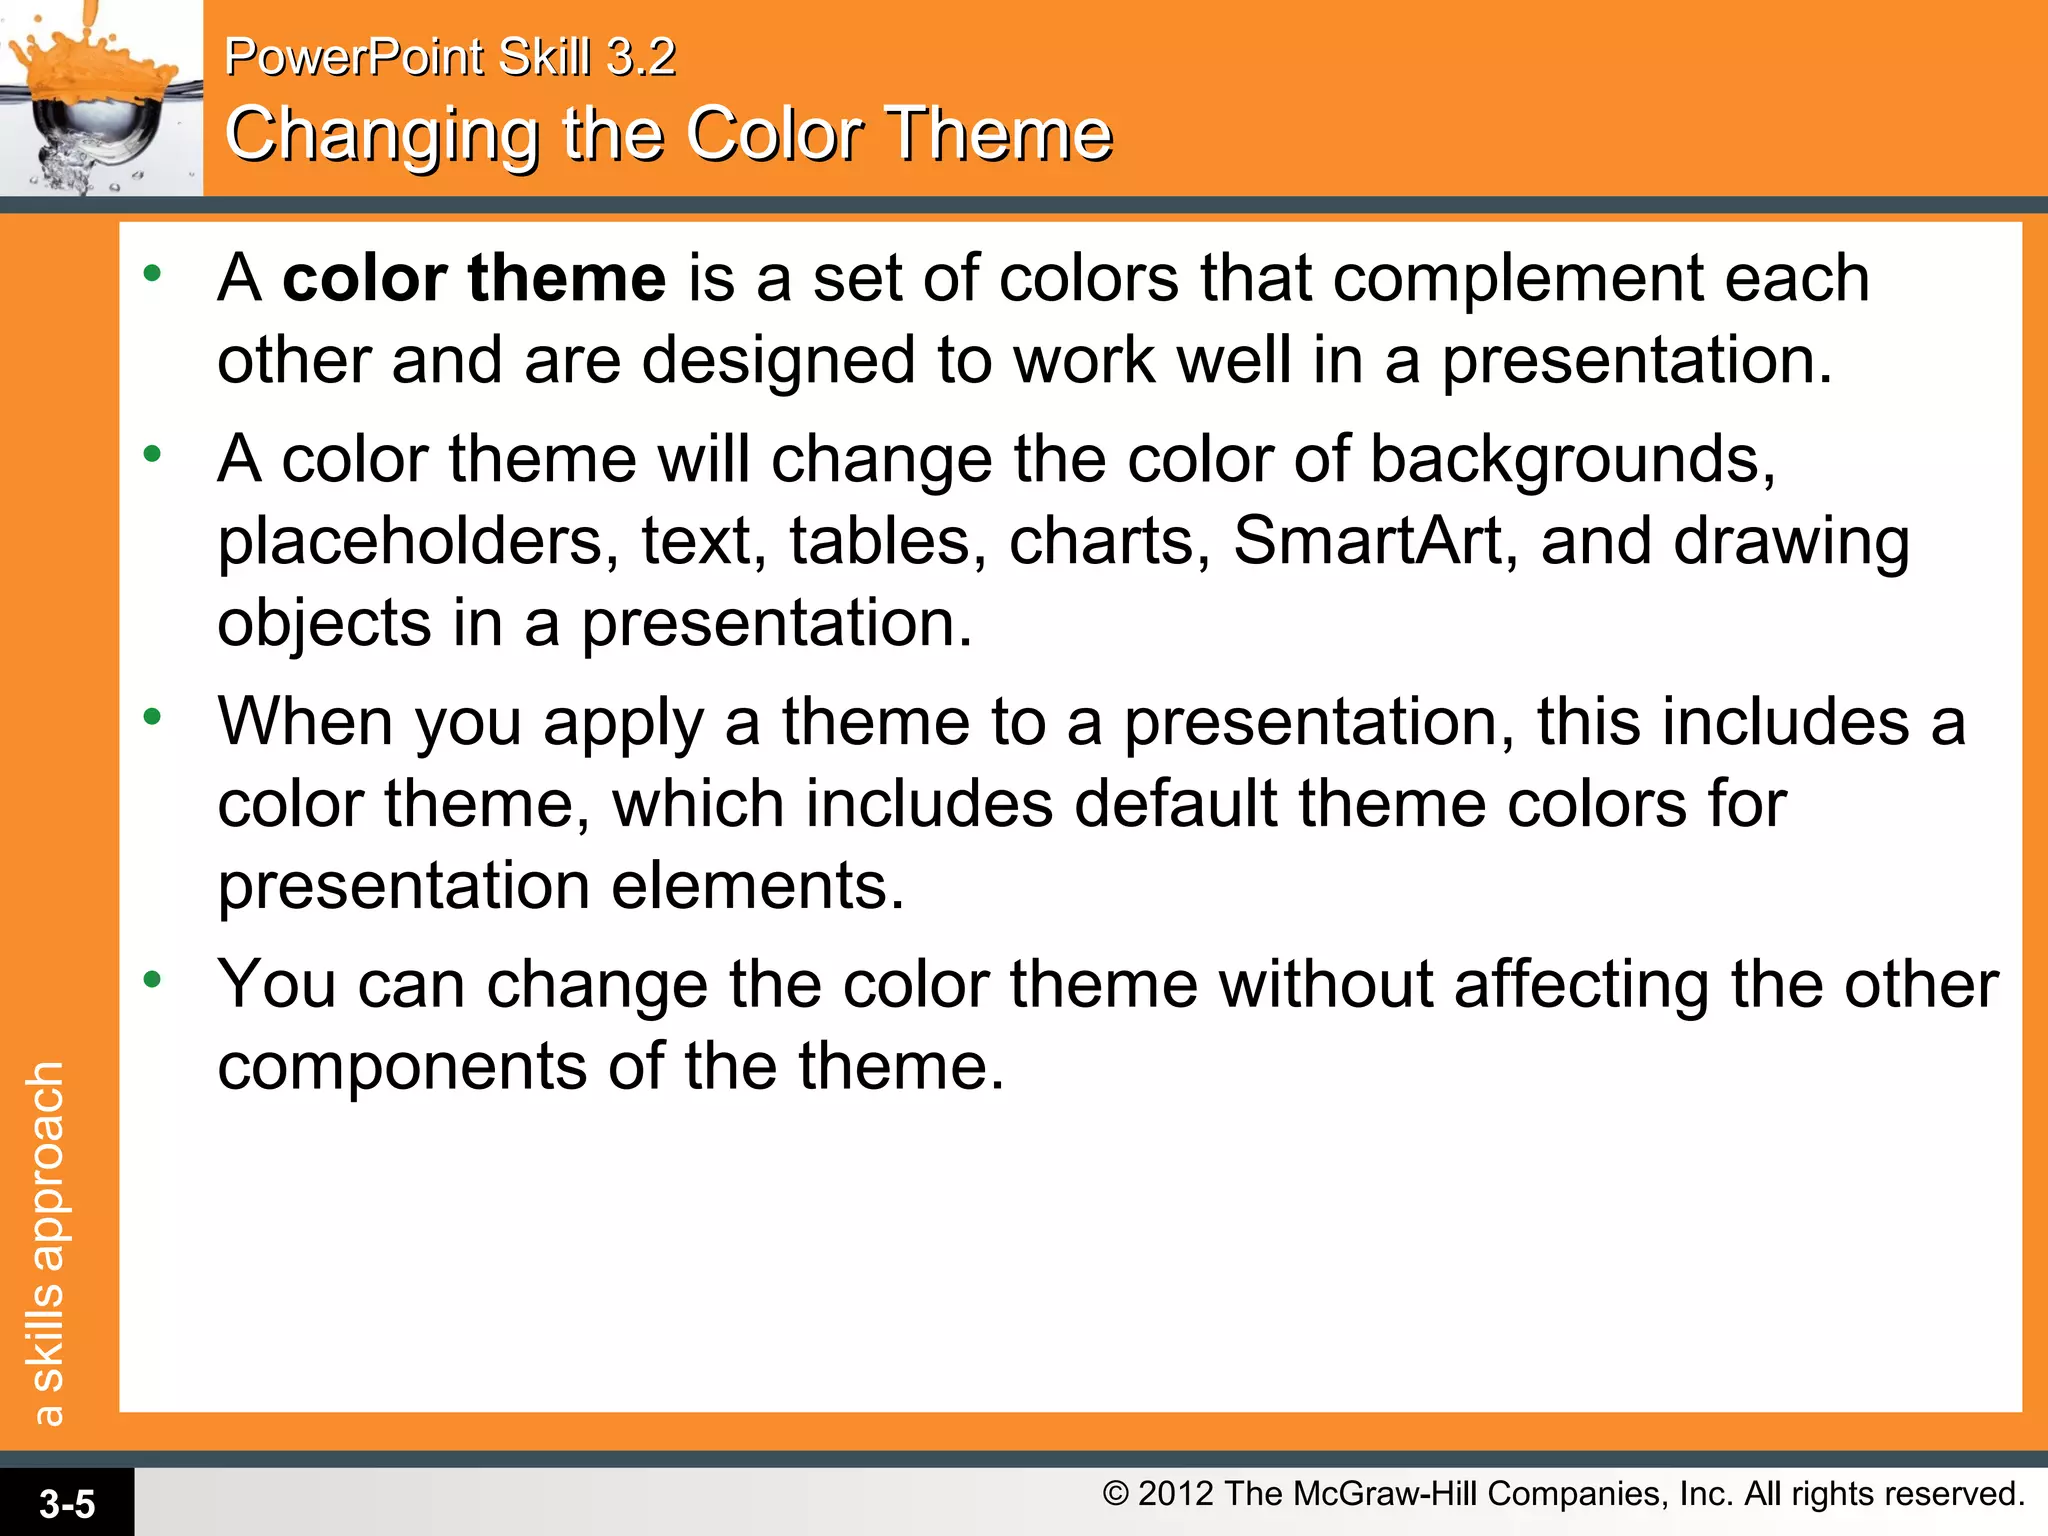
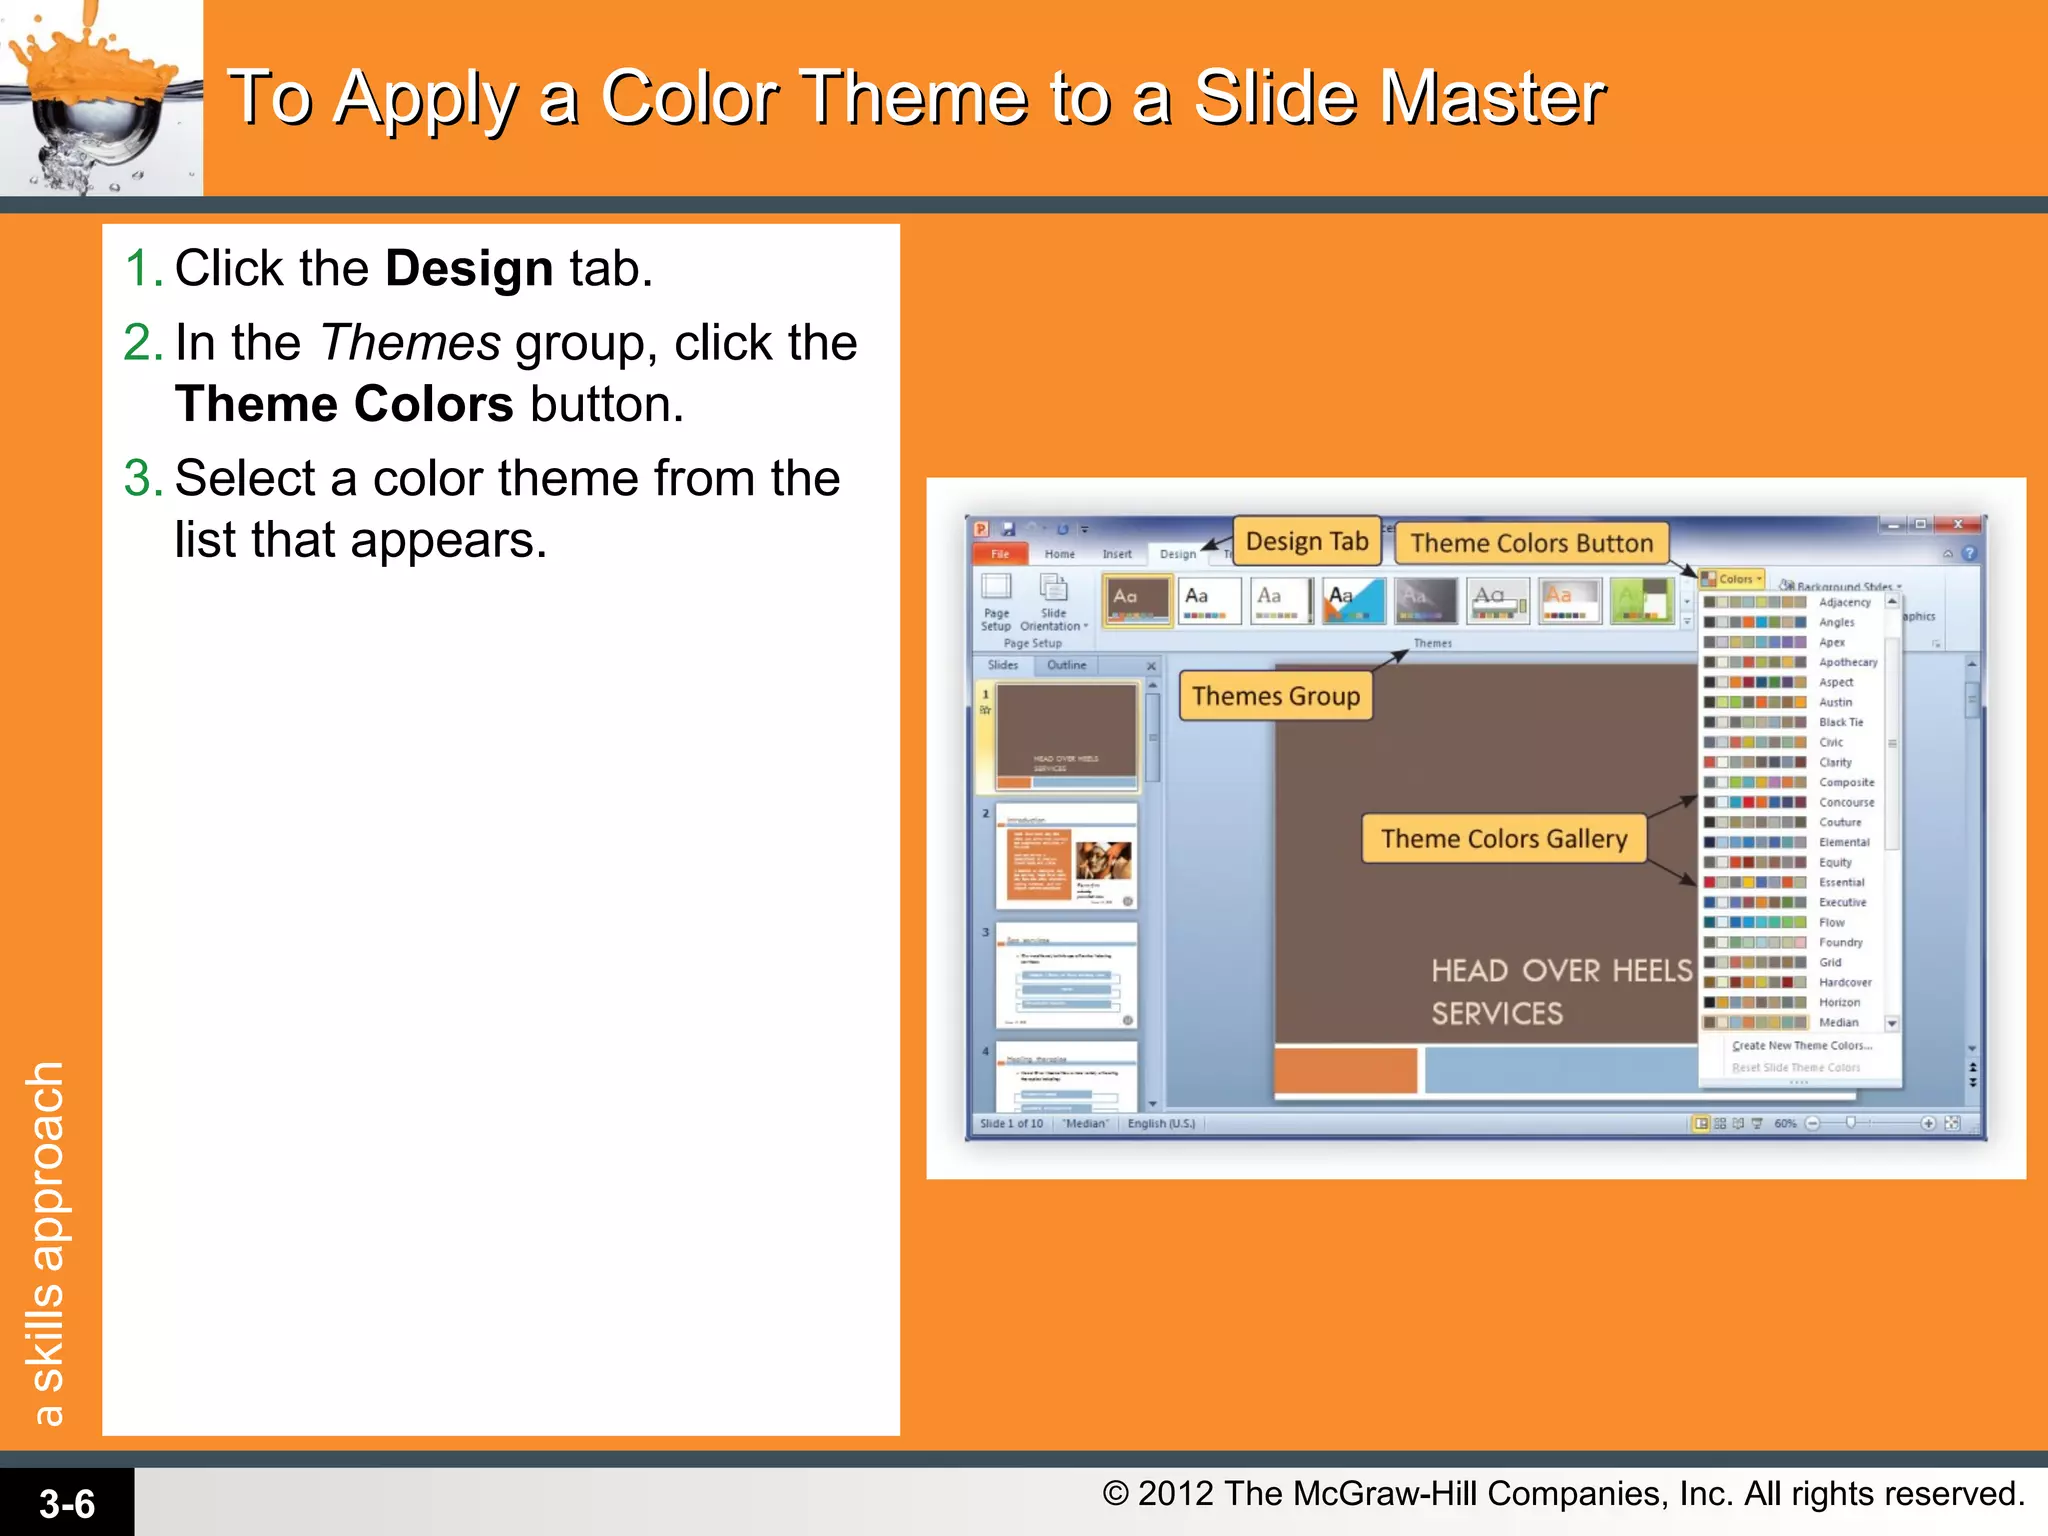
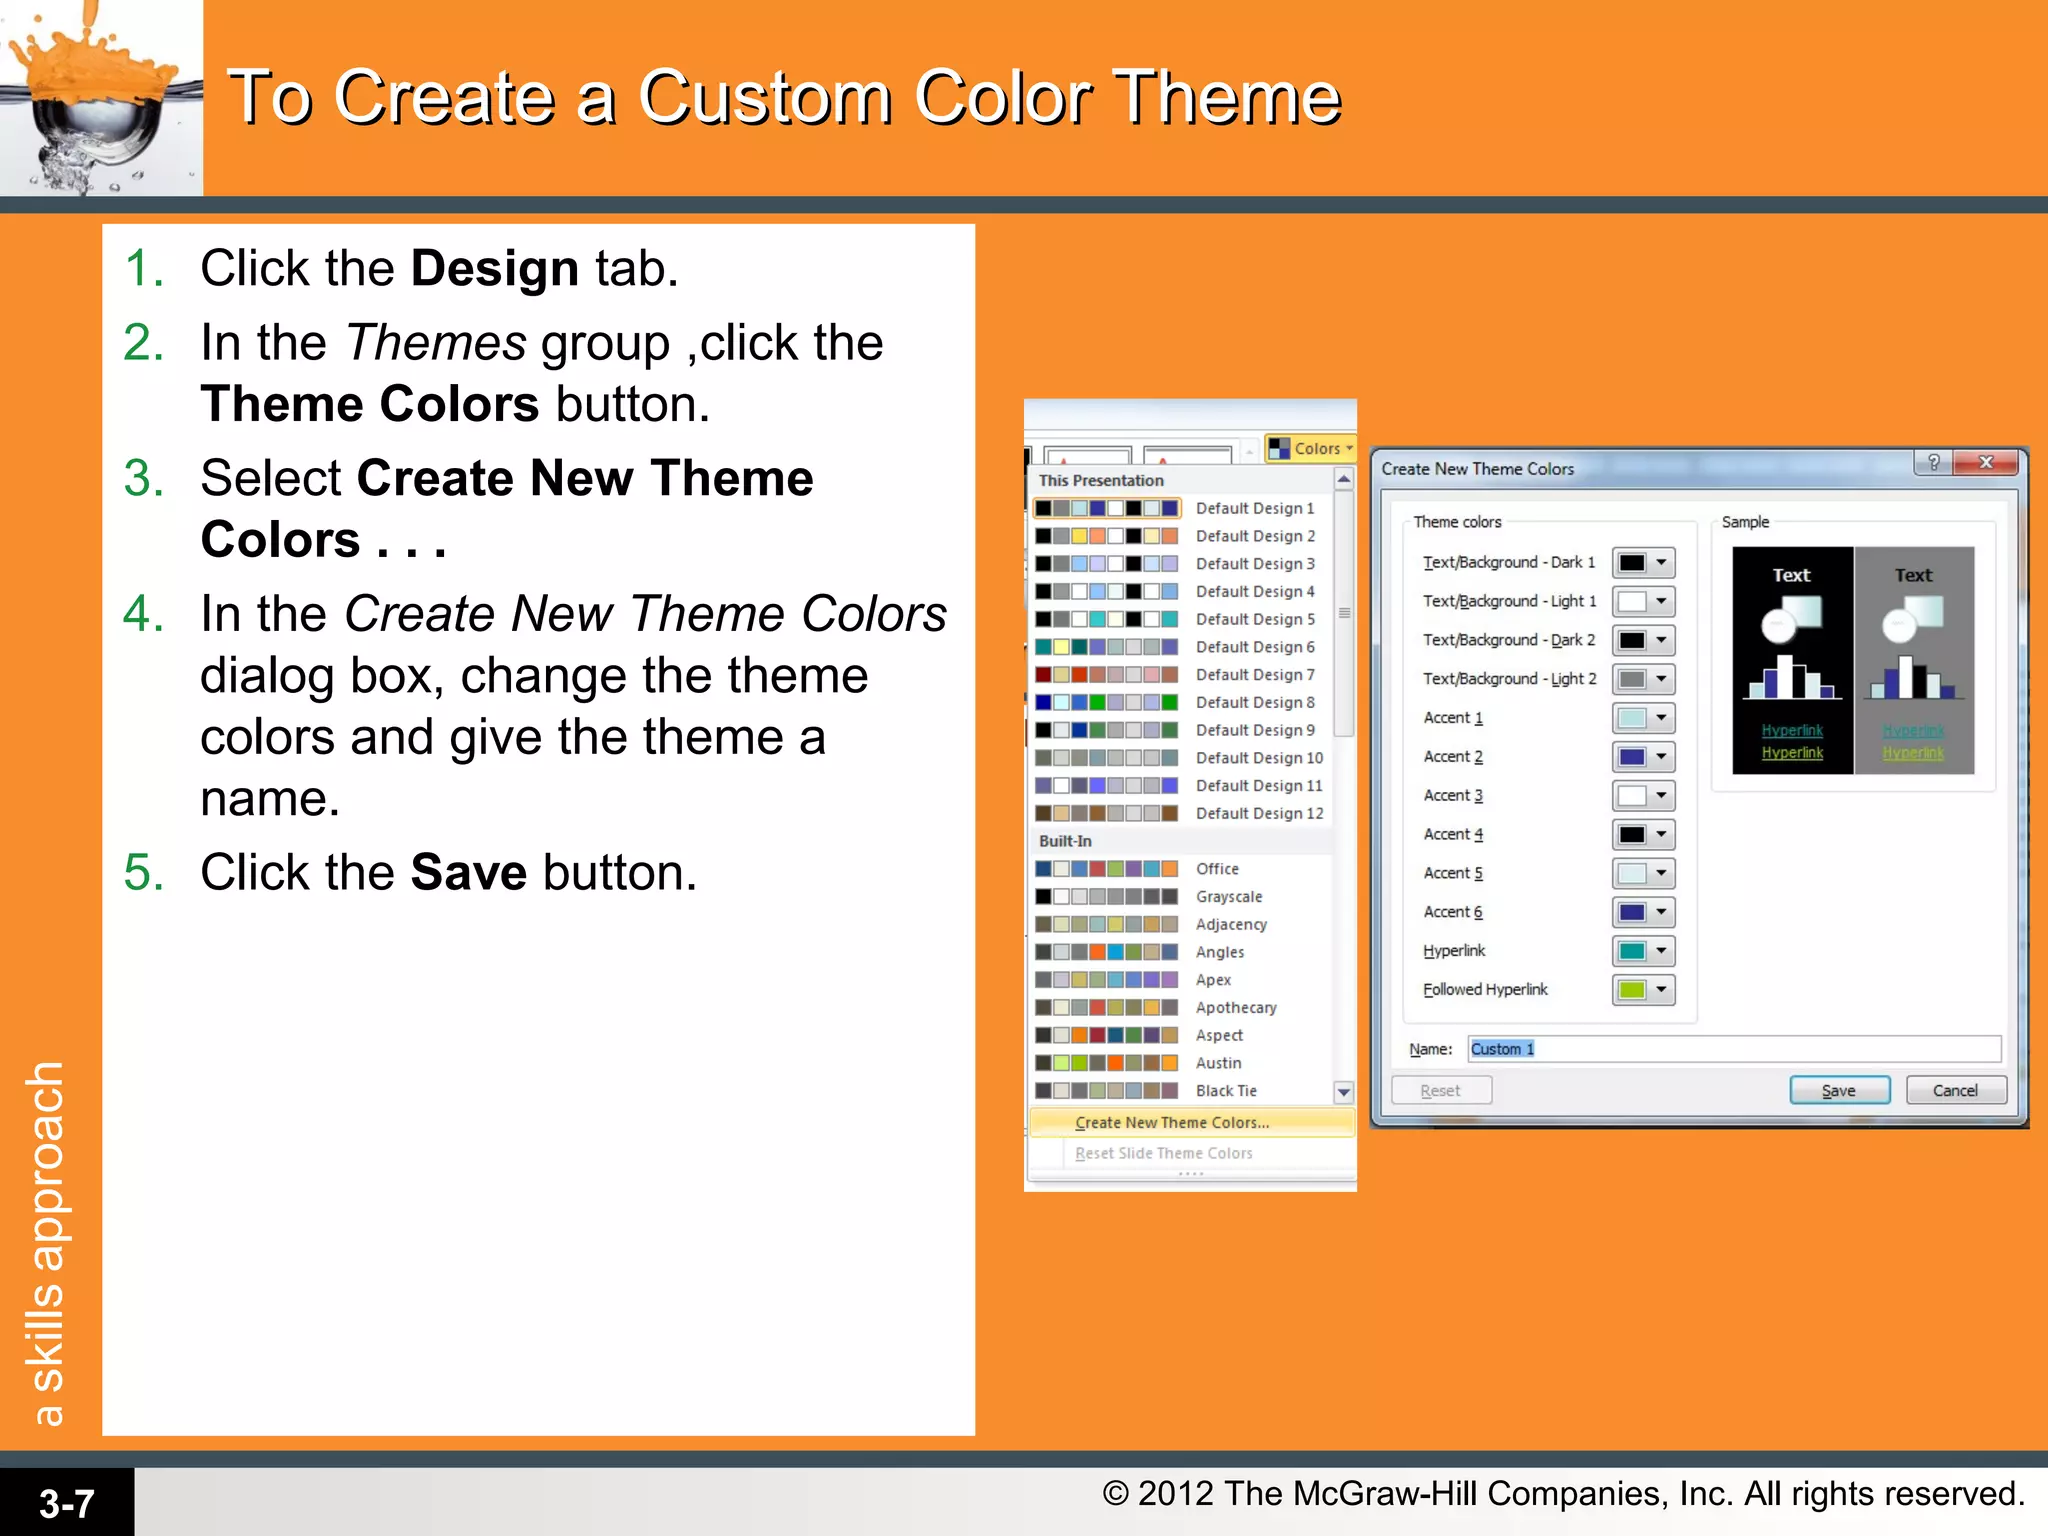
This document discusses formatting options in PowerPoint 2010 presentations. It covers how to change themes, color themes, theme effects, slide backgrounds, fonts, and the look of text boxes. It also discusses applying quick styles to text boxes and tables. The document provides step-by-step instructions for tasks like changing themes, backgrounds, fonts, and applying quick styles. It explains concepts like what themes, color themes, and theme effects are in PowerPoint.
Ribbon Toolbar & Formatting
Inserting and Adding Objects
Creating Theme Color
Creating a Hyperlink
Slide Transitions
Slide Animation
Starting a Slide Show
Printing Slide
Microsoft Office Templates
This document provides instructions on how to use various features in Microsoft PowerPoint 2010, including:
- Creating a new presentation from scratch, a template, or an existing presentation
- Inserting and formatting text using styles, colors, fonts, and other formatting options
- Adding visual elements like tables, charts, pictures, and videos
- Printing and previewing presentation slides in various layouts
The document is intended as a guide for students in an introductory computer course to learn the basic functions and formatting tools in PowerPoint 2010.
PowerPoint is a program used to create professional presentations that can include text, graphics, tables, charts, audio, video and other media. It allows users to easily enter and edit information, incorporate content from other sources, and present information in various ways. Effective presentations require planning, including determining the message, audience and delivery method. PowerPoint provides various views and tools to organize, design and deliver presentations.
This document provides a tutorial for using Microsoft Powerpoint 2010. It covers topics such as getting started, saving presentations, using the toolbar, formatting slides, inserting objects like tables and pictures, printing presentations, and other helpful functions. The tutorial includes explanations of these topics and screenshots to illustrate the user interface. It is intended to help users learn the basic functions and navigation of Powerpoint.
This document provides an overview of Microsoft PowerPoint, including its uses, interface, slide layouts, adding and modifying content like text, images, and multimedia. It describes how to change designs, duplicate/move/delete slides, and insert slide transitions and animations. Formatting tools are explained for pictures, grouping objects, and including hyperlinks in a presentation. The goal of PowerPoint is to create digital slide shows and presentations that can be published online or printed.
This document provides an overview of PowerPoint, including:
- A brief history of PowerPoint from its origins at Forethought in 1987 to recent versions.
- An explanation of how PowerPoint presentations work, including slides, animations, transitions and customization options.
- Descriptions of the PowerPoint Viewer program and supported file formats.
- A list of PowerPoint versions from 1990 to the present.
The document then provides tips for creating effective PowerPoint presentations, focusing on outlines, slide structure, fonts, colors, backgrounds, graphs, spelling and conclusions.
PowerPoint is a presentation program developed by Microsoft as part of the Microsoft Office suite. It runs on Windows and Mac operating systems. The current versions are PowerPoint 2007 and 2010 for Windows, and PowerPoint 2011 for Mac. PowerPoint was initially called "Presenter" before being renamed in 1987. It provides tools for creating slides with text, images, and multimedia content and arranging them in a presentation. Users can customize slide layouts, themes, animations and slide transitions.
This document provides instructions for using various features in Microsoft PowerPoint. It discusses the View tab's master views, including the Slide, Handout, and Notes masters which act as templates. It also covers the Slide Show tab's Setup group, which allows configuring options for slide show timing, narration, and media playback. Specific functions covered include zooming, fitting slides to windows, rehearsing timings, recording slide shows, and playing back narrations.
This document provides instructions for learning how to use Microsoft PowerPoint 2010. It covers how to open PowerPoint, navigate the interface, insert various objects like text, images, charts and multimedia, apply formatting and animations, create hyperlinks, manage slide designs and transitions, and save and open presentations. The 22 sections walk through each task in a step-by-step manner.
This document provides an overview of features and functions in Microsoft PowerPoint 2013, including:
- Creating and editing presentations, slides, text, and visual elements like tables, charts, photos, and videos.
- Formatting presentations with themes, slide layouts, animations, and multimedia enhancements.
- Organizing slides into sections, rearranging slides, and outlining the presentation.
- Customizing elements like the ribbon, slide masters, and saving as templates.
- Sharing and delivering presentations through different formats, password protection, comments, and collaboration.
PowerPoint 2010 introduces new features to help users at every stage of creating and delivering a presentation. It provides templates to help users start presentations, allows simultaneous collaboration on a single document, includes new options for styling and animating pictures and videos, and enables users to broadcast or record presentations and share them online through tools for optimizing file size and embedding media.
This document provides an overview of the parts and views of Microsoft PowerPoint. It describes the main interface elements like the title bar, menu bar, toolbars, and views such as Normal View, Slide Sorter View, Outline View, Notes Pages View, and Slide Show View. It explains that Normal View is the main editing view with four working areas, while Slide Sorter View makes it easy to organize slide sequences and Outline View is good for writing content and planning presentations.
Microsoft PowerPoint is a presentation program developed by Microsoft as part of its Microsoft Office suite. It allows users to create slideshow presentations consisting of text, images, videos, and other objects that can be displayed on-screen or printed. PowerPoint has tools for inserting tables, charts, graphics, and other media and formatting slide layouts, as well as tools for animating and transitioning between slides during a live presentation. The main components of the PowerPoint interface include the ribbon, which contains tabs for commonly used tools, and the Microsoft Office button for creating new presentations or accessing recently opened ones.
This document provides an overview of key features and functions in Microsoft PowerPoint, including slide layouts, designs, and views. It discusses how to organize content using the outline pane, import Word outlines, format text and slides, use slide and title masters, add special items like charts and tables, and insert animations, transitions, sounds, music, and movies. The document also covers printing options and exporting PowerPoints to Word.
PowerPoint 2010 is a visual application used to create presentations combining text, images, graphs, videos and more. It has a ribbon interface with tabs for tasks like Home, Insert and Design. The application window includes elements like a title bar, quick access toolbar, file tab, groups of commands, slide and notes panes, and status bar. The document provides guidance on designing effective PowerPoint presentations, such as minimizing slides, using readable font sizes, keeping text simple, adding visuals, and checking for errors.
PowerPoint is a graphical presentation program used to organize and present information through slides. Slides can contain text, graphics, sound, and other objects that can be arranged freely. Presentations can be printed, displayed live, or navigated through by the presenter.
To open PowerPoint, go to the Start menu and select it from the Microsoft Office programs. The first thing a user should do is save their new presentation. To save, go to File > Save As and specify a name and location for the file. It's important to save often while working to prevent losing unsaved changes if the computer crashes.
Microsoft PowerPoint is a Microsoft Office product that allows users to design multimedia slide presentations. It incorporates various media types like images, sounds, videos, text, and charts. PowerPoint interacts with other Office applications and is included in most Microsoft Office software packages. The software provides tools for formatting, adding and removing slides, changing slide layouts and views, modifying backgrounds and fonts, and inserting elements like clipart, word art, animations, and smart art.
This document provides an overview of Microsoft PowerPoint 2007. It covers starting PowerPoint, exploring the interface and ribbon, creating and modifying presentations, adding and arranging slides, applying themes and backgrounds, and using different views including normal, slide sorter, and slide show views. Tutorials are also available online for additional PowerPoint features and functions.
Nine Easy Steps To Creating A PPt Presentationjoelk
This 9-step document outlines the process for creating a basic PowerPoint presentation, including organizing content, entering and editing text and outlines, selecting design templates, adding images and graphics, applying slide transitions and animations, printing and presenting slides, and testing the final presentation.
This document provides instructions for learning basic skills in Microsoft PowerPoint. It outlines several lessons that teach how to open PowerPoint, identify its main tools and parts, insert text and media, apply themes and formatting, add animations and transitions between slides. The goals are to understand PowerPoint's basic functions and how to effectively present information to an audience. Quizzes are included to test comprehension.
Microsoft PowerPoint is presentation software that allows users to create professional slideshow presentations. It has tools for adding text, images, videos, charts and more. PowerPoint also offers various layouts, designs, and animation features. The main components of a PowerPoint presentation include slides, which are individual pages that contain text, graphics and other media; and layouts, which refer to the arrangement of content on each slide. To use PowerPoint, users open the application, create and design slides using various tools and features, and can then save their work as a presentation file.
This document provides an agenda for a computer workshop on Microsoft PowerPoint. It outlines topics that will be covered including getting started, working with content, formatting slides, adding different types of content like video and audio, slide effects and animations, setting up slide shows, printing options, and packaging a presentation for CD.
This document provides instructions for opening PowerPoint and performing basic tasks like inserting text, themes, backgrounds, transitions, animations, sounds, headers/footers, and notes. It explains that to open PowerPoint, the user can click Start then All Programs > Microsoft Office > PowerPoint, or click Start then Run and type "PowerPoint". It then provides step-by-step instructions for various common PowerPoint functions like inserting slides, text boxes, themes, backgrounds, transitions, animations, sounds, headers/footers and notes.
PowerPoint is a Microsoft presentation program that allows users to create slide shows with notes to display and navigate through during presentations. Slide shows consist of individual pages or "slides" that can be printed, displayed live, or navigated through by the presenter. PowerPoint provides three types of movements between elements on slides (custom animations) and between slides (transitions). It has versions for Windows and Mac operating systems.
The document provides an overview of the key features and capabilities of Microsoft PowerPoint 2016. It discusses navigating the PowerPoint interface and ribbon. It also covers how to work with presentations by creating, editing, and formatting slides, as well as adding various multimedia elements like pictures, videos, shapes, charts, and animations. The document concludes by discussing how to prepare and share presentations by rehearsing, printing, saving as a video, and sharing with others.
PowerPoint 2010 introduces several new features including co-authoring that allows multiple people to work on a presentation simultaneously, improved photo cropping and graphic layouts, bookmarks for video and audio, adding screenshots directly in slides, and editing and viewing presentations from phones. Presentations can also now be converted to video files or made portable by embedding. These features aim to make collaboration easier and presentations more visual and professional.
The document outlines 10 new features of PowerPoint 2010 including more design options, an updated File tab, automatic saving of updated presentations, new animation tools like the animation painter, 3D animations, merging and comparing PowerPoints with others, embedding and editing videos within presentations, sharing PowerPoints without requiring the program be installed, simultaneous editing with others using a Windows Live account, and applying textures and designs to pictures.
PowerPoint 2012 introduces new features to help users create more engaging presentations, collaborate more effectively, and share presentations more easily. Key features include advanced photo editing tools to enhance visuals, real-time co-authoring so multiple people can work on a presentation simultaneously, ability to embed and edit video directly in PowerPoint, and capabilities to share presentations online or convert them to video files. PowerPoint 2012 also allows accessing and editing presentations from more devices including smartphones.
There are four main slide views in PowerPoint: Normal view which is the default for creating and editing slides; Slide Sorter view displays miniature slides that can be reordered by dragging; Reading view fills most of the screen with a preview for presentation; Slide Show view fills the entire screen and is what the audience will see during a presentation.
This document discusses reviewing and collaborating on PowerPoint presentations using comments and the compare feature. It explains how to add, edit, respond to, and delete comments. It also describes how to compare two versions of a presentation to see differences and decide which changes to include. Finally, it provides instructions for using the document inspector to check for and remove any comments before sharing the final presentation.
PowerPoint 2010 introduces new features to help users author, enrich, and deliver presentations. It provides sample templates for starting presentations, allows organizing slides into sections, and enables real-time collaboration through simultaneous editing. Users can stylize images with new effects, animate content using the Animation Painter, and embed and customize videos. PowerPoint 2010 also allows broadcasting slideshows, recording narrated presentations as videos, and optimizing presentations for compatibility and compact file sizes when sharing.
Este documento describe los diferentes elementos de diseño de diapositivas en PowerPoint 2010, incluyendo nueve diseños predeterminados, temas de diseño, estilos de fondo, aplicar numeración y encabezados. Explica cómo aplicar y cambiar diseños, ocultar gráficos de fondo, y configurar páginas y elementos como número de diapositiva, fecha y pie de página.
The document discusses various formatting skills for PowerPoint presentations, including changing themes, color themes, theme effects, slide backgrounds, fonts, text boxes, tables, shapes, SmartArt layouts, and pictures. Key skills covered are applying themes, color themes, and effects; customizing backgrounds, fonts, text boxes, tables, shapes; and changing SmartArt layouts.
This document provides an overview of creating and managing presentations in Microsoft PowerPoint 2010. It discusses planning an effective presentation, examining the PowerPoint window and interface, entering slide text, adding new slides, applying design themes, comparing different presentation views, and printing a PowerPoint presentation. The chapter objectives are defined for each section to guide the user in learning key PowerPoint functions.
Watch this with a 10-15 minute audiotrack at http://vimeo.com/novusprogram/powerpoint1
This lesson provides information on the basics of PowerPoint, Microsoft’s powerful presentation development tool. The topics covered include a basic review of the program’s toolbars and options, and an introduction to slide creation. The objective of the lesson is for the user to be comfortable with operations like opening and creating PowerPoint documents, saving PowerPoint documents, navigating the options and toolbar, adding new slides, formatting text, formatting textboxes, using different program views, and starting a presentation. The lesson teaches concepts through a combination of image-based slides and video tutorials.
The Novus project is a combination of video tutorials designed to be used in conjunction with a free business simulation software program. The Novus Business and IT Program contains 36 business and IT training videos, covering basic finance, accounting, marketing, economics, business strategy, Word, Excel, and PowerPoint. Users will have an opportunity to apply the lessons in the Novus Business Simulator. Over six rounds, the user or teams will have to make decisions on capital purchases, financing, production, financing, and human resources for a microbrewery. This channel has arranged the 36 video lessons into the order in which they are meant to be used with the simulator. To watch this slideshow as a video, please go to our Vimeo page at: https://vimeo.com/novusprogram. To download our free business simulation software, please go to our SourceForge page at: http://sourceforge.net/projects/novus/.
PowerPoint 2010 introduces new features to enhance every step of creating and delivering presentations:
1) Authors can use templates, sections, and co-authoring to organize large presentations and collaborate simultaneously on one document.
2) Presentations can be enriched with new picture effects, animation tools, embedded video capabilities, and transition effects.
3) Delivering presentations is improved with features for broadcasting live shows, recording narrated videos, optimizing file sizes for sharing, and accessing slides from any web browser.
The document provides tips for creating effective PowerPoint presentations, noting that the presenter should consider their audience and main message before building the presentation. It distinguishes between presentations meant as tutorials to be viewed independently versus those meant to accompany a live presentation, and offers advice on writing style, using images and graphics, citing sources, and avoiding common mistakes like reading slides verbatim. The document also includes examples of effective PowerPoint presentations on business topics and nonprofit events.
This document provides an overview of common productivity software applications, including their purposes and example uses. It lists word processors like Microsoft Word for creating text documents, spreadsheet programs like Excel for working with numbers and calculations, presentation software such as PowerPoint for presentations with graphics and text, and database programs like Access to organize data. It also includes instructions on opening these applications from a desktop or Citrix environment and describes typical interface elements.
This document provides steps for making a basic PowerPoint presentation:
1) Choose a template and title slide, then insert additional slides using shortcuts or the insert menu.
2) Customize each slide by adding headings, text, and formatting fonts, colors, and bullets.
3) Make the presentation more engaging by inserting clip art, charts, movies, or sound files.
4) Set up the slide show with custom animations, transitions, recordings, and timings.
This document provides lessons about using PowerPoint presentations effectively. It cautions that PowerPoint is not a substitute for the presenter and their knowledge. Presenters should let their personality and material shine through, not hide behind the presentation. Blaming weaknesses in a presentation on PowerPoint is misguided, as the presenter is responsible for the quality of the presentation. This message comes from a training program that offers over 13 hours of PowerPoint video lessons on 4 DVDs.
The document provides instructions for using various features in Microsoft PowerPoint, including how to open PowerPoint, select slide layouts and design templates, add slides, enter and format text, insert clip art and shapes, take screenshots, add slide animations and transitions. Key steps include clicking "File" then "New" to start a new presentation, selecting slide layouts and design templates, clicking "Insert" to add text boxes, clip art or shapes, using the "Print Screen" key to take screenshots, and clicking "Slide Show" then "Custom Animation" or "Slide Transition" to add effects.
This document provides guidance on using PowerPoint effectively for presentations. It discusses the various toolbars in PowerPoint and how to use them. It also offers tips on creating slides, such as using simple designs with short bullet points, consistent formatting, and colors. The document emphasizes keeping content concise and using visual elements like images, charts and animation effects sparingly to reinforce key points.
The document provides tips and tricks for using PowerPoint more efficiently. It recommends customizing toolbars, using shortcuts, building templates with common elements like colors and fonts, keeping designs simple, and focusing on content over visuals. The goal is to spend less time on layout and more on content creation.
This document provides an overview of skills for adding different types of content to PowerPoint slides, including text, lists, tables, charts, images, and media. It covers how to insert text using text placeholders or text boxes, add bulleted and numbered lists, import outlines from Word, incorporate WordArt, and use the content placeholder to quickly add various elements like tables, SmartArt graphics, shapes, clip art, screenshots and pictures. The document consists of descriptions and step-by-step instructions for each content type.
This document provides instructions on how to use various features in Microsoft Word, including WordArt, clip art, shapes, page borders, and inserting blank pages. It explains that WordArt allows you to add decorative text styles to documents and can be customized. Clip art can be searched for and inserted. Shapes can have their fill and 3D effects customized. Borders can be added to pages, text, tables, objects and pictures. Blank pages can be inserted anywhere in a document.
PowerPoint 2013 is a slide show presentation program developed by Microsoft that allows users to create and deliver professional presentations. It offers tools for word processing, outlining, drawing, graphing, and presentation management. The document discusses how to create and open presentations in PowerPoint, save files, customize slides, apply themes, insert images, tables, charts, videos and other media, animate objects, and present slideshows. It also covers more advanced topics like grouping objects, customizing tables and charts, using SmartArt graphics, and applying slide timings and transitions.
This workshop otherwise called learning support programme is geared to help graduate students (especially those having inadequate core computing skills) develop a facet of necessary skills that can be applied in their daily research activities and subsequent academic careers. In particular, it will help them to grasp soft IT skills using Microsoft words.
This document provides instructions for creating a basic PowerPoint presentation. It includes steps to apply a theme, change the slide format to widescreen, insert title and content slides, add an image, apply slide transitions and animations, and save the presentation. The document recommends saving drafts frequently under different file names as the presentation is being developed.
This document provides instructions for creating a basic PowerPoint presentation. It describes how to apply a theme, change the slide format to widescreen, insert title and content slides, add an image, apply slide transitions and animations, and save the presentation. Key steps include choosing a theme to set colors and fonts, changing the aspect ratio to 16:9 for widescreen displays, inserting different slide types, adding animations through the Custom Animation feature, and regularly saving drafts of the presentation.
This document provides instructions for creating a basic PowerPoint presentation. It describes applying a theme; changing the slide format to 16:9; inserting title, content, and image slides; applying slide transitions and animations; and saving the presentation. Key steps include choosing a theme on the Design tab, setting the slide size to On-Screen Show on the Page Setup menu, adding new slides, inserting images from Clip Art or Pictures, selecting transitions and timings on the Animations tab, and custom animating bulleted lists. The presentation should be saved frequently under different file names as it is being created.
The document provides instructions for formatting documents in Word 2010, including applying themes, inserting page borders and watermarks, adding headers and footers, and inserting hyperlinks. It covers 14 different formatting skills such as using color and font themes, saving quick parts as building blocks, and adjusting margins. Step-by-step instructions are provided for how to perform each skill.
The document provides an overview of Microsoft PowerPoint, including its components, features, and functions. It describes PowerPoint as presentation software that allows users to create professional presentations with slides, outlines, speaker notes, templates, and various media. Key components are outlined panes, slide pane, notes pane, task pane, and view buttons. Features covered include slide layouts, templates, different presentation views (normal, slide sorter, outline, notes page, reading), and slide masters. Examples are given of tasks like creating slides with different layouts, applying designs, inserting images, video, hyperlinks, and transitions between slides.
Are You Still Watching? How to Create Engaging Presentations for Virtual Lear...Aggregage
Remote meetings are here to stay - and many are BORING. If you are trying to engage your learners (or any audience), compelling content is critical. But trying to create stimulating content with the same tools you’ve always had is hard, right?
Thankfully, wrong! Terrific tools in PowerPoint along with visual assets help you create the kind of dynamic content you need to capture your remote audience’s attention, with functions that allow for interactive sequences and navigation. Come along to this masterclass packed with live demonstrations of how to create compelling presentations for successful meetings in a virtual and hybrid environment.
In this webinar, you will learn how to:
•Create dynamic visuals that support persuasive stories to engage your audience
•Develop professional-looking designs for presentations and other content
•Become a PowerPoint legend with techniques and assets to make effective presentations quickly and easily
This document provides guidance on using PowerPoint to create effective presentations. It discusses the basic functions and toolbars in PowerPoint, how to design and organize slides, and tips for balancing text, images, and other design elements. The key steps covered include learning the various toolbars in PowerPoint, how to create and format slides, inserting and organizing text, images, charts and other visual elements, using animation effects, and balancing the design of slides for clarity and readability.
This document provides guidance on using PowerPoint to design effective presentations. It discusses how to select a presentation option, create slides, organize text, images, and effects, and balance design elements. The key points are:
- PowerPoint allows blank presentations for full customization or templates for guided design.
- Slides should be kept simple with short bullet points reinforcing the speech.
- Consistent formatting, readable fonts, and complimentary colors improve visuals.
- Animation and media should emphasize important points without distracting from the content.
- Effective slides balance different elements so no one part overpowers the others.
To make an effective presentation on PowerPoint, here are some tips to keep in mind:
1. **Start with a goal**: Identify the purpose of your presentation and what you want to achieve with it. This will help you structure your content and ensure that it is relevant to your audience ¹.
2. **Less is more**: Avoid cluttering your slides with too much text or images. Keep your slides simple and easy to read. Use bullet points to highlight key information and avoid using too many transitions ¹⁴.
3. **Consider your typeface**: Choose a font that is easy to read and use it consistently throughout your presentation. Avoid using too many different fonts or font sizes, as this can be distracting ¹.
4. **Make bullet points count**: Use bullet points to highlight key information and keep your content concise. Avoid using full sentences or paragraphs on your slides ¹².
5. **Think in color**: Use color to highlight important information and make your slides visually appealing. However, avoid using too many colors or bright colors that can be hard on the eyes ¹.
6. **Take a look from the top down**: Review your presentation from the perspective of your audience. Ensure that your content is easy to read and that your slides are visually appealing ¹.
7. **Start with templates**: Consider using pre-designed templates to help you create a professional-looking presentation. This can save you time and ensure that your presentation looks polished ¹⁵.
I hope these tips help you create an effective PowerPoint presentation! Let me know if you have any other questions.
Source: Conversation with Bing, 11/01/2024
(1) 8 Tips to Make the Best PowerPoint Presentations - How-To Geek. https://www.howtogeek.com/712825/8-tips-to-make-the-best-powerpoint-presentations/.
(2) Tips for creating and delivering an effective presentation. https://support.microsoft.com/en-us/office/tips-for-creating-and-delivering-an-effective-presentation-f43156b0-20d2-4c51-8345-0c337cefb88b.
(3) Tips for Making Effective PowerPoint Presentations. https://www.ncsl.org/legislative-staff/lscc/tips-for-making-effective-powerpoint-p
This document provides instructions for customizing PowerPoint templates and includes several template examples. It explains how to apply a logo to all slides by changing the image on the slide master. The templates demonstrate how to add custom text and layouts to slides. They include options for adding titles, diagrams, cycles, and timelines. The templates are designed to be customized with the user's own text and graphics.
This document provides a summary of key Microsoft Office applications and some of their main features:
- Microsoft Word allows performing calculations in tables, customizing themes, and creating labels with mail merge.
- Microsoft Excel features include inserting hyperlinks, creating and formatting tables, and looking up values in tables using VLOOKUP.
- Microsoft Access helps modify fields, create calculated fields, add combo boxes to find records.
- Microsoft PowerPoint enables customizing animation effects, changing design and style including adding charts from Excel, and inserting/trimming audio and digital video.
Make Visually Stunning PowerPoints - Training HandoutTeresa Beary
Written summary of the Make Visually Stunning PowerPoints workshop that I teach. Provides most of the detail from the live lecture and includes links to additional resources.
This document provides an overview of Chapter 1 of PowerPoint 2010: Getting Started. It introduces the basic concepts and skills needed to use PowerPoint, including understanding the different views, using the Slides and Outline tabs, adding and modifying slides, applying slide transitions, working with the Slide Master, and adding notes. The chapter covers the PowerPoint interface and teaches how to navigate, build, and enhance a basic presentation.
The document discusses creating and applying styles, inserting and modifying images, and creating and using templates in digital documents. It provides details on the different types of styles in OpenOffice, how to apply and modify styles, and how to insert images from files, scanners, the clipboard, and gallery. It also describes how to position and modify inserted images using various tools and settings. The document concludes with information on working with tables, including creating, formatting, and modifying tables.
Impress is the presentation (slide show) program included in LibreOffice. You can create slides that contain many different elements, including text, bulleted and numbered lists, tables, charts, and a wide range of graphic objects such as clip-art, drawings and photographs. Impress also includes a spelling checker, a thesaurus, text styles, and background styles.
What is Impress?
Starting a presentation.
Formatting a presentation.
Design a presentation.
Working with templates.
The document discusses various types of secondary storage devices used in computing. It describes hard disks, which use rigid platters to store files organized into tracks and sectors. Optical disks are discussed, including CDs, DVDs, and Blu-ray discs, along with their varying capacities. Solid-state storage options like solid-state drives, flash memory cards, and USB drives are also covered. The document provides details on the characteristics and capabilities of these common secondary storage technologies.
The document discusses input and output devices for computers. It describes various hardware used for input such as keyboards, mice, scanners, cameras and microphones. It also covers output devices like monitors, printers, e-book readers and HDTVs. The document provides details on the features and types of these common input and output peripherals that allow the transfer of data between users and computer systems.
This document discusses system software, including operating systems, utilities, device drivers, and language translators. It describes the basic functions of operating systems like managing computer resources and providing a user interface. Popular operating systems mentioned include Windows, Mac OS, UNIX, and Linux. Utilities are specialized programs that make computing easier, like backup programs and antivirus software. Device drivers allow communication between devices and computers.
This document provides an overview of Chapter 5 from a Word 2010 skills book, which covers working with references and mailings in Word. The chapter includes skills on inserting tables of contents and footnotes/endnotes, selecting reference styles, adding citations and creating bibliographies, marking entries for and creating an index, customizing print jobs, and mail merges. Each skill is briefly described and the steps to perform it are listed.
This document discusses skills for working with tables and graphics in Word 2010. It covers how to create and format tables, including inserting and deleting rows and columns, merging and splitting cells, sorting data, and adding borders and shading. It also covers how to insert different types of graphics like clip art, pictures, shapes, and SmartArt. Formatting options for graphics like quick styles and wrapping text are also discussed. The document provides step-by-step instructions for completing many common table and graphic tasks in Word.
This document provides an overview of Chapter 4 from a PowerPoint 2010 skills book. The chapter covers managing and delivering presentations, including skills for deleting and reordering slides, copying slides, defining custom slide shows, adding comments and hyperlinks, rehearsing timings, and printing presentations. Specific skills covered include deleting slides, changing slide order, copying and pasting slides, using the Office clipboard, defining custom slide shows, hiding slides, adding comments, rehearsing timings, starting slide shows, using presentation tools like annotations, and customizing handout masters.
This document provides an overview of Microsoft Office 2010 and its common features. It discusses the main Office applications (Word, Excel, PowerPoint, Access), the Office user interface including the ribbon and quick access toolbar, and basic functions like opening, saving, and printing files. Common steps for starting an Office application and opening existing files are also outlined.
This document discusses various chart types and data analysis tools in Excel 2010. It covers how to insert, format and modify column, pie and line charts. Topics include changing the chart design using quick layouts and styles, modifying the chart layout by adding or removing titles, labels and tables. Other sections cover changing the chart type, moving charts to different worksheets, and data analysis tools like sorting, filtering and conditional formatting. The overall document provides a guide to creating and customizing various charts and performing basic data analysis in Excel.
The document describes various formatting options in Excel, including:
- Applying themes to worksheets to change fonts, colors and effects
- Merging and unmerging cells to combine or separate cells
- Modifying row heights and column widths for proper data display
- Inserting and deleting rows and columns to add or remove data lines
- Freezing rows and columns so headers remain visible while scrolling
- Hiding and unhiding rows and columns to selectively show or conceal data
- Naming and renaming worksheets for improved organization
- Changing worksheet tab colors for easier identification
This document provides an overview of using formulas and functions in Excel 2010. It covers topics such as:
- Using common functions like SUM, AVERAGE, COUNT, MIN, MAX in formulas
- Using the AutoSum button to quickly insert functions
- Creating formulas with other statistical, date/time, logical functions
- Using absolute and relative cell references in formulas
- Naming ranges of cells for use in formulas
- Checking formulas for errors
The document is from a chapter that teaches key skills for working with formulas and functions in Excel, with explanations and step-by-step instructions.
The document is a chapter about getting started with Excel 2010. It introduces basic Excel concepts like workbooks, worksheets, rows, columns and cells. It then covers skills for entering and formatting data, including text, numbers, dates and formulas. Specific skills covered include wrapping text, inserting data using AutoFill, inserting and deleting cells, applying formatting like fonts and cell styles, and using number and date formats. The chapter provides instructions and screenshots to demonstrate these basic Excel functions.
This document provides an overview of formatting text and paragraphs in Word 2010. It discusses skills for applying character effects like bold, italics, and underline; changing fonts, font sizes, text case, and font colors; creating bulleted and numbered lists; adjusting paragraph alignment, spacing, and indents; and using tab stops and leaders. The document is formatted as a skills approach training manual with step-by-step instructions and screenshots for common text and paragraph formatting tasks in Word.
This document provides an introduction to Microsoft Word 2010 and outlines some basic skills for using the application. It covers entering, selecting and deleting text, using AutoCorrect, checking spelling and grammar, and finding and replacing text. The document is divided into sections for different skills and includes instructions and screenshots to illustrate the topics.
This document provides an overview of wound healing, its functions, stages, mechanisms, factors affecting it, and complications.
A wound is a break in the integrity of the skin or tissues, which may be associated with disruption of the structure and function.
Healing is the body’s response to injury in an attempt to restore normal structure and functions.
Healing can occur in two ways: Regeneration and Repair
There are 4 phases of wound healing: hemostasis, inflammation, proliferation, and remodeling. This document also describes the mechanism of wound healing. Factors that affect healing include infection, uncontrolled diabetes, poor nutrition, age, anemia, the presence of foreign bodies, etc.
Complications of wound healing like infection, hyperpigmentation of scar, contractures, and keloid formation.
Leveraging Generative AI to Drive Nonprofit InnovationTechSoup
In this webinar, participants learned how to utilize Generative AI to streamline operations and elevate member engagement. Amazon Web Service experts provided a customer specific use cases and dived into low/no-code tools that are quick and easy to deploy through Amazon Web Service (AWS.)
Chapter wise All Notes of First year Basic Civil Engineering.pptxDenish Jangid
Chapter wise All Notes of First year Basic Civil Engineering
Syllabus
Chapter-1
Introduction to objective, scope and outcome the subject
Chapter 2
Introduction: Scope and Specialization of Civil Engineering, Role of civil Engineer in Society, Impact of infrastructural development on economy of country.
Chapter 3
Surveying: Object Principles & Types of Surveying; Site Plans, Plans & Maps; Scales & Unit of different Measurements.
Linear Measurements: Instruments used. Linear Measurement by Tape, Ranging out Survey Lines and overcoming Obstructions; Measurements on sloping ground; Tape corrections, conventional symbols. Angular Measurements: Instruments used; Introduction to Compass Surveying, Bearings and Longitude & Latitude of a Line, Introduction to total station.
Levelling: Instrument used Object of levelling, Methods of levelling in brief, and Contour maps.
Chapter 4
Buildings: Selection of site for Buildings, Layout of Building Plan, Types of buildings, Plinth area, carpet area, floor space index, Introduction to building byelaws, concept of sun light & ventilation. Components of Buildings & their functions, Basic concept of R.C.C., Introduction to types of foundation
Chapter 5
Transportation: Introduction to Transportation Engineering; Traffic and Road Safety: Types and Characteristics of Various Modes of Transportation; Various Road Traffic Signs, Causes of Accidents and Road Safety Measures.
Chapter 6
Environmental Engineering: Environmental Pollution, Environmental Acts and Regulations, Functional Concepts of Ecology, Basics of Species, Biodiversity, Ecosystem, Hydrological Cycle; Chemical Cycles: Carbon, Nitrogen & Phosphorus; Energy Flow in Ecosystems.
Water Pollution: Water Quality standards, Introduction to Treatment & Disposal of Waste Water. Reuse and Saving of Water, Rain Water Harvesting. Solid Waste Management: Classification of Solid Waste, Collection, Transportation and Disposal of Solid. Recycling of Solid Waste: Energy Recovery, Sanitary Landfill, On-Site Sanitation. Air & Noise Pollution: Primary and Secondary air pollutants, Harmful effects of Air Pollution, Control of Air Pollution. . Noise Pollution Harmful Effects of noise pollution, control of noise pollution, Global warming & Climate Change, Ozone depletion, Greenhouse effect
Text Books:
1. Palancharmy, Basic Civil Engineering, McGraw Hill publishers.
2. Satheesh Gopi, Basic Civil Engineering, Pearson Publishers.
3. Ketki Rangwala Dalal, Essentials of Civil Engineering, Charotar Publishing House.
4. BCP, Surveying volume 1
Elevate Your Nonprofit's Online Presence_ A Guide to Effective SEO Strategies...TechSoup
Whether you're new to SEO or looking to refine your existing strategies, this webinar will provide you with actionable insights and practical tips to elevate your nonprofit's online presence.
Temple of Asclepius in Thrace. Excavation resultsKrassimira Luka
The temple and the sanctuary around were dedicated to Asklepios Zmidrenus. This name has been known since 1875 when an inscription dedicated to him was discovered in Rome. The inscription is dated in 227 AD and was left by soldiers originating from the city of Philippopolis (modern Plovdiv).
Beyond Degrees - Empowering the Workforce in the Context of Skills-First.pptxEduSkills OECD
Iván Bornacelly, Policy Analyst at the OECD Centre for Skills, OECD, presents at the webinar 'Tackling job market gaps with a skills-first approach' on 12 June 2024
Gender and Mental Health - Counselling and Family Therapy Applications and In...PsychoTech Services
A proprietary approach developed by bringing together the best of learning theories from Psychology, design principles from the world of visualization, and pedagogical methods from over a decade of training experience, that enables you to: Learn better, faster!
How Barcodes Can Be Leveraged Within Odoo 17Celine George
In this presentation, we will explore how barcodes can be leveraged within Odoo 17 to streamline our manufacturing processes. We will cover the configuration steps, how to utilize barcodes in different manufacturing scenarios, and the overall benefits of implementing this technology.
PowerPoint Skills Page: PP-56 In this chapter you learn the skills necessary to edit and format a PowerPoint 2010 presentation using themes, Quick Styles, text boxes, and animation effects. By incorporating pictures, animation, color, and backgrounds, you can create a very professional-looking presentation.
PowerPoint Skill 3.1 Changing the Presentation Theme Page: PP-57 tell me more - Although themes are designed to make it easy for you to create a cohesive look for presentations, you may find that the themes available in the Microsoft Office applications are close to what you want but not quite right for your presentation. To create your own version of a theme, all you need to do is change the theme’s color, font, or effect styles. When you modify an existing theme, you can save it out as your own custom theme. The file will be saved with the .thmx file extension. The theme will be saved in the Document Themes folder and will be available from Excel, Word, and Outlook as well as PowerPoint.
PowerPoint Skill 3.1 Changing the Presentation Theme Page: PP-57; Figure PP 3.1 try this - To apply a theme, you can also click a theme on the Ribbon without opening the gallery. You can also change the theme of a presentation from Slide Master view. On the Slide Master tab, in the Edit Themes group, click the Themes button, and select a theme.
PowerPoint Skill 3.2 Changing the Color Theme Page: PP-58 When creating a presentation, it is important to choose colors that work well together. Poor color choices can detract from the message you are trying to convey in your presentation. If the colors you choose are too muted, your presentation may seem dull. If the colors you choose are too harsh and clash with each other, your presentation may seem busy and unfocused. PowerPoint 2010 includes a number of color themes for you to choose from. tell me more - When you change the color theme for a presentation, the color options for presentation elements will change. The theme colors will appear in the Font Color menu, as well as in the Table Styles and Shape Styles galleries. Choose your colors from these preset theme colors to ensure your document has a consistent color design.
PowerPoint Skill 3.2 Changing the Color Theme Page: PP-58; Figure PP 3.2 try this - You can also change the color theme of a presentation from Slide Master view. On the Slide Master tab, in the Edit Themes group, click the Theme Colors button, and select a color theme.
PowerPoint Skill 3.2 Changing the Color Theme Page: PP-58 tips & tricks - You can create a new color theme selecting your own colors for text and accents.
PowerPoint Skill 3.3 Changing the Theme Effects Page: PP-59 (and glossary, p. 15) In PowerPoint 2010, you can add graphic effects to drawing objects and text. These graphic effects give you the ability to create dynamic images without the help of a professional designer. You can create sophisticated fills for objects and control the shape outline for objects, including the color, weight, and line style. Using these new effects can be overwhelming at first. How do you know which effects go well together? A part of a presentation’s theme is the theme effects .
PowerPoint Skill 3.3 Changing the Theme Effects Page: PP-59; Figure PP 3.3 try this - You can also change the theme effects of a presentation from Slide Master view. On the Slide Master tab, in the Edit Themes group, click the Theme Effects button, and select an option.
PowerPoint Skill 3.4 Changing the Slide Background Page: PP-60 When you apply a theme to a presentation the default background styles will be applied to your slides. To change just the background of all the slides in a presentation (and not other theme elements such as fonts), you should change the background style for the presentation. tell me more - Since the background is tied to the presentation’s theme, when you change the theme of a presentation, not only does the background of the slides change, but the Background Styles gallery also changes to reflect the new theme colors.
PowerPoint Skill 3.4 Changing the Slide Background Page: PP-60; Figure PP 3.4 try this - You can also change the background for a presentation from Slide Master view. On the Slide Master tab, in the Background group, click the Background Styles button, and select a background.
PowerPoint Skill 3.4 Changing the Slide Background Page: PP-60 tips & tricks - You can create your own custom background style from the Format Background dialog box.
PowerPoint Skill 3.5 Changing Fonts Page: PP-61 tips & tricks - Using different fonts, font sizes, and font colors can enhance your presentation, giving it a distinctive appearance. However, when you create a presentation it is best to limit the number of fonts, font sizes, and font colors you use. Using multiple fonts and effects in one presentation can give it a disorganized and unprofessional appearance. tell me more - PowerPoint offers many fonts. Serif fonts, such as Cambria and Times New Roman, have an embellishment at the end of each stroke. They are used for notes pages, printed pages, and body text. Sans serif fonts, such as Calibri and Arial, do not have an embellishment at the end of each stroke. They are typically used for titles and subtitles in on-screen presentations since they have a clean look. try this - To change the font, right-click the text, click the arrow next to the Font box on the Mini toolbar, and select an option. To change the font size, right-click the text, click the arrow next to the Font Size box on the Mini toolbar, and select an option. To change the font color, right-click the text, click the arrow next to the Font Color button on the Mini toolbar, and select an option.
PowerPoint Skill 3.6 Changing the Look of Text Boxes Page: PP-62 tell me more - If you want to further adjust the visual effects of a text box, you can use the Format Shape dialog box. The Format Shape dialog box allows you to finely tune the graphic look of a shape by changing its fill, line color and style, shadow, and 3-D format. To open the Format Shape dialog box, click the dialog launcher in the Shape Styles group on the Drawing Tools Format tab. Click an effect category on the left to display the controls for the effect in the area on the right. tips & tricks - You can resize text boxes just as you would resize any image in PowerPoint. First, point to one of the resize handles on the text box. When the mouse changes to the resize cursor, click and drag the mouse toward the center of the image to make it smaller, or drag the mouse away from the center of the image to make it larger. When the image is the size you want, release the mouse button.
PowerPoint Skill 3.6 Changing the Look of Text Boxes Page: PP-62; Figure PP 3.6
PowerPoint Skill 3.7 Applying Quick Styles to Text Boxes Page: PP-63 tips & tricks - You can further modify the look of text boxes by using the Shading , Borders , and Effects buttons in the Shape Styles group. tell me more - When you insert a text box into a presentation, the Format tab under Drawing Tools displays. This tab is called a contextual tab because it only displays when a text box is the active element. The Format tab contains tools to change the look of the text box, such as shape styles, WordArt styles, sizing, and arrangement options.
PowerPoint Skill 3.7 Applying Quick Styles to Text Boxes Page: PP-63; Figure PP 3.7 try this - The Shape Styles group on the Ribbon displays the latest Quick Styles you have used. If you want to apply a recently used Quick Style, you can click the option directly from the Ribbon without opening the Shape Styles gallery.
PowerPoint Skill 3.8 Applying Quick Styles to Tables Page: PP-64 Just as you can apply complex formatting to text boxes using Quick Styles for shapes, you can also apply complex formatting to tables using Quick Styles for tables. With Quick Styles for tables, you can apply the borders and shading for a table with one command, giving your table a professional, sophisticated look without a lot of work.
PowerPoint Skill 3.8 Applying Quick Styles to Tables Page: PP-64; Figure PP 3.8 tips & tricks - To remove all formatting from the table, click the Clear Table button at the bottom of the Table Quick Styles gallery. You can further modify the look of tables by using the Shading , Borders , and Effects buttons in the Table Styles group. try this - The Table Styles group on the Ribbon displays the latest Quick Styles set you chose. If you want to apply a recently used Quick Style, you can click the option directly from the Ribbon without opening the Table Styles gallery.
PowerPoint Skill 3.9 Using the Shape Styles Gallery Page: PP-65 try this - The Shape Styles group on the Ribbon displays the latest Quick Styles you have used. If you want to apply a recently used Quick Style, you can click the option directly from the Ribbon without opening the Shape Styles gallery.
PowerPoint Skill 3.9 Using the Shape Styles Gallery Page: PP-65; Figure PP 3.9
PowerPoint Skill 3.9 Using the Shape Styles Gallery Page: PP-65 After clicking the shape to turn on the Drawing Tools options, the Format tab will be displayed for you to complete the above steps on the selected shape.
PowerPoint Skill 3.9 Using the Shape Styles Gallery Page: PP-65 After clicking the shape to turn on the Drawing Tools options, the Format tab will be displayed for you to complete the above steps on the selected shape. tell me more - Once you have mastered applying the prebuilt shape styles to shapes, you can try further refining those styles using the Format Shape dialog box. The Format Shape dialog box allows you to finely tune the graphic look of a shape by changing its fill, line color and style, shadow, and 3-D format.
PowerPoint Skill 3.10 Changing the Layout of SmartArt Page: PP-66 After you have added a SmartArt diagram to your slide, you may find a different layout would convey your information better. For example, you may have initially chosen a list diagram, but then later realized a cycle diagram is more appropriate for your information. You can change the diagram layout rather than re-creating the entire diagram over again.
PowerPoint Skill 3.10 Changing the Layout of SmartArt Page: PP-66; Figure PP 3.10 Note: This slide assumes a SmartArt Diagram has been added to your presentation. To add a SmartArt Diagram, select the Insert tab and click on the SmartArt button in the Illustrations Group to bring up the Choose a SmartArt Graphics dialog box. Once you have added a SmartArt Diagram to your presentation, you can change the layout of the SmartArt by following the steps above. Click on the SmartArt Diagram to select it and to bring up the Design tab options under Table Tools . By default SmartArt diagrams display information from left to right, as you would read text on a page. If you want to change the direction of information in the diagram, click the Right to Left button in the Create Graphic group. The diagram now flows from the right side of the slide to the left side.
PowerPoint Skill 3.10 Changing the Layout of SmartArt Page: PP-66; Figure PP 3.11 try this - You can add more shapes to a SmartArt diagram by right-clicking the shape in the diagram, pointing to Add Shape, and selecting an option.
PowerPoint Skill 3.11 Using the Picture Style’s Gallery Page: PP-67 When creating a presentation, you want to grab the audience’s attention. What makes one presentation stand out from another isn’t necessarily the content of the slides, but the graphics used to convey that content.
PowerPoint Skill 3.11 Using the Picture Style’s Gallery Page: PP-67; Figure PP 3.12 Select the picture you want to apply a Picture Quick Style to by clicking on it. tips & tricks - You can further modify the look of pictures by using the Picture Border and Picture Effects buttons in the Picture Styles group. try this - The Picture Styles group on the Ribbon displays the latest Quick Styles you have used. If you want to apply a recently used Quick Style, you can click the option directly from the Ribbon without opening the Picture Styles gallery.
PowerPoint Skill 3.12 Showing the Ruler and Gridlines Page: PP-68 When you are designing slides in your presentation, aligning placeholders and graphics can be the difference between a polished presentation and one that looks thrown together.
PowerPoint Skill 3.12 Showing the Ruler and Gridlines Page: PP-68; Figure PP 3.13 try this - To display gridlines, you can also: Click the Format tab under Picture Tools . In the Arrange group, click the Align button and select View Gridlines.
PowerPoint Skill 3.12 Showing the Ruler and Gridlines Page: PP-68
PowerPoint Skill 3.13 Changing the Size of Images Page: PP-69 When you first add an image to a slide, more than likely it is not the size you want. It will either be too small or too large. tips & tricks - When using one of the corner resize handles, press Shift on the keyboard as you drag the mouse to constrain the aspect ratio of the image. Constraining the aspect ratio resizes the width by the same percentage as the height. This prevents the image from becoming distorted.
PowerPoint Skill 3.13 Changing the Size of Images Page: PP-69; Figure PP 3.14 try this - You can also resize an image by entering the width and height of the image in the Width: and Height: boxes in the Size group on the Format tab under Picture Tools .
PowerPoint Skill 3.14 Changing the Size of a Placeholder Page: PP-70
PowerPoint Skill 3.14 Changing the Size of a Placeholder Page: PP-70; Figure PP 3.15 tips & tricks - When using one of the corner resize handles, press Shift on the keyboard as you drag the mouse to constrain the aspect ratio of the image and prevent the image from becoming distorted. try this - You can also resize a placeholder by entering the width and height of the placeholder in the Width: and Height: boxes in the Size group on the Format tab under Picture Tools .
PowerPoint Skill 3.15 Aligning, Grouping, and Rotating Images Pages: PP-71 and PP-72 When designing a presentation it is important to place your graphics so that they will have the most impact on your audience. tips & tricks - From the View tab you can display gridlines in the Slide pane, which is helpful when you have many graphics you want to align. To learn more about this feature, see the topic Showing the Ruler and Gridlines in this chapter.
PowerPoint Skill 3.15 Aligning, Grouping, and Rotating Images Pages: PP-71 and PP-72; Figure PP 3.16
PowerPoint Skill 3.15 Aligning, Grouping, and Rotating Images Pages: PP-71 and PP-72 First, select the graphic you want to rotate. The Picture Tools contextual tab will appear.
PowerPoint Skill 3.15 Aligning, Grouping, and Rotating Images Pages: PP-71 and PP-72 Note: Remember to select multiple graphics you need to click on the 1 st graphic, and while holding down the Ctrl key, click the remaining graphics to be grouped. (The Shift key can also be used to group graphics.) try this - To group graphics, you can also: Select the graphics you want to group as one object. Right-click the selected graphics, point to Group , and select Group.
PowerPoint Skill 3.16 Applying Animation Effects Page: PP-73 Adding animations to slides can help emphasize important points and grab your audience’s attention. In PowerPoint you can animate individual objects on a slide, including text, images, charts, tables, and SmartArt.
PowerPoint Skill 3.16 Applying Animation Effects Page: PP-73; Figure PP 3.17 tips & tricks - To remove an animation, select None in the gallery. try this - To add an animation, you can also select an animation option from the Advanced Animation gallery.
PowerPoint Skill 3.17 Modifying Animations Page: PP-74 Although PowerPoint comes with a number of easy-to-use, prebuilt animations, you may find that you want to further customize those animations to better suit your needs. tips & tricks - When you add animations to objects, a number appears next to the object with the animation. This number indicates the order in which the animations will play. To reorder animations, click the Move Earlier or Move Later buttons in the Timing group.