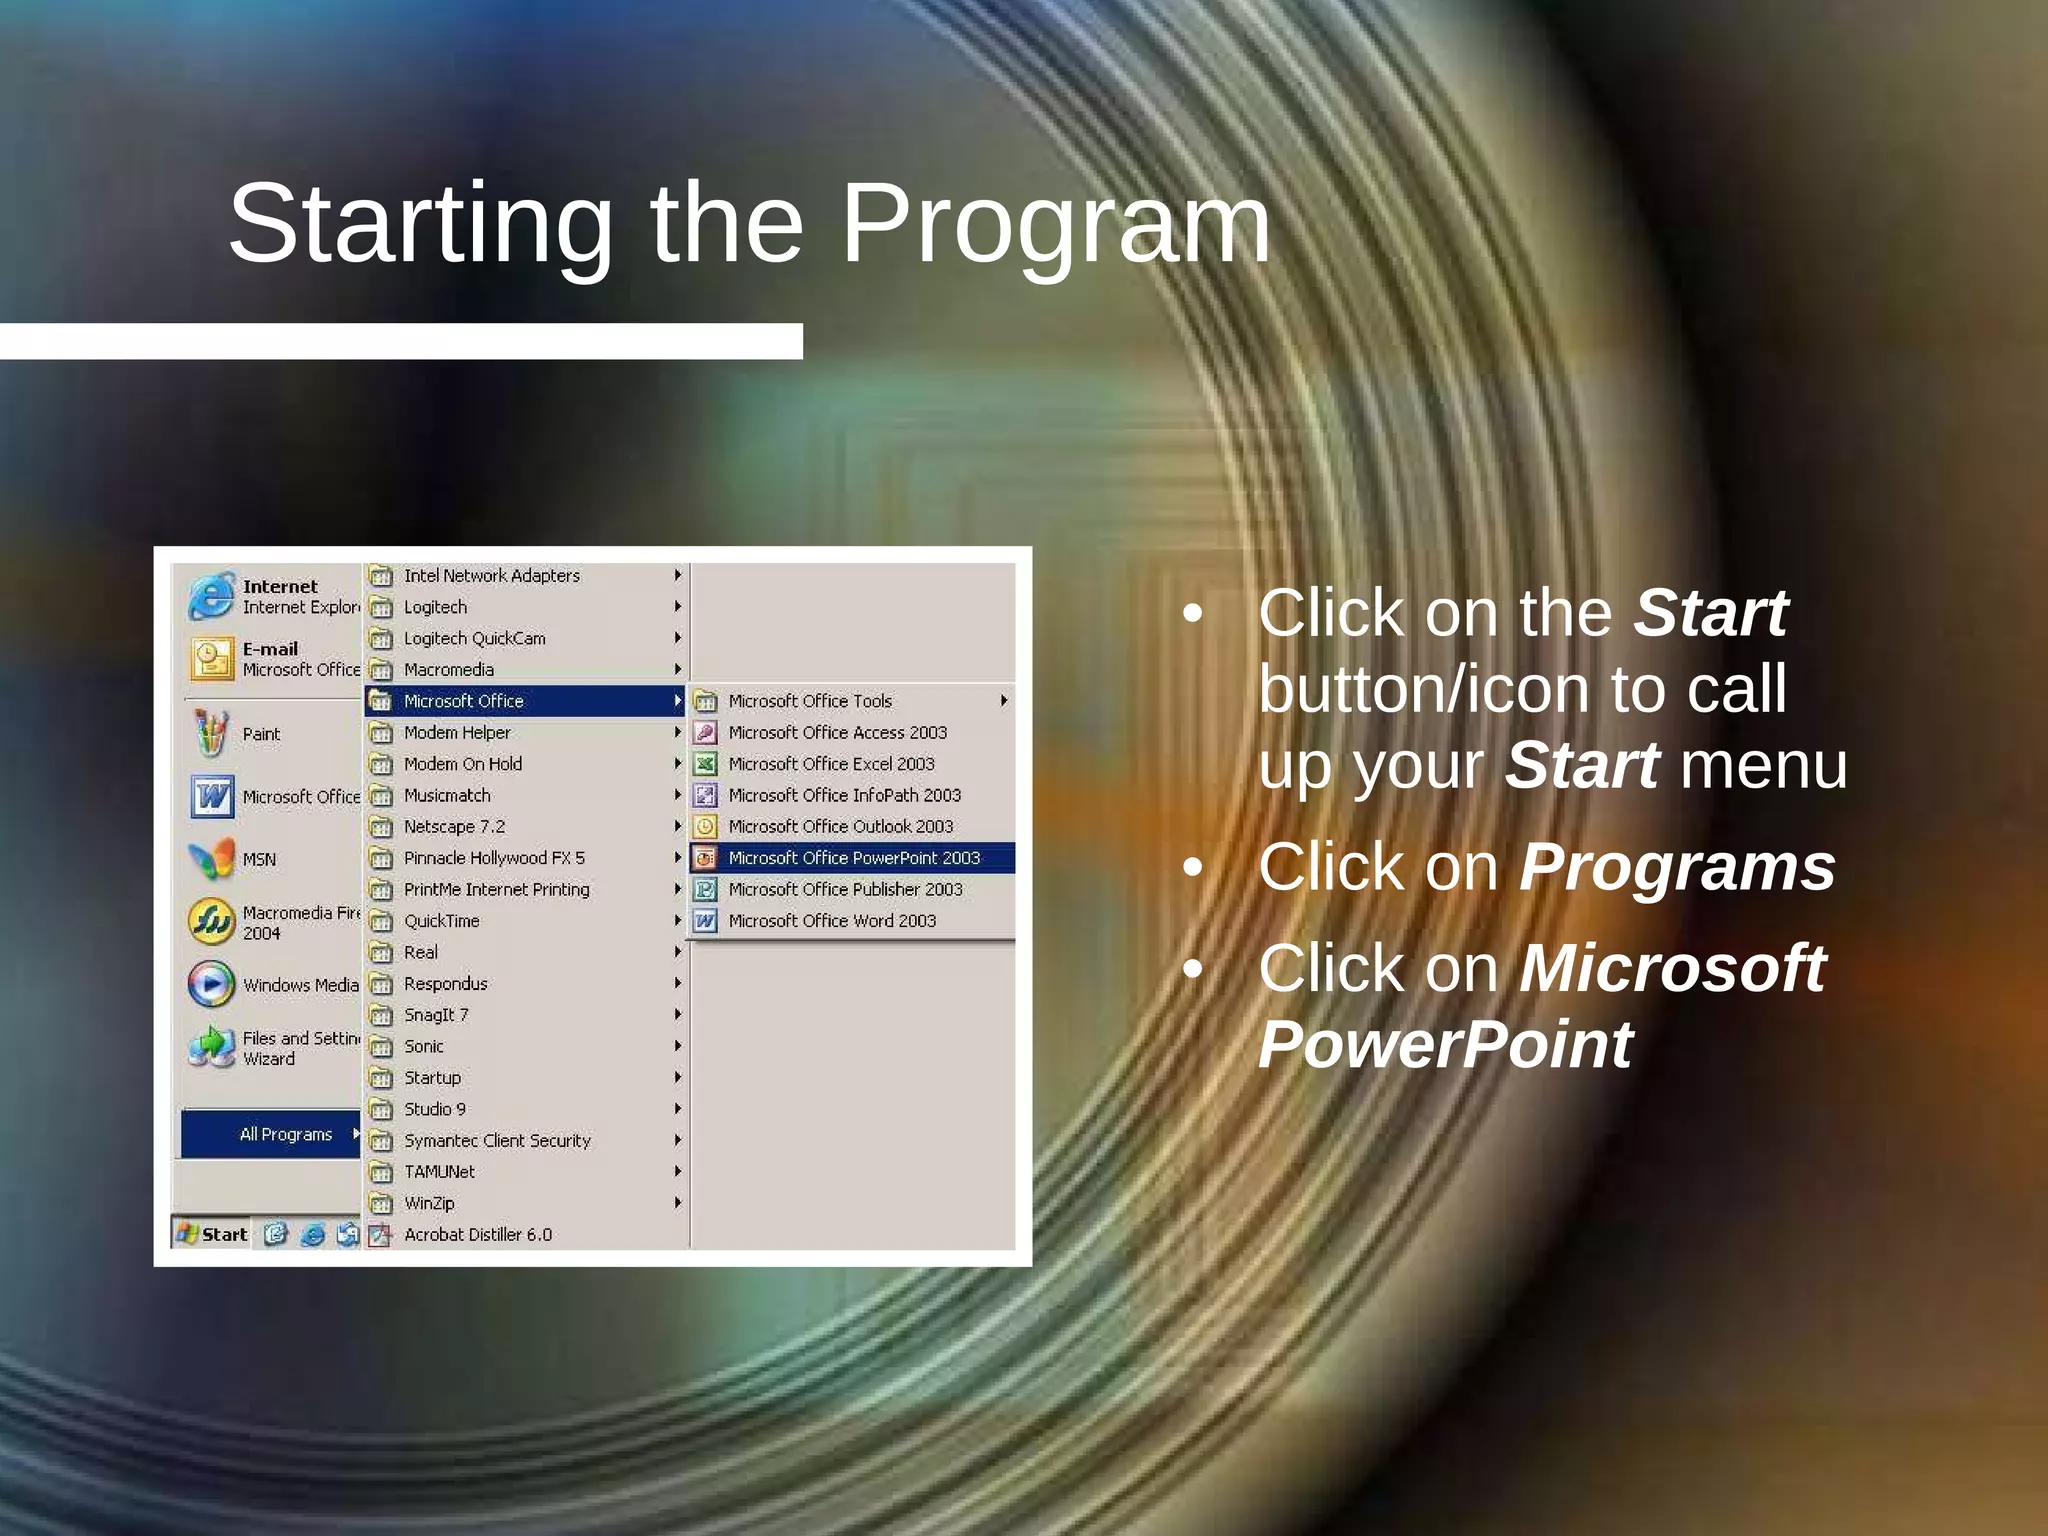
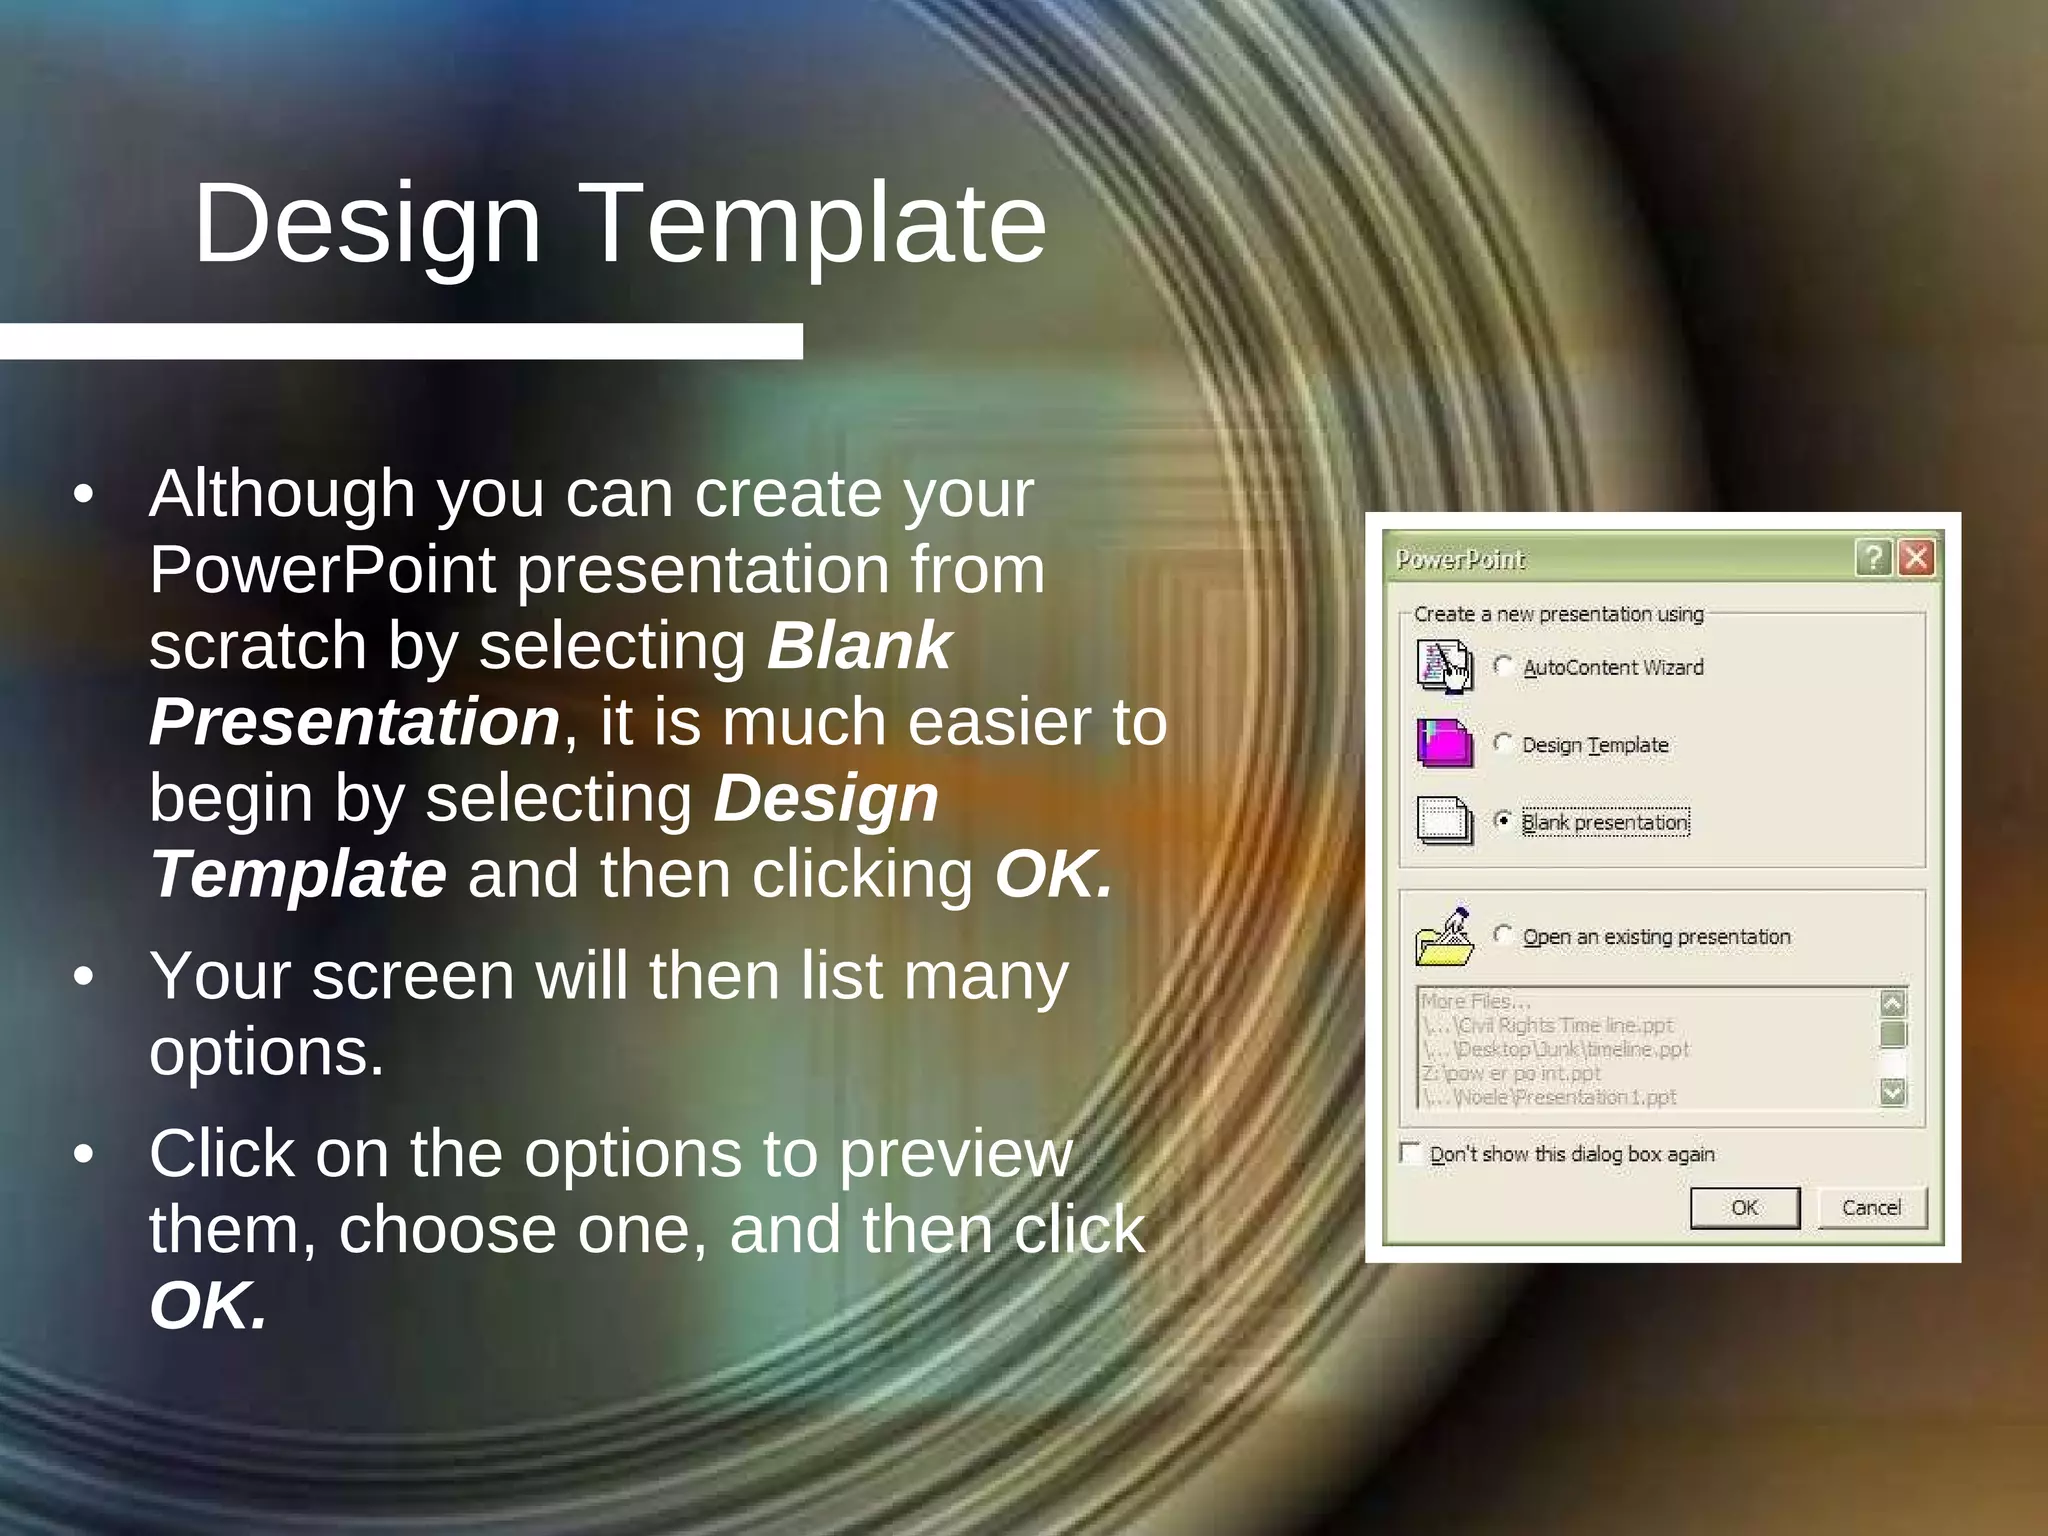
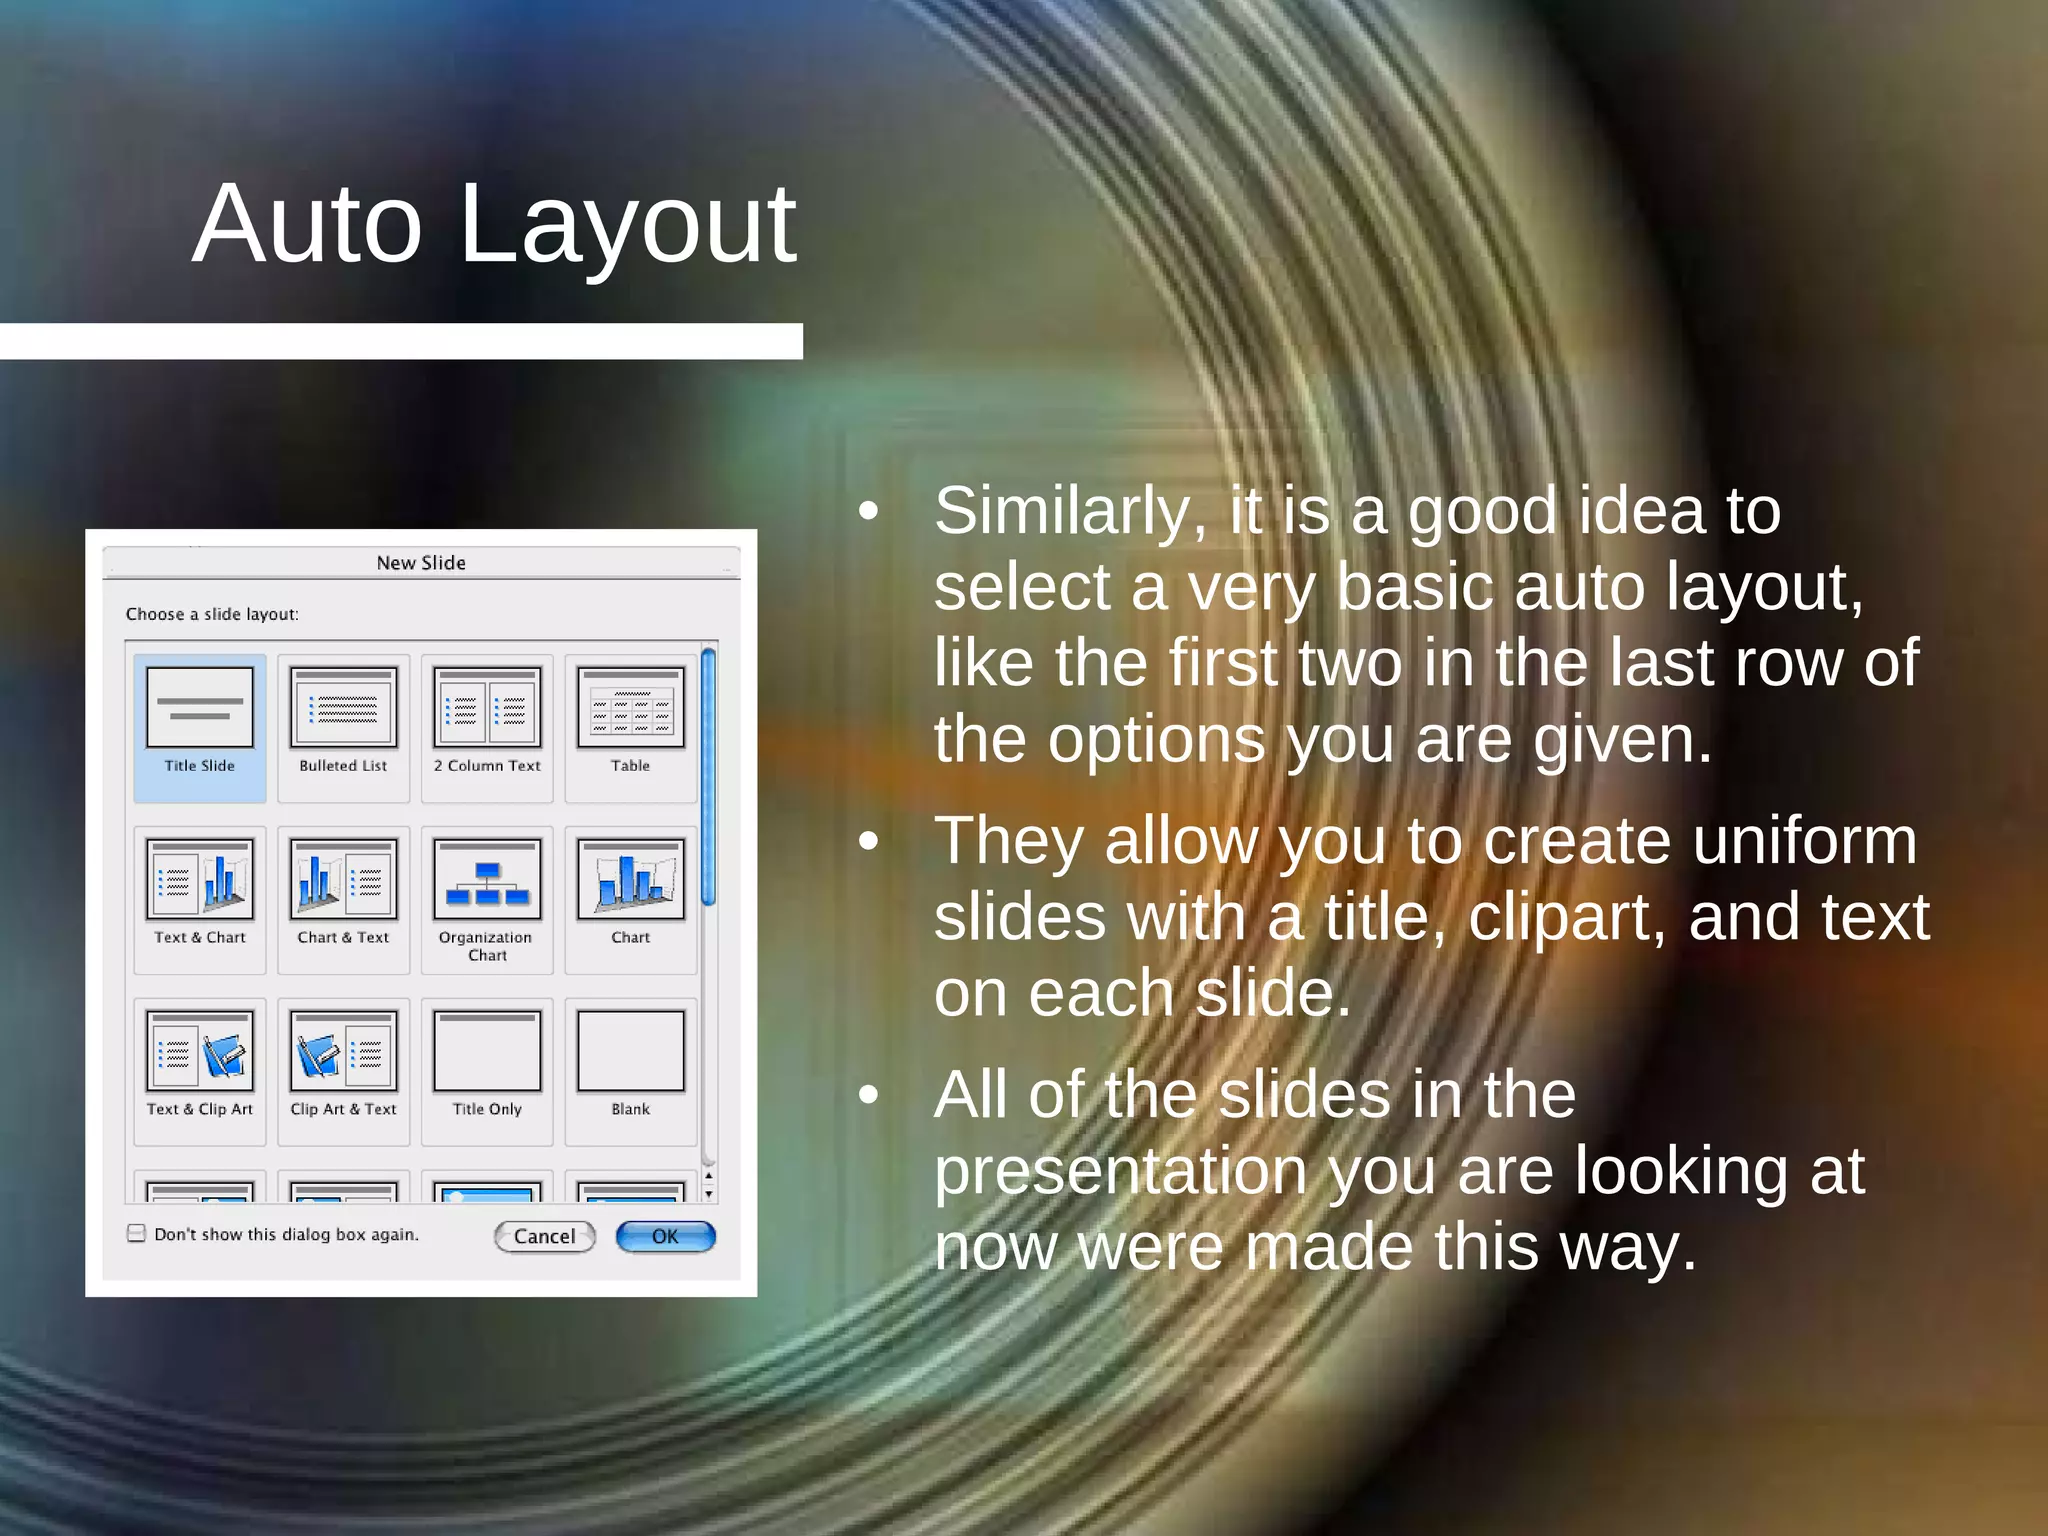
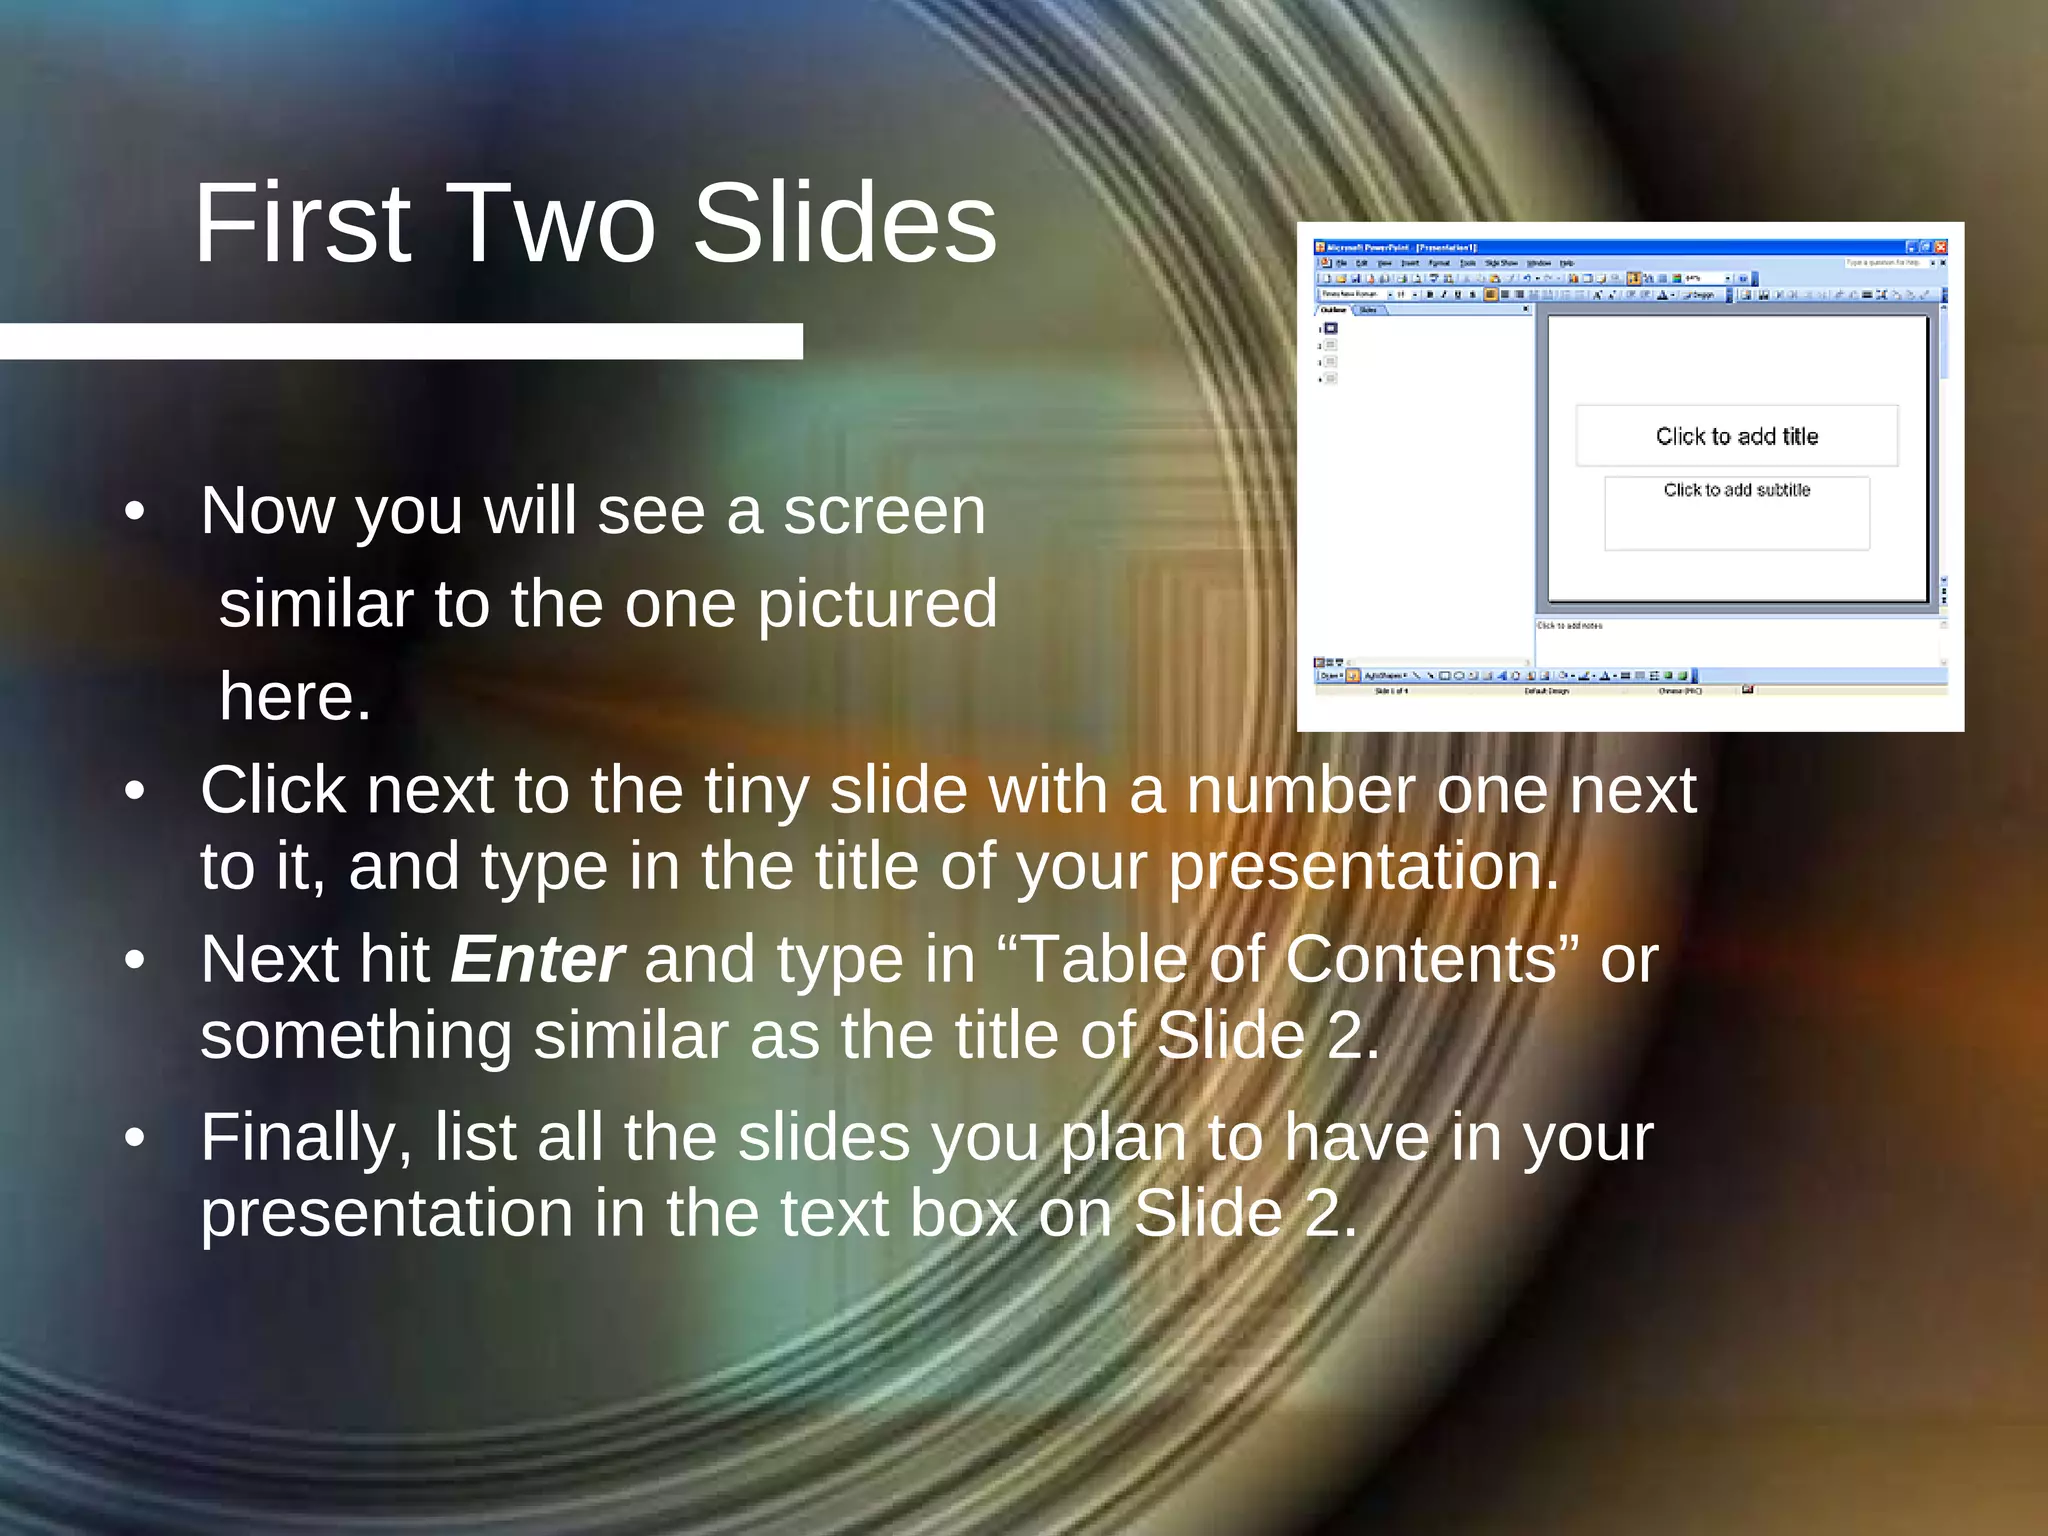
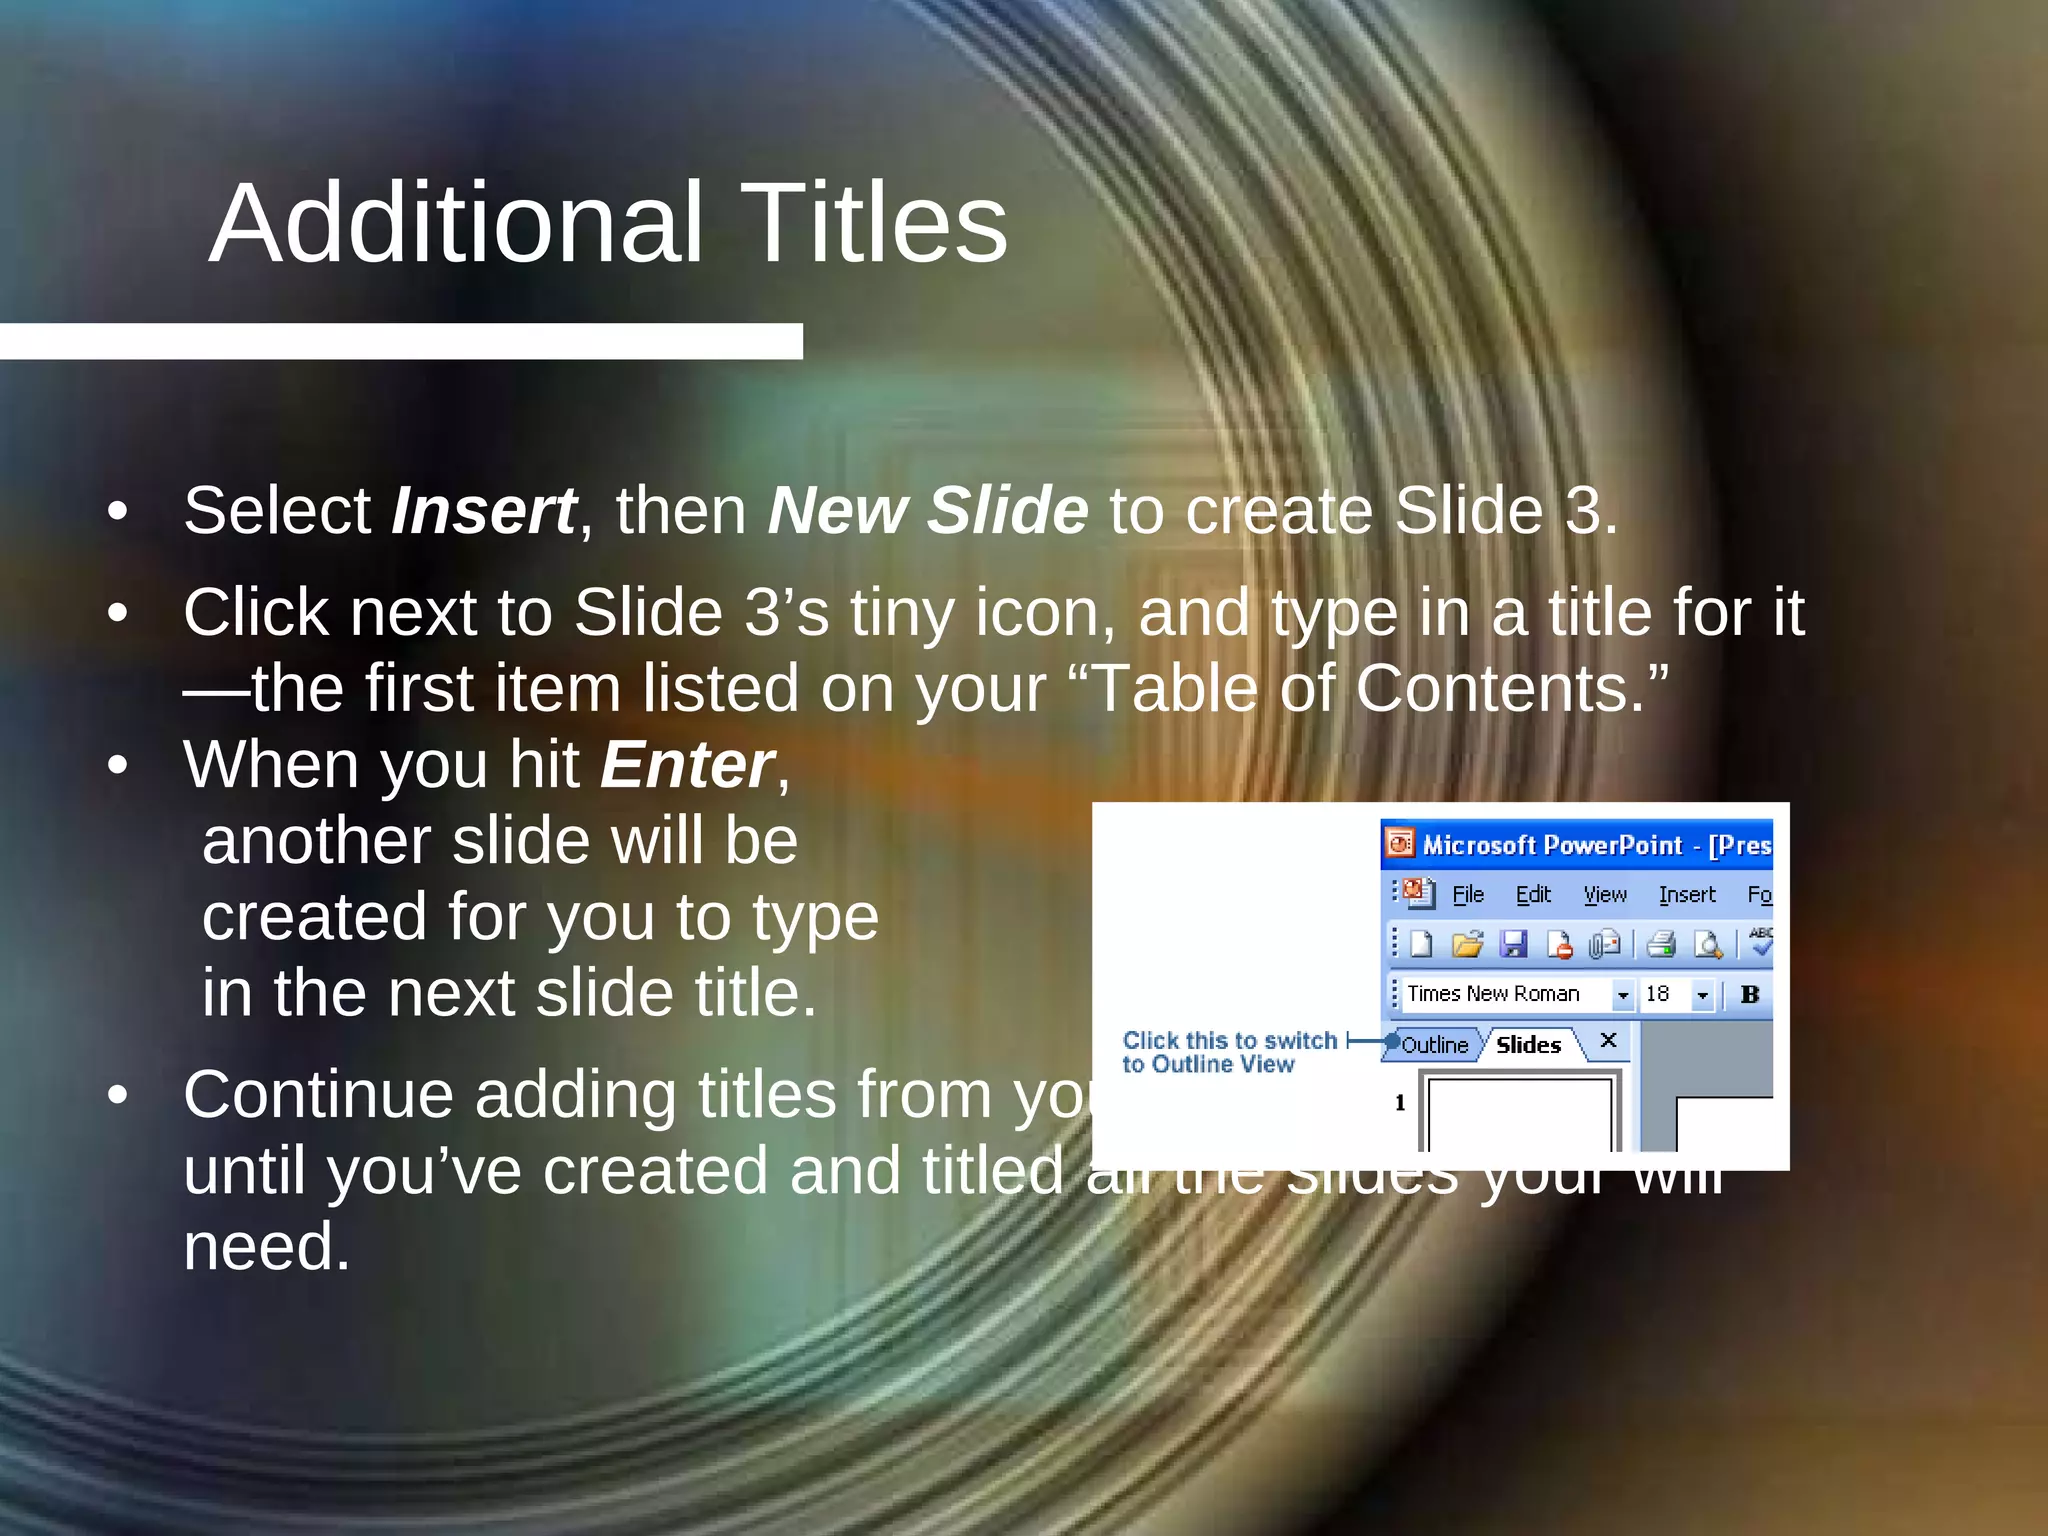
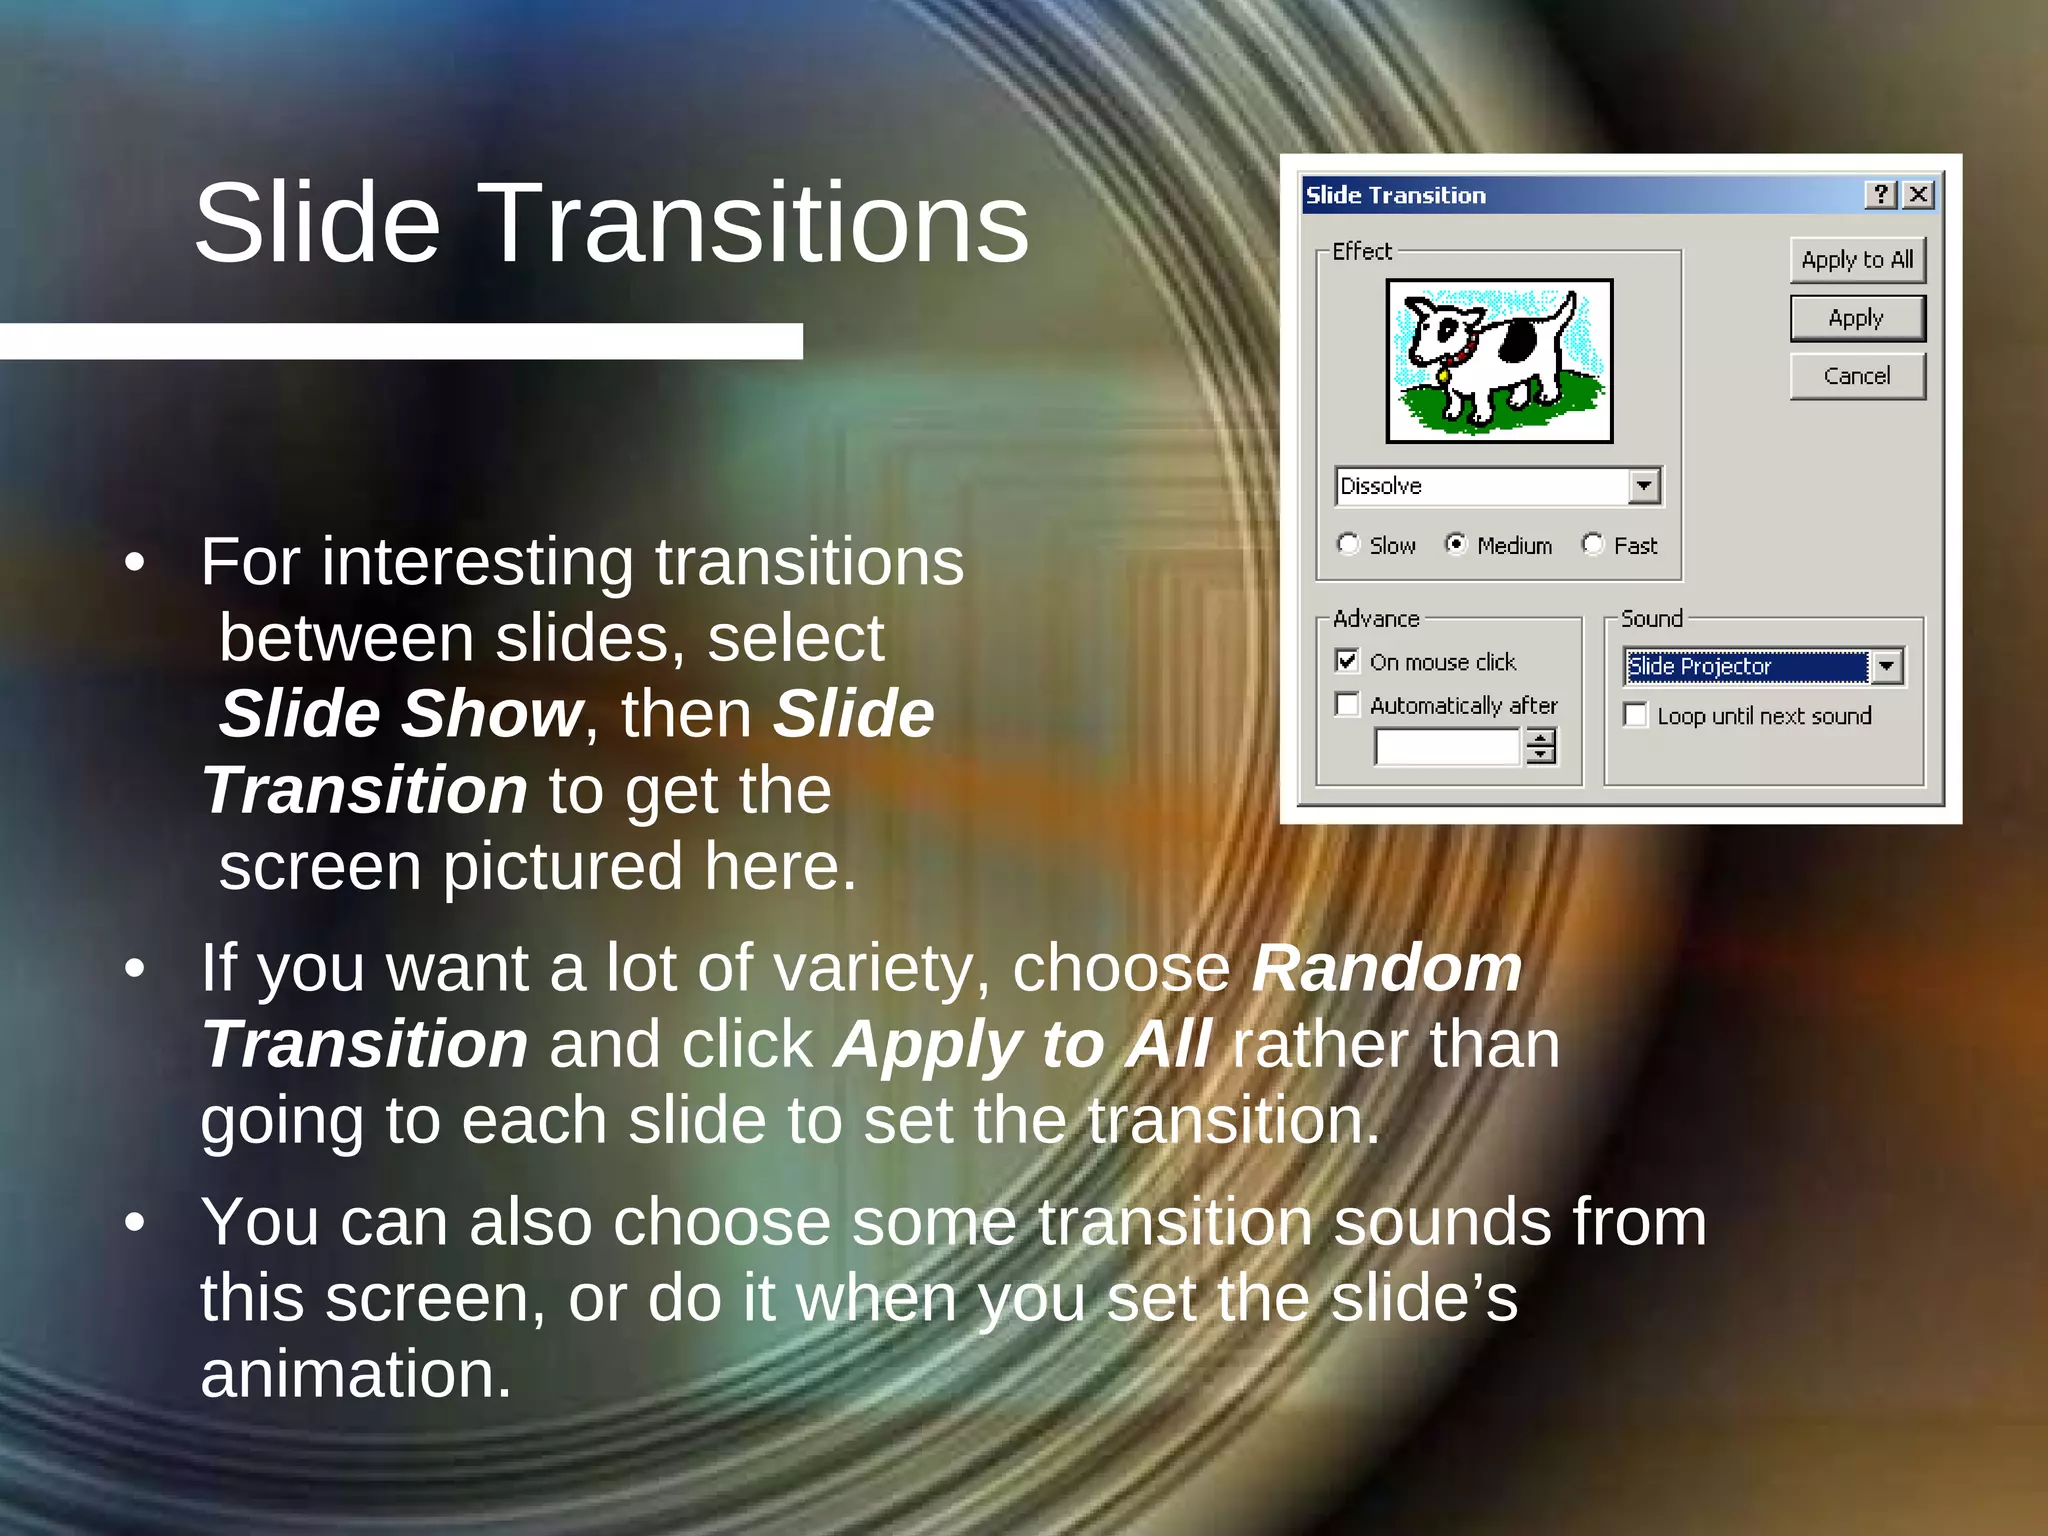
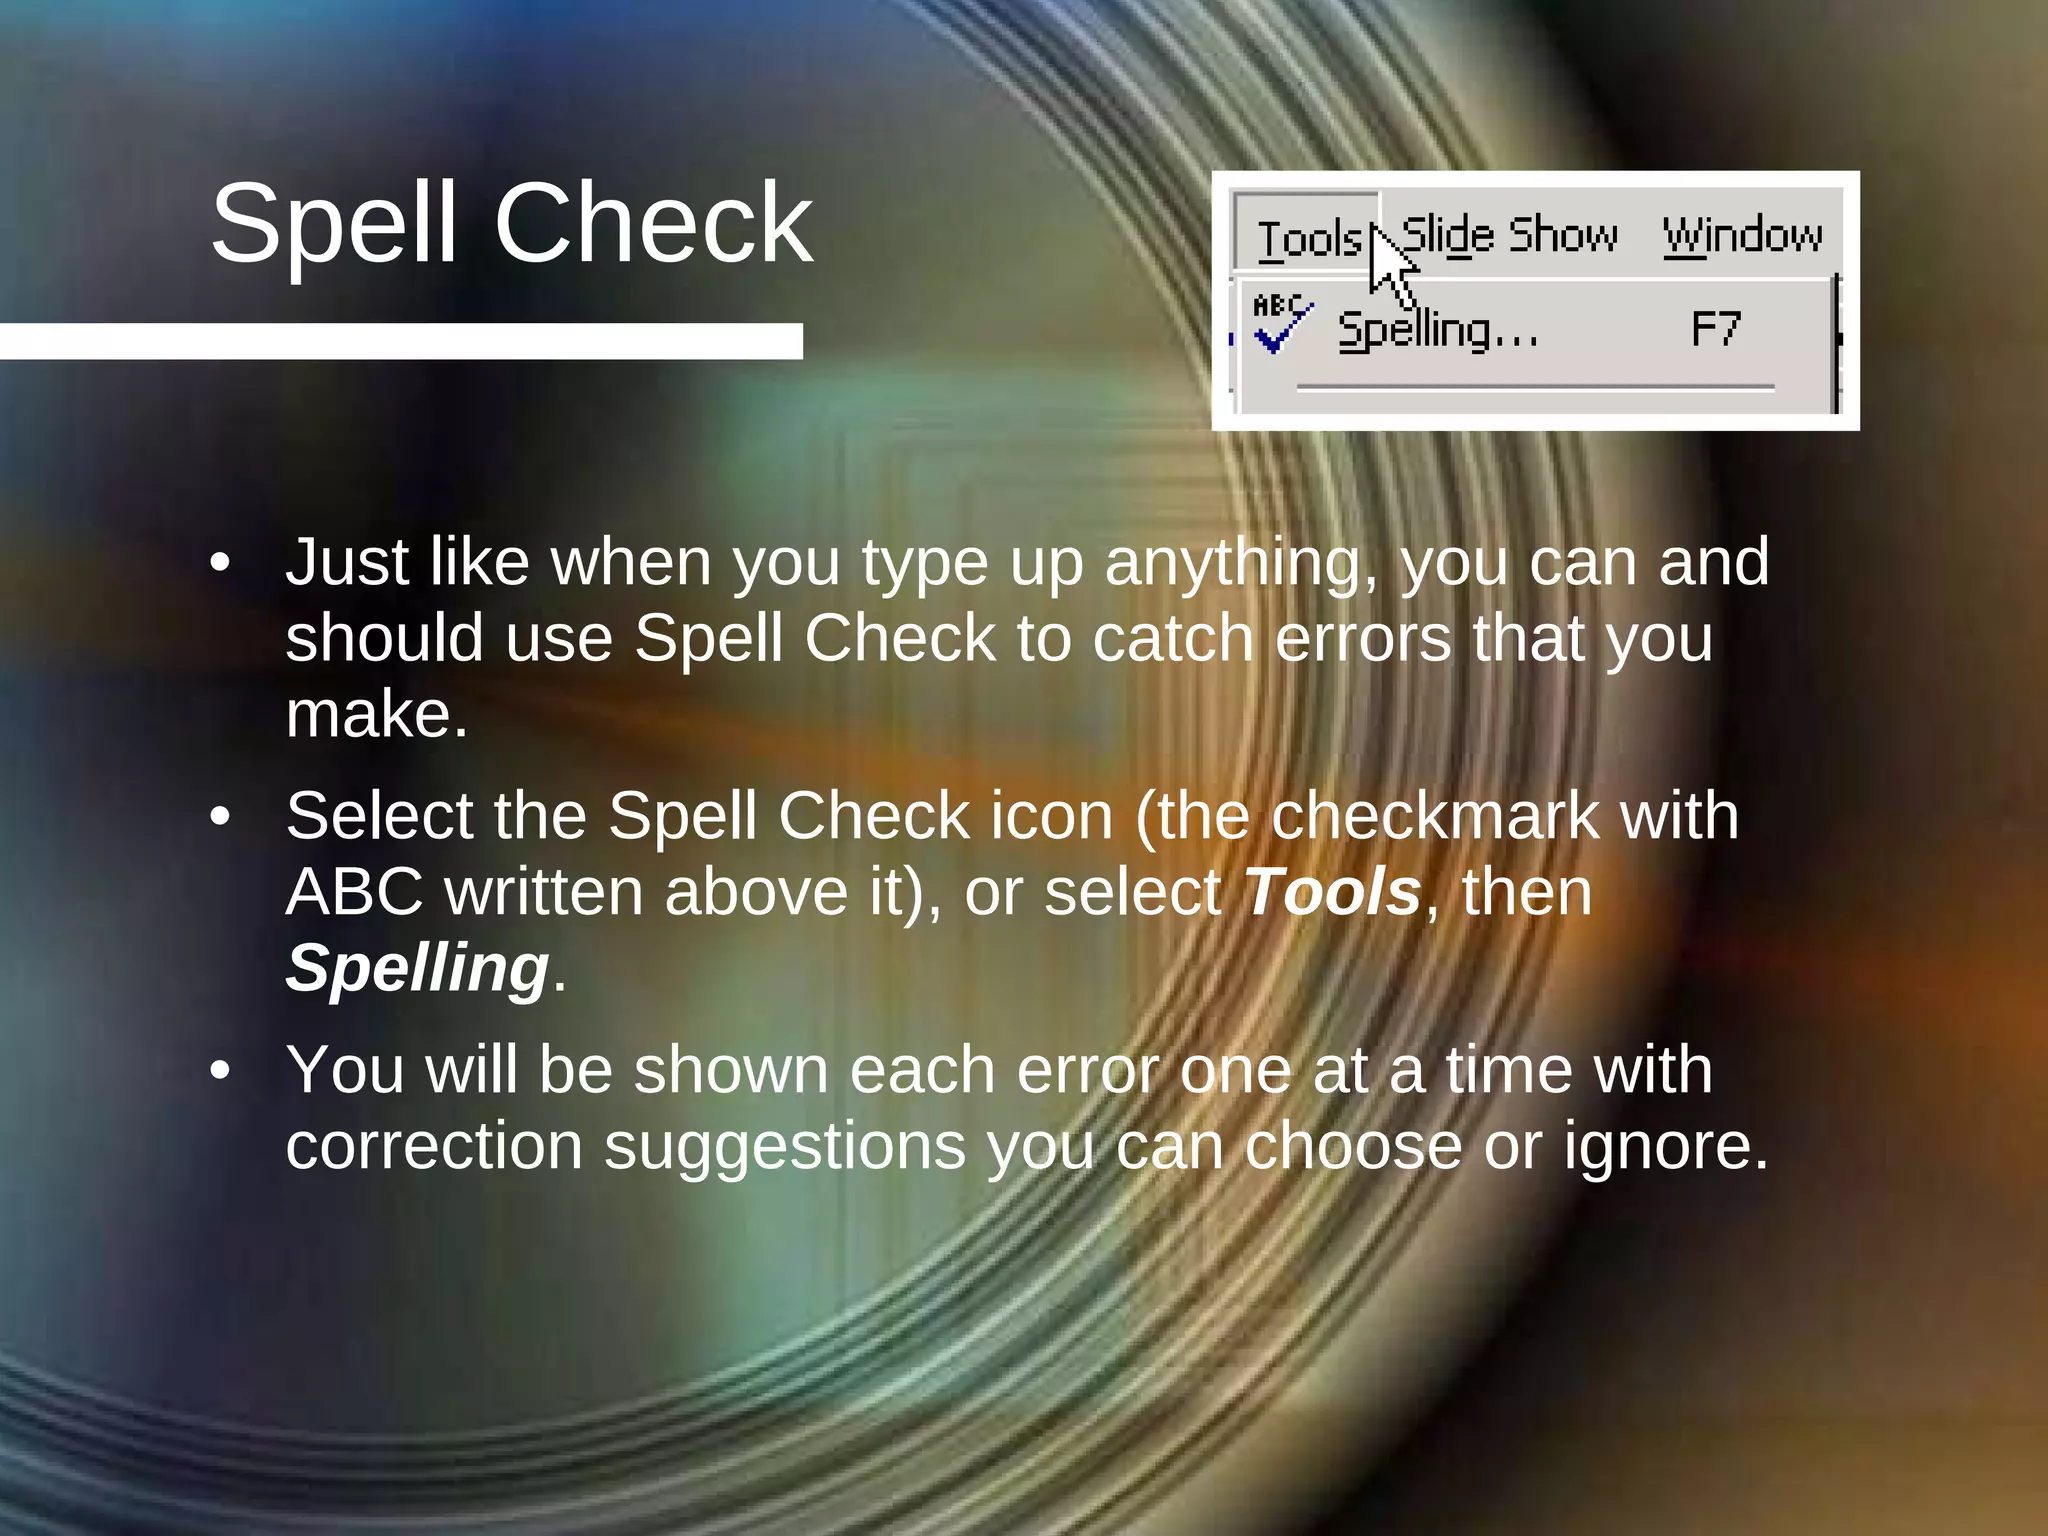
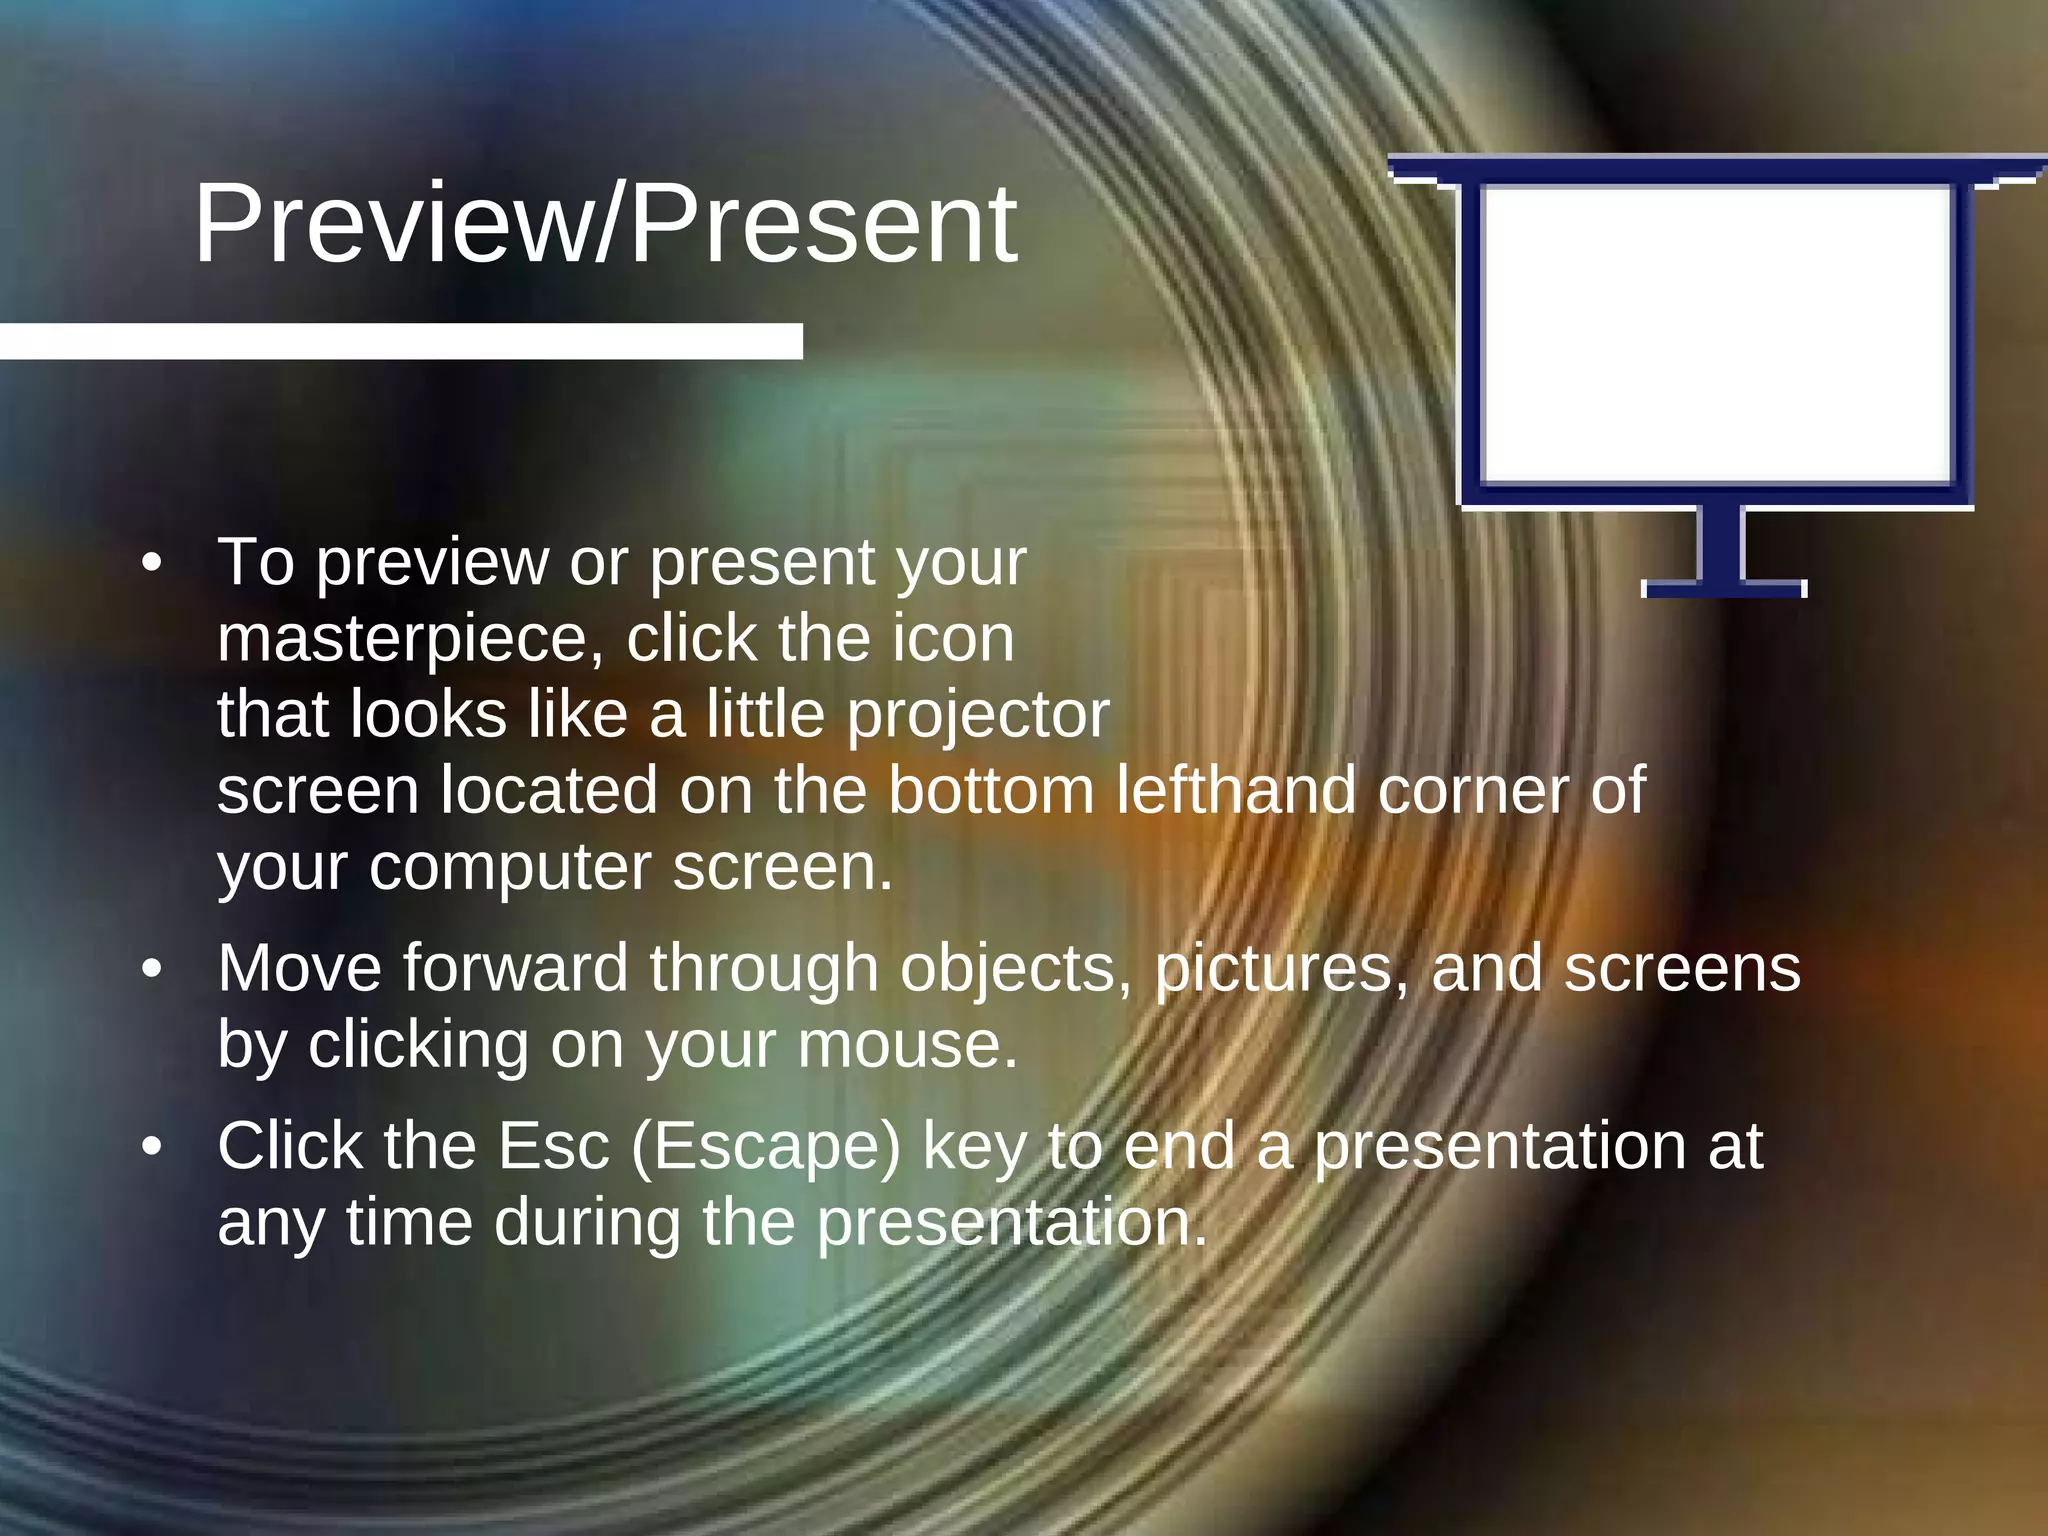
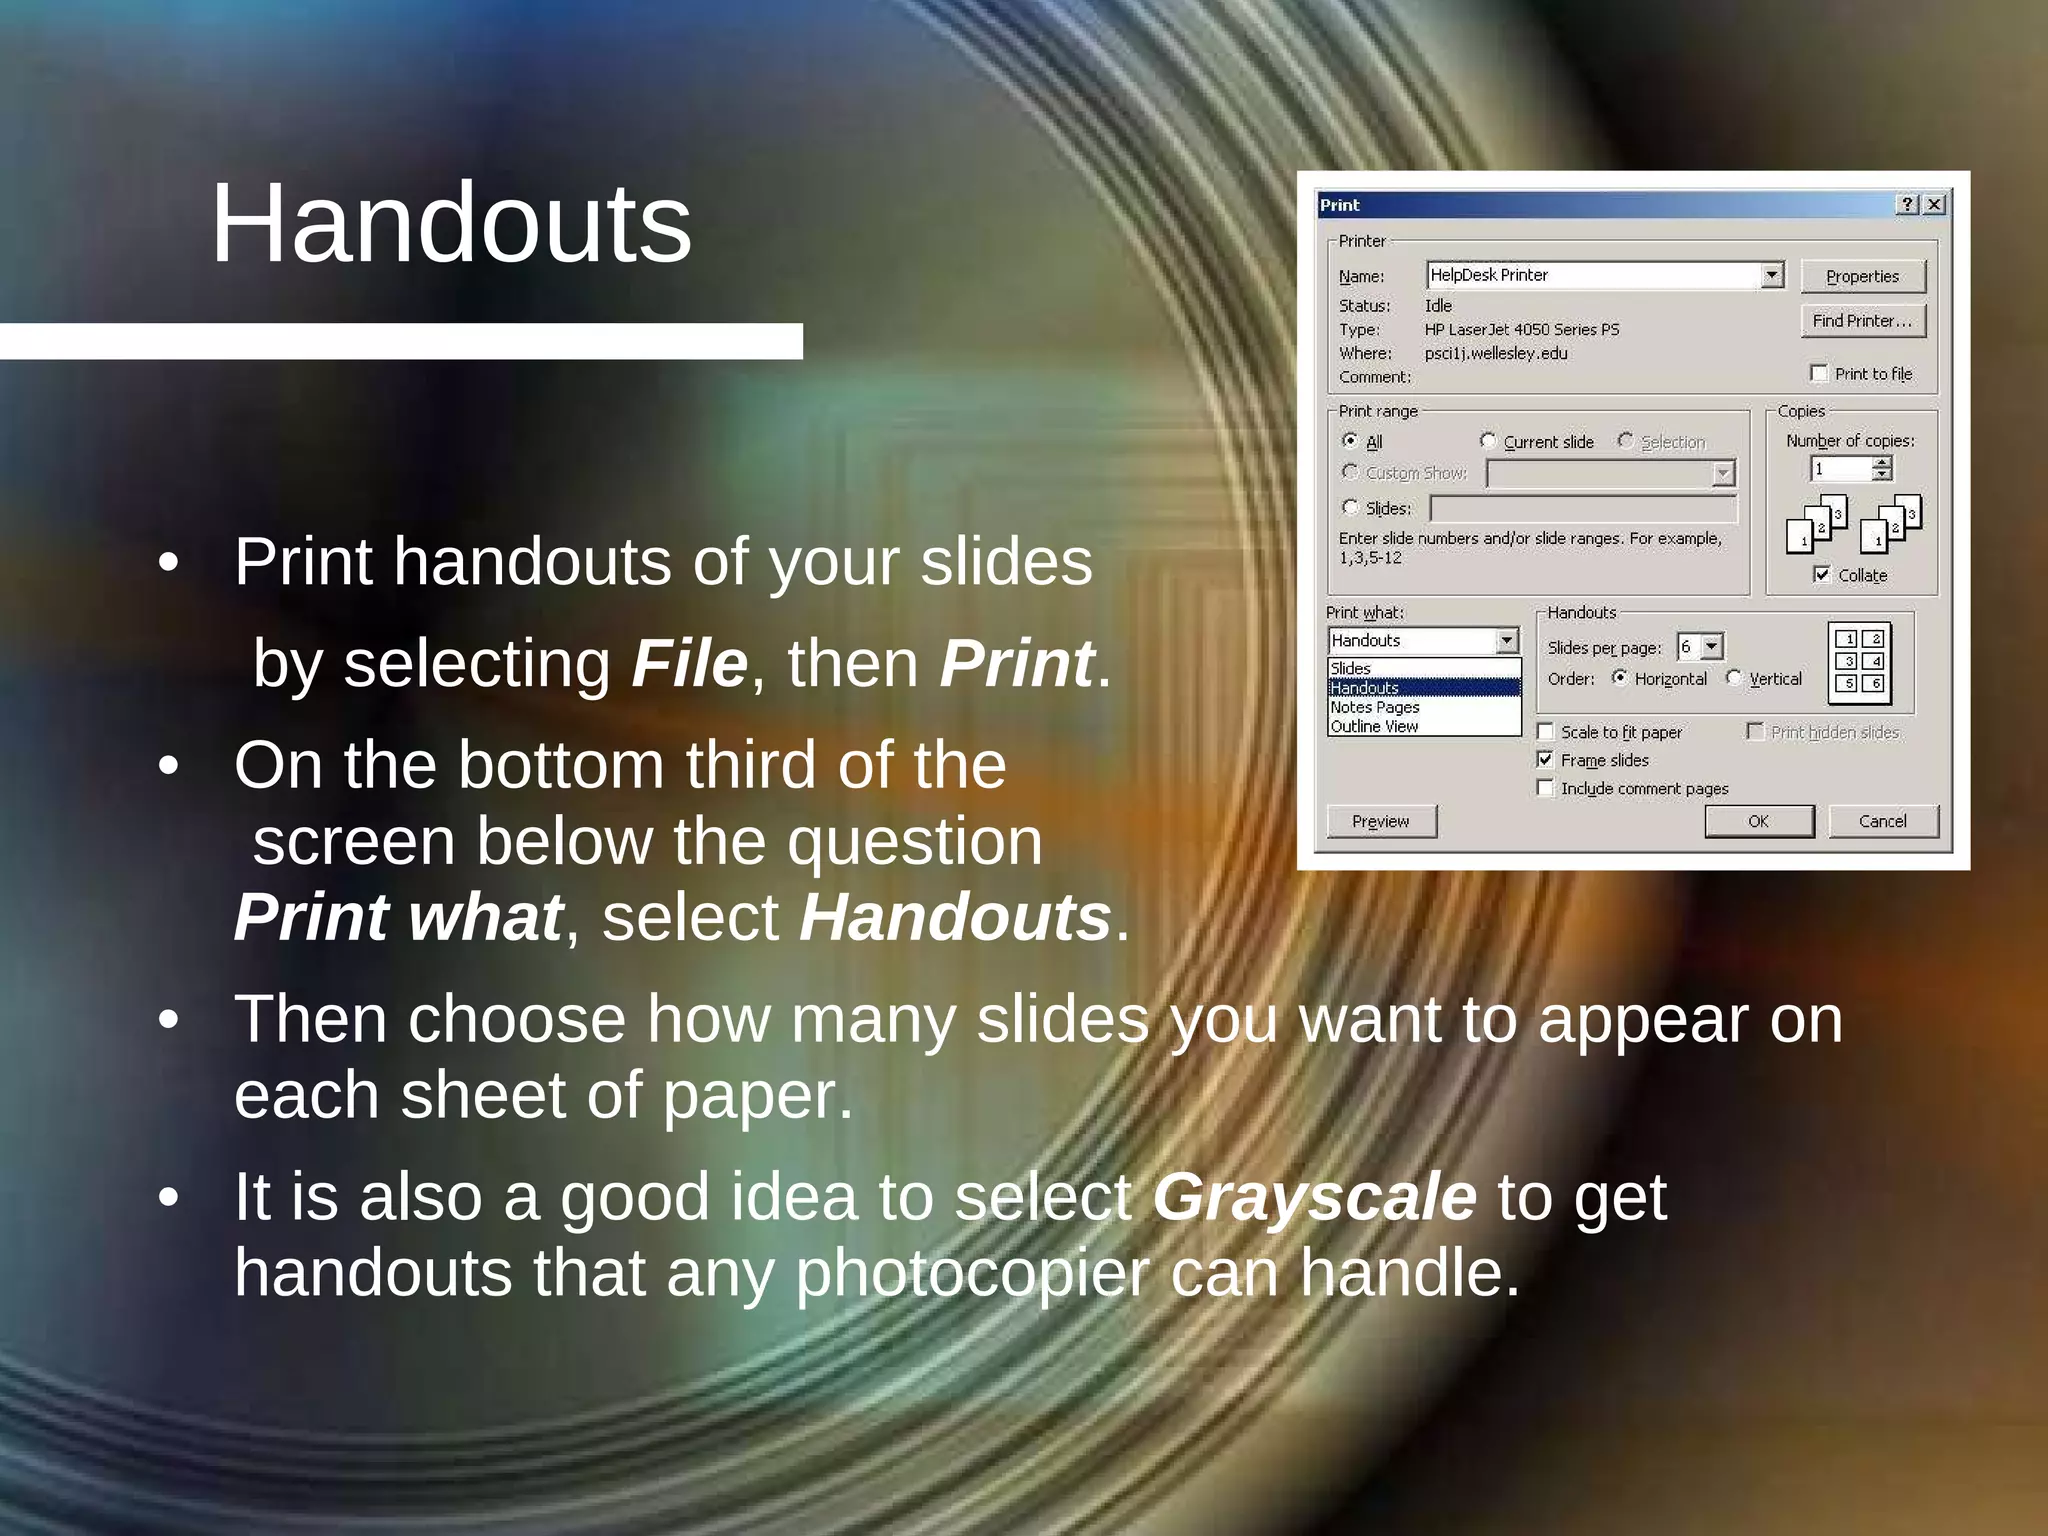
PowerPoint Basics: Step by Step Ms. McQueen Sherman Indian H.S. English 1 Classes March 10, 2006
Table of Contents Starting the Program Design Template Auto Layout First Two Slides Additional Titles All Clip Art Image Quality Remaining Text Slide Transitions Animation Spell Check Preview/Present Conclusion Sources
Starting the Program Click on the  Start  button/icon to call up your  Start  menu Click on  Programs Click on  Microsoft PowerPoint
Design Template Although you can create your PowerPoint presentation from scratch by selecting  Blank Presentation , it is much easier to begin by selecting  Design Template  and then clicking  OK. Your screen will then list many options. Click on the options to preview them, choose one, and then click  OK.
Auto Layout Similarly, it is a good idea to select a very basic auto layout, like the first two in the last row of the options you are given. They allow you to create uniform slides with a title, clipart, and text on each slide. All of the slides in the presentation you are looking at now were made this way.
First Two Slides Now you will see a screen  similar to the one pictured  here. Click next to the tiny slide with a number one next to it, and type in the title of your presentation. Next hit  Enter  and type in “Table of Contents” or something similar as the title of Slide 2. Finally, list all the slides you plan to have in your presentation in the text box on Slide 2.
Additional Titles Select  Insert , then  New Slide  to create Slide 3. Click next to Slide 3’s tiny icon, and type in a title for it—the first item listed on your “Table of Contents.” When you hit  Enter ,  another slide will be  created for you to type  in the next slide title. Continue adding titles from your “Table of Contents” until you’ve created and titled all the slides your will need.
All Clip Art Next select all the clip art and other photos and graphics you want to use. Find a good search phrase/source, and as you go through its images, copy and paste the best images onto a blank space on an empty slide. Later copy and paste the images onto the slides they work best on. To find images on Google, select  Images , then  Advanced Image Search , and enter the keyword.
Image Quality You’ll get the best quality  images if you: Copy the largest version  of an image. Paste the image onto a blank space on the slide,  not  into the clip art box.  Later drag the pasted image into the clip art box. Avoid distorting images when resizing them by pulling on the corner.
Remaining Text At this point, go back through each slide and add the text you want in the text boxes. On your first slide, include your name, course name, date, and period. Resize text and picture boxes as necessary for fit and balance, but keep all your text size 24 or 28.
Slide Transitions For interesting transitions between slides, select  Slide Show , then  Slide  Transition  to get the  screen pictured here. If you want a lot of variety, choose  Random Transition  and click  Apply to All  rather than going to each slide to set the transition. You can also choose some transition sounds from this screen, or do it when you set the slide’s animation.
Animation Animation refers to anything that  moves, including when and images appear on a slide. Animated objects can easily be imported from the web  just like  clip art and photos. To set the order of when text and images appear, right click on any text or image on a slide, then select  Custom Animation . Be sure to check the boxes next to any object you want to control, then use the arrows on the  Order and Timing  tab to determine what pops up 1 st , 2 nd , etc.
Spell Check Just like when you type up anything, you can and should use Spell Check to catch errors that you make.  Select the Spell Check icon (the checkmark with ABC written above it), or select  Tools , then  Spelling . You will be shown each error one at a time with correction suggestions you can choose or ignore.
Preview/Present To preview or present your  masterpiece, click the icon  that looks like a little projector  screen located on the bottom lefthand corner of  your computer screen. Move forward through objects, pictures, and screens by clicking on your mouse. Click the Esc (Escape) key to end a presentation at any time during the presentation.
Handouts Print handouts of your slides by selecting  File , then  Print . On the bottom third of the  screen below the question  Print what , select  Handouts . Then choose how many slides you want to appear on each sheet of paper. It is also a good idea to select  Grayscale  to get handouts that any photocopier can handle.
Conclusion Making PowerPoint  presentations  is not very difficult; they make a  great impression; and people can  walk away with some great handouts like I have given to you. If you can remember some of the tips given in this presentation (like doing all your title boxes first, then all your clipart, then all your text), this task can be very manageable, even enjoyable.
Sources http://www.soniacoleman.com http://www.powerpointbackgrounds.com/powerpointtips.htm http://www.rdpslides.com/pptfaq http://www.infoideas.net http://www.google.com

Power Point Basics

  • 1.
    PowerPoint Basics: Stepby Step Ms. McQueen Sherman Indian H.S. English 1 Classes March 10, 2006
  • 2.
    Table of ContentsStarting the Program Design Template Auto Layout First Two Slides Additional Titles All Clip Art Image Quality Remaining Text Slide Transitions Animation Spell Check Preview/Present Conclusion Sources
  • 3.
    Starting the ProgramClick on the Start button/icon to call up your Start menu Click on Programs Click on Microsoft PowerPoint
  • 4.
    Design Template Althoughyou can create your PowerPoint presentation from scratch by selecting Blank Presentation , it is much easier to begin by selecting Design Template and then clicking OK. Your screen will then list many options. Click on the options to preview them, choose one, and then click OK.
  • 5.
    Auto Layout Similarly,it is a good idea to select a very basic auto layout, like the first two in the last row of the options you are given. They allow you to create uniform slides with a title, clipart, and text on each slide. All of the slides in the presentation you are looking at now were made this way.
  • 6.
    First Two SlidesNow you will see a screen similar to the one pictured here. Click next to the tiny slide with a number one next to it, and type in the title of your presentation. Next hit Enter and type in “Table of Contents” or something similar as the title of Slide 2. Finally, list all the slides you plan to have in your presentation in the text box on Slide 2.
  • 7.
    Additional Titles Select Insert , then New Slide to create Slide 3. Click next to Slide 3’s tiny icon, and type in a title for it—the first item listed on your “Table of Contents.” When you hit Enter , another slide will be created for you to type in the next slide title. Continue adding titles from your “Table of Contents” until you’ve created and titled all the slides your will need.
  • 8.
    All Clip ArtNext select all the clip art and other photos and graphics you want to use. Find a good search phrase/source, and as you go through its images, copy and paste the best images onto a blank space on an empty slide. Later copy and paste the images onto the slides they work best on. To find images on Google, select Images , then Advanced Image Search , and enter the keyword.
  • 9.
    Image Quality You’llget the best quality images if you: Copy the largest version of an image. Paste the image onto a blank space on the slide, not into the clip art box. Later drag the pasted image into the clip art box. Avoid distorting images when resizing them by pulling on the corner.
  • 10.
    Remaining Text Atthis point, go back through each slide and add the text you want in the text boxes. On your first slide, include your name, course name, date, and period. Resize text and picture boxes as necessary for fit and balance, but keep all your text size 24 or 28.
  • 11.
    Slide Transitions Forinteresting transitions between slides, select Slide Show , then Slide Transition to get the screen pictured here. If you want a lot of variety, choose Random Transition and click Apply to All rather than going to each slide to set the transition. You can also choose some transition sounds from this screen, or do it when you set the slide’s animation.
  • 12.
    Animation Animation refersto anything that moves, including when and images appear on a slide. Animated objects can easily be imported from the web just like clip art and photos. To set the order of when text and images appear, right click on any text or image on a slide, then select Custom Animation . Be sure to check the boxes next to any object you want to control, then use the arrows on the Order and Timing tab to determine what pops up 1 st , 2 nd , etc.
  • 13.
    Spell Check Justlike when you type up anything, you can and should use Spell Check to catch errors that you make. Select the Spell Check icon (the checkmark with ABC written above it), or select Tools , then Spelling . You will be shown each error one at a time with correction suggestions you can choose or ignore.
  • 14.
    Preview/Present To previewor present your masterpiece, click the icon that looks like a little projector screen located on the bottom lefthand corner of your computer screen. Move forward through objects, pictures, and screens by clicking on your mouse. Click the Esc (Escape) key to end a presentation at any time during the presentation.
  • 15.
    Handouts Print handoutsof your slides by selecting File , then Print . On the bottom third of the screen below the question Print what , select Handouts . Then choose how many slides you want to appear on each sheet of paper. It is also a good idea to select Grayscale to get handouts that any photocopier can handle.
  • 16.
    Conclusion Making PowerPoint presentations is not very difficult; they make a great impression; and people can walk away with some great handouts like I have given to you. If you can remember some of the tips given in this presentation (like doing all your title boxes first, then all your clipart, then all your text), this task can be very manageable, even enjoyable.
  • 17.
    Sources http://www.soniacoleman.com http://www.powerpointbackgrounds.com/powerpointtips.htmhttp://www.rdpslides.com/pptfaq http://www.infoideas.net http://www.google.com