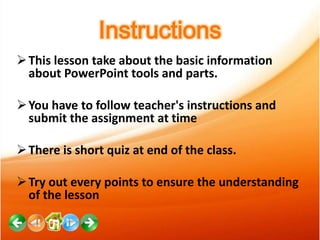
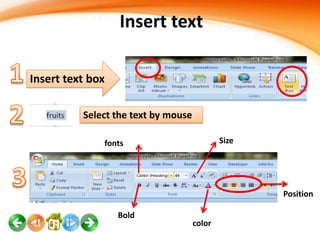
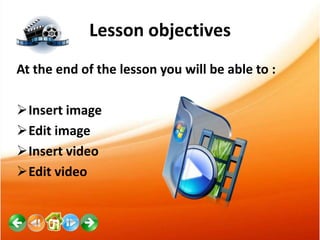
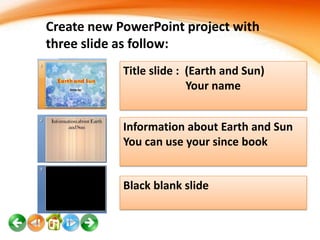
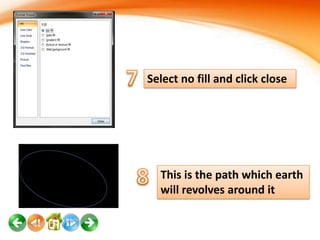
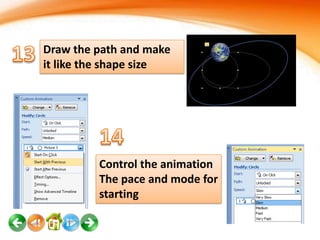
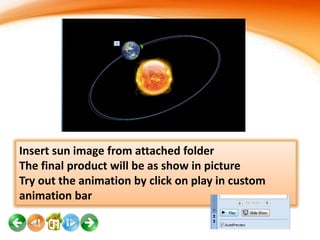
This document provides instructions for learning basic skills in Microsoft PowerPoint. It outlines several lessons that teach how to open PowerPoint, identify its main tools and parts, insert text and media, apply themes and formatting, add animations and transitions between slides. The goals are to understand PowerPoint's basic functions and how to effectively present information to an audience. Quizzes are included to test comprehension.
Watch this with a 10-15 minute audiotrack at http://vimeo.com/novusprogram/powerpoint1
This lesson provides information on the basics of PowerPoint, Microsoft’s powerful presentation development tool. The topics covered include a basic review of the program’s toolbars and options, and an introduction to slide creation. The objective of the lesson is for the user to be comfortable with operations like opening and creating PowerPoint documents, saving PowerPoint documents, navigating the options and toolbar, adding new slides, formatting text, formatting textboxes, using different program views, and starting a presentation. The lesson teaches concepts through a combination of image-based slides and video tutorials.
The Novus project is a combination of video tutorials designed to be used in conjunction with a free business simulation software program. The Novus Business and IT Program contains 36 business and IT training videos, covering basic finance, accounting, marketing, economics, business strategy, Word, Excel, and PowerPoint. Users will have an opportunity to apply the lessons in the Novus Business Simulator. Over six rounds, the user or teams will have to make decisions on capital purchases, financing, production, financing, and human resources for a microbrewery. This channel has arranged the 36 video lessons into the order in which they are meant to be used with the simulator. To watch this slideshow as a video, please go to our Vimeo page at: https://vimeo.com/novusprogram. To download our free business simulation software, please go to our SourceForge page at: http://sourceforge.net/projects/novus/.
This is a guide to PowerPoint 2007 that I created for staff INSET. It covers lots of things from the very basics to the more complex features of the developer tab. I spent a while on this so I thought I would share in case anyone else would find this use
Need the very basics for Microsoft Powerpoint? Look no further! We've taken our Microsoft Powerpoint class and moved it online, available 24/7, so anyone needing a brief rundown of the uses for Powerpoint, the windows and ribbons, and some helpful tips can get to it.
Learning target:
- Identify Microsoft Office 2016.
- Recognize the functions and parts of Word 2016.
- Create a new document.
- How to open an existing document.
- How to save your document.
Introduction to Microsoft PowerPoint 2010 for Microsoft Windows SlidesSaide OER Africa
This HIBB begins with explaining the basics of Microsoft PowerPoint, including how to start a new presentation, open an existing presentation, and save a presentation. It discusses the Ribbon toolbar and how to use it. The HIBB gives the viewer an introduction to many customizing options PowerPoint has available. The HIBB concludes with describing how to view outlines, print handouts, and view the slideshow.
At the end of this HIBB, students will be able to create a slideshow presentation with many customized features including but not limited to formatting fonts and pictures, inserting images, tables, and hyperlinks, and adding slide designs and transitions. Students will be able to view the slideshows they create and print the presentation handouts.
PowerPoint is a presentation software package. With PowerPoint, you can easily create slide shows. Trainers and other presenters use slide shows to illustrate their presentations.
This presentation is a simple introduction in distance education
Presentation contains a definition of distance education and the history of the development of distance education. Then we explained our point of view about the term distance education what is right: distance education or distance Learning .
This Is a presentation about distance Education. It include the defintion of distance Education, What is better to used Education or distance learning and old and new technology used in distance learning.
Ethnobotany and Ethnopharmacology:
Ethnobotany in herbal drug evaluation,
Impact of Ethnobotany in traditional medicine,
New development in herbals,
Bio-prospecting tools for drug discovery,
Role of Ethnopharmacology in drug evaluation,
Reverse Pharmacology.
The Indian economy is classified into different sectors to simplify the analysis and understanding of economic activities. For Class 10, it's essential to grasp the sectors of the Indian economy, understand their characteristics, and recognize their importance. This guide will provide detailed notes on the Sectors of the Indian Economy Class 10, using specific long-tail keywords to enhance comprehension.
For more information, visit-www.vavaclasses.com
Operation “Blue Star” is the only event in the history of Independent India where the state went into war with its own people. Even after about 40 years it is not clear if it was culmination of states anger over people of the region, a political game of power or start of dictatorial chapter in the democratic setup.
The people of Punjab felt alienated from main stream due to denial of their just demands during a long democratic struggle since independence. As it happen all over the word, it led to militant struggle with great loss of lives of military, police and civilian personnel. Killing of Indira Gandhi and massacre of innocent Sikhs in Delhi and other India cities was also associated with this movement.
This is a presentation by Dada Robert in a Your Skill Boost masterclass organised by the Excellence Foundation for South Sudan (EFSS) on Saturday, the 25th and Sunday, the 26th of May 2024.
He discussed the concept of quality improvement, emphasizing its applicability to various aspects of life, including personal, project, and program improvements. He defined quality as doing the right thing at the right time in the right way to achieve the best possible results and discussed the concept of the "gap" between what we know and what we do, and how this gap represents the areas we need to improve. He explained the scientific approach to quality improvement, which involves systematic performance analysis, testing and learning, and implementing change ideas. He also highlighted the importance of client focus and a team approach to quality improvement.
How to Create Map Views in the Odoo 17 ERPCeline George
The map views are useful for providing a geographical representation of data. They allow users to visualize and analyze the data in a more intuitive manner.
How to Make a Field invisible in Odoo 17Celine George
It is possible to hide or invisible some fields in odoo. Commonly using “invisible” attribute in the field definition to invisible the fields. This slide will show how to make a field invisible in odoo 17.
Read| The latest issue of The Challenger is here! We are thrilled to announce that our school paper has qualified for the NATIONAL SCHOOLS PRESS CONFERENCE (NSPC) 2024. Thank you for your unwavering support and trust. Dive into the stories that made us stand out!
2. Instructions
Click on picture to start view a lesson
To go next slide
To go the end of lesson
To go first slide of lesson
Back to previous slide
Back to the main slide
You will found instruction for each
lesson ,follow it to learn perfectly
4. Instructions
This lesson take about the basic information
about PowerPoint tools and parts.
You have to follow teacher's instructions and
submit the assignment at time
There is short quiz at end of the class.
Try out every points to ensure the understanding
of the lesson
5. Lesson objectives
• You will be able to open Microsoft
PowerPoint
• You will be able to determine the main parts
of PowerPoint.
• You will be able to identify the main tools in
PowerPoint.
• You will be able to insert text
8. • From the Start menu
select All Programs
• From Microsoft
Office select
Microsoft
PowerPoint
9. Why we use PowerPoint
PowerPoint is a presentation software package.
PowerPoint presentation consists of a number of
individual pages or “slides.” Slides may contain
text, graphics, tables, movies, etc. The
presentation can be printed, displayed on a
computer, and can be projected using a video
projector. PowerPoint can add animation to your
texts, graphics, tables, movies, and other objects
through Custom Animations. You can also add
transition (movement) between your slides.
10. PowerPoint 2010 has a new, intuitive user interface called the
Microsoft Office Fluent User Interface, which helps you create
better presentations quicker. Additionally, PowerPoint 2010
offers new and improved effects, themes, and layouts.
11. Microsoft Office Button & Quick
Access Toolbar
In the upper‐left corner is the Microsoft
Office button. When you click the
button, a menu appears. You can use the
menu to create a new file, open your
existing file, save a file, and print a file.
Next to the Microsoft Office button is the Quick Access toolbar.
The quick access toolbar is a customizable toolbar that contains
commands
12. The Ribbon
You can use the commands to tell PowerPoint what to
do. The Ribbon is located at the top of the PowerPoint
Window. At the top of the Ribbon there are several
tables; clicking a table displaces several replanted group
commands. You can click on the command buttons to
issue commands or to access menus.
For more information click here
13. PowerPoint Window
STATUS BAR
Appears at the bottom of
the window. The status
bar displays the slide
number that is currently
displayed and also the
total number of slides.
SLIDE SHOW
Use the slide show view when you want to
view your slides as they will look in your
final presentation
19. Saving Your Work
Saving for the First Time
Click Microsoft Office Button
Click Save
Renaming and Saving as an Earlier
Version and type of show PowerPoint
Click Microsoft Office Button
Click Save As
Choose the type that you want
20. Why we use PowerPoint?
Click to evaluate your
answer
23. Quiz
OUTLINE is ?
Display slide in full mode
Insert text
Displays the text contained in your presentation
Cerate theme
24.
25. Instructions
This lesson talk about how you can insert picture and
video into PowerPoint ,it is a kind of funny lesson
which you will interest with.
Before you start this lesson review the last lesson
because it is related
You will learn by video ,please follow the steps one by
one.
The activities are for increase understanding
26. Lesson objectives
At the end of the lesson you will be able to :
Insert image
Edit image
Insert video
Edit video
27. Open new PowerPoint file
Write the title “Fruits and Health”
Change the font's type ,size and
color
Change the theme or change
background color
Help for more success
28. Insert text and image
With your group add new slide and insert
fruit image (from the attached folder) at
the center of slide then insert text for the
image
29.
30. Edit image
In your presentation insert fruit image
(from the attached folder) and make it
as this image .
31. Insert video
From the center of the slide text box
click on insert video
or
From insert menu click on insert
video
32. Insert video
After select the video, this
massage box will appear .
Choose how you want to
view the video
Sound of video level
Video options
View video in slide
Show options
35. Instructions
• This lesson talk about the animation ,you will
design fun animated earth revolves around sun
also you will insert interested transition slides
effects.
• The pictures are attached on the picture folder.
• At the end of class you should submit your
PowerPoint
36. Lesson objective
At the end of this lesson you will be able to :
Insert shape
Change the format of shape
Add animation to the objects
Control the animation path and time
Add transition slide animation
37. Create new PowerPoint project with
three slide as follow:
Title slide : (Earth and Sun)
Your name
Information about Earth and Sun
You can use your since book
Black blank slide
38. Insert a shape
Select slide (3)
From insert select shapes
Select circle
Draw it by clicking in slide
39. Control the size and
direction of the circle by
the square edges
To change the fill of
circle click right
button of mouse and
select “ format shape”
40. Select no fill and click close
This is the path which earth
will revolves around it
41. Insert earth image from
attached folder
Select animation bar
Animation for
image, text, shape
,video ….
Animation when
go from slide to
another
53. Why we use PowerPoint?
Display the information
Interactive way to visualize
concepts
Add animation to content
Add video and image
Hyperlink
54. What is the deferent between custom
animation and transition slide animation:
custom animation add for objects
like image , shape , text
Transition slide animation add for
slide and show when you trans to
next slide