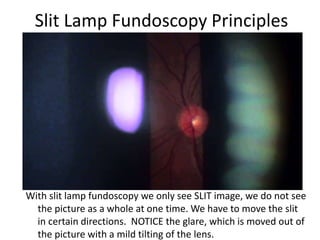
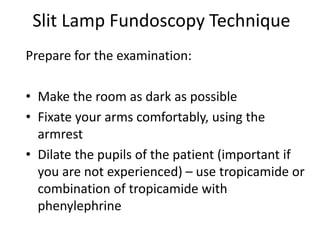
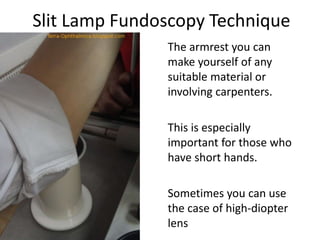
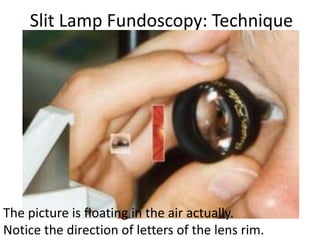
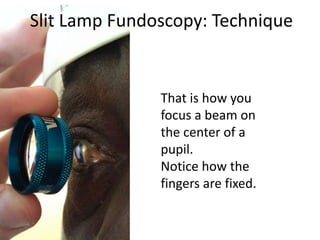
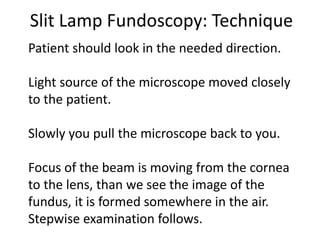
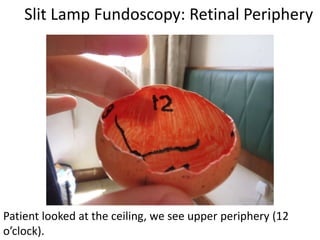
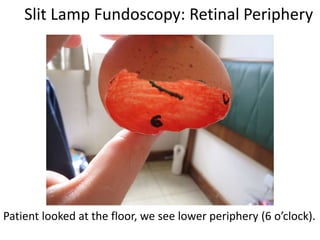
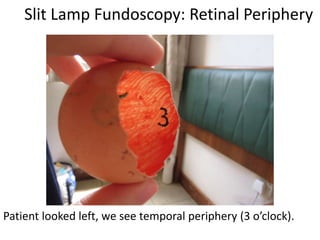
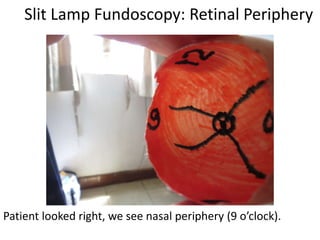
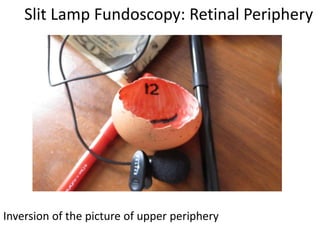
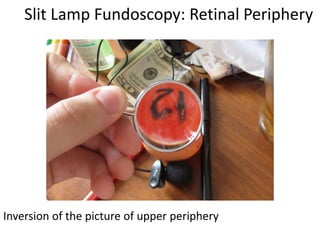
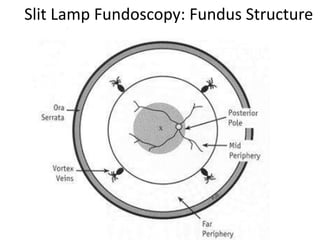
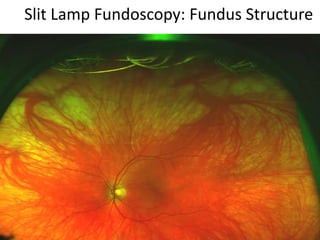
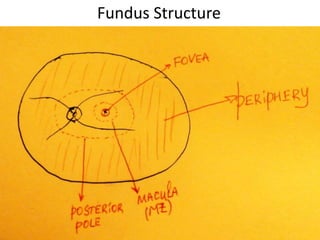
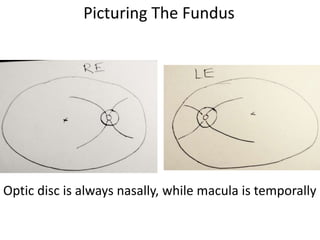
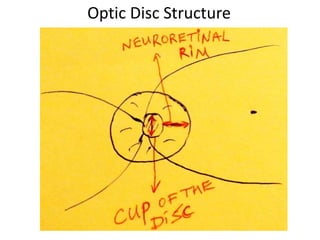
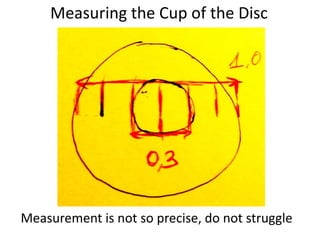
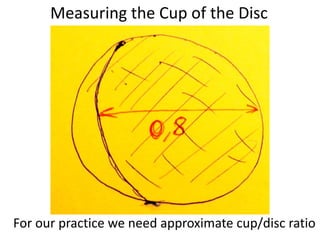
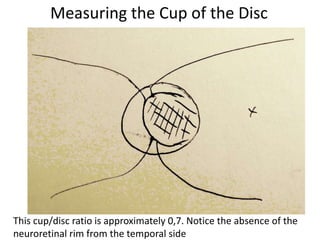
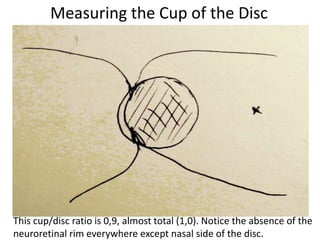
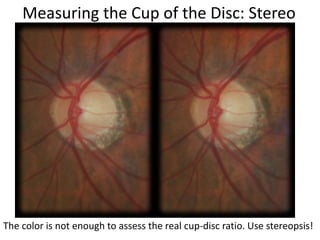
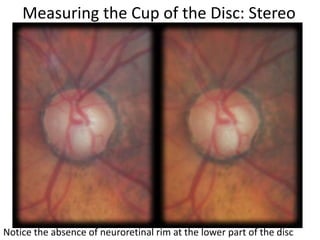
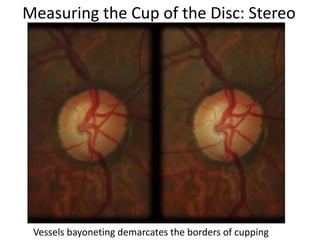
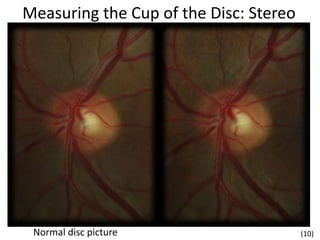
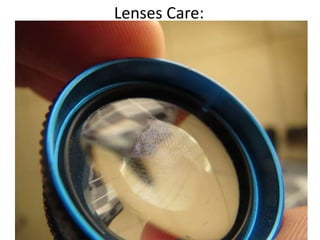
2. Slit Lamp Fundoscopy
Biomicroscopy with simultaneous fundus
examination.
Using high-diopter lens (+60D, +78D, +90D,
+120D and others).
Ophthalmoscopy with slit lamp is the most
difficult skill in ophthalmic examination.
Ophthalmoscopy using slit lamp and the lens
gives the most clear picture of the fundus:
magnified, 3D, very bright).
4. Slit Lamp Fundoscopy
It is possible to do fundoscopy with wide AND
with narrow pupil most of the times.
The latter is surely more difficult for
inexperienced examiner.
Moreover, it is difficult and sometimes not
possible to examine fundus periphery with
narrow pupils.
5. Slit Lamp Fundoscopy Principles
Use slit lamp as you do for anterior
segment.
The task is to focus the beam light on the
fundus.
The beam is narrow. Examine fundus
stepwise.
Everything what is not into the beam light
focus – is not seen or seen poorly.
6. Slit Lamp Fundoscopy Principles
With slit lamp fundoscopy we only see SLIT image, we do not see
the picture as a whole at one time. We have to move the slit
in certain directions. NOTICE the glare, which is moved out of
the picture with a mild tilting of the lens.
7. Slit Lamp Fundoscopy Technique
Prepare for the examination:
• Make the room as dark as possible
• Fixate your arms comfortably, using the
armrest
• Dilate the pupils of the patient (important if
you are not experienced) – use tropicamide or
combination of tropicamide with
phenylephrine
9. Slit Lamp Fundoscopy Technique
The armrest you can
make yourself of any
suitable material or
involving carpenters.
This is especially
important for those who
have short hands.
Sometimes you can use
the case of high-diopter
lens
10. Slit Lamp Fundoscopy: Set Slit Lamp
First use magnification of x15 or less (i.e. x10). The
bigger the magnification, the harder it is for
inexperienced examiner to set the focus on the
fundus and to orient within the fundus.
Set the light beam as narrow as possible. The narrower
the pupil, the narrower the beam should be. The
height of the beam is not so important. The width
can be regulated during the examination.
11. Slit Lamp Fundoscopy: Set Slit Lamp
Set the brightness of the beam to the level most
comfortable for you (usually it is the brightest) and
for the patient (usually patients are more
comfortable with darker beam).
Height, width and brightness of the beam can be
regulated during the procedure, that is especially
important with uncooperative patients and patients
with photophobia.
The light-source and the pieces of the slit lamp should
be aligned into one axis (90 degree to the patient).
12. Slit Lamp Fundoscopy: Start Exam
Fixate a chin and a forehead of the patient (using
chinrest and headrest).
Ask patient to look straight or in other needed gauze
position.
Focus the beam on the center of the pupil.
Fix your hand with the lens on a cheek of a patient or
using a headrest.
It is more suitable to use left hand for a right eye of a
patient, and vice versa.
13. Slit Lamp Fundoscopy: Technique
DO NOT USE ONE HAND FOR BOTH EYES.
SWITH YOUR HANDS. IT IS EASY TO GET
USED TO ONE HAND, AND IT WILL SPOIL
YOUR EXAMINATIONS LATER.
14. Slit Lamp Fundoscopy: Technique
Grab the lens with big and index finger, the rest of the
fingers will help you to tilt the lens and pull the
upper eyelid up.
Set the center of the lens on the center of the pupil
(use the beam to check it).
The working distance of the lens is 5-10 mm.
It does not matter what side of the lens should be
faced to the patient, if the lens is double aspheric
(volk, ocular instruments). Otherwise – the letters on
the lens rim should be directed towards the patient
(see the foto).
15. Slit Lamp Fundoscopy: Technique
The picture is floating in the air actually.
Notice the direction of letters of the lens rim.
16. That is how you
focus a beam on
the center of a
pupil.
Notice how the
fingers are fixed.
Slit Lamp Fundoscopy: Technique
17. Slit Lamp Fundoscopy: Technique
Patient should look in the needed direction.
Light source of the microscope moved closely
to the patient.
Slowly you pull the microscope back to you.
Focus of the beam is moving from the cornea
to the lens, than we see the image of the
fundus, it is formed somewhere in the air.
Stepwise examination follows.
18. Slit Lamp Fundoscopy: Technique
Practice makes perfect!
Do at least one dilated and one non-
dilated fundoscopy of the disc EVERY
DAY.
After 2-3 weeks you may add the
macula to your daily MUST DO list.
19. Slit Lamp Fundoscopy: The Image
The image which you see – is inverted. It means that
you see it upwards down and left-to-right. If you see
something in the upper part of your picture – it is
actually in the lower part of that part of the fundus,
which you are examining. The same goes to “left or
right” parameters.
The illustration of that fact is the relation of optic disc
and macula. The latter is always temporally (closer to
the temple), the disc is nasally (closer to the nose).
But with the slit lamp fundoscopy we see the picture
inverted – disc is always temporally there.
20. Slit Lamp Fundoscopy: The Image
Fundus of the left eye (egg), as if we see the eye in horizontal cross-
section. As it should be with the left eye – the optic disc is closer to the
nose than macula.
21. Slit Lamp Fundoscopy: The Image
Fundus of the same left eye (egg) with the using of high-diopter “+” lens.
Equally to the +90D or +78D, the image gets inverted. Macula and disc have
changed their places and got upside-down.
22. Slit Lamp Fundoscopy: The Image
When you are drawing the fundus picture in the file – there
are two ways you can do it. The first one implies mental
gymnastics – you may try to picture the findings immediately
in the way they are really located in the fundus (direct
picture).
The other way is to rotate your file on 180 degree and draw
the picture JUST exactly how you’ve seen it in inverted way. If
you’ll rotate this file back to 180 degree – the findings will be
in correct position and direct.
Use mental gymnastics! It is useful for a brain and will help
you to understand the topography of the fundus better.
23. Slit Lamp Fundoscopy: The Image
The area of fundus which you can see
depends on refractive power of the lens.
The more powerful is the lens, the bigger
part of fundus you see at a one time. For
example, with +60D you will struggle
trying to see the periphery with narrow
pupil, but +120D lens will easily allow you
to see it.
24. Slit Lamp Fundoscopy: The Image
The field of fundus which is seen – depends
not only on the lens, but also on the
patient’s cooperation. The more precisely
patient follows your instructions, the bigger
piece of fundus you will see.
It is wise to do the fundoscopy in the next
order: optic disc (patient fixates the
contralateral ear of the examiner), macula
(patient fixates straighth), periphery (patient
fixated every needed direction).
25. Slit Lamp Fundoscopy: Retinal Periphery
It is most comfortable for the beginner to
examine periphery of the retina starting
from 12 o’clock meridian going clockwise
and seeing the 1-30, 3, 4-30, 6, 7-30, 9 and
10-30 o’clock meridians.
26. Slit Lamp Fundoscopy: Retinal Periphery
For the beginner it is difficult to orient
within the fundus in a certain gauze
direction of a patient. It is quiet easy.
Patient looks at the direction of the piece
of fundus which you see. Patient looks
down – we see the lower periphery.
Patient looks up – we see the upper
periphery. Etc.
27. Slit Lamp Fundoscopy: Retinal Periphery
Patient fixated straight. We receive macula in the field of
view.
28. Slit Lamp Fundoscopy: Retinal Periphery
Patient fixated the contralateral ear of examiner. We receive
optic disc in the center of a fundus picture.
29. Slit Lamp Fundoscopy: Retinal Periphery
Patient looked at the ceiling, we see upper periphery (12
o’clock).
30. Slit Lamp Fundoscopy: Retinal Periphery
Patient looked at the floor, we see lower periphery (6 o’clock).
31. Slit Lamp Fundoscopy: Retinal Periphery
Patient looked left, we see temporal periphery (3 o’clock).
32. Slit Lamp Fundoscopy: Retinal Periphery
Patient looked right, we see nasal periphery (9 o’clock).
40. Measuring the Cup of the Disc
Measurement is not so precise, do not struggle
41. Measuring the Cup of the Disc
For our practice we need approximate cup/disc ratio
42. Measuring the Cup of the Disc
This cup/disc ratio is approximately 0,7. Notice the absence of the
neuroretinal rim from the temporal side
43. Measuring the Cup of the Disc
This cup/disc ratio is 0,9, almost total (1,0). Notice the absence of the
neuroretinal rim everywhere except nasal side of the disc.
44. Measuring the Cup of the Disc: Stereo
The color is not enough to assess the real cup-disc ratio. Use stereopsis!
45. Notice the absence of neuroretinal rim at the lower part of the disc
Measuring the Cup of the Disc: Stereo
46. Measuring the Cup of the Disc: Stereo
Vessels bayoneting demarcates the borders of cupping
49. Lenses Care:
1)Do not touch the lens itself, touch only the
rim!
2)Occasionally you may clean the lens
surface gently with a smooth tissue
without fibers.
3)Put the lens into the case immediately
after use!
50. References:
(1) S.Barnard, A.Field, "Slit Lamp Indirect Ophthalmoscopy", American Academy of
Optometry, http://www.academy.org.uk/tutorials/volklens.htm
(2) "Practical Ophthalmology - A Manual for Beginning Residents", 5th ed., American
Academy of Ophthalmology, 2005
(3) James Benjamin, "Ophthalmology Investigation and Examination Techniques", 2006
(4) Контактные диагностические линзы и фиксация локтя:
http://terra-ophthalmica.blogspot.com/2012/06/blog-post_21.html
(5) Rosalind A. Stevens, Patrick J. Saine, Marshall E. Tyler, "Stereo atlas of fluorescein
and indocyanine green angiography", 1999
(6) William L. Jones, "Peripheral Ocular Fundus (Third Edition)", 2007
(7) Vortex Veins and Blonde Fundus,
http://www.optos.com/RecognizingPathology/pages/Visualization/VortexVeins-
8.html
(8) S.A. Rizvi, "A simple method to view stereo-images of the optic nerve head on
ordinary computer monitors", Eye (2009)
(9) My own fotos