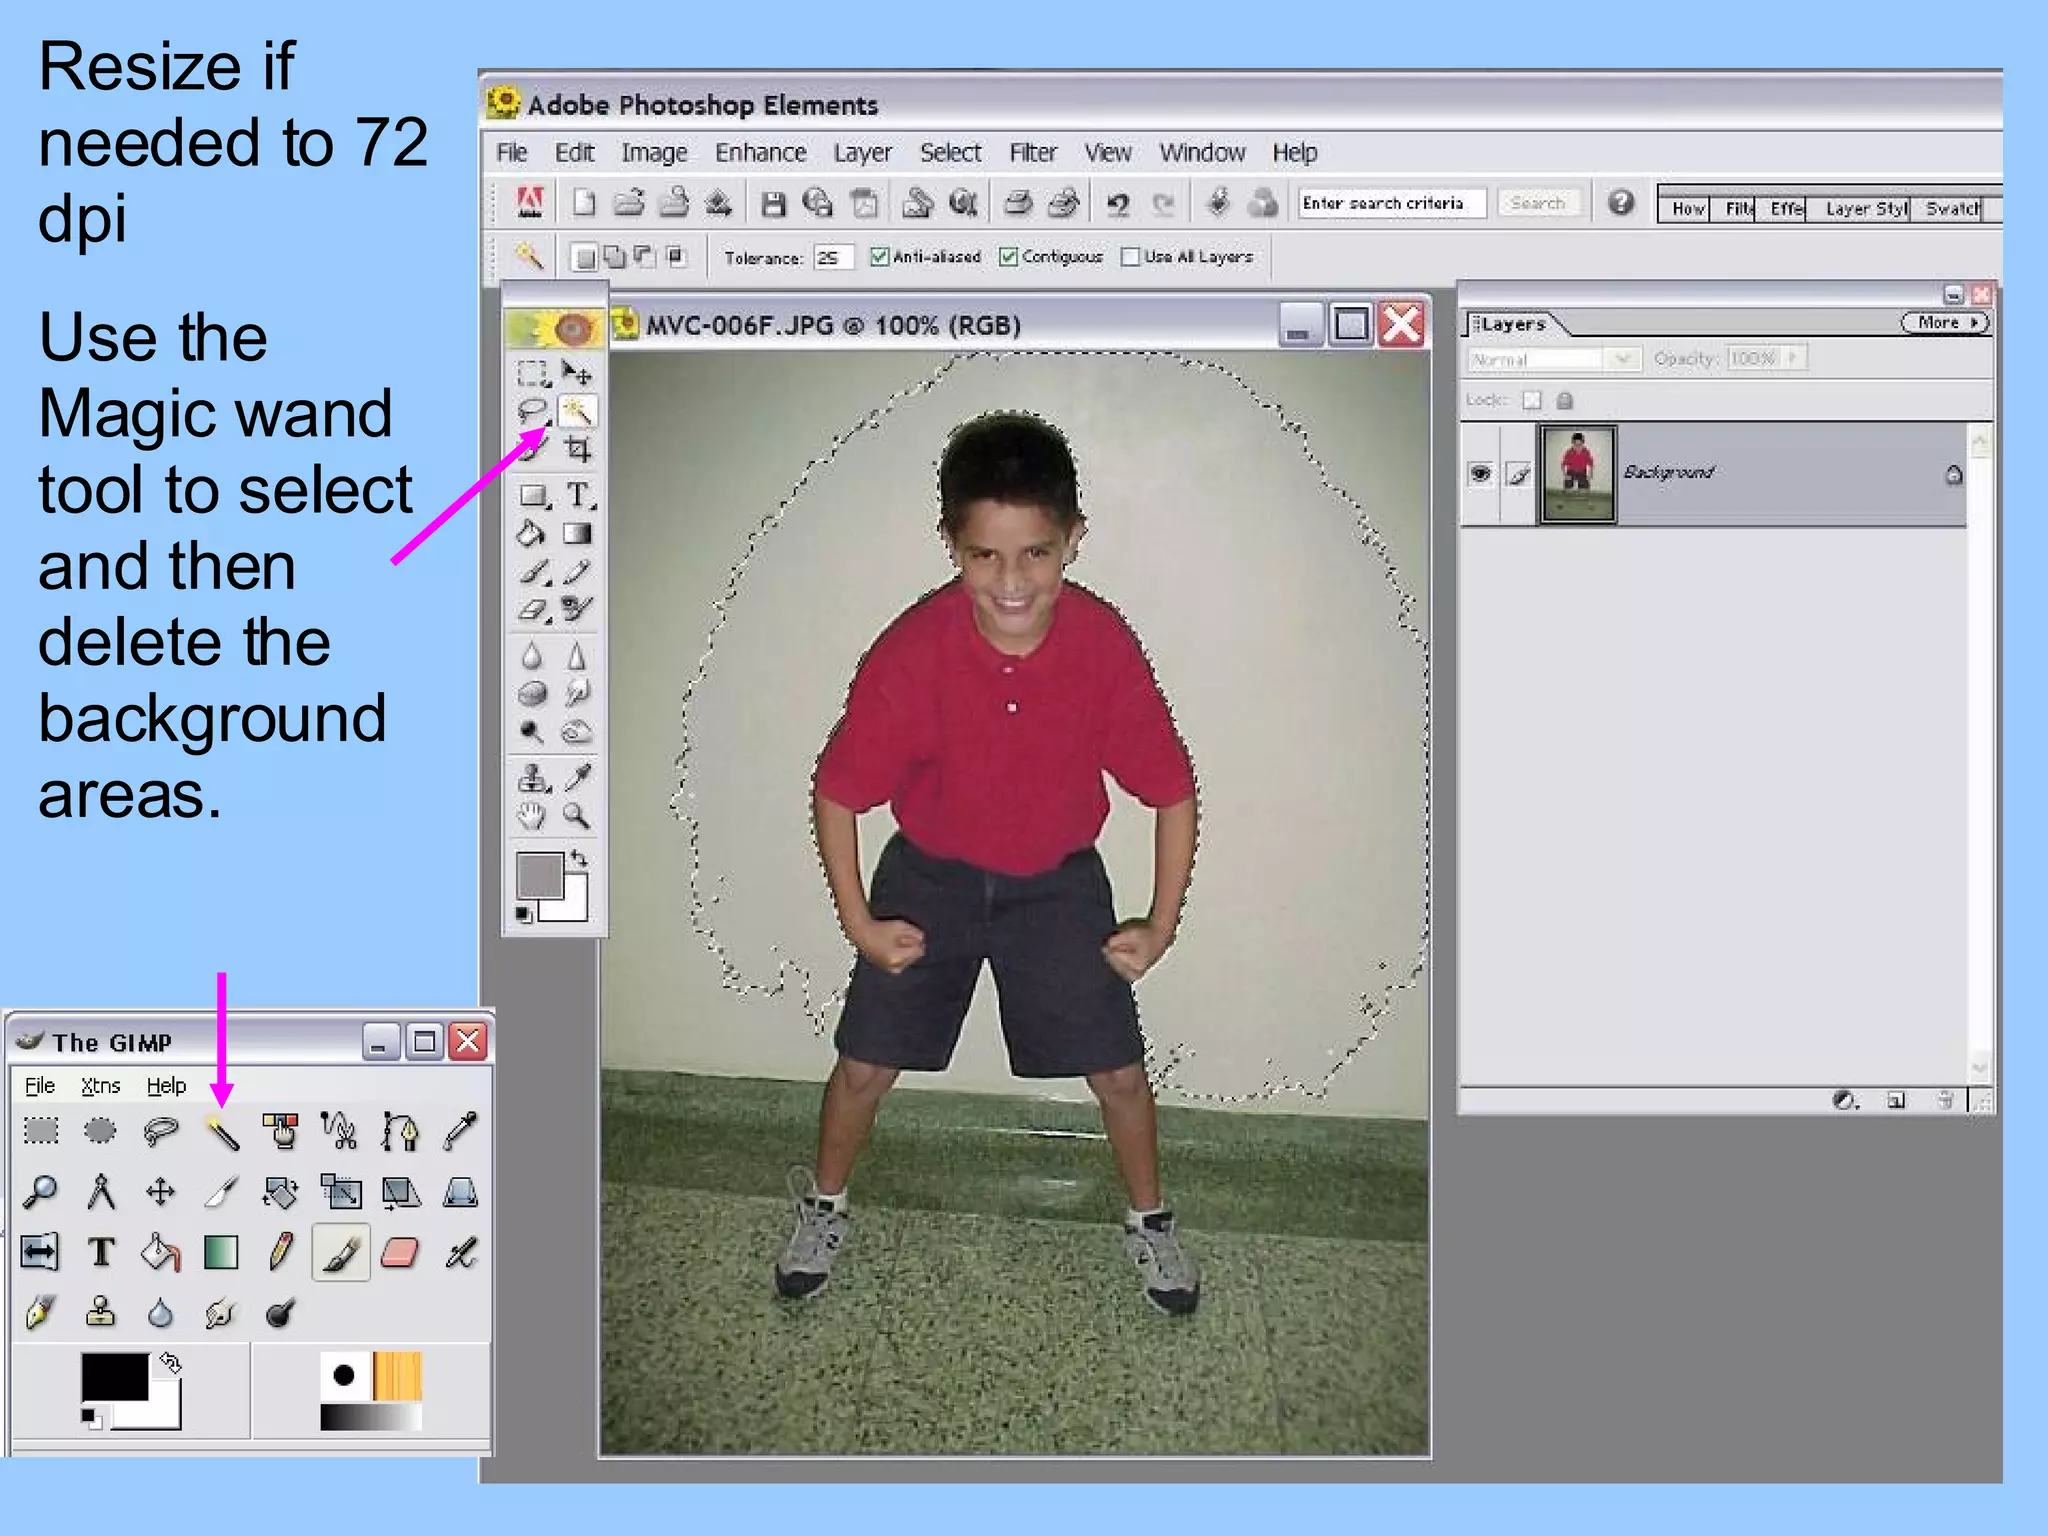
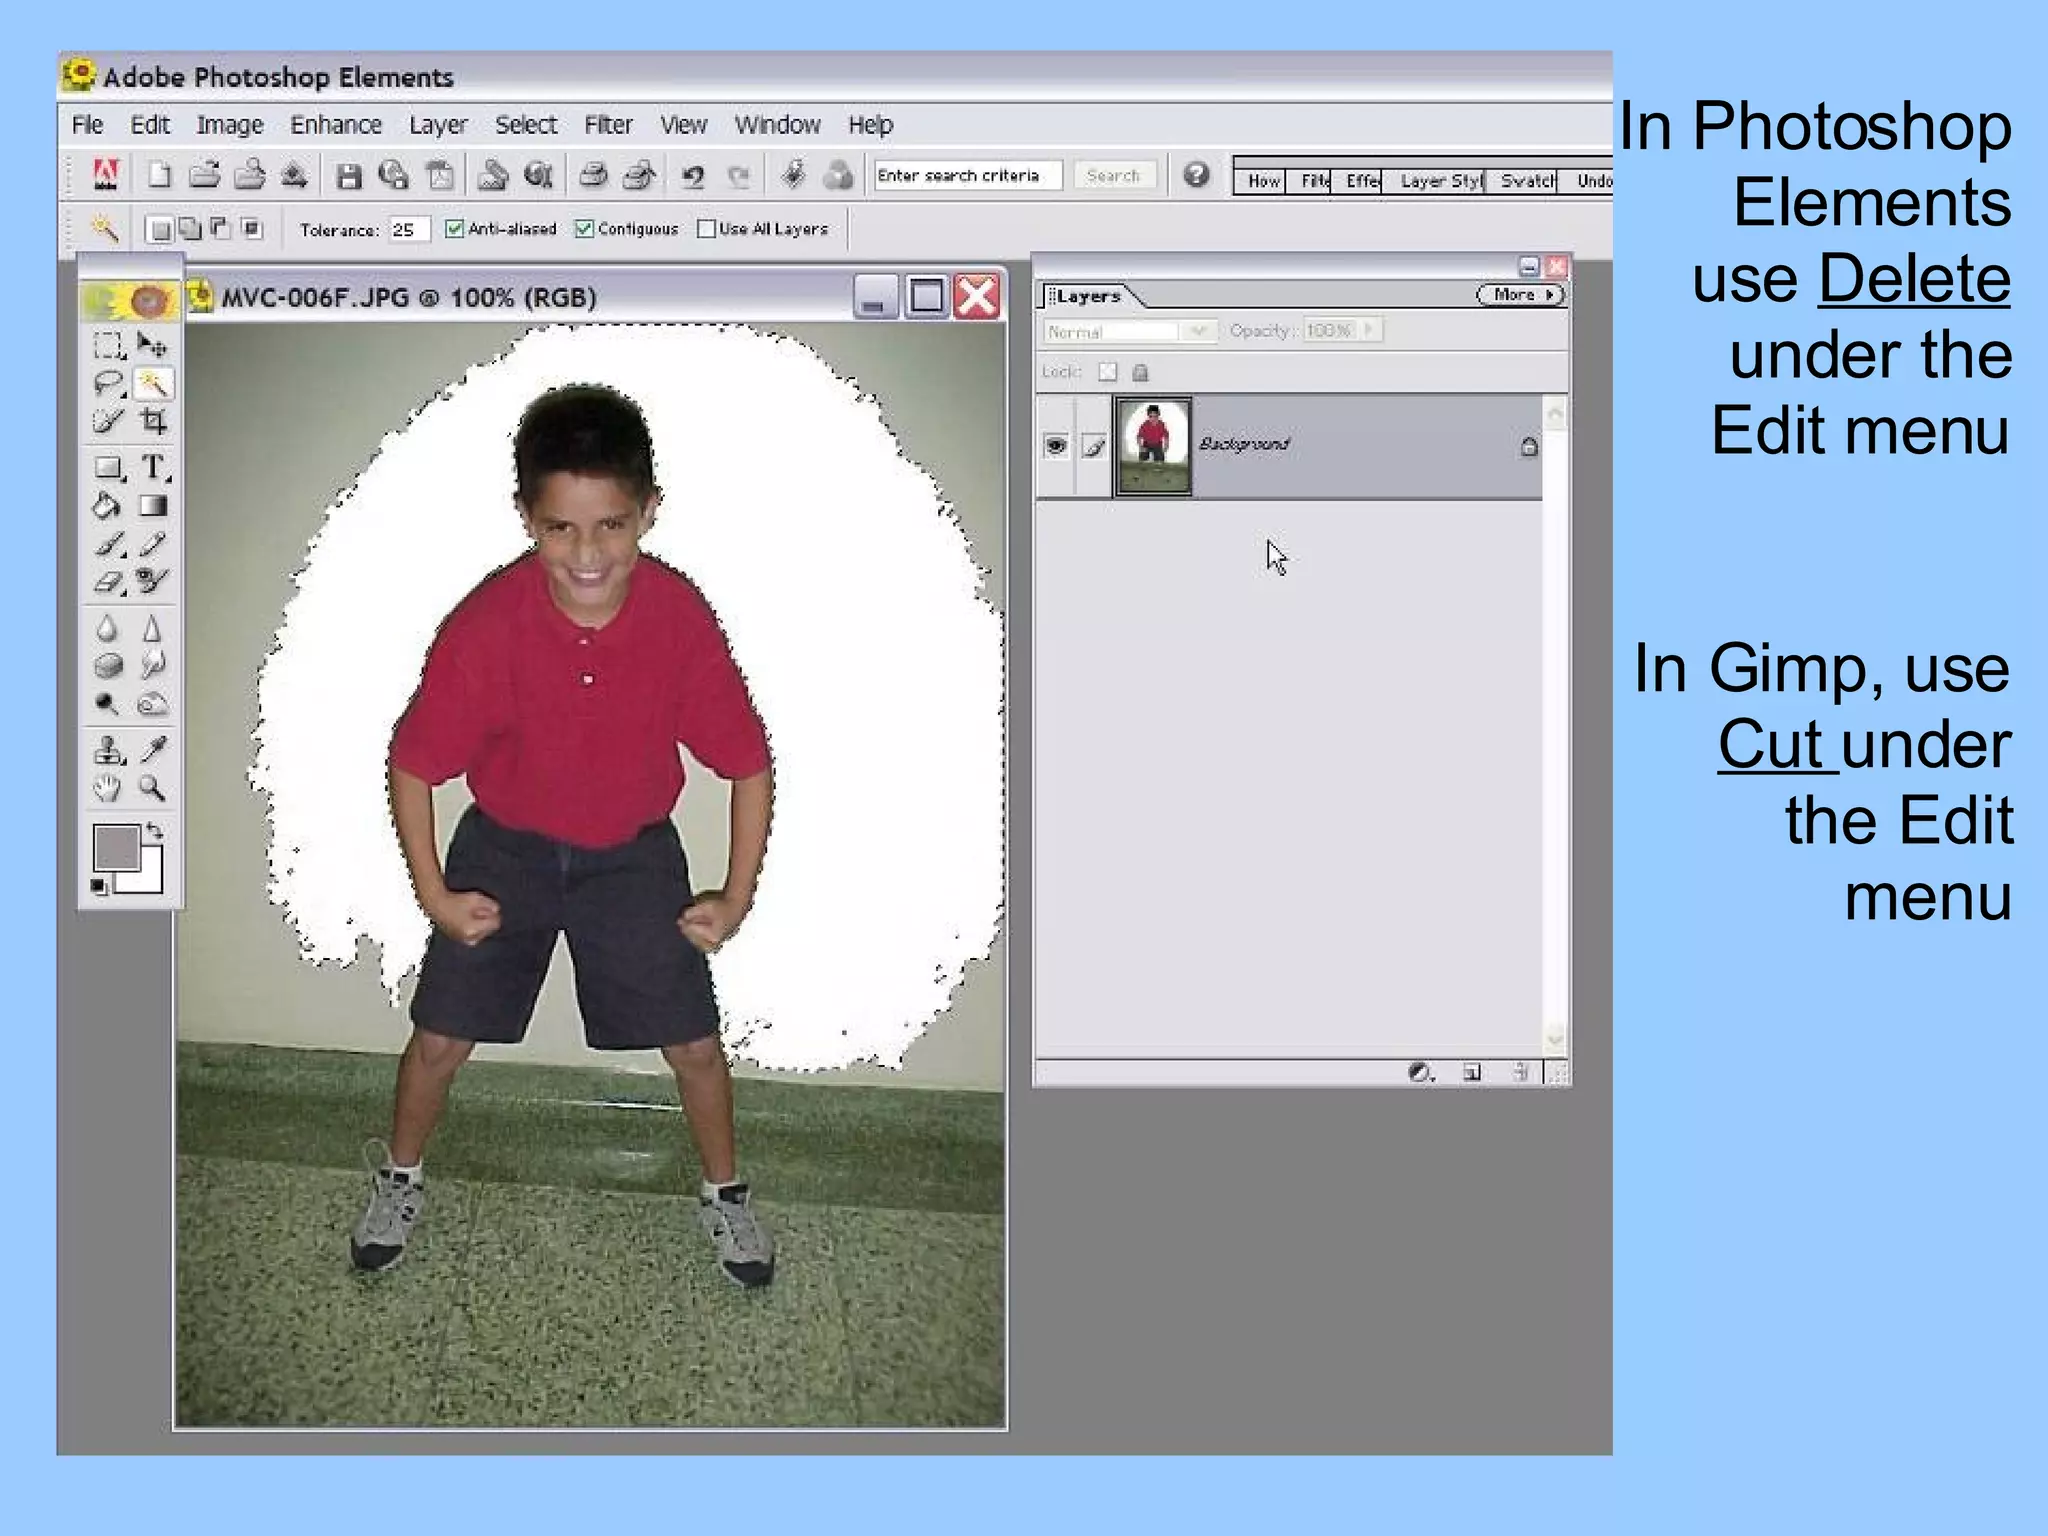
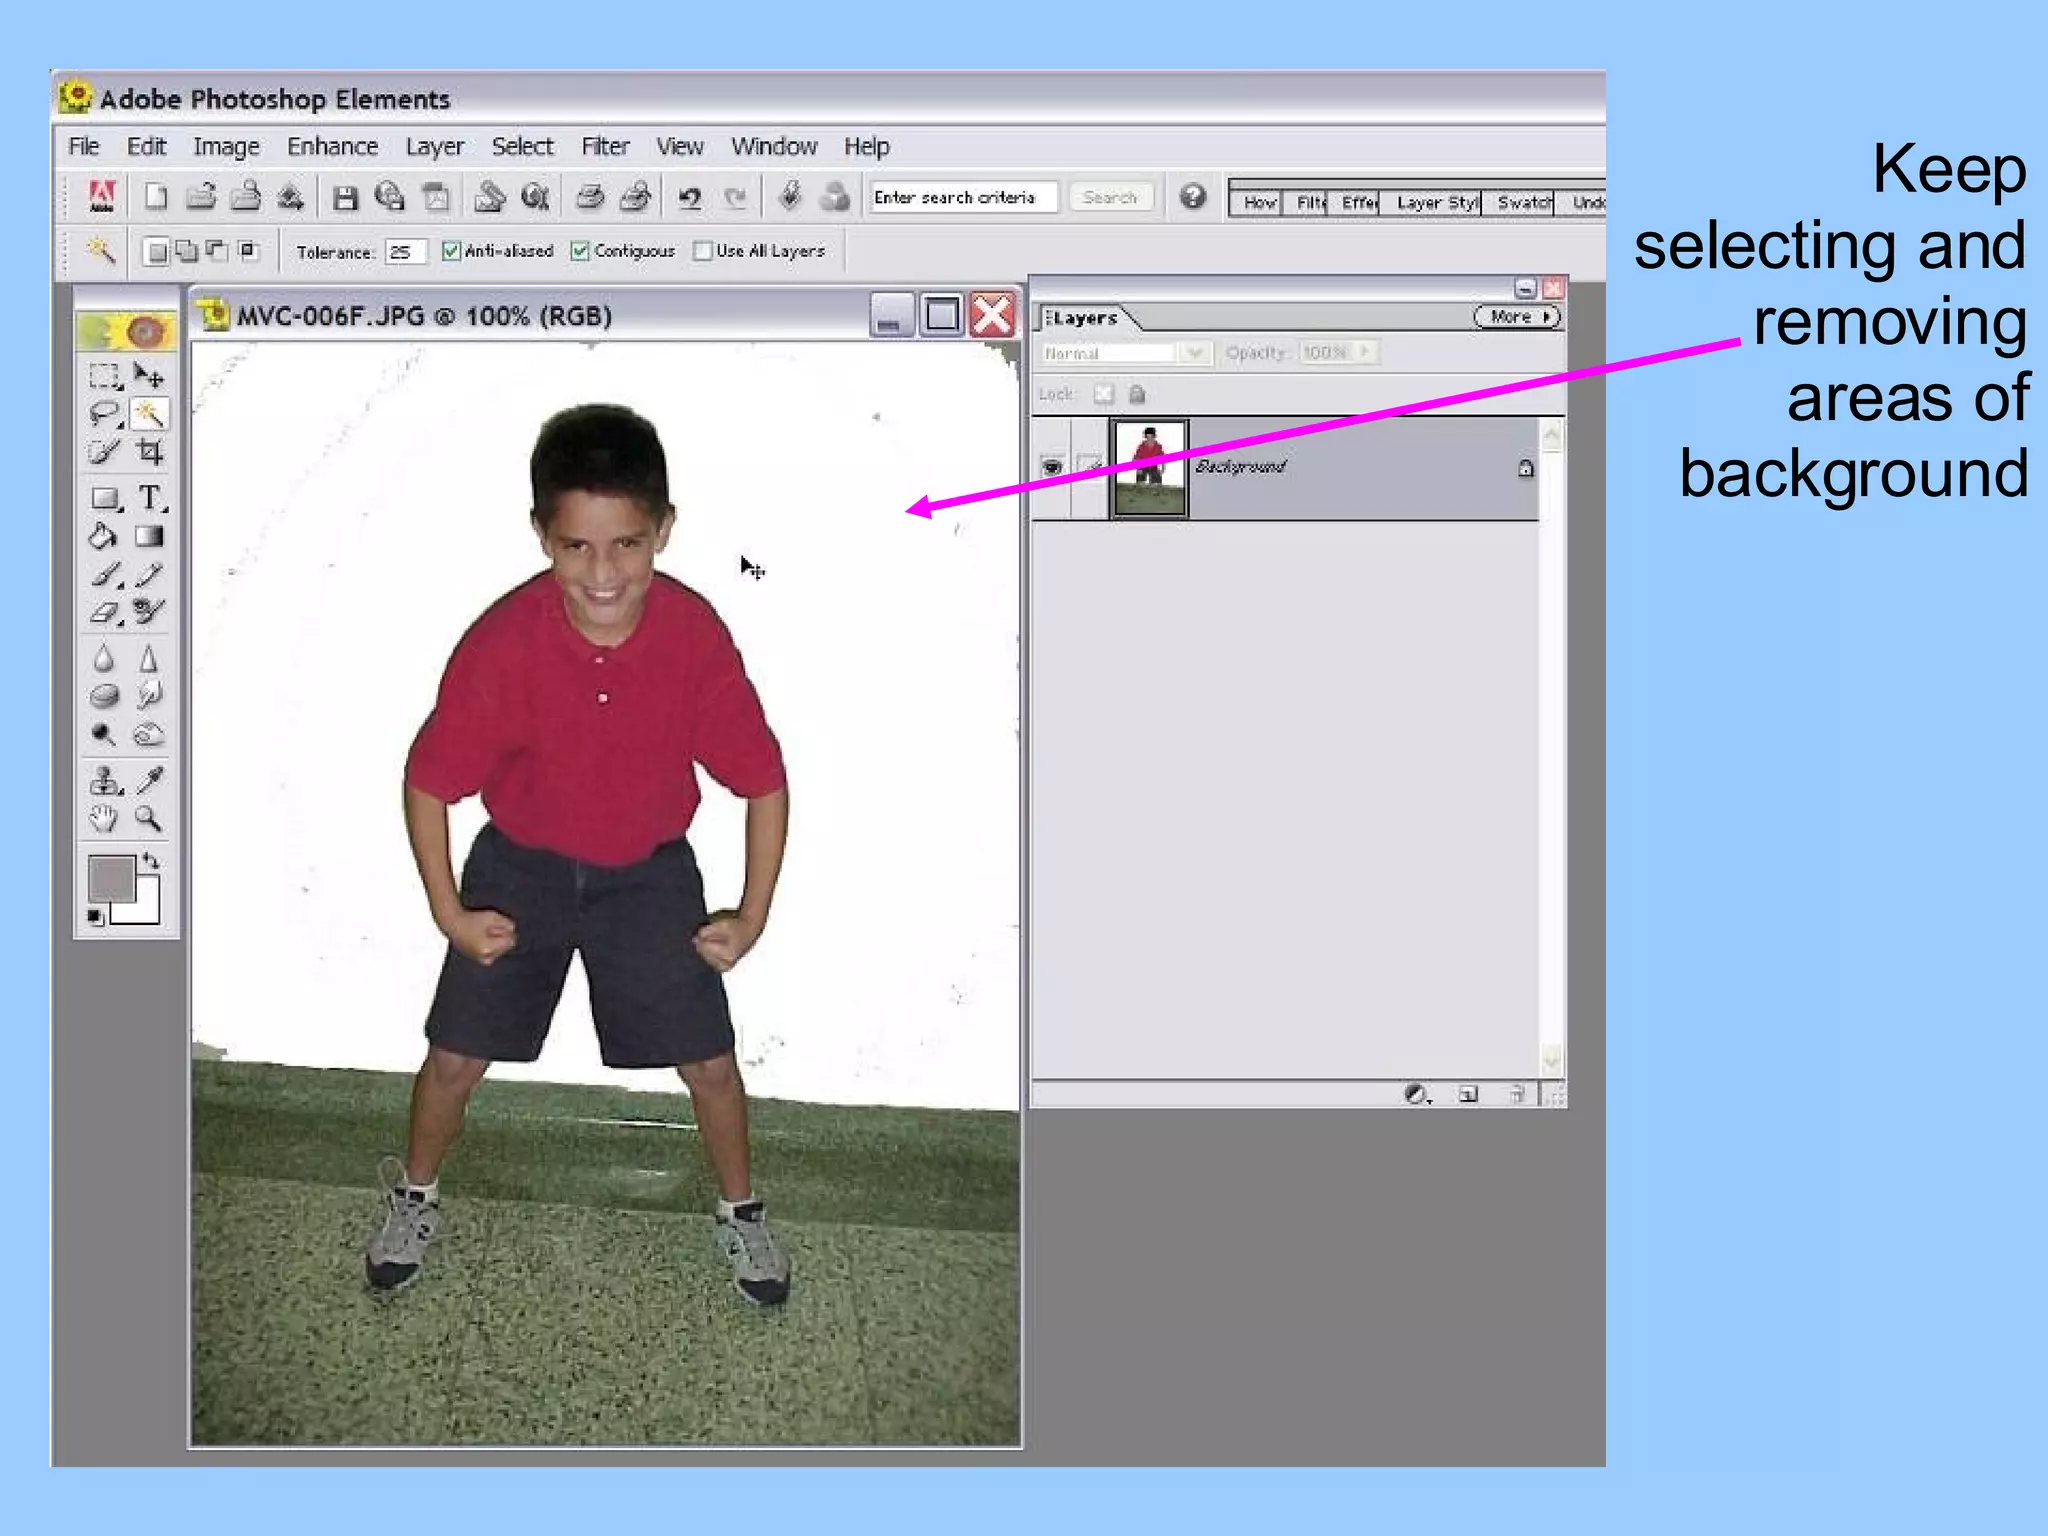
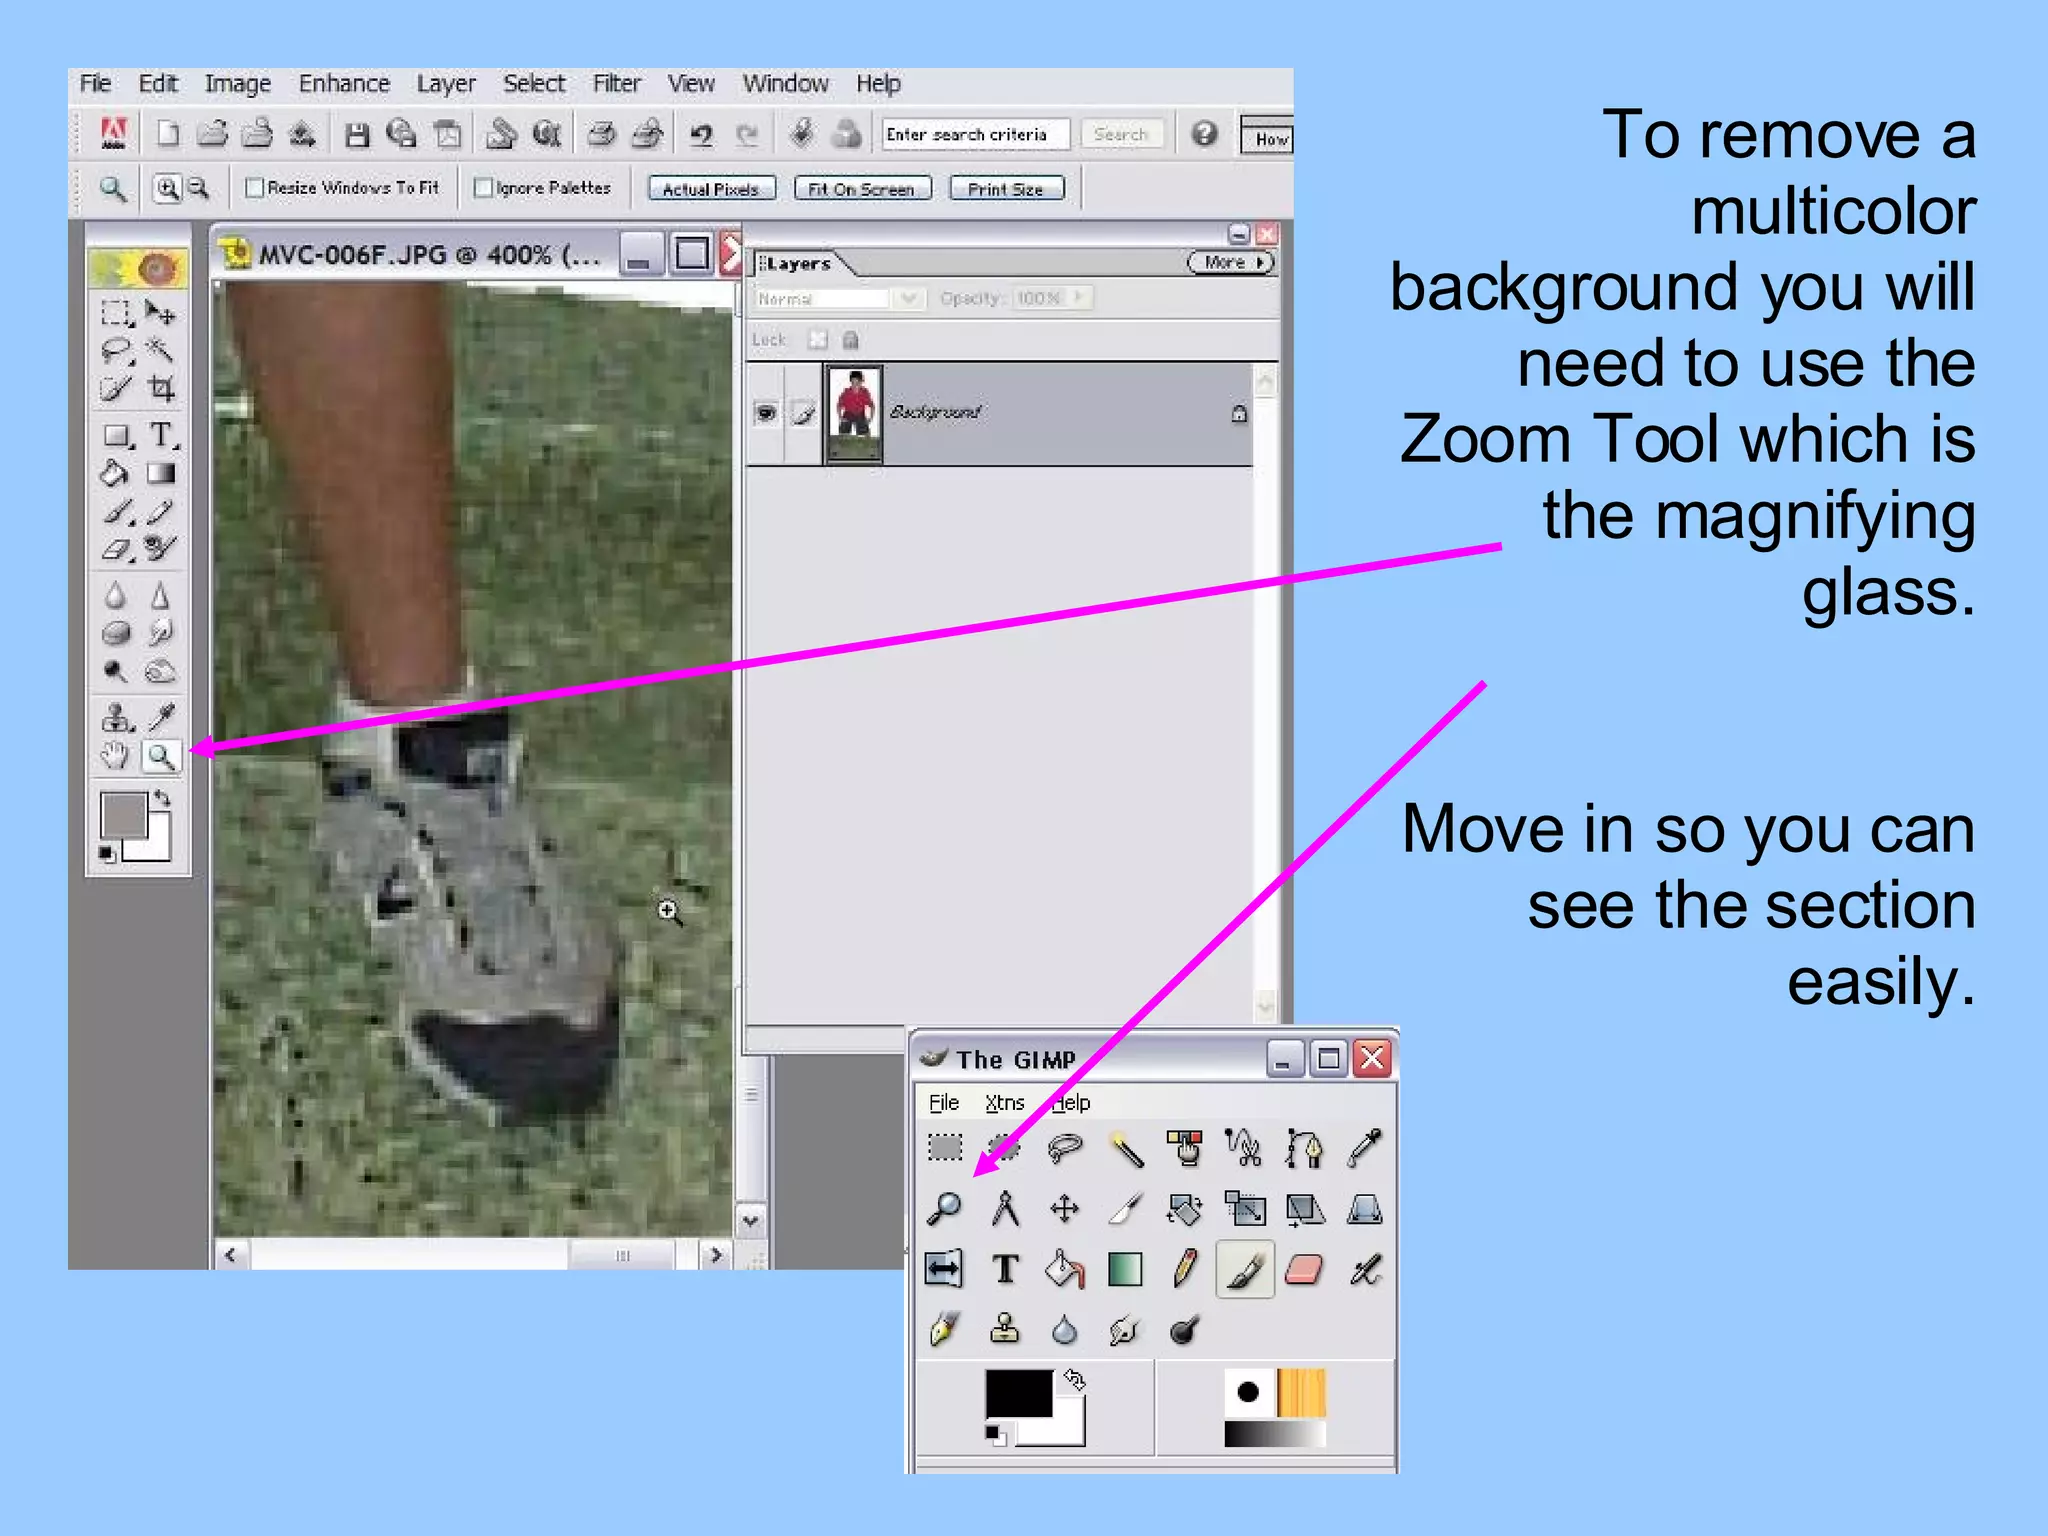
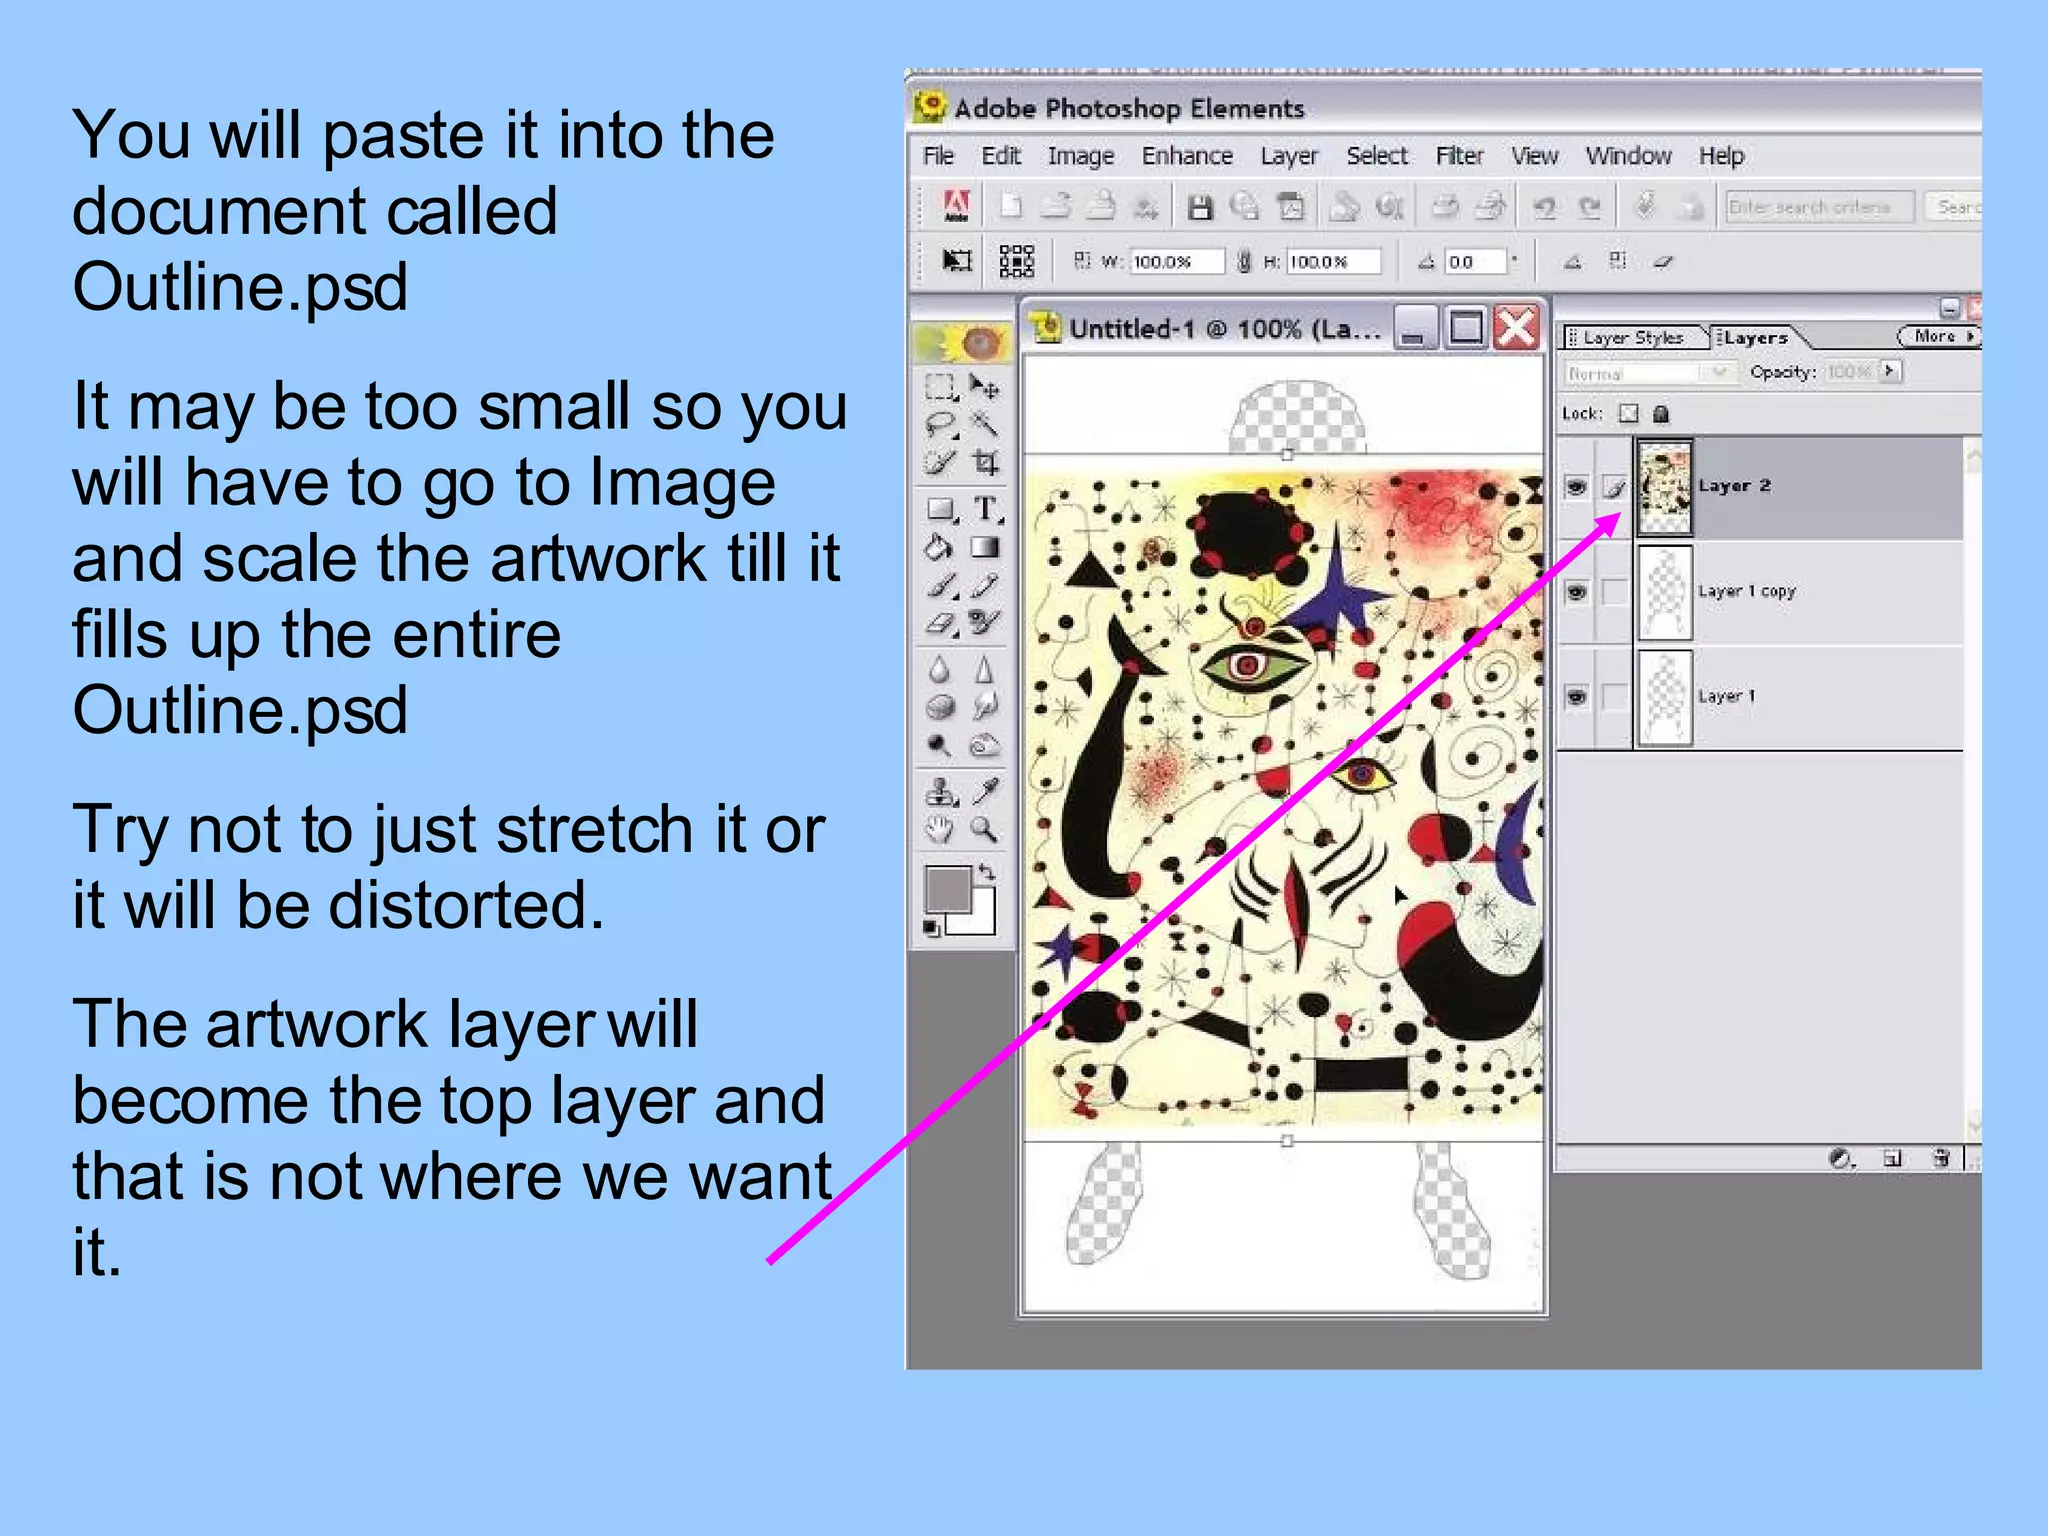
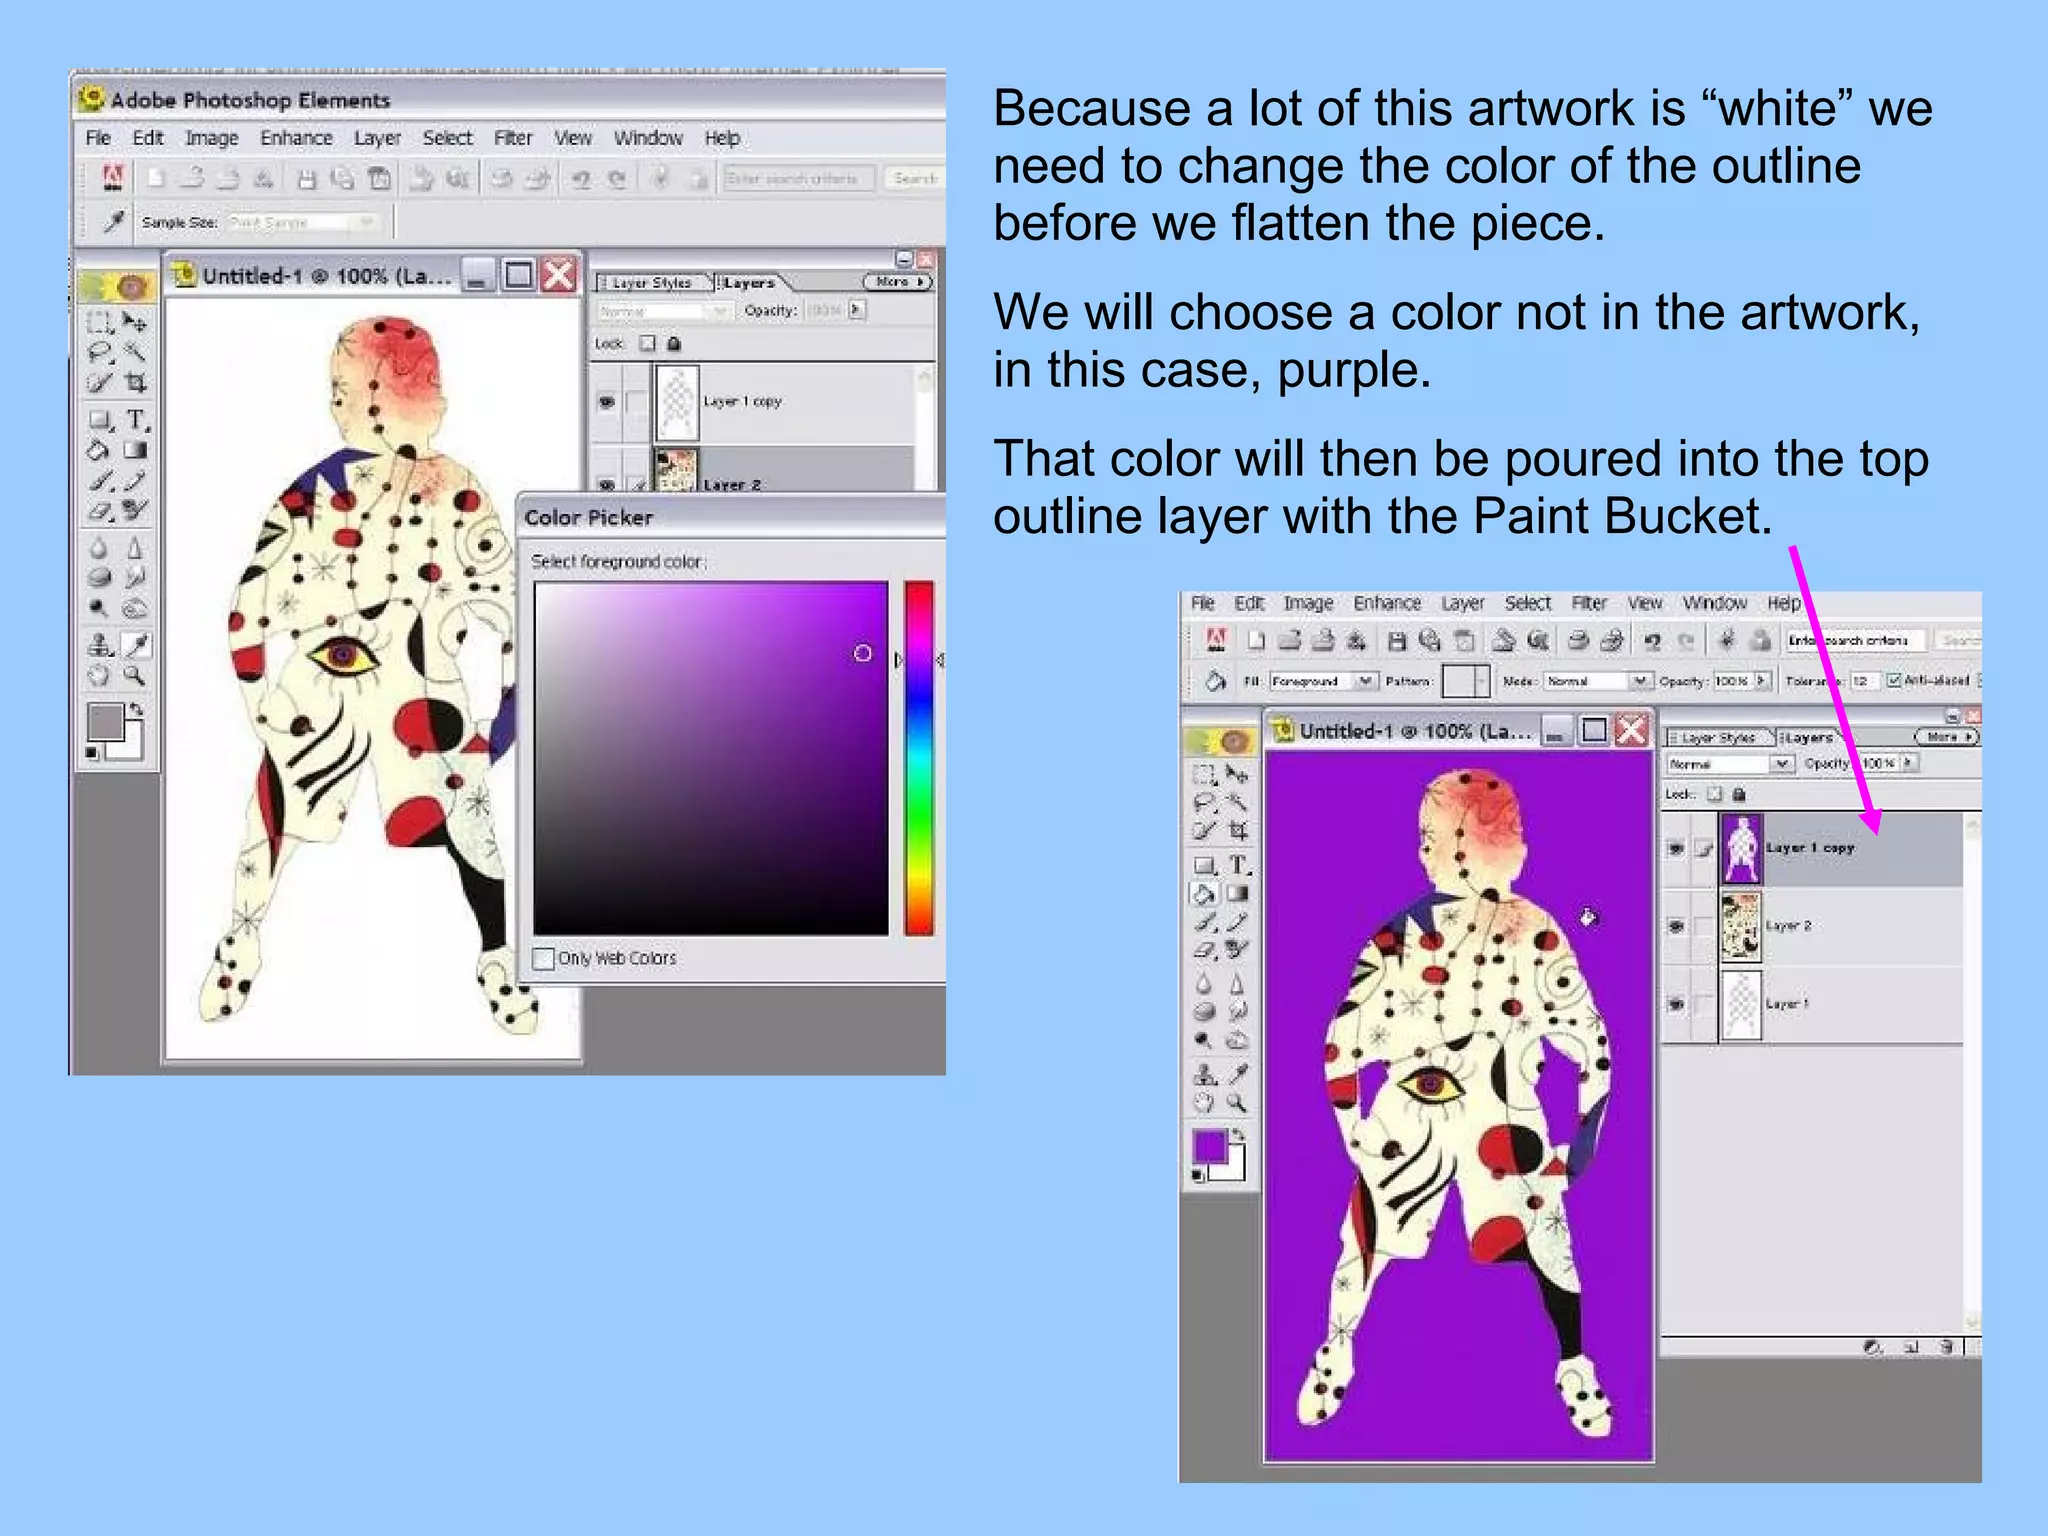
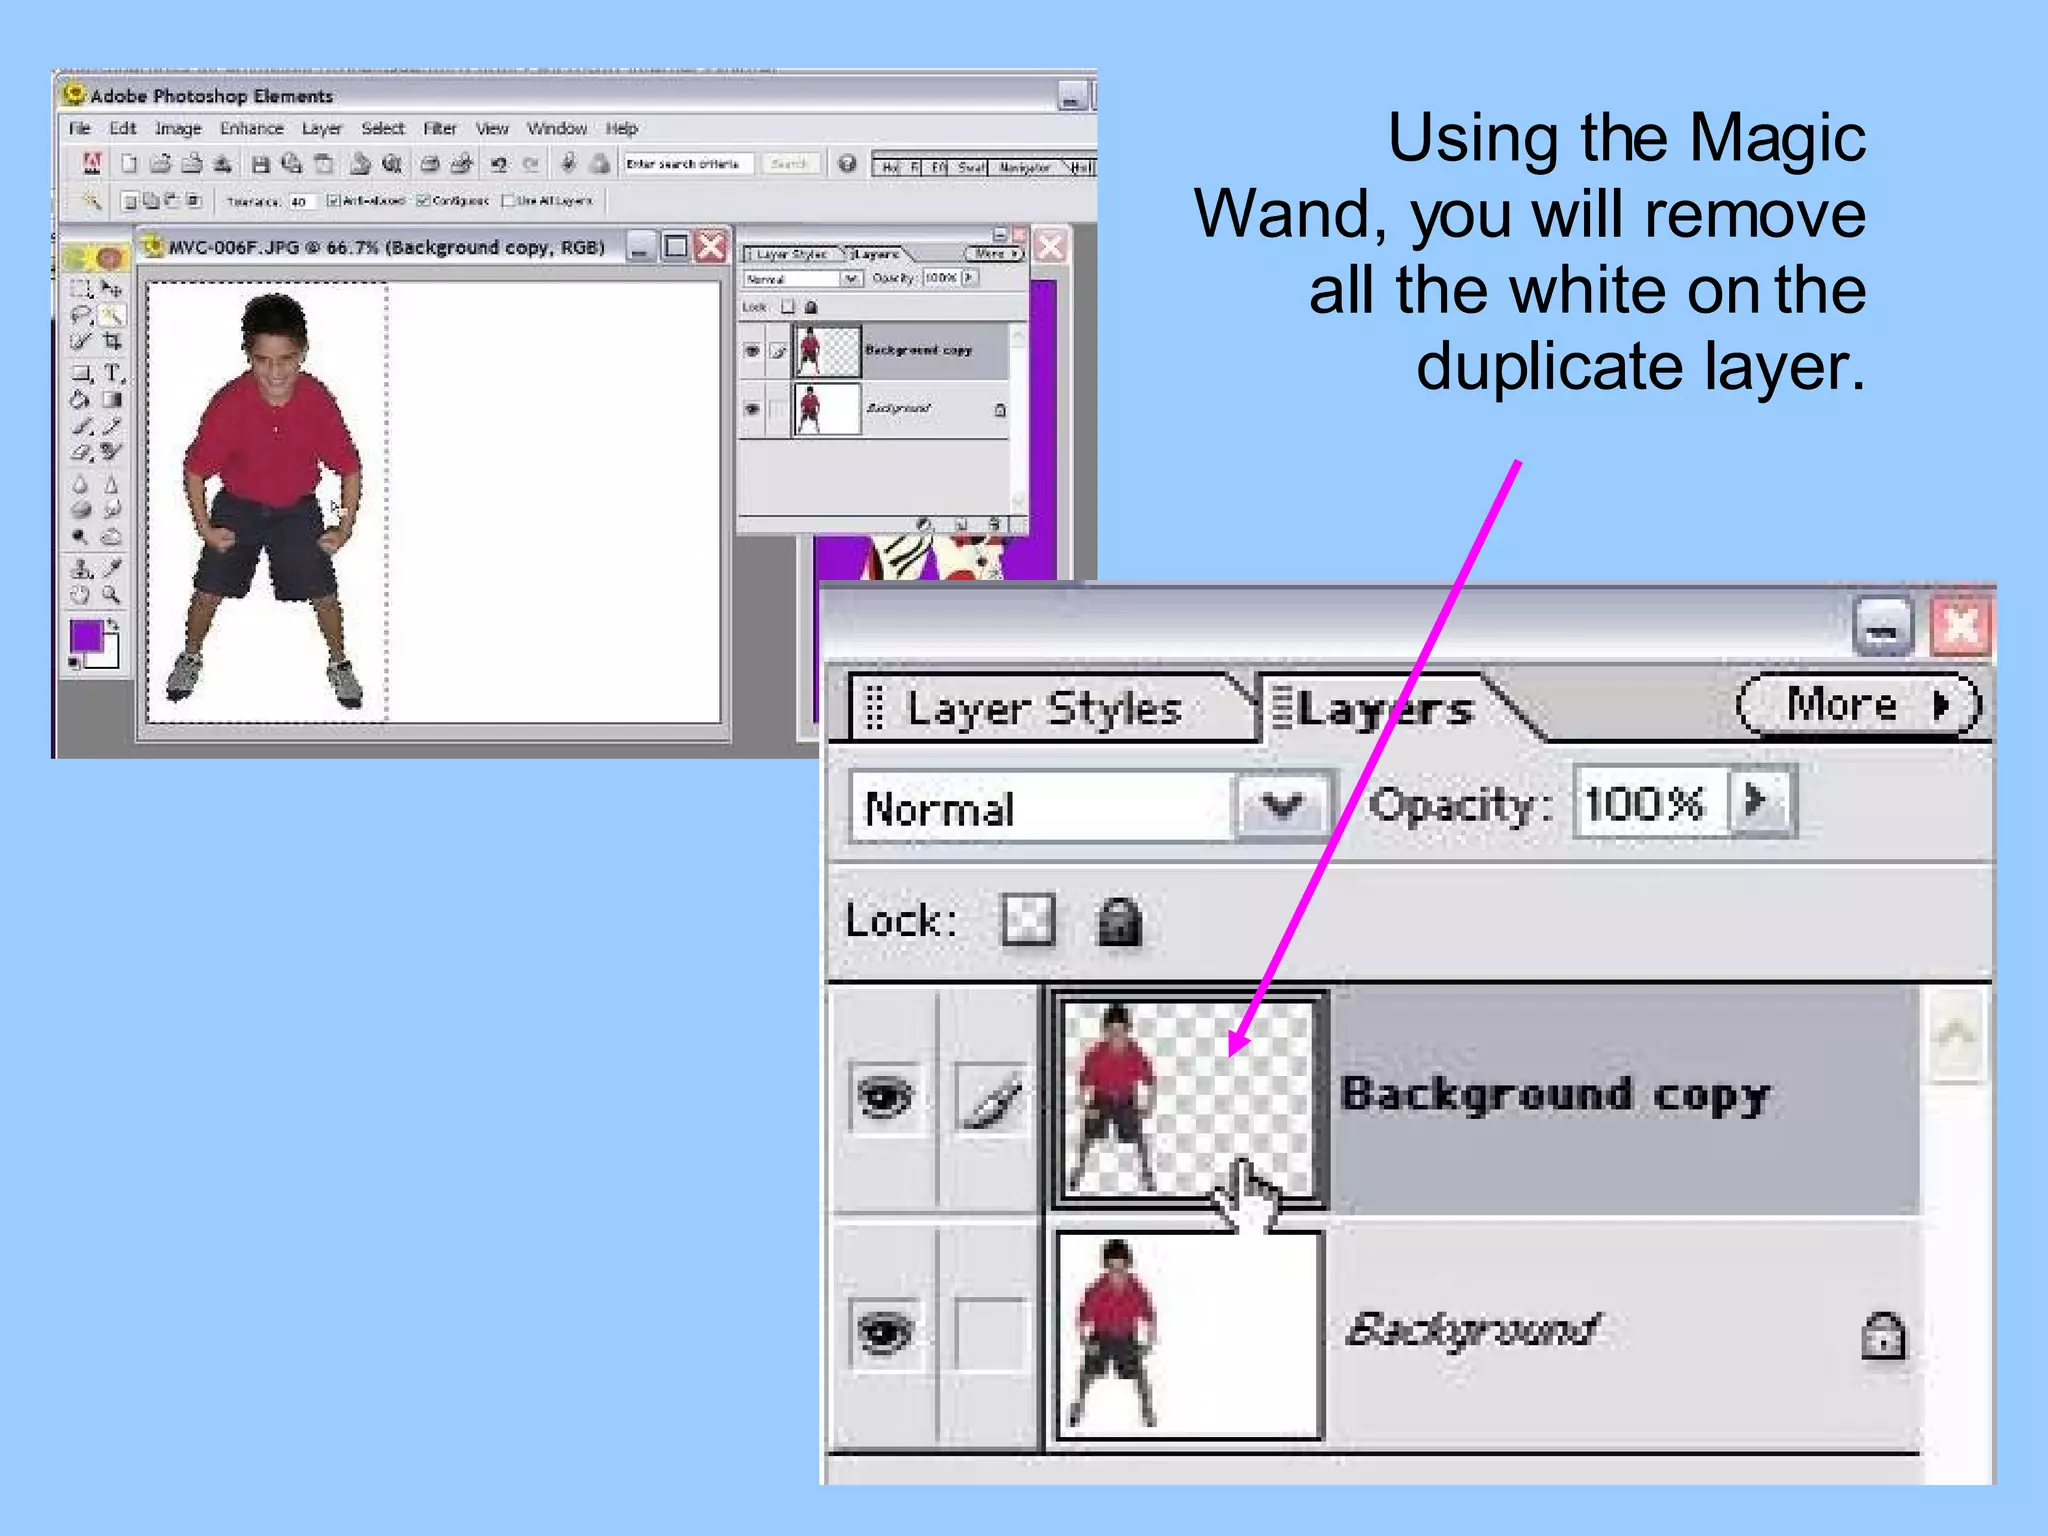
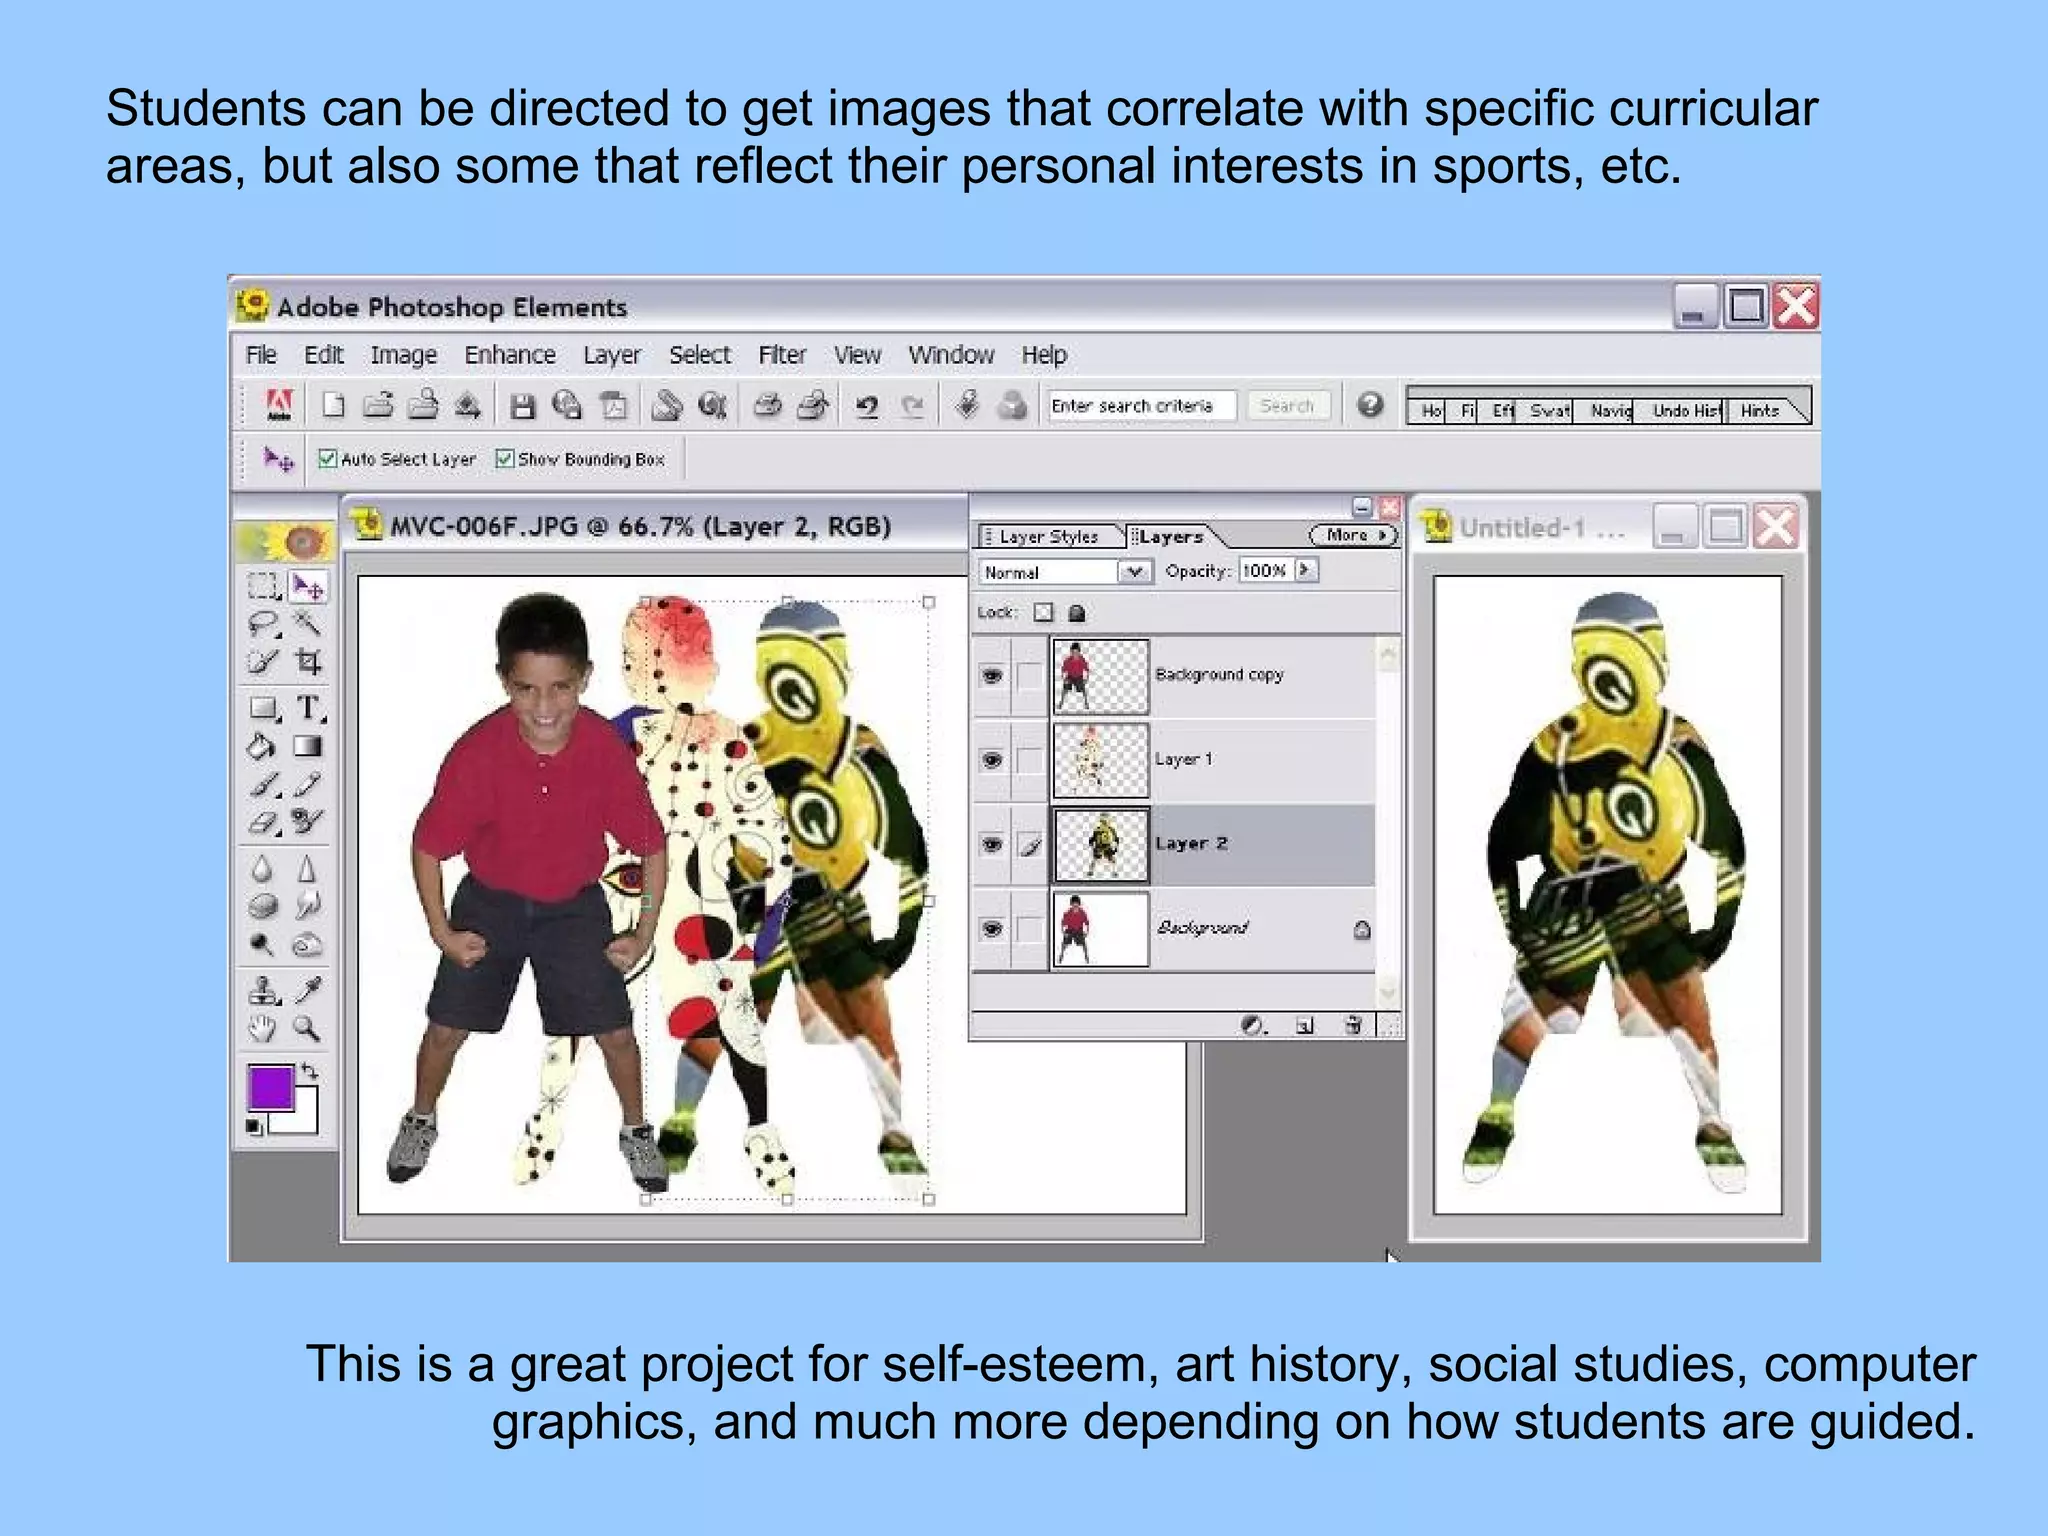
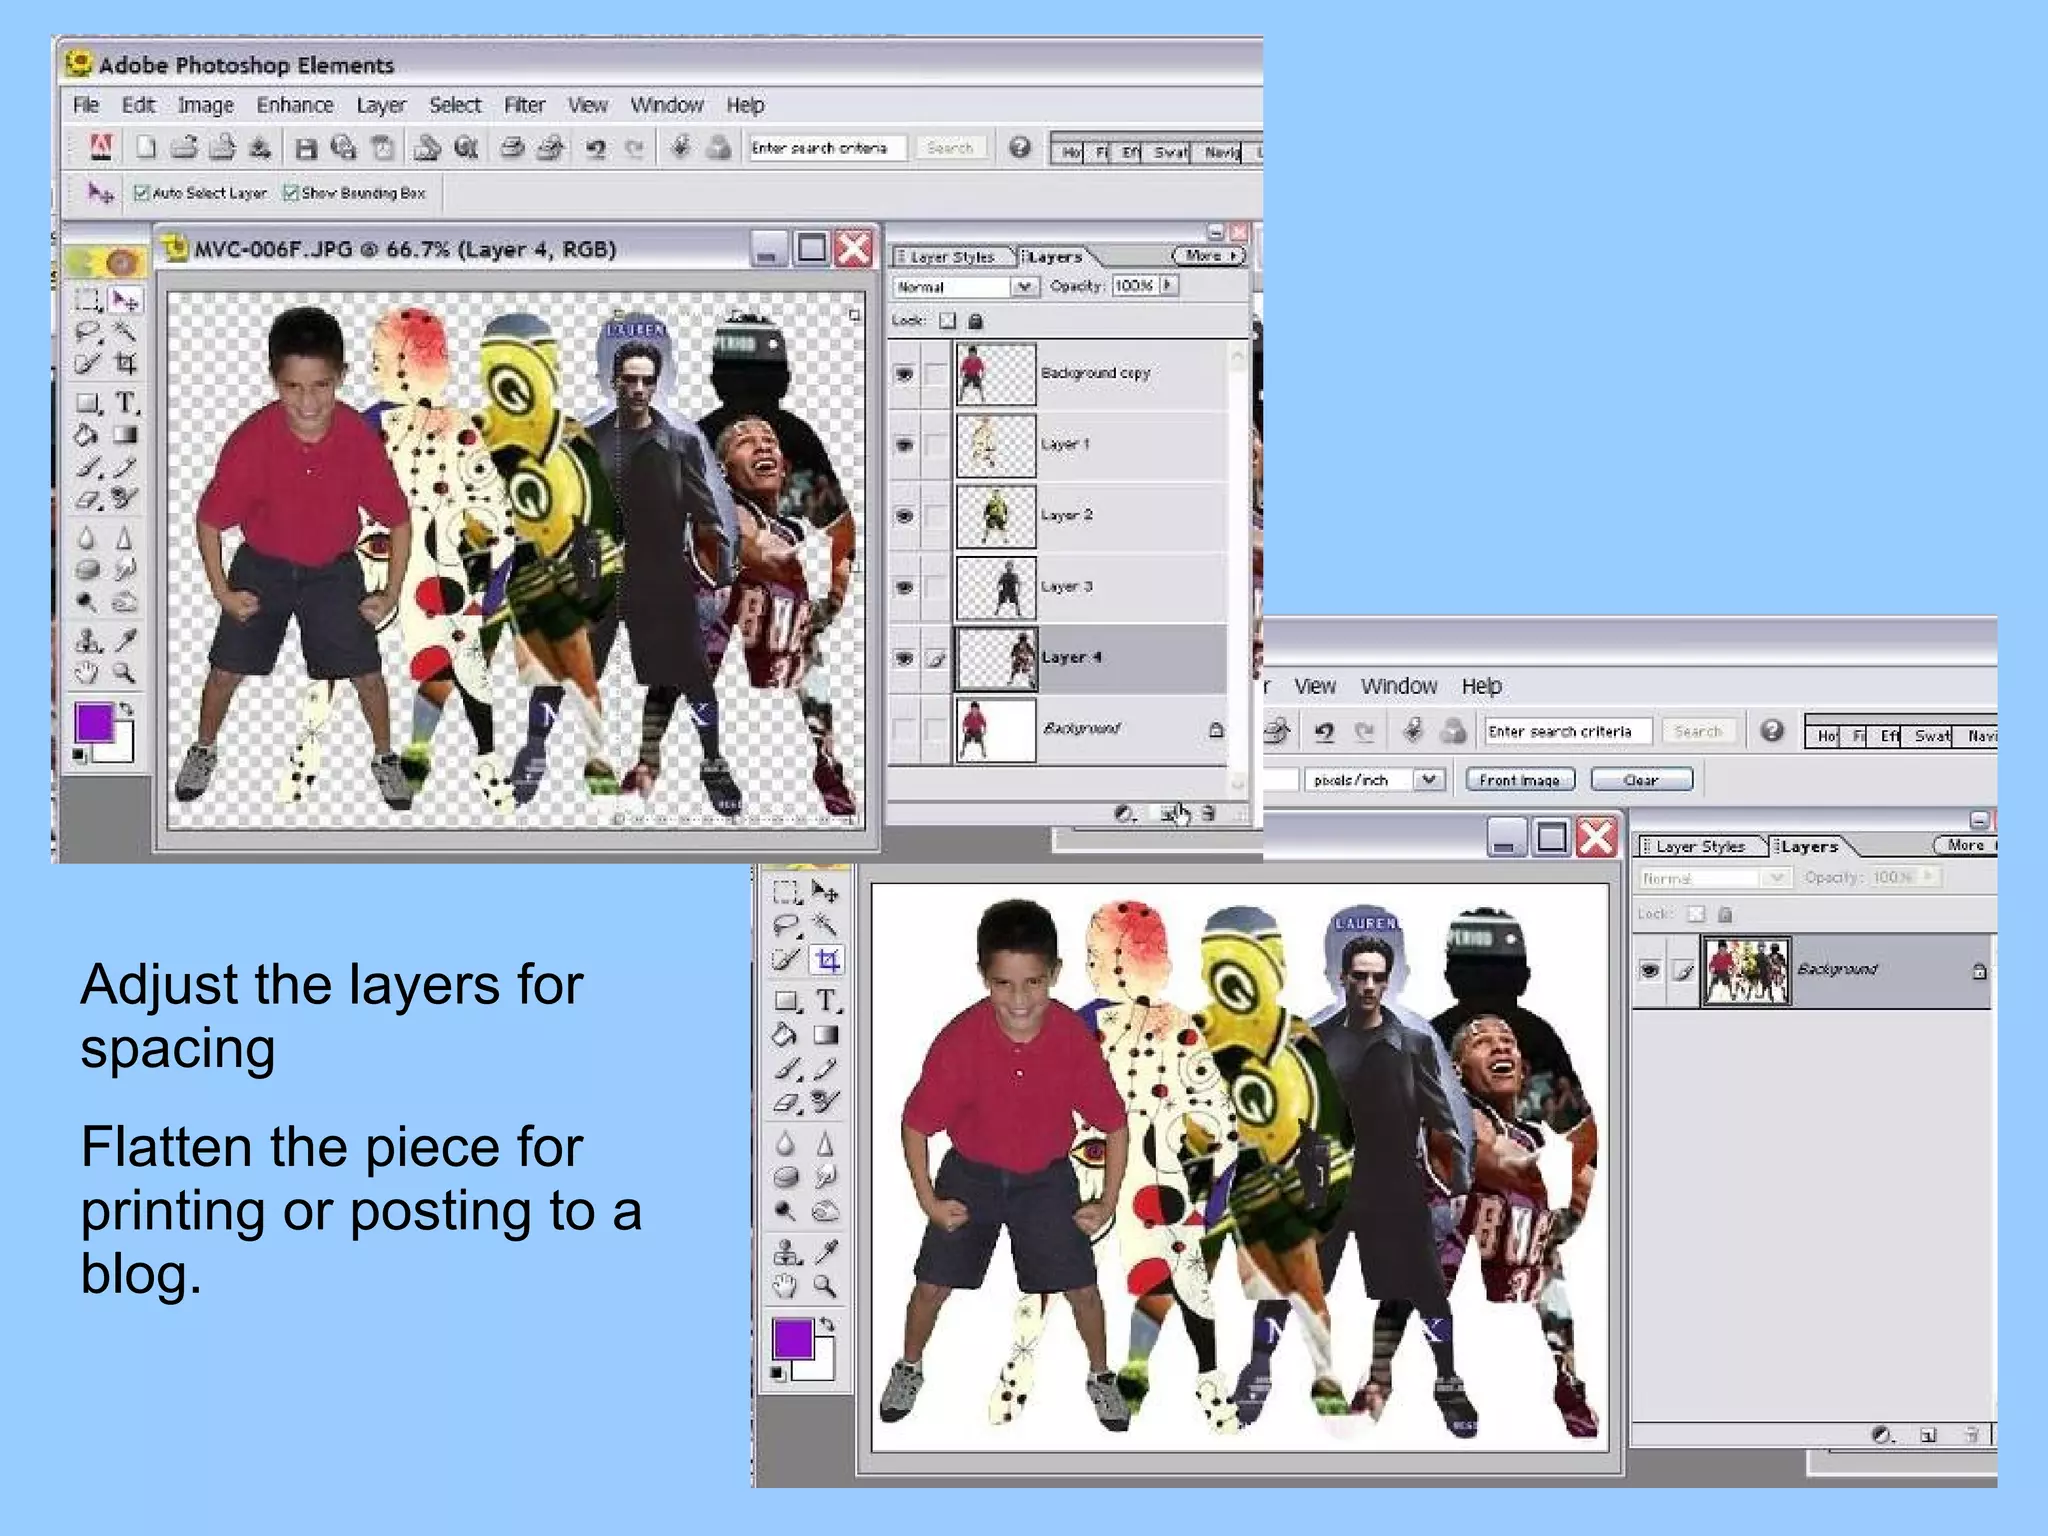
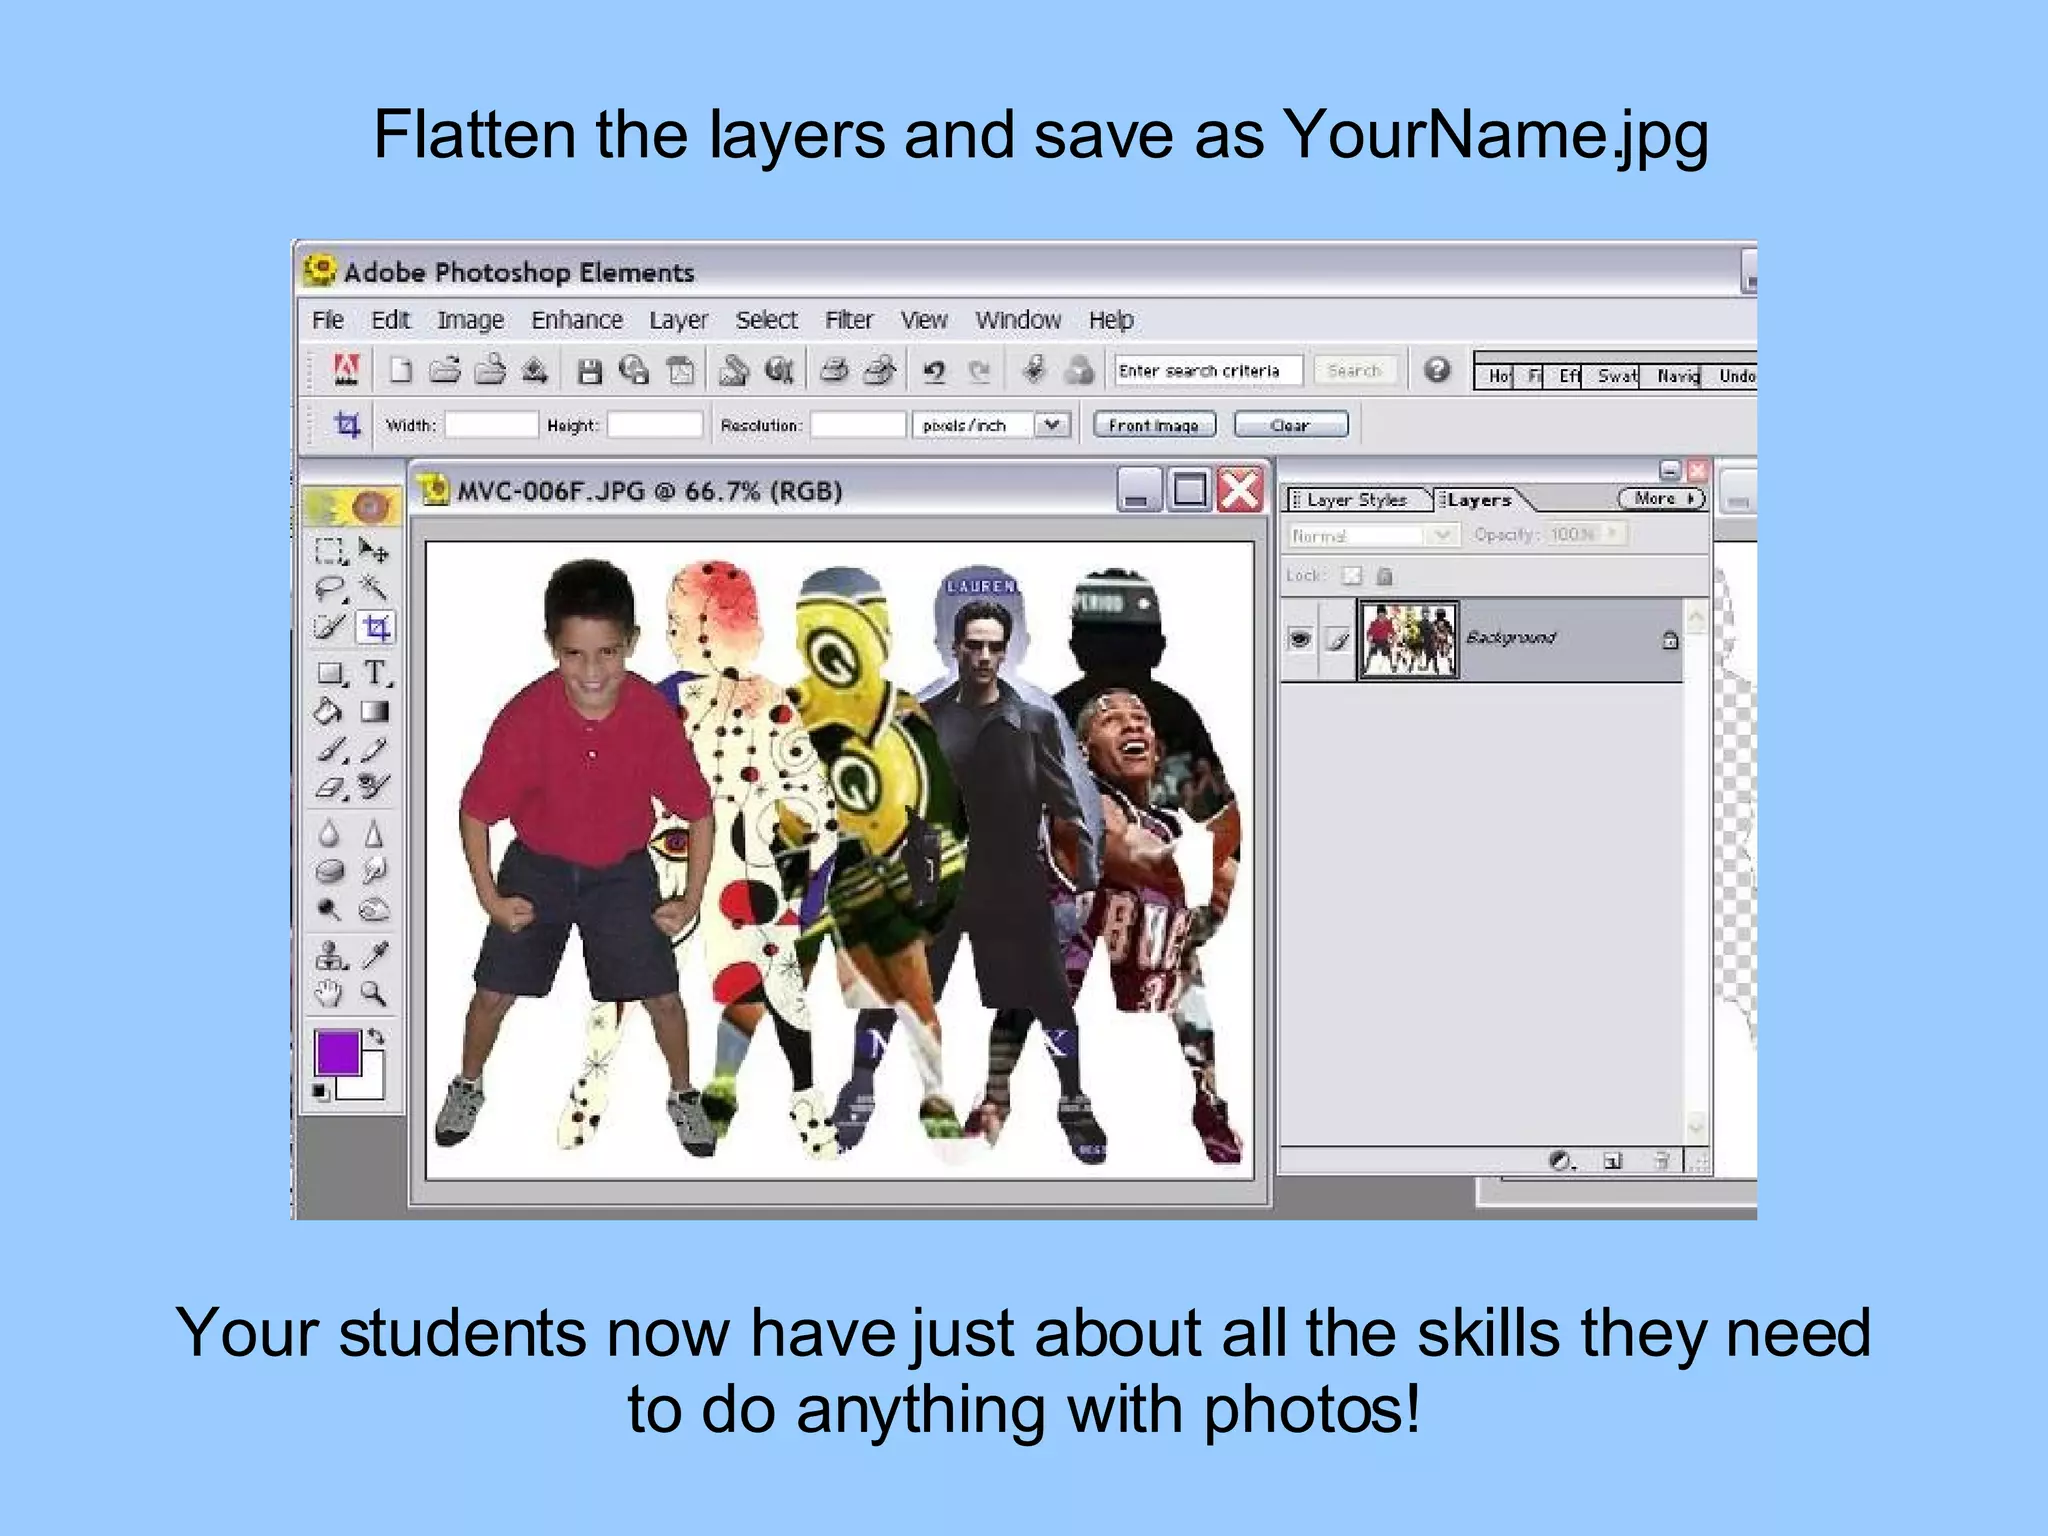
Introduction to using Photoshop  Elements Level: 6th to 12th grade  Self esteem and awareness Pop culture iconography Art History Other curricular areas optional Lesson Plan by Noreen Strehlow Pop Culture Self Portrait
Take a full length photo near a blank wall Save to your folder & open with Photoshop or Gimp
For Photoshop Elements, go to Image, Rotate & 90˚ Right For Gimp go to Layer, Transform, & Rotate 90˚ CW
Resize if needed to 72 dpi Use the Magic wand tool to select and then delete the background areas.
In Photoshop Elements use  Delete  under the Edit menu In Gimp, use  Cut  under the Edit menu
Keep selecting and removing areas of background
Use the  Cropping  tool to remove excess width from the photo. In Gimp, the  Cropping  tool looks like a scalpel.
To remove a multicolor background you will need to use the Zoom Tool which is the magnifying glass. Move in so you can see the section easily.
You may adjust the size of the  Eraser  tool just like you would the  Paintbrush  tool. Use the  Eraser  tool to carefully remove the background from the photo.
This can be tedious work but an important skill to learn when working with photos. When you have successfully removed the object from the background, you will be able to take out larger sections and not ruin the photo.
Now you can use the  Magic Wand  again to select as much as possible without damaging the edge of the person’s body. The best way to prevent having to do this much work is to have a solid color wall and floor but this was the best we could do in a pinch.
Keep going till you have as much of the background removed as possible.  Use the  Eraser  to clean up any little bit that is left. You will have an image on a pure white background. Save as YourName.psd
Under the Layer menu you will choose Duplicate Layer. You need to see your Layers. In Elements you go to Window and make sure Layers has a checkmark. In Gimp you go to Dialogs and click on Layers.
Now you will use the  Magic Wand  to select the entire white area. Hold down the Shift key to select multiple areas like the small ones inside the arms. Go to the Select menu and choose Inverse. In Gimp you will choose Invert
Inverse or Invert will then select the entire image within the white selection. Choose Delete or Cut and you will end up with a clean white “cookie cutter” outline of the image. Do this to both layers and save as Outline.psd
Go to the internet and do a search for an art masterpiece that you especially like. Right click on the image and choose Copy.
You will paste it into the document called Outline.psd It may be too small so you will have to go to Image and scale the artwork till it fills up the entire Outline.psd Try not to just stretch it or it will be distorted. The artwork layer will become the top layer and that is not where we want it.
We want to “sandwich” the image in between the two white outline layers. So we drag the middle layer to the top so it “covers” the artwork and creates the artwork into the “shape” of the image.
Because a lot of this artwork is “white” we need to change the color of the outline before we flatten the piece. We will choose a color not in the artwork, in this case, purple. That color will then be poured into the top outline layer with the Paint Bucket.
Now we will choose Flatten Image under the Layer menu. DO NOT SAVE  the Outline.psd like this or you will ruin your nice white “cookie cutter” file.
Because the purple is so different from the white, we can use the Magic Wand and select all the purple areas. We don’t want the purple. We want what is inside the purple so go to Select and choose Inverse or Invert. When you have the image inside the purple selected, Copy it.
You will have 2 files open; The YourName.psd & Outline.psd Duplicate the layer. Go to Image and choose Resize and then Canvas size in Photoshop Elements. In Gimp you will go to Image and choose Canvas size directly.
You are going to add extra space to the right of the image. Keep the image to the left. The finished file should be 10 inches wide by about 7 inches high
Using the Magic Wand, you will remove all the white on the duplicate layer.
Remember way back when you copied the artwork shape? Well, it’s still in your computer’s memory on the clipboard! You are going to paste it into the YourName.psd Whenever you paste, it is the top layer.
Since this project wants the original image on top, we move the artwork layer by dragging it down below. Save the YourName.psd with your newly added artwork layer
Go back  to your Outline.psd Undo  the Flatten Layers Undo  the purple color Delete  the artwork layer Repeat the process  of going to the internet to get an image, sandwiching it between, flattening, selecting inverse, copying
Students can be directed to get images that correlate with specific curricular areas, but also some that reflect their personal interests in sports, etc. This is a great project for self-esteem, art history, social studies, computer graphics, and much more depending on how students are guided.
When you allow students some personal choices, there is a greater sense of ownership. Students have to learn a lot of technical skills in order to complete this pop culture autobiographical computer graphic poster.
Adjust the layers for spacing  Flatten the piece for printing or posting to a blog.
Flatten the layers and save as YourName.jpg Your students now have just about all the skills they need to do anything with photos!
Ta Da!

Pop Culture Ms Bio

  • 1.
    Introduction to usingPhotoshop Elements Level: 6th to 12th grade Self esteem and awareness Pop culture iconography Art History Other curricular areas optional Lesson Plan by Noreen Strehlow Pop Culture Self Portrait
  • 2.
    Take a fulllength photo near a blank wall Save to your folder & open with Photoshop or Gimp
  • 3.
    For Photoshop Elements,go to Image, Rotate & 90˚ Right For Gimp go to Layer, Transform, & Rotate 90˚ CW
  • 4.
    Resize if neededto 72 dpi Use the Magic wand tool to select and then delete the background areas.
  • 5.
    In Photoshop Elementsuse Delete under the Edit menu In Gimp, use Cut under the Edit menu
  • 6.
    Keep selecting andremoving areas of background
  • 7.
    Use the Cropping tool to remove excess width from the photo. In Gimp, the Cropping tool looks like a scalpel.
  • 8.
    To remove amulticolor background you will need to use the Zoom Tool which is the magnifying glass. Move in so you can see the section easily.
  • 9.
    You may adjustthe size of the Eraser tool just like you would the Paintbrush tool. Use the Eraser tool to carefully remove the background from the photo.
  • 10.
    This can betedious work but an important skill to learn when working with photos. When you have successfully removed the object from the background, you will be able to take out larger sections and not ruin the photo.
  • 11.
    Now you canuse the Magic Wand again to select as much as possible without damaging the edge of the person’s body. The best way to prevent having to do this much work is to have a solid color wall and floor but this was the best we could do in a pinch.
  • 12.
    Keep going tillyou have as much of the background removed as possible. Use the Eraser to clean up any little bit that is left. You will have an image on a pure white background. Save as YourName.psd
  • 13.
    Under the Layermenu you will choose Duplicate Layer. You need to see your Layers. In Elements you go to Window and make sure Layers has a checkmark. In Gimp you go to Dialogs and click on Layers.
  • 14.
    Now you willuse the Magic Wand to select the entire white area. Hold down the Shift key to select multiple areas like the small ones inside the arms. Go to the Select menu and choose Inverse. In Gimp you will choose Invert
  • 15.
    Inverse or Invertwill then select the entire image within the white selection. Choose Delete or Cut and you will end up with a clean white “cookie cutter” outline of the image. Do this to both layers and save as Outline.psd
  • 16.
    Go to theinternet and do a search for an art masterpiece that you especially like. Right click on the image and choose Copy.
  • 17.
    You will pasteit into the document called Outline.psd It may be too small so you will have to go to Image and scale the artwork till it fills up the entire Outline.psd Try not to just stretch it or it will be distorted. The artwork layer will become the top layer and that is not where we want it.
  • 18.
    We want to“sandwich” the image in between the two white outline layers. So we drag the middle layer to the top so it “covers” the artwork and creates the artwork into the “shape” of the image.
  • 19.
    Because a lotof this artwork is “white” we need to change the color of the outline before we flatten the piece. We will choose a color not in the artwork, in this case, purple. That color will then be poured into the top outline layer with the Paint Bucket.
  • 20.
    Now we willchoose Flatten Image under the Layer menu. DO NOT SAVE the Outline.psd like this or you will ruin your nice white “cookie cutter” file.
  • 21.
    Because the purpleis so different from the white, we can use the Magic Wand and select all the purple areas. We don’t want the purple. We want what is inside the purple so go to Select and choose Inverse or Invert. When you have the image inside the purple selected, Copy it.
  • 22.
    You will have2 files open; The YourName.psd & Outline.psd Duplicate the layer. Go to Image and choose Resize and then Canvas size in Photoshop Elements. In Gimp you will go to Image and choose Canvas size directly.
  • 23.
    You are goingto add extra space to the right of the image. Keep the image to the left. The finished file should be 10 inches wide by about 7 inches high
  • 24.
    Using the MagicWand, you will remove all the white on the duplicate layer.
  • 25.
    Remember way backwhen you copied the artwork shape? Well, it’s still in your computer’s memory on the clipboard! You are going to paste it into the YourName.psd Whenever you paste, it is the top layer.
  • 26.
    Since this projectwants the original image on top, we move the artwork layer by dragging it down below. Save the YourName.psd with your newly added artwork layer
  • 27.
    Go back to your Outline.psd Undo the Flatten Layers Undo the purple color Delete the artwork layer Repeat the process of going to the internet to get an image, sandwiching it between, flattening, selecting inverse, copying
  • 28.
    Students can bedirected to get images that correlate with specific curricular areas, but also some that reflect their personal interests in sports, etc. This is a great project for self-esteem, art history, social studies, computer graphics, and much more depending on how students are guided.
  • 29.
    When you allowstudents some personal choices, there is a greater sense of ownership. Students have to learn a lot of technical skills in order to complete this pop culture autobiographical computer graphic poster.
  • 30.
    Adjust the layersfor spacing Flatten the piece for printing or posting to a blog.
  • 31.
    Flatten the layersand save as YourName.jpg Your students now have just about all the skills they need to do anything with photos!
  • 32.