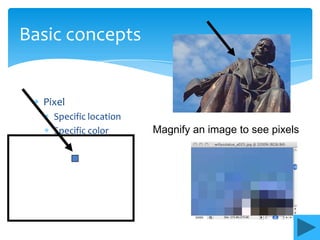
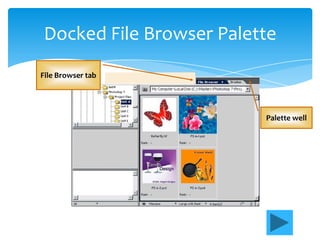
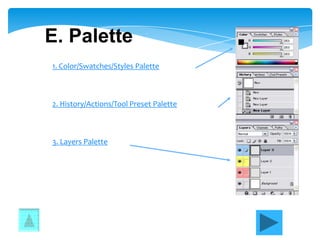
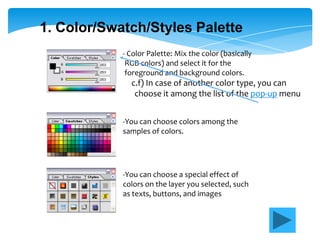
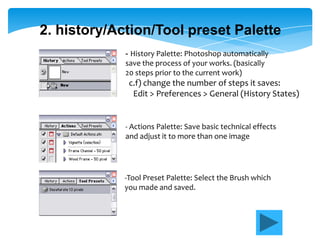
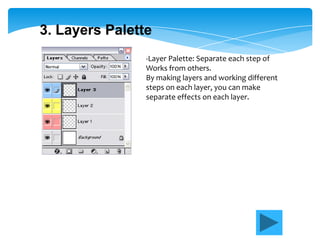
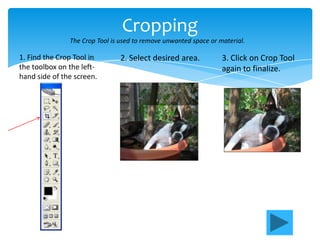
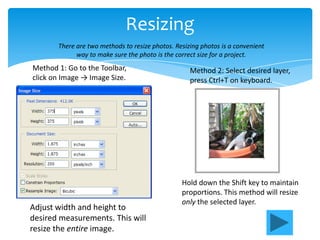
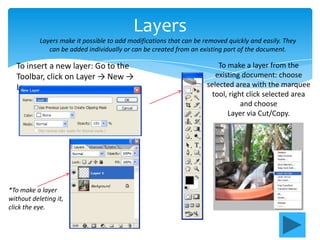
This document provides an introduction to basic tools and concepts in Adobe Photoshop. It outlines how Photoshop allows editing photos and graphics through tools like pixels, selection tools, layers, and adjustments. Basic tools are described like brush, eraser, clone stamp, and filters for special effects. The document demonstrates how to open, resize and save images, as well as use layers, adjustments, cropping and rotations.
An introductory walkthrough/class, originally designed for tweens (ages 9-12), on using the open-source photo editing program GIMP. The lesson provides an overview of GIMP and walks you through the steps for creating a simple composite image.
Adobe Photoshop Tools: Get knowledge about Adobe tools, Photoshop learn Adobe Photoshop from Bapu Graphics the best Graphics and Web Designing institute in Delhi,
Are you looking for best Photoshop training in ambala?
Batra Computer Centre Provides you Training In basic Computer, C & C ++, HTML, Photoshop, Web Designing and Other Courses are Available here.
Photoshop is unlike other common software interfaces which emulate virtual typewriters or graphing paper. Photoshop creates an artist's virtual studio/darkroom. When you open the program you see a toolbox on the left with tools you will use to manipulate your images, and on the right, a white square which is your "canvas" or work area. The gray area surrounding the canvas is not part of your image, but only defines its edges.
Windows 10 won’t be launching for quite a while but we already know a lot about Microsoft’s upcoming OS. From Xbox for Windows and Cortana for desktop to a resurrected Start Menu and new multitasking tools, the new platform will offer a bevy of new features. These are the 10 best.
Photoshop is unlike other common software interfaces which emulate virtual typewriters or graphing paper. Photoshop creates an artist's virtual studio/darkroom. When you open the program you see a toolbox on the left with tools you will use to manipulate your images, and on the right, a white square which is your "canvas" or work area. The gray area surrounding the canvas is not part of your image, but only defines its edges.
Fashionista Chic Couture Maze & Coloring Adventures is a coloring and activity book filled with many maze games and coloring activities designed to delight and engage young fashion enthusiasts. Each page offers a unique blend of fashion-themed mazes and stylish illustrations to color, inspiring creativity and problem-solving skills in children.
This tutorial offers a step-by-step guide on how to effectively use Pinterest. It covers the basics such as account creation and navigation, as well as advanced techniques including creating eye-catching pins and optimizing your profile. The tutorial also explores collaboration and networking on the platform. With visual illustrations and clear instructions, this tutorial will equip you with the skills to navigate Pinterest confidently and achieve your goals.
Brushstrokes of Inspiration: Four Major Influences in Victor Gilbert’s Artist...KendraJohnson54
Throughout his career, Victor Gilbert was influenced heavily by various factors, the most notable being his upbringing and the artistic movements of his time. A rich tapestry of inspirations appears in Gilbert’s work, ranging from their own experiences to the art movements of that period.
Hadj Ounis's most notable work is his sculpture titled "Metamorphosis." This piece showcases Ounis's mastery of form and texture, as he seamlessly combines metal and wood to create a dynamic and visually striking composition. The juxtaposition of the two materials creates a sense of tension and harmony, inviting viewers to contemplate the relationship between nature and industry.
This document announces the winners of the 2024 Youth Poster Contest organized by MATFORCE. It lists the grand prize and age category winners for grades K-6, 7-12, and individual age groups from 5 years old to 18 years old.
Boudoir photography, a genre that captures intimate and sensual images of individuals, has experienced significant transformation over the years, particularly in New York City (NYC). Known for its diversity and vibrant arts scene, NYC has been a hub for the evolution of various art forms, including boudoir photography. This article delves into the historical background, cultural significance, technological advancements, and the contemporary landscape of boudoir photography in NYC.
Rishikesh @ℂall @Girls ꧁❤Book❤꧂@ℂall @Girls Service Vip Top Model Safe
Ppt
1.
2. Adobe Photoshop is a softwares that will
enable the students to use the various tools
and effects available for photo editing and
graphic design.
Because of the growth of technology in this
day and age, it is necessary to have the ability
to work with digital media. This presentation
is an introduction to the basics of Adobe
Photoshop.
3. Basic concepts
Pixel
Specific location
Specific color Magnify an image to see pixels
5. More Tools for Selecting Image Parts
(Delete or Copy)
Marquee Tools
Lasso Tools
Magnetic Lasso
Magic Wand
6. 2. Move
-Move the image on a selected layer to other part of
canvas you are working
3. Brush, Gradient, Paint Bucket
a. Brush: basic tools for drawing a line
b. Gradient: this help you to paint stage by stage with
more than 2 colors
c. Paint Bucket: fill out a cropped part with just one
click of this tool
7. 4. Erase
- Erase what you cropped or where you click with
your mouse after selecting this tool
5. Clone Stamp, Pattern Stamp
a. Clone Stamp: copy a selected part and restore
it where you want
b. Pattern Stamp: this is nearly the same tool with
clone stamp, but you can arrange the shape you
cropped, and you can use it as a fixed shape
8. 6. Smudge, Dodge, Sponge
a. Smudge: effect as such rubbing canvas
with fingers
b. Dodge: Make it bright the part where you scrub
with this tool.
c. Sponge: Saturate or desaturate selected part of
an image.
7. Text
- Type in various characters
9. 8. Set foreground/background color
- Foreground color: the color of image what you
draw with a drawing tool such as brush tool
- Background color: when you use the gradient
tool, the color will be different from the foreground
color.
11. 1. Color/Swatch/Styles Palette
- Color Palette: Mix the color (basically
RGB colors) and select it for the
foreground and background colors.
c.f) In case of another color type, you can
choose it among the list of the pop-up menu
-You can choose colors among the
samples of colors.
-You can choose a special effect of
colors on the layer you selected, such
as texts, buttons, and images
12. 2. history/Action/Tool preset Palette
- History Palette: Photoshop automatically
save the process of your works. (basically
20 steps prior to the current work)
c.f) change the number of steps it saves:
Edit > Preferences > General (History States)
- Actions Palette: Save basic technical effects
and adjust it to more than one image
-Tool Preset Palette: Select the Brush which
you made and saved.
13. 3. Layers Palette
-Layer Palette: Separate each step of
Works from others.
By making layers and working different
steps on each layer, you can make
separate effects on each layer.
14. Let’s get creative!
Select foreground
and background colors
Choose the paint
brush
Now the eraser
Try the pencil
15. Let’s open a file to be edited
Open Willie.jpg
Image, Image size
Pixel width 200
Bicubic Sharper
SAVE as smw.jpg
Open Willie.jpg
Image, Image size
Constrain proportions OFF
Image, Image size
Pixel width 200 (UNDO)
Pixel height 200 (UNDO)
16. Use Filters for Special Effects!
Open Willie
Select a Filter
Example:
Artistic, Dry Brush
Save file with different
name
williedb
17. Adjustments
The following tools are used to alter photos in order to bring out details and balance intensity.
Brightness & Contrast Curves
Go to the Toolbar, click on Image → Go to the Toolbar, click on Image
Adjustments → Brightness/Contrast → Adjustments → Curves
Rotations
Go to the Toolbar,
click on Image →
Rotate Canvas
18. Cropping
The Crop Tool is used to remove unwanted space or material.
1. Find the Crop Tool in 2. Select desired area. 3. Click on Crop Tool
the toolbox on the left- again to finalize.
hand side of the screen.
19. Resizing
There are two methods to resize photos. Resizing photos is a convenient
way to make sure the photo is the correct size for a project.
Method 1: Go to the Toolbar, Method 2: Select desired layer,
click on Image → Image Size. press Ctrl+T on keyboard.
Hold down the Shift key to maintain
proportions. This method will resize
only the selected layer.
Adjust width and height to
desired measurements. This will
resize the entire image.
20. Layers
Layers make it possible to add modifications that can be removed quickly and easily. They
can be added individually or can be created from an existing part of the document.
To insert a new layer: Go to the To make a layer from the
Toolbar, click on Layer → New → existing document: choose
Layer. selected area with the marquee
tool, right click selected area
and choose
Layer via Cut/Copy.
*To make a layer
without deleting it,
click the eye.