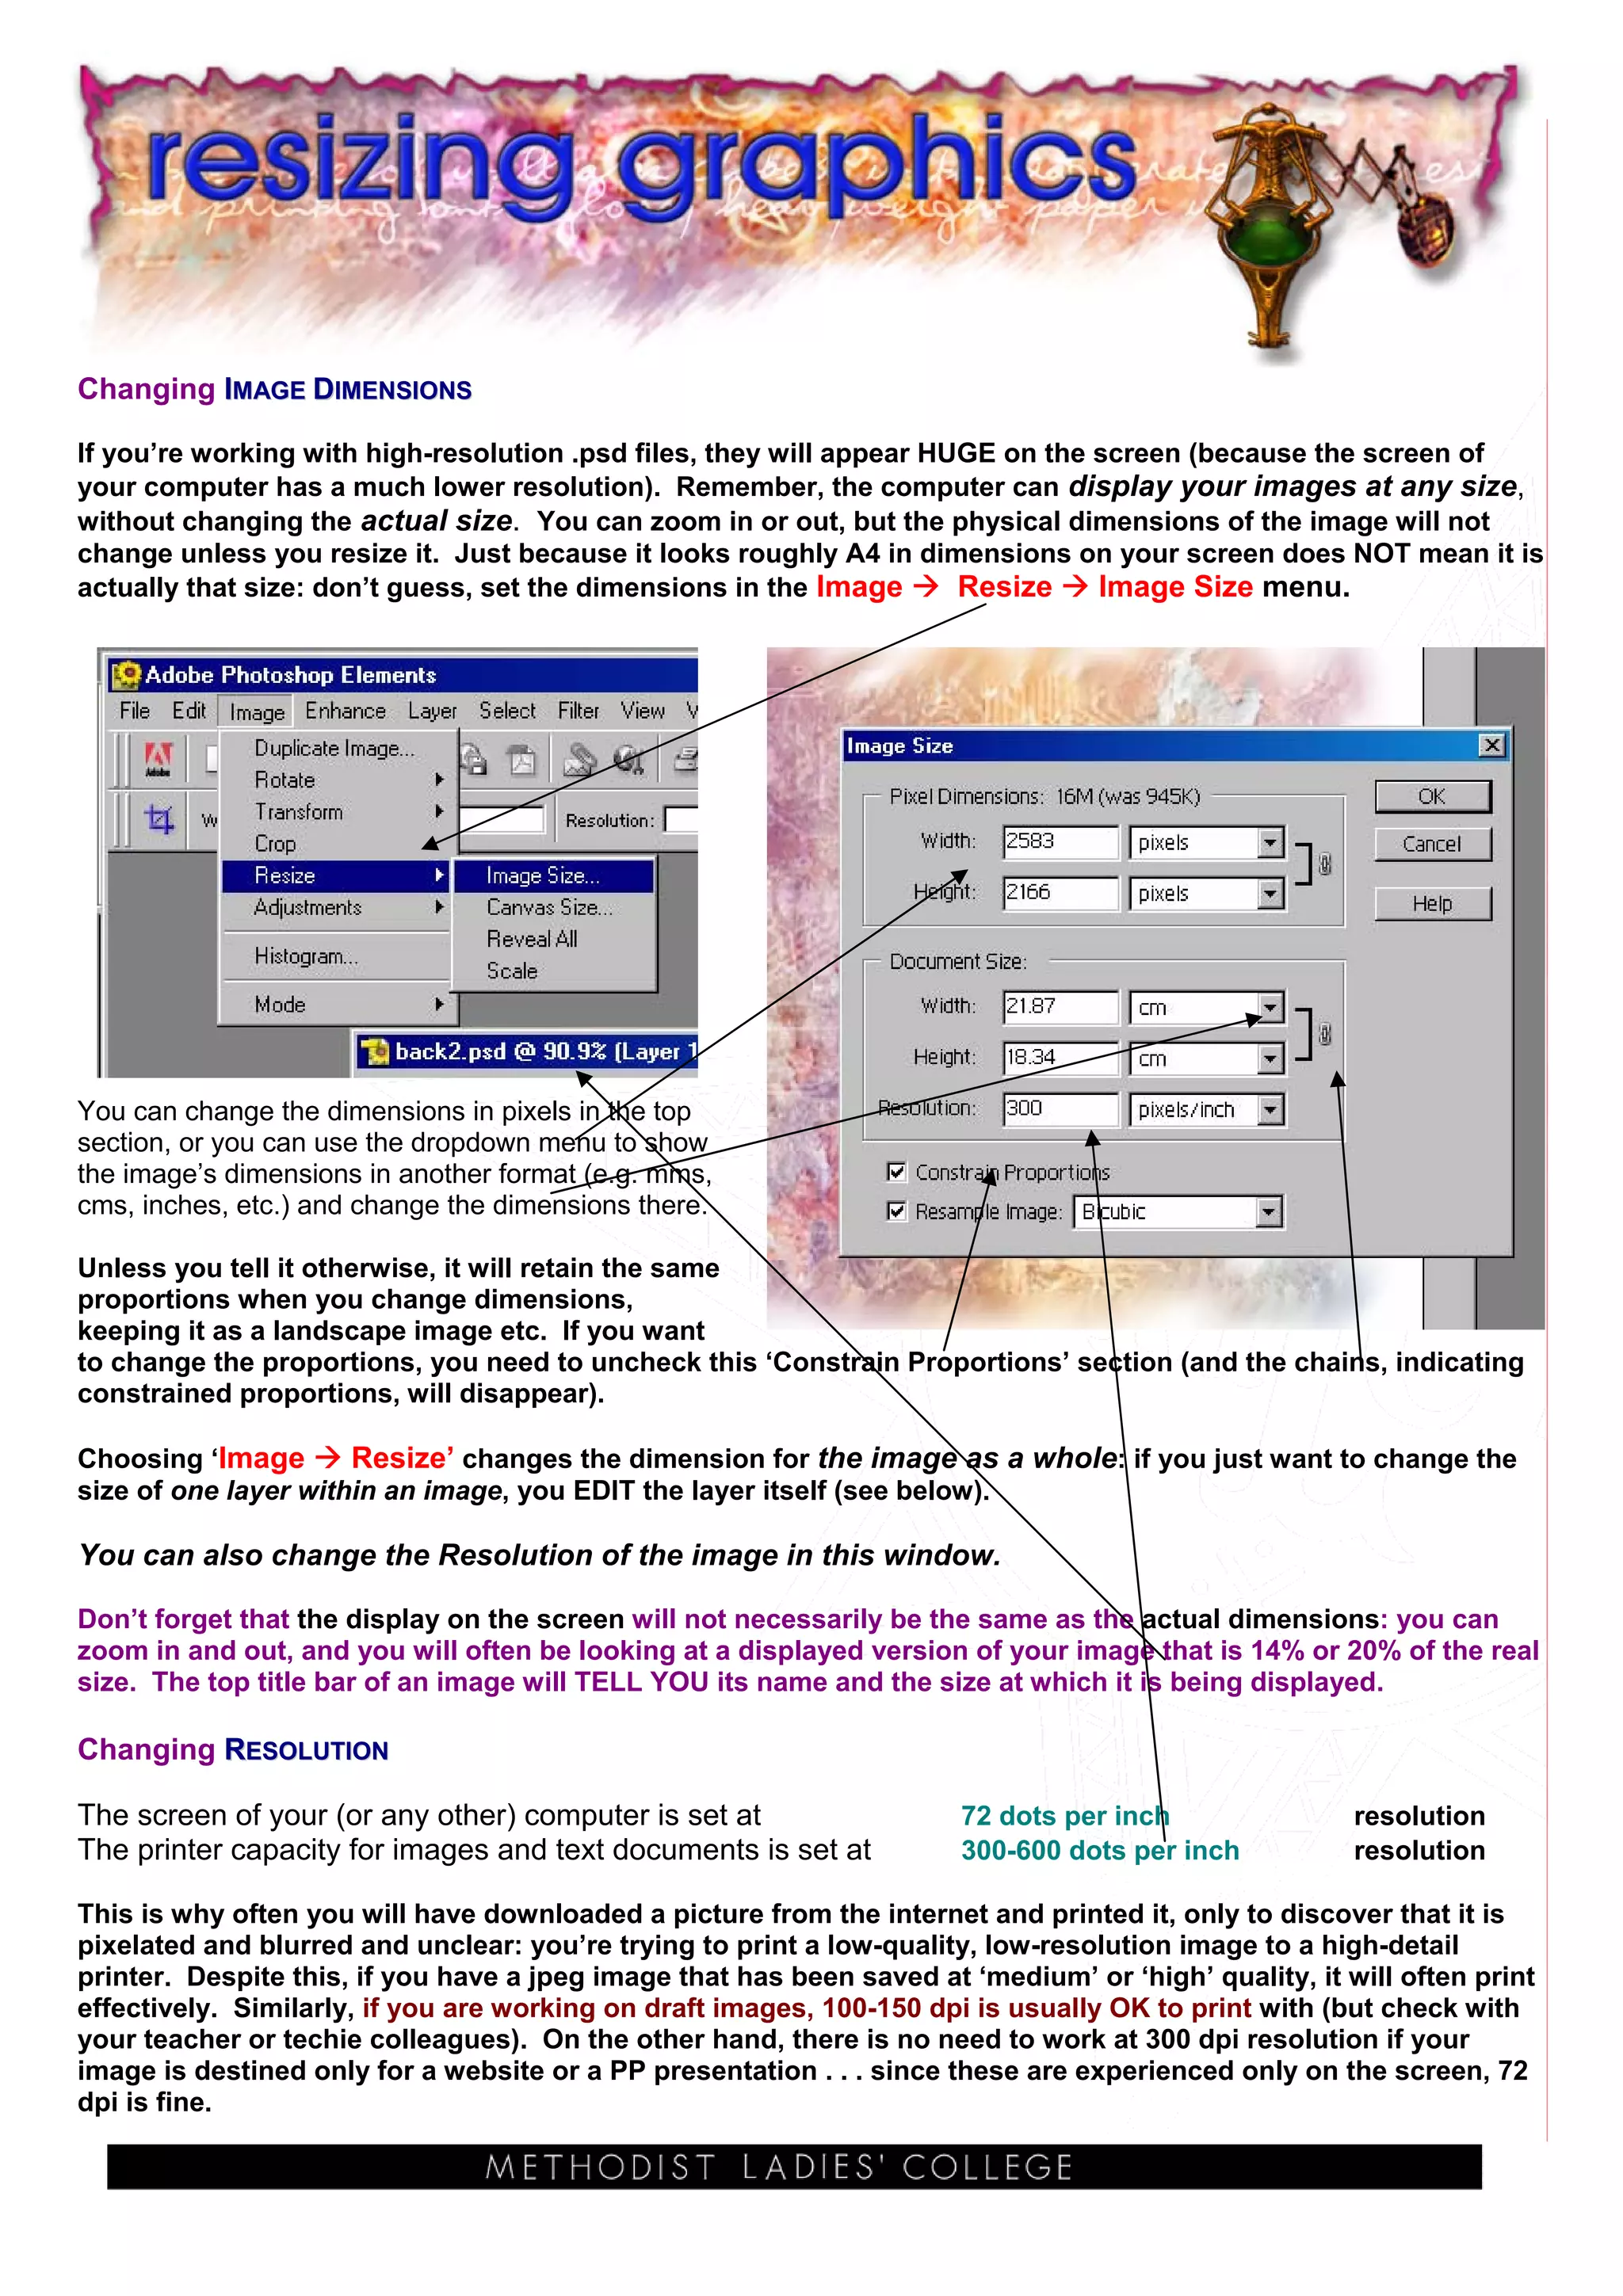
SlideShare a Scribd company logo
Changing IMAGE DIMENSIONS

If you’re working with high-resolution .psd files, they will appear HUGE on the screen (because the screen of
your computer has a much lower resolution). Remember, the computer can display your images at any size,
without changing the actual size. You can zoom in or out, but the physical dimensions of the image will not
change unless you resize it. Just because it looks roughly A4 in dimensions on your screen does NOT mean it is
actually that size: don’t guess, set the dimensions in the Image      Resize    Image Size menu.


You can change the dimensions in pixels in the top
section, or you can use the dropdown menu to show
the image’s dimensions in another format (e.g. mms,
cms, inches, etc.) and change the dimensions there.

Unless you tell it otherwise, it will retain the same
proportions when you change dimensions,
keeping it as a landscape image etc. If you want
to change the proportions, you need to uncheck this ‘Constrain Proportions’ section (and the chains, indicating
constrained proportions, will disappear).

Choosing ‘Image       Resize’ changes the dimension for the image as a whole: if you just want to change the
size of one layer within an image, you EDIT the layer itself (see below).

You can also change the Resolution of the image in this window.

Don’t forget that the display on the screen will not necessarily be the same as the actual dimensions: you can
zoom in and out, and you will often be looking at a displayed version of your image that is 14% or 20% of the real
size. The top title bar of an image will TELL YOU its name and the size at which it is being displayed.

Changing RESOLUTION

The screen of your (or any other) computer is set at                   72 dots per inch                resolution
The printer capacity for images and text documents is set at           300-600 dots per inch           resolution

This is why often you will have downloaded a picture from the internet and printed it, only to discover that it is
pixelated and blurred and unclear: you’re trying to print a low-quality, low-resolution image to a high-detail
printer. Despite this, if you have a jpeg image that has been saved at ‘medium’ or ‘high’ quality, it will often print
effectively. Similarly, if you are working on draft images, 100-150 dpi is usually OK to print with (but check with
your teacher or techie colleagues). On the other hand, there is no need to work at 300 dpi resolution if your
image is destined only for a website or a PP presentation . . . since these are experienced only on the screen, 72
dpi is fine.
CROPPING THE IMAGE

‘Cropping’ an image always means two steps: [1] selecting the section of the image that you want to keep, and
[2] discarding the rest of the image. As always, you can either do this by using the appropriate tools from the
Toolbox, or – after you’ve slected the section you want to keep -- by going through the menu up the top (in this
case, since it applies to the whole                          image, cropping is under the ‘Image’ menu).

So you would use either the crop tool                          or Image     Crop
                                                               If using the menu: make a selection in the image
Click with the Crop tool to the top left
                                                               using one of the Selection
of what you want to crop down to,
                                                               tools (e.g. the marquee
drag out the area you want to retain
                                                               tool), then go to the
(which the program will then highlight, dropping the
                                                               Image Menu and select
unwanted rest of the image into darkness). If you’re
                                                               ‘Crop’.
happy with your selection, just hit Enter. If not, you
can click on the edges of your selection to reshape
and resize it. When it’s correct, hit Enter.


Changing THE SIZE OF A LAYER WITHIN AN IMAGE

This is a matter of editing the relevant layer, so instead of using the ‘Resize’ options, you use the ‘Transform’
submenu: Image         Transform, which then gives you a series of options to . . .
           • Rotate the layer or object
           • Change the scale of the layer or object up or down
           • Skew the layer or object horizontally or
                vertically
           • Distort the layer or object: allowing any one of
                its sides or points to be stretched out and
                shifted
           • Change the perspective of the layer or object,
                which restricts the vertical movement to create
                the effect of depth and perspective.

Choosing any of these transformations brings up a box around the object with handles at the extremities:
clicking and dragging on these handles allows you to change the scale, to rotate, etc. In the same way, if you
select a layer and then click on the ‘Move’ tool in the Toolbox, “handles” appear and allow you to click and drag
                                                                  the layer into a new shape and size and position
                                                                  and etc. This gives you amazing control and
                                                                  flexibility. Remember this applies to all kinds of
                                                                  layers, including Text Layers (so you can reshape
                                                                  your text as easily as you can transform a shape).
                                                                  If you put your cursor in the middle of the layer or
                                                                  object, you can click and drag to MOVE it, and if
                                                                  you click and drag on one of the handles, you can
                                                                  transform it, and if you put your cursor close to
                                                                  one of the corners of the layer or object, it
                                                                  changes to a curved double-headed arrow . . .
                                                                  clicking and dragging at this point allows you to
                                                                  rotate the layer.


REMEMBER: the ‘Zoom’ tool, or changing the display in the ‘View’ menu, DOES NOT change the
actual dimensions of the image, it just changes how it is being displayed on the screen. Always go
                back to the Image       Resize   Image Size menu if you want to change the physical
                dimensions. If you’ve set the dimensions at A3 size, even if it displays at 15% on the
                screen (and therefore looks no larger than a small tissue rather than A3) it will
                nonetheless print at A3. Check the display size on the top title bar of the image if
                you’re wondering about any difference between display versus actual size.

More Related Content

What's hot

Changing eye colour in photoshop
 Changing eye colour in photoshop Changing eye colour in photoshop
Changing eye colour in photoshop
Cardinal Newman Catholic School
 
Drawing Splines on 3D
Drawing Splines on 3DDrawing Splines on 3D
Drawing Splines on 3D
graphitech
 
Sony PMW-EX3 Annotation
Sony PMW-EX3 AnnotationSony PMW-EX3 Annotation
Sony PMW-EX3 Annotation
Hannah Charles Media AS
 
Smooth and soften skin in a photo with photoshop
Smooth and soften skin in a photo with photoshopSmooth and soften skin in a photo with photoshop
Smooth and soften skin in a photo with photoshop
Cardinal Newman Catholic School
 
Photoshop tools
Photoshop toolsPhotoshop tools
Photoshop tools
Shantanu Kumar
 
Applying masks in photoshop
Applying masks in photoshopApplying masks in photoshop
Applying masks in photoshop
Cardinal Newman Catholic School
 
Image manipulation - Photoshop
Image manipulation - PhotoshopImage manipulation - Photoshop
Image manipulation - Photoshop
Cardinal Newman Catholic School
 
Hair removal - Photoshop
Hair removal - PhotoshopHair removal - Photoshop
Hair removal - Photoshop
Cardinal Newman Catholic School
 
GIMP Tutorial by Juan Rodrigo Badiola
GIMP Tutorial by Juan Rodrigo BadiolaGIMP Tutorial by Juan Rodrigo Badiola
GIMP Tutorial by Juan Rodrigo Badiola
JuanRodrigoBadiola
 
Post-Production in Snapseed
Post-Production in SnapseedPost-Production in Snapseed
Post-Production in Snapseed
Jill Hopke
 
Crazy Photos: An Introduction to GIMP
Crazy Photos: An Introduction to GIMPCrazy Photos: An Introduction to GIMP
Crazy Photos: An Introduction to GIMP
Rino Landa
 
How to Edit in Photoshop (Part 2): Adding Background and Using Adjustment Tools
How to Edit in Photoshop (Part 2): Adding Background and Using Adjustment ToolsHow to Edit in Photoshop (Part 2): Adding Background and Using Adjustment Tools
How to Edit in Photoshop (Part 2): Adding Background and Using Adjustment Tools
Maria Eloisa Blanza
 
Edgy Colors
Edgy ColorsEdgy Colors
Edgy Colors
snshnangel04
 
Photoshop technical skills
Photoshop technical skillsPhotoshop technical skills
Photoshop technical skillsFigen232
 
Photo shop cs5-watercolor-painting-effect-tutorial
Photo shop cs5-watercolor-painting-effect-tutorialPhoto shop cs5-watercolor-painting-effect-tutorial
Photo shop cs5-watercolor-painting-effect-tutorialMenSagam Technologies
 
adobephotoshop_frerking
adobephotoshop_frerking adobephotoshop_frerking
adobephotoshop_frerking
Agung Yuwono
 

What's hot (18)

Changing eye colour in photoshop
 Changing eye colour in photoshop Changing eye colour in photoshop
Changing eye colour in photoshop
 
roldan
roldanroldan
roldan
 
Drawing Splines on 3D
Drawing Splines on 3DDrawing Splines on 3D
Drawing Splines on 3D
 
sample-06
sample-06sample-06
sample-06
 
Sony PMW-EX3 Annotation
Sony PMW-EX3 AnnotationSony PMW-EX3 Annotation
Sony PMW-EX3 Annotation
 
Smooth and soften skin in a photo with photoshop
Smooth and soften skin in a photo with photoshopSmooth and soften skin in a photo with photoshop
Smooth and soften skin in a photo with photoshop
 
Photoshop tools
Photoshop toolsPhotoshop tools
Photoshop tools
 
Applying masks in photoshop
Applying masks in photoshopApplying masks in photoshop
Applying masks in photoshop
 
Image manipulation - Photoshop
Image manipulation - PhotoshopImage manipulation - Photoshop
Image manipulation - Photoshop
 
Hair removal - Photoshop
Hair removal - PhotoshopHair removal - Photoshop
Hair removal - Photoshop
 
GIMP Tutorial by Juan Rodrigo Badiola
GIMP Tutorial by Juan Rodrigo BadiolaGIMP Tutorial by Juan Rodrigo Badiola
GIMP Tutorial by Juan Rodrigo Badiola
 
Post-Production in Snapseed
Post-Production in SnapseedPost-Production in Snapseed
Post-Production in Snapseed
 
Crazy Photos: An Introduction to GIMP
Crazy Photos: An Introduction to GIMPCrazy Photos: An Introduction to GIMP
Crazy Photos: An Introduction to GIMP
 
How to Edit in Photoshop (Part 2): Adding Background and Using Adjustment Tools
How to Edit in Photoshop (Part 2): Adding Background and Using Adjustment ToolsHow to Edit in Photoshop (Part 2): Adding Background and Using Adjustment Tools
How to Edit in Photoshop (Part 2): Adding Background and Using Adjustment Tools
 
Edgy Colors
Edgy ColorsEdgy Colors
Edgy Colors
 
Photoshop technical skills
Photoshop technical skillsPhotoshop technical skills
Photoshop technical skills
 
Photo shop cs5-watercolor-painting-effect-tutorial
Photo shop cs5-watercolor-painting-effect-tutorialPhoto shop cs5-watercolor-painting-effect-tutorial
Photo shop cs5-watercolor-painting-effect-tutorial
 
adobephotoshop_frerking
adobephotoshop_frerking adobephotoshop_frerking
adobephotoshop_frerking
 

Similar to Resizing images

Photo Shop
Photo ShopPhoto Shop
Digital work station intro
Digital work station introDigital work station intro
Digital work station intro
Whitney Brooks
 
Photoshop cs6
Photoshop cs6Photoshop cs6
Photoshop cs6
RohitMehra98
 
Introduction- The Basics of Photoshop CS6
Introduction- The Basics of Photoshop CS6Introduction- The Basics of Photoshop CS6
Introduction- The Basics of Photoshop CS6
Crest TechnoSoft
 
learn sketchup (for the beginners)
learn sketchup (for the beginners)learn sketchup (for the beginners)
learn sketchup (for the beginners)
Moksha Bhatia
 
photoshop_workshop_01
photoshop_workshop_01photoshop_workshop_01
photoshop_workshop_01tutorialsruby
 
photoshop_workshop_01
photoshop_workshop_01photoshop_workshop_01
photoshop_workshop_01tutorialsruby
 
Customizing Your Document in PerfectForms
Customizing Your Document in PerfectFormsCustomizing Your Document in PerfectForms
Customizing Your Document in PerfectFormsKaren Hunter-Sliger
 
Adobe photoshop
Adobe photoshopAdobe photoshop
Adobe photoshop
KevinMendoza91
 
Photoshop intro to basics
Photoshop intro to basicsPhotoshop intro to basics
Photoshop intro to basicsNatalie Hurd
 
Photoshop How To
Photoshop How ToPhotoshop How To
Photoshop How To
waltersart1
 
Photoshop Handbook
Photoshop HandbookPhotoshop Handbook
Photoshop Handbook
Niraj Agarwal
 
ETECH_WEEK7-Image-Manipulation-Techniques-1.pdf
ETECH_WEEK7-Image-Manipulation-Techniques-1.pdfETECH_WEEK7-Image-Manipulation-Techniques-1.pdf
ETECH_WEEK7-Image-Manipulation-Techniques-1.pdf
bongsantiago96
 
Learning Photoshop.pptx
Learning Photoshop.pptxLearning Photoshop.pptx
Learning Photoshop.pptx
Sanjeev Banerjee
 
Editing Your Photos
Editing Your PhotosEditing Your Photos
Editing Your Photosaquariancic
 
How to make a transparent background in Photoshop
How to make a transparent background in PhotoshopHow to make a transparent background in Photoshop
How to make a transparent background in Photoshop
Zenith Clipping
 

Similar to Resizing images (20)

Poser presentation1
Poser presentation1Poser presentation1
Poser presentation1
 
08 graphics
08 graphics08 graphics
08 graphics
 
Photo Shop
Photo ShopPhoto Shop
Photo Shop
 
Digital work station intro
Digital work station introDigital work station intro
Digital work station intro
 
Photoshop cs6
Photoshop cs6Photoshop cs6
Photoshop cs6
 
Introduction- The Basics of Photoshop CS6
Introduction- The Basics of Photoshop CS6Introduction- The Basics of Photoshop CS6
Introduction- The Basics of Photoshop CS6
 
learn sketchup (for the beginners)
learn sketchup (for the beginners)learn sketchup (for the beginners)
learn sketchup (for the beginners)
 
photoshop_workshop_01
photoshop_workshop_01photoshop_workshop_01
photoshop_workshop_01
 
photoshop_workshop_01
photoshop_workshop_01photoshop_workshop_01
photoshop_workshop_01
 
Customizing Your Document in PerfectForms
Customizing Your Document in PerfectFormsCustomizing Your Document in PerfectForms
Customizing Your Document in PerfectForms
 
Adobe photoshop
Adobe photoshopAdobe photoshop
Adobe photoshop
 
Photoshop intro to basics
Photoshop intro to basicsPhotoshop intro to basics
Photoshop intro to basics
 
Photoshop How To
Photoshop How ToPhotoshop How To
Photoshop How To
 
2010 11 Graphics
2010 11 Graphics2010 11 Graphics
2010 11 Graphics
 
Photoshop Handbook
Photoshop HandbookPhotoshop Handbook
Photoshop Handbook
 
ETECH_WEEK7-Image-Manipulation-Techniques-1.pdf
ETECH_WEEK7-Image-Manipulation-Techniques-1.pdfETECH_WEEK7-Image-Manipulation-Techniques-1.pdf
ETECH_WEEK7-Image-Manipulation-Techniques-1.pdf
 
Chap39
Chap39Chap39
Chap39
 
Learning Photoshop.pptx
Learning Photoshop.pptxLearning Photoshop.pptx
Learning Photoshop.pptx
 
Editing Your Photos
Editing Your PhotosEditing Your Photos
Editing Your Photos
 
How to make a transparent background in Photoshop
How to make a transparent background in PhotoshopHow to make a transparent background in Photoshop
How to make a transparent background in Photoshop
 

Recently uploaded

Assure Contact Center Experiences for Your Customers With ThousandEyes
Assure Contact Center Experiences for Your Customers With ThousandEyesAssure Contact Center Experiences for Your Customers With ThousandEyes
Assure Contact Center Experiences for Your Customers With ThousandEyes
ThousandEyes
 
FIDO Alliance Osaka Seminar: FIDO Security Aspects.pdf
FIDO Alliance Osaka Seminar: FIDO Security Aspects.pdfFIDO Alliance Osaka Seminar: FIDO Security Aspects.pdf
FIDO Alliance Osaka Seminar: FIDO Security Aspects.pdf
FIDO Alliance
 
UiPath Test Automation using UiPath Test Suite series, part 3
UiPath Test Automation using UiPath Test Suite series, part 3UiPath Test Automation using UiPath Test Suite series, part 3
UiPath Test Automation using UiPath Test Suite series, part 3
DianaGray10
 
GDG Cloud Southlake #33: Boule & Rebala: Effective AppSec in SDLC using Deplo...
GDG Cloud Southlake #33: Boule & Rebala: Effective AppSec in SDLC using Deplo...GDG Cloud Southlake #33: Boule & Rebala: Effective AppSec in SDLC using Deplo...
GDG Cloud Southlake #33: Boule & Rebala: Effective AppSec in SDLC using Deplo...
James Anderson
 
State of ICS and IoT Cyber Threat Landscape Report 2024 preview
State of ICS and IoT Cyber Threat Landscape Report 2024 previewState of ICS and IoT Cyber Threat Landscape Report 2024 preview
State of ICS and IoT Cyber Threat Landscape Report 2024 preview
Prayukth K V
 
FIDO Alliance Osaka Seminar: Passkeys at Amazon.pdf
FIDO Alliance Osaka Seminar: Passkeys at Amazon.pdfFIDO Alliance Osaka Seminar: Passkeys at Amazon.pdf
FIDO Alliance Osaka Seminar: Passkeys at Amazon.pdf
FIDO Alliance
 
Elevating Tactical DDD Patterns Through Object Calisthenics
Elevating Tactical DDD Patterns Through Object CalisthenicsElevating Tactical DDD Patterns Through Object Calisthenics
Elevating Tactical DDD Patterns Through Object Calisthenics
Dorra BARTAGUIZ
 
Free Complete Python - A step towards Data Science
Free Complete Python - A step towards Data ScienceFree Complete Python - A step towards Data Science
Free Complete Python - A step towards Data Science
RinaMondal9
 
SAP Sapphire 2024 - ASUG301 building better apps with SAP Fiori.pdf
SAP Sapphire 2024 - ASUG301 building better apps with SAP Fiori.pdfSAP Sapphire 2024 - ASUG301 building better apps with SAP Fiori.pdf
SAP Sapphire 2024 - ASUG301 building better apps with SAP Fiori.pdf
Peter Spielvogel
 
When stars align: studies in data quality, knowledge graphs, and machine lear...
When stars align: studies in data quality, knowledge graphs, and machine lear...When stars align: studies in data quality, knowledge graphs, and machine lear...
When stars align: studies in data quality, knowledge graphs, and machine lear...
Elena Simperl
 
The Art of the Pitch: WordPress Relationships and Sales
The Art of the Pitch: WordPress Relationships and SalesThe Art of the Pitch: WordPress Relationships and Sales
The Art of the Pitch: WordPress Relationships and Sales
Laura Byrne
 
Quantum Computing: Current Landscape and the Future Role of APIs
Quantum Computing: Current Landscape and the Future Role of APIsQuantum Computing: Current Landscape and the Future Role of APIs
Quantum Computing: Current Landscape and the Future Role of APIs
Vlad Stirbu
 
Unsubscribed: Combat Subscription Fatigue With a Membership Mentality by Head...
Unsubscribed: Combat Subscription Fatigue With a Membership Mentality by Head...Unsubscribed: Combat Subscription Fatigue With a Membership Mentality by Head...
Unsubscribed: Combat Subscription Fatigue With a Membership Mentality by Head...
Product School
 
UiPath Test Automation using UiPath Test Suite series, part 4
UiPath Test Automation using UiPath Test Suite series, part 4UiPath Test Automation using UiPath Test Suite series, part 4
UiPath Test Automation using UiPath Test Suite series, part 4
DianaGray10
 
FIDO Alliance Osaka Seminar: The WebAuthn API and Discoverable Credentials.pdf
FIDO Alliance Osaka Seminar: The WebAuthn API and Discoverable Credentials.pdfFIDO Alliance Osaka Seminar: The WebAuthn API and Discoverable Credentials.pdf
FIDO Alliance Osaka Seminar: The WebAuthn API and Discoverable Credentials.pdf
FIDO Alliance
 
Welocme to ViralQR, your best QR code generator.
Welocme to ViralQR, your best QR code generator.Welocme to ViralQR, your best QR code generator.
Welocme to ViralQR, your best QR code generator.
ViralQR
 
The Future of Platform Engineering
The Future of Platform EngineeringThe Future of Platform Engineering
The Future of Platform Engineering
Jemma Hussein Allen
 
LF Energy Webinar: Electrical Grid Modelling and Simulation Through PowSyBl -...
LF Energy Webinar: Electrical Grid Modelling and Simulation Through PowSyBl -...LF Energy Webinar: Electrical Grid Modelling and Simulation Through PowSyBl -...
LF Energy Webinar: Electrical Grid Modelling and Simulation Through PowSyBl -...
DanBrown980551
 
DevOps and Testing slides at DASA Connect
DevOps and Testing slides at DASA ConnectDevOps and Testing slides at DASA Connect
DevOps and Testing slides at DASA Connect
Kari Kakkonen
 
Introduction to CHERI technology - Cybersecurity
Introduction to CHERI technology - CybersecurityIntroduction to CHERI technology - Cybersecurity
Introduction to CHERI technology - Cybersecurity
mikeeftimakis1
 

Recently uploaded (20)

Assure Contact Center Experiences for Your Customers With ThousandEyes
Assure Contact Center Experiences for Your Customers With ThousandEyesAssure Contact Center Experiences for Your Customers With ThousandEyes
Assure Contact Center Experiences for Your Customers With ThousandEyes
 
FIDO Alliance Osaka Seminar: FIDO Security Aspects.pdf
FIDO Alliance Osaka Seminar: FIDO Security Aspects.pdfFIDO Alliance Osaka Seminar: FIDO Security Aspects.pdf
FIDO Alliance Osaka Seminar: FIDO Security Aspects.pdf
 
UiPath Test Automation using UiPath Test Suite series, part 3
UiPath Test Automation using UiPath Test Suite series, part 3UiPath Test Automation using UiPath Test Suite series, part 3
UiPath Test Automation using UiPath Test Suite series, part 3
 
GDG Cloud Southlake #33: Boule & Rebala: Effective AppSec in SDLC using Deplo...
GDG Cloud Southlake #33: Boule & Rebala: Effective AppSec in SDLC using Deplo...GDG Cloud Southlake #33: Boule & Rebala: Effective AppSec in SDLC using Deplo...
GDG Cloud Southlake #33: Boule & Rebala: Effective AppSec in SDLC using Deplo...
 
State of ICS and IoT Cyber Threat Landscape Report 2024 preview
State of ICS and IoT Cyber Threat Landscape Report 2024 previewState of ICS and IoT Cyber Threat Landscape Report 2024 preview
State of ICS and IoT Cyber Threat Landscape Report 2024 preview
 
FIDO Alliance Osaka Seminar: Passkeys at Amazon.pdf
FIDO Alliance Osaka Seminar: Passkeys at Amazon.pdfFIDO Alliance Osaka Seminar: Passkeys at Amazon.pdf
FIDO Alliance Osaka Seminar: Passkeys at Amazon.pdf
 
Elevating Tactical DDD Patterns Through Object Calisthenics
Elevating Tactical DDD Patterns Through Object CalisthenicsElevating Tactical DDD Patterns Through Object Calisthenics
Elevating Tactical DDD Patterns Through Object Calisthenics
 
Free Complete Python - A step towards Data Science
Free Complete Python - A step towards Data ScienceFree Complete Python - A step towards Data Science
Free Complete Python - A step towards Data Science
 
SAP Sapphire 2024 - ASUG301 building better apps with SAP Fiori.pdf
SAP Sapphire 2024 - ASUG301 building better apps with SAP Fiori.pdfSAP Sapphire 2024 - ASUG301 building better apps with SAP Fiori.pdf
SAP Sapphire 2024 - ASUG301 building better apps with SAP Fiori.pdf
 
When stars align: studies in data quality, knowledge graphs, and machine lear...
When stars align: studies in data quality, knowledge graphs, and machine lear...When stars align: studies in data quality, knowledge graphs, and machine lear...
When stars align: studies in data quality, knowledge graphs, and machine lear...
 
The Art of the Pitch: WordPress Relationships and Sales
The Art of the Pitch: WordPress Relationships and SalesThe Art of the Pitch: WordPress Relationships and Sales
The Art of the Pitch: WordPress Relationships and Sales
 
Quantum Computing: Current Landscape and the Future Role of APIs
Quantum Computing: Current Landscape and the Future Role of APIsQuantum Computing: Current Landscape and the Future Role of APIs
Quantum Computing: Current Landscape and the Future Role of APIs
 
Unsubscribed: Combat Subscription Fatigue With a Membership Mentality by Head...
Unsubscribed: Combat Subscription Fatigue With a Membership Mentality by Head...Unsubscribed: Combat Subscription Fatigue With a Membership Mentality by Head...
Unsubscribed: Combat Subscription Fatigue With a Membership Mentality by Head...
 
UiPath Test Automation using UiPath Test Suite series, part 4
UiPath Test Automation using UiPath Test Suite series, part 4UiPath Test Automation using UiPath Test Suite series, part 4
UiPath Test Automation using UiPath Test Suite series, part 4
 
FIDO Alliance Osaka Seminar: The WebAuthn API and Discoverable Credentials.pdf
FIDO Alliance Osaka Seminar: The WebAuthn API and Discoverable Credentials.pdfFIDO Alliance Osaka Seminar: The WebAuthn API and Discoverable Credentials.pdf
FIDO Alliance Osaka Seminar: The WebAuthn API and Discoverable Credentials.pdf
 
Welocme to ViralQR, your best QR code generator.
Welocme to ViralQR, your best QR code generator.Welocme to ViralQR, your best QR code generator.
Welocme to ViralQR, your best QR code generator.
 
The Future of Platform Engineering
The Future of Platform EngineeringThe Future of Platform Engineering
The Future of Platform Engineering
 
LF Energy Webinar: Electrical Grid Modelling and Simulation Through PowSyBl -...
LF Energy Webinar: Electrical Grid Modelling and Simulation Through PowSyBl -...LF Energy Webinar: Electrical Grid Modelling and Simulation Through PowSyBl -...
LF Energy Webinar: Electrical Grid Modelling and Simulation Through PowSyBl -...
 
DevOps and Testing slides at DASA Connect
DevOps and Testing slides at DASA ConnectDevOps and Testing slides at DASA Connect
DevOps and Testing slides at DASA Connect
 
Introduction to CHERI technology - Cybersecurity
Introduction to CHERI technology - CybersecurityIntroduction to CHERI technology - Cybersecurity
Introduction to CHERI technology - Cybersecurity
 

Resizing images

  • 1. Changing IMAGE DIMENSIONS If you’re working with high-resolution .psd files, they will appear HUGE on the screen (because the screen of your computer has a much lower resolution). Remember, the computer can display your images at any size, without changing the actual size. You can zoom in or out, but the physical dimensions of the image will not change unless you resize it. Just because it looks roughly A4 in dimensions on your screen does NOT mean it is actually that size: don’t guess, set the dimensions in the Image Resize Image Size menu. You can change the dimensions in pixels in the top section, or you can use the dropdown menu to show the image’s dimensions in another format (e.g. mms, cms, inches, etc.) and change the dimensions there. Unless you tell it otherwise, it will retain the same proportions when you change dimensions, keeping it as a landscape image etc. If you want to change the proportions, you need to uncheck this ‘Constrain Proportions’ section (and the chains, indicating constrained proportions, will disappear). Choosing ‘Image Resize’ changes the dimension for the image as a whole: if you just want to change the size of one layer within an image, you EDIT the layer itself (see below). You can also change the Resolution of the image in this window. Don’t forget that the display on the screen will not necessarily be the same as the actual dimensions: you can zoom in and out, and you will often be looking at a displayed version of your image that is 14% or 20% of the real size. The top title bar of an image will TELL YOU its name and the size at which it is being displayed. Changing RESOLUTION The screen of your (or any other) computer is set at 72 dots per inch resolution The printer capacity for images and text documents is set at 300-600 dots per inch resolution This is why often you will have downloaded a picture from the internet and printed it, only to discover that it is pixelated and blurred and unclear: you’re trying to print a low-quality, low-resolution image to a high-detail printer. Despite this, if you have a jpeg image that has been saved at ‘medium’ or ‘high’ quality, it will often print effectively. Similarly, if you are working on draft images, 100-150 dpi is usually OK to print with (but check with your teacher or techie colleagues). On the other hand, there is no need to work at 300 dpi resolution if your image is destined only for a website or a PP presentation . . . since these are experienced only on the screen, 72 dpi is fine.
  • 2. CROPPING THE IMAGE ‘Cropping’ an image always means two steps: [1] selecting the section of the image that you want to keep, and [2] discarding the rest of the image. As always, you can either do this by using the appropriate tools from the Toolbox, or – after you’ve slected the section you want to keep -- by going through the menu up the top (in this case, since it applies to the whole image, cropping is under the ‘Image’ menu). So you would use either the crop tool or Image Crop If using the menu: make a selection in the image Click with the Crop tool to the top left using one of the Selection of what you want to crop down to, tools (e.g. the marquee drag out the area you want to retain tool), then go to the (which the program will then highlight, dropping the Image Menu and select unwanted rest of the image into darkness). If you’re ‘Crop’. happy with your selection, just hit Enter. If not, you can click on the edges of your selection to reshape and resize it. When it’s correct, hit Enter. Changing THE SIZE OF A LAYER WITHIN AN IMAGE This is a matter of editing the relevant layer, so instead of using the ‘Resize’ options, you use the ‘Transform’ submenu: Image Transform, which then gives you a series of options to . . . • Rotate the layer or object • Change the scale of the layer or object up or down • Skew the layer or object horizontally or vertically • Distort the layer or object: allowing any one of its sides or points to be stretched out and shifted • Change the perspective of the layer or object, which restricts the vertical movement to create the effect of depth and perspective. Choosing any of these transformations brings up a box around the object with handles at the extremities: clicking and dragging on these handles allows you to change the scale, to rotate, etc. In the same way, if you select a layer and then click on the ‘Move’ tool in the Toolbox, “handles” appear and allow you to click and drag the layer into a new shape and size and position and etc. This gives you amazing control and flexibility. Remember this applies to all kinds of layers, including Text Layers (so you can reshape your text as easily as you can transform a shape). If you put your cursor in the middle of the layer or object, you can click and drag to MOVE it, and if you click and drag on one of the handles, you can transform it, and if you put your cursor close to one of the corners of the layer or object, it changes to a curved double-headed arrow . . . clicking and dragging at this point allows you to rotate the layer. REMEMBER: the ‘Zoom’ tool, or changing the display in the ‘View’ menu, DOES NOT change the actual dimensions of the image, it just changes how it is being displayed on the screen. Always go back to the Image Resize Image Size menu if you want to change the physical dimensions. If you’ve set the dimensions at A3 size, even if it displays at 15% on the screen (and therefore looks no larger than a small tissue rather than A3) it will nonetheless print at A3. Check the display size on the top title bar of the image if you’re wondering about any difference between display versus actual size.