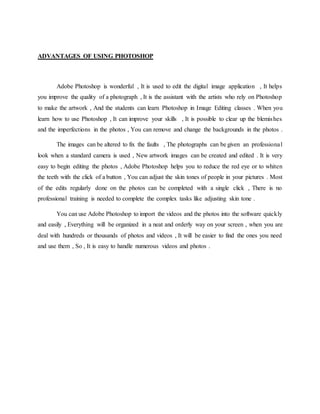
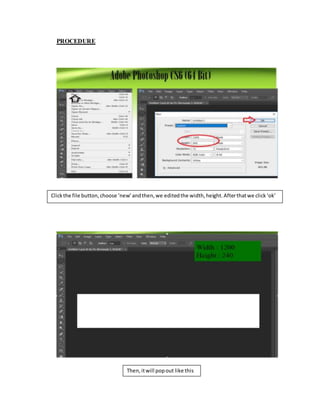
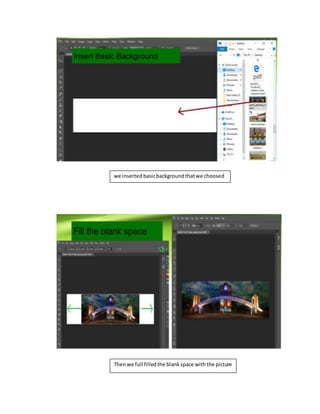
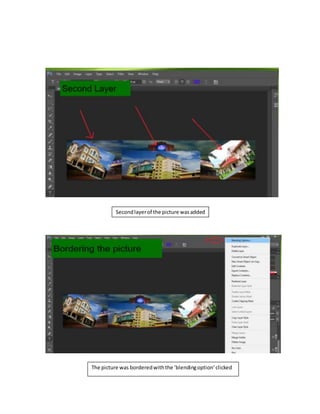
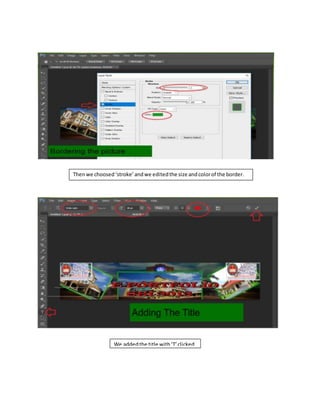
LECTURER:
DR. AZMI IBRAHIM
PHOTOSHOP FOR GRAPHIC EDITING
NAME:
MOHAMMAD AIZUDDIN BIN ISMAIL
D20152071992
LEONARD LINGGIE ANAK ALIE
D2015071995
MUHAMAD FARHAN BIN MOHD RASHID
D20152071977
INTRODUCTION
Adobe Photoshop is a raster graphics editor developed and published by Adobe Systems for
macOS and Windows. Photoshop was created in 1988 by Thomas and John Knoll. Since then, it
has become the de facto industry standard in raster graphics editing, such that the word
"photoshop" has become a verb as in "to Photoshop an image," "photoshopping" and "photoshop
contest", though Adobe discourages such use. It can edit and compose raster images in multiple
layers and supports masks, alpha compositing and several color models including RGB, CMYK,
CIELAB, spot color and duotone. Photoshop has vast support for graphic file formats but also uses
its own PSD and PSB file formats which support all the aforementioned features. In addition to
raster graphics, it has limited abilities to edit or render text, vector graphics (especially through
clipping path), 3D graphics and video. Photoshop's featureset can be expanded by Photoshop plug-
ins, programs developed and distributed independently of Photoshop that can run inside it and
offer new or enhanced features.
Photoshop's naming scheme was initially based on version numbers. However, in October 2002,
following the introduction of Creative Suite branding, each new version of Photoshop was
designated with "CS" plus a number, the eighth major version of Photoshop was Photoshop CS
and the ninth major version was Photoshop CS2.Photoshop CS3through CS6 were also distributed
in two different editions: Standard and Extended. In June 2013, with the introduction of Creative
Cloud branding, Photoshop's licensing scheme was changed to that of software as a service rental
model and the "CS" suffixes were replaced with "CC". Historically, Photoshop was bundled with
additional software such as Adobe ImageReady, Adobe Fireworks, Adobe Bridge, Adobe Device
Central and Adobe Camera RAW.
BASIC TOOLS OF PHOTOSHOP
Marquee Tool : The images in Photoshop are stored pixel by pixel, with a code indicating the color of
each. The image is just a big mosaic of dots.Therefore, before you can do anything in Photoshop,you first need to
indicate which pixels you want to change.The selection tool is one way of doing this. Click on this tool to select it,
then click and drag on your image to make a dotted selection box. Hold shift while you drag if you want a perfect
square or circle. Any pixels within the box will be affected when you make your next move. If you click and hold on
this tool with your mouse button down,you will see that there is also an oval selection shape,and a crop tool .
Crop Tool: . To crop your image, draw a box with the crop tool. Adjust the selection with the selection
points,and then hit return to crop.
Lasso Tool : The lasso tool lets you select freeform shapes,rather than just rectangles and ovals.
Magic Wand: Yet another way to select pixels is with the magic wand. When you click on an area of the
image with this tool, all pixels that are the same color as the pixel you clicked will be selected. Double click on the
tool to set the level of tolerance you would like (i.e. how similar in color the pixels must be to your original pixel
color. A higher tolerance means a broader color range).
The Move Tool: This is a very important tool, because up until now all you have been able to do is select
pixels, and not actually move them. The move tool not only allows you to move areas you have selected,but also to
move entire layers without first making a selection. If you hold the option (or alt) key while clicking and dragging
with the move tool, you can copy the selection.
Airbrush Paintbrush and Pencil tools can be used to draw with the foreground color
on whichever layer is selected.To change the foreground color, double-click on it in the toolbox. You will then see a
palette of colors from which to choose.Select one and click OK. To change the brush size, go to Window > Show
Brushes.
Eraser Tool: Erases anything on the selected layer. You can change the eraser size by going to Window >
Show Brushes.
Line Tool: Can be used to draw straight lines. Click on the tool to select it, then click with the tool on the
canvas area and drag to draw a line. When you release the mouse button,the line will end. You can change the
thickness of the line or add arrowheads to it by double clicking on the tool to see this dialog box:
Text tool: Click on this tool to select it, then click in the Canvas area. You will be given a dialog box in
which to type your text, and choose its attributes. Each new block of text goes on its own layer, so you can move it
around with the Move Tool. Once you have placed the text, however, it is no longer editable. To correct mis takes,
you must delete the old version (by deleting its layer) and replace it.
Eyedropper: Click with this tool on any color in the canvas to make that color the foreground color. (You
can then paint or type with it).
Magnifier: Click with this tool on a part of your image you want to see closer, or drag with it to define the
area you want to expand to the size of the window. Hold down the Option or Alt key to make it a "reducer" instead
and zoom back out.
Grabber: Click with this and drag to move the entire page for better viewing.
Options Bar
The Options bar appears at the top of the screen and is context sensitive,changing as you change tools. The tool in
use is shown in the left corner, and options relating to the tool appear to the right of that.
ADVANTAGES OF USING PHOTOSHOP
Adobe Photoshop is wonderful , It is used to edit the digital image application , It helps
you improve the quality of a photograph , It is the assistant with the artists who rely on Photoshop
to make the artwork , And the students can learn Photoshop in Image Editing classes . When you
learn how to use Photoshop , It can improve your skills , It is possible to clear up the blemishes
and the imperfections in the photos , You can remove and change the backgrounds in the photos .
The images can be altered to fix the faults , The photographs can be given an professional
look when a standard camera is used , New artwork images can be created and edited . It is very
easy to begin editing the photos , Adobe Photoshop helps you to reduce the red eye or to whiten
the teeth with the click of a button , You can adjust the skin tones of people in your pictures . Most
of the edits regularly done on the photos can be completed with a single click , There is no
professional training is needed to complete the complex tasks like adjusting skin tone .
You can use Adobe Photoshop to import the videos and the photos into the software quickly
and easily , Everything will be organized in a neat and orderly way on your screen , when you are
deal with hundreds or thousands of photos and videos , It will be easier to find the ones you need
and use them , So , It is easy to handle numerous videos and photos .
PROCEDURE
Clickthe file button,choose ‘new’andthen,we editedthe width,height.Afterthatwe click‘ok’
Then,itwill popout like this
we insertedbasicbackgroundthatwe choosed
Thenwe full filledthe blankspace withthe picture
Secondlayerof the picture wasadded
The picture was borderedwiththe ‘blendingoption’clicked
Thenwe choosed‘stroke’andwe editedthe size andcolorof the border.
We addedthe title with‘T’clicked
The rectangle wasmade on each picture
Afterthat we save the picture in the form of ‘JPG’
The resultwas obtained

Photoshop

  • 1.
    LECTURER: DR. AZMI IBRAHIM PHOTOSHOPFOR GRAPHIC EDITING NAME: MOHAMMAD AIZUDDIN BIN ISMAIL D20152071992 LEONARD LINGGIE ANAK ALIE D2015071995 MUHAMAD FARHAN BIN MOHD RASHID D20152071977
  • 2.
    INTRODUCTION Adobe Photoshop isa raster graphics editor developed and published by Adobe Systems for macOS and Windows. Photoshop was created in 1988 by Thomas and John Knoll. Since then, it has become the de facto industry standard in raster graphics editing, such that the word "photoshop" has become a verb as in "to Photoshop an image," "photoshopping" and "photoshop contest", though Adobe discourages such use. It can edit and compose raster images in multiple layers and supports masks, alpha compositing and several color models including RGB, CMYK, CIELAB, spot color and duotone. Photoshop has vast support for graphic file formats but also uses its own PSD and PSB file formats which support all the aforementioned features. In addition to raster graphics, it has limited abilities to edit or render text, vector graphics (especially through clipping path), 3D graphics and video. Photoshop's featureset can be expanded by Photoshop plug- ins, programs developed and distributed independently of Photoshop that can run inside it and offer new or enhanced features. Photoshop's naming scheme was initially based on version numbers. However, in October 2002, following the introduction of Creative Suite branding, each new version of Photoshop was designated with "CS" plus a number, the eighth major version of Photoshop was Photoshop CS and the ninth major version was Photoshop CS2.Photoshop CS3through CS6 were also distributed in two different editions: Standard and Extended. In June 2013, with the introduction of Creative Cloud branding, Photoshop's licensing scheme was changed to that of software as a service rental model and the "CS" suffixes were replaced with "CC". Historically, Photoshop was bundled with additional software such as Adobe ImageReady, Adobe Fireworks, Adobe Bridge, Adobe Device Central and Adobe Camera RAW.
  • 3.
    BASIC TOOLS OFPHOTOSHOP
  • 4.
    Marquee Tool :The images in Photoshop are stored pixel by pixel, with a code indicating the color of each. The image is just a big mosaic of dots.Therefore, before you can do anything in Photoshop,you first need to indicate which pixels you want to change.The selection tool is one way of doing this. Click on this tool to select it, then click and drag on your image to make a dotted selection box. Hold shift while you drag if you want a perfect square or circle. Any pixels within the box will be affected when you make your next move. If you click and hold on this tool with your mouse button down,you will see that there is also an oval selection shape,and a crop tool . Crop Tool: . To crop your image, draw a box with the crop tool. Adjust the selection with the selection points,and then hit return to crop. Lasso Tool : The lasso tool lets you select freeform shapes,rather than just rectangles and ovals. Magic Wand: Yet another way to select pixels is with the magic wand. When you click on an area of the image with this tool, all pixels that are the same color as the pixel you clicked will be selected. Double click on the tool to set the level of tolerance you would like (i.e. how similar in color the pixels must be to your original pixel color. A higher tolerance means a broader color range). The Move Tool: This is a very important tool, because up until now all you have been able to do is select pixels, and not actually move them. The move tool not only allows you to move areas you have selected,but also to move entire layers without first making a selection. If you hold the option (or alt) key while clicking and dragging with the move tool, you can copy the selection. Airbrush Paintbrush and Pencil tools can be used to draw with the foreground color on whichever layer is selected.To change the foreground color, double-click on it in the toolbox. You will then see a palette of colors from which to choose.Select one and click OK. To change the brush size, go to Window > Show Brushes. Eraser Tool: Erases anything on the selected layer. You can change the eraser size by going to Window > Show Brushes. Line Tool: Can be used to draw straight lines. Click on the tool to select it, then click with the tool on the canvas area and drag to draw a line. When you release the mouse button,the line will end. You can change the thickness of the line or add arrowheads to it by double clicking on the tool to see this dialog box:
  • 5.
    Text tool: Clickon this tool to select it, then click in the Canvas area. You will be given a dialog box in which to type your text, and choose its attributes. Each new block of text goes on its own layer, so you can move it around with the Move Tool. Once you have placed the text, however, it is no longer editable. To correct mis takes, you must delete the old version (by deleting its layer) and replace it. Eyedropper: Click with this tool on any color in the canvas to make that color the foreground color. (You can then paint or type with it). Magnifier: Click with this tool on a part of your image you want to see closer, or drag with it to define the area you want to expand to the size of the window. Hold down the Option or Alt key to make it a "reducer" instead and zoom back out. Grabber: Click with this and drag to move the entire page for better viewing. Options Bar The Options bar appears at the top of the screen and is context sensitive,changing as you change tools. The tool in use is shown in the left corner, and options relating to the tool appear to the right of that.
  • 6.
    ADVANTAGES OF USINGPHOTOSHOP Adobe Photoshop is wonderful , It is used to edit the digital image application , It helps you improve the quality of a photograph , It is the assistant with the artists who rely on Photoshop to make the artwork , And the students can learn Photoshop in Image Editing classes . When you learn how to use Photoshop , It can improve your skills , It is possible to clear up the blemishes and the imperfections in the photos , You can remove and change the backgrounds in the photos . The images can be altered to fix the faults , The photographs can be given an professional look when a standard camera is used , New artwork images can be created and edited . It is very easy to begin editing the photos , Adobe Photoshop helps you to reduce the red eye or to whiten the teeth with the click of a button , You can adjust the skin tones of people in your pictures . Most of the edits regularly done on the photos can be completed with a single click , There is no professional training is needed to complete the complex tasks like adjusting skin tone . You can use Adobe Photoshop to import the videos and the photos into the software quickly and easily , Everything will be organized in a neat and orderly way on your screen , when you are deal with hundreds or thousands of photos and videos , It will be easier to find the ones you need and use them , So , It is easy to handle numerous videos and photos .
  • 7.
    PROCEDURE Clickthe file button,choose‘new’andthen,we editedthe width,height.Afterthatwe click‘ok’ Then,itwill popout like this
  • 8.
    we insertedbasicbackgroundthatwe choosed Thenwefull filledthe blankspace withthe picture
  • 9.
    Secondlayerof the picturewasadded The picture was borderedwiththe ‘blendingoption’clicked
  • 10.
    Thenwe choosed‘stroke’andwe editedthesize andcolorof the border. We addedthe title with‘T’clicked
  • 11.
    The rectangle wasmadeon each picture Afterthat we save the picture in the form of ‘JPG’
  • 12.