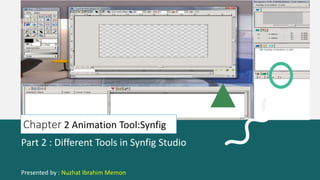
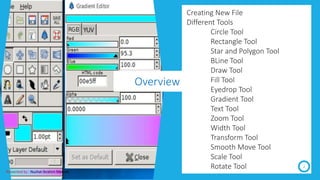
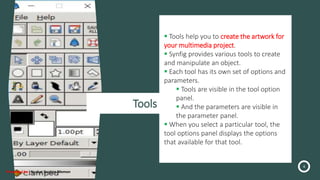
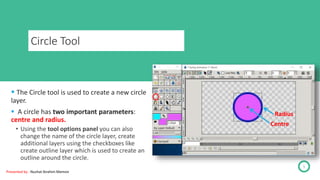
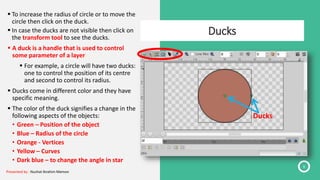
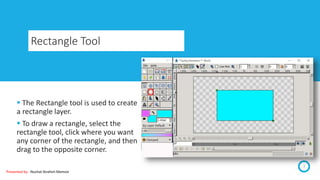
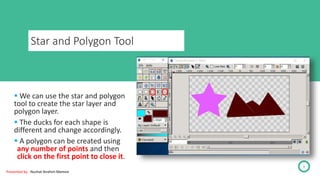
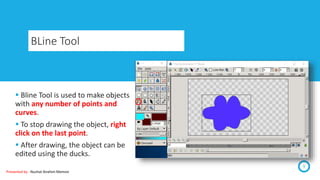
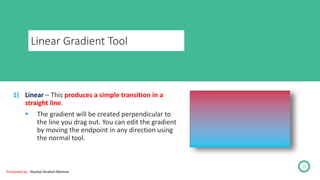
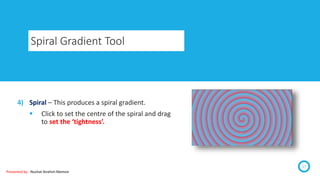
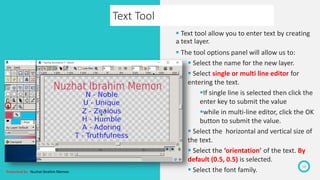
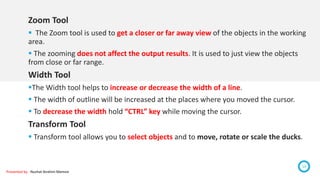
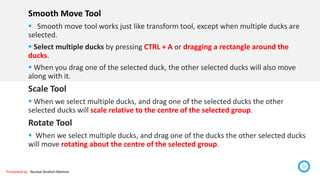
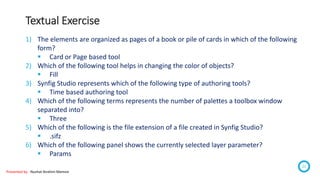
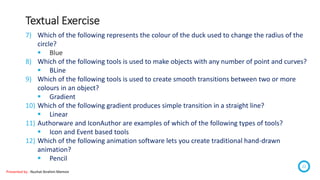
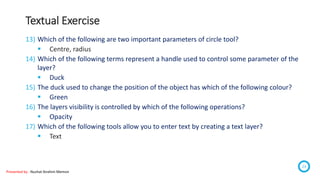
Chapter 2 Animation Tool:Synfig
Part 2 : Different Tools in Synfig Studio
Presented by : Nuzhat Ibrahim Memon
Creating New File
Different Tools
Circle Tool
Rectangle Tool
Star and Polygon Tool
BLine Tool
Draw Tool
Fill Tool
Eyedrop Tool
Gradient Tool
Text Tool
Zoom Tool
Width Tool
Transform Tool
Smooth Move Tool
Scale Tool
Rotate Tool 2
Overview
Presented by : Nuzhat Ibrahim Memon
Creating new file
3
 Select Toolbox  New file
• Alternatively, when you start Synfig, a
new file is automatically created.
 Click on the CaretEditProperties
• Set the name of the file and give a
description to your animation
 3 tabs in the properties windows,
namely Image, Time and other.
• The Image tab is used to set the image
size and image area.
• The Time tab is used for setting the
start time, end time and frames per
second.
Presented by : Nuzhat Ibrahim Memon
Tools
4
 Tools help you to create the artwork for
your multimedia project.
 Synfig provides various tools to create
and manipulate an object.
 Each tool has its own set of options and
parameters.
 Tools are visible in the tool option
panel.
 And the parameters are visible in
the parameter panel.
 When you select a particular tool, the
tool options panel displays the options
that available for that tool.
Presented by : Nuzhat Ibrahim Memon
Circle Tool
 The Circle tool is used to create a new circle
layer.
 A circle has two important parameters:
centre and radius.
• Using the tool options panel you can also
change the name of the circle layer, create
additional layers using the checkboxes like
create outline layer which is used to create an
outline around the circle.
5
Centre
Radius
Presented by : Nuzhat Ibrahim Memon
Ducks
6
 To increase the radius of circle or to move the
circle then click on the duck.
 In case the ducks are not visible then click on
the transform tool to see the ducks.
 A duck is a handle that is used to control
some parameter of a layer.
 For example, a circle will have two ducks:
one to control the position of its centre
and second to control its radius.
 Ducks come in different color and they have
specific meaning.
 The color of the duck signifies a change in the
following aspects of the objects:
• Green – Position of the object
• Blue – Radius of the circle
• Orange - Vertices
• Yellow – Curves
• Dark blue – to change the angle in star
Ducks
Presented by : Nuzhat Ibrahim Memon
Rectangle Tool
7
 The Rectangle tool is used to create
a rectangle layer.
 To draw a rectangle, select the
rectangle tool, click where you want
any corner of the rectangle, and then
drag to the opposite corner.
Presented by : Nuzhat Ibrahim Memon
Star and Polygon Tool
 We can use the star and polygon
tool to create the star layer and
polygon layer.
 The ducks for each shape is
different and change accordingly.
 A polygon can be created using
any number of points and then
click on the first point to close it.
8
Presented by : Nuzhat Ibrahim Memon
BLine Tool
9
 Bline Tool is used to make objects
with any number of points and
curves.
 To stop drawing the object, right
click on the last point.
 After drawing, the object can be
edited using the ducks.
Presented by : Nuzhat Ibrahim Memon
Draw Tool
 It is the most common tool used
for drawing.
 You can draw with the help of
mouse.
10
Presented by : Nuzhat Ibrahim Memon
Fill Tool
11
 The Fill tool changes the color of
objects.
 To fill a color in the object, select the
color from the color palette.
 This tool has an effect on circle layer,
rectangle layer, polygon layer, star
layer, region layer, outline layer and
checkboard layer.
Presented by : Nuzhat Ibrahim Memon
Eyedrop Tool
12
 The Eyedrop tool allows you to
select colour.
 Select the Eyedrop tool, and then
click in the working area to set the
default foreground color in the
Eyedrop tool to be the color you are
currently pointing to.
Presented by : Nuzhat Ibrahim Memon
Gradient Tool
Presented by : Nuzhat Ibrahim Memon
13
 It is used to create smooth transitions
between two or more colors in an
object.
 There are four types of gradients
namely linear, radial, conical and spiral.
Linear Gradient Tool
Presented by : Nuzhat Ibrahim Memon
14
1) Linear – This produces a simple transition in a
straight line.
 The gradient will be created perpendicular to
the line you drag out. You can edit the gradient
by moving the endpoint in any direction using
the normal tool.
Radial Gradient Tool
15
2) Radial – This produces circular colors with
the transition being at the center of those
circles.
 Click where you want the center of the
circles to be, and drag to set the radius of
the transitions.
Presented by : Nuzhat Ibrahim Memon
Conical Gradient Tool
Presented by : Nuzhat Ibrahim Memon
16
3) Conical – This has the appearance of looking down
on a tip of a cone.
 The gradient is along the circular arc of the
center and goes in all directions.
 Click to set the centre, and drag to indicate the
direction in which the foreground and
background colors should go.
Spiral Gradient Tool
17
4) Spiral – This produces a spiral gradient.
 Click to set the centre of the spiral and drag
to set the ‘tightness’.
Presented by : Nuzhat Ibrahim Memon
Text Tool
Presented by : Nuzhat Ibrahim Memon
18
 Text tool allow you to enter text by creating
a text layer.
 The tool options panel will allow us to:
 Select the name for the new layer.
 Select single or multi line editor for
entering the text.
If single line is selected then click the
enter key to submit the value
while in multi-line editor, click the OK
button to submit the value.
 Select the horizontal and vertical size of
the text.
 Select the ‘orientation’ of the text. By
default (0.5, 0.5) is selected.
 Select the font family.
Presented by : Nuzhat Ibrahim Memon
19
Zoom Tool
 The Zoom tool is used to get a closer or far away view of the objects in the working
area.
 The zooming does not affect the output results. It is used to just view the objects
from close or far range.
Width Tool
The Width tool helps to increase or decrease the width of a line.
 The width of outline will be increased at the places where you moved the cursor.
 To decrease the width hold “CTRL” key while moving the cursor.
Transform Tool
 Transform tool allows you to select objects and to move, rotate or scale the ducks.
Presented by : Nuzhat Ibrahim Memon
20
Smooth Move Tool
 Smooth move tool works just like transform tool, except when multiple ducks are
selected.
 Select multiple ducks by pressing CTRL + A or dragging a rectangle around the
ducks.
 When you drag one of the selected duck, the other selected ducks will also move
along with it.
Scale Tool
 When we select multiple ducks, and drag one of the selected ducks the other
selected ducks will scale relative to the centre of the selected group.
Rotate Tool
 When we select multiple ducks, and drag one of the ducks the other selected ducks
will move rotating about the centre of the selected group.
Textual Exercise
Presented by : Nuzhat Ibrahim Memon
21
1) The elements are organized as pages of a book or pile of cards in which of the following
form?
 Card or Page based tool
2) Which of the following tool helps in changing the color of objects?
 Fill
3) Synfig Studio represents which of the following type of authoring tools?
 Time based authoring tool
4) Which of the following terms represents the number of palettes a toolbox window
separated into?
 Three
5) Which of the following is the file extension of a file created in Synfig Studio?
 .sifz
6) Which of the following panel shows the currently selected layer parameter?
 Params
Textual Exercise
Presented by : Nuzhat Ibrahim Memon
22
7) Which of the following represents the colour of the duck used to change the radius of the
circle?
 Blue
8) Which of the following tools is used to make objects with any number of point and curves?
 BLine
9) Which of the following tools is used to create smooth transitions between two or more
colours in an object?
 Gradient
10) Which of the following gradient produces simple transition in a straight line?
 Linear
11) Authorware and IconAuthor are examples of which of the following types of tools?
 Icon and Event based tools
12) Which of the following animation software lets you create traditional hand-drawn
animation?
 Pencil
Textual Exercise
Presented by : Nuzhat Ibrahim Memon
23
13) Which of the following are two important parameters of circle tool?
 Centre, radius
14) Which of the following terms represent a handle used to control some parameter of the
layer?
 Duck
15) The duck used to change the position of the object has which of the following colour?
 Green
16) The layers visibility is controlled by which of the following operations?
 Opacity
17) Which of the following tools allow you to enter text by creating a text layer?
 Text
Thanks for watching
24
Presented by : Nuzhat Ibrahim Memon

Std 11 Computer Chapter 2 Animation Tool: synfig (Part 2 Different Tools in Synfig)

  • 1.
    Chapter 2 AnimationTool:Synfig Part 2 : Different Tools in Synfig Studio Presented by : Nuzhat Ibrahim Memon
  • 2.
    Creating New File DifferentTools Circle Tool Rectangle Tool Star and Polygon Tool BLine Tool Draw Tool Fill Tool Eyedrop Tool Gradient Tool Text Tool Zoom Tool Width Tool Transform Tool Smooth Move Tool Scale Tool Rotate Tool 2 Overview Presented by : Nuzhat Ibrahim Memon
  • 3.
    Creating new file 3 Select Toolbox  New file • Alternatively, when you start Synfig, a new file is automatically created.  Click on the CaretEditProperties • Set the name of the file and give a description to your animation  3 tabs in the properties windows, namely Image, Time and other. • The Image tab is used to set the image size and image area. • The Time tab is used for setting the start time, end time and frames per second. Presented by : Nuzhat Ibrahim Memon
  • 4.
    Tools 4  Tools helpyou to create the artwork for your multimedia project.  Synfig provides various tools to create and manipulate an object.  Each tool has its own set of options and parameters.  Tools are visible in the tool option panel.  And the parameters are visible in the parameter panel.  When you select a particular tool, the tool options panel displays the options that available for that tool. Presented by : Nuzhat Ibrahim Memon
  • 5.
    Circle Tool  TheCircle tool is used to create a new circle layer.  A circle has two important parameters: centre and radius. • Using the tool options panel you can also change the name of the circle layer, create additional layers using the checkboxes like create outline layer which is used to create an outline around the circle. 5 Centre Radius Presented by : Nuzhat Ibrahim Memon
  • 6.
    Ducks 6  To increasethe radius of circle or to move the circle then click on the duck.  In case the ducks are not visible then click on the transform tool to see the ducks.  A duck is a handle that is used to control some parameter of a layer.  For example, a circle will have two ducks: one to control the position of its centre and second to control its radius.  Ducks come in different color and they have specific meaning.  The color of the duck signifies a change in the following aspects of the objects: • Green – Position of the object • Blue – Radius of the circle • Orange - Vertices • Yellow – Curves • Dark blue – to change the angle in star Ducks Presented by : Nuzhat Ibrahim Memon
  • 7.
    Rectangle Tool 7  TheRectangle tool is used to create a rectangle layer.  To draw a rectangle, select the rectangle tool, click where you want any corner of the rectangle, and then drag to the opposite corner. Presented by : Nuzhat Ibrahim Memon
  • 8.
    Star and PolygonTool  We can use the star and polygon tool to create the star layer and polygon layer.  The ducks for each shape is different and change accordingly.  A polygon can be created using any number of points and then click on the first point to close it. 8 Presented by : Nuzhat Ibrahim Memon
  • 9.
    BLine Tool 9  BlineTool is used to make objects with any number of points and curves.  To stop drawing the object, right click on the last point.  After drawing, the object can be edited using the ducks. Presented by : Nuzhat Ibrahim Memon
  • 10.
    Draw Tool  Itis the most common tool used for drawing.  You can draw with the help of mouse. 10 Presented by : Nuzhat Ibrahim Memon
  • 11.
    Fill Tool 11  TheFill tool changes the color of objects.  To fill a color in the object, select the color from the color palette.  This tool has an effect on circle layer, rectangle layer, polygon layer, star layer, region layer, outline layer and checkboard layer. Presented by : Nuzhat Ibrahim Memon
  • 12.
    Eyedrop Tool 12  TheEyedrop tool allows you to select colour.  Select the Eyedrop tool, and then click in the working area to set the default foreground color in the Eyedrop tool to be the color you are currently pointing to. Presented by : Nuzhat Ibrahim Memon
  • 13.
    Gradient Tool Presented by: Nuzhat Ibrahim Memon 13  It is used to create smooth transitions between two or more colors in an object.  There are four types of gradients namely linear, radial, conical and spiral.
  • 14.
    Linear Gradient Tool Presentedby : Nuzhat Ibrahim Memon 14 1) Linear – This produces a simple transition in a straight line.  The gradient will be created perpendicular to the line you drag out. You can edit the gradient by moving the endpoint in any direction using the normal tool.
  • 15.
    Radial Gradient Tool 15 2)Radial – This produces circular colors with the transition being at the center of those circles.  Click where you want the center of the circles to be, and drag to set the radius of the transitions. Presented by : Nuzhat Ibrahim Memon
  • 16.
    Conical Gradient Tool Presentedby : Nuzhat Ibrahim Memon 16 3) Conical – This has the appearance of looking down on a tip of a cone.  The gradient is along the circular arc of the center and goes in all directions.  Click to set the centre, and drag to indicate the direction in which the foreground and background colors should go.
  • 17.
    Spiral Gradient Tool 17 4)Spiral – This produces a spiral gradient.  Click to set the centre of the spiral and drag to set the ‘tightness’. Presented by : Nuzhat Ibrahim Memon
  • 18.
    Text Tool Presented by: Nuzhat Ibrahim Memon 18  Text tool allow you to enter text by creating a text layer.  The tool options panel will allow us to:  Select the name for the new layer.  Select single or multi line editor for entering the text. If single line is selected then click the enter key to submit the value while in multi-line editor, click the OK button to submit the value.  Select the horizontal and vertical size of the text.  Select the ‘orientation’ of the text. By default (0.5, 0.5) is selected.  Select the font family.
  • 19.
    Presented by :Nuzhat Ibrahim Memon 19 Zoom Tool  The Zoom tool is used to get a closer or far away view of the objects in the working area.  The zooming does not affect the output results. It is used to just view the objects from close or far range. Width Tool The Width tool helps to increase or decrease the width of a line.  The width of outline will be increased at the places where you moved the cursor.  To decrease the width hold “CTRL” key while moving the cursor. Transform Tool  Transform tool allows you to select objects and to move, rotate or scale the ducks.
  • 20.
    Presented by :Nuzhat Ibrahim Memon 20 Smooth Move Tool  Smooth move tool works just like transform tool, except when multiple ducks are selected.  Select multiple ducks by pressing CTRL + A or dragging a rectangle around the ducks.  When you drag one of the selected duck, the other selected ducks will also move along with it. Scale Tool  When we select multiple ducks, and drag one of the selected ducks the other selected ducks will scale relative to the centre of the selected group. Rotate Tool  When we select multiple ducks, and drag one of the ducks the other selected ducks will move rotating about the centre of the selected group.
  • 21.
    Textual Exercise Presented by: Nuzhat Ibrahim Memon 21 1) The elements are organized as pages of a book or pile of cards in which of the following form?  Card or Page based tool 2) Which of the following tool helps in changing the color of objects?  Fill 3) Synfig Studio represents which of the following type of authoring tools?  Time based authoring tool 4) Which of the following terms represents the number of palettes a toolbox window separated into?  Three 5) Which of the following is the file extension of a file created in Synfig Studio?  .sifz 6) Which of the following panel shows the currently selected layer parameter?  Params
  • 22.
    Textual Exercise Presented by: Nuzhat Ibrahim Memon 22 7) Which of the following represents the colour of the duck used to change the radius of the circle?  Blue 8) Which of the following tools is used to make objects with any number of point and curves?  BLine 9) Which of the following tools is used to create smooth transitions between two or more colours in an object?  Gradient 10) Which of the following gradient produces simple transition in a straight line?  Linear 11) Authorware and IconAuthor are examples of which of the following types of tools?  Icon and Event based tools 12) Which of the following animation software lets you create traditional hand-drawn animation?  Pencil
  • 23.
    Textual Exercise Presented by: Nuzhat Ibrahim Memon 23 13) Which of the following are two important parameters of circle tool?  Centre, radius 14) Which of the following terms represent a handle used to control some parameter of the layer?  Duck 15) The duck used to change the position of the object has which of the following colour?  Green 16) The layers visibility is controlled by which of the following operations?  Opacity 17) Which of the following tools allow you to enter text by creating a text layer?  Text
  • 24.
    Thanks for watching 24 Presentedby : Nuzhat Ibrahim Memon