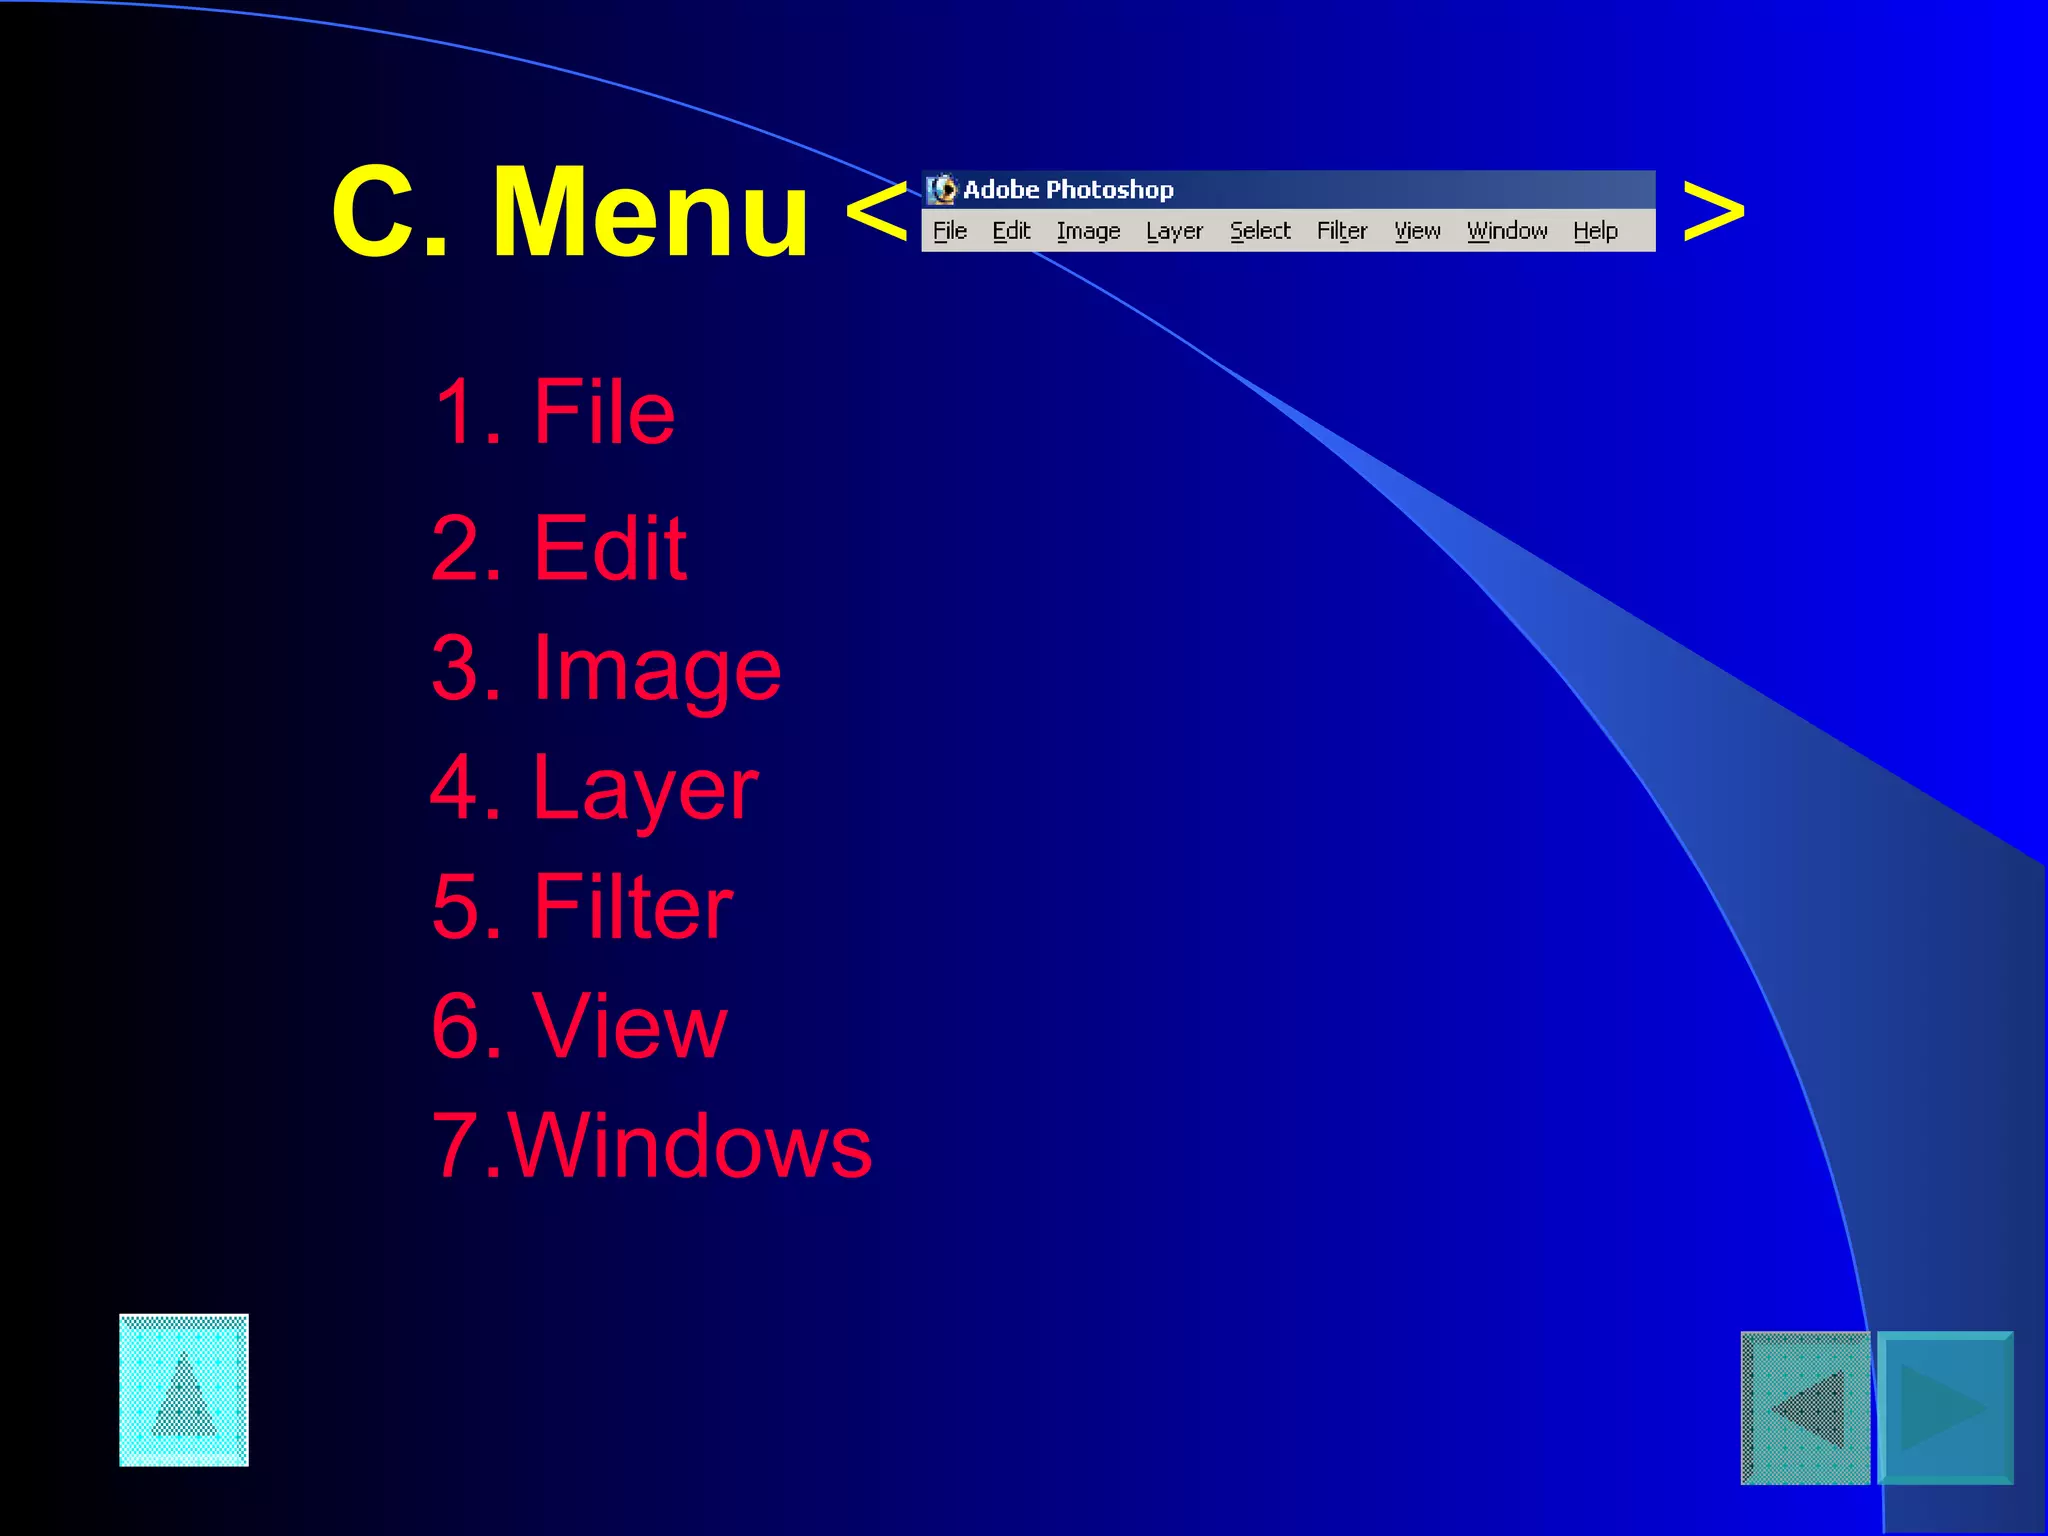
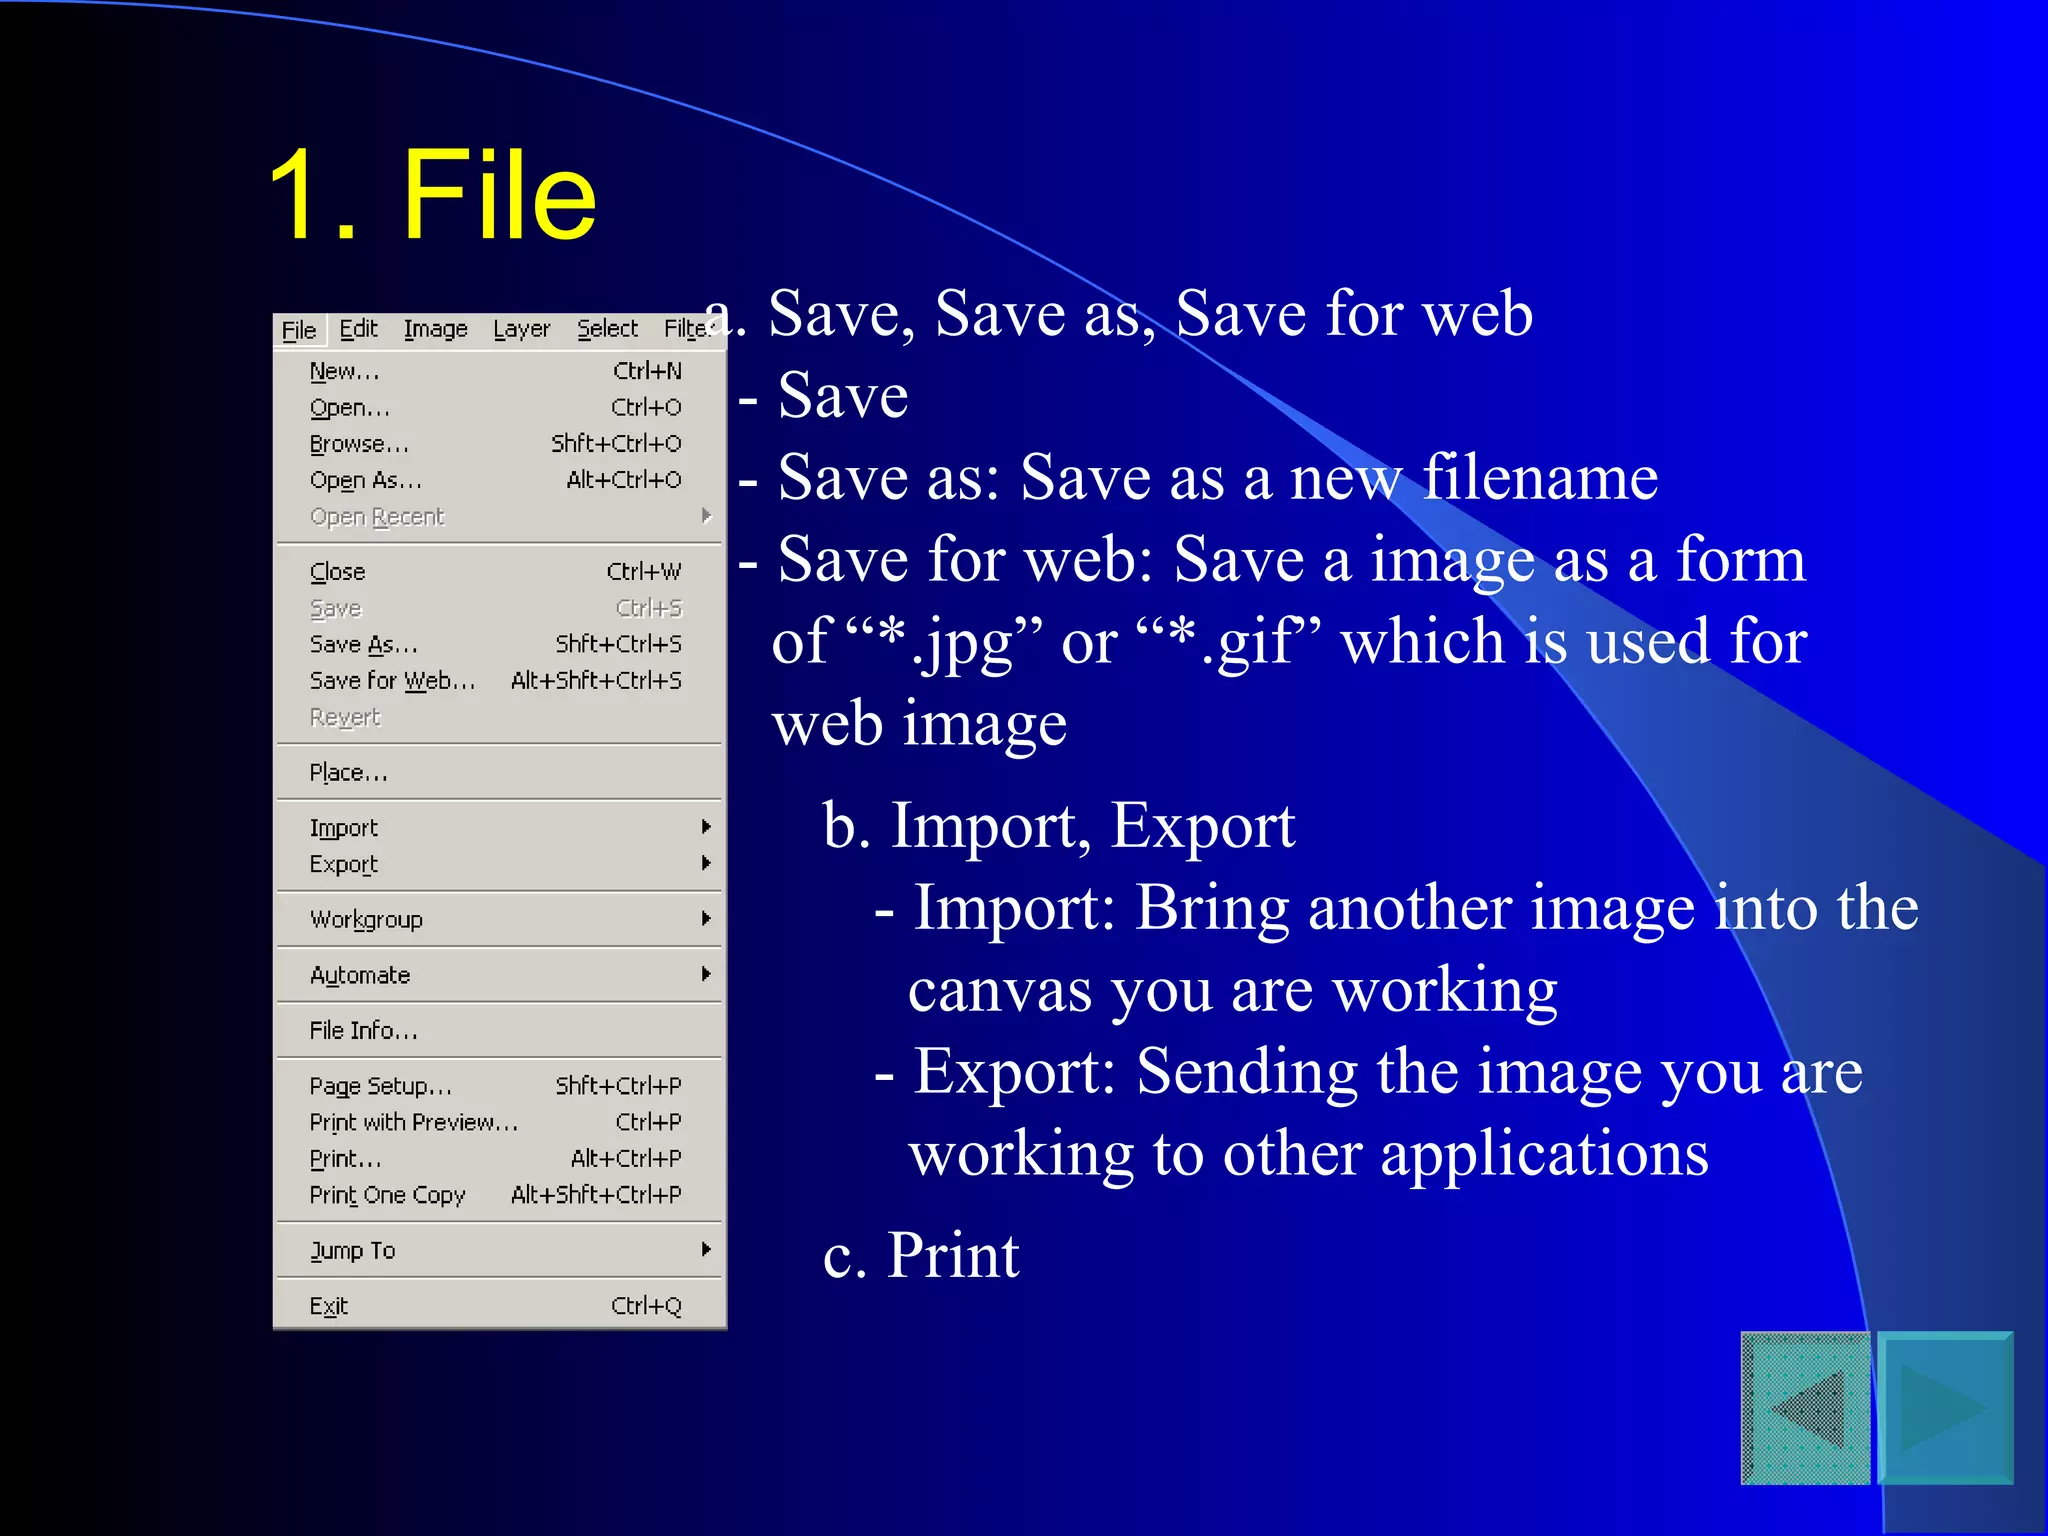
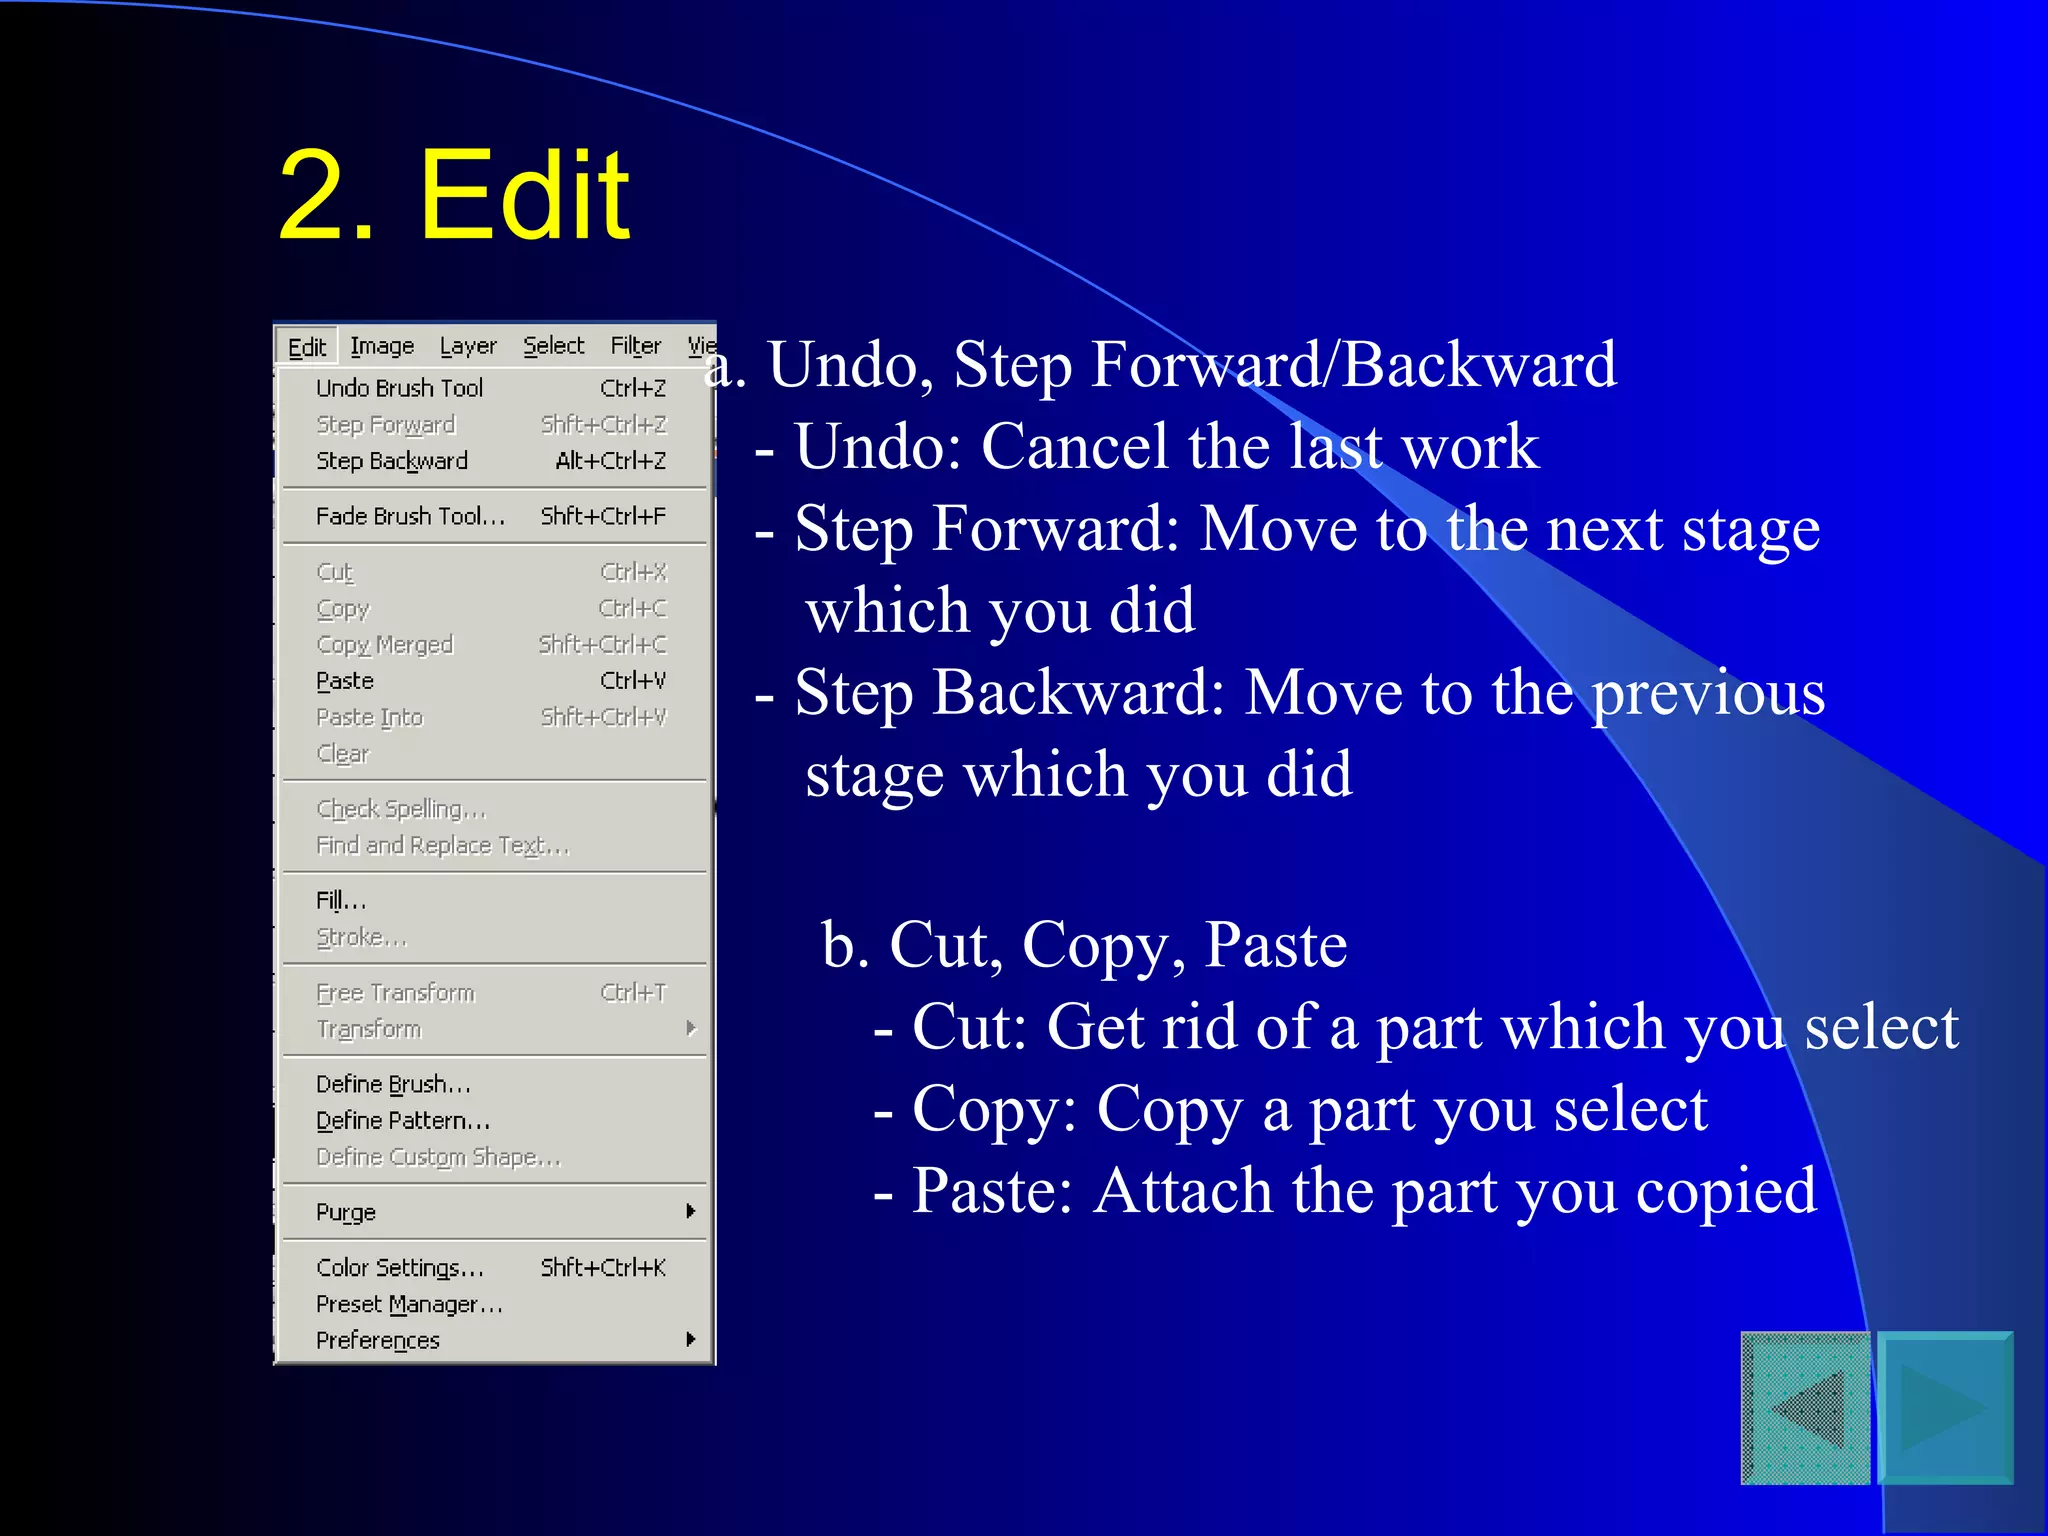
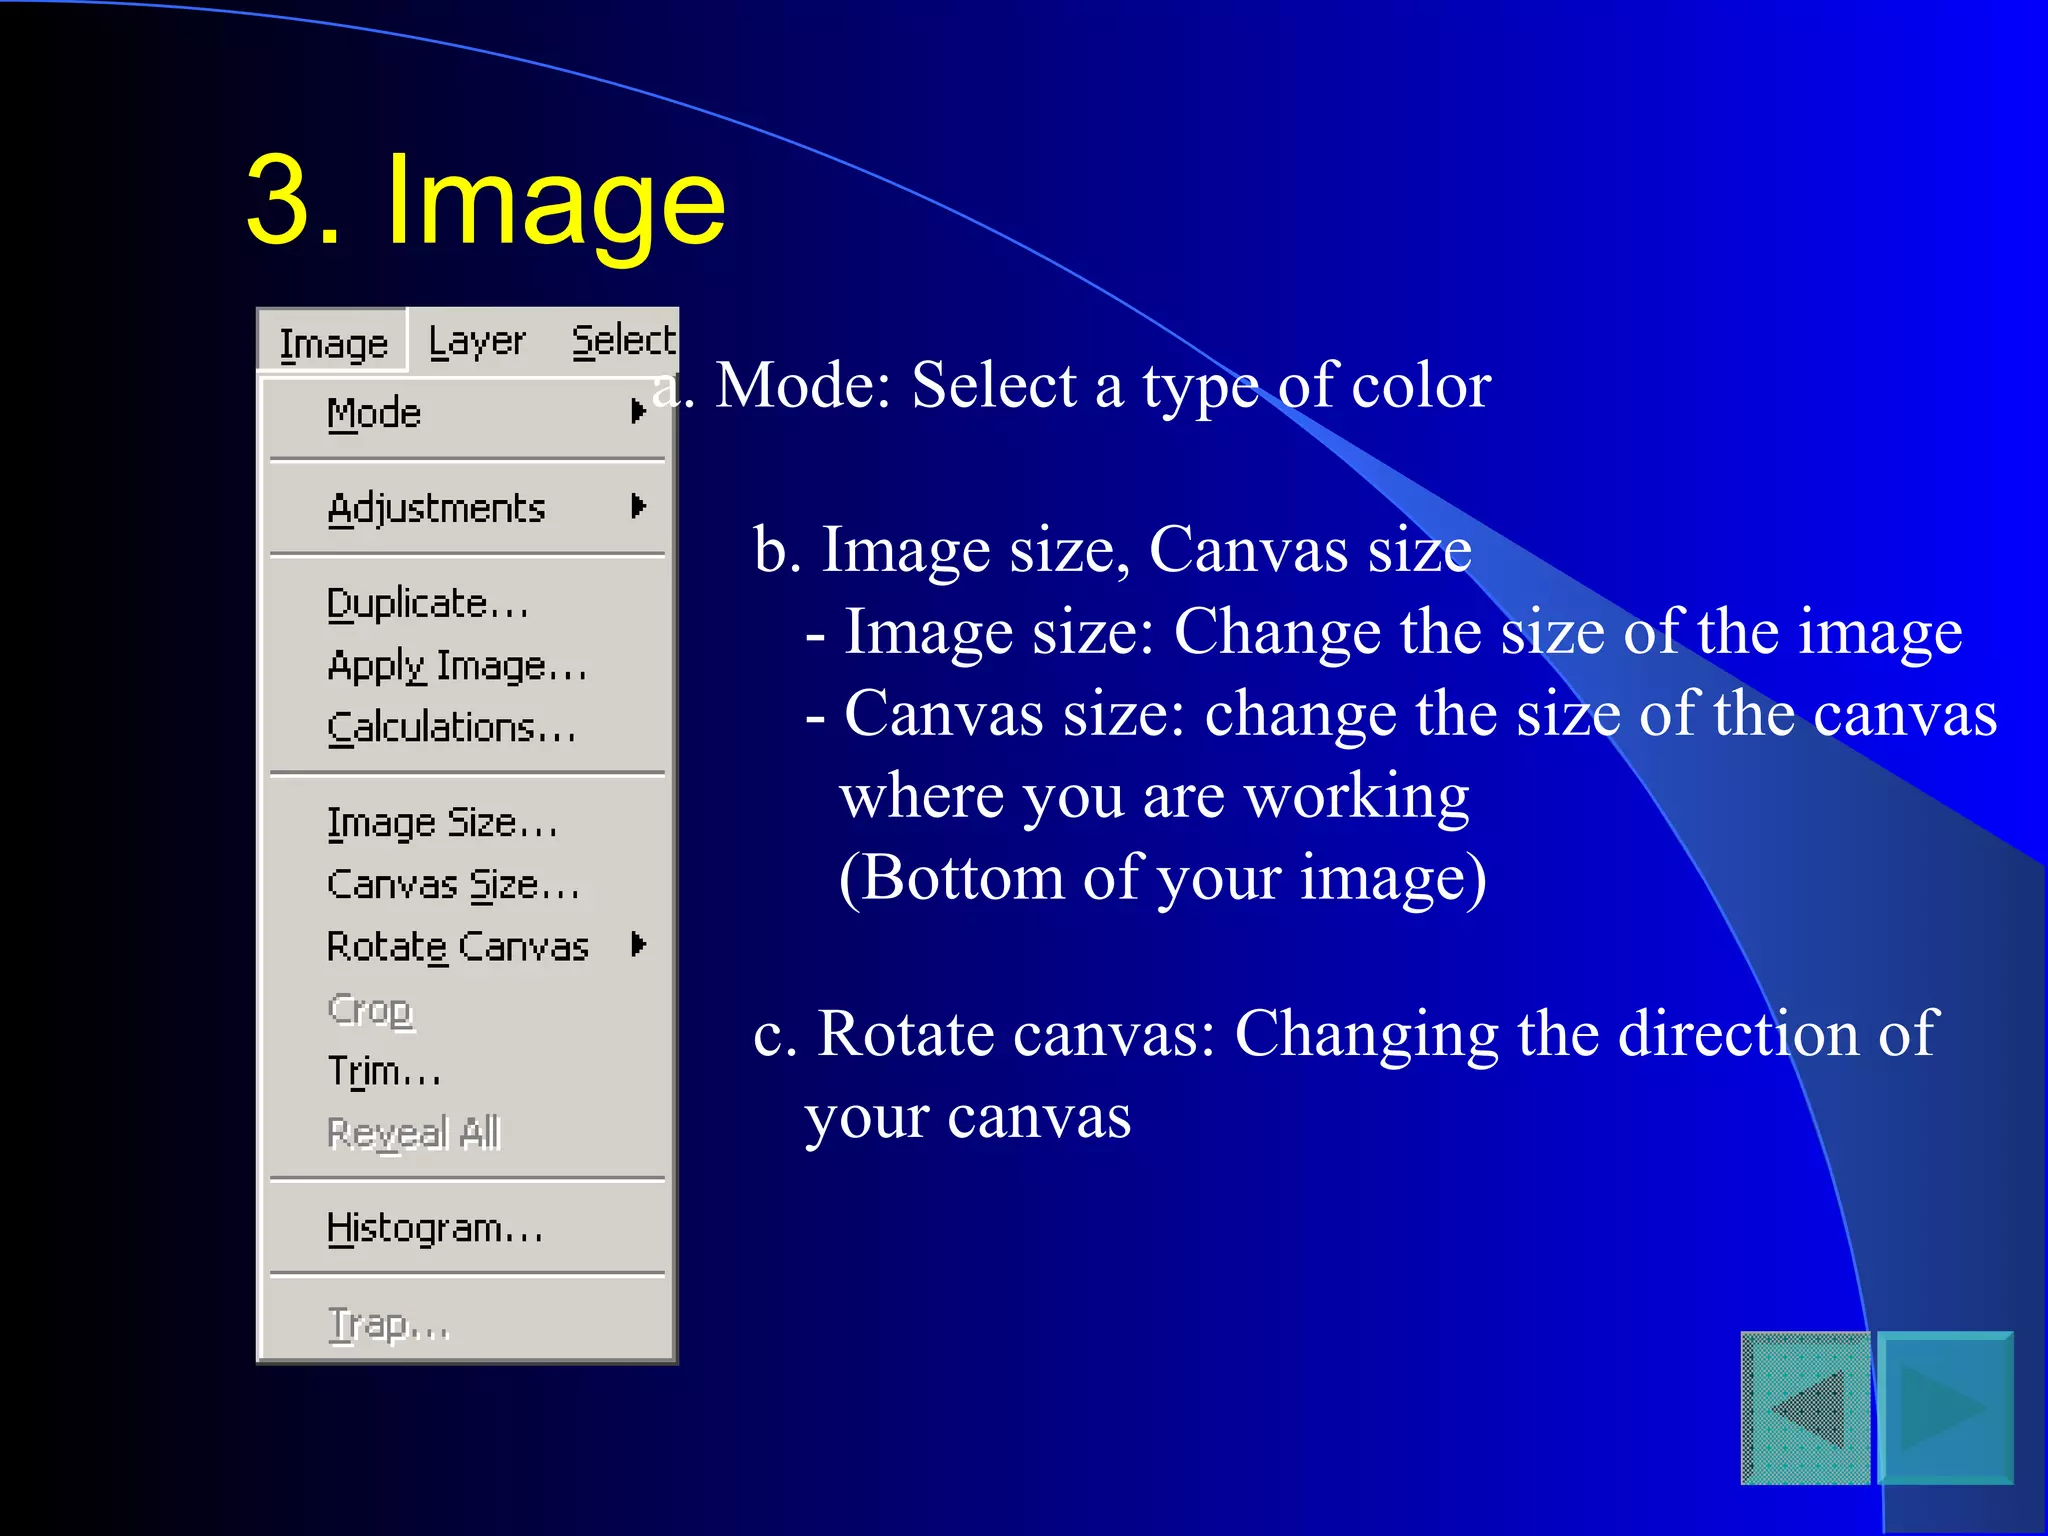
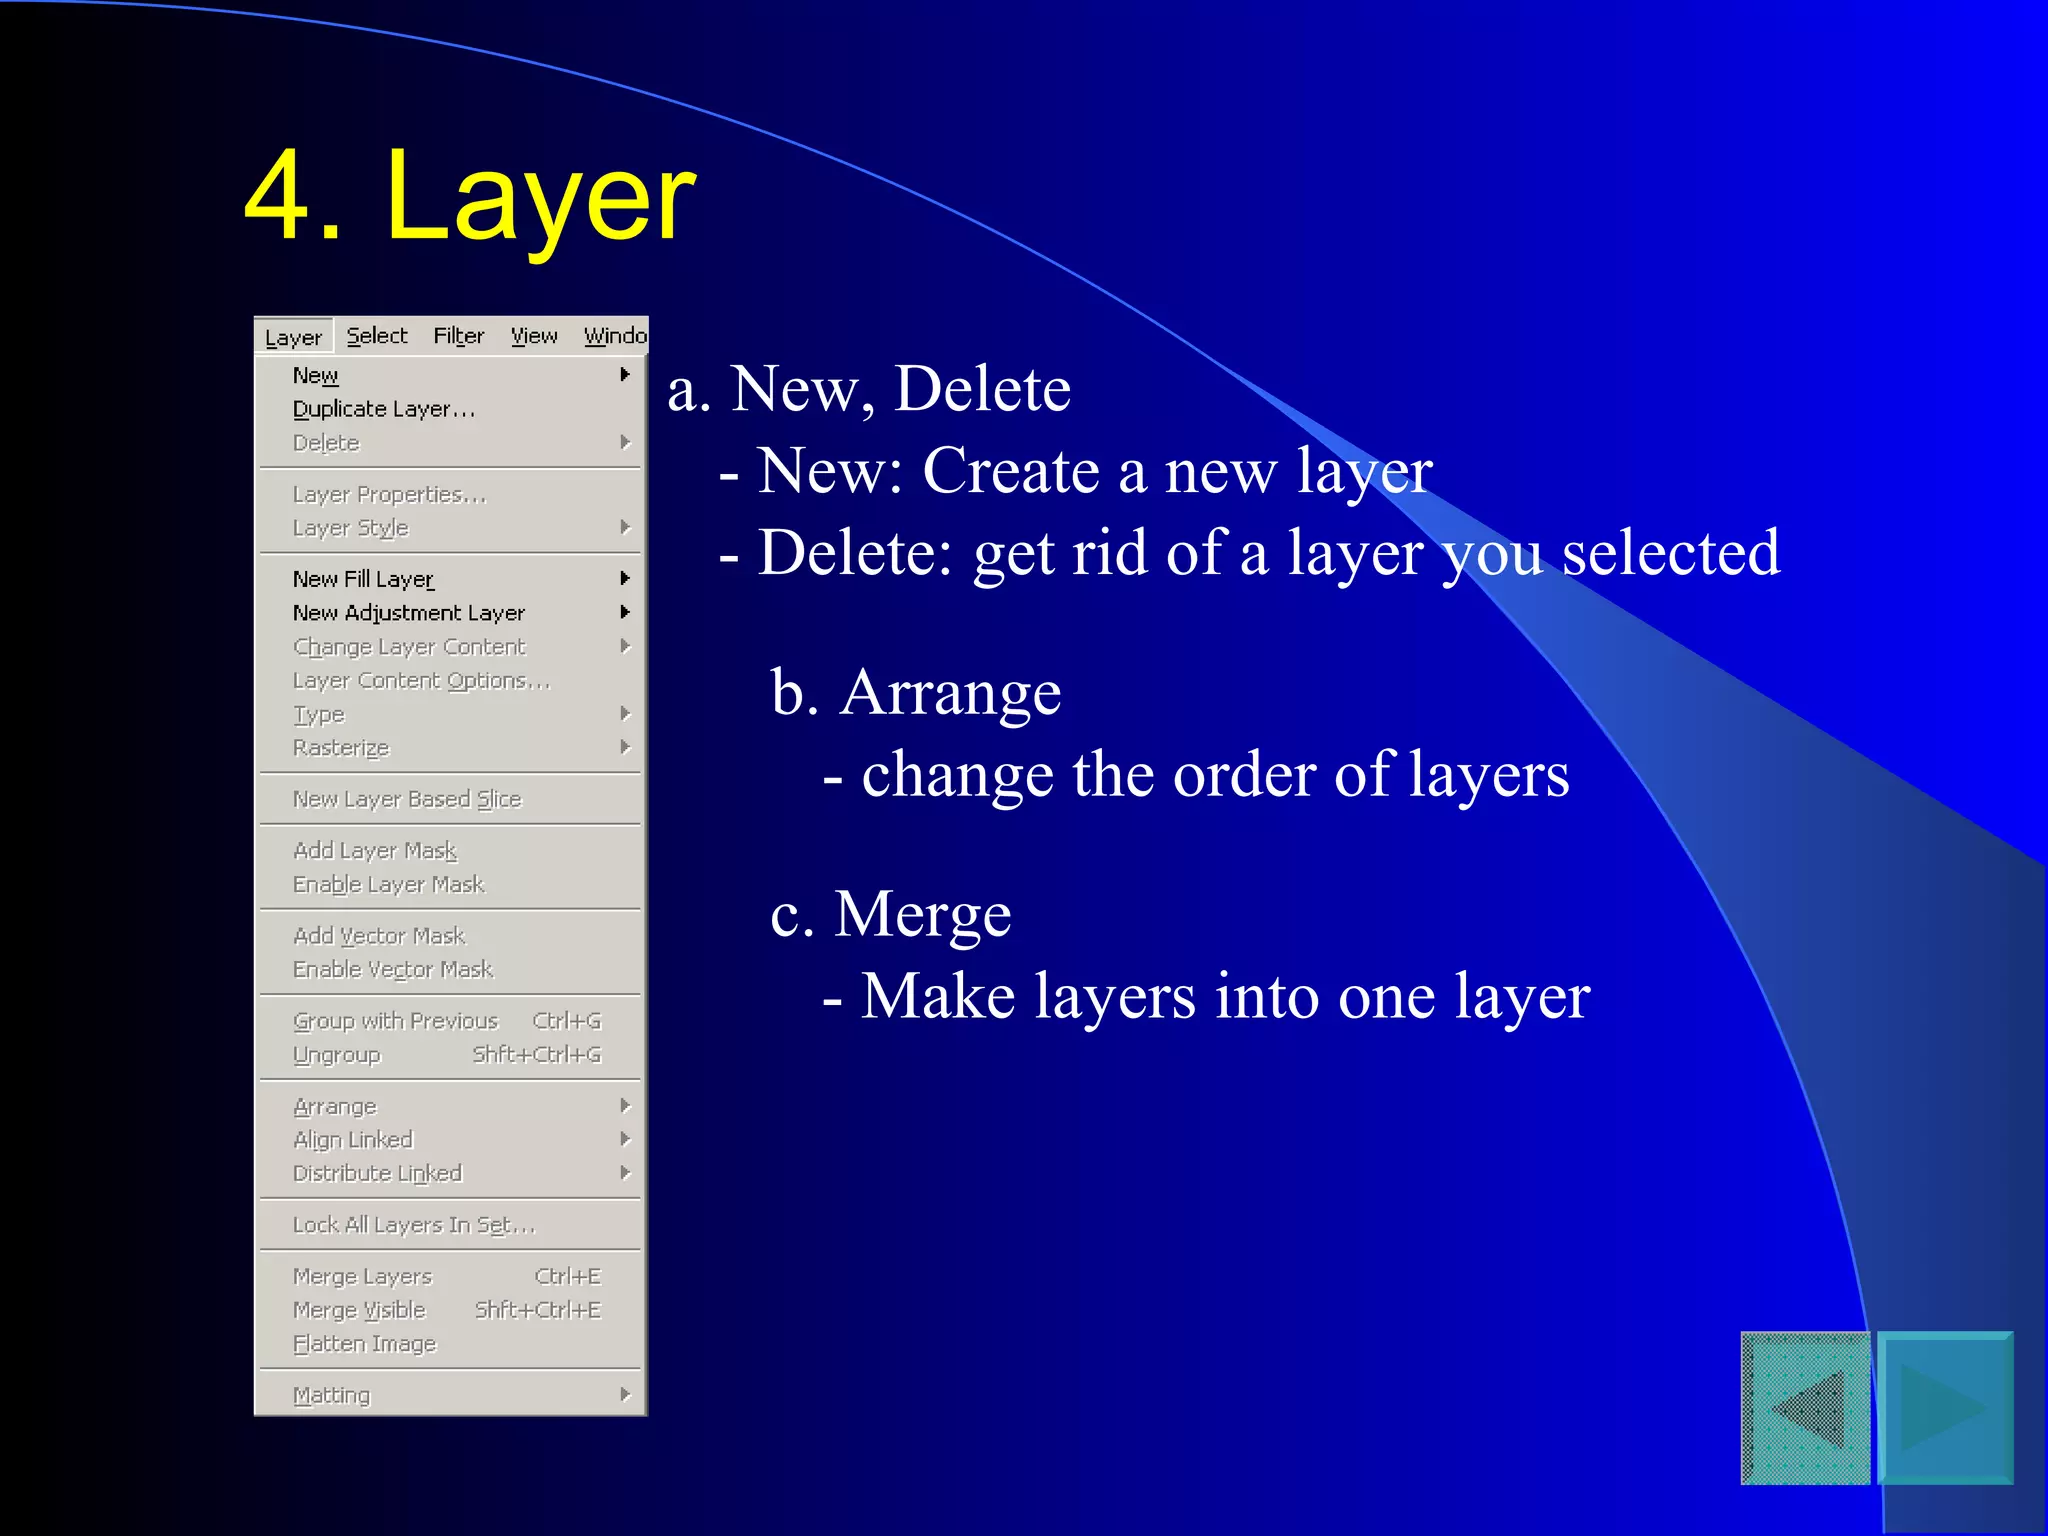
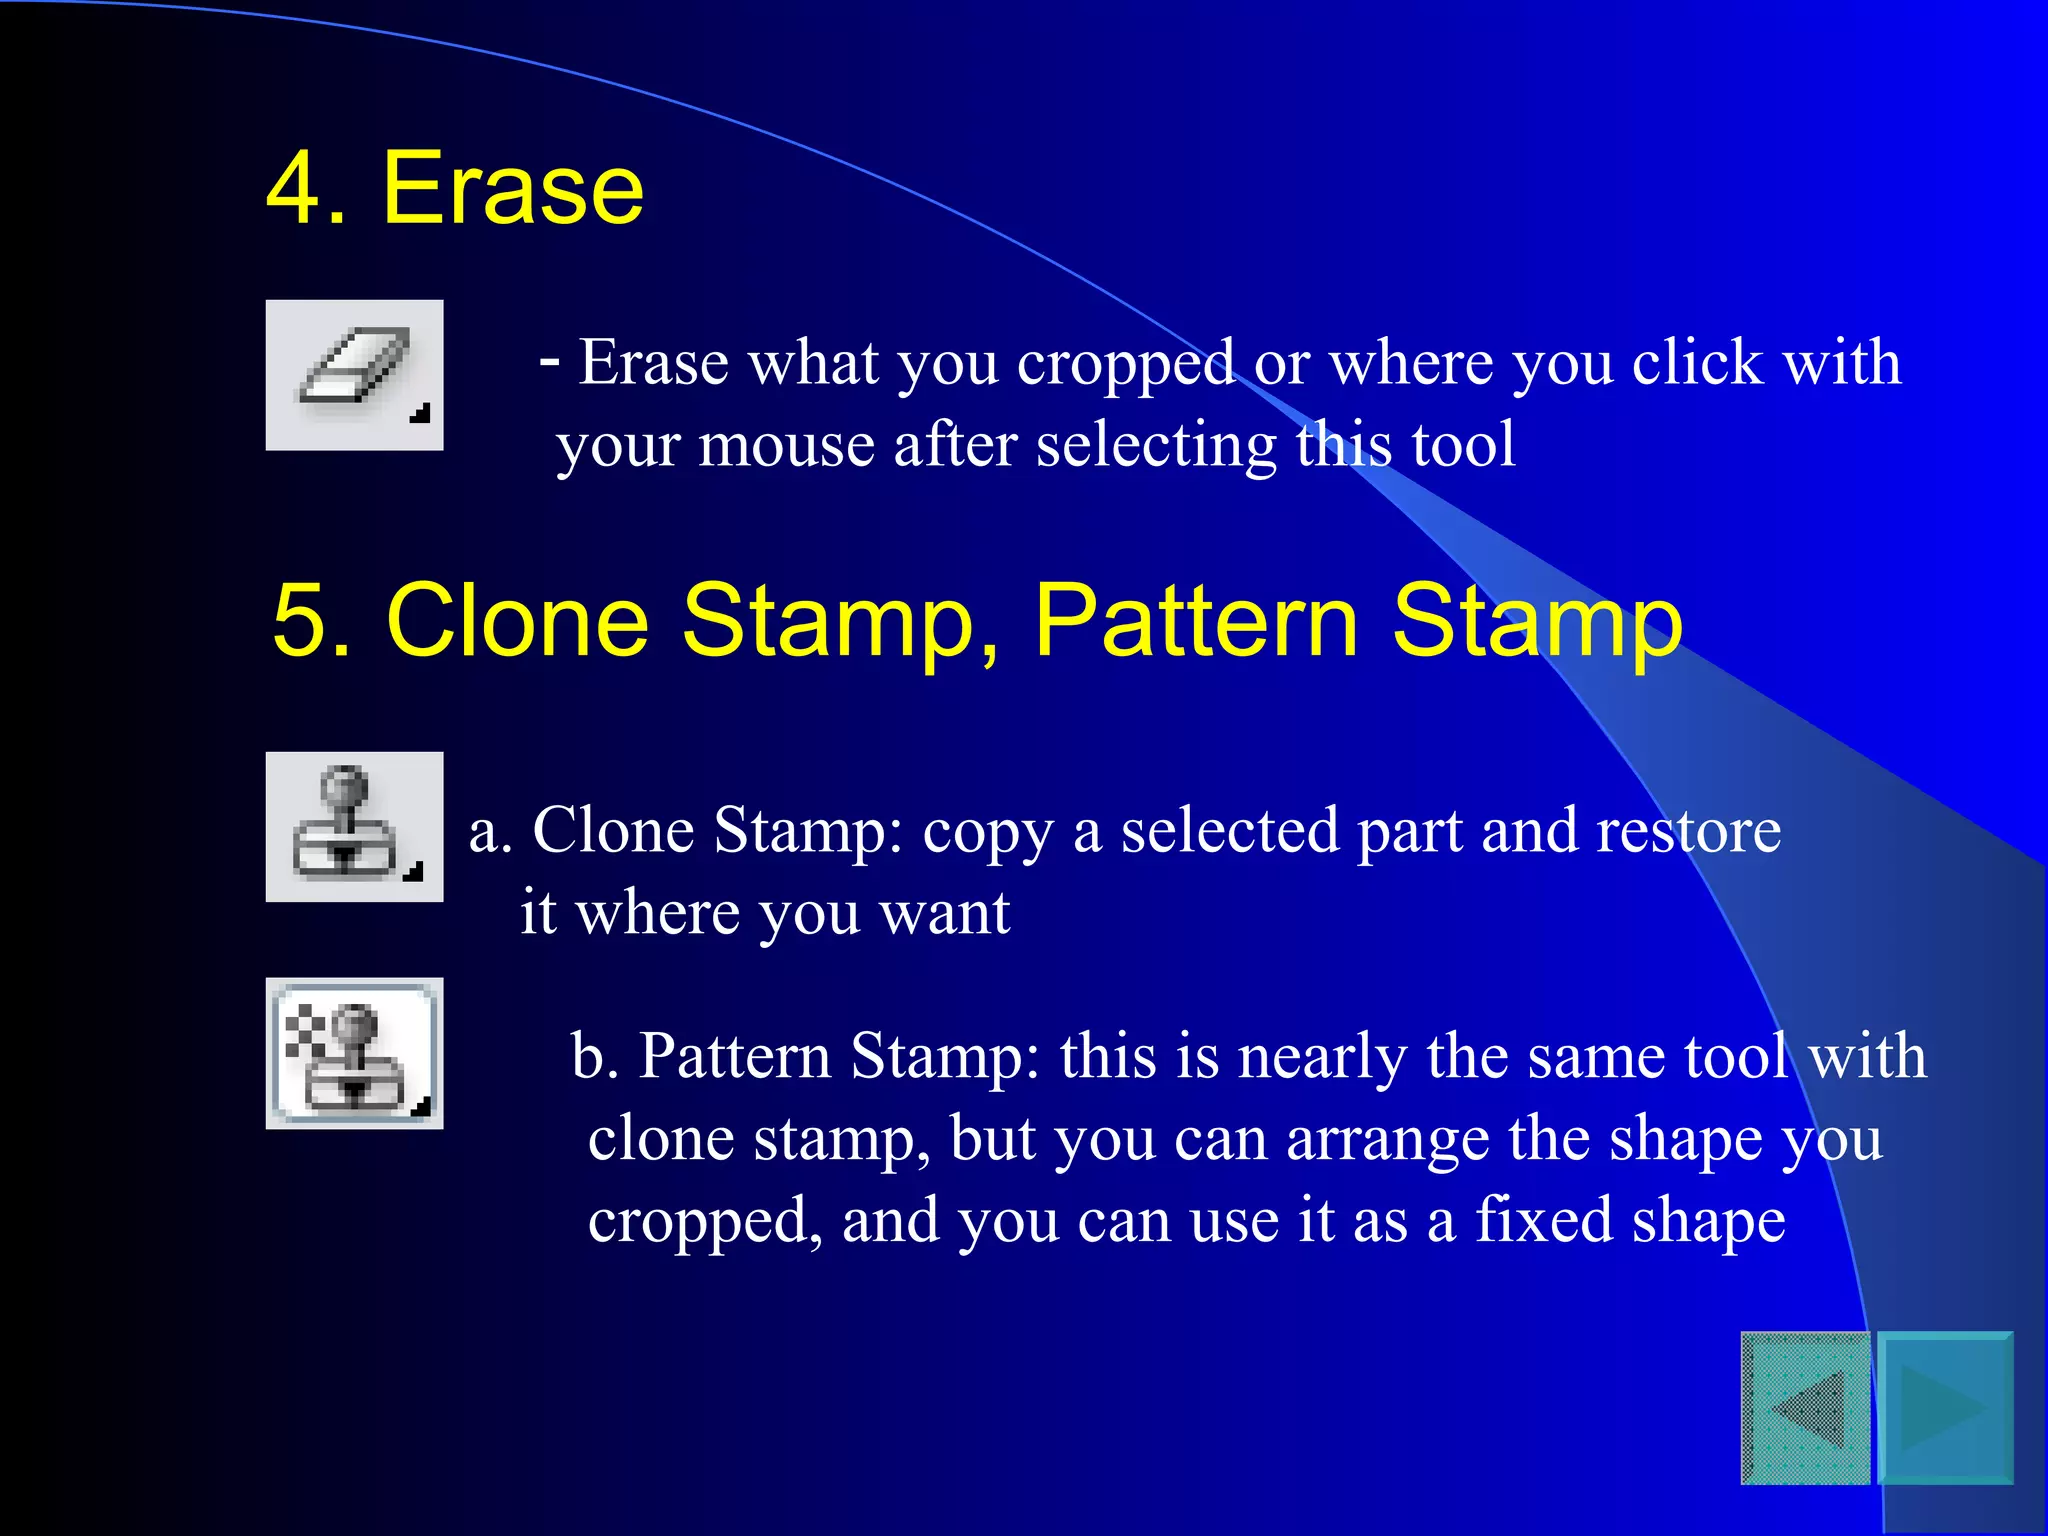
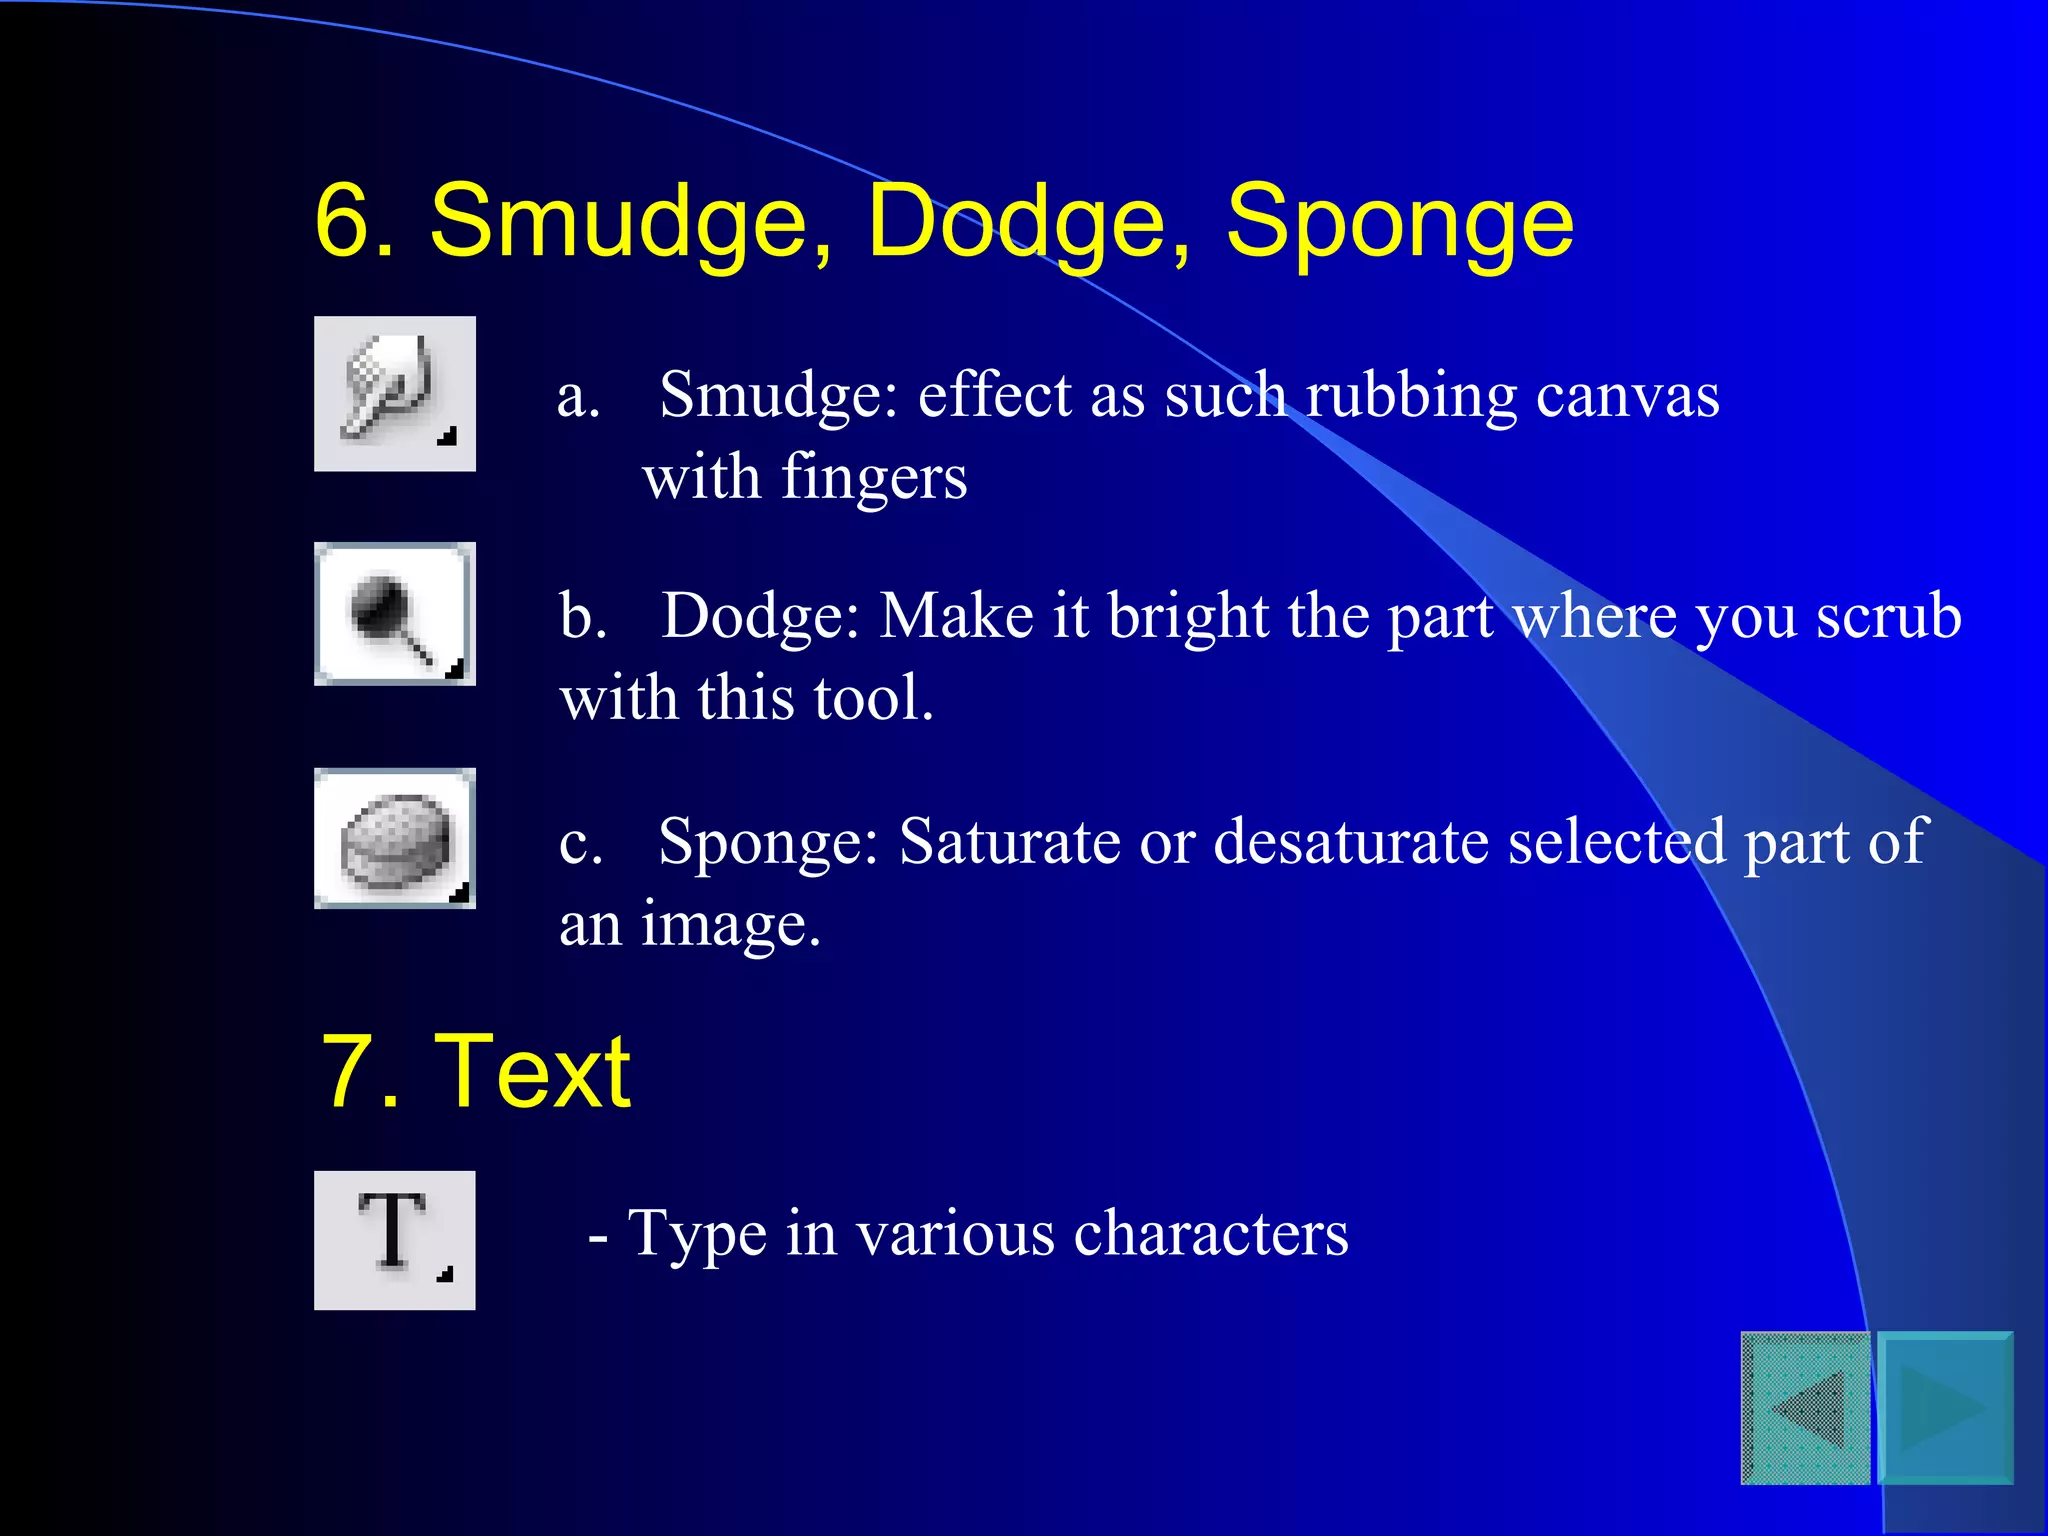
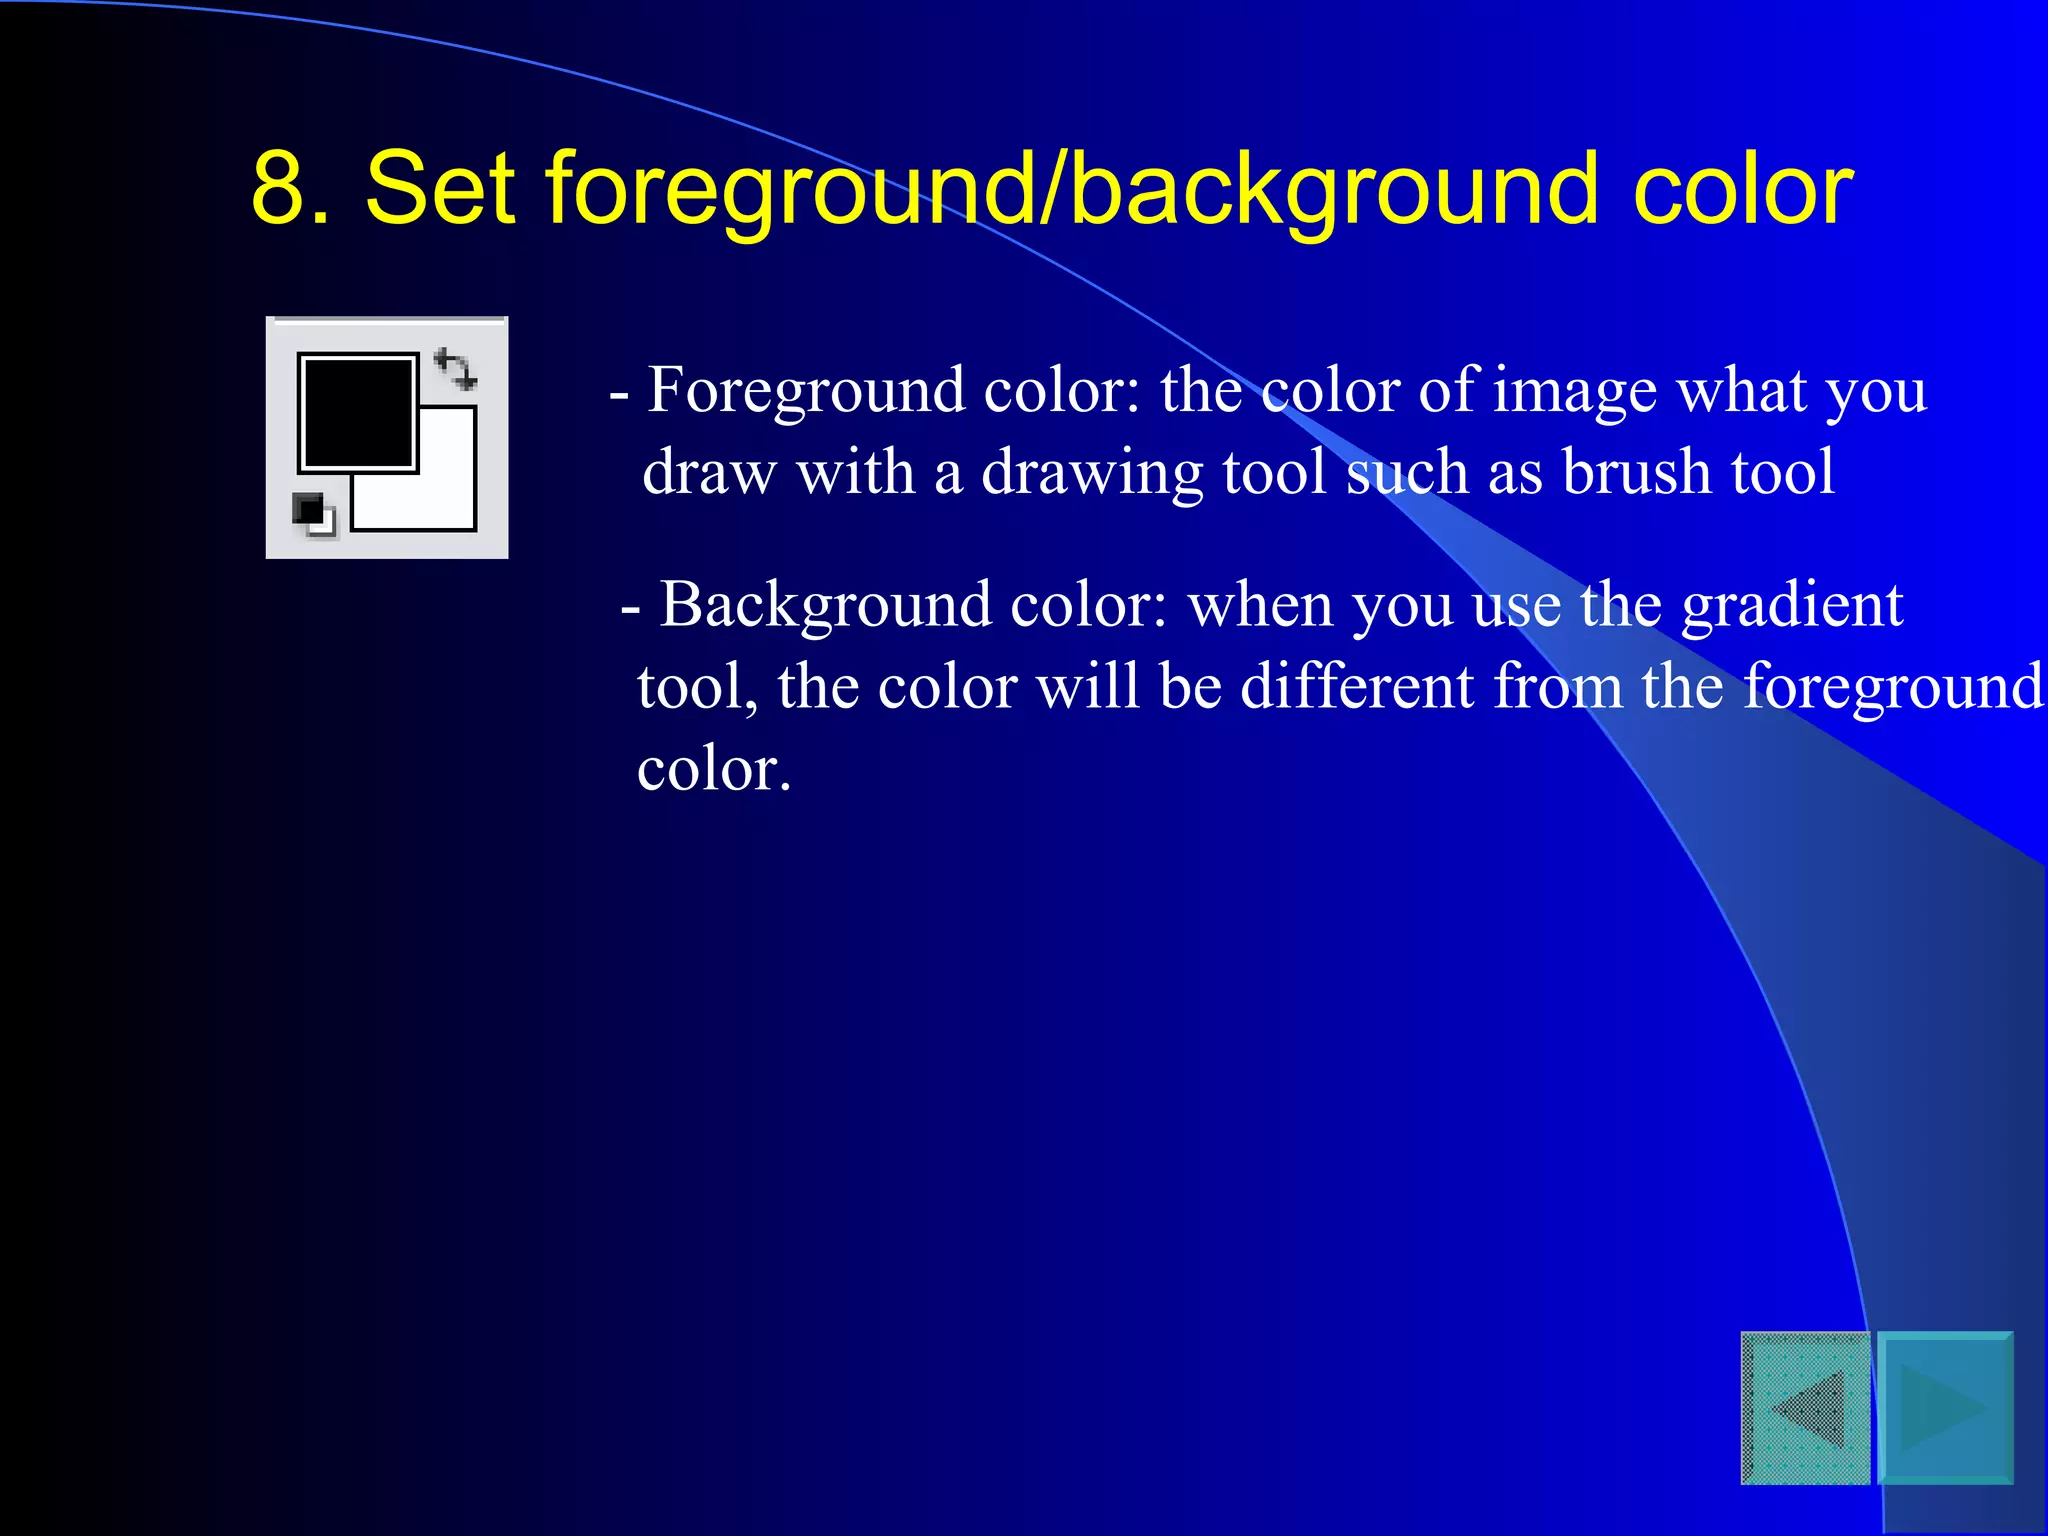
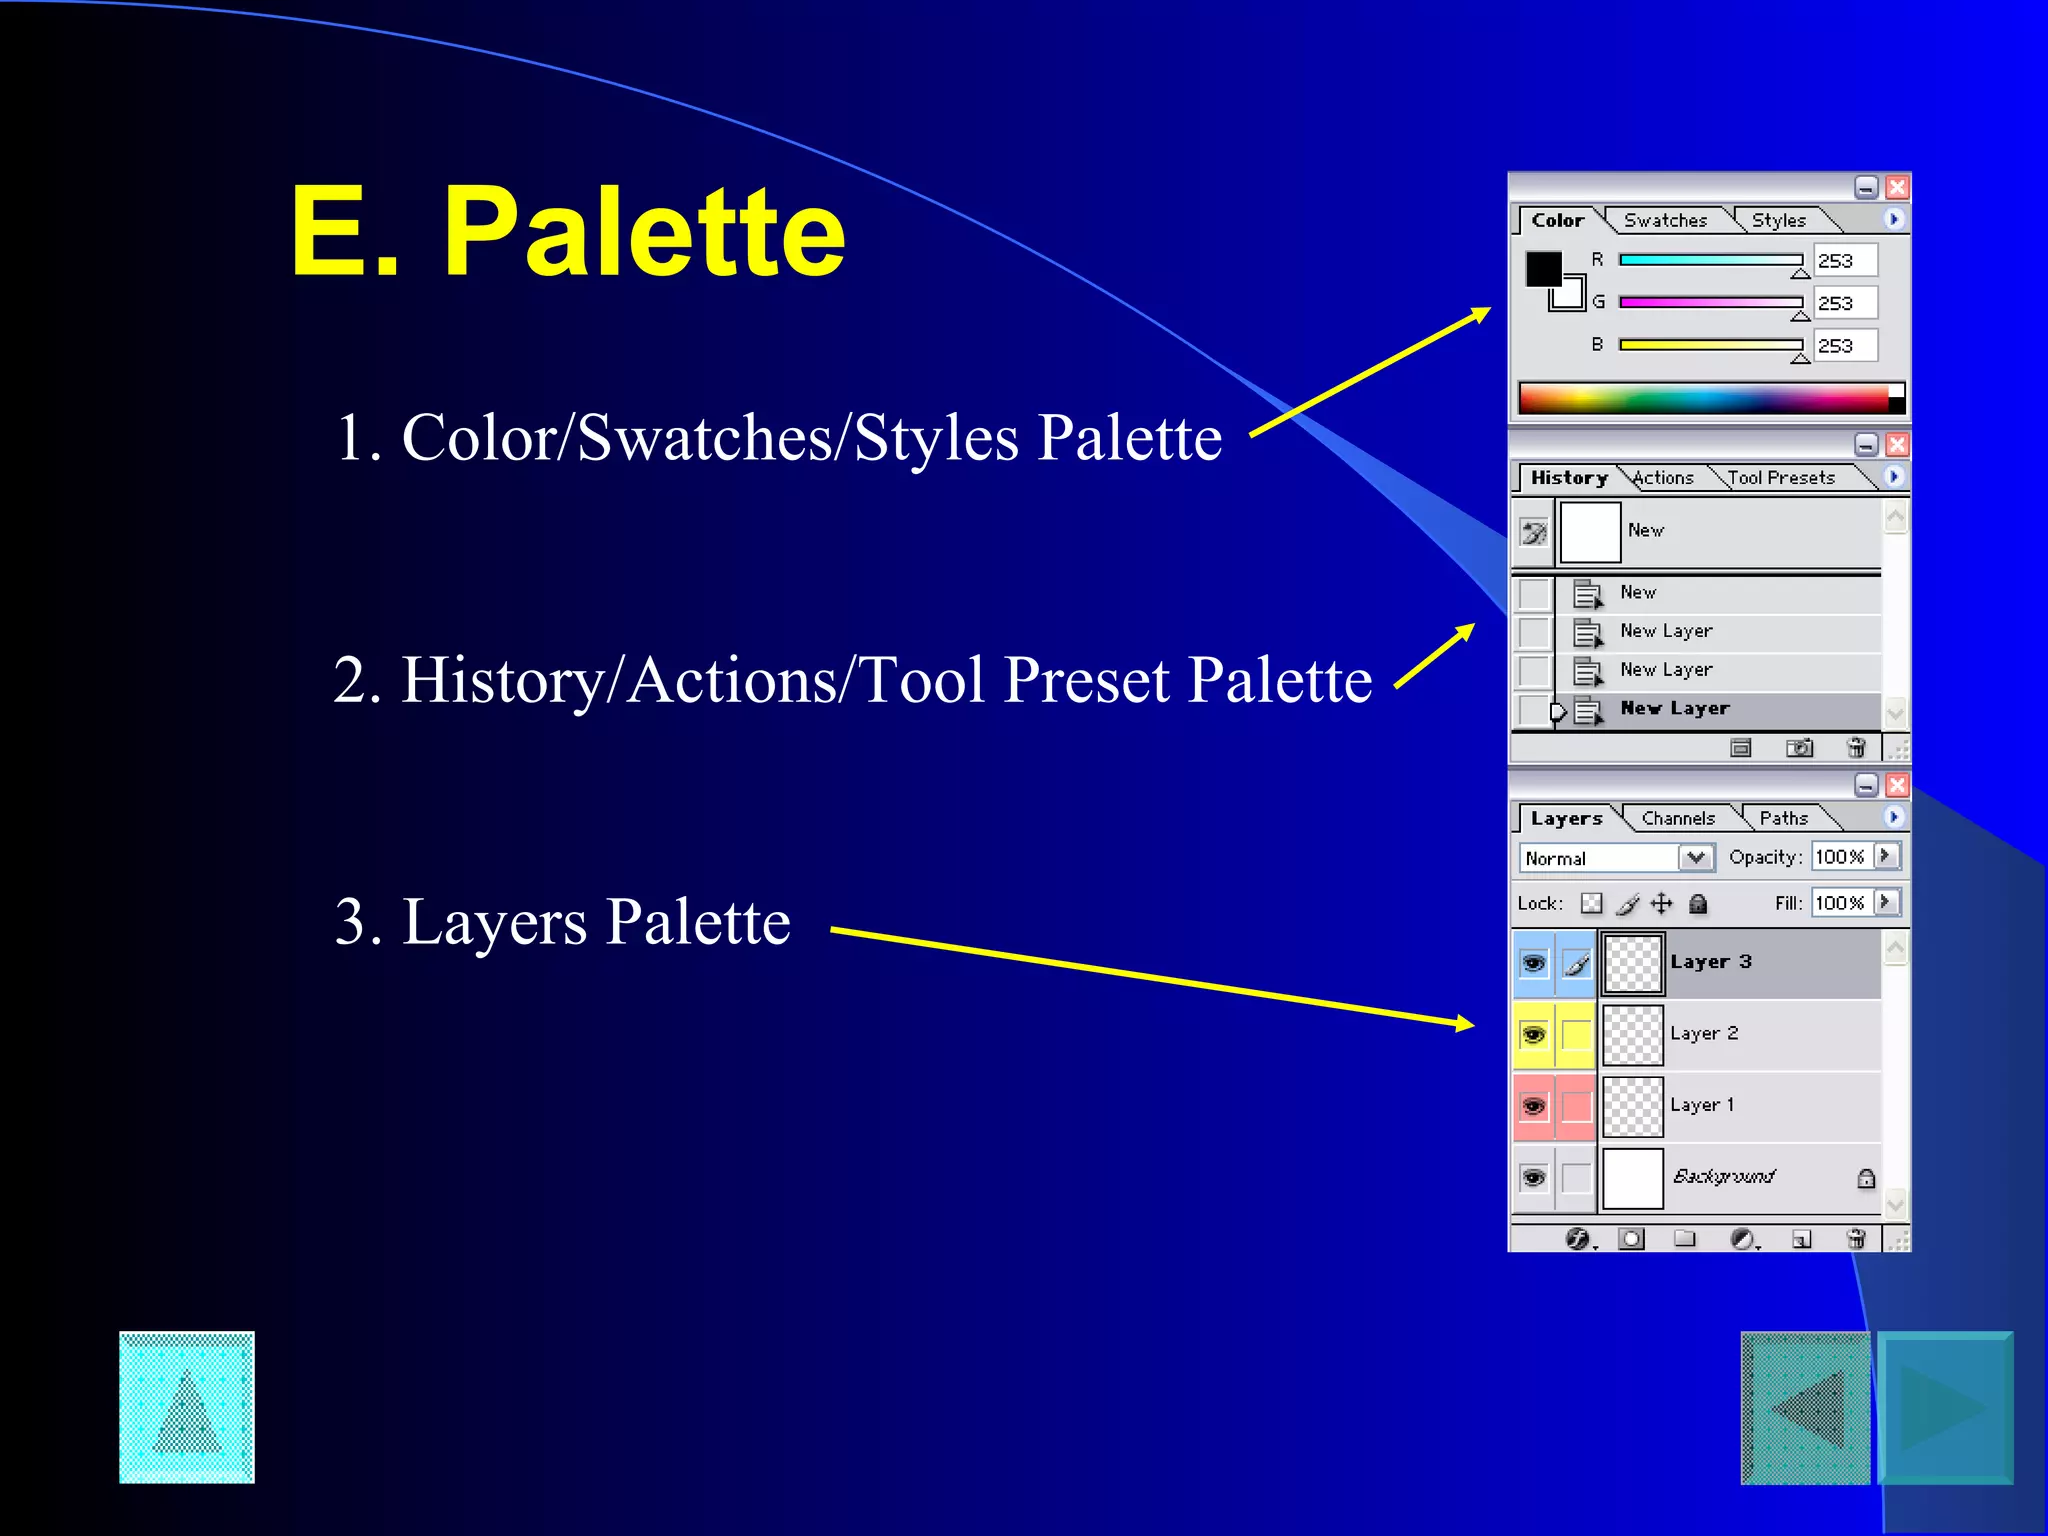
Chapter No. 09Chapter No. 09
A. Introduction
1. Adobe Photoshop?
- The professional image-editing standard
2. Two general usage of Photoshop
- Creating images
- Editing existing images
Table of Content
3. How to get started?
- 1st
option
Click “Start” >
>> Find & click
“Photoshop 7.0”
<Or>
- 2nd
option
(Click)
- Find Photoshop Icon on the desktop
 Double-Click the icon.
B. Preparation before starting work
- Option1; Creating a image
- Option 2; Editing existing images
* Option 1: Creating a image
- Step1: Click “File”  Select “New”
- Step2: Type a name for your work in the name box
 Decide the size of your work
* Option 2: Editing existing image
- Step 1: Click “File”  Select “Open”
- Step 2: Search the location of your image
in the box  Click “Open”
C. Menu
1. File
< >
2. Edit
3. Image
4. Layer
5. Filter
6. View
7.Windows
1. File
a. Save, Save as, Save for web
- Save
- Save as: Save as a new filename
- Save for web: Save a image as a form
of “*.jpg” or “*.gif” which is used for
web image
b. Import, Export
- Import: Bring another image into the
canvas you are working
- Export: Sending the image you are
working to other applications
c. Print
2. Edit
a. Undo, Step Forward/Backward
- Undo: Cancel the last work
- Step Forward: Move to the next stage
which you did
- Step Backward: Move to the previous
stage which you did
b. Cut, Copy, Paste
- Cut: Get rid of a part which you select
- Copy: Copy a part you select
- Paste: Attach the part you copied
3. Image
a. Mode: Select a type of color
b. Image size, Canvas size
- Image size: Change the size of the image
- Canvas size: change the size of the canvas
where you are working
(Bottom of your image)
c. Rotate canvas: Changing the direction of
your canvas
4. Layer
a. New, Delete
- New: Create a new layer
- Delete: get rid of a layer you selected
b. Arrange
- change the order of layers
c. Merge
- Make layers into one layer
5. Filter
-Various Kinds of technical effects
6. View
a. Zoom in/out
- Zoom in
- Zoom out
b. Print size
- Help you to print only what you need
c. Extras
- Showing horizontal and vertical lines
by dividing into separate sectors
7. Windows
- The same function with “view” in other
Windows applications such as MS-Office
You can select what you want to make
visible on your page and what you don’t
want to make visible on your page
D. Toolbar
1. Marqee, Lasso, Magic Wand, Crop
2. Move
3. Brush, gradient, paint bucket
4. Erase
5. Clone Stamp, Pattern Stamp
6. Smudge, Dodge, Sponge
7. Text
8. Set Foreground/Background color
1. Marqee, Lasso, Magic Wand, Crop
a. Marqee: Select a part of an image you are working
with arranged form such as rectangular and elliptical.
b. Lasso: Draw selection paths freehand with a mouse
- If you click and hold, you can change the tool
so that you can draw polygons
c. Magic wand: select all the same-color or similarly
colored adjacent pixels
d. Crop: Crop the image
- The selected area will be surrounded with a blinking
dotted line
2. Move
-Move the image on a selected layer to other part of
canvas you are working
3. Brush, Gradient, Paint Bucket
a. Brush: basic tools for drawing a line
b. Gradient: this help you to paint stage by stage with
more than 2 colors
c. Paint Bucket: fill out a cropped part with just one
click of this tool
4. Erase
- Erase what you cropped or where you click with
your mouse after selecting this tool
5. Clone Stamp, Pattern Stamp
a. Clone Stamp: copy a selected part and restore
it where you want
b. Pattern Stamp: this is nearly the same tool with
clone stamp, but you can arrange the shape you
cropped, and you can use it as a fixed shape
6. Smudge, Dodge, Sponge
a. Smudge: effect as such rubbing canvas
with fingers
b. Dodge: Make it bright the part where you scrub
with this tool.
c. Sponge: Saturate or desaturate selected part of
an image.
7. Text
- Type in various characters
8. Set foreground/background color
- Foreground color: the color of image what you
draw with a drawing tool such as brush tool
- Background color: when you use the gradient
tool, the color will be different from the foreground
color.
E. Palette
1. Color/Swatches/Styles Palette
2. History/Actions/Tool Preset Palette
3. Layers Palette
1. Color/Swatch/Styles Palette
- Color Palette: Mix the color (basically
RGB colors) and select it for the
foreground and background colors.
c.f) In case of another color type, you can
choose it among the list of the pop-up menu
-You can choose colors among the
samples of colors.
-You can choose a special effect of
colors on the layer you selected, such
as texts, buttons, and images
2. history/Action/Tool preset Palette
- History Palette: Photoshop automatically
save the process of your works. (basically
20 steps prior to the current work)
c.f) change the number of steps it saves:
Edit > Preferences > General (History States)
- Actions Palette: Save basic technical effects
and adjust it to more than one image
-Tool Preset Palette: Select the Brush which
you made and saved.
3. Layers Palette
-Layer Palette: Separate each step of
Works from others.
By making layers and working different
steps on each layer, you can make
separate effects on each layer.

Adobe photoshop std. viii

  • 1.
  • 2.
    A. Introduction 1. AdobePhotoshop? - The professional image-editing standard 2. Two general usage of Photoshop - Creating images - Editing existing images Table of Content
  • 3.
    3. How toget started? - 1st option Click “Start” > >> Find & click “Photoshop 7.0” <Or> - 2nd option (Click)
  • 4.
    - Find PhotoshopIcon on the desktop  Double-Click the icon.
  • 5.
    B. Preparation beforestarting work - Option1; Creating a image - Option 2; Editing existing images
  • 6.
    * Option 1:Creating a image - Step1: Click “File”  Select “New” - Step2: Type a name for your work in the name box  Decide the size of your work
  • 7.
    * Option 2:Editing existing image - Step 1: Click “File”  Select “Open” - Step 2: Search the location of your image in the box  Click “Open”
  • 8.
    C. Menu 1. File <> 2. Edit 3. Image 4. Layer 5. Filter 6. View 7.Windows
  • 9.
    1. File a. Save,Save as, Save for web - Save - Save as: Save as a new filename - Save for web: Save a image as a form of “*.jpg” or “*.gif” which is used for web image b. Import, Export - Import: Bring another image into the canvas you are working - Export: Sending the image you are working to other applications c. Print
  • 10.
    2. Edit a. Undo,Step Forward/Backward - Undo: Cancel the last work - Step Forward: Move to the next stage which you did - Step Backward: Move to the previous stage which you did b. Cut, Copy, Paste - Cut: Get rid of a part which you select - Copy: Copy a part you select - Paste: Attach the part you copied
  • 11.
    3. Image a. Mode:Select a type of color b. Image size, Canvas size - Image size: Change the size of the image - Canvas size: change the size of the canvas where you are working (Bottom of your image) c. Rotate canvas: Changing the direction of your canvas
  • 12.
    4. Layer a. New,Delete - New: Create a new layer - Delete: get rid of a layer you selected b. Arrange - change the order of layers c. Merge - Make layers into one layer
  • 13.
    5. Filter -Various Kindsof technical effects
  • 14.
    6. View a. Zoomin/out - Zoom in - Zoom out b. Print size - Help you to print only what you need c. Extras - Showing horizontal and vertical lines by dividing into separate sectors
  • 15.
    7. Windows - Thesame function with “view” in other Windows applications such as MS-Office You can select what you want to make visible on your page and what you don’t want to make visible on your page
  • 16.
    D. Toolbar 1. Marqee,Lasso, Magic Wand, Crop 2. Move 3. Brush, gradient, paint bucket 4. Erase 5. Clone Stamp, Pattern Stamp 6. Smudge, Dodge, Sponge 7. Text 8. Set Foreground/Background color
  • 17.
    1. Marqee, Lasso,Magic Wand, Crop a. Marqee: Select a part of an image you are working with arranged form such as rectangular and elliptical. b. Lasso: Draw selection paths freehand with a mouse - If you click and hold, you can change the tool so that you can draw polygons c. Magic wand: select all the same-color or similarly colored adjacent pixels d. Crop: Crop the image - The selected area will be surrounded with a blinking dotted line
  • 18.
    2. Move -Move theimage on a selected layer to other part of canvas you are working 3. Brush, Gradient, Paint Bucket a. Brush: basic tools for drawing a line b. Gradient: this help you to paint stage by stage with more than 2 colors c. Paint Bucket: fill out a cropped part with just one click of this tool
  • 19.
    4. Erase - Erasewhat you cropped or where you click with your mouse after selecting this tool 5. Clone Stamp, Pattern Stamp a. Clone Stamp: copy a selected part and restore it where you want b. Pattern Stamp: this is nearly the same tool with clone stamp, but you can arrange the shape you cropped, and you can use it as a fixed shape
  • 20.
    6. Smudge, Dodge,Sponge a. Smudge: effect as such rubbing canvas with fingers b. Dodge: Make it bright the part where you scrub with this tool. c. Sponge: Saturate or desaturate selected part of an image. 7. Text - Type in various characters
  • 21.
    8. Set foreground/backgroundcolor - Foreground color: the color of image what you draw with a drawing tool such as brush tool - Background color: when you use the gradient tool, the color will be different from the foreground color.
  • 22.
    E. Palette 1. Color/Swatches/StylesPalette 2. History/Actions/Tool Preset Palette 3. Layers Palette
  • 23.
    1. Color/Swatch/Styles Palette -Color Palette: Mix the color (basically RGB colors) and select it for the foreground and background colors. c.f) In case of another color type, you can choose it among the list of the pop-up menu -You can choose colors among the samples of colors. -You can choose a special effect of colors on the layer you selected, such as texts, buttons, and images
  • 24.
    2. history/Action/Tool presetPalette - History Palette: Photoshop automatically save the process of your works. (basically 20 steps prior to the current work) c.f) change the number of steps it saves: Edit > Preferences > General (History States) - Actions Palette: Save basic technical effects and adjust it to more than one image -Tool Preset Palette: Select the Brush which you made and saved.
  • 25.
    3. Layers Palette -LayerPalette: Separate each step of Works from others. By making layers and working different steps on each layer, you can make separate effects on each layer.

Editor's Notes

  • #3 -create images for print, the Web, wireless devices, and other media