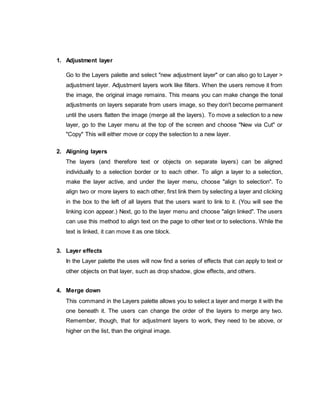
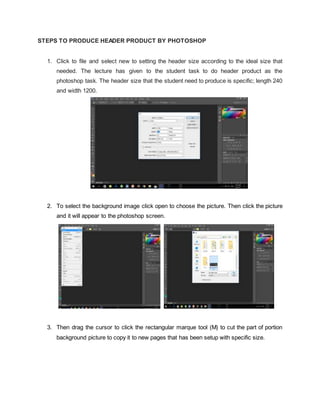
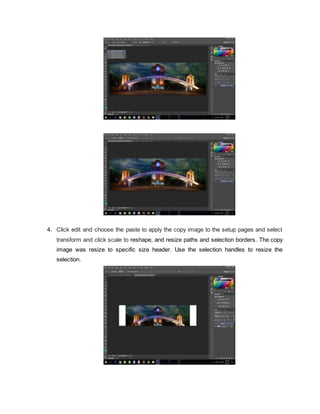
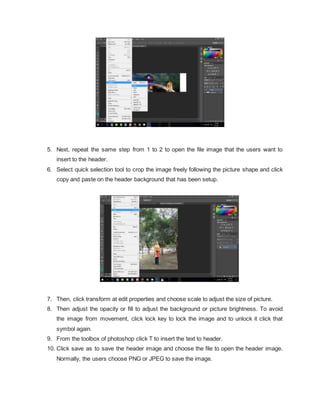
This document provides an overview of Adobe Photoshop, including its uses, benefits, and tools. Photoshop is a popular graphic design software that allows users to edit, manipulate, and enhance photos. It has various tools in its toolbox that give users precise control over selections, layers, and adjustments. While powerful, it also has some disadvantages like cost and learning curve. The document then outlines the basic tools in Photoshop like selection, navigation, and type tools. It also explains layers and how to use them to merge, align, and add effects. Finally, it provides steps for using Photoshop to create a header, including setting size, importing images, adjusting layers, and saving the file.
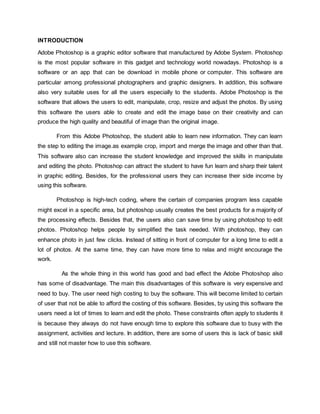

![BASIC TOOLS AND IT FUNCTION
1. Rectangular Marque Tool (M)
This tool is use to make selections on the image, in a rectangular shape. This changes
the area of the image that is affected by other tools or actions to be within the defined
shape. Holding the [Shift] key while dragging your selection, restricts the shape to a
perfect square. Holding the [Alt] key while dragging sets the center of the rectangle to
where user cursor started.
2. Move Tool (V)
Use this tool to, well, move things. Usually the user use it to move a Layer around after it
has been placed. Hold the [Shift] key to limit the movements to vertical/horizontal.
3. Lasso Tool (L)
Ok, this should be the Lasso Tool, but I use the Polygon Lasso a lot more often. Use this
to draw selections in whatever shape you would like. To close the selection, either click
on the beginning point (you’ll see the cursor change when you’re on it), or just double-
click. When holding the [Ctrl] key, you’ll see the cursor change, and the next time you
click, it will close your selection.
4. Sliced Tool (K)
This is used mostly for building websites, or splitting up one image into smaller ones
when saving out. This tool able to cut the small image smoothly.
5. Quick selecting tool ( W)
6. Horizontal Type Tool (T)
It function to makes type of text or whatever the users want to write. This step only click
at single point, and start typing right away or the users can click and drag to make a
bounding box of where your text/type goes. There’s a lot of options for the Type Tool.
Just play around, it’s fairly straight-forward.](https://image.slidesharecdn.com/adobe-photoshop-reportfull-170509045520/85/Adobe-photoshop-report-full-docx-3-320.jpg)
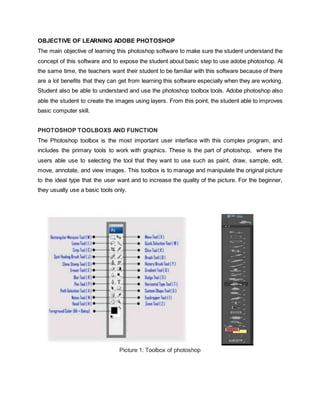
![7. Hand Tool (T)
This tool can really make short work of user job with the Hand Tool. It’s for moving
the entire image within a window. So if you’re zoomed in and your image area is
larger than the window, you can use the Hand Tool to navigate around your image.
Just click and drag. You can get to this tool at any time when using any other tool by
pressing and holding the [Spacebar].
8. Zoom Tool (Z)
This tool allows the user to zoom into the image. To back actual size picture hold the
[Alt] key to zoom out. Holding the [Shift] key will zoom all of the windows that users have
open at the same time. Double-click on the Zoom Tool in the palette to go back to 100%
view.
Picture 2: Layer of photoshop tools
Layer of Photoshop Tools
Layers are like sheets of tracing paper layered over the image. In the layers palette, Window >
Show Layers, the user can see the layers you have created. You can only change information
on the layer that is selected. Click on the eye icon at the left to make a layer invisible.](https://image.slidesharecdn.com/adobe-photoshop-reportfull-170509045520/85/Adobe-photoshop-report-full-docx-4-320.jpg)