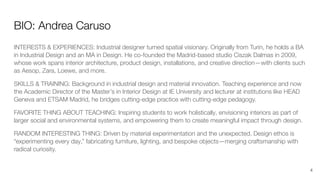
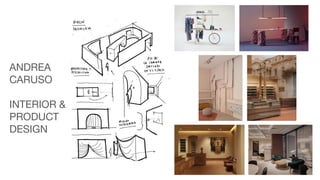
BIO: Andrea Caruso
INTERESTS& EXPERIENCES: Industrial designer turned spatial visionary. Originally from Turin, he holds a BA
in Industrial Design and an MA in Design. He co-founded the Madrid-based studio Ciszak Dalmas in 2009,
whose work spans interior architecture, product design, installations, and creative direction—with clients such
as Aesop, Zara, Loewe, and more.
SKILLS & TRAINING: Background in industrial design and material innovation. Teaching experience and now
the Academic Director of the Master’s in Interior Design at IE University and lecturer at institutions like HEAD
Geneva and ETSAM Madrid, he bridges cutting-edge practice with cutting-edge pedagogy.
FAVORITE THING ABOUT TEACHING: Inspiring students to work holistically, envisioning interiors as part of
larger social and environmental systems, and empowering them to create meaningful impact through design.
RANDOM INTERESTING THING: Driven by material experimentation and the unexpected. Design ethos is
“experimenting every day,” fabricating furniture, lighting, and bespoke objects—merging craftsmanship with
radical curiosity.
4
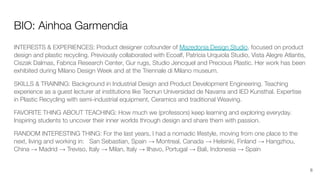
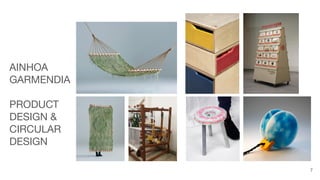
BIO: Ainhoa Garmendia
INTERESTS& EXPERIENCES: Product designer cofounder of Mazedonia Design Studio, focused on product
design and plastic recycling. Previously collaborated with Ecoalf, Patricia Urquiola Studio, Vista Alegre Atlantis,
Ciszak Dalmas, Fabrica Research Center, Gur rugs, Studio Jencquel and Precious Plastic. Her work has been
exhibited during Milano Design Week and at the Triennale di Milano museum.
SKILLS & TRAINING: Background in Industrial Design and Product Development Engineering. Teaching
experience as a guest lecturer at institutions like Tecnun Universidad de Navarra and IED Kunsthal. Expertise
in Plastic Recycling with semi-industrial equipment, Ceramics and traditional Weaving.
FAVORITE THING ABOUT TEACHING: How much we (professors) keep learning and exploring everyday.
Inspiring students to uncover their inner worlds through design and share them with passion.
RANDOM INTERESTING THING: For the last years, I had a nomadic lifestyle, moving from one place to the
next, living and working in: San Sebastian, Spain → Montreal, Canada → Helsinki, Finland → Hangzhou,
China → Madrid → Treviso, Italy → Milan, Italy → Ilhavo, Portugal → Bali, Indonesia → Spain
6
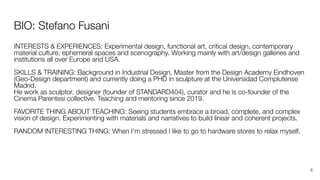
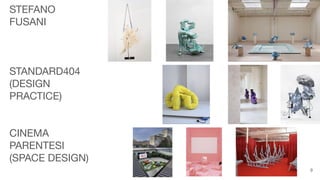
BIO: Stefano Fusani
INTERESTS& EXPERIENCES: Experimental design, functional art, critical design, contemporary
material culture, ephemeral spaces and scenography. Working mainly with art/design galleries and
institutions all over Europe and USA.
SKILLS & TRAINING: Background in Industrial Design, Master from the Design Academy Eindhoven
(Geo-Design department) and currently doing a PHD in sculpture at the Universidad Complutense
Madrid.
He work as sculptor, designer (founder of STANDARD404), curator and he is co-founder of the
Cinema Parentesi collective. Teaching and mentoring since 2019.
FAVORITE THING ABOUT TEACHING: Seeing students embrace a broad, complete, and complex
vision of design. Experimenting with materials and narratives to build linear and coherent projects.
RANDOM INTERESTING THING: When I'm stressed I like to go to hardware stores to relax myself.
8
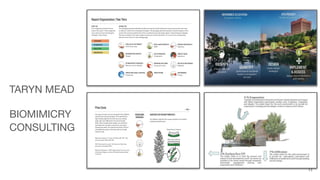
BIO: Taryn Mead
INTERESTS& EXPERIENCES: Corporate Sustainability Consultant in Biomimicry,
University professor since 2014 teaching and mentoring at the intersection of Design,
Product Development, Sustainability, Nature-Inspired Innovation, and
Entrepreneurship. Field-based, Immersive, Online, Hybrid, and Traditional Classroom
Settings. More recently, teaching Studios & Biomaterials.
SKILLS & TRAINING: Bachelors in Sustainability & Bachelors in Environmental
Biology, PhD in Innovation Management. Training in Ceramics, Biomimicry,
Biomaterials.
FAVORITE THING ABOUT TEACHING: Seeing students discover their passions
through exposure to many different ideas, positions, and perspectives.
RANDOM INTERESTING THING: I once backpacked 500 miles in 40 days with my
dog.
10
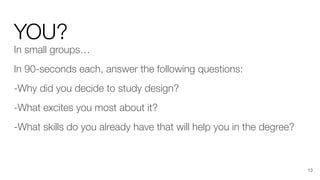
YOU?
In small groups…
In90-seconds each, answer the following questions:
-Why did you decide to study design?
-What excites you most about it?
-What skills do you already have that will help you in the degree?
13
14.
YOU?
On a scaleof 1 to 5, one being the least and five being the most:
I’ve had previous coursework in
design (beyond basic art
classes).
14
15.
YOU?
On a scaleof 1 to 5, one being the least and five being the most:
I’m comfortable learning in
a studio environment.
15
16.
YOU?
On a scaleof 1 to 5, one being the least and five being the most:
I am excited about this class.
16
17.
YOU?
On a scaleof 1 to 5, one being the least and five being the most:
I am nervous about this class.
17
18.
YOU?
On a scaleof 1 to 5, one being the least and five being the most:
I can name many designers
and/or design aesthetics that
inspire me.
18
19.
YOU?
On a scaleof 1 to 5, one being the least and five being the most:
I feel super confident that I
know what design is and what
this degree is about.
19
20.
Don’t worry…
We’ll alllearn together….by doing together.
The people in this room will become some of the best friends that you will ever have.
And you will work together a lot over the next four years.
So they will also make you crazy.
Enjoy the process.
20
21.
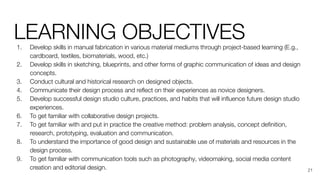
LEARNING OBJECTIVES
1. Developskills in manual fabrication in various material mediums through project-based learning (E.g.,
cardboard, textiles, biomaterials, wood, etc.)
2. Develop skills in sketching, blueprints, and other forms of graphic communication of ideas and design
concepts.
3. Conduct cultural and historical research on designed objects.
4. Communicate their design process and reflect on their experiences as novice designers.
5. Develop successful design studio culture, practices, and habits that will influence future design studio
experiences.
6. To get familiar with collaborative design projects.
7. To get familiar with and put in practice the creative method: problem analysis, concept definition,
research, prototyping, evaluation and communication.
8. To understand the importance of good design and sustainable use of materials and resources in the
design process.
9. To get familiar with communication tools such as photography, videomaking, social media content
creation and editorial design. 21
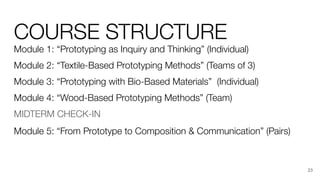
COURSE STRUCTURE
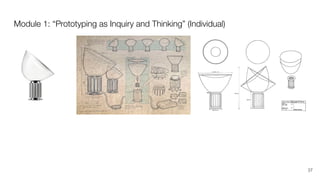
Module 1:“Prototyping as Inquiry and Thinking” (Individual)
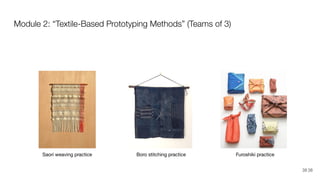
Module 2: “Textile-Based Prototyping Methods” (Teams of 3)
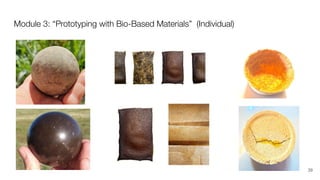
Module 3: “Prototyping with Bio-Based Materials” (Individual)
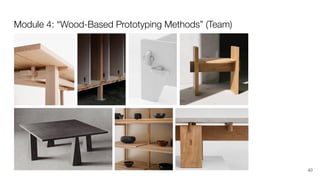
Module 4: “Wood-Based Prototyping Methods” (Team)
MIDTERM CHECK-IN
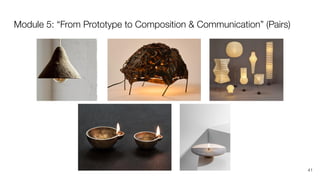
Module 5: “From Prototype to Composition & Communication” (Pairs)
23
24.
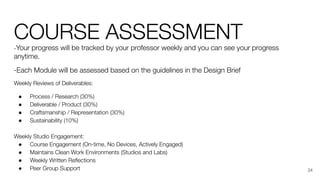
COURSE ASSESSMENT
-Your progresswill be tracked by your professor weekly and you can see your progress
anytime.
-Each Module will be assessed based on the guidelines in the Design Brief
Weekly Reviews of Deliverables:
● Process / Research (30%)
● Deliverable / Product (30%)
● Craftsmanship / Representation (30%)
● Sustainability (10%)
Weekly Studio Engagement:
● Course Engagement (On-time, No Devices, Actively Engaged)
● Maintains Clean Work Environments (Studios and Labs)
● Weekly Written Reflections
● Peer Group Support 24
COURSE THEME: CRAFT
AS/OFDESIGN
JAPANESE CRAFT & AESTHETIC
“In Praise of Shadows”
Wabi-Sabi
Documentary on Japanese culture, esp wood working
27
28.
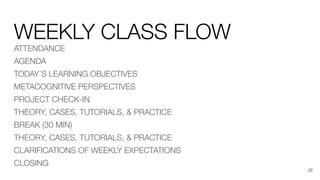
WEEKLY CLASS FLOW
ATTENDANCE
AGENDA
TODAY’SLEARNING OBJECTIVES
METACOGNITIVE PERSPECTIVES
PROJECT CHECK-IN
THEORY, CASES, TUTORIALS, & PRACTICE
BREAK (30 MIN)
THEORY, CASES, TUTORIALS, & PRACTICE
CLARIFICATIONS OF WEEKLY EXPECTATIONS
CLOSING
28
29.
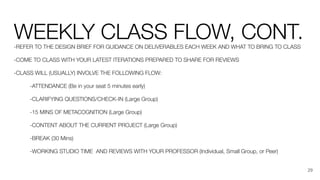
WEEKLY CLASS FLOW,CONT.
-REFER TO THE DESIGN BRIEF FOR GUIDANCE ON DELIVERABLES EACH WEEK AND WHAT TO BRING TO CLASS
-COME TO CLASS WITH YOUR LATEST ITERATIONS PREPARED TO SHARE FOR REVIEWS
-CLASS WILL (USUALLY) INVOLVE THE FOLLOWING FLOW:
-ATTENDANCE (Be in your seat 5 minutes early)
-CLARIFYING QUESTIONS/CHECK-IN (Large Group)
-15 MINS OF METACOGNITION (Large Group)
-CONTENT ABOUT THE CURRENT PROJECT (Large Group)
-BREAK (30 Mins)
-WORKING STUDIO TIME AND REVIEWS WITH YOUR PROFESSOR (Individual, Small Group, or Peer)
29
“Tell me, whatis it you plan to do with your
one wild and precious life?”
-Mary Oliver
31
32.
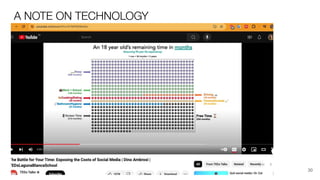
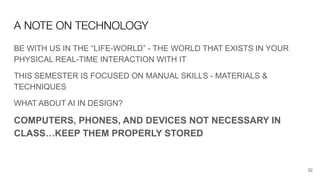
A NOTE ONTECHNOLOGY
BE WITH US IN THE “LIFE-WORLD” - THE WORLD THAT EXISTS IN YOUR
PHYSICAL REAL-TIME INTERACTION WITH IT
THIS SEMESTER IS FOCUSED ON MANUAL SKILLS - MATERIALS &
TECHNIQUES
WHAT ABOUT AI IN DESIGN?
COMPUTERS, PHONES, AND DEVICES NOT NECESSARY IN
CLASS…KEEP THEM PROPERLY STORED
32
33.
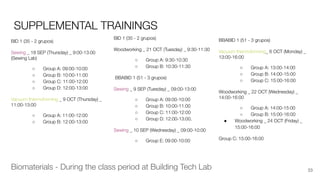
SUPPLEMENTAL TRAININGS
BID 1(35 - 2 grupos)
Woodworking _ 21 OCT (Tuesday) _ 9:30-11:30
○ Group A: 9:30-10:30
○ Group B: 10:30-11:30
BBABID 1 (51 - 3 grupos)
Sewing _ 9 SEP (Tuesday) _ 09:00-13:00
○ Group A: 09:00-10:00
○ Group B: 10:00-11:00
○ Group C: 11:00-12:00
○ Group D: 12:00-13:00.
Sewing _ 10 SEP (Wednesday) _ 09:00-10:00
○ Group E: 09:00-10:00
BID 1 (35 - 2 grupos)
Sewing _ 18 SEP (Thursday) _ 9:00-13:00
(Sewing Lab)
○ Group A: 09:00-10:00
○ Group B: 10:00-11:00
○ Group C: 11:00-12:00
○ Group D: 12:00-13:00
Vacuum thermoforming _ 9 OCT (Thursday) _
11:00-13:00
○ Group A: 11:00-12:00
○ Group B: 12:00-13:00
33
BBABID 1 (51 - 3 grupos)
Vacuum thermoforming_ 6 OCT (Monday) _
13:00-16:00
○ Group A: 13:00-14:00
○ Group B: 14:00-15:00
○ Group C: 15:00-16:00
Woodworking _ 22 OCT (Wednesday) _
14:00-16:00
○ Group A: 14:00-15:00
○ Group B: 15:00-16:00
● Woodworking _ 24 OCT (Friday) _
15:00-16:00
Group C: 15:00-16:00
Biomaterials - During the class period at Building Tech Lab
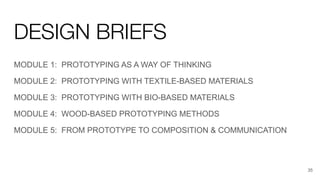
DESIGN BRIEFS
MODULE 1:PROTOTYPING AS A WAY OF THINKING
MODULE 2: PROTOTYPING WITH TEXTILE-BASED MATERIALS
MODULE 3: PROTOTYPING WITH BIO-BASED MATERIALS
MODULE 4: WOOD-BASED PROTOTYPING METHODS
MODULE 5: FROM PROTOTYPE TO COMPOSITION & COMMUNICATION
35
Module 5: “FromPrototype to Composition & Communication” (Pairs)
41
42.
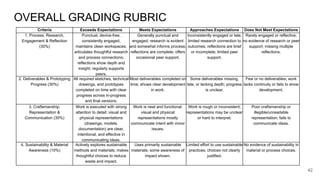
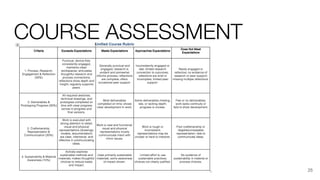
OVERALL GRADING RUBRIC
CriteriaExceeds Expectations Meets Expectations Approaches Expectations Does Not Meet Expectations
1. Process, Research,
Engagement & Reflection
(30%)
Punctual, device-free,
consistently engaged,
maintains clean workspaces;
articulates thoughtful research
and process connections;
reflections show depth and
insight; regularly supports
peers.
Generally punctual and
engaged; research is evident
and somewhat informs process;
reflections are complete; offers
occasional peer support.
Inconsistently engaged or late;
limited research connection to
outcomes; reflections are brief
or incomplete; limited peer
support.
Rarely engaged or reflective;
no evidence of research or peer
support; missing multiple
reflections.
2. Deliverables & Prototyping
Progress (30%)
All required sketches, technical
drawings, and prototypes
completed on time with clear
progress across in-progress
and final versions.
Most deliverables completed on
time; shows clear development
in work.
Some deliverables missing,
late, or lacking depth; progress
is unclear.
Few or no deliverables; work
lacks continuity or fails to show
development.
3. Craftsmanship,
Representation &
Communication (30%)
Work is executed with strong
attention to detail; visual and
physical representations
(drawings, models,
documentation) are clear,
intentional, and effective in
communicating ideas.
Work is neat and functional;
visual and physical
representations mostly
communicate intent with minor
issues.
Work is rough or inconsistent;
representations may be unclear
or hard to interpret.
Poor craftsmanship or
illegible/unreadable
representation; fails to
communicate ideas.
4. Sustainability & Material
Awareness (10%)
Actively explores sustainable
methods and materials; makes
thoughtful choices to reduce
waste and impact.
Uses primarily sustainable
materials; some awareness of
impact shown.
Limited effort to use sustainable
practices; choices not clearly
justified.
No evidence of sustainability in
material or process choices.
42
43.
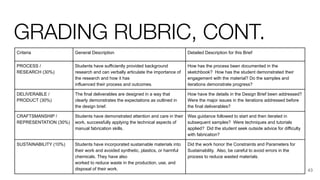
GRADING RUBRIC, CONT.
CriteriaGeneral Description Detailed Description for this Brief
PROCESS /
RESEARCH (30%)
Students have sufficiently provided background
research and can verbally articulate the importance of
the research and how it has
influenced their process and outcomes.
How has the process been documented in the
sketchbook? How has the student demonstrated their
engagement with the material? Do the samples and
iterations demonstrate progress?
DELIVERABLE /
PRODUCT (30%)
The final deliverables are designed in a way that
clearly demonstrates the expectations as outlined in
the design brief.
How have the details in the Design Brief been addressed?
Were the major issues in the iterations addressed before
the final deliverables?
CRAFTSMANSHIP /
REPRESENTATION (30%)
Students have demonstrated attention and care in their
work, successfully applying the technical aspects of
manual fabrication skills.
Was guidance followed to start and then iterated in
subsequent samples? Were techniques and tutorials
applied? Did the student seek outside advice for difficulty
with fabrication?
SUSTAINABILITY (10%) Students have incorporated sustainable materials into
their work and avoided synthetic, plastics, or harmful
chemicals. They have also
worked to reduce waste in the production, use, and
disposal of their work.
Did the work honor the Constraints and Parameters for
Sustainability. Also, be careful to avoid errors in the
process to reduce wasted materials.
43
44.
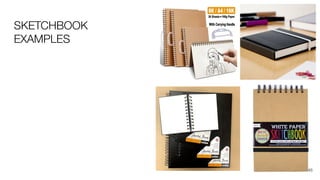
SKETCHBOOKS
Personal documentation ofproject process.
Document and demonstrate your learning and process.
Tell the story of your design.
Gather creative inputs and insights.
Misc. artifacts, archives, material samples, etc.
Photos of iterations and final projects
Collages of references, insights, inspiration, etc.
44
45.
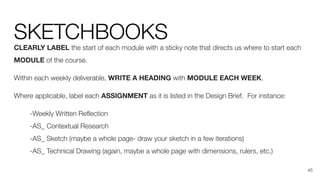
SKETCHBOOKS
CLEARLY LABEL thestart of each module with a sticky note that directs us where to start each
MODULE of the course.
Within each weekly deliverable, WRITE A HEADING with MODULE EACH WEEK.
Where applicable, label each ASSIGNMENT as it is listed in the Design Brief. For instance:
-Weekly Written Reflection
-AS_ Contextual Research
-AS_ Sketch (maybe a whole page- draw your sketch in a few iterations)
-AS_ Technical Drawing (again, maybe a whole page with dimensions, rulers, etc.)
45
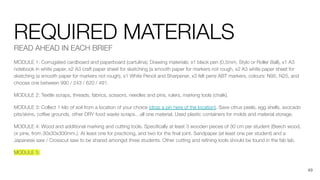
REQUIRED MATERIALS
READ AHEADIN EACH BRIEF
MODULE 1: Corrugated cardboard and paperboard (cartulina); Drawing materials: x1 black pen (0,5mm, Stylo or Roller Ball), x1 A3
notebook in white paper, x2 A3 craft paper sheet for sketching (a smooth paper for markers not rough, x2 A3 white paper sheet for
sketching (a smooth paper for markers not rough), x1 White Pencil and Sharpener, x3 felt pens ABT markers, colours: N95, N25, and
choose one between 990 / 243 / 620 / 491.
MODULE 2: Textile scraps, threads, fabrics, scissors, needles and pins, rulers, marking tools (chalk).
MODULE 3: Collect 1 kilo of soil from a location of your choice (drop a pin here of the location). Save citrus peels, egg shells, avocado
pits/skins, coffee grounds, other DRY food waste scraps…all one material. Used plastic containers for molds and material storage.
MODULE 4: Wood and additional marking and cutting tools. Specifically at least 3 wooden pieces of 30 cm per student (Beech wood,
or pine, from 30x30x300mm.). At least one for practicing, and two for the final joint. Sandpaper (at least one per student) and a
Japanese saw / Crosscut saw to be shared amongst three students. Other cutting and refining tools should be found in the fab lab.
MODULE 5:
49
50.
COURSE COMMUNICATION
-REFER TOTHE DESIGN BRIEF FOR GUIDANCE FOR EACH WEEK
-SUBSCRIBE TO BLACKBOARD ANNOUNCEMENTS
-USE BLACKBOARD MESSAGES TO COMMUNICATE WITH YOUR PROF
-IF YOU NEED CLARIFICATIONS, ASK A PEER FIRST. THEN YOUR PROFESSOR.
-UTILIZE YOUR PEER GROUP TO PROBLEM SOLVE TOGETHER
50
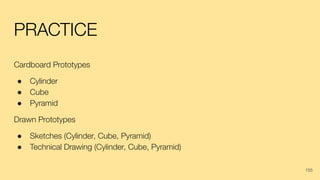
WHY DO WECREATE THEM?
To communicate an idea
To engage others in an idea
To test an idea
To iterate on an idea
To discard ideas
To experiment with a material
If a picture is worth a thousand words, a prototype is worth a thousand images.
What else?
56
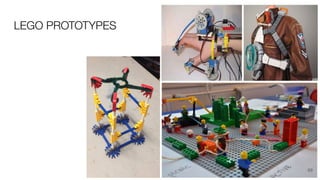
HOW CAN WECREATE
THEM?
Sketching and Diagramming
Low Fidelity vs High Fidelity
Functional Prototypes
Feasibility Prototypes
Interactive Prototypes
Paper Prototypes
Simple Materials or Complex Materials
58
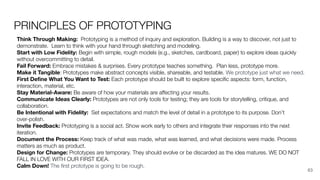
PRINCIPLES OF PROTOTYPING
ThinkThrough Making: Prototyping is a method of inquiry and exploration. Building is a way to discover, not just to
demonstrate. Learn to think with your hand through sketching and modeling.
Start with Low Fidelity: Begin with simple, rough models (e.g., sketches, cardboard, paper) to explore ideas quickly
without overcommitting to detail.
Fail Forward: Embrace mistakes & surprises. Every prototype teaches something. Plan less, prototype more.
Make it Tangible: Prototypes make abstract concepts visible, shareable, and testable. We prototype just what we need.
First Define What You Want to Test: Each prototype should be built to explore specific aspects: form, function,
interaction, material, etc.
Stay Material-Aware: Be aware of how your materials are affecting your results.
Communicate Ideas Clearly: Prototypes are not only tools for testing; they are tools for storytelling, critique, and
collaboration.
Be Intentional with Fidelity: Set expectations and match the level of detail in a prototype to its purpose. Don’t
over-polish.
Invite Feedback: Prototyping is a social act. Show work early to others and integrate their responses into the next
iteration.
Document the Process: Keep track of what was made, what was learned, and what decisions were made. Process
matters as much as product.
Design for Change: Prototypes are temporary. They should evolve or be discarded as the idea matures. WE DO NOT
FALL IN LOVE WITH OUR FIRST IDEA.
Calm Down! The first prototype is going to be rough.
63
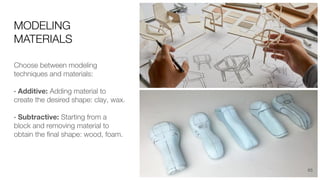
MODELING
MATERIALS
Choose between modeling
techniquesand materials:
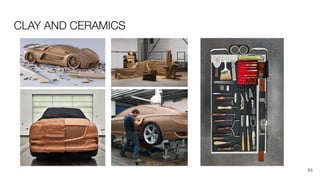
· Additive: Adding material to
create the desired shape: clay, wax.
· Subtractive: Starting from a
block and removing material to
obtain the final shape: wood, foam.
65
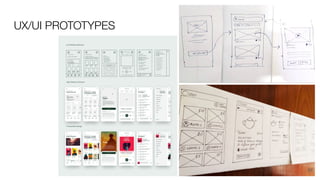
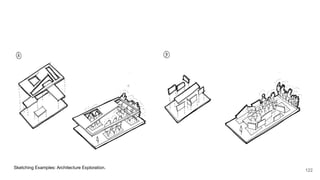
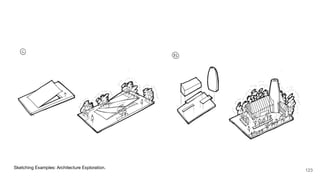
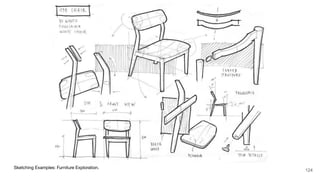
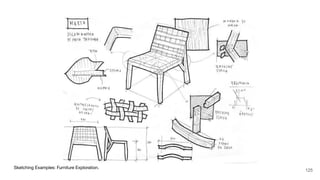
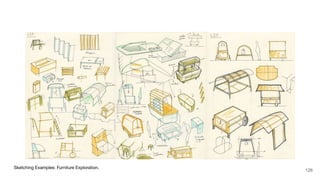
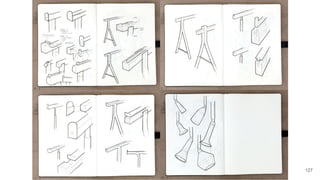
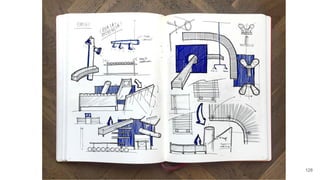
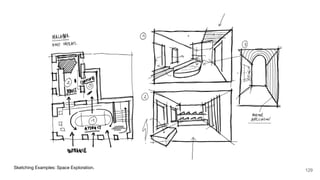
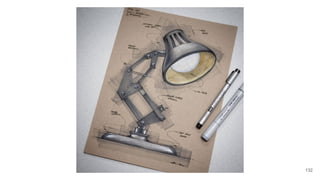
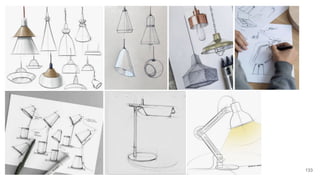
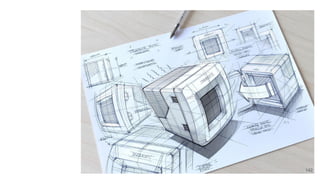
A. Sketching asPrototyping
B. Blueprints
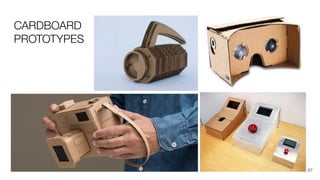
C. Cardboard as Prototyping
73
74.
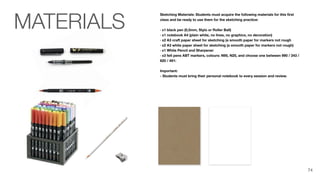
Sketching Materials: Studentsmust acquire the following materials for this first
class and be ready to use them for the sketching practice:
· x1 black pen (0,5mm, Stylo or Roller Ball)
· x1 notebook A4 (plain white, no lines, no graphics, no decoration)
· x2 A3 craft paper sheet for sketching (a smooth paper for markers not rough
· x2 A3 white paper sheet for sketching (a smooth paper for markers not rough)
· x1 White Pencil and Sharpener
· x3 felt pens ABT markers, colours: N95, N25, and choose one between 990 / 243 /
620 / 491:
Important:
- Students must bring their personal notebook to every session and review.
MATERIALS
74
75.
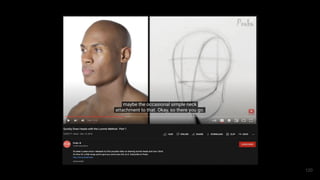
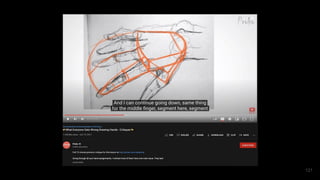
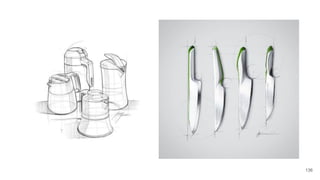
Tip for agood sketch: after
getting the big picture, shrink
into a tiny particle to see up to
the smallest detail of things. 75
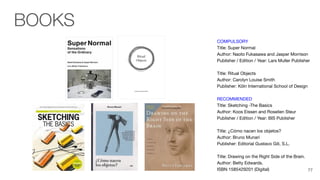
COMPULSORY
Title: Super Normal
Author:Naoto Fukasawa and Jasper Morrison
Publisher / Edition / Year: Lars Muller Publisher
Title: Ritual Objects
Author: Carolyn Louise Smith
Publisher: Köln International School of Design
RECOMMENDED
Title: Sketching -The Basics
Author: Koos Eissen and Roselien Steur
Publisher / Edition / Year: BIS Publisher
Title: ¿Cómo nacen los objetos?
Author: Bruno Munari
Publisher: Editorial Gustavo Gili, S.L.
Title: Drawing on the Right Side of the Brain.
Author: Betty Edwards.
ISBN 1585429201 (Digital)
BOOKS
77
78.
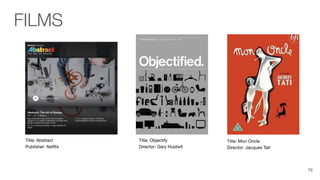
Title: Mon Oncle
Director:Jacques Tatí
Title: Abstract
Publisher: Netflix
Title: Objectify
Director: Gary Hustwit
FILMS
78
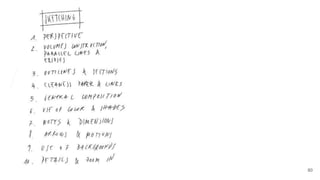
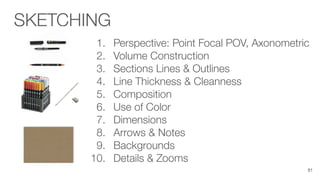
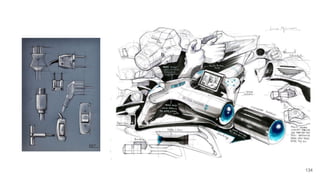
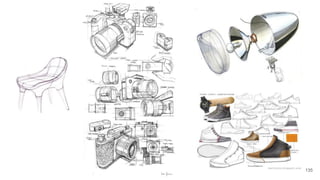
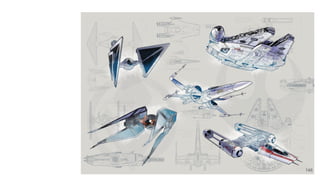
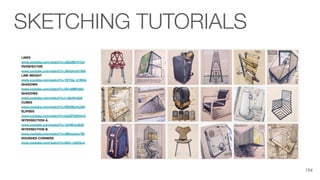
1. Perspective: PointFocal POV, Axonometric
2. Volume Construction
3. Sections Lines & Outlines
4. Line Thickness & Cleanness
5. Composition
6. Use of Color
7. Dimensions
8. Arrows & Notes
9. Backgrounds
10. Details & Zooms
81
SKETCHING
82.
Learning by doingmeans
accepting (many) failures before
achieving a good result. 82
83.
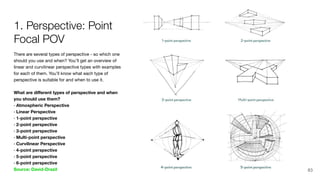
There are severaltypes of perspective - so which one
should you use and when? You’ll get an overview of
linear and curvilinear perspective types with examples
for each of them. You’ll know what each type of
perspective is suitable for and when to use it.
What are different types of perspective and when
you should use them?
· Atmospheric Perspective
· Linear Perspective
· 1-point perspective
· 2-point perspective
· 3-point perspective
· Multi-point perspective
· Curvilinear Perspective
· 4-point perspective
· 5-point perspective
· 6-point perspective
Source: David-Drazil
1. Perspective: Point
Focal POV
83
84.
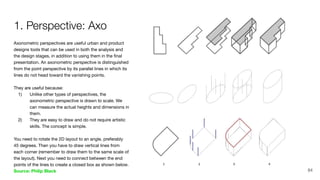
Axonometric perspectives areuseful urban and product
designs tools that can be used in both the analysis and
the design stages, in addition to using them in the final
presentation. An axonometric perspective is distinguished
from the point perspective by its parallel lines in which its
lines do not head toward the vanishing points.
They are useful because:
1) Unlike other types of perspectives, the
axonometric perspective is drawn to scale. We
can measure the actual heights and dimensions in
them.
2) They are easy to draw and do not require artistic
skills. The concept is simple.
You need to rotate the 2D layout to an angle, preferably
45 degrees. Then you have to draw vertical lines from
each corner (remember to draw them to the same scale of
the layout). Next you need to connect between the end
points of the lines to create a closed box as shown below.
Source: Philip Black
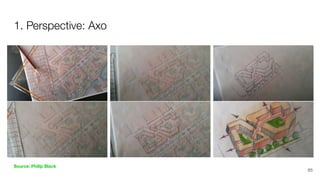
1. Perspective: Axo
84
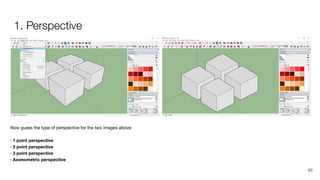
Now guess thetype of perspective for the two images above:
· 1 point perspective
· 2 point perspective
· 3 point perspective
· Axonometric perspective
1. Perspective
86
87.
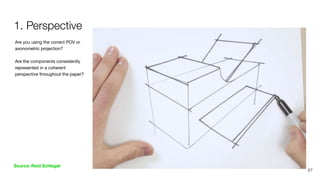
Are you usingthe correct POV or
axonometric projection?
Are the components consistently
represented in a coherent
perspective throughout the paper?
Source: Reid Schlegel
1. Perspective
87
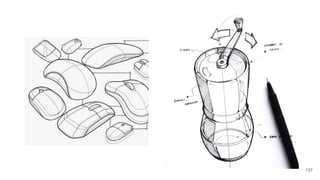
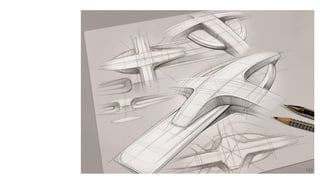
88.
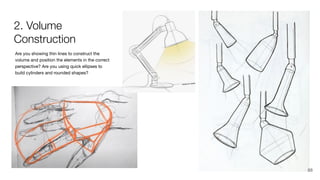
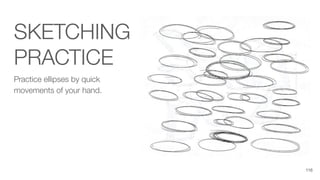
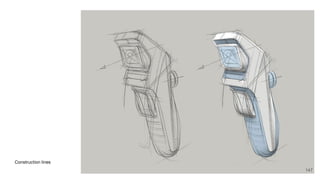
Are you showingthin lines to construct the
volume and position the elements in the correct
perspective? Are you using quick ellipses to
build cylinders and rounded shapes?
2. Volume
Construction
88
89.
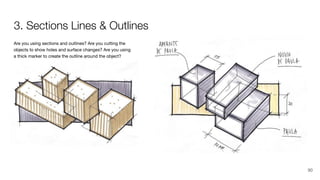
Are you usingsections and outlines? Are you cutting the
objects to show holes and surface changes? Are you using
a thick marker to create the outline around the object?
3. Sections Lines & Outlines
89
90.
Are you usingsections and outlines? Are you cutting the
objects to show holes and surface changes? Are you using
a thick marker to create the outline around the object?
3. Sections Lines & Outlines
90
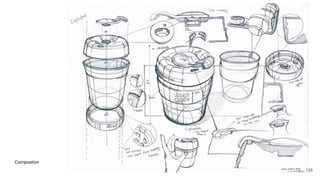
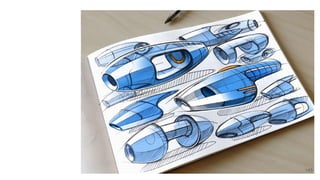
91.
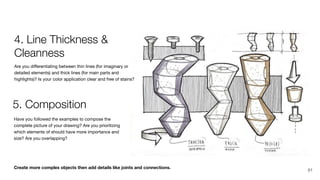
Create more complexobjects then add details like joints and connections.
Have you followed the examples to compose the
complete picture of your drawing? Are you prioritizing
which elements of should have more importance and
size? Are you overlapping?
Are you differentiating between thin lines (for imaginary or
detailed elements) and thick lines (for main parts and
highlights)? Is your color application clear and free of stains?
4. Line Thickness &
Cleanness
5. Composition
91
92.
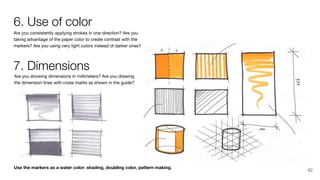
Use the markersas a water color: shading, doubling color, pattern making.
Are you showing dimensions in millimeters? Are you drawing
the dimension lines with cross marks as shown in the guide?
Are you consistently applying strokes in one direction? Are you
taking advantage of the paper color to create contrast with the
markers? Are you using very light colors instead of darker ones?
6. Use of color
7. Dimensions
92
93.
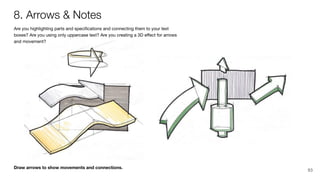
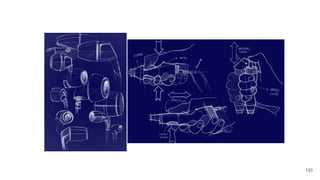
Draw arrows toshow movements and connections.
Are you highlighting parts and specifications and connecting them to your text
boxes? Are you using only uppercase text? Are you creating a 3D effect for arrows
and movement?
8. Arrows & Notes
93
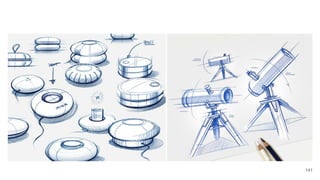
94.
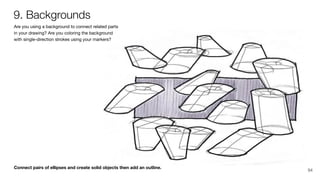
Connect pairs ofellipses and create solid objects then add an outline.
Are you using a background to connect related parts
in your drawing? Are you coloring the background
with single-direction strokes using your markers?
9. Backgrounds
94
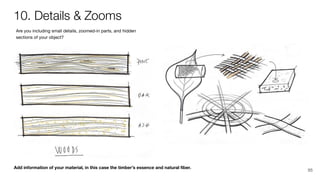
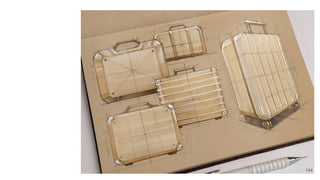
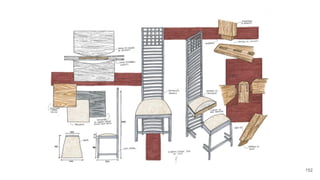
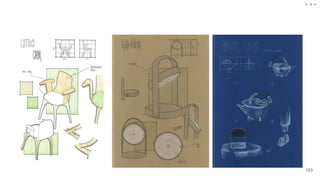
95.
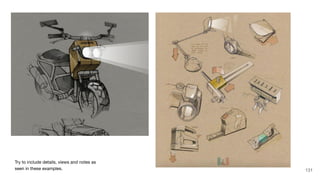
Add information ofyour material, in this case the timber’s essence and natural fiber.
Are you including small details, zoomed-in parts, and hidden
sections of your object?
10. Details & Zooms
95
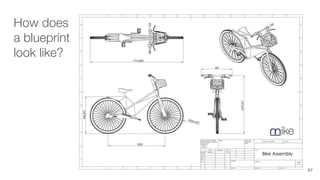
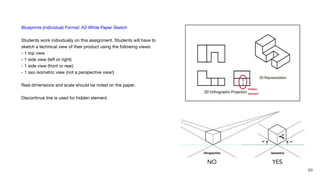
Blueprints (individual) Format:A3 White Paper Sketch
Students work individually on this assignment. Students will have to
sketch a technical view of their product using the following views:
- 1 top view
- 1 side view (left or right)
- 1 side view (front or rear)
- 1 axo isometric view (not a perspective view!)
Real dimensions and scale should be noted on the paper.
Discontinue line is used for hidden element.
NO YES
Hidden
element
99
100.
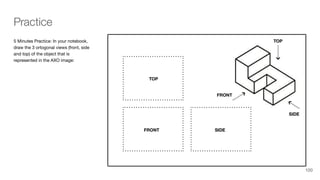
5 Minutes Practice:In your notebook,
draw the 3 ortogonal views (front, side
and top) of the object that is
represented in the AXO image:
TOP
FRONT SIDE
FRONT
TOP
SIDE
Practice
100
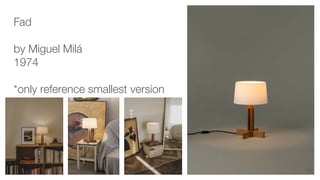
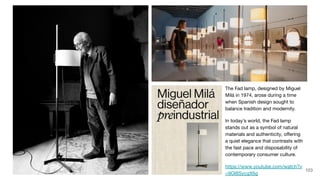
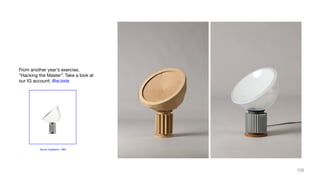
The Fad lamp,designed by Miguel
Milá in 1974, arose during a time
when Spanish design sought to
balance tradition and modernity.
In today’s world, the Fad lamp
stands out as a symbol of natural
materials and authenticity, offering
a quiet elegance that contrasts with
the fast pace and disposability of
contemporary consumer culture.
https://www.youtube.com/watch?v
=9Ol8SycgX6g
103
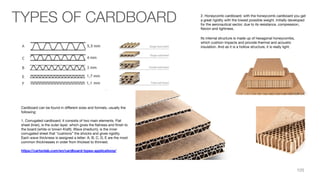
Cardboard can befound in different sizes and formats, usually the
following:
1. Corrugated cardboard: it consists of two main elements. Flat
sheet (liner), is the outer layer, which gives the flatness and finish to
the board (white or brown Kraft). Wave (medium), is the inner
corrugated sheet that “cushions” the shocks and gives rigidity.
Each wave thickness is assigned a letter: A, B, C, D, E are the most
common thicknesses in order from thickest to thinnest.
https://cartonlab.com/en/cardboard-types-applications/
2. Honeycomb cardboard: with the honeycomb cardboard you get
a great rigidity with the lowest possible weight. Initially developed
for the aeronautical sector, due to its resistance, compression,
flexion and lightness.
Its internal structure is made up of hexagonal honeycombs,
which cushion impacts and provide thermal and acoustic
insulation. And as it is a hollow structure, it is really light.
TYPES OF CARDBOARD
105
106.
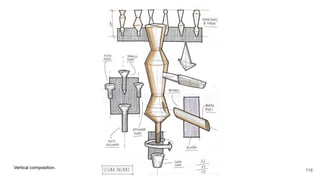
Taccia, Castiglioni, 1962
Fromanother year’s exercise,
“Hacking the Master”. Take a look at
our IG account: @ie.bids
106
107.
Cardboard is widelyused by
industrial designers to test their
products by iterating with
proportions, functions,
ergonomics and resistance.
107
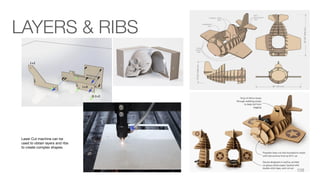
108.
Laser Cut machinecan be
used to obtain layers and ribs
to create complex shapes.
LAYERS & RIBS
108
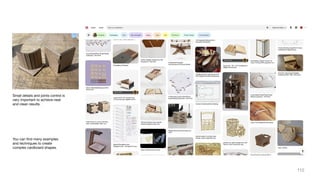
You can findmany examples
and techniques to create
complex cardboard shapes.
Small details and joints control is
very important to achieve neat
and clean results.
110
111.
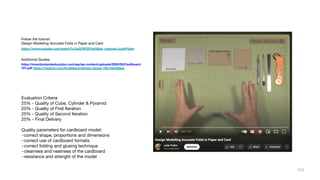
Follow the tutorial:
DesignModelling Accurate Folds in Paper and Card
https://www.youtube.com/watch?v=2s2UW32FdpQ&ab_channel=JudePullen
Additional Guides:
https://inventionlandeducation.com/wp/wp-content/uploads/2020/05/Cardboard-
101.pdf https://medium.com/@calebsun/design-issues-78a13dcb26ee
Evaluation Criteria
25% - Quality of Cube, Cylinder & Pyramid
25% - Quality of First Iteration
25% - Quality of Second Iteration
25% - Final Delivery
Quality parameters for cardboard model:
-correct shape, proportions and dimensions
-correct use of cardboard formats
-correct folding and glueing technique
-clearness and neatness of the cardboard
-resistance and strenght of the model
111
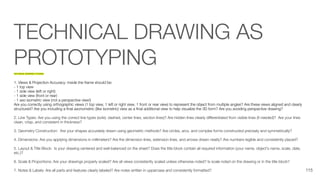
TECHNICAL DRAWING AS
PROTOTYPING
TECHNICALDRAWING TUTORIAL
1. Views & Projection Accuracy: Inside the frame should be:
- 1 top view
- 1 side view (left or right)
- 1 side view (front or rear)
- 1 axo isometric view (not a perspective view!)
Are you correctly using orthographic views (1 top view, 1 left or right view, 1 front or rear view) to represent the object from multiple angles? Are these views aligned and clearly
structured? Are you including a final axonometric (like isometric) view as a final additional view to help visualize the 3D form? Are you avoiding perspective drawing?
2. Line Types: Are you using the correct line types (solid, dashed, center lines, section lines)? Are hidden lines clearly differentiated from visible lines (if needed)? Are your lines
clean, crisp, and consistent in thickness?
3. Geometry Construction: Are your shapes accurately drawn using geometric methods? Are circles, arcs, and complex forms constructed precisely and symmetrically?
4. Dimensions: Are you applying dimensions in millimeters? Are the dimension lines, extension lines, and arrows drawn neatly? Are numbers legible and consistently placed?
5. Layout & Title Block: Is your drawing centered and well-balanced on the sheet? Does the title block contain all required information (your name, object’s name, scale, date,
etc.)?
6. Scale & Proportions: Are your drawings properly scaled? Are all views consistently scaled unless otherwise noted? Is scale noted on the drawing or in the title block?
7. Notes & Labels: Are all parts and features clearly labeled? Are notes written in uppercase and consistently formatted? 115
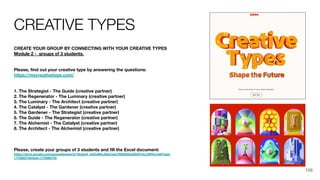
CREATIVE TYPES
CREATE YOURGROUP BY CONNECTING WITH YOUR CREATIVE TYPES
Module 2 - groups of 3 students.
Please, find out your creative type by answering the questions:
https://mycreativetype.com/
1. The Strategist - The Guide (creative partner)
2. The Regenerator - The Luminary (creative partner)
3. The Luminary - The Architect (creative partner)
4. The Catalyst - The Gardener (creative partner)
5. The Gardener - The Strategist (creative partner)
6. The Guide - The Regenerator (creative partner)
7. The Alchemist - The Catalyst (creative partner)
8. The Architect - The Alchemist (creative partner)
Please, create your groups of 3 students and fill the Excel document:
https://docs.google.com/spreadsheets/d/1sb3yixf_w2ZvB0xJlbeCykp7RI5tS2GpSDAFmLLNHXc/edit?gid=
1770583745#gid=1770583745
156
157.
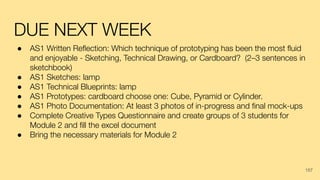
DUE NEXT WEEK
●AS1 Written Reflection: Which technique of prototyping has been the most fluid
and enjoyable - Sketching, Technical Drawing, or Cardboard? (2–3 sentences in
sketchbook)
● AS1 Sketches: lamp
● AS1 Technical Blueprints: lamp
● AS1 Prototypes: cardboard choose one: Cube, Pyramid or Cylinder.
● AS1 Photo Documentation: At least 3 photos of in-progress and final mock-ups
● Complete Creative Types Questionnaire and create groups of 3 students for
Module 2 and fill the excel document
● Bring the necessary materials for Module 2
157


![DESIGN BRIEFS, CONT.
MODULE #:
Timeline:
Start Date: [Insert Date]
Check-in / Critique: Session
Final Submission: Session
Assignment Overview:
Learning Objectives & From the Syllabus:
In-Class Activities & Deliverables:
Parameters & Constraints:
Assessment & Evaluation Criteria:
Reference Materials / Inspiration:
36](https://image.slidesharecdn.com/ids1detailedguidemodule1sessions1-3-260124202513-cdb5053d/85/IDS1_-Detailed-Guide-MODULE-1-Sessions-1-3-pdf-36-320.jpg)