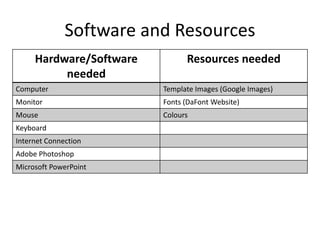
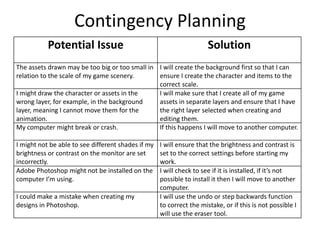
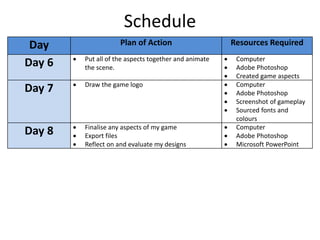
Pre-Production
Tamzin Twose
Style sheet
I’ve chosen pictures with
pixelated graphics as this is the
style of graphics that I will be
creating for my game. I couldn’t
find any pictures of a pixelated
jungle that looked similar to what
I wanted to create, so I’ve used
pictures that I sourced for my
mood board in my Initial Plans,
that have a cartoon style, block
colour as that is the form of
colour style that I will be creating
for my scenery.
Style sheet
Fonts For my game logo, I looked for fonts that are
attractive and fun. I feel that fonts 1, 2, 3 and 4
would be great. Font 5 fits in the most with the
8-bit style of game, but I don’t feel it is attractive
enough, to draw people’s attention. I tried to find
a fun font in a pixelated form, but I couldn’t find
one that was suitable.
Out of the five fonts I have chosen, I feel number
three, Agent Orange, will be the one that looks
the most fun and appealing. Also the fact that it
is an outline font means that I can fill in the text
with some colour.
For my in game text, for example score and life, I
will draw the fonts by hand using pixel squares as
I feel this will tie it in to the style of the game
best.
1
2
3
4
5
Colours The colours I’ve chosen are the ones that will feature most in my game.
The browns and green represent nature and will be used in my jungle
scenery and the yellow is for the bananas and stars which will be
collectible items in the world. The blue is in case I draw my scenery
with a sky detail and the grey is for the enemy characters, so that they
can be differentiated from the main character.
Layout 1
LIFE 0/2LEVEL 1
For my first layout plan, I
mocked up a screenshot of
the game. This helped me to
visualise where I might place
all of the aspects of the game
and what scale each aspect
needs to be.
The brown boxes represent
platforms for the monkey to
jump on. This helped me see
how I might challenge the
player to collect the stars in
order to progress to the next
level.
It also helped me to visualise
the layout of the text and to
think of how the player will
know what the goal is and
whether they are achieving
the goal by placing a star
count in the top right hand
corner.
Layout 2
For my second layout plan, I tried to
create a mock up of a game logo.
I cropped a small portion of the
background I used in Layout 1. This
is to represent that I will use the
background I create for my game as
the background for the logo. I used
the Agent Orange font which I’d
sourced for my style sheet and took
a screenshot of my game title on
the DaFont website so I could really
visualise what the text would look
like.
I placed a picture of the monkey as
he is the star of the game, so he
needed to be included and placed
some stars around the text to show
that they’re to collect in game.
Software and Resources
Hardware/Software
needed
Resources needed
Computer Template Images (Google Images)
Monitor Fonts (DaFont Website)
Mouse Colours
Keyboard
Internet Connection
Adobe Photoshop
Microsoft PowerPoint
Contingency Planning
Potential Issue Solution
The assets drawn may be too big or too small in
relation to the scale of my game scenery.
I will create the background first so that I can
ensure I create the character and items to the
correct scale.
I might draw the character or assets in the
wrong layer, for example, in the background
layer, meaning I cannot move them for the
animation.
I will make sure that I create all of my game
assets in separate layers and ensure that I have
the right layer selected when creating and
editing them.
My computer might break or crash. If this happens I will move to another computer.
I might not be able to see different shades if my
brightness or contrast on the monitor are set
incorrectly.
I will ensure that the brightness and contrast is
set to the correct settings before starting my
work.
Adobe Photoshop might not be installed on the
computer I’m using.
I will check to see if it is installed, if it’s not
possible to install it then I will move to another
computer.
I could make a mistake when creating my
designs in Photoshop.
I will use the undo or step backwards function
to correct the mistake, or if this is not possible I
will use the eraser tool.
Health and Safety
Potential Issue How will the issue be
avoided?
I might struggle to keep up with the deadlines
and become stressed.
I will ensure I have a schedule planned of how
long I have to spend on a task so that I don’t fall
behind, or I will put in extra hours to ensure the
work is completed.
I might develop eye strain from looking at the
monitor for too long.
I will ensure that I take regular scheduled
breaks.
I might develop RSI in my hand/wrist from using
a mouse or keyboard too much.
I will ensure that I take regular scheduled
breaks.
The computer or equipment might get
damaged by a drink being spilled.
I will ensure I do not keep any drinks near the
computer and only have drinks in break time, or
away from the equipment.
I might develop a bad back from sitting down
for too long.
I will ensure that my chair is adjusted and
positioned correctly before beginning my work
and take regular breaks.
My computer might overheat and catch fire. I will ensure that I switch computers at regular
intervals to ensure this does not happen.
Schedule
Day Plan of Action Resources Required
Day 1  Source template images, fonts and colours
 Mock up potential background using the
template images
 Computer
 Internet connection
 Google Images
 DaFont website
 Adobe Photoshop
Day 2  Begin drawing the backgrounds  Computer
 Adobe Photoshop
 Template images
 Sourced colours
Day 3  Finish off the backgrounds.
 Begin drawing the main character
 Computer
 Adobe Photoshop
 Sourced template images
and colours
Day 4  Draw the enemy characters  Computer
 Adobe Photoshop
 Sourced template images
and colours
Day 5  Draw the game assets (stars, bananas, text)  Computer
 Adobe Photoshop
 Sourced template images
and colours
Schedule
Day Plan of Action Resources Required
Day 6  Put all of the aspects together and animate
the scene.
 Computer
 Adobe Photoshop
 Created game aspects
Day 7  Draw the game logo  Computer
 Adobe Photoshop
 Screenshot of gameplay
 Sourced fonts and
colours
Day 8  Finalise any aspects of my game
 Export files
 Reflect on and evaluate my designs
 Computer
 Adobe Photoshop
 Microsoft PowerPoint

P4 - 5. Pre-Production (Interactive)

  • 1.
  • 2.
    Style sheet I’ve chosenpictures with pixelated graphics as this is the style of graphics that I will be creating for my game. I couldn’t find any pictures of a pixelated jungle that looked similar to what I wanted to create, so I’ve used pictures that I sourced for my mood board in my Initial Plans, that have a cartoon style, block colour as that is the form of colour style that I will be creating for my scenery.
  • 3.
    Style sheet Fonts Formy game logo, I looked for fonts that are attractive and fun. I feel that fonts 1, 2, 3 and 4 would be great. Font 5 fits in the most with the 8-bit style of game, but I don’t feel it is attractive enough, to draw people’s attention. I tried to find a fun font in a pixelated form, but I couldn’t find one that was suitable. Out of the five fonts I have chosen, I feel number three, Agent Orange, will be the one that looks the most fun and appealing. Also the fact that it is an outline font means that I can fill in the text with some colour. For my in game text, for example score and life, I will draw the fonts by hand using pixel squares as I feel this will tie it in to the style of the game best. 1 2 3 4 5 Colours The colours I’ve chosen are the ones that will feature most in my game. The browns and green represent nature and will be used in my jungle scenery and the yellow is for the bananas and stars which will be collectible items in the world. The blue is in case I draw my scenery with a sky detail and the grey is for the enemy characters, so that they can be differentiated from the main character.
  • 4.
    Layout 1 LIFE 0/2LEVEL1 For my first layout plan, I mocked up a screenshot of the game. This helped me to visualise where I might place all of the aspects of the game and what scale each aspect needs to be. The brown boxes represent platforms for the monkey to jump on. This helped me see how I might challenge the player to collect the stars in order to progress to the next level. It also helped me to visualise the layout of the text and to think of how the player will know what the goal is and whether they are achieving the goal by placing a star count in the top right hand corner.
  • 5.
    Layout 2 For mysecond layout plan, I tried to create a mock up of a game logo. I cropped a small portion of the background I used in Layout 1. This is to represent that I will use the background I create for my game as the background for the logo. I used the Agent Orange font which I’d sourced for my style sheet and took a screenshot of my game title on the DaFont website so I could really visualise what the text would look like. I placed a picture of the monkey as he is the star of the game, so he needed to be included and placed some stars around the text to show that they’re to collect in game.
  • 6.
    Software and Resources Hardware/Software needed Resourcesneeded Computer Template Images (Google Images) Monitor Fonts (DaFont Website) Mouse Colours Keyboard Internet Connection Adobe Photoshop Microsoft PowerPoint
  • 7.
    Contingency Planning Potential IssueSolution The assets drawn may be too big or too small in relation to the scale of my game scenery. I will create the background first so that I can ensure I create the character and items to the correct scale. I might draw the character or assets in the wrong layer, for example, in the background layer, meaning I cannot move them for the animation. I will make sure that I create all of my game assets in separate layers and ensure that I have the right layer selected when creating and editing them. My computer might break or crash. If this happens I will move to another computer. I might not be able to see different shades if my brightness or contrast on the monitor are set incorrectly. I will ensure that the brightness and contrast is set to the correct settings before starting my work. Adobe Photoshop might not be installed on the computer I’m using. I will check to see if it is installed, if it’s not possible to install it then I will move to another computer. I could make a mistake when creating my designs in Photoshop. I will use the undo or step backwards function to correct the mistake, or if this is not possible I will use the eraser tool.
  • 8.
    Health and Safety PotentialIssue How will the issue be avoided? I might struggle to keep up with the deadlines and become stressed. I will ensure I have a schedule planned of how long I have to spend on a task so that I don’t fall behind, or I will put in extra hours to ensure the work is completed. I might develop eye strain from looking at the monitor for too long. I will ensure that I take regular scheduled breaks. I might develop RSI in my hand/wrist from using a mouse or keyboard too much. I will ensure that I take regular scheduled breaks. The computer or equipment might get damaged by a drink being spilled. I will ensure I do not keep any drinks near the computer and only have drinks in break time, or away from the equipment. I might develop a bad back from sitting down for too long. I will ensure that my chair is adjusted and positioned correctly before beginning my work and take regular breaks. My computer might overheat and catch fire. I will ensure that I switch computers at regular intervals to ensure this does not happen.
  • 9.
    Schedule Day Plan ofAction Resources Required Day 1  Source template images, fonts and colours  Mock up potential background using the template images  Computer  Internet connection  Google Images  DaFont website  Adobe Photoshop Day 2  Begin drawing the backgrounds  Computer  Adobe Photoshop  Template images  Sourced colours Day 3  Finish off the backgrounds.  Begin drawing the main character  Computer  Adobe Photoshop  Sourced template images and colours Day 4  Draw the enemy characters  Computer  Adobe Photoshop  Sourced template images and colours Day 5  Draw the game assets (stars, bananas, text)  Computer  Adobe Photoshop  Sourced template images and colours
  • 10.
    Schedule Day Plan ofAction Resources Required Day 6  Put all of the aspects together and animate the scene.  Computer  Adobe Photoshop  Created game aspects Day 7  Draw the game logo  Computer  Adobe Photoshop  Screenshot of gameplay  Sourced fonts and colours Day 8  Finalise any aspects of my game  Export files  Reflect on and evaluate my designs  Computer  Adobe Photoshop  Microsoft PowerPoint

Editor's Notes

  • #3 Explore colours, fonts and image styles similar to what you want to produce. Discuss all three elements in relation to why you chose them and where you may use them in your project. Go over as many pages as you need to
  • #4 Explore colours, fonts and image styles similar to what you want to produce. Discuss all three elements in relation to why you chose them and where you may use them in your project. Go over as many pages as you need to
  • #5 Mock up of a potential design using the colours and fonts established in your style sheet and sourced images
  • #6 Mock up of a potential design using the colours and fonts established in your style sheet and sourced images