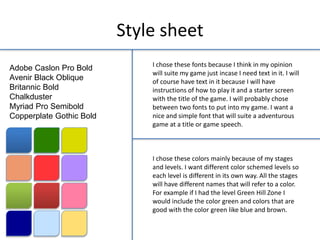
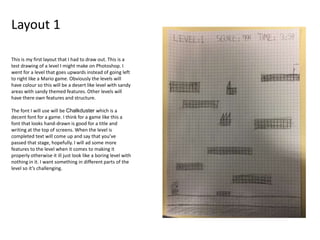
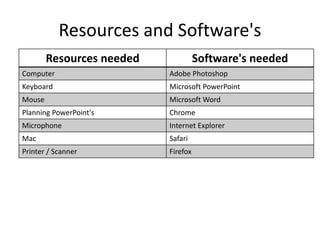
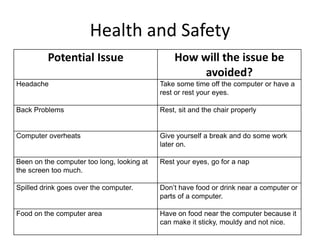
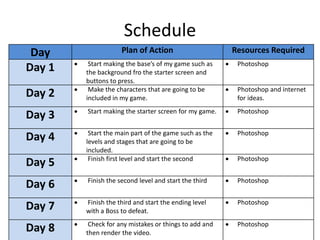
Pre-Production
Style sheet
Adobe Caslon Pro Bold
Avenir Black Oblique
Britannic Bold
Chalkduster
Myriad Pro Semibold
Copperplate Gothic Bold
I chose these fonts because I think in my opinion
will suite my game just incase I need text in it. I will
of course have text in it because I will have
instructions of how to play it and a starter screen
with the title of the game. I will probably chose
between two fonts to put into my game. I want a
nice and simple font that will suite a adventurous
game at a title or game speech.
I chose these colors mainly because of my stages
and levels. I want different color schemed levels so
each level is different in its own way. All the stages
will have different names that will refer to a color.
For example if I had the level Green Hill Zone I
would include the color green and colors that are
good with the color green like blue and brown.
Layout 1
This is my first layout that I had to draw out. This is a
test drawing of a level I might make on Photoshop. I
went for a level that goes upwards instead of going left
to right like a Mario game. Obviously the levels will
have colour so this will be a desert like level with sandy
areas with sandy themed features. Other levels will
have there own features and structure.
The font I will use will be Chalkduster which is a
decent font for a game. I think for a game like this a
font that looks hand-drawn is good for a title and
writing at the top of screens. When the level is
completed text will come up and say that you’ve
passed that stage, hopefully. I will ad some more
features to the level when it comes to making it
properly otherwise it ill just look like a boring level with
nothing in it. I want something in different parts of the
level so it’s challenging.
Layout 2
This is my second layout, however this might get used in my
game because of how good I actually made it. Besides that I
chose different colours so it changes the setting of the game and
is now in a different area. This is better when the game is
different instead of all the same because it adds something
better than just the same boring background. I added the
bushes so it doesn’t look like an empty level. This might be the
second stage of the game where the player progresses further
to the end, however I’m not sure on the order as of yet.
Resources and Software's
Resources needed Software's needed
Computer Adobe Photoshop
Keyboard Microsoft PowerPoint
Mouse Microsoft Word
Planning PowerPoint's Chrome
Microphone Internet Explorer
Mac Safari
Printer / Scanner Firefox
Contingency Planning
Potential Issue Solution
Laptop runs out of charge Charge it up before you use it.
Can’t access the internet Go somewhere where you can access internet
connection.
Computer crashes Have backup work just in case and save it
occasionally
Files get lost Have backup work
Falling behind on work Get it done for deadline dates.
Software doesn’t work Use a different computer or a different
software or restart your computer.
Health and Safety
Potential Issue How will the issue be
avoided?
Headache Take some time off the computer or have a
rest or rest your eyes.
Back Problems Rest, sit and the chair properly
Computer overheats Give yourself a break and do some work
later on.
Been on the computer too long, looking at
the screen too much.
Rest your eyes, go for a nap
Spilled drink goes over the computer. Don’t have food or drink near a computer or
parts of a computer.
Food on the computer area Have on food near the computer because it
can make it sticky, mouldy and not nice.
Schedule
Day Plan of Action Resources Required
Day 1  Start making the base’s of my game such as
the background fro the starter screen and
buttons to press.
 Photoshop
Day 2  Make the characters that are going to be
included in my game.
 Photoshop and internet
for ideas.
Day 3  Start making the starter screen for my game.  Photoshop
Day 4  Start the main part of the game such as the
levels and stages that are going to be
included.
 Photoshop
Day 5  Finish first level and start the second  Photoshop
Day 6  Finish the second level and start the third  Photoshop
Day 7  Finish the third and start the ending level
with a Boss to defeat.
 Photoshop
Day 8  Check for any mistakes or things to add and
then render the video.
 Photoshop

Interactive - Pre-Production

  • 1.
  • 2.
    Style sheet Adobe CaslonPro Bold Avenir Black Oblique Britannic Bold Chalkduster Myriad Pro Semibold Copperplate Gothic Bold I chose these fonts because I think in my opinion will suite my game just incase I need text in it. I will of course have text in it because I will have instructions of how to play it and a starter screen with the title of the game. I will probably chose between two fonts to put into my game. I want a nice and simple font that will suite a adventurous game at a title or game speech. I chose these colors mainly because of my stages and levels. I want different color schemed levels so each level is different in its own way. All the stages will have different names that will refer to a color. For example if I had the level Green Hill Zone I would include the color green and colors that are good with the color green like blue and brown.
  • 3.
    Layout 1 This ismy first layout that I had to draw out. This is a test drawing of a level I might make on Photoshop. I went for a level that goes upwards instead of going left to right like a Mario game. Obviously the levels will have colour so this will be a desert like level with sandy areas with sandy themed features. Other levels will have there own features and structure. The font I will use will be Chalkduster which is a decent font for a game. I think for a game like this a font that looks hand-drawn is good for a title and writing at the top of screens. When the level is completed text will come up and say that you’ve passed that stage, hopefully. I will ad some more features to the level when it comes to making it properly otherwise it ill just look like a boring level with nothing in it. I want something in different parts of the level so it’s challenging.
  • 4.
    Layout 2 This ismy second layout, however this might get used in my game because of how good I actually made it. Besides that I chose different colours so it changes the setting of the game and is now in a different area. This is better when the game is different instead of all the same because it adds something better than just the same boring background. I added the bushes so it doesn’t look like an empty level. This might be the second stage of the game where the player progresses further to the end, however I’m not sure on the order as of yet.
  • 5.
    Resources and Software's Resourcesneeded Software's needed Computer Adobe Photoshop Keyboard Microsoft PowerPoint Mouse Microsoft Word Planning PowerPoint's Chrome Microphone Internet Explorer Mac Safari Printer / Scanner Firefox
  • 6.
    Contingency Planning Potential IssueSolution Laptop runs out of charge Charge it up before you use it. Can’t access the internet Go somewhere where you can access internet connection. Computer crashes Have backup work just in case and save it occasionally Files get lost Have backup work Falling behind on work Get it done for deadline dates. Software doesn’t work Use a different computer or a different software or restart your computer.
  • 7.
    Health and Safety PotentialIssue How will the issue be avoided? Headache Take some time off the computer or have a rest or rest your eyes. Back Problems Rest, sit and the chair properly Computer overheats Give yourself a break and do some work later on. Been on the computer too long, looking at the screen too much. Rest your eyes, go for a nap Spilled drink goes over the computer. Don’t have food or drink near a computer or parts of a computer. Food on the computer area Have on food near the computer because it can make it sticky, mouldy and not nice.
  • 8.
    Schedule Day Plan ofAction Resources Required Day 1  Start making the base’s of my game such as the background fro the starter screen and buttons to press.  Photoshop Day 2  Make the characters that are going to be included in my game.  Photoshop and internet for ideas. Day 3  Start making the starter screen for my game.  Photoshop Day 4  Start the main part of the game such as the levels and stages that are going to be included.  Photoshop Day 5  Finish first level and start the second  Photoshop Day 6  Finish the second level and start the third  Photoshop Day 7  Finish the third and start the ending level with a Boss to defeat.  Photoshop Day 8  Check for any mistakes or things to add and then render the video.  Photoshop

Editor's Notes

  • #3 Explore colours, fonts and image styles similar to what you want to produce. Discuss all three elements in relation to why you chose them and where you may use them in your project. Go over as many pages as you need to
  • #4 Mock up of a potential design using the colours and fonts established in your style sheet and sourced images
  • #5 Mock up of a potential design using the colours and fonts established in your style sheet and sourced images