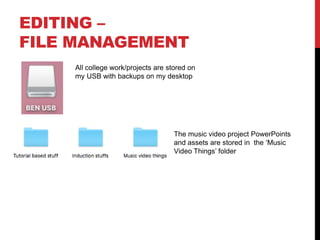
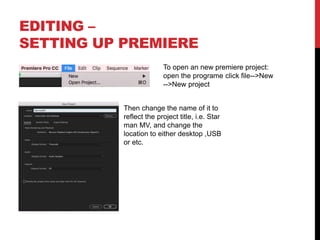
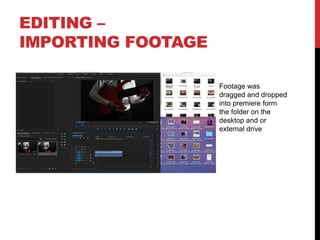
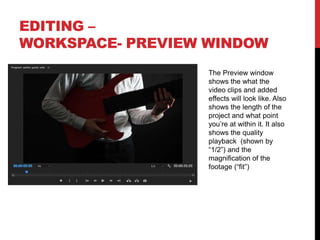
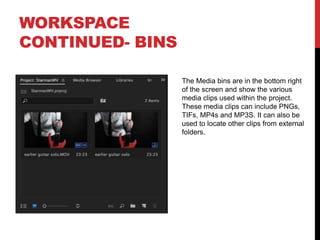
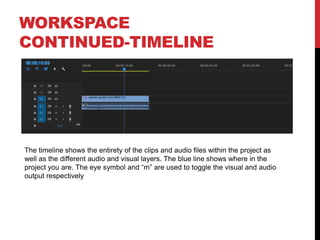
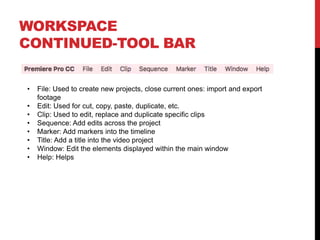
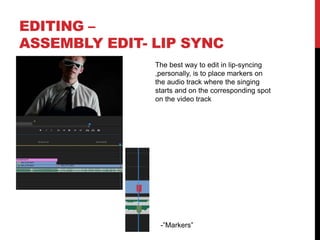
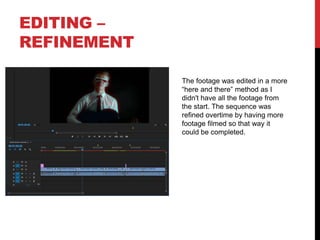
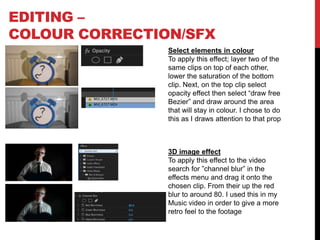
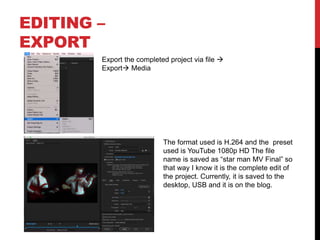
MUSIC VIDEO
PRODUCTION
PROCESS
LOGBEN DIX
PRODUCTION LOG:
GUIDANCE
• This document is for you to track the progress of your
production – filming, editing and post-production.
• This is so you can track what you did and how you did it,
explaining and amendments and changes you made and
tracking the decisions that have shaped the practical
creation of your music video.
• The more detail you include about how you made your music
video, the better. The document is broken down in to two
sections, Filming and Editing, each of these is then made of
specific elements that occur in both.
• For each slide there is a prompt detailing what you should
include, delete the prompt after you have complete the slide.
• Remember, images often show what you’ve done more
effectively than words. Use text to explain an illustration.
FILMING
Explain what worked and didn’t work about your filming and how you
managed this covering the following areas:
• Technical – using the cameras and any technical equipment; this could
be how you did your lip sync, used the green screen, dealt with problems
with batteries, etc
• Logistical – did your locations work? Did you have any access
problems? Did it rain?
• Personnel – how were your cast/crew? Did anyone let you down? How
did you manage this?
• Planning – did your planning help? Do you think it could have worked
better? How?
• Next steps – do you need to re-film? Film more? Have you changed your
video? How/why?
*If you make any drastic changes to your video you MUST
add this to your planning documentation and state how and
why this has happened
EDITING
• Record your edit progress, decisions, problems, etc. in
this section
• Include screenshots with annotations, statements, etc.
• Try to explain how you worked and justify why you chose
to work the way you did.
• Follow the structure and what to include on each slide as
this is necessary for evidence for assessment
EDITING –
FILE MANAGEMENT
All college work/projects are stored on
my USB with backups on my desktop
The music video project PowerPoints
and assets are stored in the ‘Music
Video Things’ folder
FILE MANAGEMENT
CONTINUED
Audio track PowerPoints and
video clips
Shown in this folder
Clips shown are ordered via their
names and where they should be
appearing in the video (“later guitar
solo”) or can be chosen through
the thumbnail.
EDITING –
SETTING UP PREMIERE
To open an new premiere project:
open the programe click file-->New
-->New project
Then change the name of it to
reflect the project title, i.e. Star
man MV, and change the
location to either desktop ,USB
or etc.
EDITING –
IMPORTING FOOTAGE
Footage was
dragged and dropped
into premiere form
the folder on the
desktop and or
external drive
EDITING –
WORKSPACE- PREVIEW WINDOW
The Preview window
shows the what the
video clips and added
effects will look like. Also
shows the length of the
project and what point
you’re at within it. It also
shows the quality
playback (shown by
“1/2”) and the
magnification of the
footage (“fit”)
WORKSPACE
CONTINUED- BINS
The Media bins are in the bottom right
of the screen and show the various
media clips used within the project.
These media clips can include PNGs,
TIFs, MP4s and MP3S. It can also be
used to locate other clips from external
folders.
WORKSPACE
CONTINUED-TIMELINE
The timeline shows the entirety of the clips and audio files within the project as
well as the different audio and visual layers. The blue line shows where in the
project you are. The eye symbol and “m” are used to toggle the visual and audio
output respectively
WORKSPACE
CONTINUED-TOOL BAR
• File: Used to create new projects, close current ones: import and export
footage
• Edit: Used for cut, copy, paste, duplicate, etc.
• Clip: Used to edit, replace and duplicate specific clips
• Sequence: Add edits across the project
• Marker: Add markers into the timeline
• Title: Add a title into the video project
• Window: Edit the elements displayed within the main window
• Help: Helps
WORKSPACE CONTINUED-
AUDIO LEVELS
The audio levels show the
amount of decibels being
played at one time and
through what audio channel
(let and right) they are coming
through
EDITING –
ASSEMBLY EDIT
Clips are dragged onto the timeline via the bins or through the files on
the PC
The cutting tool is used to trim clips or
separate them for specific placements of edits
EDITING –
ASSEMBLY EDIT- LIP SYNC
The best way to edit in lip-syncing
,personally, is to place markers on
the audio track where the singing
starts and on the corresponding spot
on the video track
-”Markers”
EDITING –
REFINEMENT
The footage was edited in a more
“here and there” method as I
didn't have all the footage from
the start. The sequence was
refined overtime by having more
footage filmed so that way it
could be completed.
EDITING –
COLOUR CORRECTION/SFX
Select elements in colour
To apply this effect; layer two of the
same clips on top of each other,
lower the saturation of the bottom
clip. Next, on the top clip select
opacity effect then select “draw free
Bezier” and draw around the area
that will stay in colour. I chose to do
this as I draws attention to that prop
3D image effect
To apply this effect to the video
search for ”channel blur” in the
effects menu and drag it onto the
chosen clip. From their up the red
blur to around 80. I used this in my
Music video in order to give a more
retro feel to the footage
EDITING –
EXPORT
Export the completed project via file 
Export Media
The format used is H.264 and the preset
used is YouTube 1080p HD The file
name is saved as “star man MV Final” so
that way I know it is the complete edit of
the project. Currently, it is saved to the
desktop, USB and it is on the blog.

Mv process log form 2019

  • 1.
  • 2.
    PRODUCTION LOG: GUIDANCE • Thisdocument is for you to track the progress of your production – filming, editing and post-production. • This is so you can track what you did and how you did it, explaining and amendments and changes you made and tracking the decisions that have shaped the practical creation of your music video. • The more detail you include about how you made your music video, the better. The document is broken down in to two sections, Filming and Editing, each of these is then made of specific elements that occur in both. • For each slide there is a prompt detailing what you should include, delete the prompt after you have complete the slide. • Remember, images often show what you’ve done more effectively than words. Use text to explain an illustration.
  • 3.
    FILMING Explain what workedand didn’t work about your filming and how you managed this covering the following areas: • Technical – using the cameras and any technical equipment; this could be how you did your lip sync, used the green screen, dealt with problems with batteries, etc • Logistical – did your locations work? Did you have any access problems? Did it rain? • Personnel – how were your cast/crew? Did anyone let you down? How did you manage this? • Planning – did your planning help? Do you think it could have worked better? How? • Next steps – do you need to re-film? Film more? Have you changed your video? How/why? *If you make any drastic changes to your video you MUST add this to your planning documentation and state how and why this has happened
  • 4.
    EDITING • Record youredit progress, decisions, problems, etc. in this section • Include screenshots with annotations, statements, etc. • Try to explain how you worked and justify why you chose to work the way you did. • Follow the structure and what to include on each slide as this is necessary for evidence for assessment
  • 5.
    EDITING – FILE MANAGEMENT Allcollege work/projects are stored on my USB with backups on my desktop The music video project PowerPoints and assets are stored in the ‘Music Video Things’ folder
  • 6.
    FILE MANAGEMENT CONTINUED Audio trackPowerPoints and video clips Shown in this folder Clips shown are ordered via their names and where they should be appearing in the video (“later guitar solo”) or can be chosen through the thumbnail.
  • 7.
    EDITING – SETTING UPPREMIERE To open an new premiere project: open the programe click file-->New -->New project Then change the name of it to reflect the project title, i.e. Star man MV, and change the location to either desktop ,USB or etc.
  • 8.
    EDITING – IMPORTING FOOTAGE Footagewas dragged and dropped into premiere form the folder on the desktop and or external drive
  • 9.
    EDITING – WORKSPACE- PREVIEWWINDOW The Preview window shows the what the video clips and added effects will look like. Also shows the length of the project and what point you’re at within it. It also shows the quality playback (shown by “1/2”) and the magnification of the footage (“fit”)
  • 10.
    WORKSPACE CONTINUED- BINS The Mediabins are in the bottom right of the screen and show the various media clips used within the project. These media clips can include PNGs, TIFs, MP4s and MP3S. It can also be used to locate other clips from external folders.
  • 11.
    WORKSPACE CONTINUED-TIMELINE The timeline showsthe entirety of the clips and audio files within the project as well as the different audio and visual layers. The blue line shows where in the project you are. The eye symbol and “m” are used to toggle the visual and audio output respectively
  • 12.
    WORKSPACE CONTINUED-TOOL BAR • File:Used to create new projects, close current ones: import and export footage • Edit: Used for cut, copy, paste, duplicate, etc. • Clip: Used to edit, replace and duplicate specific clips • Sequence: Add edits across the project • Marker: Add markers into the timeline • Title: Add a title into the video project • Window: Edit the elements displayed within the main window • Help: Helps
  • 13.
    WORKSPACE CONTINUED- AUDIO LEVELS Theaudio levels show the amount of decibels being played at one time and through what audio channel (let and right) they are coming through
  • 14.
    EDITING – ASSEMBLY EDIT Clipsare dragged onto the timeline via the bins or through the files on the PC The cutting tool is used to trim clips or separate them for specific placements of edits
  • 15.
    EDITING – ASSEMBLY EDIT-LIP SYNC The best way to edit in lip-syncing ,personally, is to place markers on the audio track where the singing starts and on the corresponding spot on the video track -”Markers”
  • 16.
    EDITING – REFINEMENT The footagewas edited in a more “here and there” method as I didn't have all the footage from the start. The sequence was refined overtime by having more footage filmed so that way it could be completed.
  • 17.
    EDITING – COLOUR CORRECTION/SFX Selectelements in colour To apply this effect; layer two of the same clips on top of each other, lower the saturation of the bottom clip. Next, on the top clip select opacity effect then select “draw free Bezier” and draw around the area that will stay in colour. I chose to do this as I draws attention to that prop 3D image effect To apply this effect to the video search for ”channel blur” in the effects menu and drag it onto the chosen clip. From their up the red blur to around 80. I used this in my Music video in order to give a more retro feel to the footage
  • 18.
    EDITING – EXPORT Export thecompleted project via file  Export Media The format used is H.264 and the preset used is YouTube 1080p HD The file name is saved as “star man MV Final” so that way I know it is the complete edit of the project. Currently, it is saved to the desktop, USB and it is on the blog.