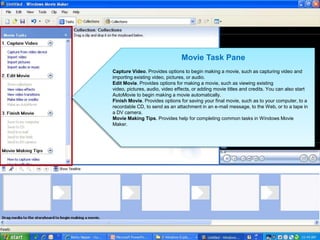
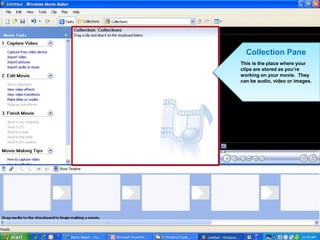
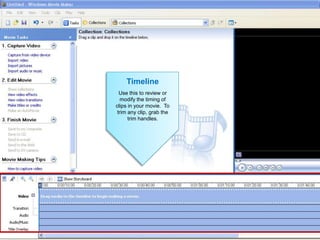
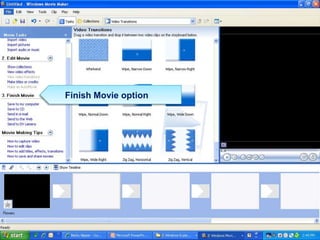
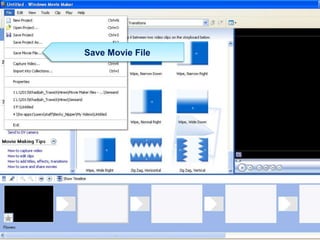
Let’s Make a Movie!
  Using MovieMaker
What is MovieMaker?
• MovieMaker is a program that lets you
  create and edit your own movies.
• You can do this using pictures, video and
  audio.
• You can add special effects and transitions
  to make your movie really stand out.
So, How Do I Begin?
• First, create a folder where you
  can keep all of your files relating
  to the project.
• It is very important to keep
  EVERYTHING (pictures and audio)
  within this folder.
• You will collect all of your files
  FIRST before you begin building
  your movie.
So, How Do I Begin?
• Next, you will open a new project
  in MovieMaker
• From the Start menu, go to All
  Programs and then search for
  Windows Movie Maker
• Go ahead and save your project
  in your folder or on a flash drive
Now, Let’s Make a Movie!
Movie Task Pane
Capture Video. Provides options to begin making a movie, such as capturing video and
importing existing video, pictures, or audio.
Edit Movie. Provides options for making a movie, such as viewing existing
video, pictures, audio, video effects, or adding movie titles and credits. You can also start
AutoMovie to begin making a movie automatically.
Finish Movie. Provides options for saving your final movie, such as to your computer, to a
recordable CD, to send as an attachment in an e-mail message, to the Web, or to a tape in
a DV camera.
Movie Making Tips. Provides help for completing common tasks in Windows Movie
Maker.
Collection Pane
This is the place where your
clips are stored as you’re
working on your movie. They
can be audio, video or images.
Storyboard
This is where you can
arrange the sequence
of your movie – simply
 drag & drop from the
   collection pane to
          here.
Storyboard
     Timeline
This is where you can
arrangethis to review or
    Use the sequence
    modify the timing of
of your movie – simply
 drag &in your movie. To
  clips drop from the
   collection pane to the
   trim any clip, grab
        trim handles.
           here.
Tips to Remember
• The storyboard view only allows
  you see the images in your movie.
  Switch to timeline view to see all
  of your images plus audio and
  transitions!
• Only certain files can be imported
  into MovieMaker. A list of them
  are on the next slide.
Supported MovieMaker File Types
   • Video:
     .asf, .avi, .m1v, .mp2, .mp2v, .mpe,
     .mpeg, .mpg, .mpv2, .wm, and
     .wmv
   • Audio: .aif, .aifc, .aiff
     .asf, .au, .mp2, .mp3, .mpa, .snd, .
     wav, and .wma
   • Picture:
     .bmp, .dib, .emf, .gif, .jfif, .jpe, .jpe
Add Special Effects, Transitions
          and Titles
  From the Edit Movie option in the Movie Tasks
 pane, add effects like Sepia, Watercolor and
 Fading In

  Change the transition effects if desired

  Add text, titles or credits to your clips

  Use the timeline pane to get your timing right

  Remember that less is more when it comes to
 effects
The Final Cut…

 This last step is very important…when you are done
with your movie, make sure you complete the last step

 As you’ve been working on your movie, you’ve been
working in a project file. If you simply save your file when
you’re done, you have missed the crucial last step

 IT IS VERY IMPORTANT that you save your file as a
MOVIE…this will collect all of your files (the video, audio
and project files) into one movie file.

 You can do this one of 2 ways
Finish Movie option
Save Movie File
Be Aware…
 Of copyright and legal issues
when looking online for
images, audio or video clips
 Use the LibGuide to collect your
images and sounds
 Of not saving your movie correctly.
Once you are completely finished
and do not need to make any more
edits, then you may save your movie
file.
Now it’s your turn…
 From your My Computer folder, find the :P
drive.
 Look for the folder “Media Resources”
 There are a variety of both audio and video
clips for you to use.
 Open these files, save them to your
computer (remember to put everything in one
folder!) and make a mini-movie.
 Be creative!
Want to Access This
  Presentation?
• Go the PCHS home page
• Click on the Media Center tab
• Select the Guides and Pathfinders
  page
• In the green LibGuides box, scroll until
  you find the Poetry Alive link. This will
  take you to the LibGuide with all of the
  tools to create an awesome digital
  poem!

Let’s make a movie!

  • 1.
    Let’s Make aMovie! Using MovieMaker
  • 2.
    What is MovieMaker? •MovieMaker is a program that lets you create and edit your own movies. • You can do this using pictures, video and audio. • You can add special effects and transitions to make your movie really stand out.
  • 3.
    So, How DoI Begin? • First, create a folder where you can keep all of your files relating to the project. • It is very important to keep EVERYTHING (pictures and audio) within this folder. • You will collect all of your files FIRST before you begin building your movie.
  • 4.
    So, How DoI Begin? • Next, you will open a new project in MovieMaker • From the Start menu, go to All Programs and then search for Windows Movie Maker • Go ahead and save your project in your folder or on a flash drive
  • 5.
  • 6.
    Movie Task Pane CaptureVideo. Provides options to begin making a movie, such as capturing video and importing existing video, pictures, or audio. Edit Movie. Provides options for making a movie, such as viewing existing video, pictures, audio, video effects, or adding movie titles and credits. You can also start AutoMovie to begin making a movie automatically. Finish Movie. Provides options for saving your final movie, such as to your computer, to a recordable CD, to send as an attachment in an e-mail message, to the Web, or to a tape in a DV camera. Movie Making Tips. Provides help for completing common tasks in Windows Movie Maker.
  • 7.
    Collection Pane This isthe place where your clips are stored as you’re working on your movie. They can be audio, video or images.
  • 8.
    Storyboard This is whereyou can arrange the sequence of your movie – simply drag & drop from the collection pane to here.
  • 9.
    Storyboard Timeline This is where you can arrangethis to review or Use the sequence modify the timing of of your movie – simply drag &in your movie. To clips drop from the collection pane to the trim any clip, grab trim handles. here.
  • 10.
    Tips to Remember •The storyboard view only allows you see the images in your movie. Switch to timeline view to see all of your images plus audio and transitions! • Only certain files can be imported into MovieMaker. A list of them are on the next slide.
  • 11.
    Supported MovieMaker FileTypes • Video: .asf, .avi, .m1v, .mp2, .mp2v, .mpe, .mpeg, .mpg, .mpv2, .wm, and .wmv • Audio: .aif, .aifc, .aiff .asf, .au, .mp2, .mp3, .mpa, .snd, . wav, and .wma • Picture: .bmp, .dib, .emf, .gif, .jfif, .jpe, .jpe
  • 12.
    Add Special Effects,Transitions and Titles  From the Edit Movie option in the Movie Tasks pane, add effects like Sepia, Watercolor and Fading In  Change the transition effects if desired  Add text, titles or credits to your clips  Use the timeline pane to get your timing right  Remember that less is more when it comes to effects
  • 13.
    The Final Cut… This last step is very important…when you are done with your movie, make sure you complete the last step  As you’ve been working on your movie, you’ve been working in a project file. If you simply save your file when you’re done, you have missed the crucial last step  IT IS VERY IMPORTANT that you save your file as a MOVIE…this will collect all of your files (the video, audio and project files) into one movie file.  You can do this one of 2 ways
  • 14.
  • 15.
  • 16.
    Be Aware…  Ofcopyright and legal issues when looking online for images, audio or video clips  Use the LibGuide to collect your images and sounds  Of not saving your movie correctly. Once you are completely finished and do not need to make any more edits, then you may save your movie file.
  • 17.
    Now it’s yourturn…  From your My Computer folder, find the :P drive.  Look for the folder “Media Resources”  There are a variety of both audio and video clips for you to use.  Open these files, save them to your computer (remember to put everything in one folder!) and make a mini-movie.  Be creative!
  • 18.
    Want to AccessThis Presentation? • Go the PCHS home page • Click on the Media Center tab • Select the Guides and Pathfinders page • In the green LibGuides box, scroll until you find the Poetry Alive link. This will take you to the LibGuide with all of the tools to create an awesome digital poem!