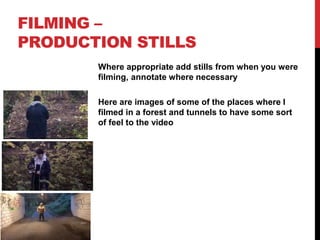
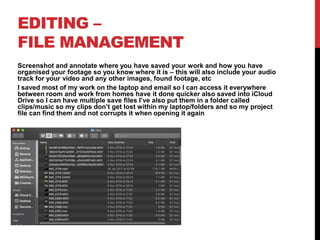
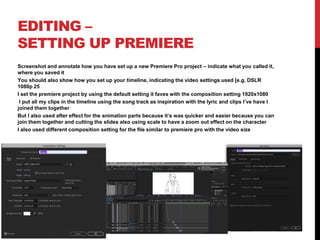
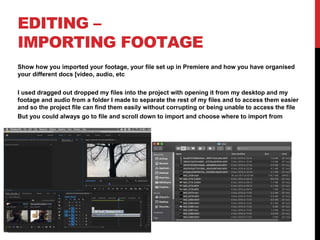
MUSIC VIDEO
PRODUCTION
PROCESS
LOGYOUR NAME
PRODUCTION LOG:
GUIDANCE
• This document is for you to track the progress of your production
– filming, editing and post-production.
• This is so you can track what you did and how you did it,
explaining and amendments and changes you made and tracking
the decisions that have shaped the practical creation of your
music video.
• The more detail you include about how you made your music
video, the better. The document is broken down in to two
sections, Filming and Editing, each of these is then made of
specific elements that occur in both.
• For each slide there is a prompt detailing what you should
include, delete the prompt after you have complete the slide.
• Remember, images often show what you’ve done more effectively
than words. Use text to explain an illustration.
FILMING
Explain what worked and didn’t work about your filming and how you managed
this covering the following areas:
• Technical – using the cameras and any technical equipment; this could be
how you did your lip sync, used the green screen, dealt with problems with
batteries, etc
• Logistical – did your locations work? Did you have any access problems?
Did it rain?
• Personnel – how were your cast/crew? Did anyone let you down? How did
you manage this?
• Planning – did your planning help? Do you think it could have worked
better? How?
• Next steps – do you need to re-film? Film more? Have you changed your
video? How/why?
*If you make any drastic changes to your video you MUST add
this to your planning documentation and state how and why
this has happened
FILMING –
PRODUCTION STILLS
Where appropriate add stills from when you were
filming, annotate where necessary
Here are images of some of the places where I
filmed in a forest and tunnels to have some sort
of feel to the video
EDITING
• Record your edit progress, decisions, problems, etc. in this
section
• Include screenshots with annotations, statements, etc.
• Try to explain how you worked and justify why you chose
to work the way you did.
• Follow the structure and what to include on each slide as
this is necessary for evidence for assessment
EDITING PROGRESS
Here I cut the clips into the sections for the bits
I wanted shorten them down basically cut the
clips off where I started to stop recording and
started to move the camera
Also moved the clips to the section of the song
I wanted them to be placed at so I could add
later clips in between them and sort them out at
a later date
Here I joined the clips together to
fit with each other and try and sort
each scene so they fit with the
song lyrics and that some
transition work well with each
other
Another thing I did was add a little
animation near the start to cover
my face because I hate it so I
used a scribble effect (basically
two frames repeating it self but
like with a pencil)
Here I unlinked the audio from the footage
so it doesn’t overlap with the song also
adding more footage to the video and
cropping it so it cuts off at the right
moment
Another thing I did it add text to the start
the music video like a title to it (the song
title and and artist) with a little animation
With the text moving slightly
Here I put the exported the video to add curtain to the
video that I couldn’t do in because they dont have
curtain effects i wanted to use within the video like i
included some animation and cant get it to work with
premiere because i need it go at a curtain speed also
added some animation of someone running away from
them selves it to symbolise the song and story
the graph is to steady the motions in the
rotations and position effect and to level it
out and to make the transition steady
EDITING
I added a bit of animation near the end that affects personally
to me because of the song lyrics and the way I made the
character
The character is supposed to represent me in the music video
because of the way I see my self though my eye most of the
music is kinda depressing but that the style I wanted it to be
so it worked out in the end but theres a scene where eyes are
moving side to side didn’t work the way I wanted because of
the amount of frames I did didn’t work well I should have
added more but I place all my animation slides into After
effects because that software better to animation than
premiere
EDITING –
FILE MANAGEMENT
Screenshot and annotate where you have saved your work and how you have
organised your footage so you know where it is – this will also include your audio
track for your video and any other images, found footage, etc
I saved most of my work on the laptop and email so I can access it everywhere
between room and work from homes have it done quicker also saved into iCloud
Drive so I can have multiple save files I’ve also put them in a folder called
clips/music so my clips don’t get lost within my laptop/folders and so my project
file can find them and not corrupts it when opening it again
EDITING –
SETTING UP PREMIERE
Screenshot and annotate how you have set up a new Premiere Pro project – indicate what you called it,
where you saved it
You should also show how you set up your timeline, indicating the video settings used [e.g. DSLR
1080p 25
I set the premiere project by using the default setting it faves with the composition setting 1920x1080
I put all my clips in the timeline using the song track as inspiration with the lyric and clips I’ve have I
joined them together
But I also used after effect for the animation parts because it’s was quicker and easier because you can
join them together and cutting the slides also using scale to have a zoom out effect on the character
I also used different composition setting for the file similar to premiere pro with the video size
EDITING –
IMPORTING FOOTAGE
Show how you imported your footage, your file set up in Premiere and how you have organised
your different docs [video, audio, etc
I used dragged out dropped my files into the project with opening it from my desktop and my
footage and audio from a folder I made to separate the rest of my files and to access them easier
and so the project file can find them easily without corrupting or being unable to access the file
But you could always go to file and scroll down to import and choose where to import from
EDITING –
WORKSPACE
Show and describe the Premiere Pro workspace – preview
window, bins, timeline, playback window, tool bar, audio levels,
etc
EDITING –
ASSEMBLY EDIT
Show how you put together your basic sequence in the order you want it – previewing clips, dragging to the
timeline, trimming/cutting, etc
If you have a lip sync, pay special attention to showing how you synchronised the footage with the audio track
I put together my sequence by listening to the music track I put and
basing my clips of the song lyrics and placing them in sync with the
music certain drops change the scene while some words change it
I would click the razor tool to cut the clip to the section of the scene I
want then delete the bit I don’t then drag the scene to the section of the
song I want them at I would also drag the end and start of the clip to get
rid of maybe some seconds of the clips
EDITING –
REFINEMENT
Show and explain how you have refined and improved your
initial sequence edit
I refined the sequence by adding different transitions to make
the music video better and not bland I’ve add some levels to
brighten some of the clips because some were to darks to see
also added a bit of animation near the end because I ran out of
clips to edit
EDITING –
COLOUR CORRECTION/SFX
Show and explain your colour correction process/effects process – use staged screenshots to show
each part of the process and the effect. Explain why you chose to do this
The effect I’ve added are in the program after effect where I added transitions to make the music video
better than just a plan video where it just shifts to a new scene randomly without warning so I did some
side and shake transitions where they come from the side or just a little bounce to it
The screenshots show were and what i did to do this the graph is to smooth and the speed and
transitions so it’s not all shaky it’s levels it out
The transform shows what’s involved with the transitions whiles the first one where their placed
EDITING –
EXPORT
Show how you exported your completed project, show which
settings you have used and explain your choice of file name
and where you have saved it
I exported it though media exporter and it rendered both
audio and video at 1080p it took 22 minutes to render then I
uploaded it to YouTube and the file name I just named it
music video media so I don’t mix it up my other files
I saved it to my folder clips and desktop

Mv process log form

  • 1.
  • 2.
    PRODUCTION LOG: GUIDANCE • Thisdocument is for you to track the progress of your production – filming, editing and post-production. • This is so you can track what you did and how you did it, explaining and amendments and changes you made and tracking the decisions that have shaped the practical creation of your music video. • The more detail you include about how you made your music video, the better. The document is broken down in to two sections, Filming and Editing, each of these is then made of specific elements that occur in both. • For each slide there is a prompt detailing what you should include, delete the prompt after you have complete the slide. • Remember, images often show what you’ve done more effectively than words. Use text to explain an illustration.
  • 3.
    FILMING Explain what workedand didn’t work about your filming and how you managed this covering the following areas: • Technical – using the cameras and any technical equipment; this could be how you did your lip sync, used the green screen, dealt with problems with batteries, etc • Logistical – did your locations work? Did you have any access problems? Did it rain? • Personnel – how were your cast/crew? Did anyone let you down? How did you manage this? • Planning – did your planning help? Do you think it could have worked better? How? • Next steps – do you need to re-film? Film more? Have you changed your video? How/why? *If you make any drastic changes to your video you MUST add this to your planning documentation and state how and why this has happened
  • 4.
    FILMING – PRODUCTION STILLS Whereappropriate add stills from when you were filming, annotate where necessary Here are images of some of the places where I filmed in a forest and tunnels to have some sort of feel to the video
  • 5.
    EDITING • Record youredit progress, decisions, problems, etc. in this section • Include screenshots with annotations, statements, etc. • Try to explain how you worked and justify why you chose to work the way you did. • Follow the structure and what to include on each slide as this is necessary for evidence for assessment
  • 6.
    EDITING PROGRESS Here Icut the clips into the sections for the bits I wanted shorten them down basically cut the clips off where I started to stop recording and started to move the camera Also moved the clips to the section of the song I wanted them to be placed at so I could add later clips in between them and sort them out at a later date
  • 7.
    Here I joinedthe clips together to fit with each other and try and sort each scene so they fit with the song lyrics and that some transition work well with each other Another thing I did was add a little animation near the start to cover my face because I hate it so I used a scribble effect (basically two frames repeating it self but like with a pencil)
  • 8.
    Here I unlinkedthe audio from the footage so it doesn’t overlap with the song also adding more footage to the video and cropping it so it cuts off at the right moment Another thing I did it add text to the start the music video like a title to it (the song title and and artist) with a little animation With the text moving slightly
  • 9.
    Here I putthe exported the video to add curtain to the video that I couldn’t do in because they dont have curtain effects i wanted to use within the video like i included some animation and cant get it to work with premiere because i need it go at a curtain speed also added some animation of someone running away from them selves it to symbolise the song and story the graph is to steady the motions in the rotations and position effect and to level it out and to make the transition steady
  • 10.
    EDITING I added abit of animation near the end that affects personally to me because of the song lyrics and the way I made the character The character is supposed to represent me in the music video because of the way I see my self though my eye most of the music is kinda depressing but that the style I wanted it to be so it worked out in the end but theres a scene where eyes are moving side to side didn’t work the way I wanted because of the amount of frames I did didn’t work well I should have added more but I place all my animation slides into After effects because that software better to animation than premiere
  • 11.
    EDITING – FILE MANAGEMENT Screenshotand annotate where you have saved your work and how you have organised your footage so you know where it is – this will also include your audio track for your video and any other images, found footage, etc I saved most of my work on the laptop and email so I can access it everywhere between room and work from homes have it done quicker also saved into iCloud Drive so I can have multiple save files I’ve also put them in a folder called clips/music so my clips don’t get lost within my laptop/folders and so my project file can find them and not corrupts it when opening it again
  • 12.
    EDITING – SETTING UPPREMIERE Screenshot and annotate how you have set up a new Premiere Pro project – indicate what you called it, where you saved it You should also show how you set up your timeline, indicating the video settings used [e.g. DSLR 1080p 25 I set the premiere project by using the default setting it faves with the composition setting 1920x1080 I put all my clips in the timeline using the song track as inspiration with the lyric and clips I’ve have I joined them together But I also used after effect for the animation parts because it’s was quicker and easier because you can join them together and cutting the slides also using scale to have a zoom out effect on the character I also used different composition setting for the file similar to premiere pro with the video size
  • 13.
    EDITING – IMPORTING FOOTAGE Showhow you imported your footage, your file set up in Premiere and how you have organised your different docs [video, audio, etc I used dragged out dropped my files into the project with opening it from my desktop and my footage and audio from a folder I made to separate the rest of my files and to access them easier and so the project file can find them easily without corrupting or being unable to access the file But you could always go to file and scroll down to import and choose where to import from
  • 14.
    EDITING – WORKSPACE Show anddescribe the Premiere Pro workspace – preview window, bins, timeline, playback window, tool bar, audio levels, etc
  • 15.
    EDITING – ASSEMBLY EDIT Showhow you put together your basic sequence in the order you want it – previewing clips, dragging to the timeline, trimming/cutting, etc If you have a lip sync, pay special attention to showing how you synchronised the footage with the audio track I put together my sequence by listening to the music track I put and basing my clips of the song lyrics and placing them in sync with the music certain drops change the scene while some words change it I would click the razor tool to cut the clip to the section of the scene I want then delete the bit I don’t then drag the scene to the section of the song I want them at I would also drag the end and start of the clip to get rid of maybe some seconds of the clips
  • 16.
    EDITING – REFINEMENT Show andexplain how you have refined and improved your initial sequence edit I refined the sequence by adding different transitions to make the music video better and not bland I’ve add some levels to brighten some of the clips because some were to darks to see also added a bit of animation near the end because I ran out of clips to edit
  • 17.
    EDITING – COLOUR CORRECTION/SFX Showand explain your colour correction process/effects process – use staged screenshots to show each part of the process and the effect. Explain why you chose to do this The effect I’ve added are in the program after effect where I added transitions to make the music video better than just a plan video where it just shifts to a new scene randomly without warning so I did some side and shake transitions where they come from the side or just a little bounce to it The screenshots show were and what i did to do this the graph is to smooth and the speed and transitions so it’s not all shaky it’s levels it out The transform shows what’s involved with the transitions whiles the first one where their placed
  • 18.
    EDITING – EXPORT Show howyou exported your completed project, show which settings you have used and explain your choice of file name and where you have saved it I exported it though media exporter and it rendered both audio and video at 1080p it took 22 minutes to render then I uploaded it to YouTube and the file name I just named it music video media so I don’t mix it up my other files I saved it to my folder clips and desktop