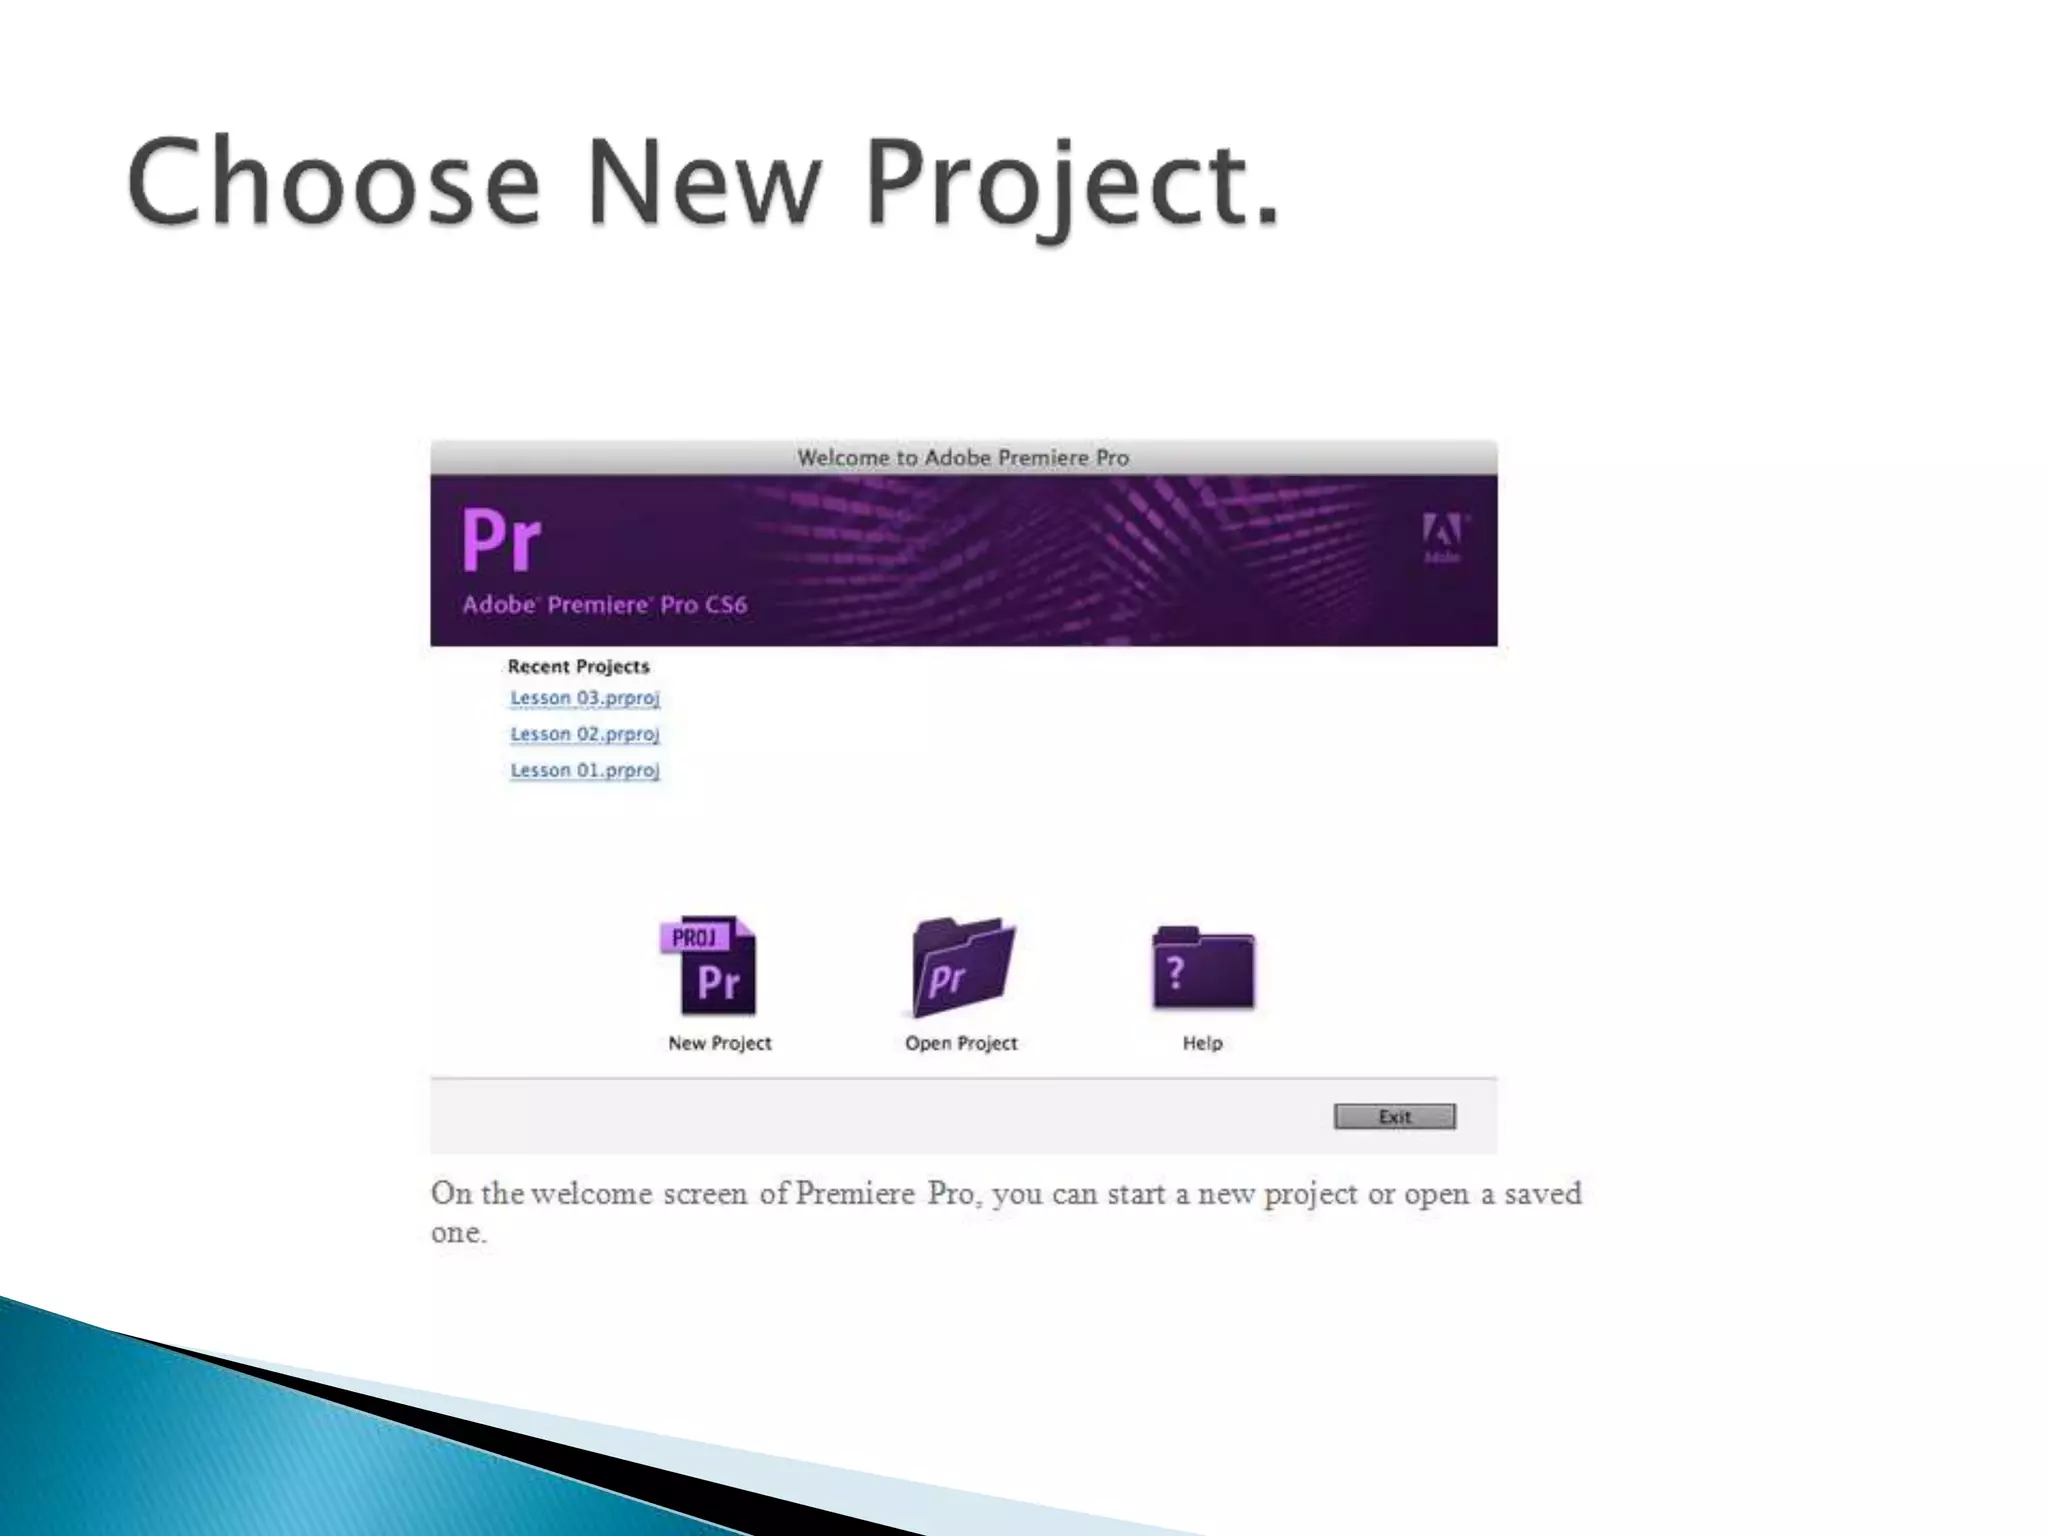
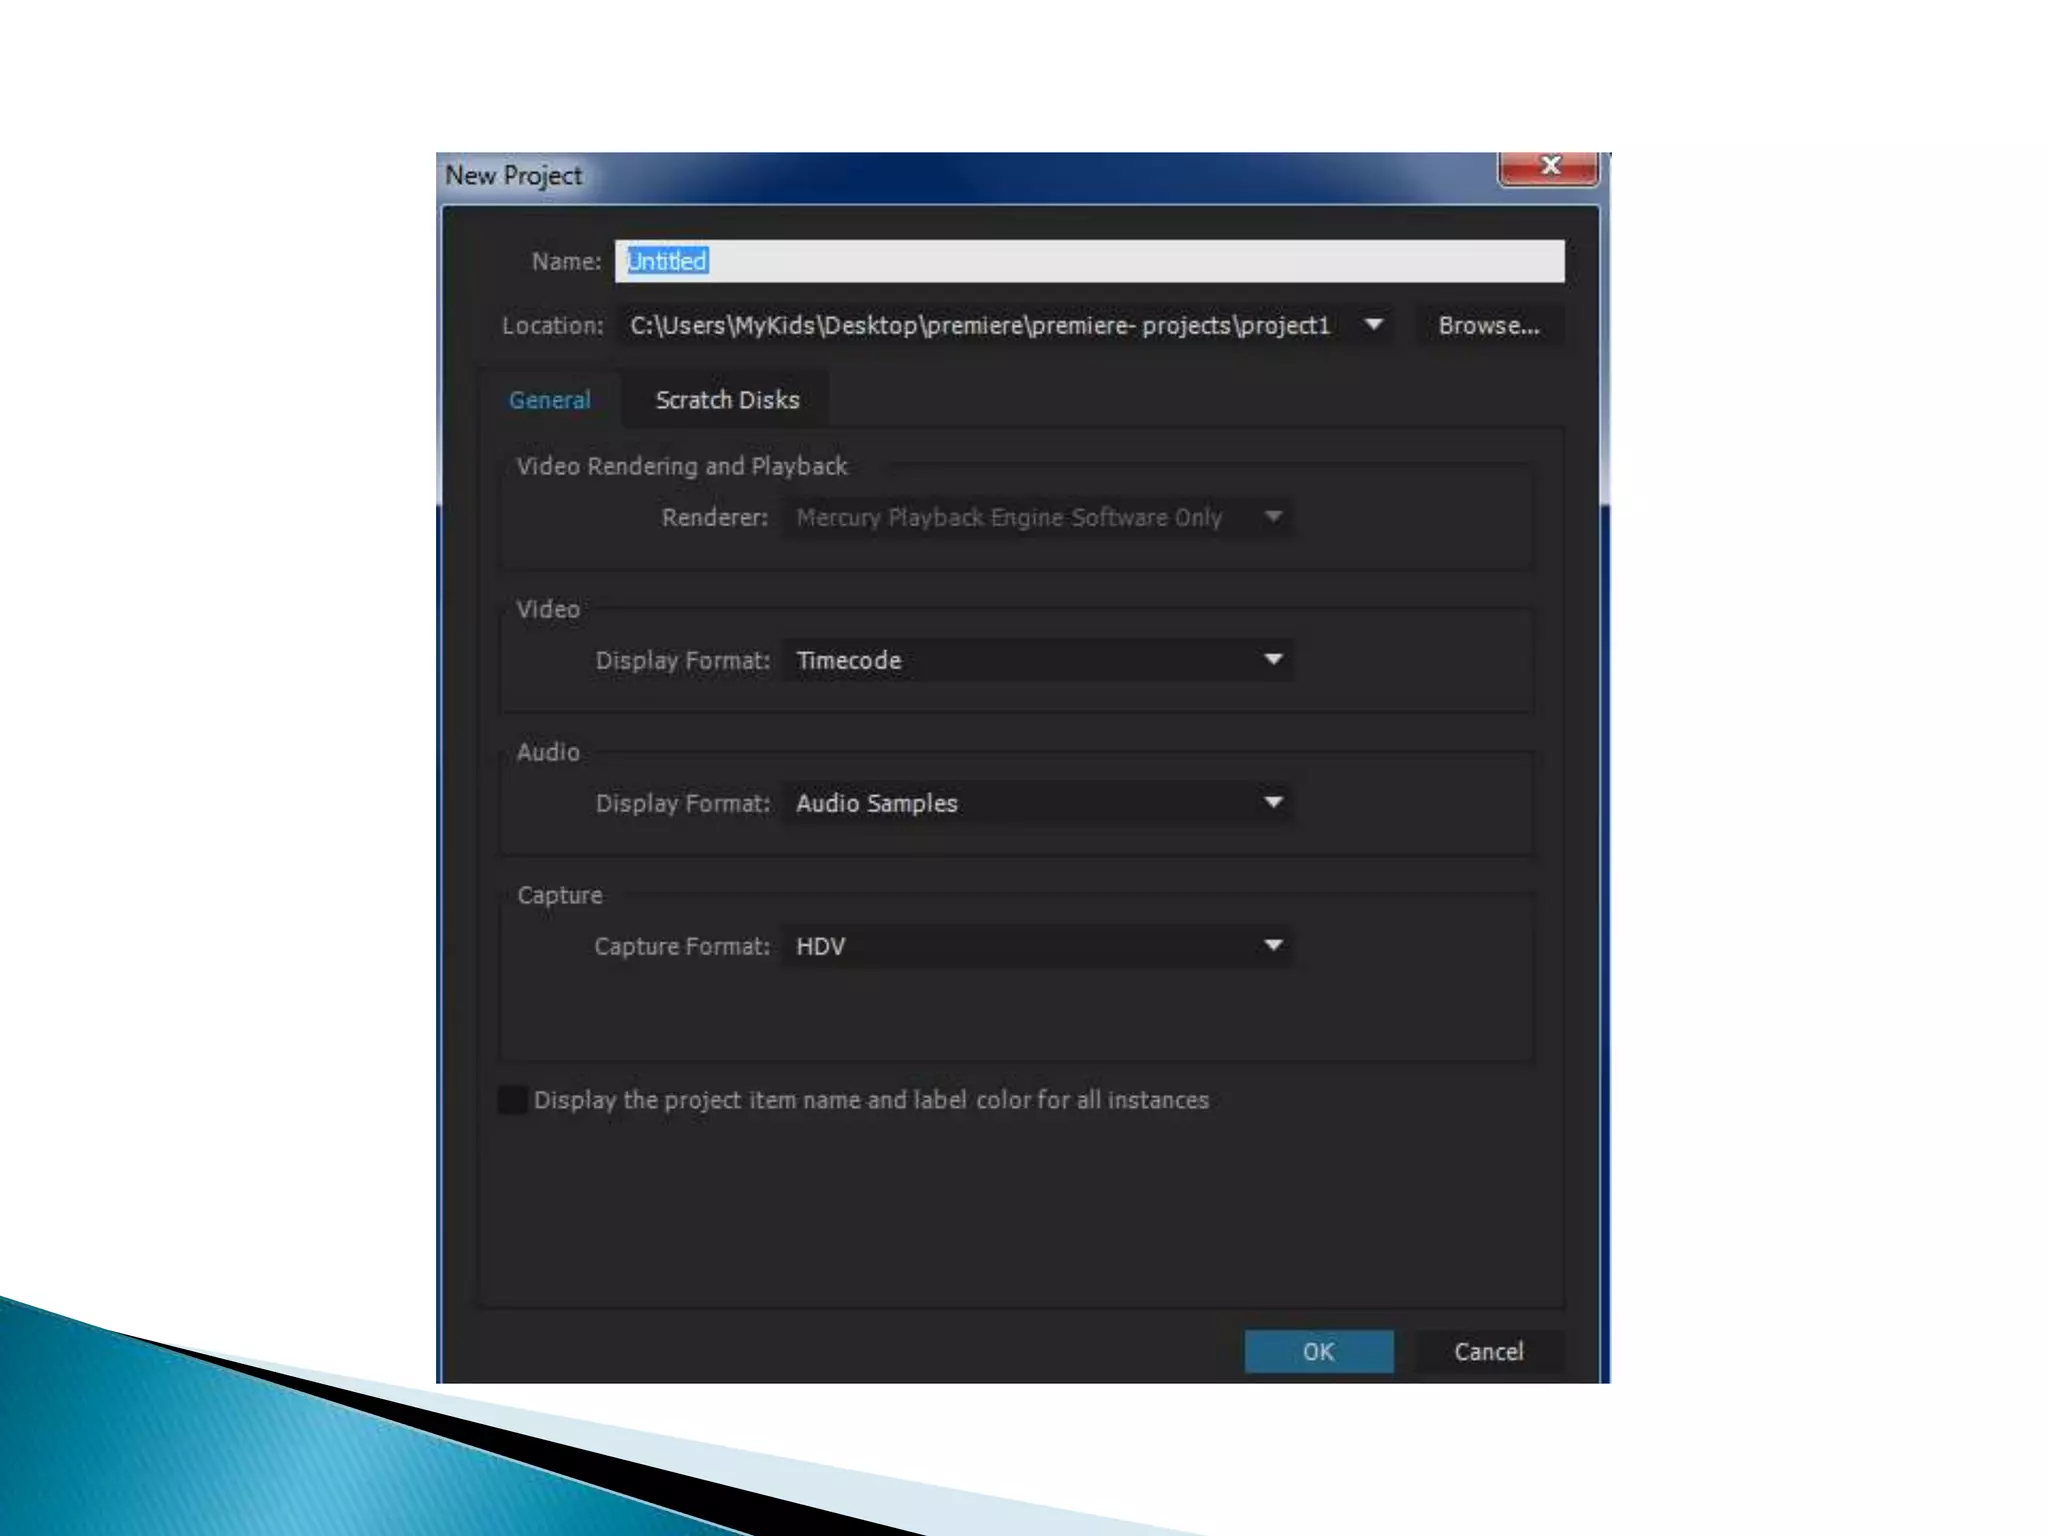
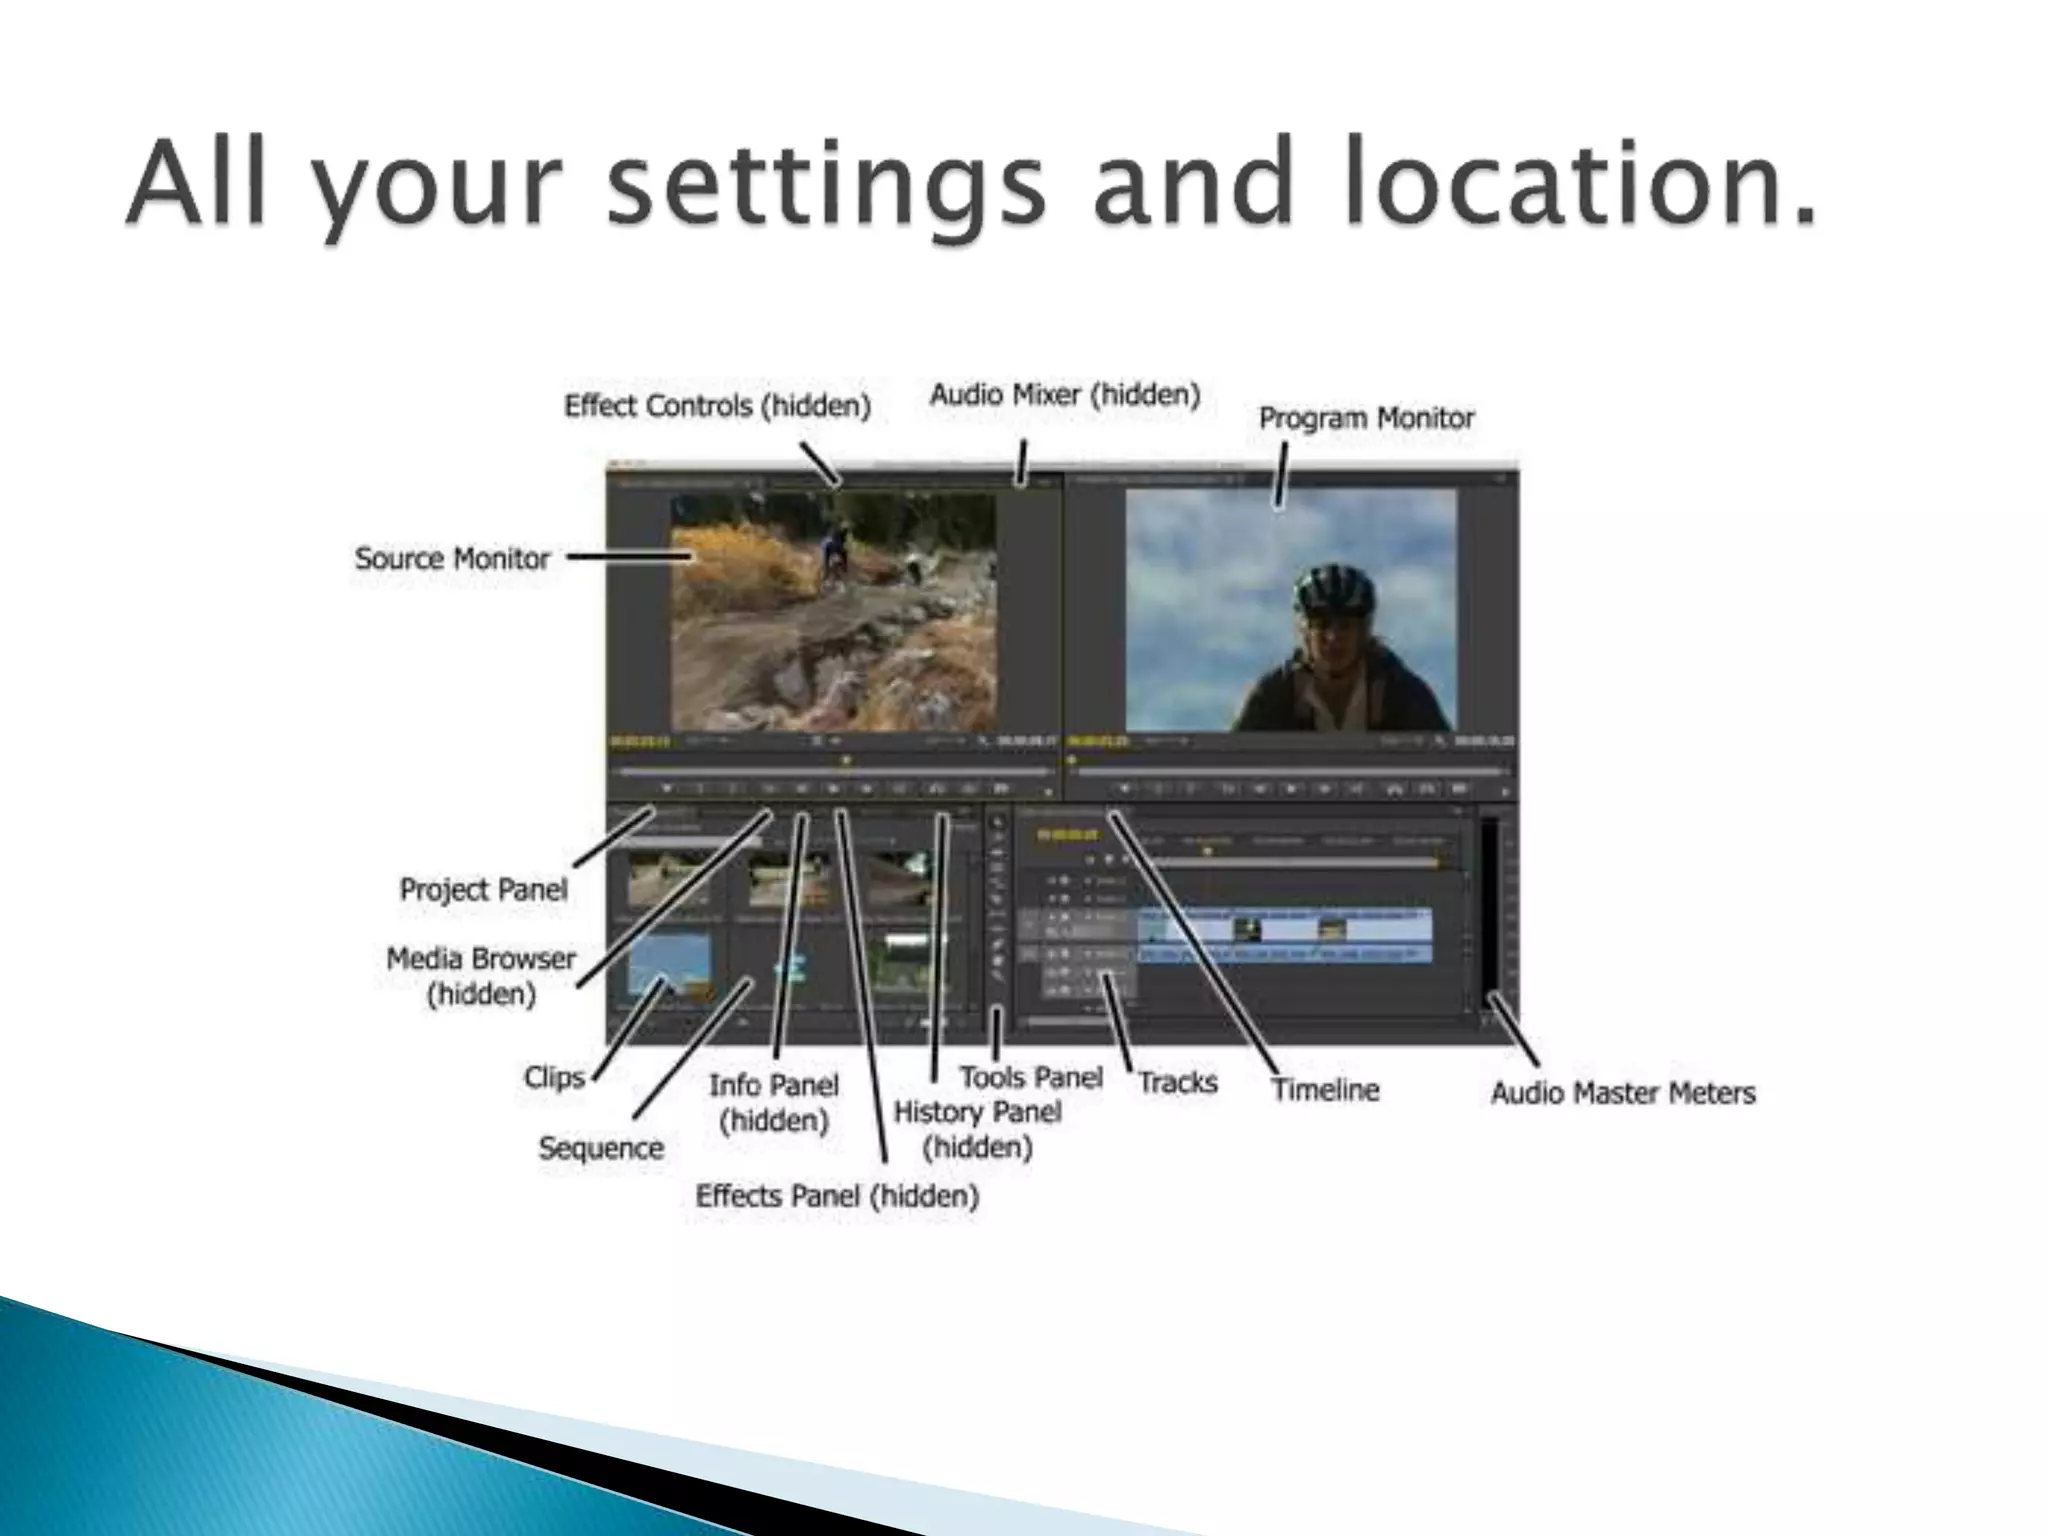
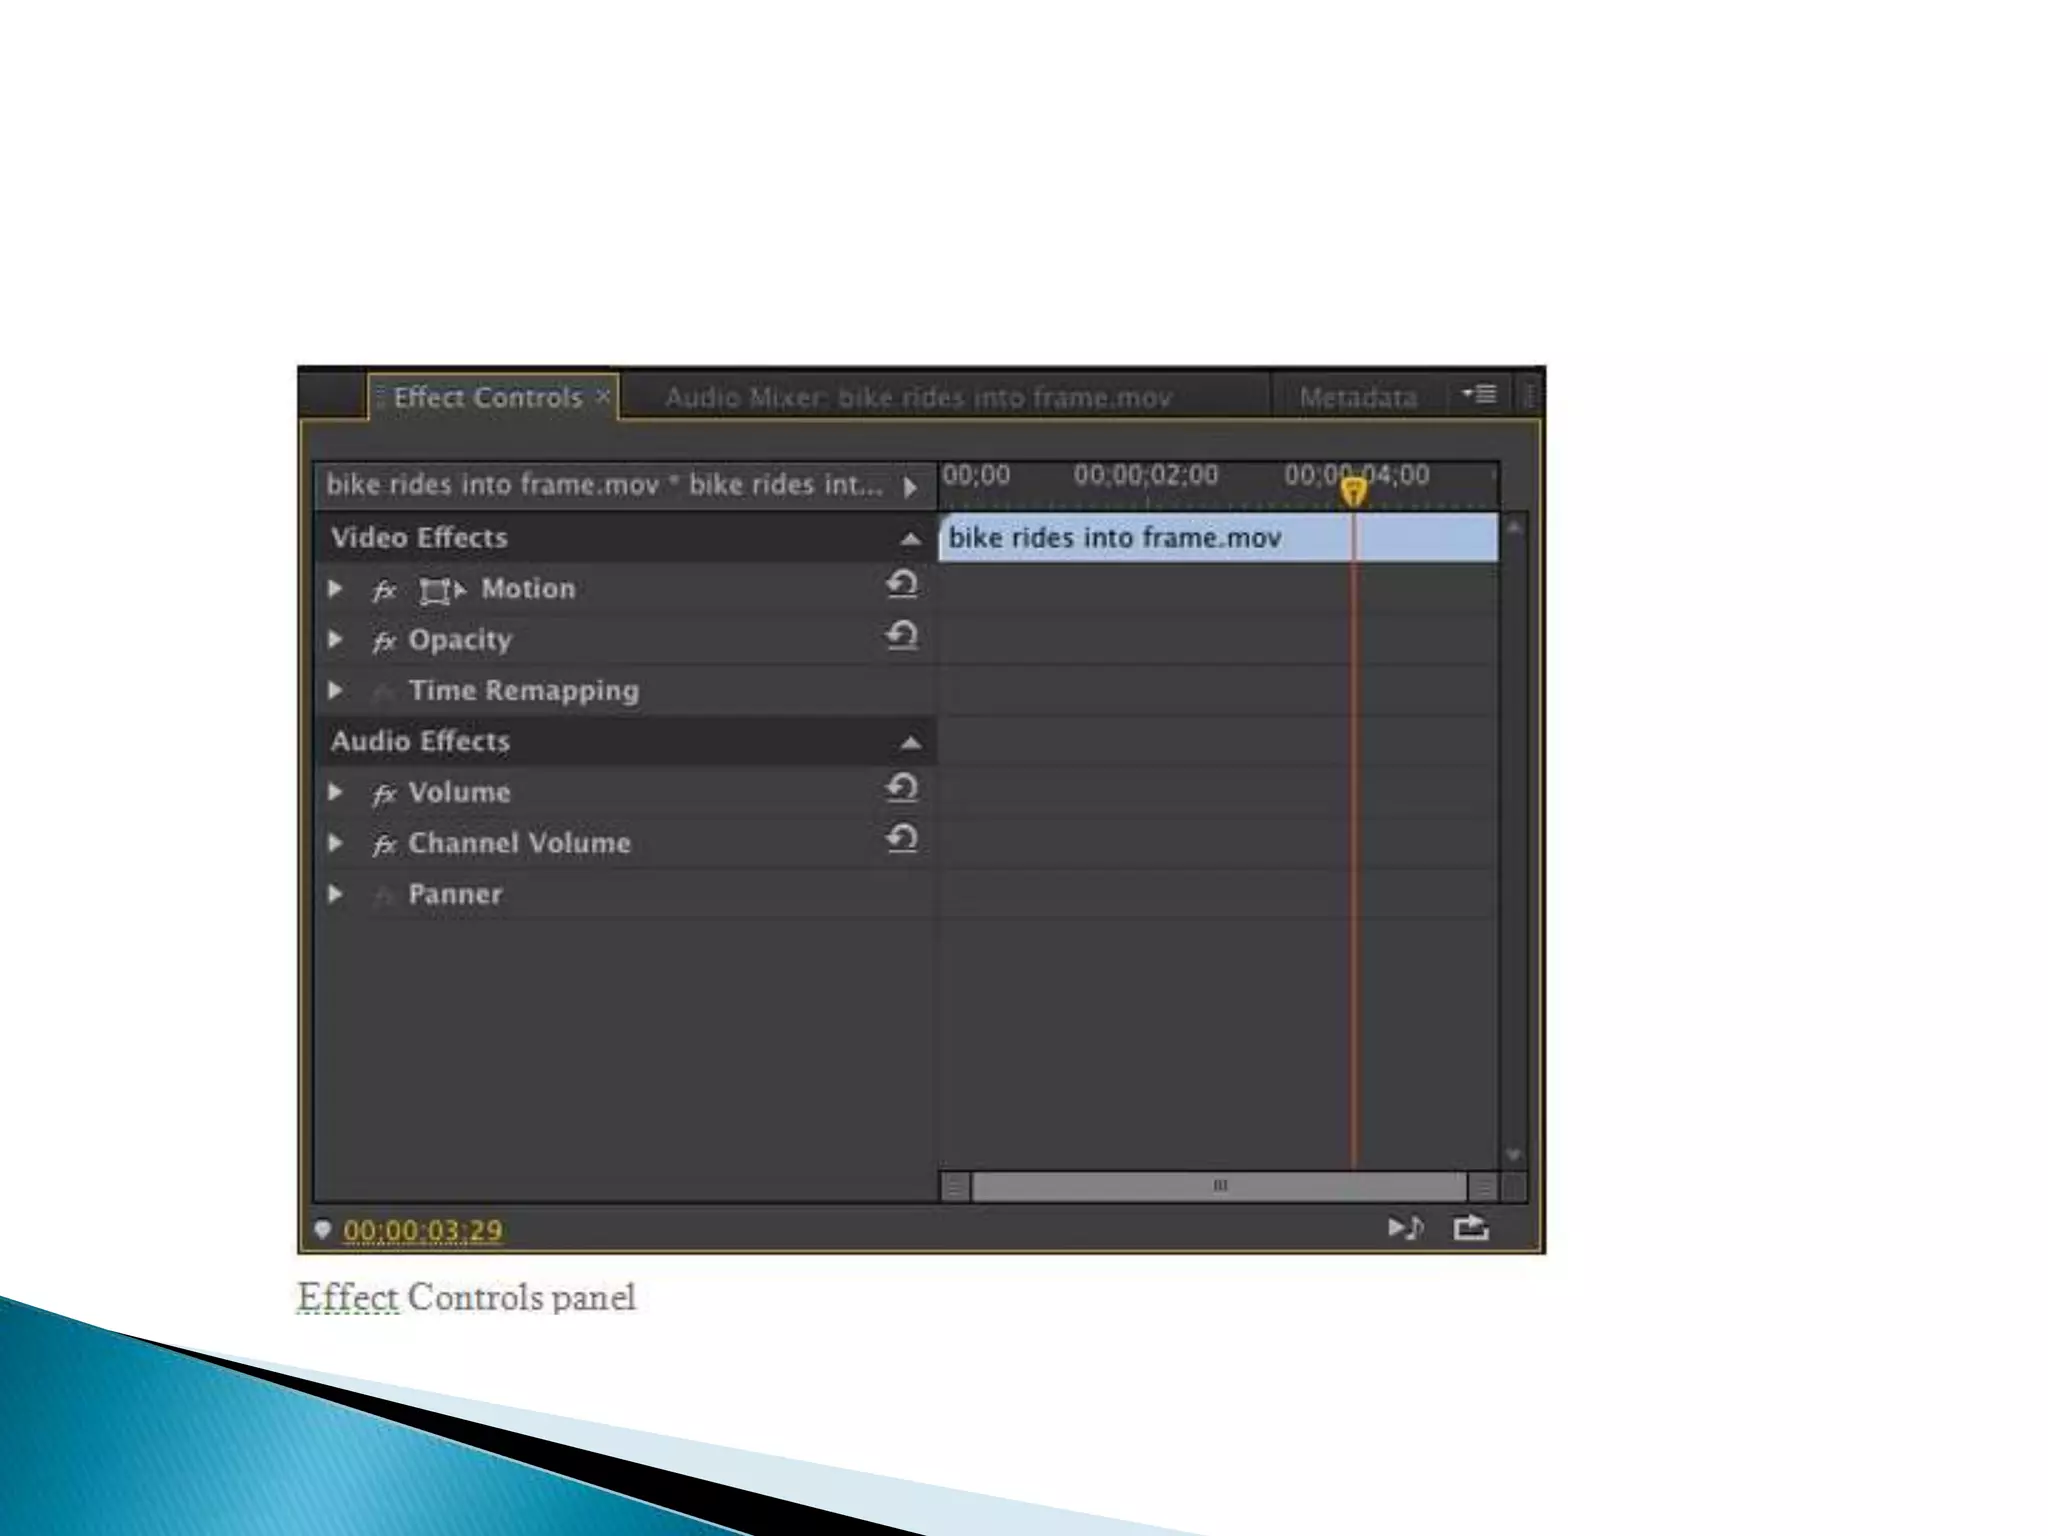
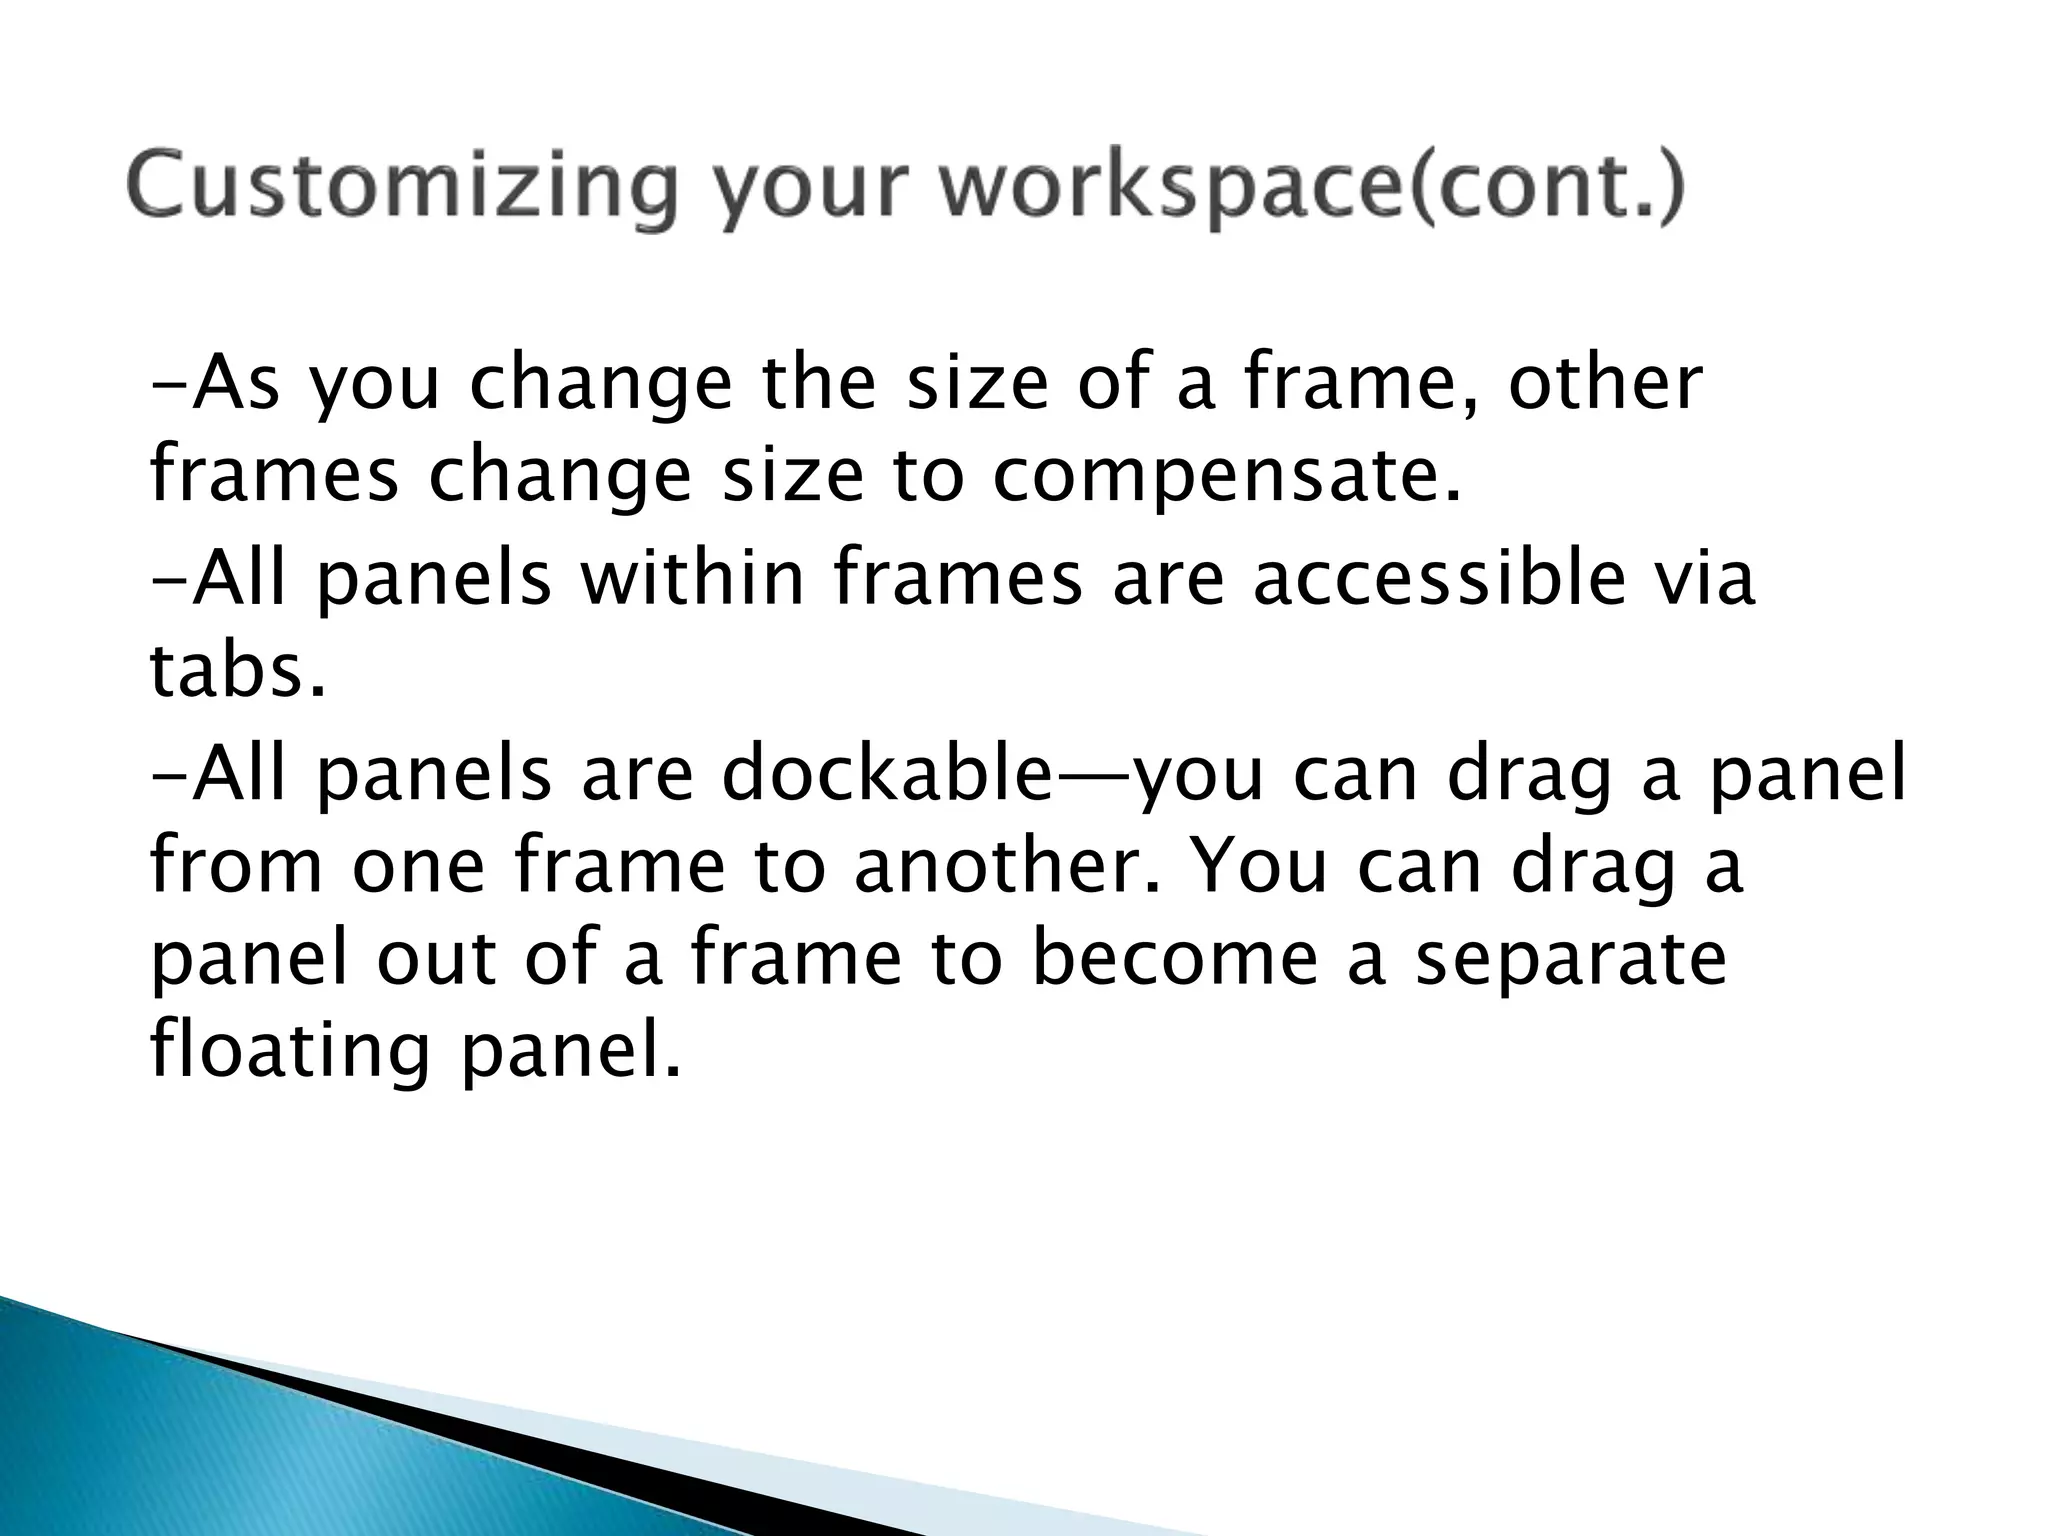
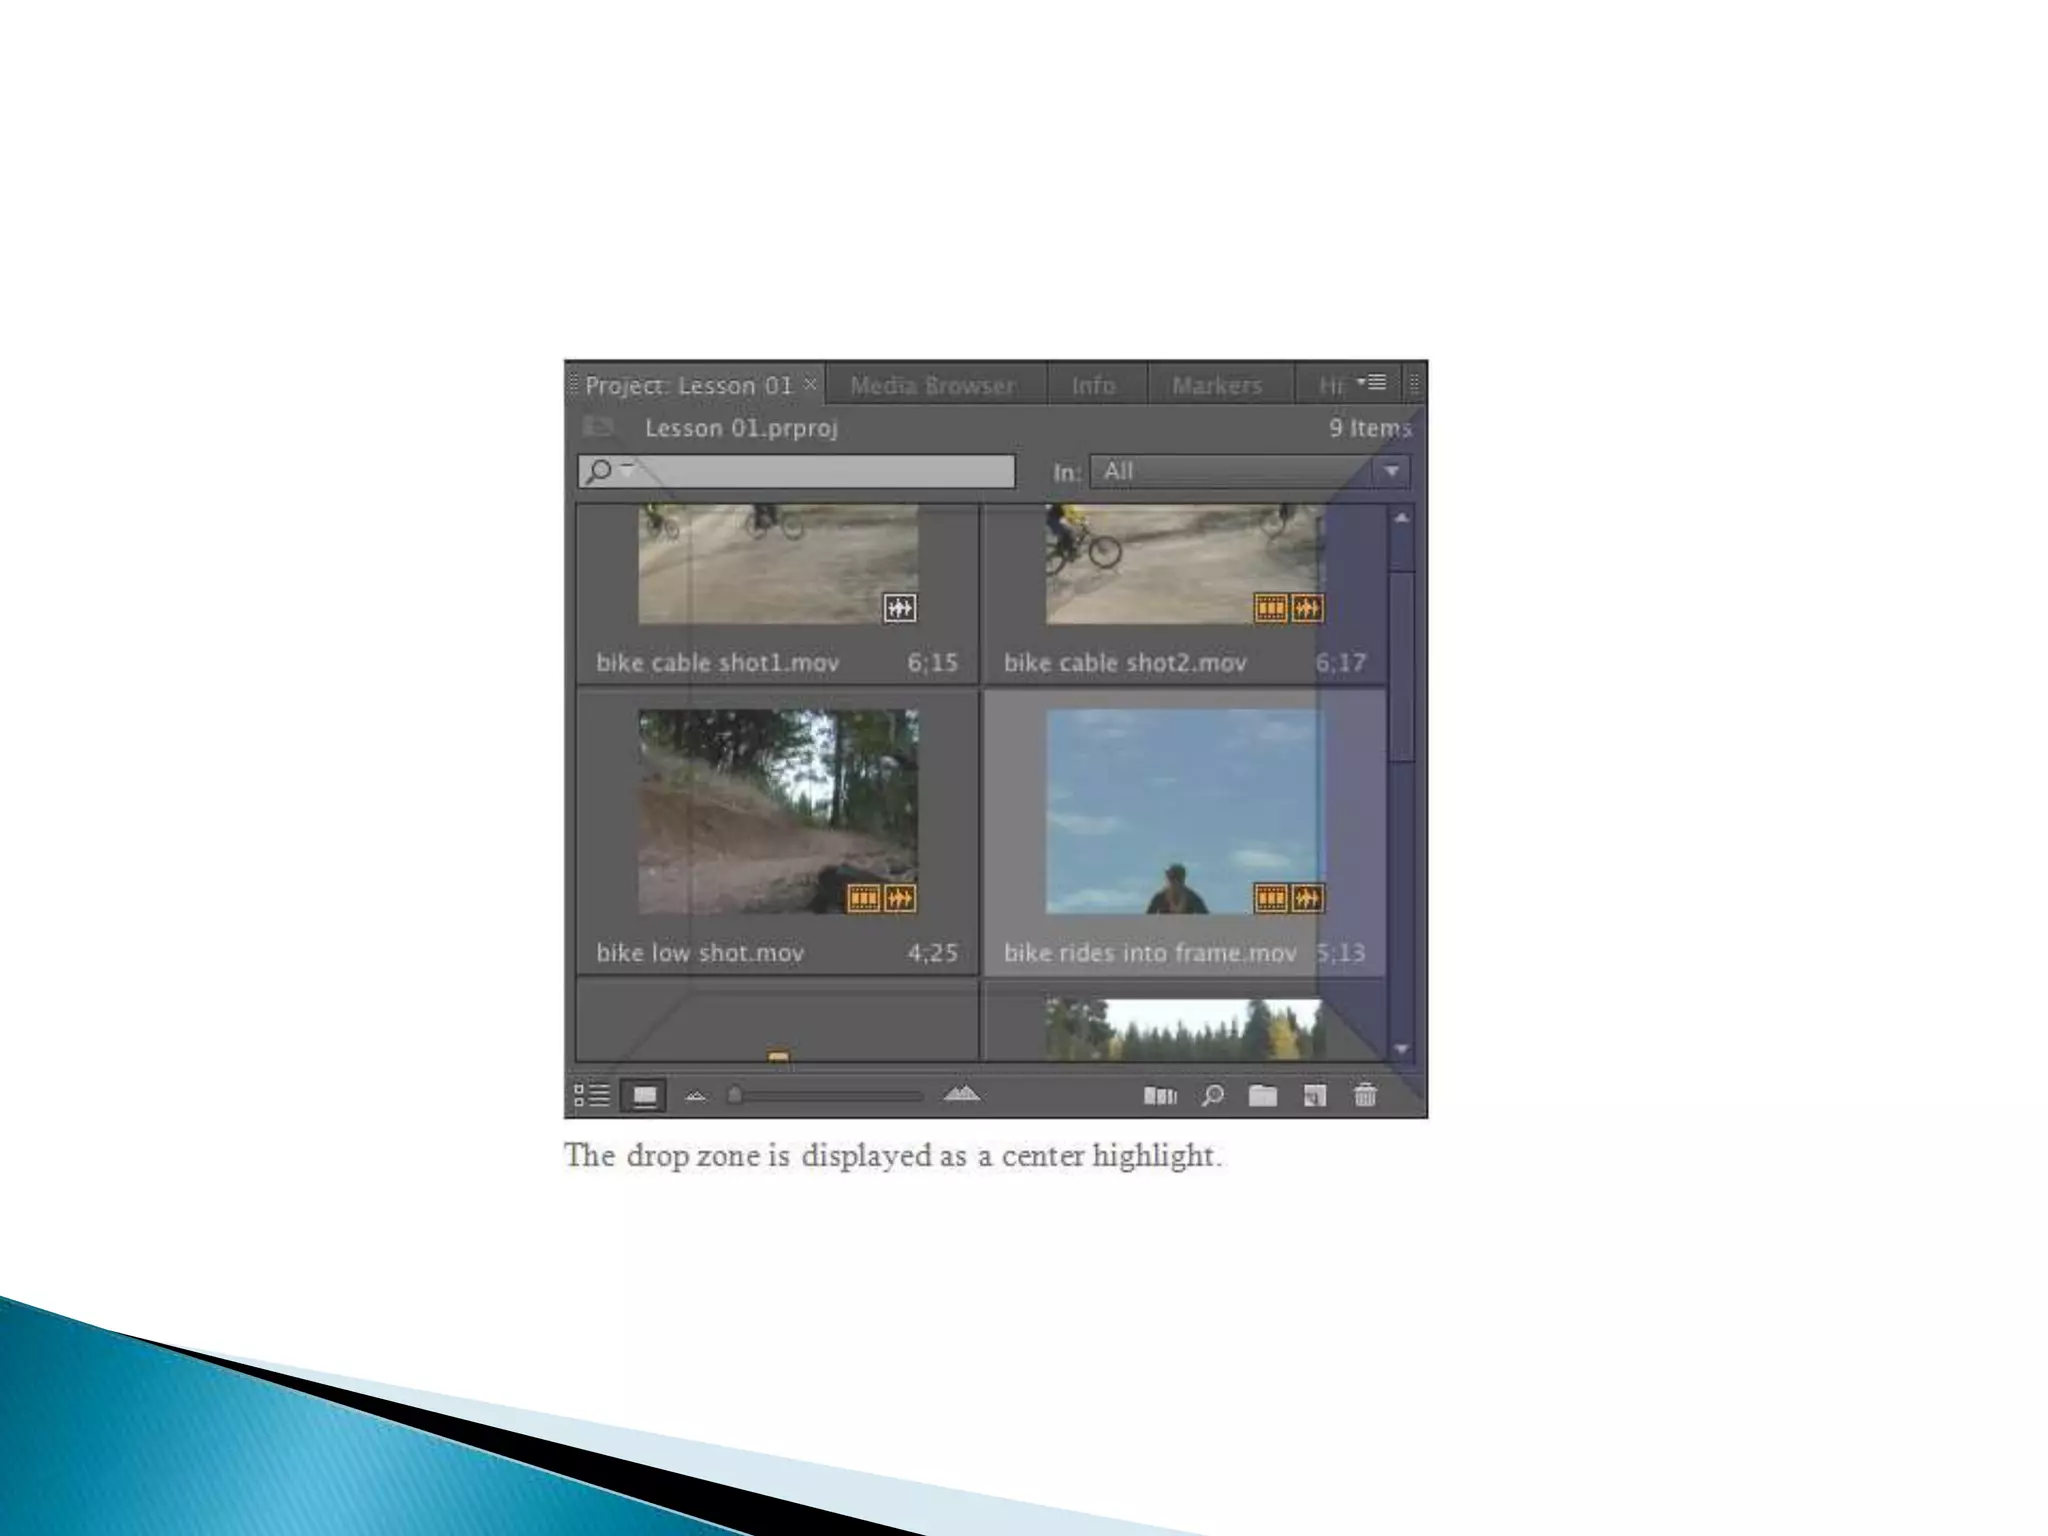
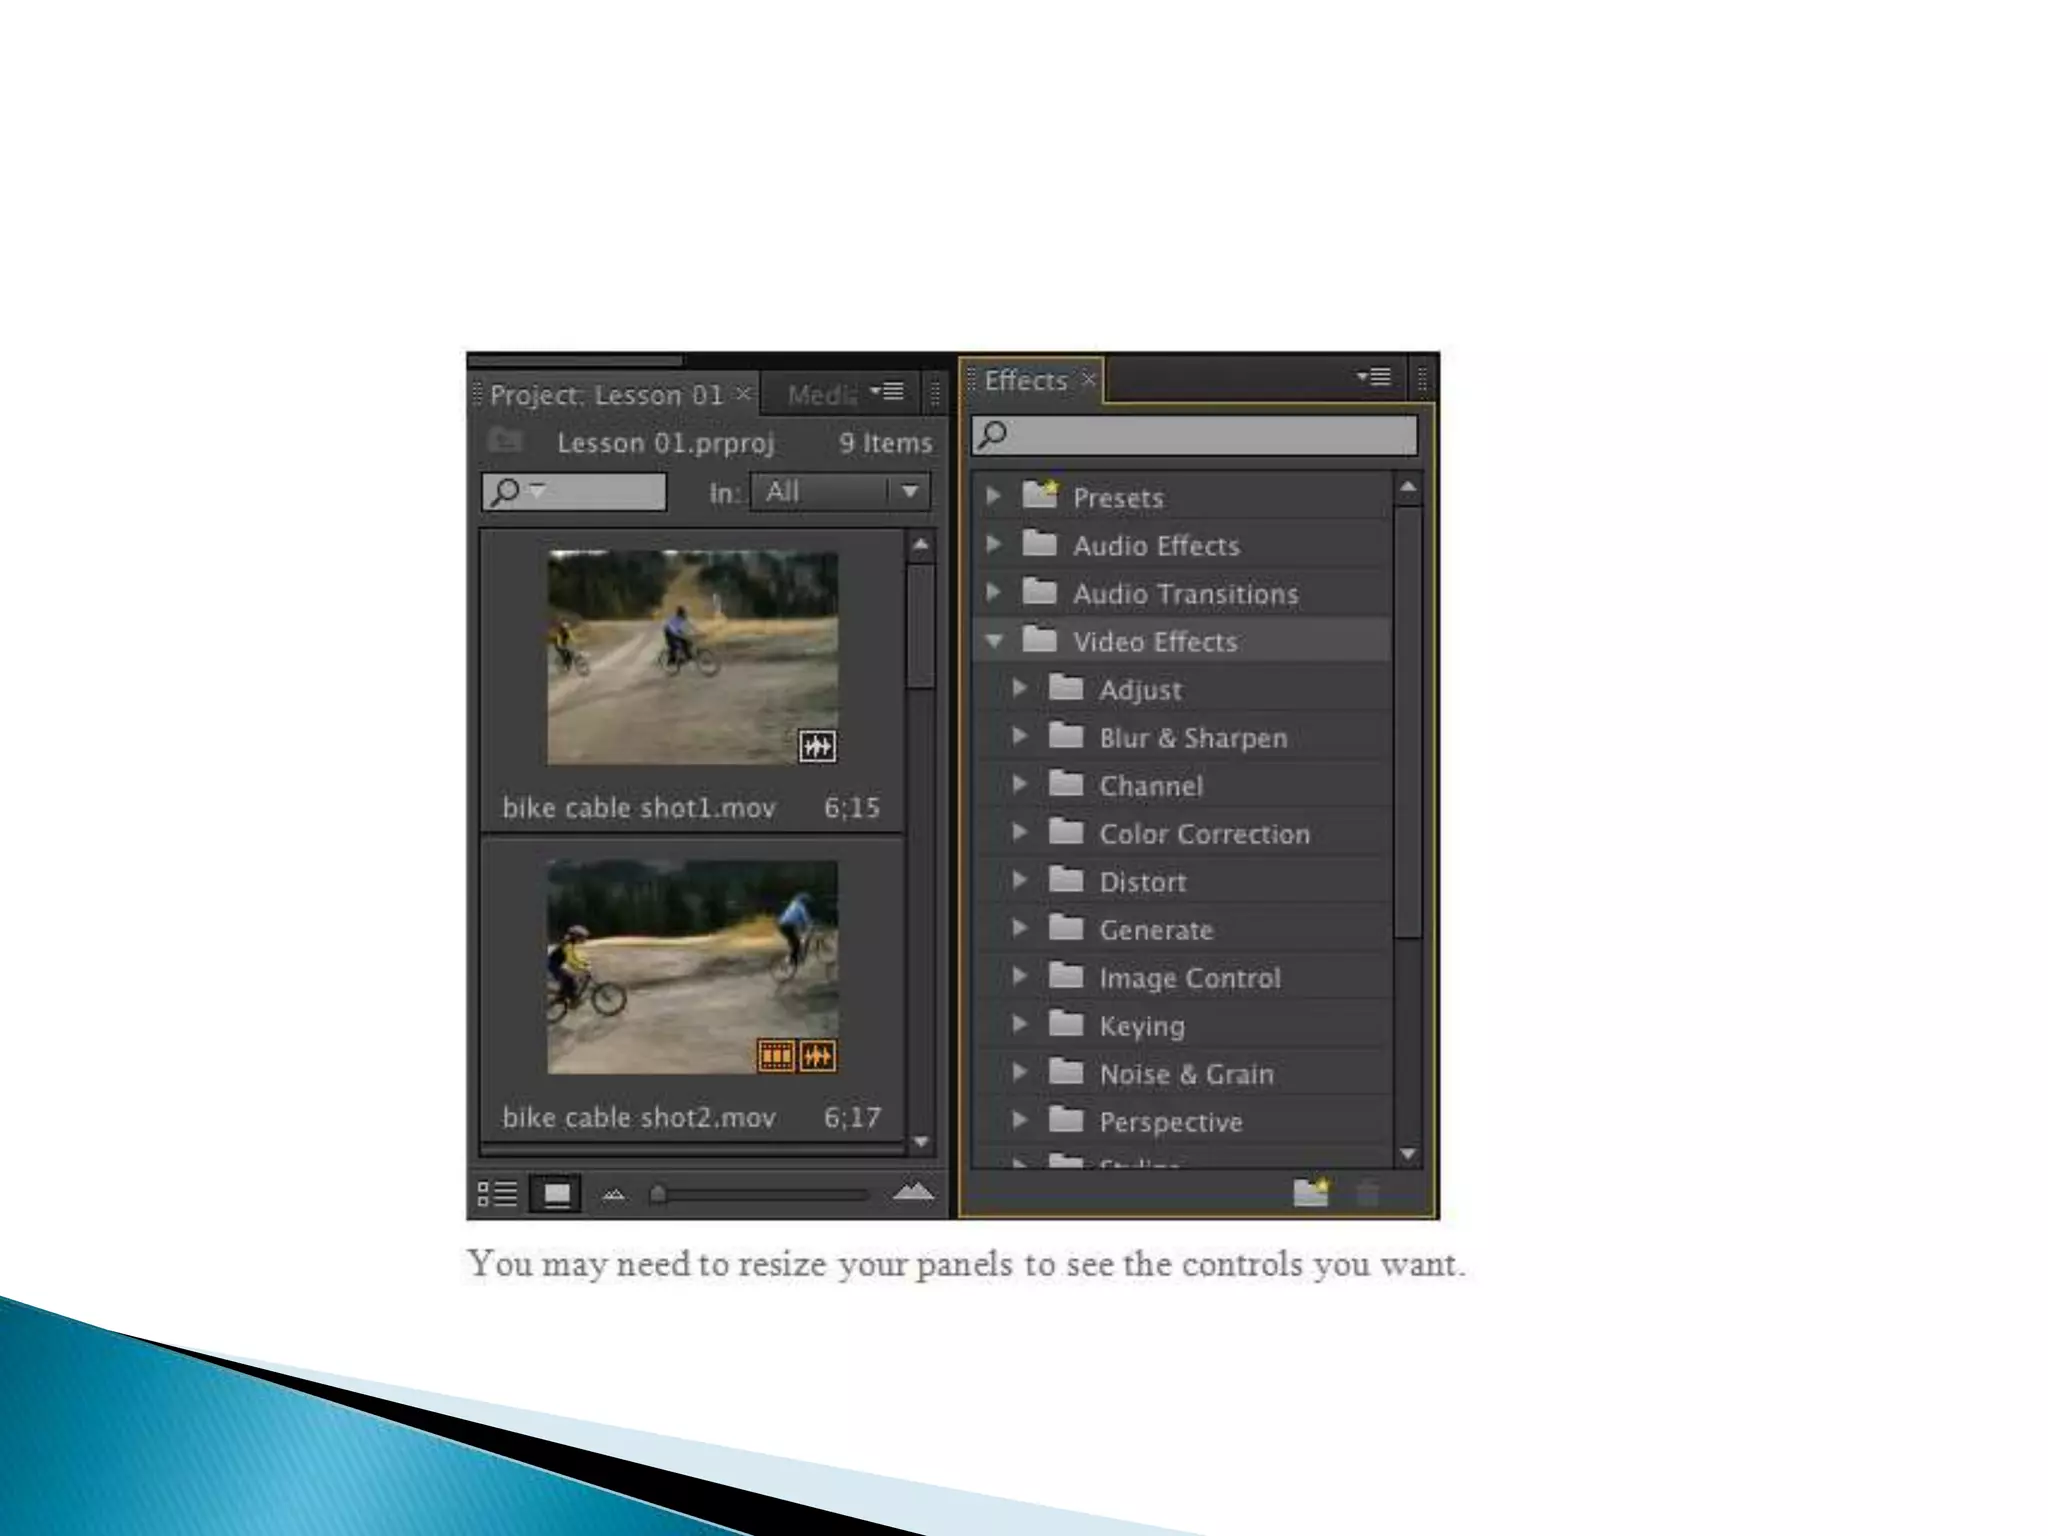
SlideShare a Scribd company logo
Adobe Premiere editing and interface
overview
 It’s helpful to begin by getting a little
familiarity with the editing interface so you
can recognize the tools as you work with
them in the following lessons. To make it
easier to configure the user interface,
 Premiere Pro offers workspaces. Workspaces
quickly configure the various panels and tools
on-screen in ways that are helpful for
particular activities, such as editing, colour,
special effects work, or audio mixing
 Launch Premiere Pro.
 The first thing you will see is a box asking
whether you would like to create a new
Project or work on an existing project.
The most recent Projects will appear as their
titles above “New Project”
This is where where your previous saved
versions and all media should be saved.
This is in a folder on the media shared drive.
However, you should create a back up of this
on your memory stick or hard drive.
 Each workspace item appears in its own
panel, and multiple panels can be combined
into a single frame.
 Some items with common industry terms
stand alone, such as Timeline, Audio Mixer,
and Program Monitor. The main user
interface elements are as follows:
 Project pane– This is where all the files you import into
Premiere are located. This includes movie files, image
sequences, Photoshop files (and all the layers), and sound
files among others. At the bottom of the panel, there are
tools to help you organize (such as creating folders).
 Effect Controls – Any effect you add to your footage can be
controlled in here using a simple sliding scale system.
 Effects – A series of drop down menu’s containing
audio and video effects. These can be added by
dragging them from this window onto your footage
in the Timeline
 Timeline panel: This is where you’ll do most of your actual
editing. You view and work on sequences (the term for edited
video segments or entire projects) in the Timeline panel. One
strength of sequences is that you can nest them (place
sequences inside other sequences). In this way, you can break
up a production into manageable chunks or create unique
special effects.
 Tracks: You can layer—or composite—video clips, images,
graphics, and titles on an unlimited number of tracks. Video
clips on upper video tracks cover whatever is directly below
them on the Timeline. Therefore, you need to give clips on
higher tracks some kind of transparency or reduce their size
if you want clips on lower tracks to show through.
 Monitor panels: You use the Source Monitor (on the left) to
view and trim raw clips (your original footage). To view a clip
in the Source Monitor, double-click it in the Project panel.
The Program Monitor (on the right) is for viewing your
sequence. Some editors prefer working with only one monitor
screen.
 Project panel: This is where you place links to your project’s
media files: video clips, audio files, graphics, still images, and
sequences. You can use bins—similar to folders—to organize
your assets
 Media Browser: This panel helps you browse your hard drive
to find footage. It’s especially useful for file-based camera
media.
 Effects panel: This panel contains all the clip effects you will
use in your sequences, including video filters, audio effects,
and transitions (docked, by default, with the Project panel).
Effects are grouped by type to make them easier to find.
 Effects panel: This panel contains all the clip effects you will
use in your sequences, including video filters, audio effects,
and transitions (docked, by default, with the Project panel).
Effects are grouped by type to make them easier to find
 Audio Mixer: This panel (docked, by default,
with the Source and Effect Controls panels) is
based on audio production studio hardware,
with volume sliders and panning knobs.
There is one set of controls for each audio
track on the Timeline, plus a master track
 Effect Controls panel: This panel (docked, by
default, with the Source and Audio Mixer
panels, or accessible via the Window menu)
 displays the controls for any effects applied
to a clip you select in a sequence. Motion,
Opacity, and Time Remapping controls are
always available for visual clips. Most effect
parameters are adjustable over time, allowing
you to animate effects.
 Tools panel: Each icon in this panel
represents a tool that performs a specific
function, typically a type of edit in a
sequence.
 The Selection tool is context-sensitive, which
means it changes appearance to indicate the
function that matches the circumstances. If
you find your cursor doesn’t work as you
expect it, it might be because you have the
wrong tool
 Info panel: The Info panel (docked, by default,
with the History and Info panels, or accessible via
the Window menu) presents information about
any asset you select in the Project panel or any
clip or transition selected in a sequence.
 • History panel: This panel (docked, by
default, with the Effects and Info panels) tracks
the steps you take and lets you back up easily.
It’s a kind of visual Undo list. When you select a
previous step, all steps that came after it are also
undone
 In addition to customizing the default
workspaces (based on tasks), you can adjust
the position and location of panels to create a
workspace that works best for you. You can
then store a workspace or even or create
multiple workspaces for different tasks
-As you change the size of a frame, other
frames change size to compensate.
-All panels within frames are accessible via
tabs.
-All panels are dockable—you can drag a panel
from one frame to another. You can drag a
panel out of a frame to become a separate
floating panel.
 In the following slides all these functions
were explained by applying an example to
create customized workspace.
 1-Click the Source Monitor panel (selecting
its tab if necessary), and then position your
pointer on the vertical divider between the
Source panel and the Program panel. Then,
click and drag left and right to change the
sizes of those frames. You can choose to
have different sizes for your video displays.
 2-Place the pointer on the horizontal divider
between the Source panel and the Timeline.
Drag up and down to change the sizes of
these frames.
 3-Click the gripper area in the upper-left
corner of the tab for the Effects panel (to the
left of the name), and drag it to the middle of
the Source panel to dock the Effects panel in
that frame.
 Note: As you move a panel, Premiere Pro displays
a drop zone. If the panel is a rectangle, it will go
into the selected frame as an additional tab. If it’s
a trapezoid, it will go into its own frame.
 When many panels are combined in a single
frame, you may not be able to see all the tabs. A
navigation slider appears above the tabs to
navigate between them. Slide it left or right to
reveal hidden tabs. You can also display a panel
by choosing it in the Window menu.
 4 Click and drag the Effects drag handle to
a point near the right of the Project panel to
place it in its own frame.
 The drop zone is a trapezoid that covers the
right portion of the Project panel. Release the
mouse button, and your workspace should
look something like the example on the right.
 You can also pull panels out into their own
floating panel.
 5-Click the Source Monitor’s drag handle,
and hold down the Control (Windows) or
Command (Mac OS) key while dragging it out
of its frame. Its drop zone image is much
more distinct, indicating that you are about
to create a floating panel
 6-Drop the Program Monitor anywhere, creating
a floating panel. Resize it by dragging from a
corner or a side like any other panel.
 7 - As you gain experience, you might want to
create and save the layout of your panels as a
customized workspace. To do so, choose Window
> Workspace > New Workspace. Type a name,
and click OK.
 8 - If you want to return a workspace to its
default layout, choose Window > Workspace >
Reset Current Workspace. To return to a
recognizable starting point, choose the preset
Editing workspace and reset it.

More Related Content

What's hot

Basic Video Editing
Basic Video EditingBasic Video Editing
Basic Video Editing
Roxanne Robes
 
Video editing presentation
Video editing presentationVideo editing presentation
Video editing presentation
TANZICT
 
PHOTOSHOP BASICS
PHOTOSHOP BASICSPHOTOSHOP BASICS
PHOTOSHOP BASICS
shhajira
 
Adobe Photoshop
Adobe Photoshop Adobe Photoshop
Adobe Photoshop
Mujeeb Riaz
 
Adobe Premiere Tutorial
Adobe Premiere TutorialAdobe Premiere Tutorial
Adobe Premiere Tutorial
samharlow
 
Lesson 3 motion tween
Lesson 3 motion tweenLesson 3 motion tween
Lesson 3 motion tween
Fatima AlSaadi
 
Basics of Photoshop Tutorial
Basics of Photoshop TutorialBasics of Photoshop Tutorial
Basics of Photoshop Tutorial
Jaibharath Tiragabatti
 
Video Editing Basics
Video Editing BasicsVideo Editing Basics
Video Editing Basics
John Grace
 
Adobe premiere ppt
Adobe premiere pptAdobe premiere ppt
Adobe premiere ppt
Kalpesh Suthar
 
Photoshop Guide
Photoshop GuidePhotoshop Guide
Photoshop Guide
Marco Hernández
 
Video editor
Video editorVideo editor
Video editor
Gopinat Boratynski
 
Basics of Video Editing | Types of Video Editing | Video Production Process
Basics of Video Editing | Types of Video Editing | Video Production ProcessBasics of Video Editing | Types of Video Editing | Video Production Process
Basics of Video Editing | Types of Video Editing | Video Production Process
Ravi Bhadauria
 
Session 2.2 photoshop interface
Session 2.2   photoshop interfaceSession 2.2   photoshop interface
Session 2.2 photoshop interface
John Josef Jimenez
 
Video Editing Process
Video Editing ProcessVideo Editing Process
Video Editing Process
Hi-Tech Animation
 
Lecture 1 introduction to flash
Lecture 1 introduction to flashLecture 1 introduction to flash
Lecture 1 introduction to flash
poleyseugenio
 
Simple flash animation
Simple flash animationSimple flash animation
Simple flash animation
Bubblefruit.com
 
Adobe Flash CS4 - Shape tween
Adobe Flash CS4 - Shape tweenAdobe Flash CS4 - Shape tween
Adobe Flash CS4 - Shape tween
Fatima AlSaadi
 
Adobe Premiere Pro
Adobe Premiere ProAdobe Premiere Pro
Adobe Premiere Pro
NYCCTfab
 

What's hot (20)

Basic Video Editing
Basic Video EditingBasic Video Editing
Basic Video Editing
 
Video editing presentation
Video editing presentationVideo editing presentation
Video editing presentation
 
PHOTOSHOP BASICS
PHOTOSHOP BASICSPHOTOSHOP BASICS
PHOTOSHOP BASICS
 
Adobe Photoshop
Adobe Photoshop Adobe Photoshop
Adobe Photoshop
 
Adobe Premiere Tutorial
Adobe Premiere TutorialAdobe Premiere Tutorial
Adobe Premiere Tutorial
 
Lesson 3 motion tween
Lesson 3 motion tweenLesson 3 motion tween
Lesson 3 motion tween
 
Basics of Photoshop Tutorial
Basics of Photoshop TutorialBasics of Photoshop Tutorial
Basics of Photoshop Tutorial
 
Video Editing Basics
Video Editing BasicsVideo Editing Basics
Video Editing Basics
 
Adobe premiere ppt
Adobe premiere pptAdobe premiere ppt
Adobe premiere ppt
 
Photoshop Guide
Photoshop GuidePhotoshop Guide
Photoshop Guide
 
Video editor
Video editorVideo editor
Video editor
 
Basics of Video Editing | Types of Video Editing | Video Production Process
Basics of Video Editing | Types of Video Editing | Video Production ProcessBasics of Video Editing | Types of Video Editing | Video Production Process
Basics of Video Editing | Types of Video Editing | Video Production Process
 
Session 2.2 photoshop interface
Session 2.2   photoshop interfaceSession 2.2   photoshop interface
Session 2.2 photoshop interface
 
Video Editing Process
Video Editing ProcessVideo Editing Process
Video Editing Process
 
Lecture 1 introduction to flash
Lecture 1 introduction to flashLecture 1 introduction to flash
Lecture 1 introduction to flash
 
Simple flash animation
Simple flash animationSimple flash animation
Simple flash animation
 
video
videovideo
video
 
Video editing
Video editingVideo editing
Video editing
 
Adobe Flash CS4 - Shape tween
Adobe Flash CS4 - Shape tweenAdobe Flash CS4 - Shape tween
Adobe Flash CS4 - Shape tween
 
Adobe Premiere Pro
Adobe Premiere ProAdobe Premiere Pro
Adobe Premiere Pro
 

Similar to Intro to premier pro

Std 11 Computer Chapter 2 Animation Tool: Synfig
Std 11 Computer Chapter 2 Animation Tool: SynfigStd 11 Computer Chapter 2 Animation Tool: Synfig
Std 11 Computer Chapter 2 Animation Tool: Synfig
Nuzhat Memon
 
Basic After Effect & Animation GIF (J&T Express)
Basic After Effect & Animation GIF (J&T Express)Basic After Effect & Animation GIF (J&T Express)
Basic After Effect & Animation GIF (J&T Express)
IzzuwanIsmail
 
Intro toflash
Intro toflashIntro toflash
Intro toflash
sephia17584
 
Moviemaker report
Moviemaker reportMoviemaker report
Moviemaker report
Marlon Gajana
 
Authoring metaphors
Authoring metaphorsAuthoring metaphors
Authoring metaphors
pavishkumarsingh
 
Bea's powerpoint presentation
Bea's powerpoint presentationBea's powerpoint presentation
Bea's powerpoint presentationBea Nelene A. Que
 
Bea's powerpoint presentation
Bea's powerpoint presentationBea's powerpoint presentation
Bea's powerpoint presentationBea Nelene A. Que
 
Pod handler
Pod handlerPod handler
Pod handler
TheaJennings2
 
Video editing
Video editingVideo editing
Video editing
SebThrower
 
Adobe beginners-guide
Adobe beginners-guideAdobe beginners-guide
Adobe beginners-guide
jom1987
 
WLMM Interface
WLMM InterfaceWLMM Interface
WLMM InterfaceAlshuaili
 
powerpoint10Basics.pdf
powerpoint10Basics.pdfpowerpoint10Basics.pdf
powerpoint10Basics.pdf
MakeketsoMakompo
 
Mv process log form 2019 (2)
Mv process log form 2019 (2)Mv process log form 2019 (2)
Mv process log form 2019 (2)
EllieJones40
 
After effects-basics
After effects-basicsAfter effects-basics
After effects-basicsSamuel Hayman
 
Digital Signage CDMS_Editor_manual.pdf
Digital Signage CDMS_Editor_manual.pdfDigital Signage CDMS_Editor_manual.pdf
Digital Signage CDMS_Editor_manual.pdf
Digital Signage Specialist
 
lesson 1.ppt
lesson 1.pptlesson 1.ppt
lesson 1.ppt
rhemaflexion
 
Adobe Captivate: The Swiss Army Knife of Visual Help Authoring
Adobe Captivate: The Swiss Army Knife of Visual Help AuthoringAdobe Captivate: The Swiss Army Knife of Visual Help Authoring
Adobe Captivate: The Swiss Army Knife of Visual Help Authoring
Scott Abel
 
Lesson 1 second quarter Office 2007 format
Lesson 1 second quarter Office 2007 formatLesson 1 second quarter Office 2007 format
Lesson 1 second quarter Office 2007 formatCel Mallari
 
NX_CAD
NX_CADNX_CAD
NX_CAD
Barney Day
 

Similar to Intro to premier pro (20)

Std 11 Computer Chapter 2 Animation Tool: Synfig
Std 11 Computer Chapter 2 Animation Tool: SynfigStd 11 Computer Chapter 2 Animation Tool: Synfig
Std 11 Computer Chapter 2 Animation Tool: Synfig
 
Basic After Effect & Animation GIF (J&T Express)
Basic After Effect & Animation GIF (J&T Express)Basic After Effect & Animation GIF (J&T Express)
Basic After Effect & Animation GIF (J&T Express)
 
Intro toflash
Intro toflashIntro toflash
Intro toflash
 
Moviemaker report
Moviemaker reportMoviemaker report
Moviemaker report
 
Authoring metaphors
Authoring metaphorsAuthoring metaphors
Authoring metaphors
 
Bea's powerpoint presentation
Bea's powerpoint presentationBea's powerpoint presentation
Bea's powerpoint presentation
 
Bea's powerpoint presentation
Bea's powerpoint presentationBea's powerpoint presentation
Bea's powerpoint presentation
 
Pod handler
Pod handlerPod handler
Pod handler
 
Video editing
Video editingVideo editing
Video editing
 
Adobe beginners-guide
Adobe beginners-guideAdobe beginners-guide
Adobe beginners-guide
 
WLMM Interface
WLMM InterfaceWLMM Interface
WLMM Interface
 
powerpoint10Basics.pdf
powerpoint10Basics.pdfpowerpoint10Basics.pdf
powerpoint10Basics.pdf
 
Mv process log form 2019 (2)
Mv process log form 2019 (2)Mv process log form 2019 (2)
Mv process log form 2019 (2)
 
Title (1)
Title (1)Title (1)
Title (1)
 
After effects-basics
After effects-basicsAfter effects-basics
After effects-basics
 
Digital Signage CDMS_Editor_manual.pdf
Digital Signage CDMS_Editor_manual.pdfDigital Signage CDMS_Editor_manual.pdf
Digital Signage CDMS_Editor_manual.pdf
 
lesson 1.ppt
lesson 1.pptlesson 1.ppt
lesson 1.ppt
 
Adobe Captivate: The Swiss Army Knife of Visual Help Authoring
Adobe Captivate: The Swiss Army Knife of Visual Help AuthoringAdobe Captivate: The Swiss Army Knife of Visual Help Authoring
Adobe Captivate: The Swiss Army Knife of Visual Help Authoring
 
Lesson 1 second quarter Office 2007 format
Lesson 1 second quarter Office 2007 formatLesson 1 second quarter Office 2007 format
Lesson 1 second quarter Office 2007 format
 
NX_CAD
NX_CADNX_CAD
NX_CAD
 

More from Louise Sands

Film Tv Sound Lecture (1)
Film  Tv Sound Lecture (1)Film  Tv Sound Lecture (1)
Film Tv Sound Lecture (1)
Louise Sands
 
Developing reflection
Developing reflection Developing reflection
Developing reflection
Louise Sands
 
Basics cinematography
Basics cinematography Basics cinematography
Basics cinematography
Louise Sands
 
Editing introduction and history support
Editing introduction and history support Editing introduction and history support
Editing introduction and history support
Louise Sands
 
Nihilism in fight club
Nihilism in fight clubNihilism in fight club
Nihilism in fight club
Louise Sands
 
Fincher as auteur
Fincher as auteurFincher as auteur
Fincher as auteur
Louise Sands
 
Masculinity in fight club
Masculinity in fight clubMasculinity in fight club
Masculinity in fight club
Louise Sands
 
Fight Club and Marxism
Fight Club and MarxismFight Club and Marxism
Fight Club and Marxism
Louise Sands
 
Final presentation
Final presentationFinal presentation
Final presentation
Louise Sands
 
Gif workshop 1
Gif workshop 1Gif workshop 1
Gif workshop 1
Louise Sands
 
Animation logbook
Animation logbookAnimation logbook
Animation logbook
Louise Sands
 
In designtutorial
In designtutorialIn designtutorial
In designtutorial
Louise Sands
 
Fight club booklet
Fight club bookletFight club booklet
Fight club booklet
Louise Sands
 
How to produce pre production paperwork
How to produce pre production paperwork  How to produce pre production paperwork
How to produce pre production paperwork
Louise Sands
 
Health and safety Film
Health and safety FilmHealth and safety Film
Health and safety Film
Louise Sands
 
Small scale research project
Small scale research projectSmall scale research project
Small scale research project
Louise Sands
 
Level 2 cinematic techniques
Level 2 cinematic techniquesLevel 2 cinematic techniques
Level 2 cinematic techniques
Louise Sands
 
Demographics psychographics
Demographics psychographics Demographics psychographics
Demographics psychographics
Louise Sands
 
Collage and Layers
Collage and LayersCollage and Layers
Collage and Layers
Louise Sands
 
Script writing with Celtx Lecture 2
Script writing with Celtx Lecture 2Script writing with Celtx Lecture 2
Script writing with Celtx Lecture 2
Louise Sands
 

More from Louise Sands (20)

Film Tv Sound Lecture (1)
Film  Tv Sound Lecture (1)Film  Tv Sound Lecture (1)
Film Tv Sound Lecture (1)
 
Developing reflection
Developing reflection Developing reflection
Developing reflection
 
Basics cinematography
Basics cinematography Basics cinematography
Basics cinematography
 
Editing introduction and history support
Editing introduction and history support Editing introduction and history support
Editing introduction and history support
 
Nihilism in fight club
Nihilism in fight clubNihilism in fight club
Nihilism in fight club
 
Fincher as auteur
Fincher as auteurFincher as auteur
Fincher as auteur
 
Masculinity in fight club
Masculinity in fight clubMasculinity in fight club
Masculinity in fight club
 
Fight Club and Marxism
Fight Club and MarxismFight Club and Marxism
Fight Club and Marxism
 
Final presentation
Final presentationFinal presentation
Final presentation
 
Gif workshop 1
Gif workshop 1Gif workshop 1
Gif workshop 1
 
Animation logbook
Animation logbookAnimation logbook
Animation logbook
 
In designtutorial
In designtutorialIn designtutorial
In designtutorial
 
Fight club booklet
Fight club bookletFight club booklet
Fight club booklet
 
How to produce pre production paperwork
How to produce pre production paperwork  How to produce pre production paperwork
How to produce pre production paperwork
 
Health and safety Film
Health and safety FilmHealth and safety Film
Health and safety Film
 
Small scale research project
Small scale research projectSmall scale research project
Small scale research project
 
Level 2 cinematic techniques
Level 2 cinematic techniquesLevel 2 cinematic techniques
Level 2 cinematic techniques
 
Demographics psychographics
Demographics psychographics Demographics psychographics
Demographics psychographics
 
Collage and Layers
Collage and LayersCollage and Layers
Collage and Layers
 
Script writing with Celtx Lecture 2
Script writing with Celtx Lecture 2Script writing with Celtx Lecture 2
Script writing with Celtx Lecture 2
 

Recently uploaded

How to Break the cycle of negative Thoughts
How to Break the cycle of negative ThoughtsHow to Break the cycle of negative Thoughts
How to Break the cycle of negative Thoughts
Col Mukteshwar Prasad
 
PART A. Introduction to Costumer Service
PART A. Introduction to Costumer ServicePART A. Introduction to Costumer Service
PART A. Introduction to Costumer Service
PedroFerreira53928
 
Overview on Edible Vaccine: Pros & Cons with Mechanism
Overview on Edible Vaccine: Pros & Cons with MechanismOverview on Edible Vaccine: Pros & Cons with Mechanism
Overview on Edible Vaccine: Pros & Cons with Mechanism
DeeptiGupta154
 
Chapter 3 - Islamic Banking Products and Services.pptx
Chapter 3 - Islamic Banking Products and Services.pptxChapter 3 - Islamic Banking Products and Services.pptx
Chapter 3 - Islamic Banking Products and Services.pptx
Mohd Adib Abd Muin, Senior Lecturer at Universiti Utara Malaysia
 
Unit 8 - Information and Communication Technology (Paper I).pdf
Unit 8 - Information and Communication Technology (Paper I).pdfUnit 8 - Information and Communication Technology (Paper I).pdf
Unit 8 - Information and Communication Technology (Paper I).pdf
Thiyagu K
 
How to Create Map Views in the Odoo 17 ERP
How to Create Map Views in the Odoo 17 ERPHow to Create Map Views in the Odoo 17 ERP
How to Create Map Views in the Odoo 17 ERP
Celine George
 
Digital Tools and AI for Teaching Learning and Research
Digital Tools and AI for Teaching Learning and ResearchDigital Tools and AI for Teaching Learning and Research
Digital Tools and AI for Teaching Learning and Research
Vikramjit Singh
 
Home assignment II on Spectroscopy 2024 Answers.pdf
Home assignment II on Spectroscopy 2024 Answers.pdfHome assignment II on Spectroscopy 2024 Answers.pdf
Home assignment II on Spectroscopy 2024 Answers.pdf
Tamralipta Mahavidyalaya
 
Basic phrases for greeting and assisting costumers
Basic phrases for greeting and assisting costumersBasic phrases for greeting and assisting costumers
Basic phrases for greeting and assisting costumers
PedroFerreira53928
 
Welcome to TechSoup New Member Orientation and Q&A (May 2024).pdf
Welcome to TechSoup   New Member Orientation and Q&A (May 2024).pdfWelcome to TechSoup   New Member Orientation and Q&A (May 2024).pdf
Welcome to TechSoup New Member Orientation and Q&A (May 2024).pdf
TechSoup
 
TESDA TM1 REVIEWER FOR NATIONAL ASSESSMENT WRITTEN AND ORAL QUESTIONS WITH A...
TESDA TM1 REVIEWER  FOR NATIONAL ASSESSMENT WRITTEN AND ORAL QUESTIONS WITH A...TESDA TM1 REVIEWER  FOR NATIONAL ASSESSMENT WRITTEN AND ORAL QUESTIONS WITH A...
TESDA TM1 REVIEWER FOR NATIONAL ASSESSMENT WRITTEN AND ORAL QUESTIONS WITH A...
EugeneSaldivar
 
The approach at University of Liverpool.pptx
The approach at University of Liverpool.pptxThe approach at University of Liverpool.pptx
The approach at University of Liverpool.pptx
Jisc
 
Thesis Statement for students diagnonsed withADHD.ppt
Thesis Statement for students diagnonsed withADHD.pptThesis Statement for students diagnonsed withADHD.ppt
Thesis Statement for students diagnonsed withADHD.ppt
EverAndrsGuerraGuerr
 
1.4 modern child centered education - mahatma gandhi-2.pptx
1.4 modern child centered education - mahatma gandhi-2.pptx1.4 modern child centered education - mahatma gandhi-2.pptx
1.4 modern child centered education - mahatma gandhi-2.pptx
JosvitaDsouza2
 
Ethnobotany and Ethnopharmacology ......
Ethnobotany and Ethnopharmacology ......Ethnobotany and Ethnopharmacology ......
Ethnobotany and Ethnopharmacology ......
Ashokrao Mane college of Pharmacy Peth-Vadgaon
 
Introduction to Quality Improvement Essentials
Introduction to Quality Improvement EssentialsIntroduction to Quality Improvement Essentials
Introduction to Quality Improvement Essentials
Excellence Foundation for South Sudan
 
CLASS 11 CBSE B.St Project AIDS TO TRADE - INSURANCE
CLASS 11 CBSE B.St Project AIDS TO TRADE - INSURANCECLASS 11 CBSE B.St Project AIDS TO TRADE - INSURANCE
CLASS 11 CBSE B.St Project AIDS TO TRADE - INSURANCE
BhavyaRajput3
 
How to Make a Field invisible in Odoo 17
How to Make a Field invisible in Odoo 17How to Make a Field invisible in Odoo 17
How to Make a Field invisible in Odoo 17
Celine George
 
2024.06.01 Introducing a competency framework for languag learning materials ...
2024.06.01 Introducing a competency framework for languag learning materials ...2024.06.01 Introducing a competency framework for languag learning materials ...
2024.06.01 Introducing a competency framework for languag learning materials ...
Sandy Millin
 
aaaaaaaaaaaaaaaaaaaaaaaaaaaaaaaaaaaaaaaaa
aaaaaaaaaaaaaaaaaaaaaaaaaaaaaaaaaaaaaaaaaaaaaaaaaaaaaaaaaaaaaaaaaaaaaaaaaaaaaaaaaa
aaaaaaaaaaaaaaaaaaaaaaaaaaaaaaaaaaaaaaaaa
siemaillard
 

Recently uploaded (20)

How to Break the cycle of negative Thoughts
How to Break the cycle of negative ThoughtsHow to Break the cycle of negative Thoughts
How to Break the cycle of negative Thoughts
 
PART A. Introduction to Costumer Service
PART A. Introduction to Costumer ServicePART A. Introduction to Costumer Service
PART A. Introduction to Costumer Service
 
Overview on Edible Vaccine: Pros & Cons with Mechanism
Overview on Edible Vaccine: Pros & Cons with MechanismOverview on Edible Vaccine: Pros & Cons with Mechanism
Overview on Edible Vaccine: Pros & Cons with Mechanism
 
Chapter 3 - Islamic Banking Products and Services.pptx
Chapter 3 - Islamic Banking Products and Services.pptxChapter 3 - Islamic Banking Products and Services.pptx
Chapter 3 - Islamic Banking Products and Services.pptx
 
Unit 8 - Information and Communication Technology (Paper I).pdf
Unit 8 - Information and Communication Technology (Paper I).pdfUnit 8 - Information and Communication Technology (Paper I).pdf
Unit 8 - Information and Communication Technology (Paper I).pdf
 
How to Create Map Views in the Odoo 17 ERP
How to Create Map Views in the Odoo 17 ERPHow to Create Map Views in the Odoo 17 ERP
How to Create Map Views in the Odoo 17 ERP
 
Digital Tools and AI for Teaching Learning and Research
Digital Tools and AI for Teaching Learning and ResearchDigital Tools and AI for Teaching Learning and Research
Digital Tools and AI for Teaching Learning and Research
 
Home assignment II on Spectroscopy 2024 Answers.pdf
Home assignment II on Spectroscopy 2024 Answers.pdfHome assignment II on Spectroscopy 2024 Answers.pdf
Home assignment II on Spectroscopy 2024 Answers.pdf
 
Basic phrases for greeting and assisting costumers
Basic phrases for greeting and assisting costumersBasic phrases for greeting and assisting costumers
Basic phrases for greeting and assisting costumers
 
Welcome to TechSoup New Member Orientation and Q&A (May 2024).pdf
Welcome to TechSoup   New Member Orientation and Q&A (May 2024).pdfWelcome to TechSoup   New Member Orientation and Q&A (May 2024).pdf
Welcome to TechSoup New Member Orientation and Q&A (May 2024).pdf
 
TESDA TM1 REVIEWER FOR NATIONAL ASSESSMENT WRITTEN AND ORAL QUESTIONS WITH A...
TESDA TM1 REVIEWER  FOR NATIONAL ASSESSMENT WRITTEN AND ORAL QUESTIONS WITH A...TESDA TM1 REVIEWER  FOR NATIONAL ASSESSMENT WRITTEN AND ORAL QUESTIONS WITH A...
TESDA TM1 REVIEWER FOR NATIONAL ASSESSMENT WRITTEN AND ORAL QUESTIONS WITH A...
 
The approach at University of Liverpool.pptx
The approach at University of Liverpool.pptxThe approach at University of Liverpool.pptx
The approach at University of Liverpool.pptx
 
Thesis Statement for students diagnonsed withADHD.ppt
Thesis Statement for students diagnonsed withADHD.pptThesis Statement for students diagnonsed withADHD.ppt
Thesis Statement for students diagnonsed withADHD.ppt
 
1.4 modern child centered education - mahatma gandhi-2.pptx
1.4 modern child centered education - mahatma gandhi-2.pptx1.4 modern child centered education - mahatma gandhi-2.pptx
1.4 modern child centered education - mahatma gandhi-2.pptx
 
Ethnobotany and Ethnopharmacology ......
Ethnobotany and Ethnopharmacology ......Ethnobotany and Ethnopharmacology ......
Ethnobotany and Ethnopharmacology ......
 
Introduction to Quality Improvement Essentials
Introduction to Quality Improvement EssentialsIntroduction to Quality Improvement Essentials
Introduction to Quality Improvement Essentials
 
CLASS 11 CBSE B.St Project AIDS TO TRADE - INSURANCE
CLASS 11 CBSE B.St Project AIDS TO TRADE - INSURANCECLASS 11 CBSE B.St Project AIDS TO TRADE - INSURANCE
CLASS 11 CBSE B.St Project AIDS TO TRADE - INSURANCE
 
How to Make a Field invisible in Odoo 17
How to Make a Field invisible in Odoo 17How to Make a Field invisible in Odoo 17
How to Make a Field invisible in Odoo 17
 
2024.06.01 Introducing a competency framework for languag learning materials ...
2024.06.01 Introducing a competency framework for languag learning materials ...2024.06.01 Introducing a competency framework for languag learning materials ...
2024.06.01 Introducing a competency framework for languag learning materials ...
 
aaaaaaaaaaaaaaaaaaaaaaaaaaaaaaaaaaaaaaaaa
aaaaaaaaaaaaaaaaaaaaaaaaaaaaaaaaaaaaaaaaaaaaaaaaaaaaaaaaaaaaaaaaaaaaaaaaaaaaaaaaaa
aaaaaaaaaaaaaaaaaaaaaaaaaaaaaaaaaaaaaaaaa
 

Intro to premier pro

  • 1. Adobe Premiere editing and interface overview
  • 2.  It’s helpful to begin by getting a little familiarity with the editing interface so you can recognize the tools as you work with them in the following lessons. To make it easier to configure the user interface,  Premiere Pro offers workspaces. Workspaces quickly configure the various panels and tools on-screen in ways that are helpful for particular activities, such as editing, colour, special effects work, or audio mixing
  • 3.  Launch Premiere Pro.  The first thing you will see is a box asking whether you would like to create a new Project or work on an existing project. The most recent Projects will appear as their titles above “New Project”
  • 4.
  • 5.
  • 6. This is where where your previous saved versions and all media should be saved. This is in a folder on the media shared drive. However, you should create a back up of this on your memory stick or hard drive.
  • 7.
  • 8.  Each workspace item appears in its own panel, and multiple panels can be combined into a single frame.  Some items with common industry terms stand alone, such as Timeline, Audio Mixer, and Program Monitor. The main user interface elements are as follows:
  • 9.  Project pane– This is where all the files you import into Premiere are located. This includes movie files, image sequences, Photoshop files (and all the layers), and sound files among others. At the bottom of the panel, there are tools to help you organize (such as creating folders).  Effect Controls – Any effect you add to your footage can be controlled in here using a simple sliding scale system.  Effects – A series of drop down menu’s containing audio and video effects. These can be added by dragging them from this window onto your footage in the Timeline
  • 10.  Timeline panel: This is where you’ll do most of your actual editing. You view and work on sequences (the term for edited video segments or entire projects) in the Timeline panel. One strength of sequences is that you can nest them (place sequences inside other sequences). In this way, you can break up a production into manageable chunks or create unique special effects.  Tracks: You can layer—or composite—video clips, images, graphics, and titles on an unlimited number of tracks. Video clips on upper video tracks cover whatever is directly below them on the Timeline. Therefore, you need to give clips on higher tracks some kind of transparency or reduce their size if you want clips on lower tracks to show through.
  • 11.  Monitor panels: You use the Source Monitor (on the left) to view and trim raw clips (your original footage). To view a clip in the Source Monitor, double-click it in the Project panel. The Program Monitor (on the right) is for viewing your sequence. Some editors prefer working with only one monitor screen.  Project panel: This is where you place links to your project’s media files: video clips, audio files, graphics, still images, and sequences. You can use bins—similar to folders—to organize your assets
  • 12.  Media Browser: This panel helps you browse your hard drive to find footage. It’s especially useful for file-based camera media.  Effects panel: This panel contains all the clip effects you will use in your sequences, including video filters, audio effects, and transitions (docked, by default, with the Project panel). Effects are grouped by type to make them easier to find.  Effects panel: This panel contains all the clip effects you will use in your sequences, including video filters, audio effects, and transitions (docked, by default, with the Project panel). Effects are grouped by type to make them easier to find
  • 13.  Audio Mixer: This panel (docked, by default, with the Source and Effect Controls panels) is based on audio production studio hardware, with volume sliders and panning knobs. There is one set of controls for each audio track on the Timeline, plus a master track
  • 14.
  • 15.
  • 16.  Effect Controls panel: This panel (docked, by default, with the Source and Audio Mixer panels, or accessible via the Window menu)  displays the controls for any effects applied to a clip you select in a sequence. Motion, Opacity, and Time Remapping controls are always available for visual clips. Most effect parameters are adjustable over time, allowing you to animate effects.
  • 17.
  • 18.  Tools panel: Each icon in this panel represents a tool that performs a specific function, typically a type of edit in a sequence.  The Selection tool is context-sensitive, which means it changes appearance to indicate the function that matches the circumstances. If you find your cursor doesn’t work as you expect it, it might be because you have the wrong tool
  • 19.
  • 20.  Info panel: The Info panel (docked, by default, with the History and Info panels, or accessible via the Window menu) presents information about any asset you select in the Project panel or any clip or transition selected in a sequence.  • History panel: This panel (docked, by default, with the Effects and Info panels) tracks the steps you take and lets you back up easily. It’s a kind of visual Undo list. When you select a previous step, all steps that came after it are also undone
  • 21.  In addition to customizing the default workspaces (based on tasks), you can adjust the position and location of panels to create a workspace that works best for you. You can then store a workspace or even or create multiple workspaces for different tasks
  • 22. -As you change the size of a frame, other frames change size to compensate. -All panels within frames are accessible via tabs. -All panels are dockable—you can drag a panel from one frame to another. You can drag a panel out of a frame to become a separate floating panel.
  • 23.  In the following slides all these functions were explained by applying an example to create customized workspace.
  • 24.  1-Click the Source Monitor panel (selecting its tab if necessary), and then position your pointer on the vertical divider between the Source panel and the Program panel. Then, click and drag left and right to change the sizes of those frames. You can choose to have different sizes for your video displays.
  • 25.
  • 26.  2-Place the pointer on the horizontal divider between the Source panel and the Timeline. Drag up and down to change the sizes of these frames.  3-Click the gripper area in the upper-left corner of the tab for the Effects panel (to the left of the name), and drag it to the middle of the Source panel to dock the Effects panel in that frame.
  • 27.
  • 28.  Note: As you move a panel, Premiere Pro displays a drop zone. If the panel is a rectangle, it will go into the selected frame as an additional tab. If it’s a trapezoid, it will go into its own frame.  When many panels are combined in a single frame, you may not be able to see all the tabs. A navigation slider appears above the tabs to navigate between them. Slide it left or right to reveal hidden tabs. You can also display a panel by choosing it in the Window menu.
  • 29.  4 Click and drag the Effects drag handle to a point near the right of the Project panel to place it in its own frame.
  • 30.
  • 31.
  • 32.  The drop zone is a trapezoid that covers the right portion of the Project panel. Release the mouse button, and your workspace should look something like the example on the right.  You can also pull panels out into their own floating panel.
  • 33.  5-Click the Source Monitor’s drag handle, and hold down the Control (Windows) or Command (Mac OS) key while dragging it out of its frame. Its drop zone image is much more distinct, indicating that you are about to create a floating panel
  • 34.
  • 35.  6-Drop the Program Monitor anywhere, creating a floating panel. Resize it by dragging from a corner or a side like any other panel.  7 - As you gain experience, you might want to create and save the layout of your panels as a customized workspace. To do so, choose Window > Workspace > New Workspace. Type a name, and click OK.  8 - If you want to return a workspace to its default layout, choose Window > Workspace > Reset Current Workspace. To return to a recognizable starting point, choose the preset Editing workspace and reset it.