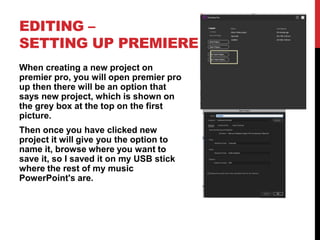
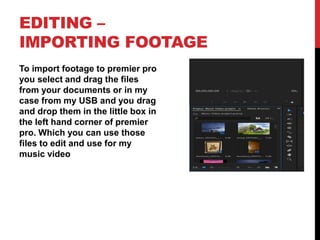
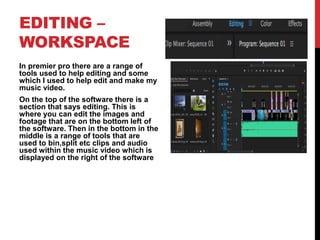
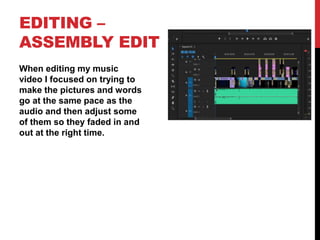
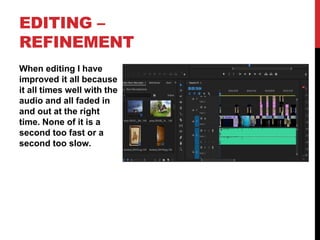
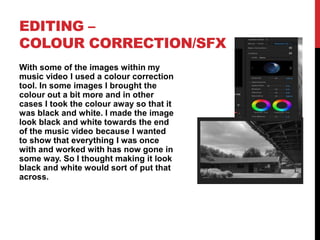
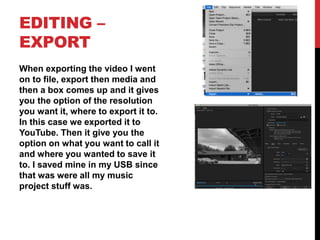
MUSIC VIDEO
PRODUCTION
PROCESS
LOGTEGAN ARTHUR
PRODUCTION LOG:
GUIDANCE
• This document is for you to track the progress of your
production – filming, editing and post-production.
• This is so you can track what you did and how you did it,
explaining and amendments and changes you made and
tracking the decisions that have shaped the practical
creation of your music video.
• The more detail you include about how you made your music
video, the better. The document is broken down in to two
sections, Filming and Editing, each of these is then made of
specific elements that occur in both.
• For each slide there is a prompt detailing what you should
include, delete the prompt after you have complete the slide.
• Remember, images often show what you’ve done more
effectively than words. Use text to explain an illustration.
FILMING –
PRODUCTION STILLS
When trying to produce this certain part of the music
video with the words and the world. I had to make them
both time right with the song as well as each other, so that
they would both fade in and out at the same time. But if it
was a second too early or late then you would be able to
notice, so when doing this it was quite difficult making
sure the timing was right but eventually it worked out.
Also on the image below I had to time the word right to
the song otherwise it would look really odd if it came too
early or late. But then I had to make it run long enough so
that it syncs with the song. So it was quite difficult but I
managed to get it right in time.
EDITING
When working on this section and image of the music
video, I did have to edit it quite a bit. I had to try and take
the colour away from the image so that it was black and
white so it would link to the song in some way but also
what I wanted to show within the music video.
At first there was some difficulties because the image
was too big and the music video kept sticking in that
section. But luckily after adjusting the size changing the
colour, adding a title etc. That section of the video all
came together really well.
EDITING –
FILE MANAGEMENT
When saving my work I
went to file (as shown in the
picture) and then clicked
save as
After clicking save as a little box
like this will come up where I
name my project “music Video
Project” then it says where I
wanted to save it and it says
untitled, so I saved it on my USB
stick with the rest of my stuff for
my music project.
Then on my USB stick is
all the pictures and
footage that I want to use
for my music video, in the
square box is the audio I
saved to use for my
music video . I selected
this song because after
looking at the original
music video it was quite
basic and simple and I
wanted to try and create
that in my own kind of
way.
Then below the
audio my music
video project is
saved, shown in the
box. I made sure
they were all saved
in the same place so
that it is easier to
access.
EDITING –
SETTING UP PREMIERE
When creating a new project on
premier pro, you will open premier pro
up then there will be an option that
says new project, which is shown on
the grey box at the top on the first
picture.
Then once you have clicked new
project it will give you the option to
name it, browse where you want to
save it, so I saved it on my USB stick
where the rest of my music
PowerPoint's are.
EDITING –
IMPORTING FOOTAGE
To import footage to premier pro
you select and drag the files
from your documents or in my
case from my USB and you drag
and drop them in the little box in
the left hand corner of premier
pro. Which you can use those
files to edit and use for my
music video
EDITING –
WORKSPACE
In premier pro there are a range of
tools used to help editing and some
which I used to help edit and make my
music video.
On the top of the software there is a
section that says editing. This is
where you can edit the images and
footage that are on the bottom left of
the software. Then in the bottom in the
middle is a range of tools that are
used to bin,split etc clips and audio
used within the music video which is
displayed on the right of the software
EDITING –
ASSEMBLY EDIT
When editing my music
video I focused on trying to
make the pictures and words
go at the same pace as the
audio and then adjust some
of them so they faded in and
out at the right time.
EDITING –
REFINEMENT
When editing I have
improved it all because
it all times well with the
audio and all faded in
and out at the right
time. None of it is a
second too fast or a
second too slow.
EDITING –
COLOUR CORRECTION/SFX
With some of the images within my
music video I used a colour correction
tool. In some images I brought the
colour out a bit more and in other
cases I took the colour away so that it
was black and white. I made the image
look black and white towards the end
of the music video because I wanted
to show that everything I was once
with and worked with has now gone in
some way. So I thought making it look
black and white would sort of put that
across.
EDITING –
EXPORT
When exporting the video I went
on to file, export then media and
then a box comes up and it gives
you the option of the resolution
you want it, where to export it to.
In this case we exported it to
YouTube. Then it give you the
option on what you want to call it
and where you wanted to save it
to. I saved mine in my USB since
that was were all my music
project stuff was.

MV process log

  • 1.
  • 2.
    PRODUCTION LOG: GUIDANCE • Thisdocument is for you to track the progress of your production – filming, editing and post-production. • This is so you can track what you did and how you did it, explaining and amendments and changes you made and tracking the decisions that have shaped the practical creation of your music video. • The more detail you include about how you made your music video, the better. The document is broken down in to two sections, Filming and Editing, each of these is then made of specific elements that occur in both. • For each slide there is a prompt detailing what you should include, delete the prompt after you have complete the slide. • Remember, images often show what you’ve done more effectively than words. Use text to explain an illustration.
  • 3.
    FILMING – PRODUCTION STILLS Whentrying to produce this certain part of the music video with the words and the world. I had to make them both time right with the song as well as each other, so that they would both fade in and out at the same time. But if it was a second too early or late then you would be able to notice, so when doing this it was quite difficult making sure the timing was right but eventually it worked out. Also on the image below I had to time the word right to the song otherwise it would look really odd if it came too early or late. But then I had to make it run long enough so that it syncs with the song. So it was quite difficult but I managed to get it right in time.
  • 4.
    EDITING When working onthis section and image of the music video, I did have to edit it quite a bit. I had to try and take the colour away from the image so that it was black and white so it would link to the song in some way but also what I wanted to show within the music video. At first there was some difficulties because the image was too big and the music video kept sticking in that section. But luckily after adjusting the size changing the colour, adding a title etc. That section of the video all came together really well.
  • 5.
    EDITING – FILE MANAGEMENT Whensaving my work I went to file (as shown in the picture) and then clicked save as
  • 6.
    After clicking saveas a little box like this will come up where I name my project “music Video Project” then it says where I wanted to save it and it says untitled, so I saved it on my USB stick with the rest of my stuff for my music project.
  • 7.
    Then on myUSB stick is all the pictures and footage that I want to use for my music video, in the square box is the audio I saved to use for my music video . I selected this song because after looking at the original music video it was quite basic and simple and I wanted to try and create that in my own kind of way.
  • 8.
    Then below the audiomy music video project is saved, shown in the box. I made sure they were all saved in the same place so that it is easier to access.
  • 9.
    EDITING – SETTING UPPREMIERE When creating a new project on premier pro, you will open premier pro up then there will be an option that says new project, which is shown on the grey box at the top on the first picture. Then once you have clicked new project it will give you the option to name it, browse where you want to save it, so I saved it on my USB stick where the rest of my music PowerPoint's are.
  • 10.
    EDITING – IMPORTING FOOTAGE Toimport footage to premier pro you select and drag the files from your documents or in my case from my USB and you drag and drop them in the little box in the left hand corner of premier pro. Which you can use those files to edit and use for my music video
  • 11.
    EDITING – WORKSPACE In premierpro there are a range of tools used to help editing and some which I used to help edit and make my music video. On the top of the software there is a section that says editing. This is where you can edit the images and footage that are on the bottom left of the software. Then in the bottom in the middle is a range of tools that are used to bin,split etc clips and audio used within the music video which is displayed on the right of the software
  • 12.
    EDITING – ASSEMBLY EDIT Whenediting my music video I focused on trying to make the pictures and words go at the same pace as the audio and then adjust some of them so they faded in and out at the right time.
  • 13.
    EDITING – REFINEMENT When editingI have improved it all because it all times well with the audio and all faded in and out at the right time. None of it is a second too fast or a second too slow.
  • 14.
    EDITING – COLOUR CORRECTION/SFX Withsome of the images within my music video I used a colour correction tool. In some images I brought the colour out a bit more and in other cases I took the colour away so that it was black and white. I made the image look black and white towards the end of the music video because I wanted to show that everything I was once with and worked with has now gone in some way. So I thought making it look black and white would sort of put that across.
  • 15.
    EDITING – EXPORT When exportingthe video I went on to file, export then media and then a box comes up and it gives you the option of the resolution you want it, where to export it to. In this case we exported it to YouTube. Then it give you the option on what you want to call it and where you wanted to save it to. I saved mine in my USB since that was were all my music project stuff was.