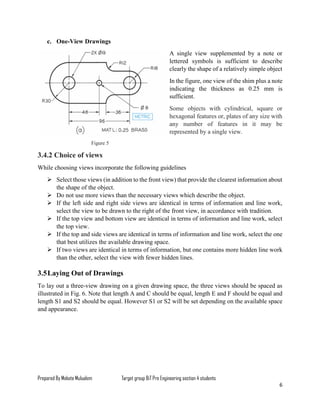
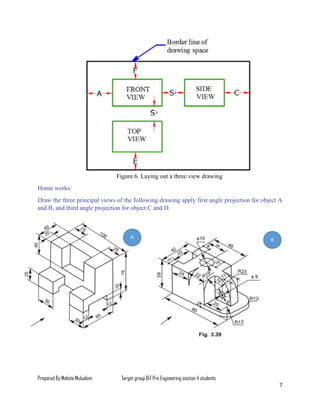
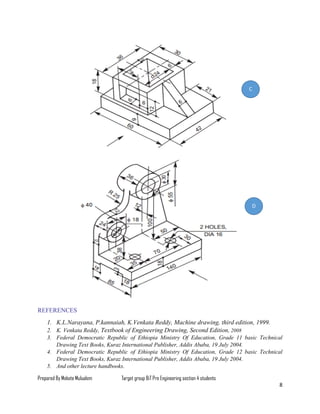
Scaling in conventional MOSFET for constant electric field and constant voltage
Introduction to Multi-view Drawing
1. Prepared By Mekete Mulualem Target group BiT Pre Engineering section 4 students
1
Engineering Drawing
Lesson Five
Chapter Three: Multi-View Drawing
Objectives: after completion of this chapter students should able to:
Explain the importance of multi-view drawings;
Prepare arranged view with first and third angle projection;
Arrange the six principal views in 1st and 3rd angle projection methods;
Lay out multi-view drawings;
Prepare the multi – view drawing of an object;
Identify normal, inclined and oblique surface;
Apply visualization skills by solid and surface to multi-view drawings.
Chapter contents:
System of projection
Six principal views
Selection and Choice of views
Laying out of views
Projection of planer and non-planer surfaces
Projection of tangent surfaces, fillets, rounds run outs
3.1 Introduction
A pictorial drawing shows an object as it appears to the observer, but not in its true lengths. Such
a picture cannot describe the object fully, no matter which direction it is viewed from, because it
does not show the exact shapes and sizes of the several parts. In industry, a complete and clear
description of the shape and size of an object to be made is necessary. Therefore, a number of
views systematically arranged, are used. This system of view is called multi-view projection.
Multi-view drawing is the graphic representation of an object on a sheet of paper in a way that
will describe exact shape and proportions. This is done by drawing different views of the object as
it is seen from different positions. These views are then arranged in a standard order so can
understand them immediately.
These views are arranged close to each other as shown in fig. 1(b)
These three view are the most frequently used
Spacing between views is a matter of appearance
They should be spaced well apart, yet close enough to appear related to each other
Any object can be viewed from six mutually perpendicular directions. These six views may be
drawn if necessary.
What is multi-view drawing? Its advantage over pictorial drawings?
2. Prepared By Mekete Mulualem Target group BiT Pre Engineering section 4 students
2
3.2 Systems or angles of projection
The principles of orthographic projection may be followed in four different angles or systems, viz.,
first, second, third and fourth angle projections. A projection is said to be first, second, third or
fourth angle when the object is imagined to be in the first, second, third or fourth quadrant
respectively. First angle and third angle projections are the most common (widely applicable) types
of projections.
First angle projection Third angle projection
The Bureau of Indian Standards, BIS
European countries
ISO standard
Canada
USA
Japan
Thailand, Australia
A. First angle projection
In first angle projection, the object is imagined to be positioned in the first quadrant. The view
from the front of the object is obtained by looking at the object from the right side of the quadrant.
The object is between the observer and the plane of projection (vertical plane). Here, the object is
imagined to be transparent and the projection lines are extended from various points of the object
to intersect the projection plane. The front view is drawn above the xy line and the top view below
xy. (above xy line is v.p and below xy line is H.P).
B. Third angle projection
In this, the object is situated in Third Quadrant. The Planes of projection lie between the object
and the observer. Therefore, in the projection process it is necessary to assume the plane of
projection to be transparent. The front view comes below the xy line and the top view about it.
(a) (b) (c)
Figure 1: symbol of first angle and third angle projection (a), view arrangement of third angle (b)
and first angle(c) projection
Differentiate first angle and third angle projection.
3. Prepared By Mekete Mulualem Target group BiT Pre Engineering section 4 students
3
3.3 Six principal views
An object in space may be imagined as surrounded by six mutually perpendicular planes. So, it is possible
to obtain six different views by viewing the object along the six directions, normal to the six planes.
Figure 2
These views are arranged as shown which is the American National Standard Arrangement. The
Top, front, and bottom views align vertically, while the rear, left side, front and right-side views
align horizontally.
Height is shown in the rear, left-side, front, and right-side views.
Width is shown in the rear, top, front, and bottom views.
Depth is shown in the four views that surround the front view
4. Prepared By Mekete Mulualem Target group BiT Pre Engineering section 4 students
4
In the four views that surround the front view, the front of the object faces towards
the front view.
Figure a.
3.4 Selection and choice of views
3.4.1 Selection of views
For describing any object completely through its orthographic projections, it is important to select
a number of views. The number of views required to describe any object will depend upon the
extent of complexity involved in it. The higher the symmetry, the lesser the number of views
required.
In selecting views, the drafter should choose those that best show essential contours or shapes and
have the least number of hidden lines.
a. Three-views drawing
In general, most of the objects consisting of either a single component or an assembly of a number
of components, are described with the help of three views. In such cases, the views normally
selected are the views from the front, above and left or right side, as shown below.
Figure 3
Exercise 1: Draw three principal views of
the following object, figure a, by using
both first angle and third angle projections.
5. Prepared By Mekete Mulualem Target group BiT Pre Engineering section 4 students
5
Three features of the object above need to be shown on the drawing:
Rounded top and hole…seen from the front
Rectangular notch and round corners…seen from the top
Right angle with filleted corner… seen from the side
Both the front and rear views show the true shapes of the hole and the round top. But, the front
view is preferred because it has no hidden lines, so the rear view is crossed out
Both the top and bottom views show the rectangular notch and rounded corner,
But, the top view is preferred because it has fewer hidden lines.
Both the right-side and left-side views show the right angle with the filleted corner. In this
example the side views are identical, except reversed. In such instance, it is customary to
choose the right-side view, so the necessary view are the three remaining views.
b. Two-View Drawings
Some objects which are symmetrical about two axes may be represented completely by two views
normally, the largest face showing most of the details of the object is selected for drawing the view
from the front, take a look in fig below.
Figure 4
6. Prepared By Mekete Mulualem Target group BiT Pre Engineering section 4 students
6
c. One-View Drawings
A single view supplemented by a note or
lettered symbols is sufficient to describe
clearly the shape of a relatively simple object
In the figure, one view of the shim plus a note
indicating the thickness as 0.25 mm is
sufficient.
Some objects with cylindrical, square or
hexagonal features or, plates of any size with
any number of features in it may be
represented by a single view.
Figure 5
3.4.2 Choice of views
While choosing views incorporate the following guidelines
Select those views (in addition to the front view) that provide the clearest information about
the shape of the object.
Do not use more views than the necessary views which describe the object.
If the left side and right side views are identical in terms of information and line work,
select the view to be drawn to the right of the front view, in accordance with tradition.
If the top view and bottom view are identical in terms of information and line work, select
the top view.
If the top and side views are identical in terms of information and line work, select the one
that best utilizes the available drawing space.
If two views are identical in terms of information, but one contains more hidden line work
than the other, select the view with fewer hidden lines.
3.5Laying Out of Drawings
To lay out a three-view drawing on a given drawing space, the three views should be spaced as
illustrated in Fig. 6. Note that length A and C should be equal, length E and F should be equal and
length S1 and S2 should be equal. However S1 or S2 will be set depending on the available space
and appearance.
7. Prepared By Mekete Mulualem Target group BiT Pre Engineering section 4 students
7
Figure 6. Laying out a three view drawing
Home works:
Draw the three principal views of the following drawing apply first angle projection for object A
and B, and third angle projection for object C and D.
BA
8. Prepared By Mekete Mulualem Target group BiT Pre Engineering section 4 students
8
REFERENCES
1. K.L.Narayana, P.kannaiah, K.Venkata Reddy, Machine drawing, third edition, 1999.
2. K. Venkata Reddy, Textbook of Engineering Drawing, Second Edition, 2008
3. Federal Democratic Republic of Ethiopia Ministry Of Education, Grade 11 basic Technical
Drawing Text Books, Kuraz International Publisher, Addis Ababa, 19 July 2004.
4. Federal Democratic Republic of Ethiopia Ministry Of Education, Grade 12 basic Technical
Drawing Text Books, Kuraz International Publisher, Addis Ababa, 19 July 2004.
5. And other lecture handbooks.
D
C