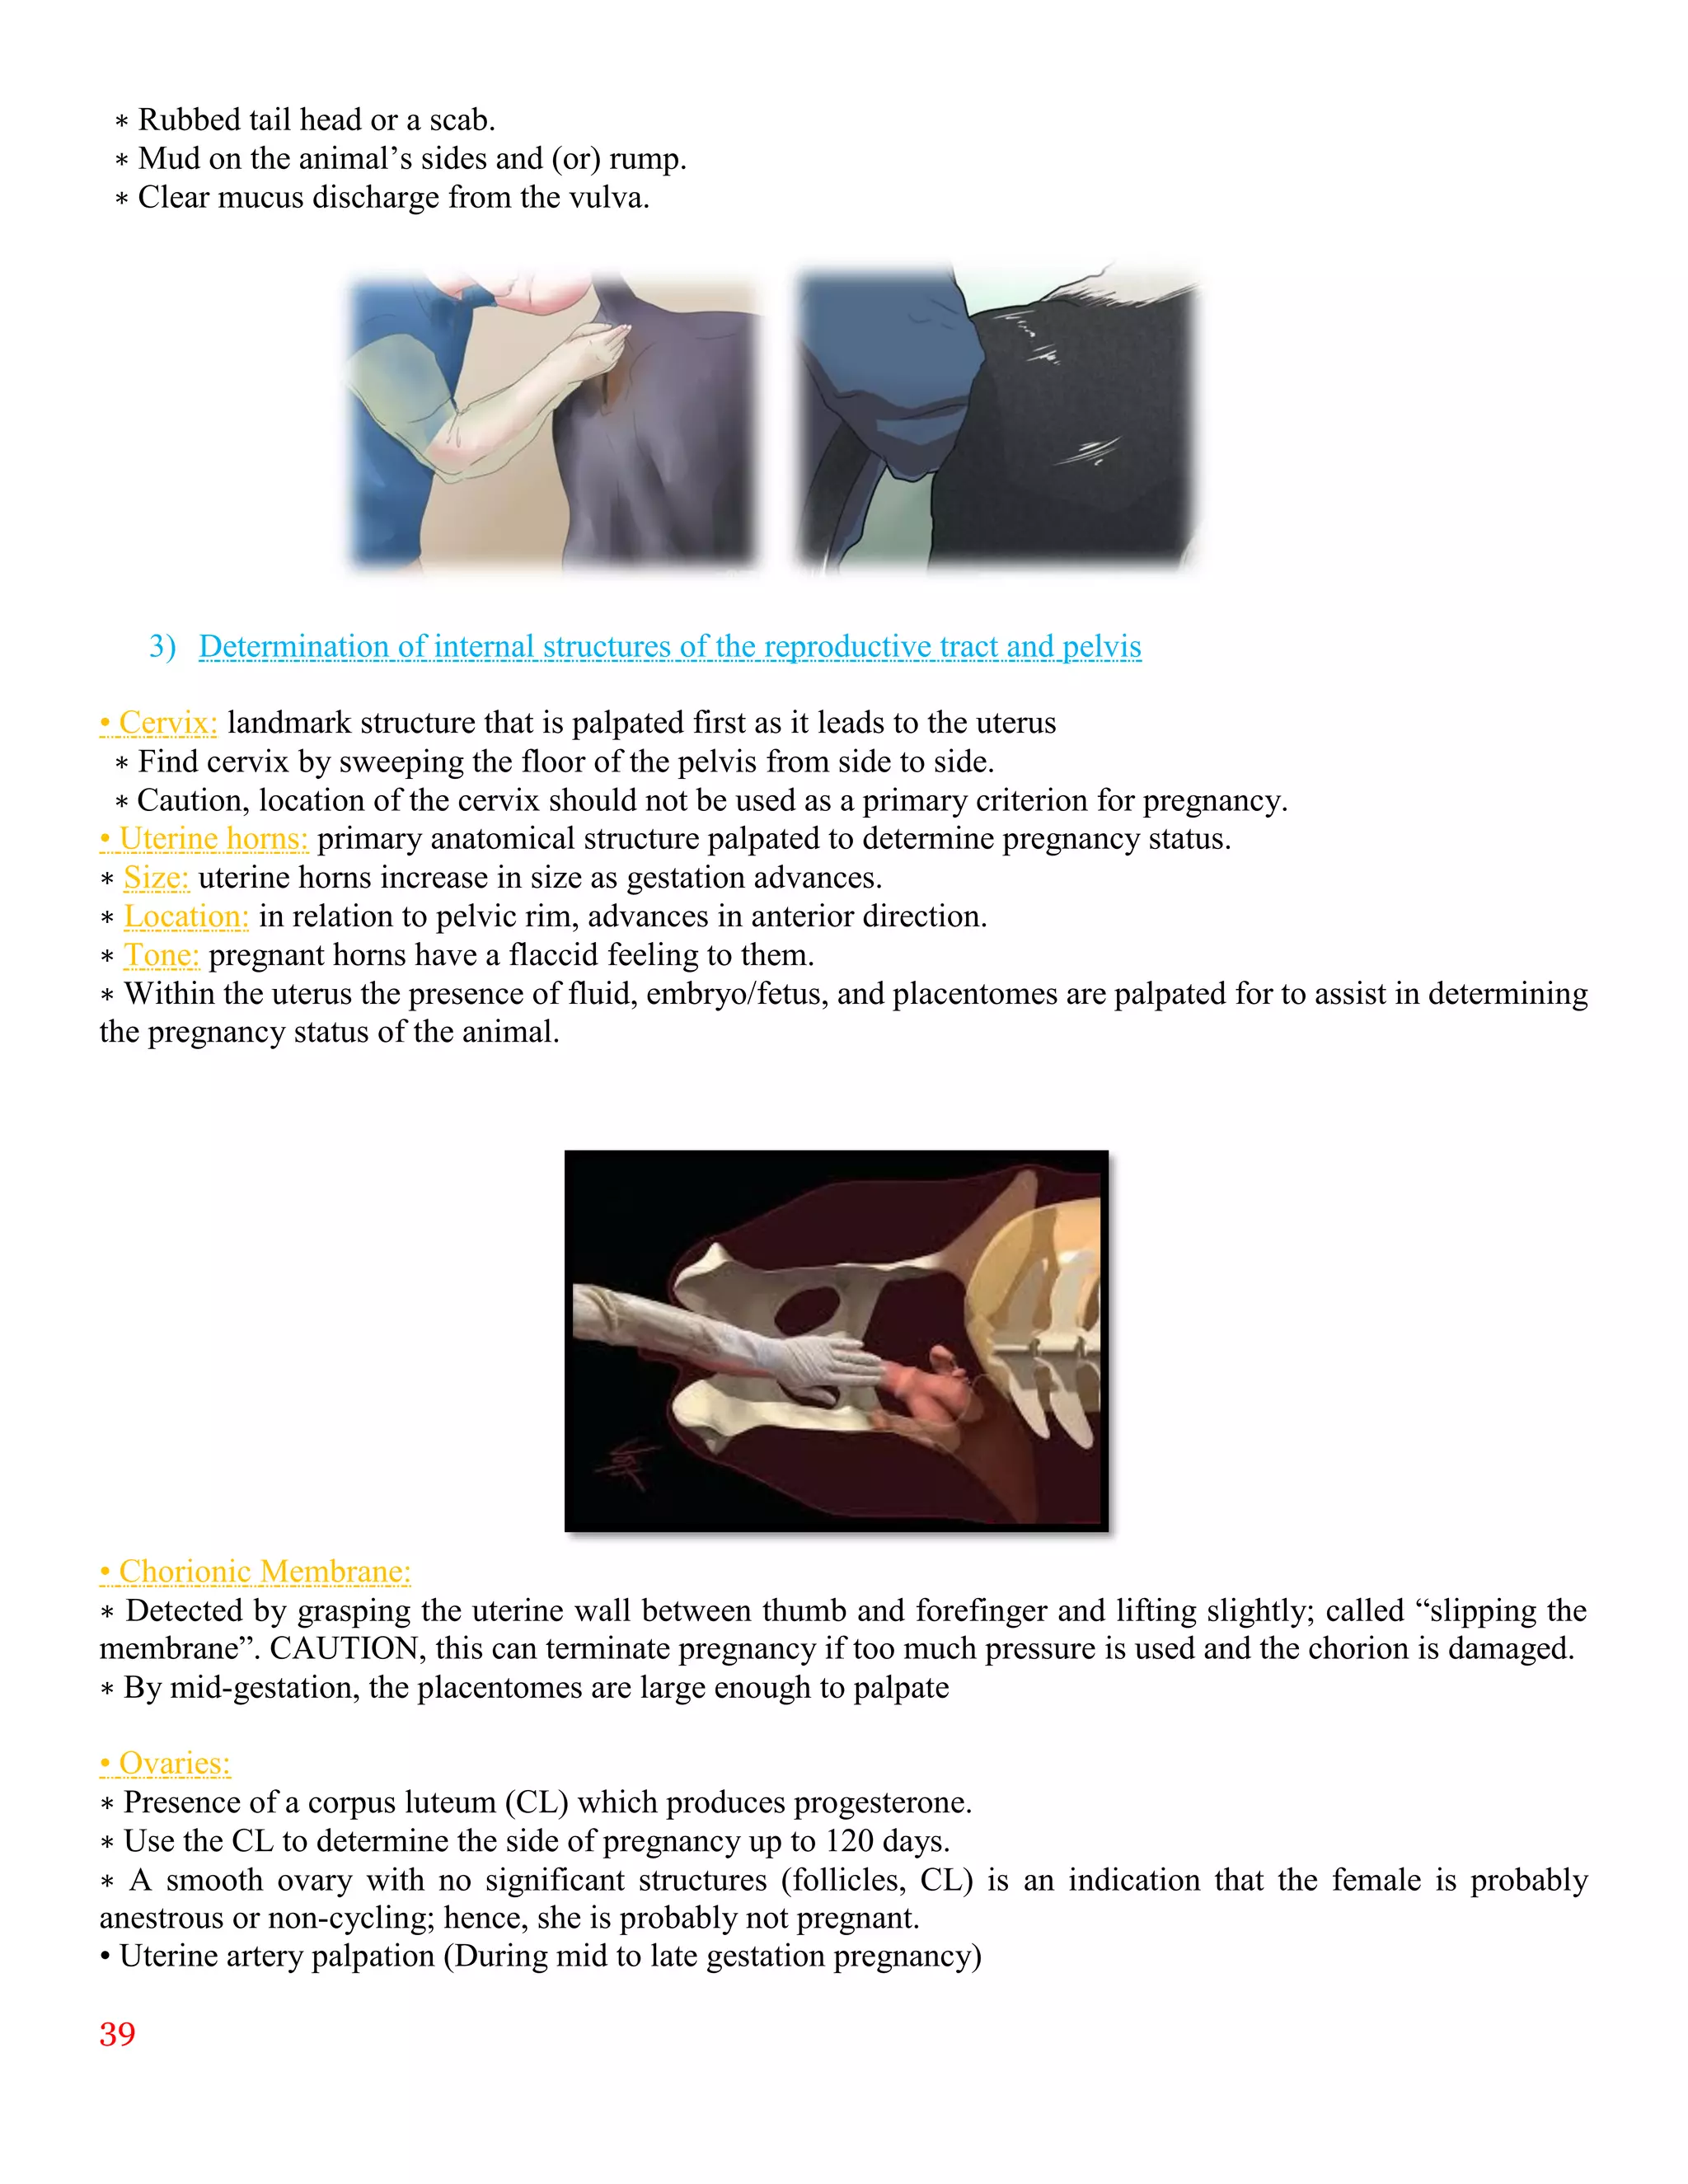
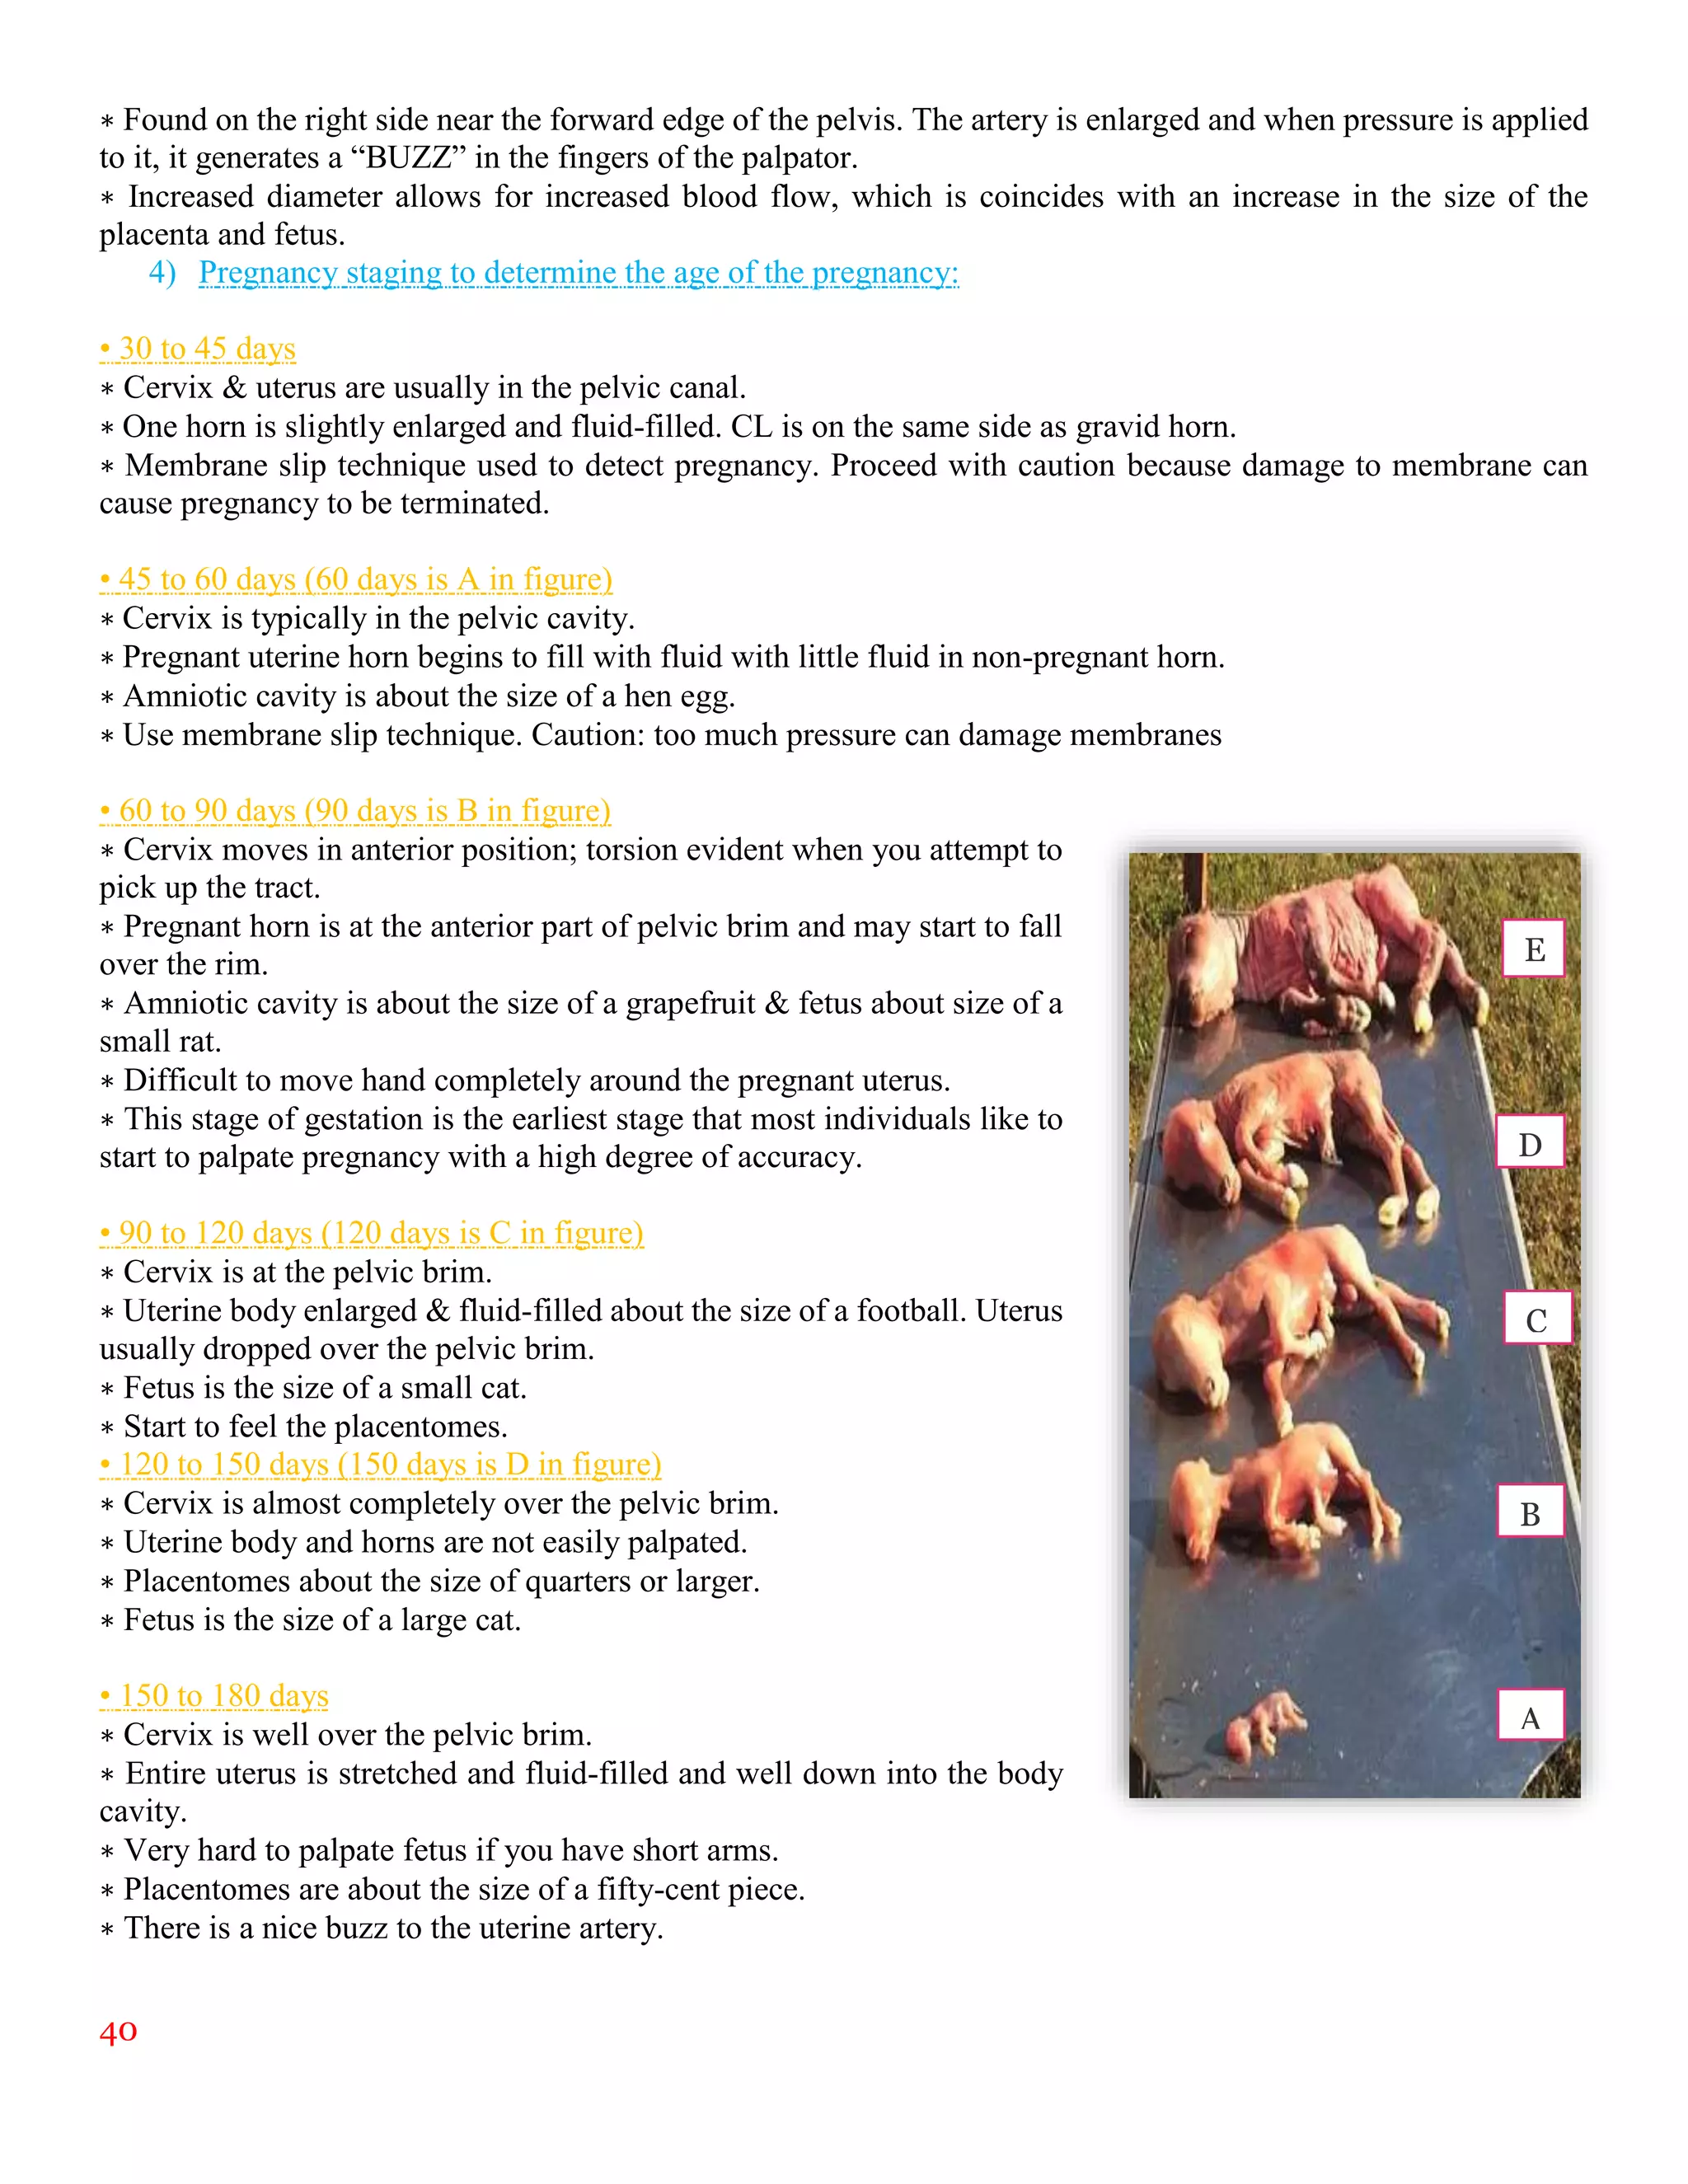
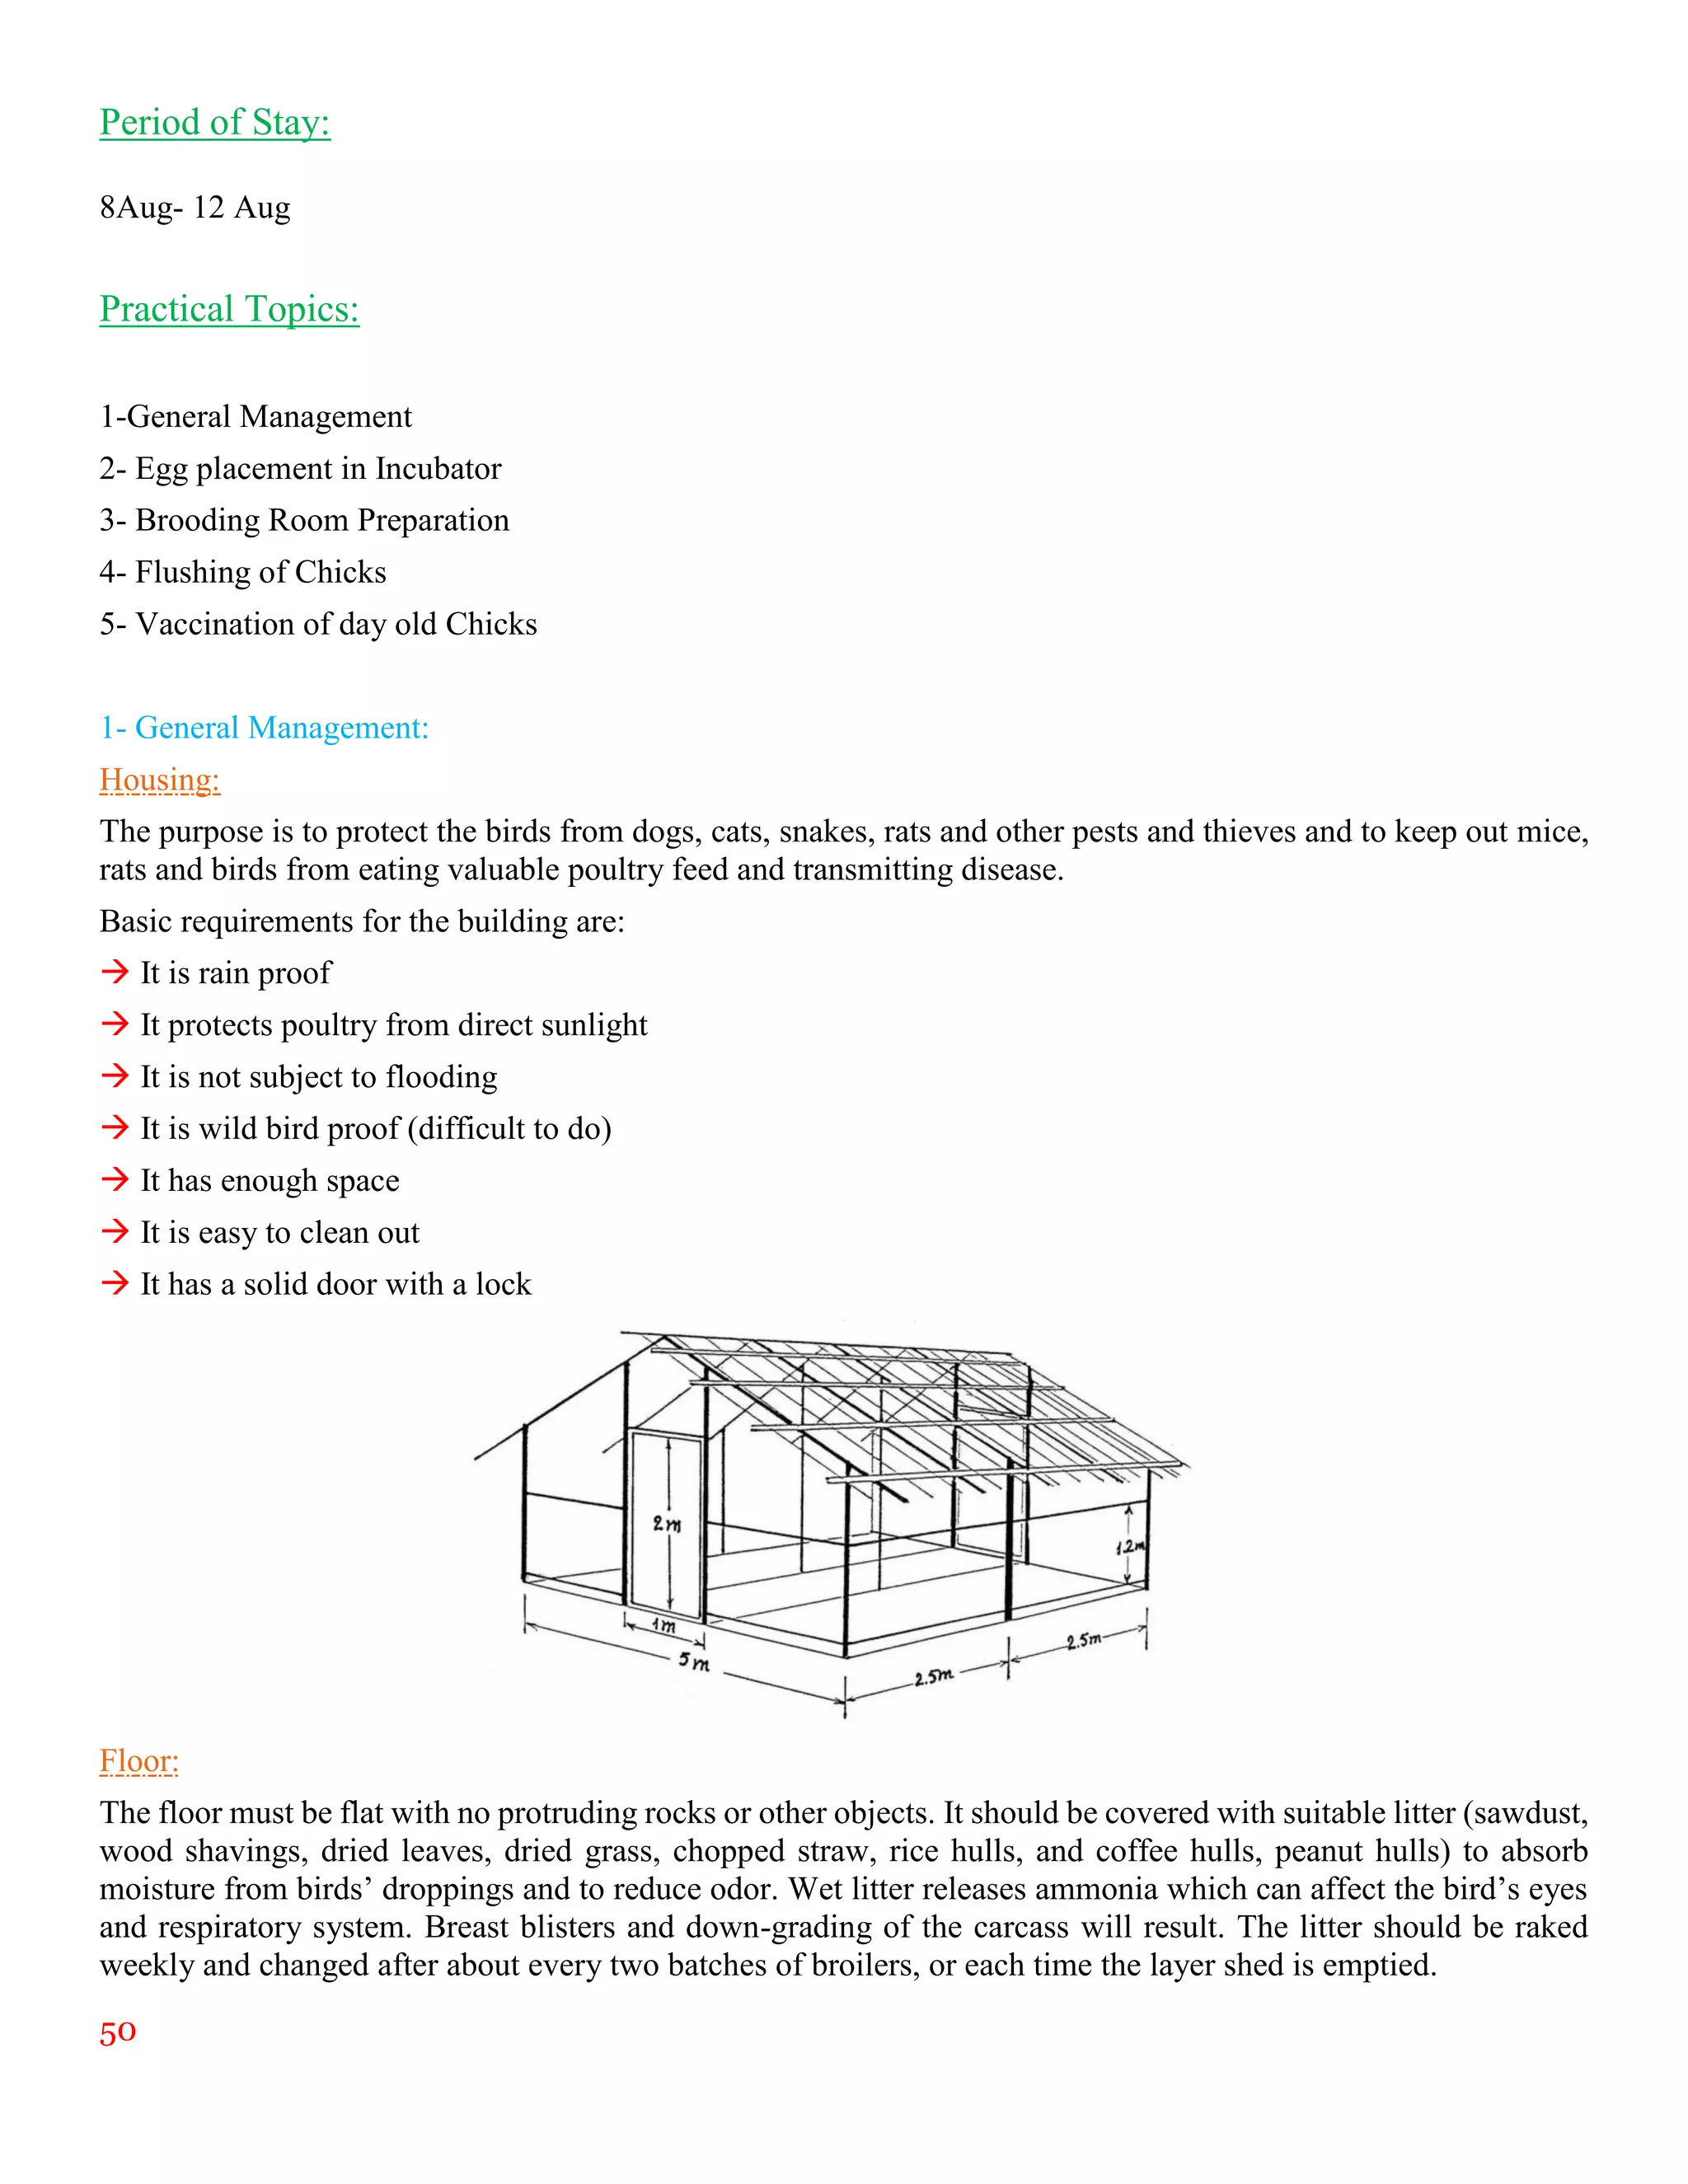
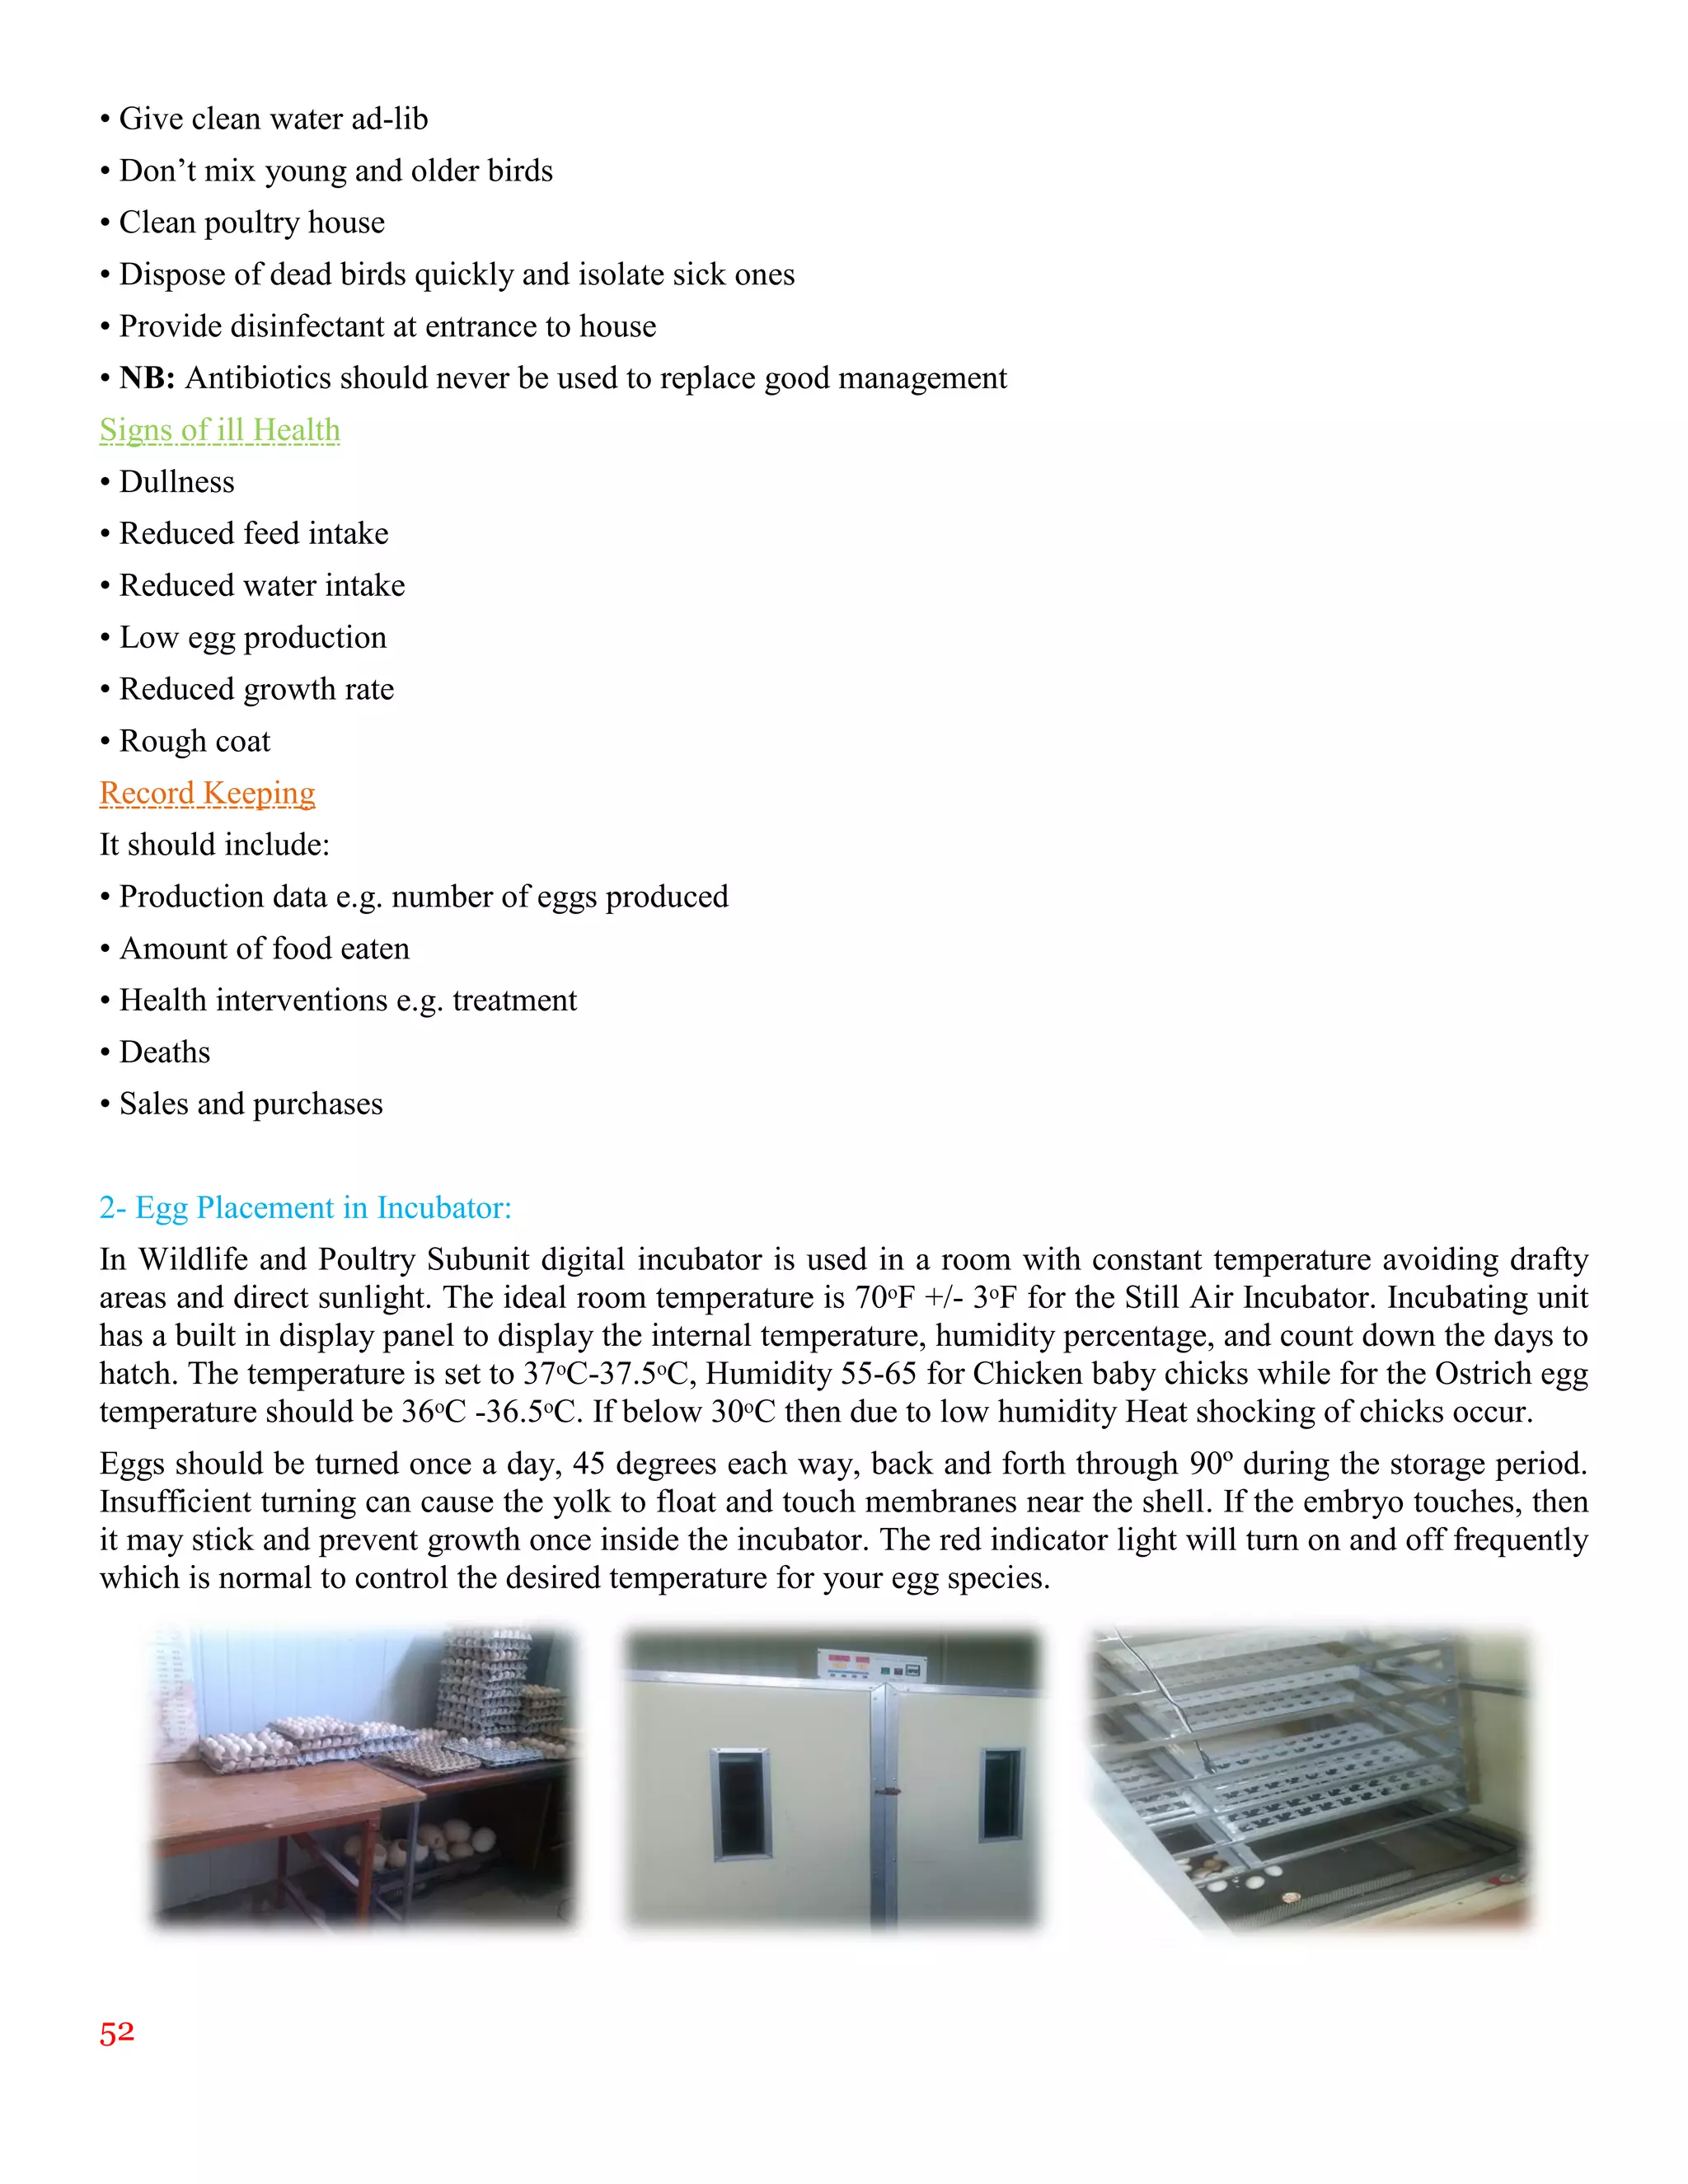
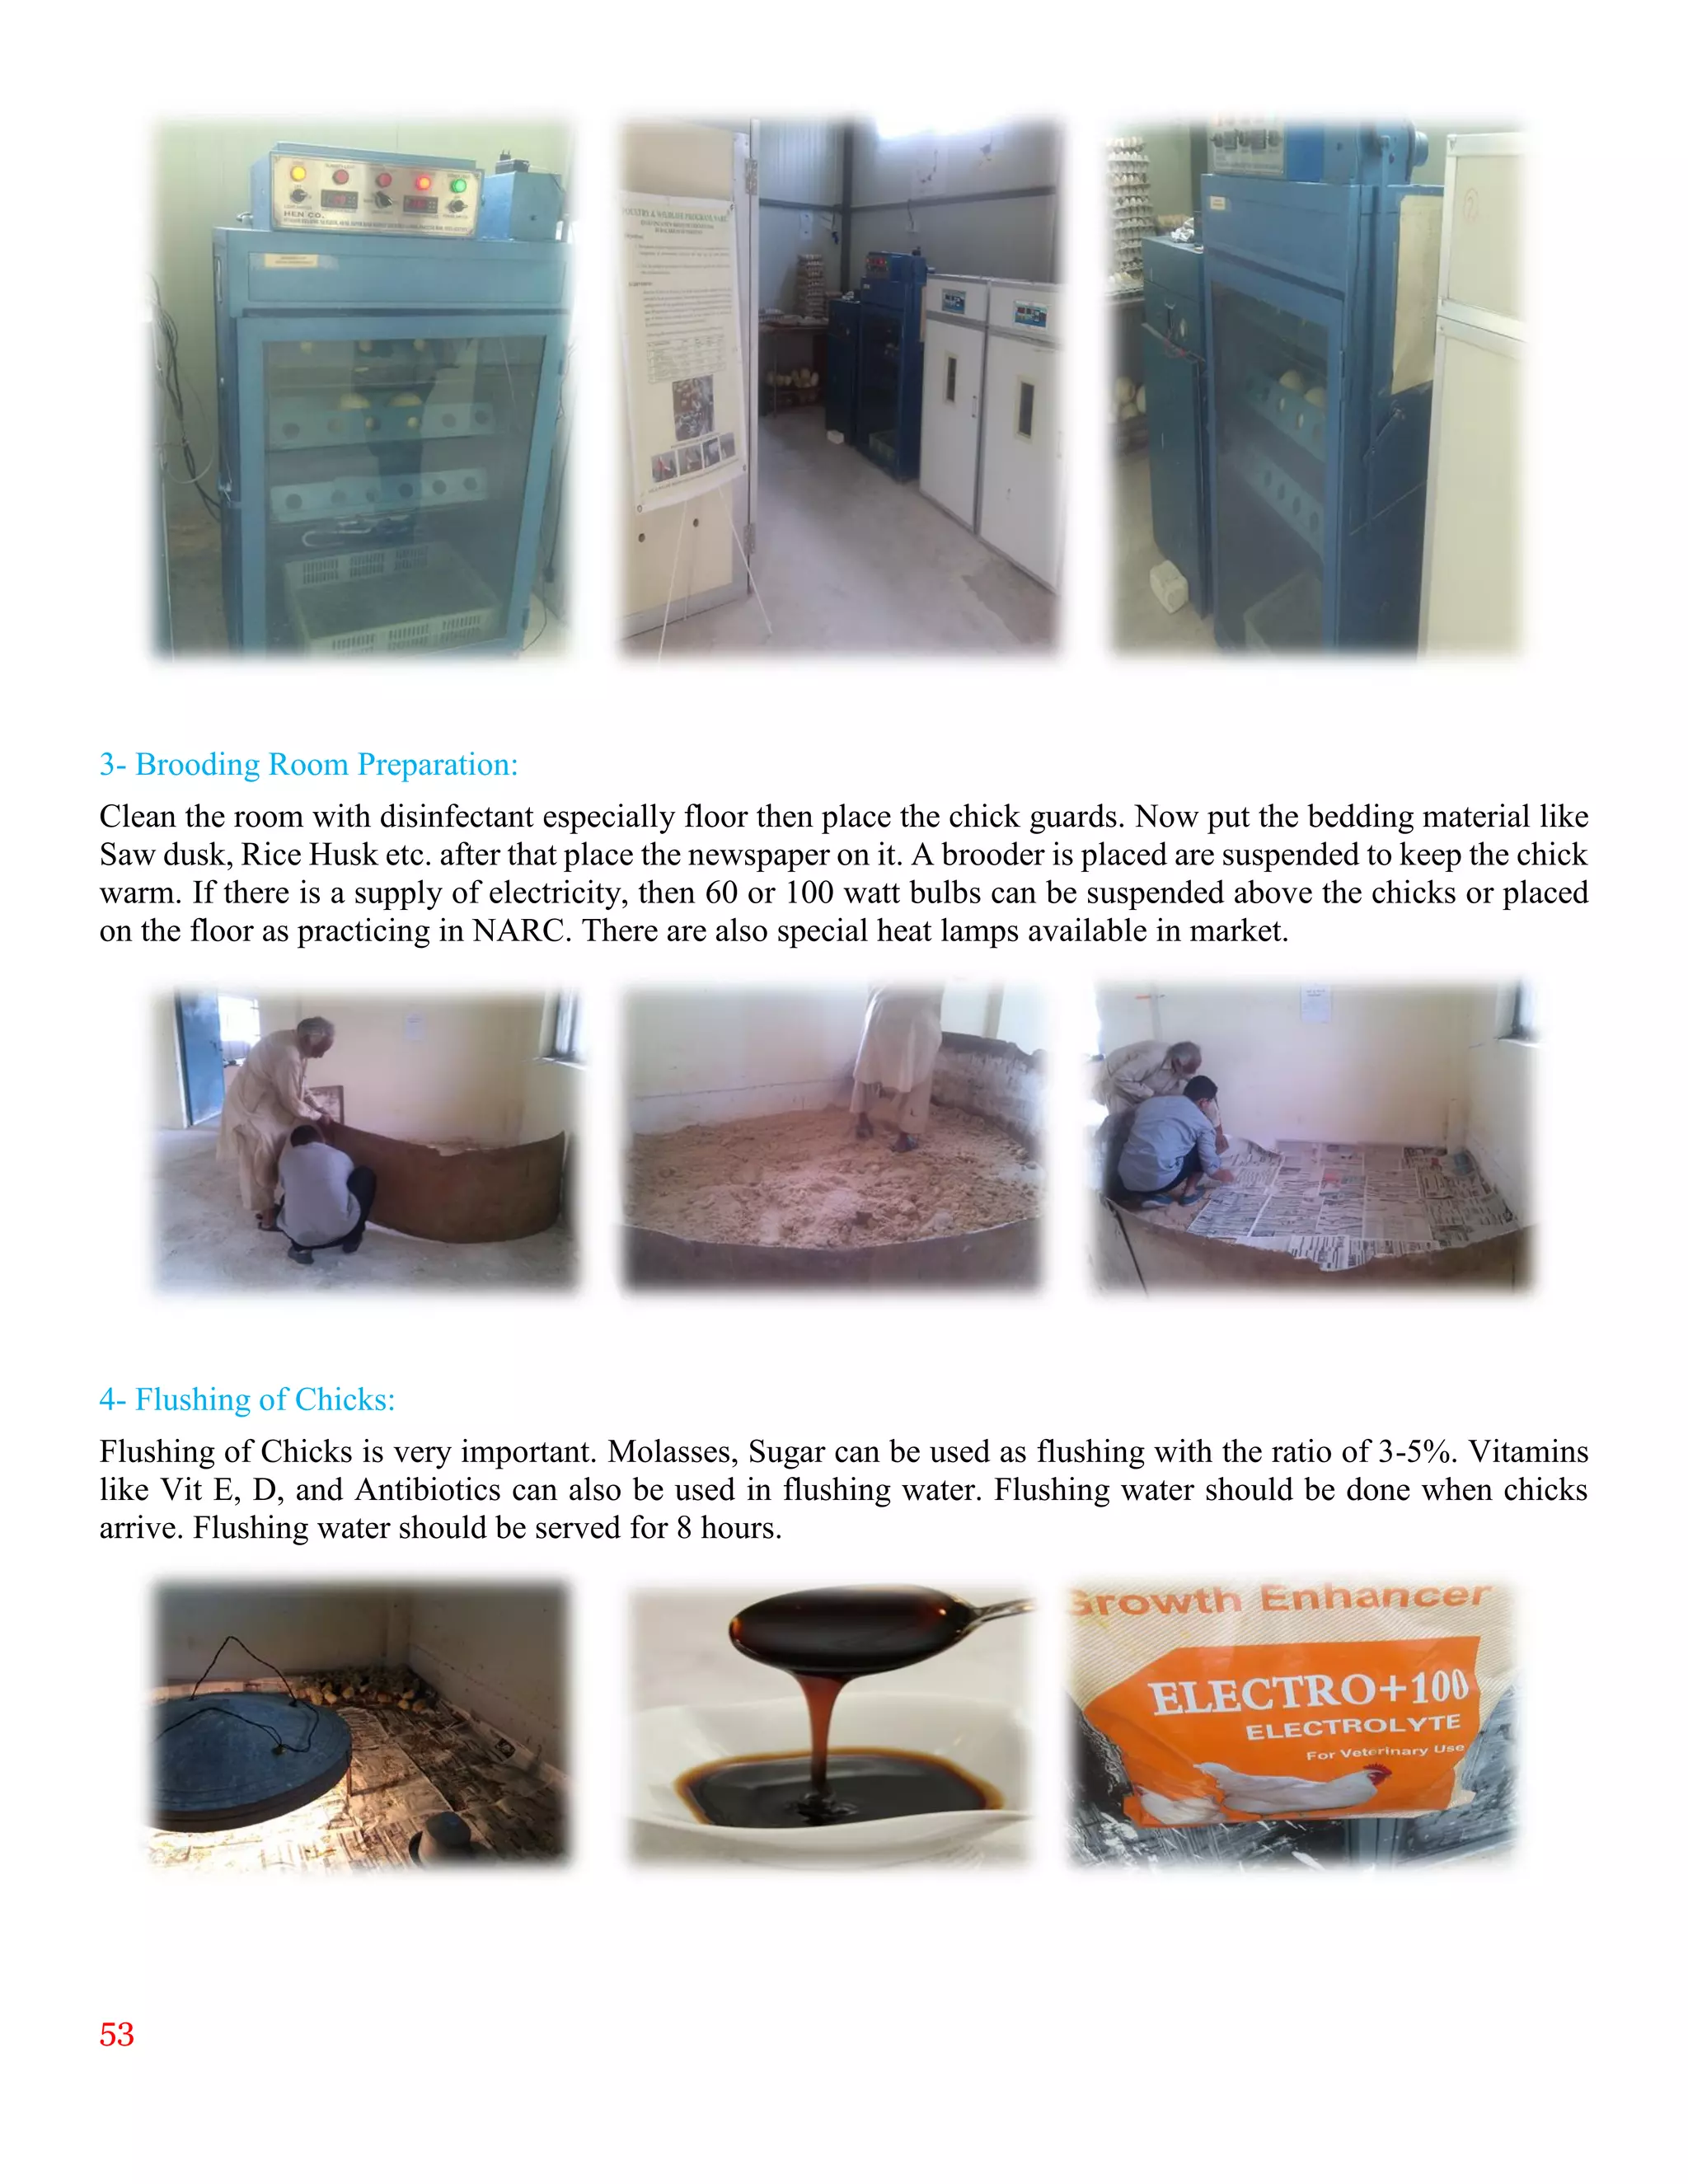
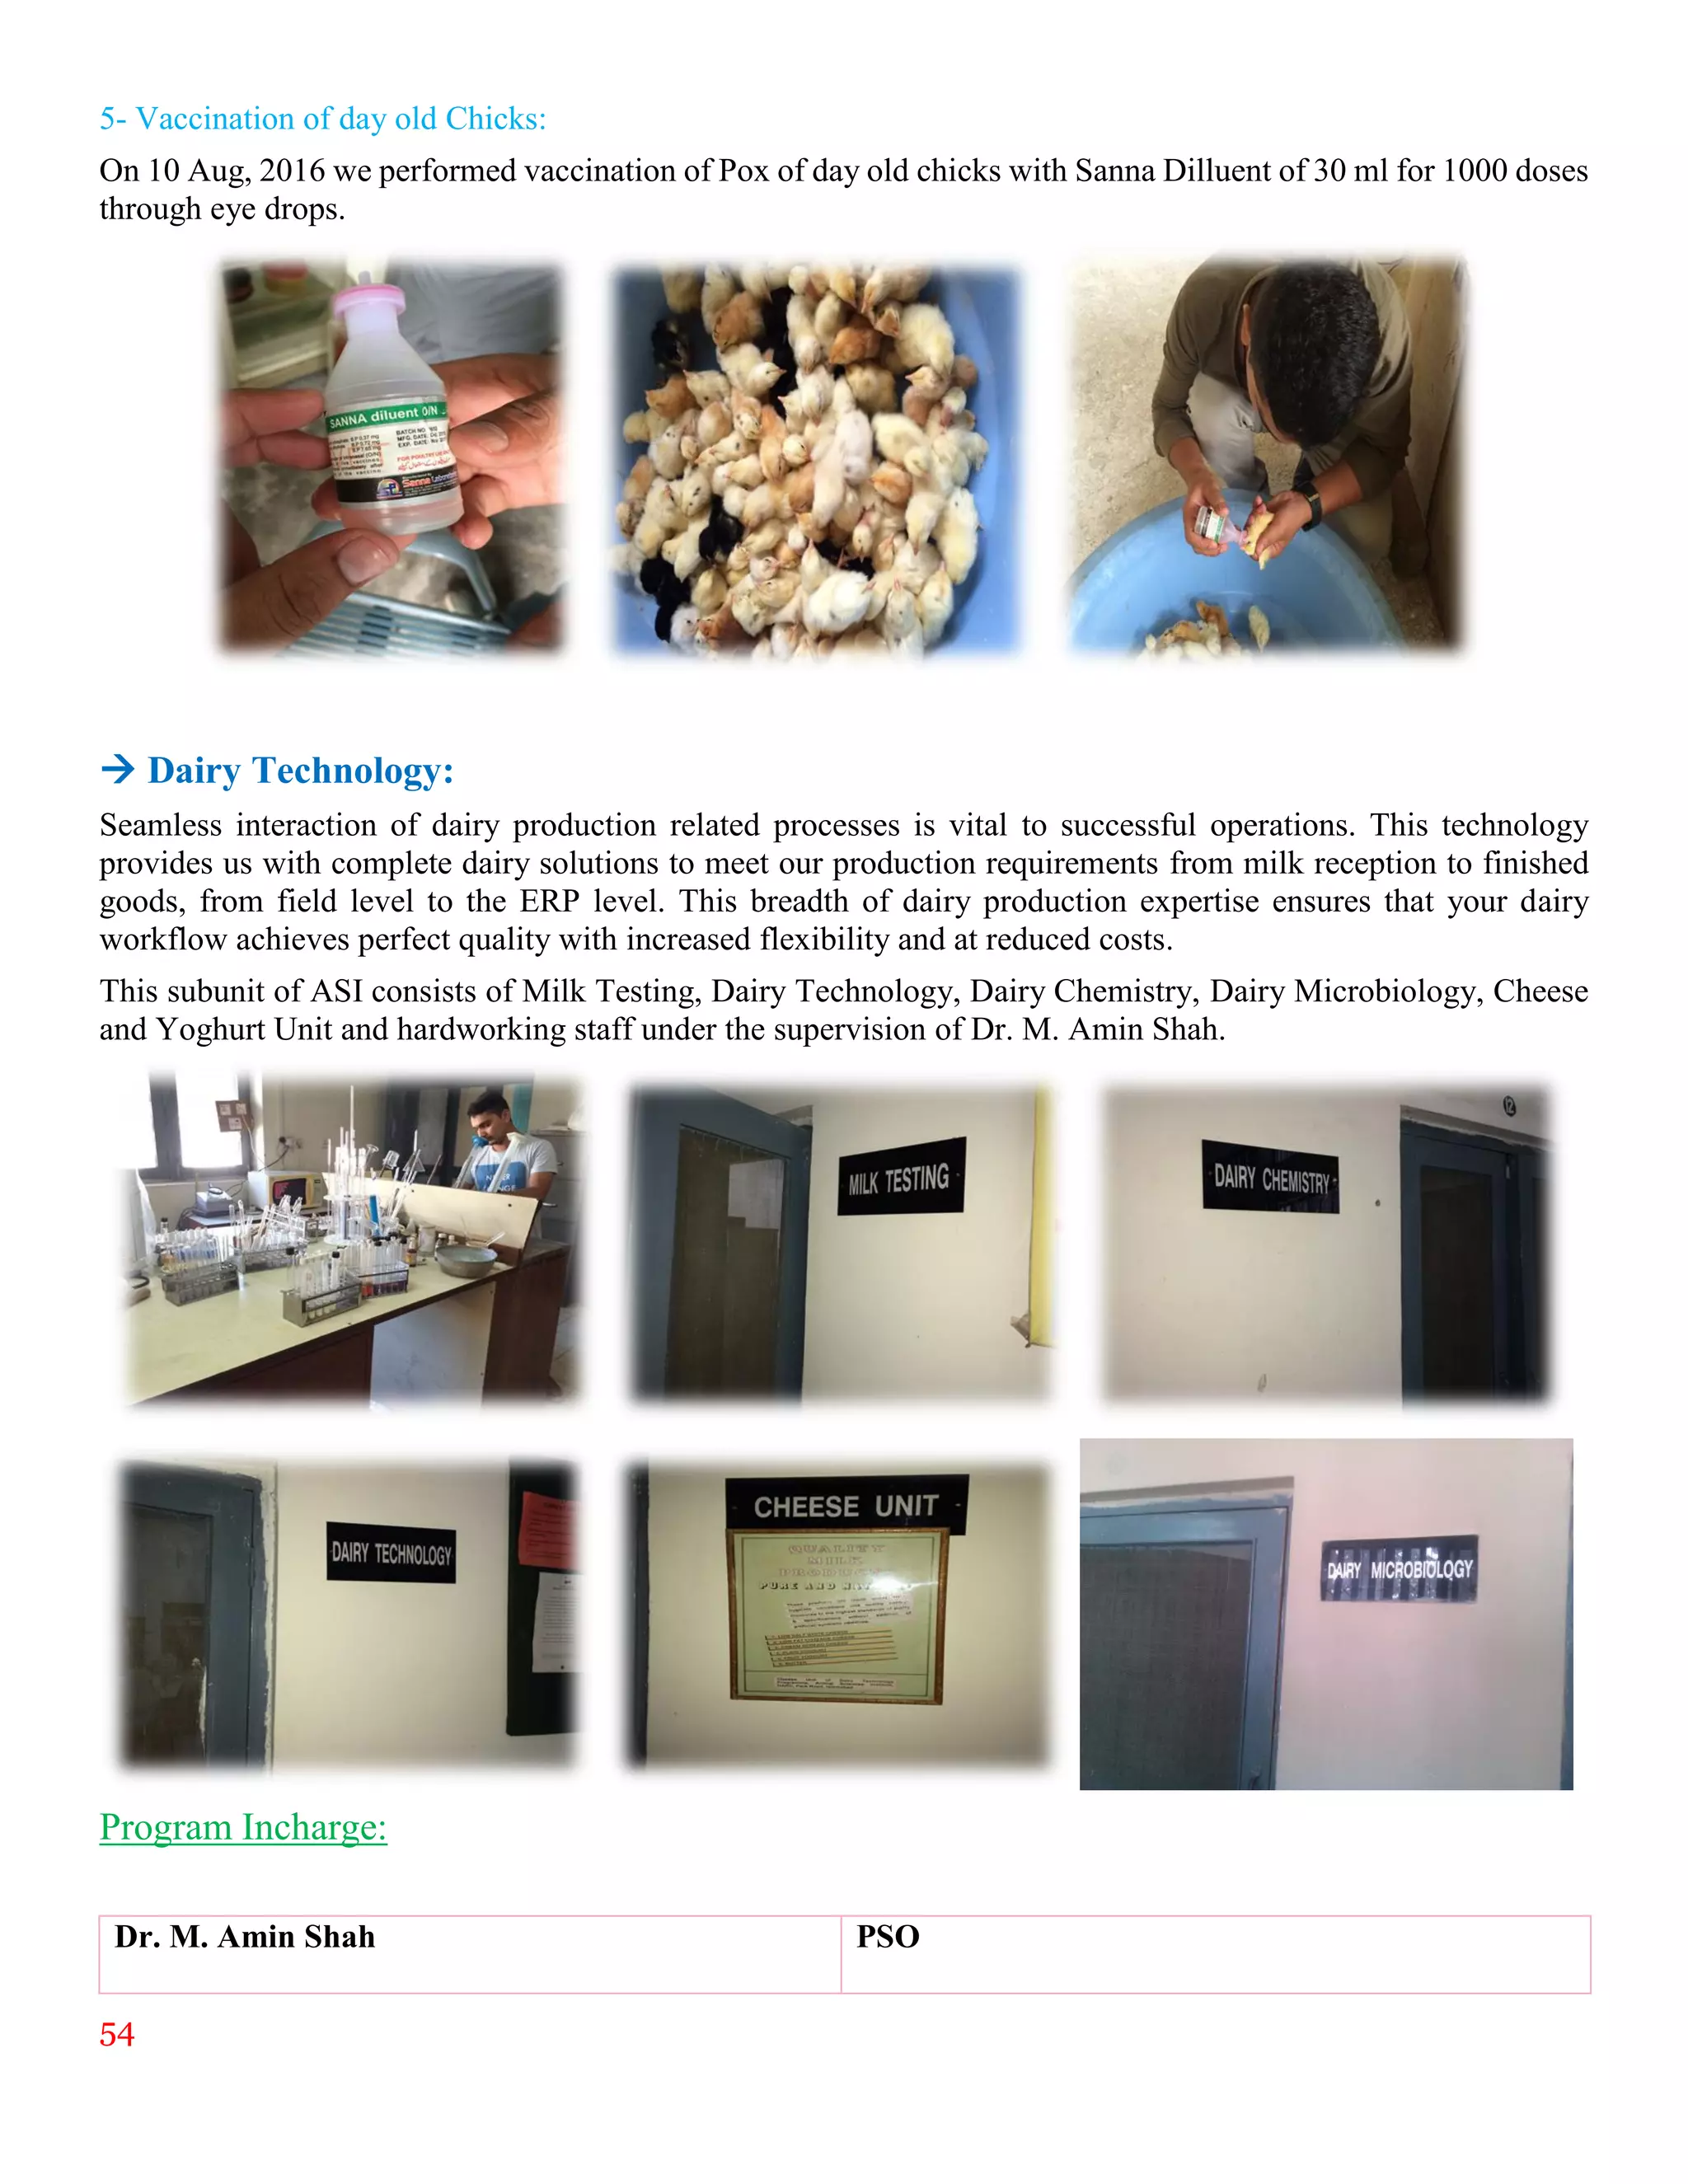
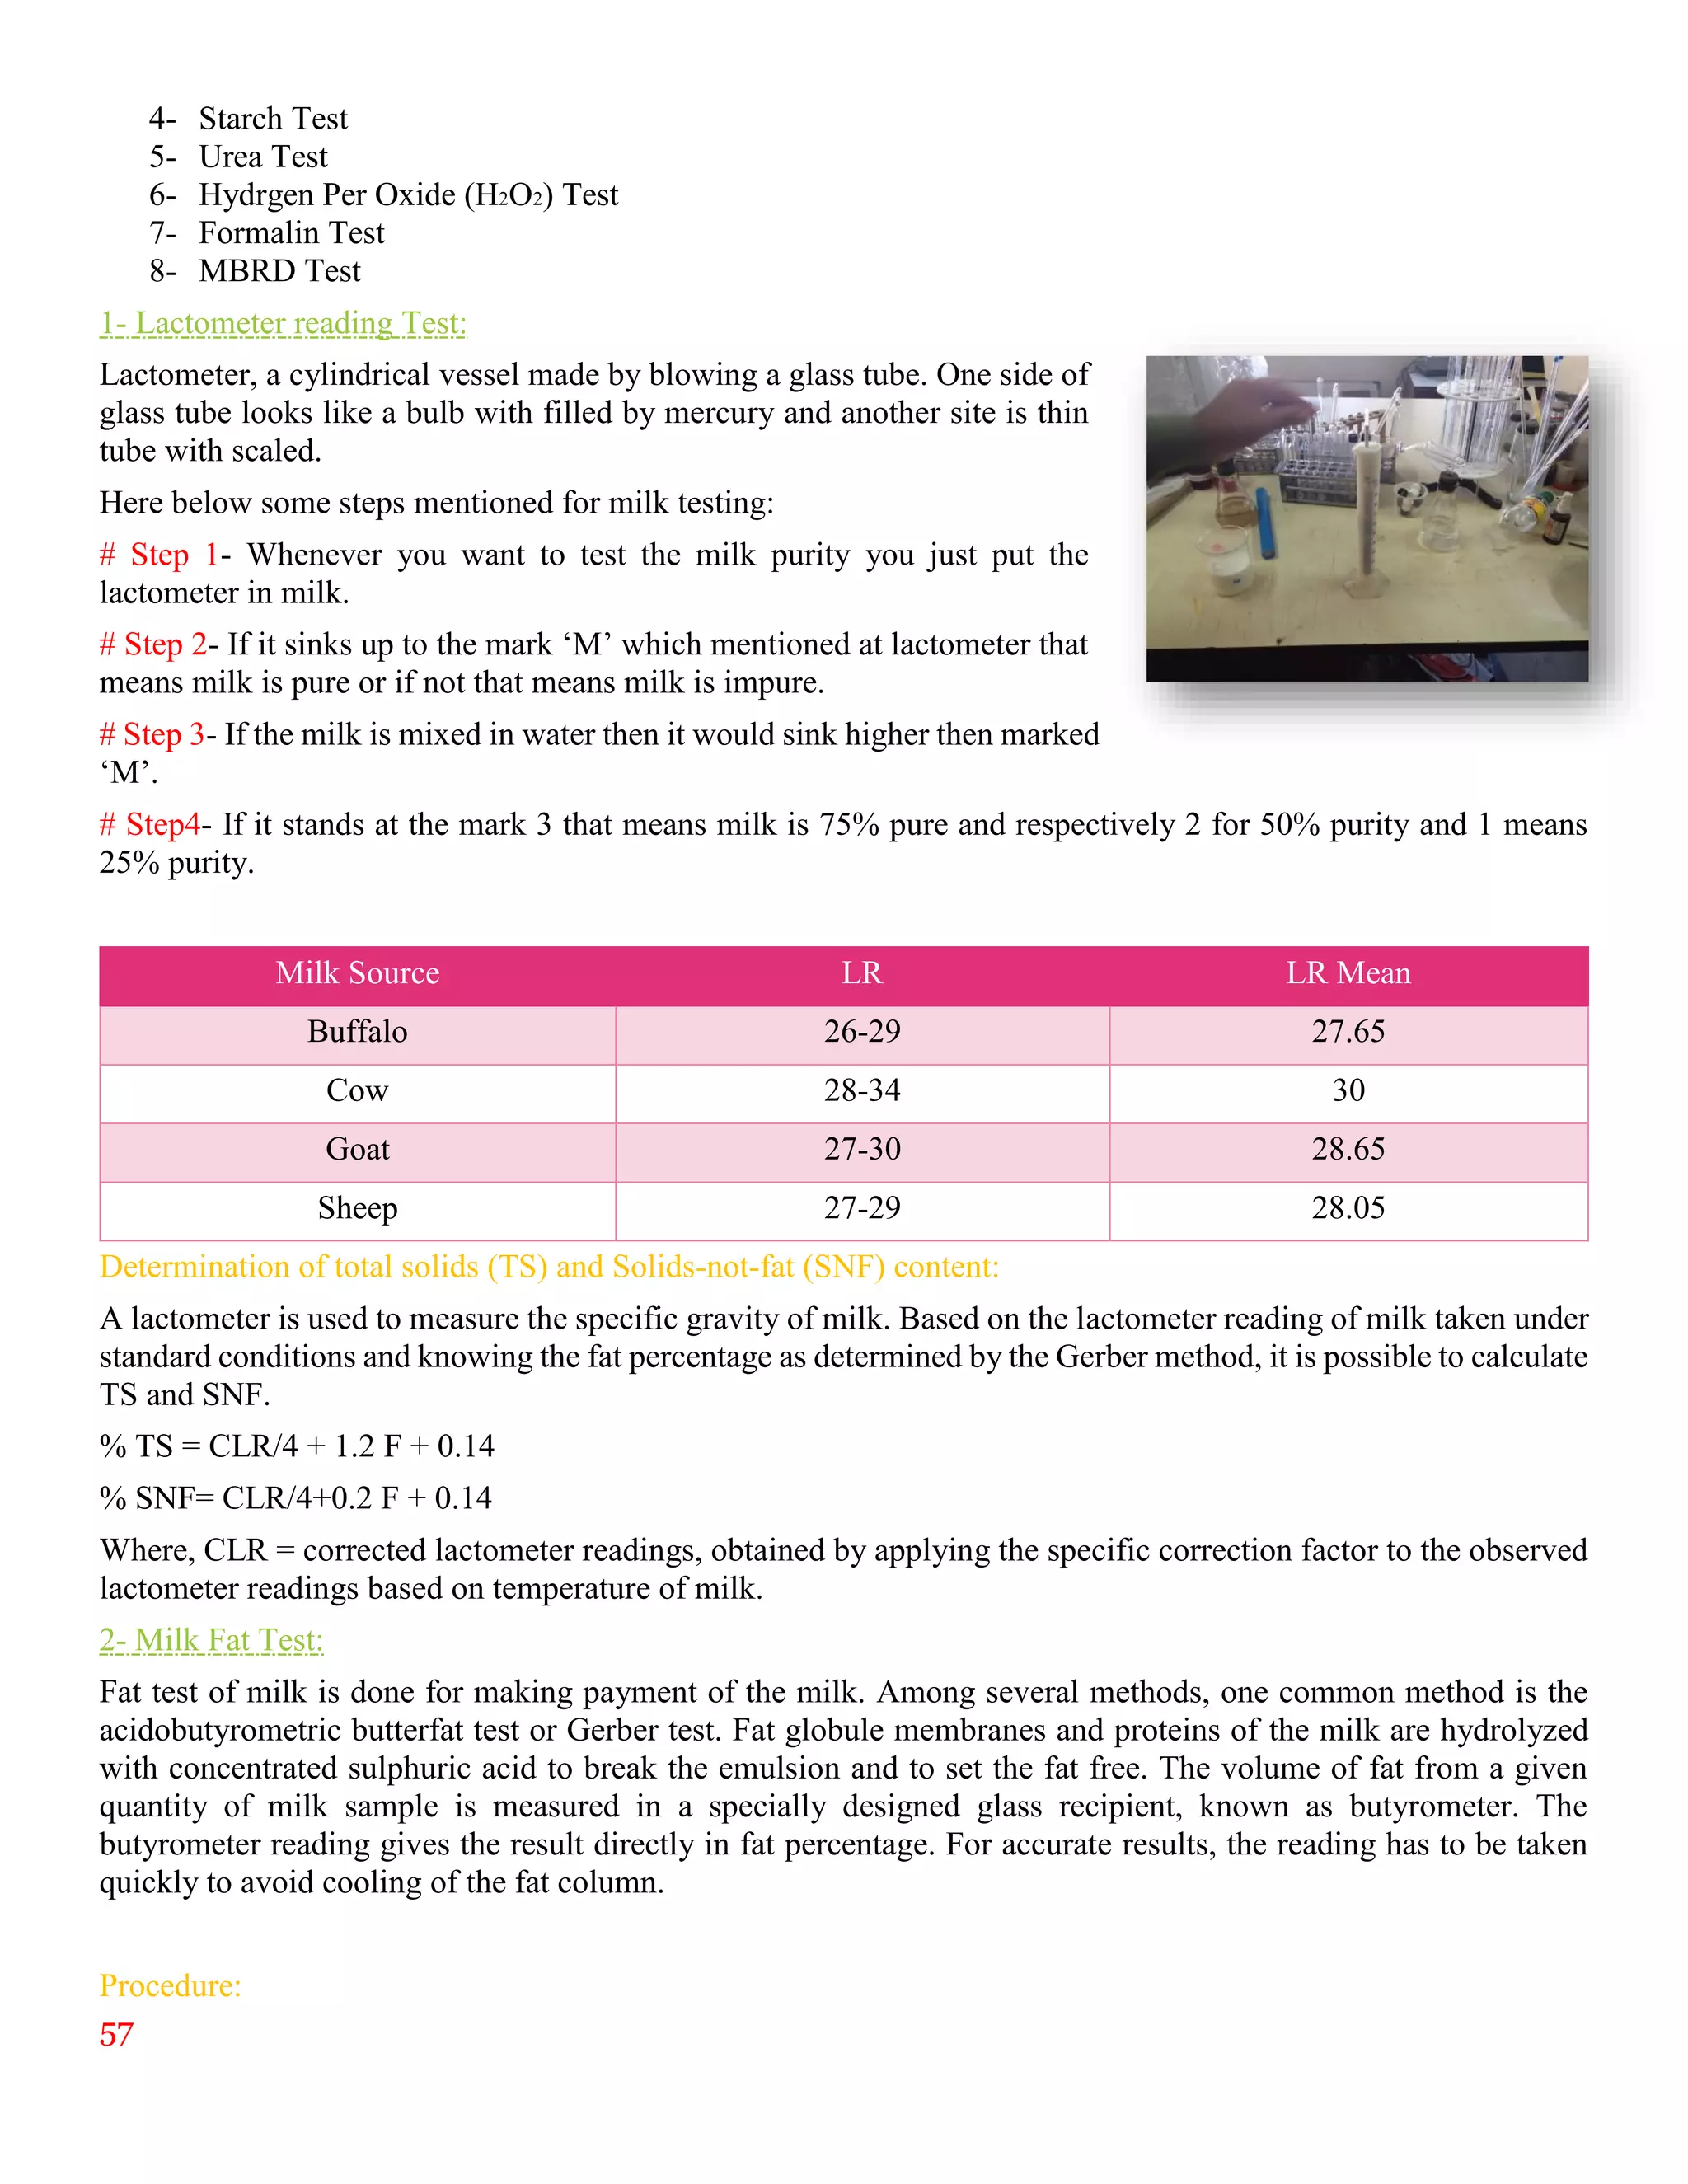
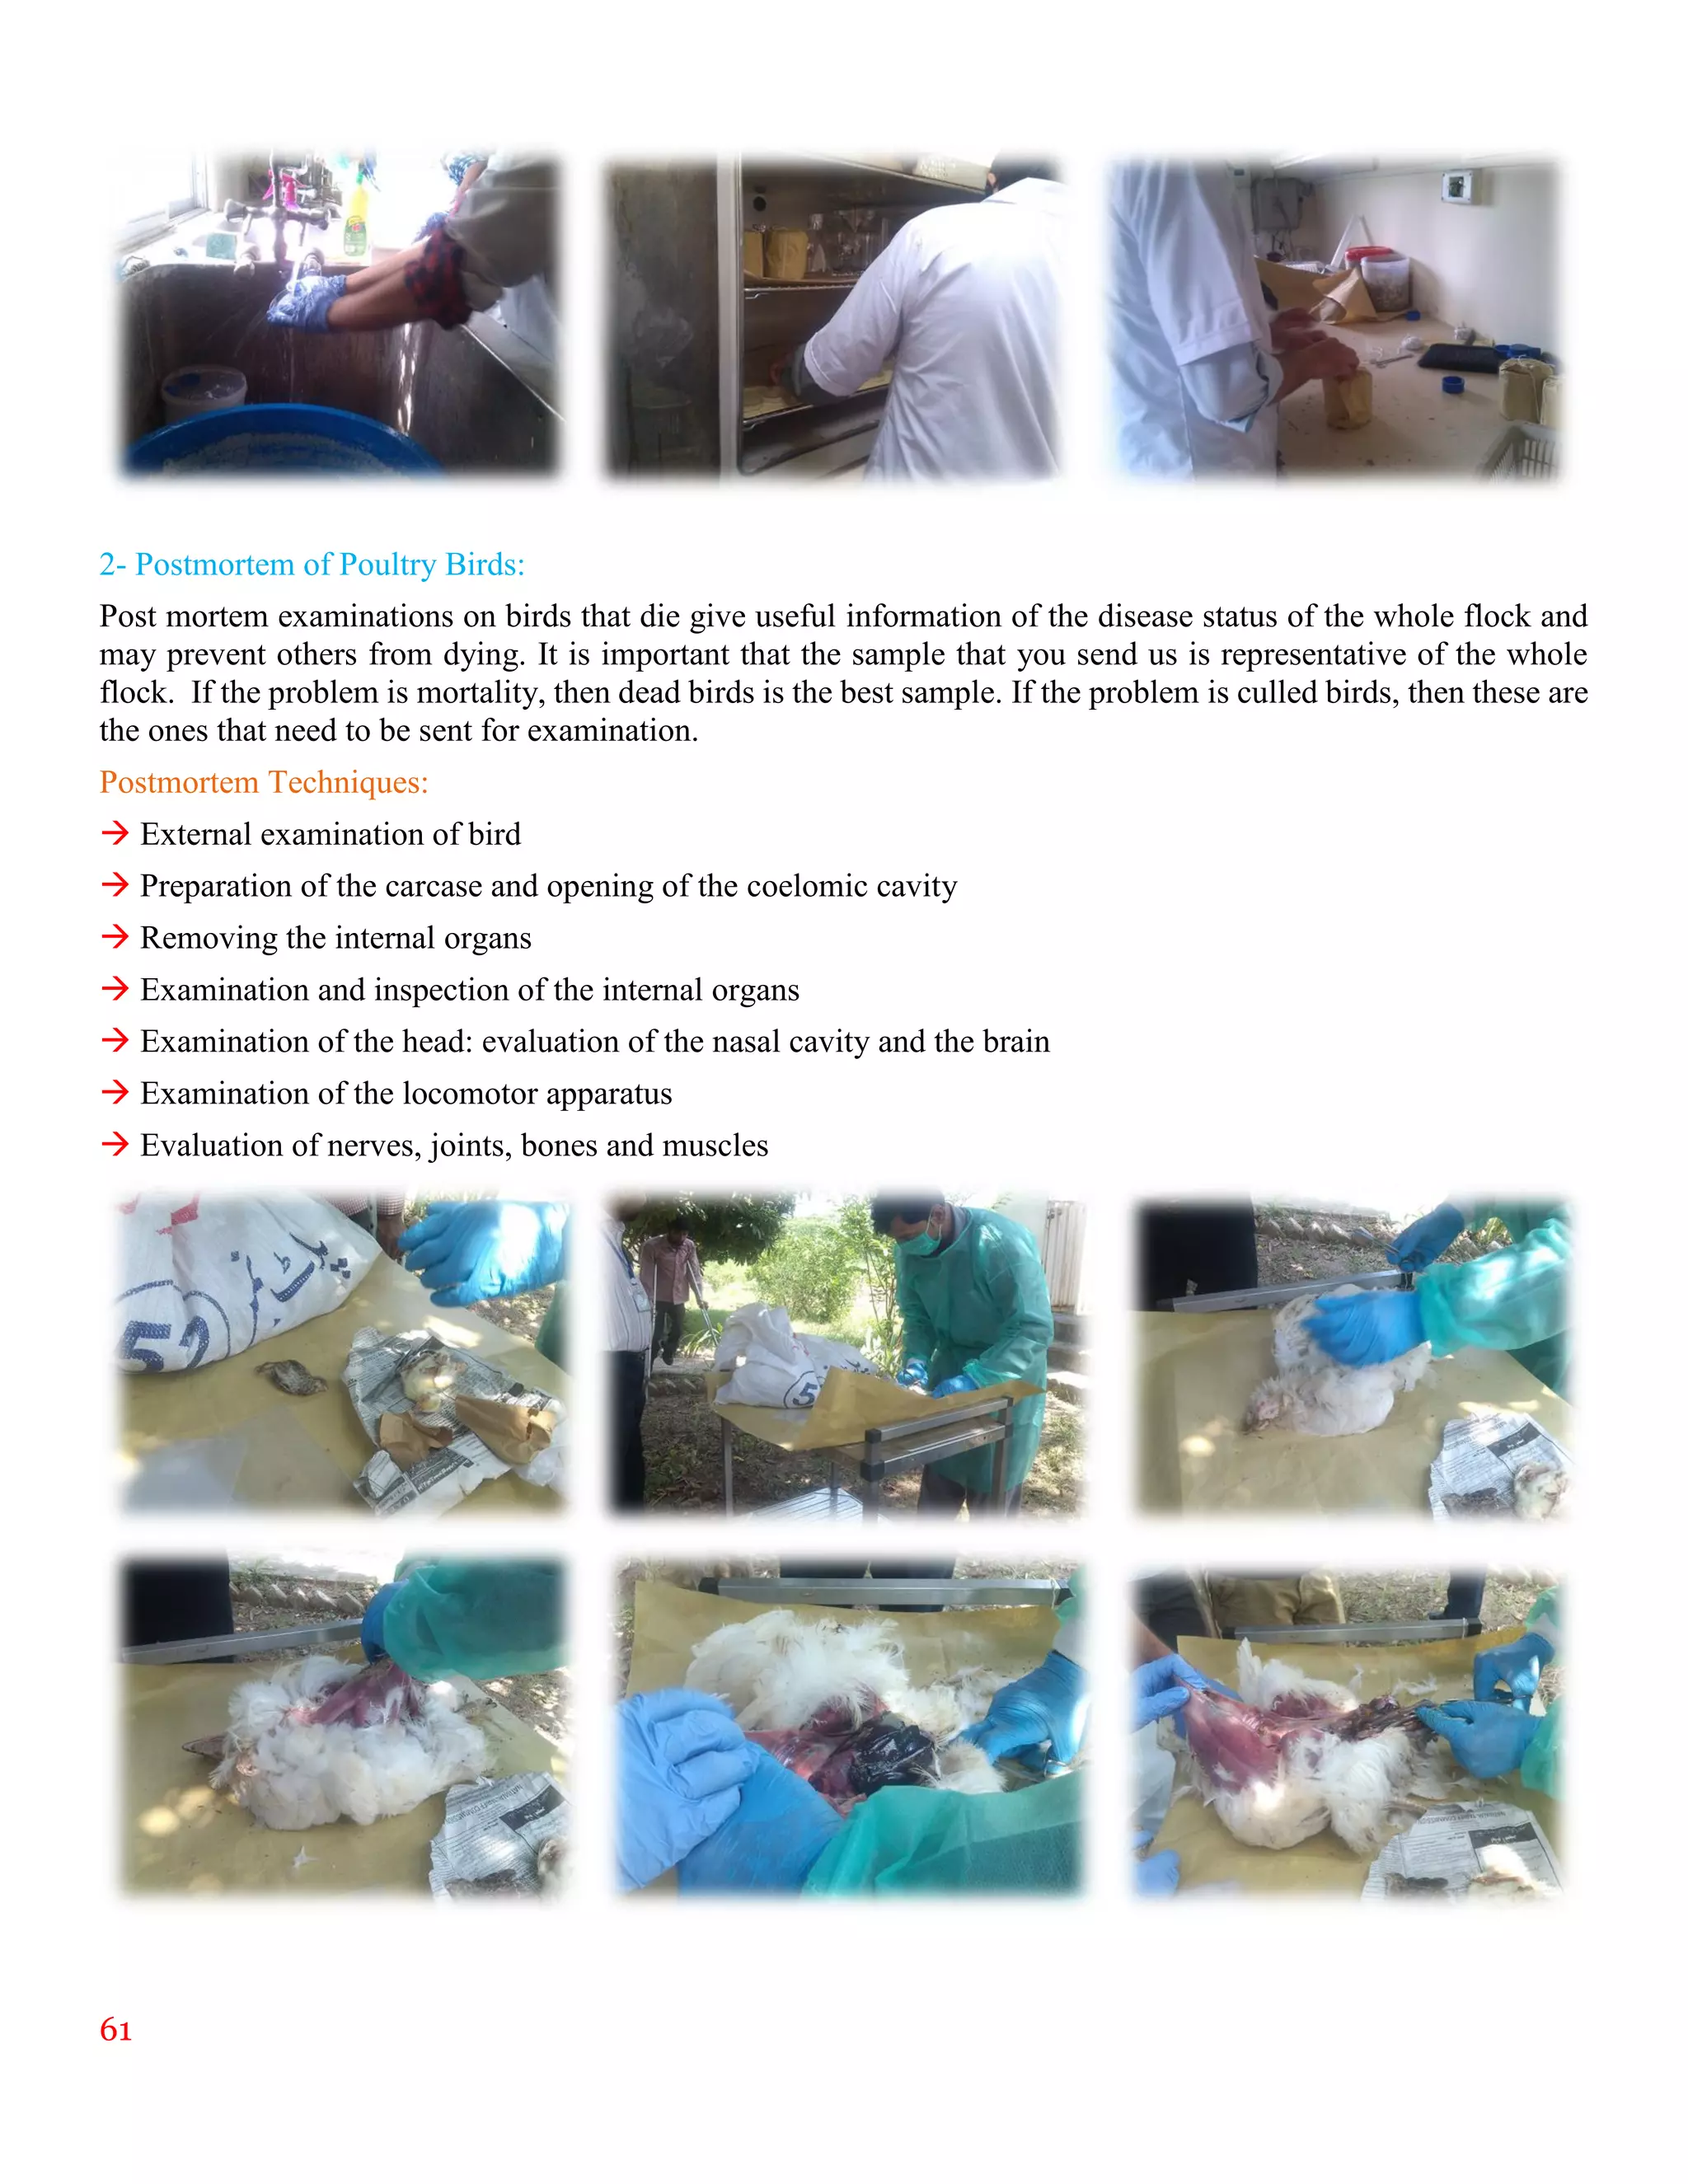
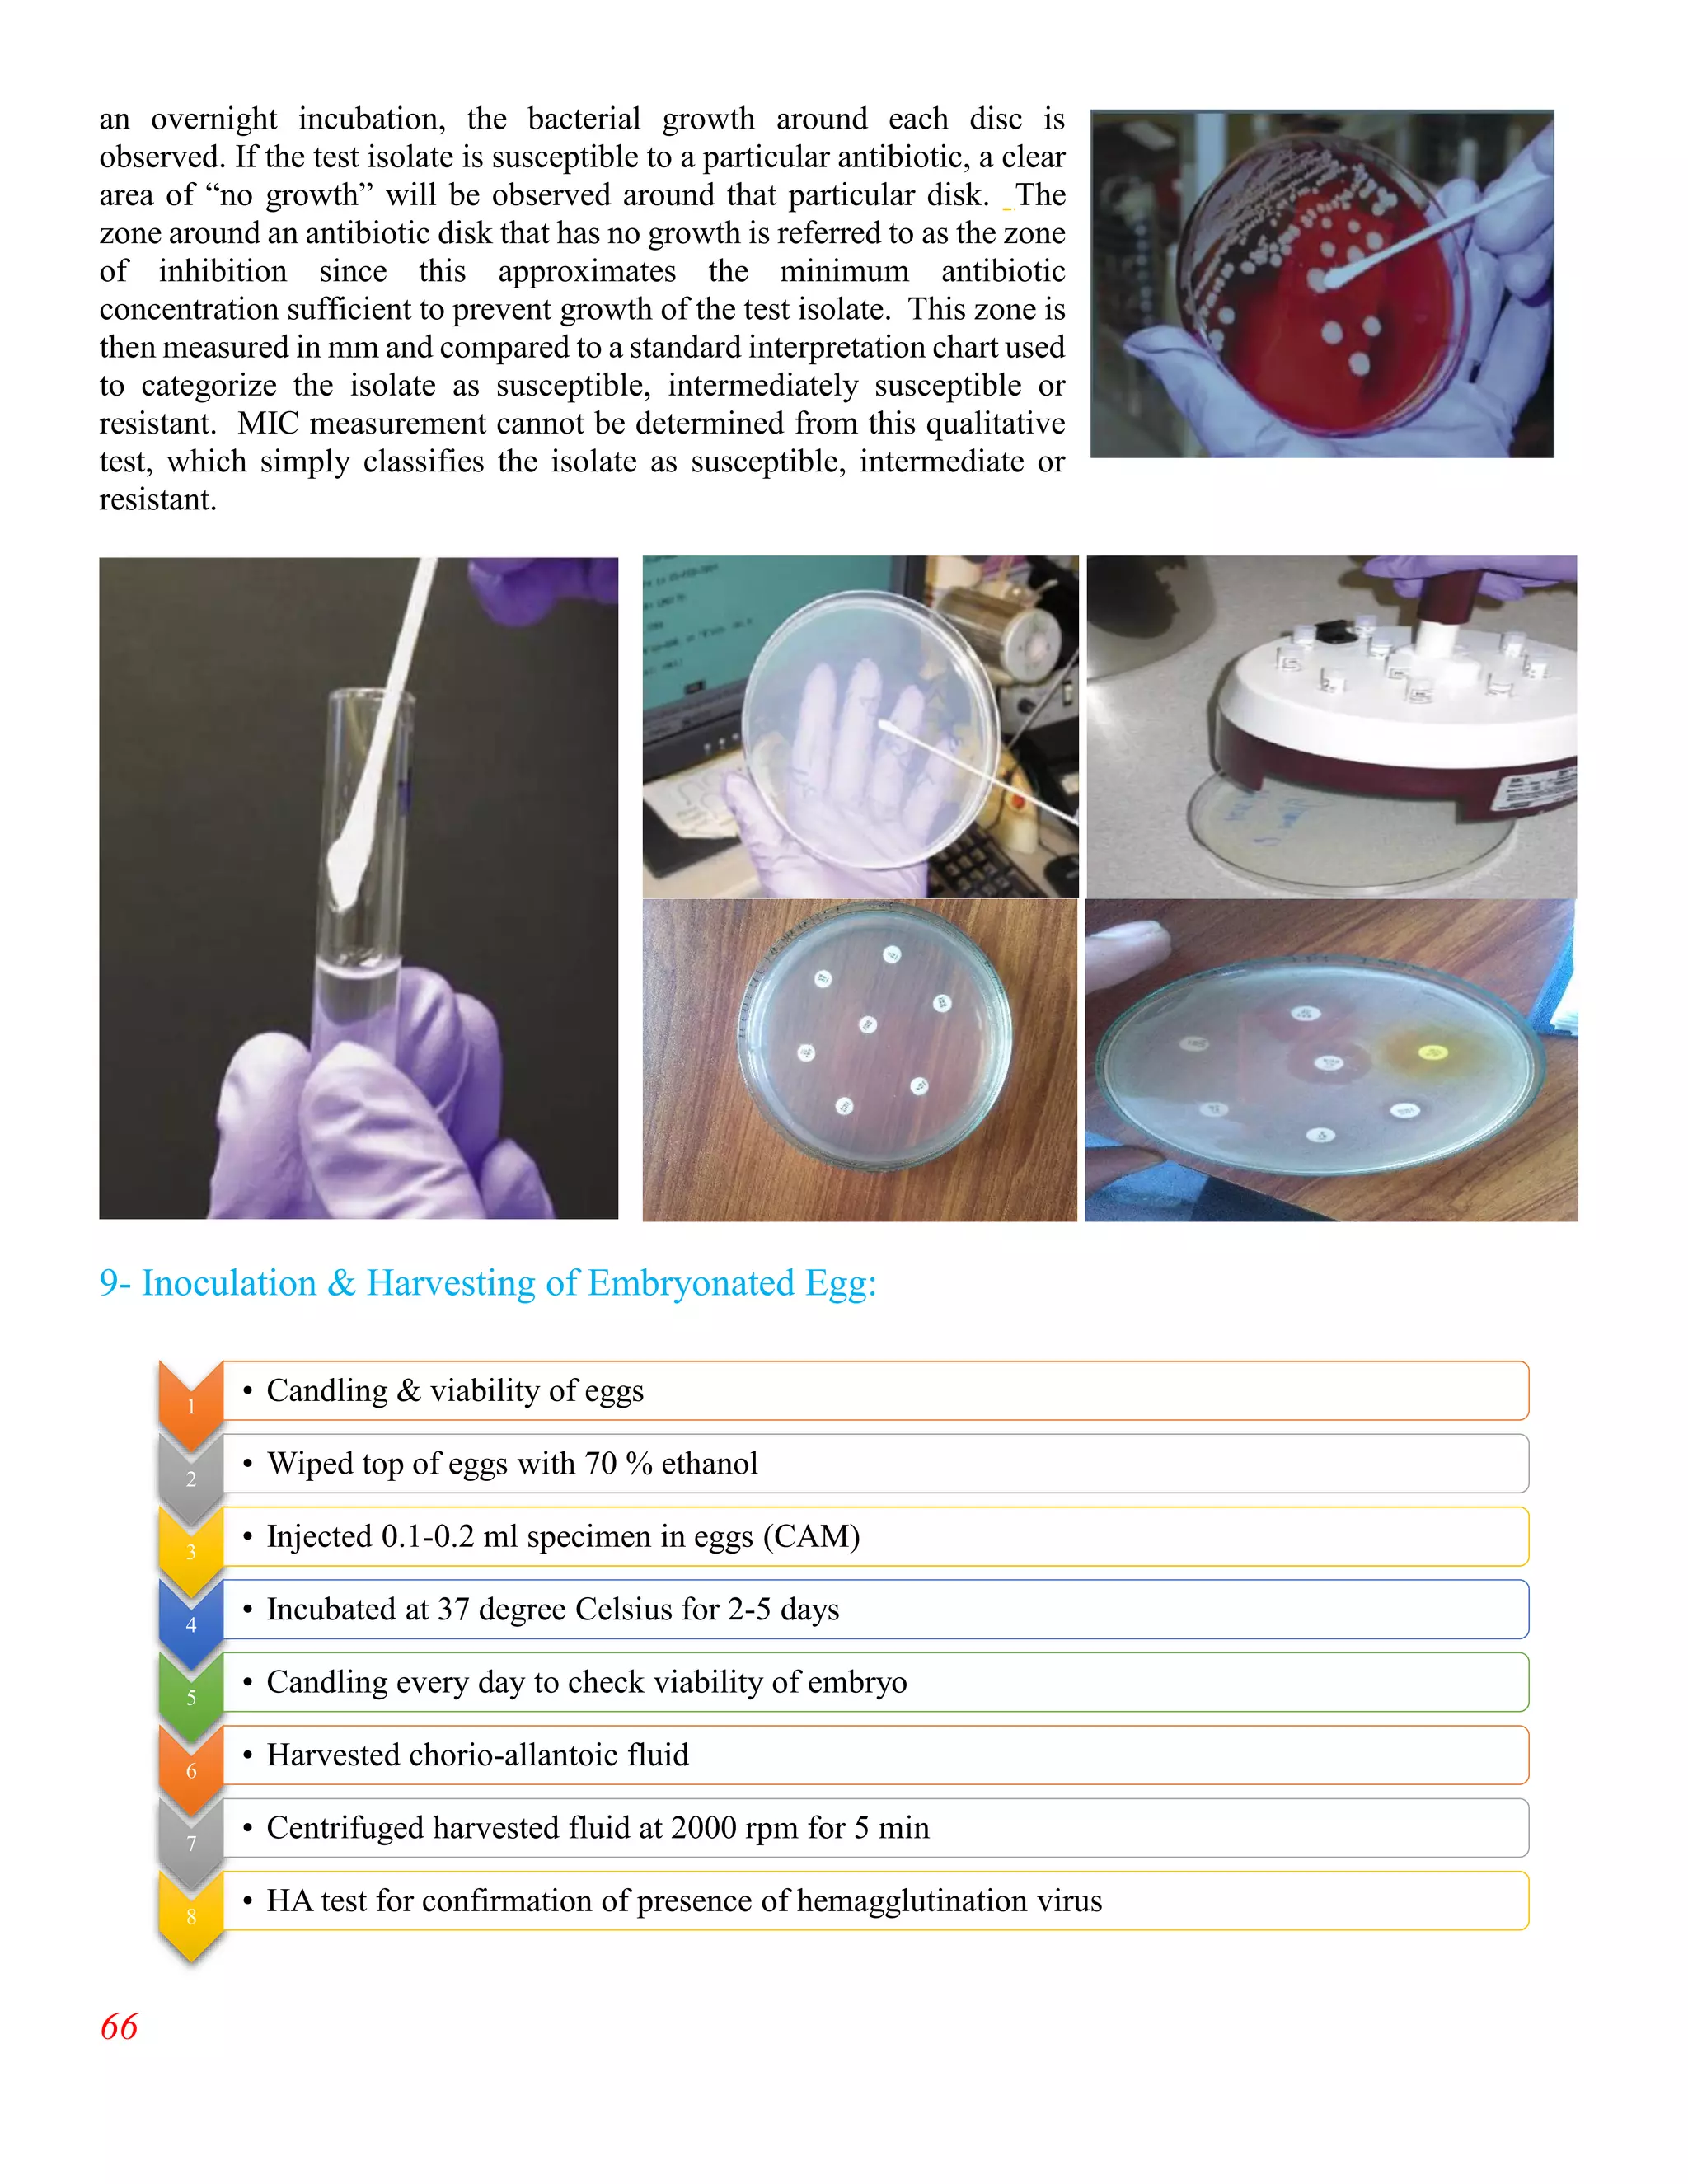
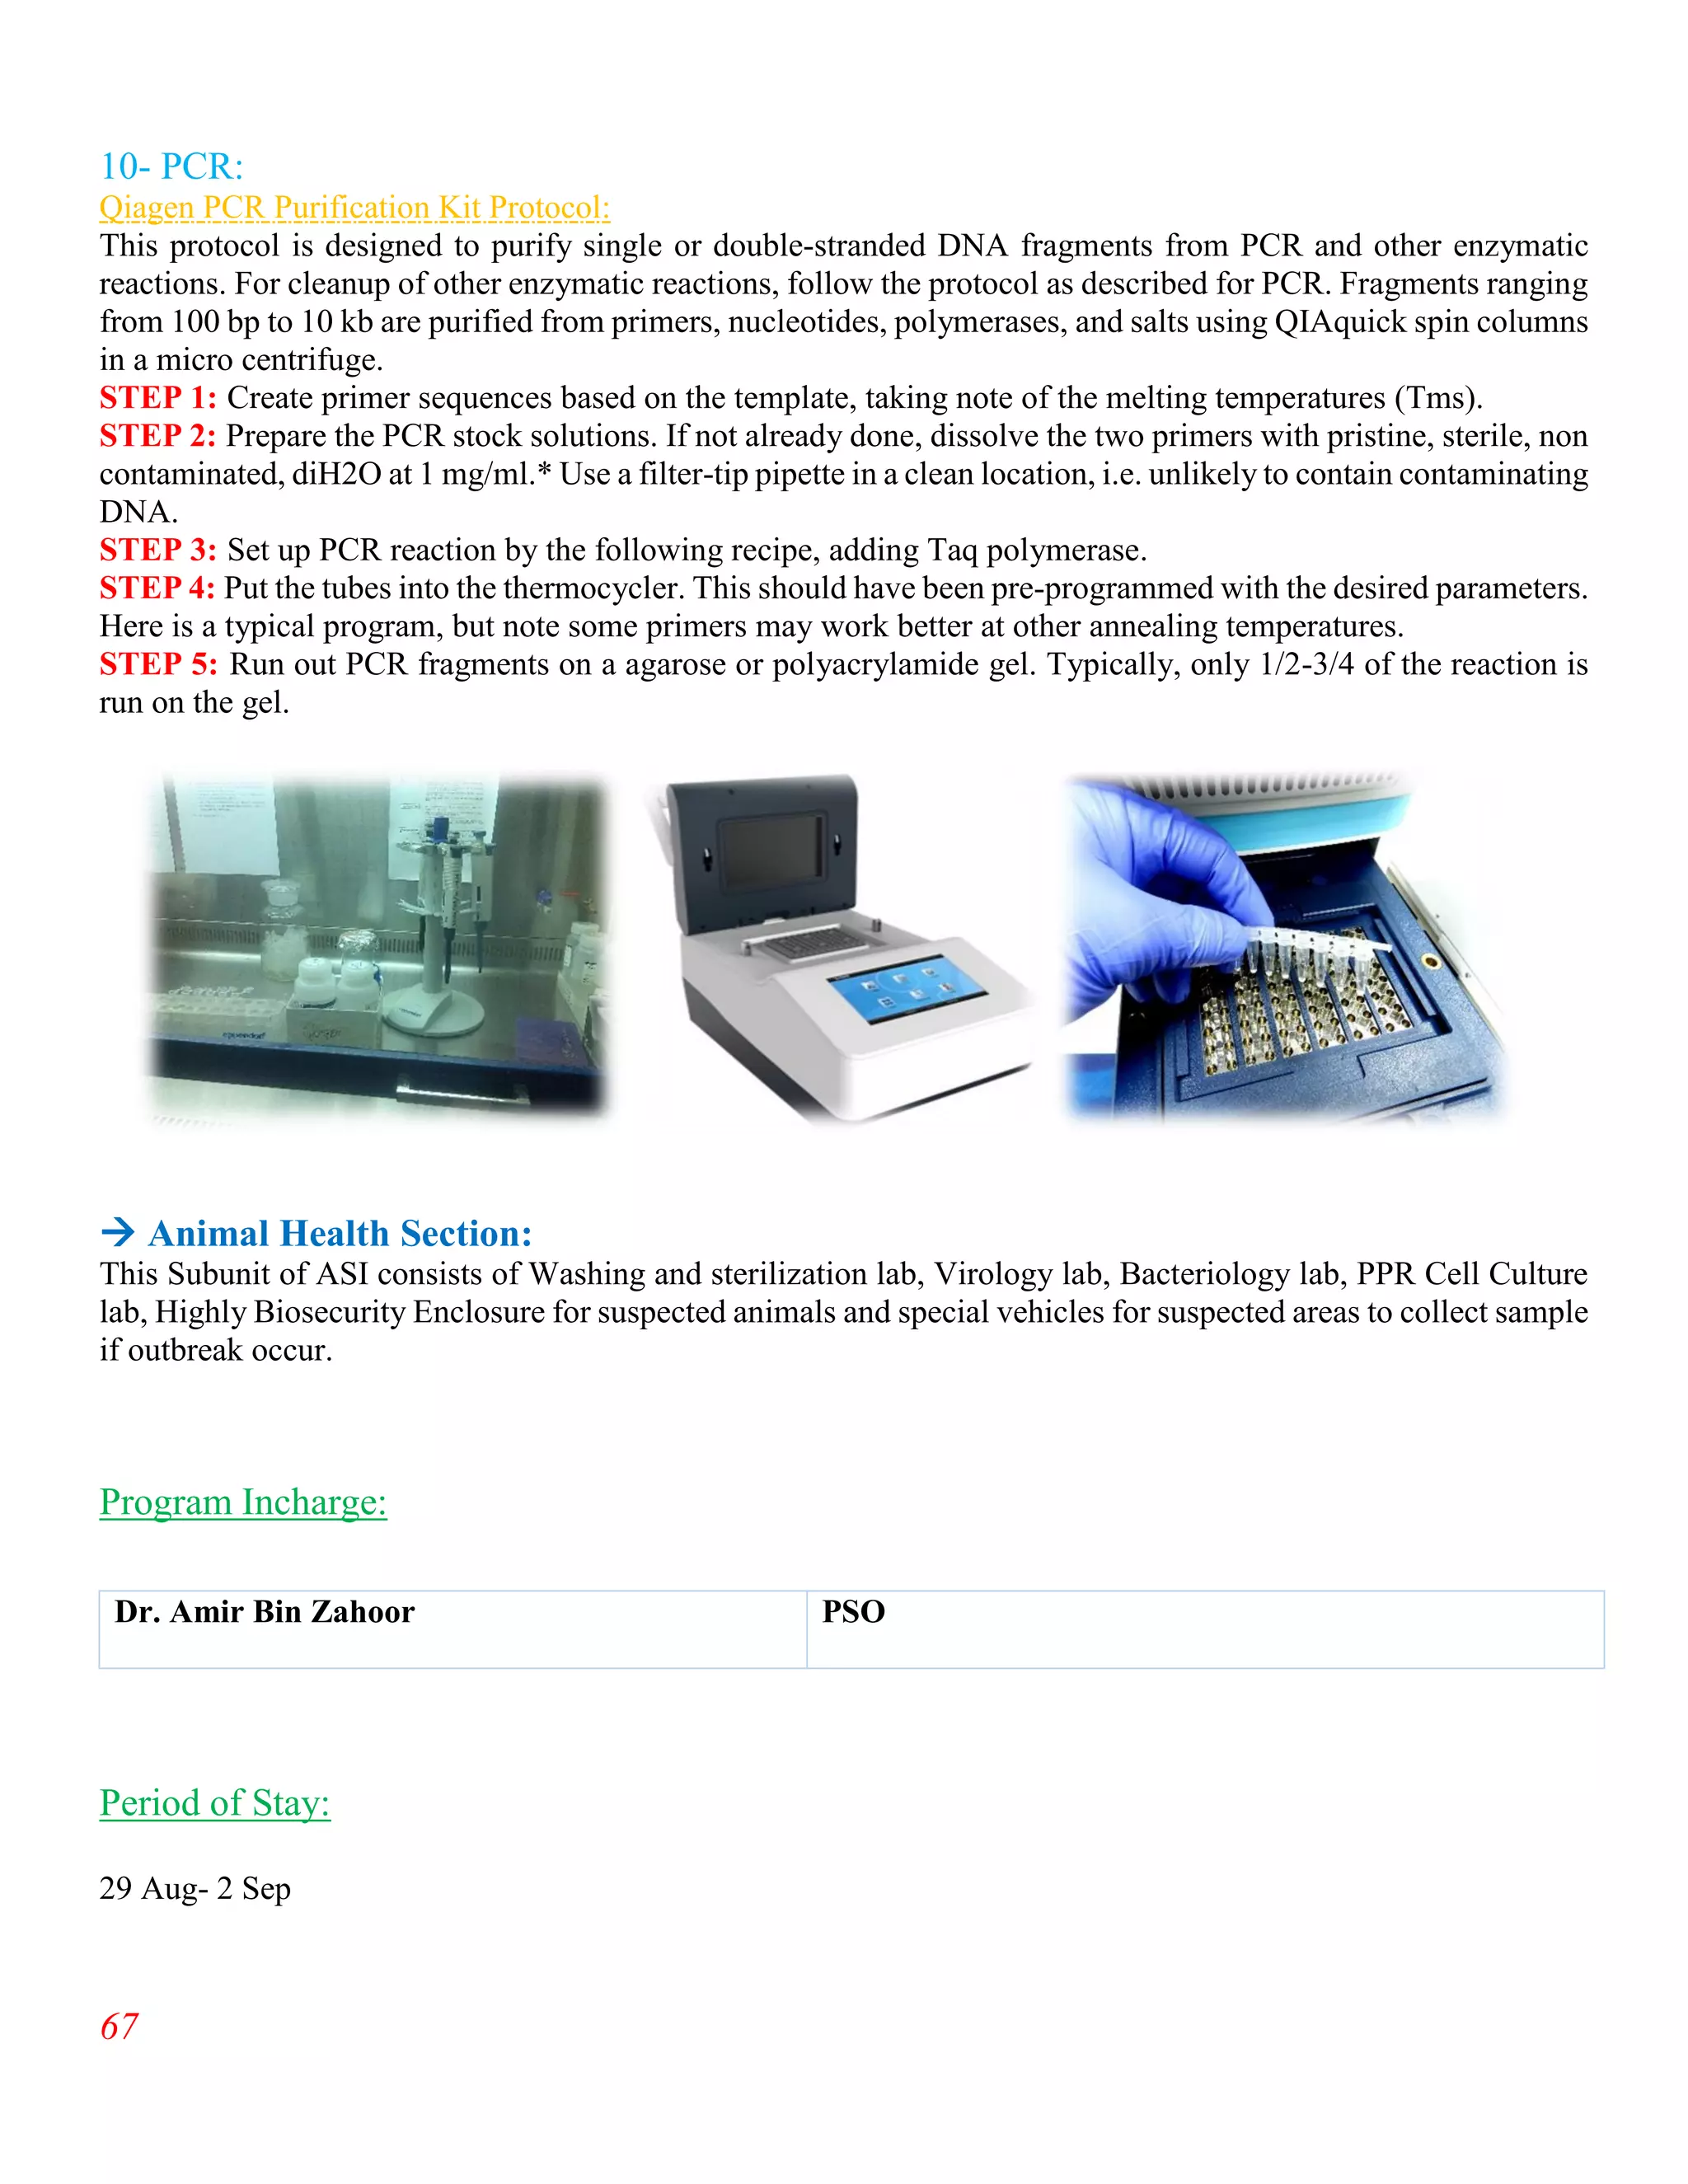
The document summarizes an internship report submitted by two students at the Animal Sciences Institute (ASI) of the National Agricultural Research Council (NARC) in Islamabad, Pakistan. ASI conducts research in animal health, production, and technology. The students completed rotations in eight ASI departments over two months, gaining experience in areas like animal reproduction, livestock, small ruminants, wildlife and poultry, and dairy technology. They studied topics such as bovine reproductive physiology, the estrous cycle, reproductive hormones, and ultrasound use. The report provides an overview of NARC and ASI, and details of the students' work in ASI's Animal Reproduction Section.
For the fulfillment of DVM degree, 1 year internship programme was needed up to 2007-08 session. This is the final presentation of internship programme.
Care and Management of Pregnant Cows and EwesPervaiz Dar
Pregnancy is central to care and management of animals. Healthy Pregnant Animals means a Healthy and Prosperous Farm. Pregnant animals need special care for example they need suitable ration to reduce the possibility of diseases like milk fever and ketosis at the time of calving and also to ensure adequate milk production. There are other aspects which need to be cared about pregnant animals which we discuss in this presentation.
This presentation by University of Maryland Extension Sheep & Goat Specialist Susan Schoenian discusses ewe nutrition from breeding until weaning and lamb nutrition from birth to weaning.
Introduction about quail
Advantages of quail farming
Housing
Feeding
Egg and meat production
Nutrient content in egg and meat
Incubation and hatching
Chicks management
Quail diseases and its management
Centers for parent quails and interesting facts about quail etc.,
INTERNSHIP REPORT
Work completed at
Soil Physics Research Program
LAND RESOURCES RESEARCH INSTITUTE
NATIONAL AGRICULTURAL REASERCH CENTRE ISLAMABAD
Relationship of Soil Physical & Chemical Properties with Aggregate Stability in Rice-Wheat Soil
Introduction to AI for Nonprofits with Tapp NetworkTechSoup
Dive into the world of AI! Experts Jon Hill and Tareq Monaur will guide you through AI's role in enhancing nonprofit websites and basic marketing strategies, making it easy to understand and apply.
Model Attribute Check Company Auto PropertyCeline George
In Odoo, the multi-company feature allows you to manage multiple companies within a single Odoo database instance. Each company can have its own configurations while still sharing common resources such as products, customers, and suppliers.
Biological screening of herbal drugs: Introduction and Need for
Phyto-Pharmacological Screening, New Strategies for evaluating
Natural Products, In vitro evaluation techniques for Antioxidants, Antimicrobial and Anticancer drugs. In vivo evaluation techniques
for Anti-inflammatory, Antiulcer, Anticancer, Wound healing, Antidiabetic, Hepatoprotective, Cardio protective, Diuretics and
Antifertility, Toxicity studies as per OECD guidelines
Read| The latest issue of The Challenger is here! We are thrilled to announce that our school paper has qualified for the NATIONAL SCHOOLS PRESS CONFERENCE (NSPC) 2024. Thank you for your unwavering support and trust. Dive into the stories that made us stand out!
Macroeconomics- Movie Location
This will be used as part of your Personal Professional Portfolio once graded.
Objective:
Prepare a presentation or a paper using research, basic comparative analysis, data organization and application of economic information. You will make an informed assessment of an economic climate outside of the United States to accomplish an entertainment industry objective.
Welcome to TechSoup New Member Orientation and Q&A (May 2024).pdfTechSoup
In this webinar you will learn how your organization can access TechSoup's wide variety of product discount and donation programs. From hardware to software, we'll give you a tour of the tools available to help your nonprofit with productivity, collaboration, financial management, donor tracking, security, and more.
A Strategic Approach: GenAI in EducationPeter Windle
Artificial Intelligence (AI) technologies such as Generative AI, Image Generators and Large Language Models have had a dramatic impact on teaching, learning and assessment over the past 18 months. The most immediate threat AI posed was to Academic Integrity with Higher Education Institutes (HEIs) focusing their efforts on combating the use of GenAI in assessment. Guidelines were developed for staff and students, policies put in place too. Innovative educators have forged paths in the use of Generative AI for teaching, learning and assessments leading to pockets of transformation springing up across HEIs, often with little or no top-down guidance, support or direction.
This Gasta posits a strategic approach to integrating AI into HEIs to prepare staff, students and the curriculum for an evolving world and workplace. We will highlight the advantages of working with these technologies beyond the realm of teaching, learning and assessment by considering prompt engineering skills, industry impact, curriculum changes, and the need for staff upskilling. In contrast, not engaging strategically with Generative AI poses risks, including falling behind peers, missed opportunities and failing to ensure our graduates remain employable. The rapid evolution of AI technologies necessitates a proactive and strategic approach if we are to remain relevant.
1. 1
INTERNSHIP REPORT
ASI (NARC)
Animal Sciences Institute NARC Islamabad
NARC is the biggest research council of Pakistan. There are different
departments which are working under this council. ASI (Animal Sciences
Institute is one of them. The objectives of this department are:
To conduct research of national importance in Animal Health and Animal
Production.
To manage and supervise research activities of the different programs.
To develop linkages for collaborative research with other institutions
within and outside the country.
To organize national and international scientific meetings.
To work with the farmers and transfer technologies to the end-users.
To provide consultancy and advisory services to farmers/entrepreneurs
and other agencies.
ASI Research Programs
Animal Reproduction
Livestock Research
Small Ruminant
Wildlife & Poultry
Dairy Technology
NRLDP
Aqua Culture & Fisheries
Animal Health
Animal Nutrition
Animal
Nutrition
dff
ff
SUBMITTED BY
M. Fakhar-e-Alam Kulyar
M. Farrasat Ullah
(Islamia University BWP)
Reg. No. AS-174, AS-175
2. 2
CERTIFICATE
This is to certify that M.Fakhar-e-Alam Kulyar (Reg. No. AS-174), M. Farrasat Ullah (Reg. No. AS-175) are the
students of department “University College of Veterinary & Animal Sciences Islamia University Bahawalpur”
has successfully completed their internship in the different eight departments of “Animal Sciences Institute (ASI)”
which was conduct on rotation base having the time period of two months under the National Agriculture
Research Center (NARC), Islamabad.
Supervisor at ASI: Head of Department
Dr. S Murtaza H. Andrabi Dr. M. Fatah Ullah Khan
________________ _______________
PSO/Focal Person ASI /NARC Senior Director ASI/NARC
3. 3
ACKNOWLEDGMENT
Thanks to “ALLAH Almighty” The most kind and merciful, the most beneficent. Who is entire source of
knowledge and wisdom endowed to mankind and countless salutations to Holy Prophet Muhammad (PBUH),
who is a torch of guidance and knowledge for humanity.
We would like to express our deepest appreciation to all those who provided us the possibility to complete
internship at NARC. Especially Dr. M. Fatah Ullah Khan (Senior Director ASI/NARC) who accepted our
request and gave us an opportunity to learn under his guidance. I would also like to say heartiest thanks to our
Internship Supervisor Dr. S.M.H Andrabi (PSO at ASI/NARC) who gave us chance to learn a lot of things under
his supervision.
Fakhar-e-Alam, Farrsat Ullah
4. 4
Table of Content:
Title Page No.
Overview of NARC 4
Introduction to ASI 1
Animal Reproduction Section 5
Livestock Research Section 25
Small Ruminant Section 40
Wildlife & Poultry Section 48
Dairy Technology Section 53
NRLPD
Animal Health Section
Animal Nutrition Section
5. 5
Overview of NARC:
National Agricultural Research Centre (NARC), Islamabad established in 1984, is the largest research Centre of
the Pakistan Agricultural Research Council (PARC). NARC, with a total land area of approximately 1400 acres,
is located near Rawal Lake, six kilometers south-east of Islamabad. Physical facilities in term of experimental
fields, laboratories, green houses, gene bank, library/ documentation, auditorium, machinery & lab equipment
repair workshops, stores, hostels, cafeteria, audio visual studios, are also available at NARC.
NARC coordinated programs serve as a common platform for the scientists working in different federal,
provincial agricultural research, and academic institutions to jointly plan their research activities, avoiding
unnecessary duplication of research efforts. Research which can best be addressed at a national Centre rather than
by provincial institutions is undertaken at NARC. The adaptation of technologies available from the international
research system is also managed by NARC, in collaboration with the provincial research and extension institutions.
In particular, research requiring sophisticated instruments like electron microscopes, ultracentrifuges, and
elaborate analytical and quality testing facilities is undertaken at NARC, supported by highly qualified and trained
manpower.
Introduction to ASI (Animal Sciences Institute):
The Subunit ASI was established in 1978. The main research
activities include bovine quantitative genetics of native
livestock and crossbreeding; cryopreservation of semen for
field use, embryo transfer and in-vitro fertilization; efficient
utilization of agro-industrial by-products; development of calf
starter and early weaning diet using indigenous feed
ingredients; improved diagnostic methods and vaccine
production and epidemiology of major livestock diseases;
improving quality of raw milk and indigenous methods of
dairy product manufacturing. This institute also has a Feed
Technology Unit that directly serves livestock farmers by
providing quality livestock feed and multi-nutrient blocks on
nominal profit basis. A Livestock Research Station (LRS)
housing 350 cattle, buffaloes, sheep and goats, and 4 poultry
sheds which supports research activities.
Animal Reproduction Section:
This Subunit of ASI consists of Breeding sheds (in which Sahiwal, Freezian, Jersy, Neli Ravi different types of
goat breeds are there), Semen Evaluation laboratory, Thawing Laboratory, Genetic laboratory, Ultrasound
Examination room with hardworking staff working under the supervision of Dr. S.M.H Andrabi.
Program Incharge:
Dr. S.M.H Andrabi PSO
6. 6
Period of Stay:
14 July- 22 July
Theoretical Topics:
1- Female Reproductive Physiology of Bovines
2- Estrus Cycle
3- Cystic Ovaries
4- Reproductive Hormones
5- Estrus Synchronization
6- Types of Placenta
7- Ultrasound
8- Mummification & Maceration
9- Hydropsy Conditions
10- EEM
1- Female Reproductive Physiology of Bovines:
There are two ovaries, two oviducts, two
uterine horns, a uterine body, cervix, vagina
and vulva. The bladder lies below the
reproductive tract and is connected at the
urethral opening located on the vaginal floor.
The rectum is located above the reproductive
system.
The vulva is the external opening to the
reproductive system. The vulva has three main
functions: the passage of urine, the opening for
mating and serves as part of the birth canal.
Included in this structure are the lips and
clitoris. The vulva lips are located at the sides
of the opening and appear wrinkled and dry
when the cow is not in estrus. As the animal
approaches estrus, the vulva will usually begin
to swell and develop a moist red appearance. The vagina, about six inches in length, extends from the urethral
opening to the cervix. During natural mating, semen is deposited in the anterior portion of the vagina. The vagina
will also serve as part of the birth canal at the time of calving. The cervix is a thick walled organ forming a
connection between the vagina and uterus. It is composed of dense connective tissue and muscle and will be the
primary landmark when inseminating cattle. The opening into the cervix protrudes back into the vagina. This
forms a 360º blind-ended pocket completely around the cervical opening. This pocket is referred to as the fornix.
The interior of the cervix contains three to four annular rings or folds that facilitate the main function of the cervix,
which is to protect the uterus from the external environment. The cervix opens anteriorly into the uterine body.
About an inch long, the body of the uterus serves as a connection between the two uterine horns and the cervix.
The uterine body is the site where semen should be deposited during artificial insemination.
7. 7
uterine horns consist of three layers of muscle and a heavy network of blood vessels. The main function of the
uterus is to provide a suitable environment for fetal development. When a cow is bred, either naturally or by
artificial insemination, the uterine muscles, under the
influence of hormones oxytocin and estrogen,
rhythmically contract to aid in sperm transport to the
oviducts. Oviducts, as their name implies, carry ova, the
cow’s eggs. The oviducts are also commonly referred to
as the fallopian tubes. The oviduct has several distinct
regions when examined microscopically.
The lower segment, closest to the uterus is called the
isthmus. The connection between the uterus and the
isthmus is called the utero-tubal junction or UTJ. The
UTJ functions as a filter of abnormal sperm and the
isthmus as a reservoir for healthy sperm.
2- Estrus Cycle:
Over a period of time, many changes take place in the reproductive system in response to changing hormone
levels. These changes in normal open females repeat every 18 to 21 days. This regular repetitive cycle is called
the estrous cycle.
Let’s discuss how the estrous cycle works starting with a cow in heat on day zero. Looking at the reproductive
tract, we see several things happening. One ovary has a large follicle approximately 15 to 20mm in diameter. This
follicle has a mature egg inside ready to be released. The cells lining the follicle are producing the hormone
estrogen. Estrogen is transported in the blood stream to all parts of the cow’s body, causing other organs to react
in a number of ways. It makes the uterus more sensitive to stimulation and aids in the transport of semen at the
8. 8
time of insemination. It causes the cervix to secrete viscous mucus that flows and lubricates the vagina. Estrogen
is also responsible for all signs of heat including; a red swollen vulva, allowing other cows to mount her, going
off feed, bellowing considerably and holding her ears erect are but a few of the many signs.
On day one, the follicle ruptures or “ovulates” releasing the egg to the waiting infundibulum. Several hours prior
to ovulation estrogen production declines. As a result, the cow no longer displays the familiar signs of heat. After
ovulation, new types of cells called, luteal cells, grow in the void on the ovary where the follicle was located.
Quite rapidly over the next five to six days these cells grow to form the corpus luteum (CL). The CL produces
another hormone, progesterone. Progesterone prepares the uterus for pregnancy. Under the influence of
progesterone, the uterus produces a nourishing substance for the embryo called uterine milk. At the same time,
progesterone causes a thick mucus plug to form in the cervix, preventing access of bacteria or viruses into the
uterus.
Duration and Signs of Estrus:
Species Duration Signs of Estrus
Cow 12-24 hours Most reliable sign of estrus is standing to be mounted.
Mare 4-9 days Urinate frequently, vulva winking, nervousness.
Sow 24-72 hours Standing still if pressure is applied to loin area.
Ewe 24-36 hours Standing to be mounted by ram.
3- Cystic Ovaries:
Cystic Ovaries occurrence is high in postpartum period especially first 30 to 60 days following the parturition.
Types:
These are of three types:
Follicular cyst
Luteal cyst
Cystic corpora lutea
(i) Follicular cyst:
If a follicle of size 2.5 cm or larger persists on ovaries for 10 days, usually in the absence of corpus luteum. GnRH
preparations are used to treat Follicular cyst.
9. 9
(ii) Luteal cyst:
Mature follicle is unable to ovulate but partial luteinization occurs to form a cyst. PG preparations are used to
treat Luteal Cyst. Follicular and luteal cysts are an-ovulatory cysts; ovulation does not take place.
(iii) Cystic corpora lutea:
There is accumulation of fluid (water or serum) under the CL. Conception rate is very low because progesterone
conc. is very low produced from such luteal tissue.
4- Reproductive Hormones:
Hormone
Chemical signals that travel via bloodstream to affect the function of the distant organ.
Regulatory factor
Secretory organ
Target organ/tissue
They may be autocrine or Paracrine
Autocrine:
Produced and used by the same cell/tissue.
Paracrine:
Produced by the neighboring cells and transported via the interstitial fluid.
10. 10
Classes of hormones:
There are three general classes
1) Lipids:
Cholesterol derivatives (steroids)
12-C fatty acid derivatives (eicosanoids)
2) Proteins and polypeptides
3) Monoamines
Cholesterol and its Derivatives:
Cholesterol:
Large molecule
• Hydrocarbon ring
Highly hydrophobic
Source:
• Diet
• De Novo synthesis
Found in cell membrane
Derivatives:
Vitamin D
Bile acid
• Lipid digestion
Steroid hormones
• Sex steroids
• Adrenal steroild
All cholesterol derivatives contain sterol ring
Steroid hormones:
These hormones are commonly called as sex steroid hormones.
Produced mainly by the gonads
• Ovaries and testis
• Some production by placenta, adrenal gland, and brain
Water-insoluble but lipid soluble
• Easily move across the plasma membrane
• Bound to Steroid hormone-binging globulin during transport
There are three classes of sex steroid hormones.
Progestin/progestagens
Estrogens
Endrogens
Steroidogenesis is the metabolic process through which Steroid Hormones are produced.
Steroidogenesis:
Source of cholesterol
1) Acetate:
• De Novo Synthesis
2) Lipoproteins:
• HDL (humans and rodents)
• LDL (cattle)
Common pathway:
11. 11
1) Conversion of cholesterol to pregnenolone
Splits into two different pathway with the same outcome
Delta-4 pathway:
• Conversion of pregnenolone to progesterone
• Conversion of progesterone to androstenedione
Delta-5 pathway:
• Conversion of pregnenolone to androstenedione
Production of Estrogens:
Final destination of steroidogenesis in the ovary
• Conversion of androgens (testosterone) to estradiol-17 beta
Some species (i.e. rats) use delta-4 pathway, whereas others (i.e. cows) prefer delta-5 pathway
General function of steroid hormones:
Development of physical characteristics
Male and female sex characteristics
• Primary (reproductive organs)
• Secondary (physical)
Reproductive success
1) Sexual behavior and libido
2) Fertility
3) Pregnancy
Eicosanoids:
Derivative of 12-C fatty acid (Arachidonic acid)
1) Prostaglandins (more important for reproduction)
2) Leukotriens
Arachidonic acid released from phospholipid component of the cell membrane
3) Phospolipase A
4) Phospholipase C
Prostaglandins:
Produced from leukotriens through cyclooxygenases
No specific organ of production
1) Originally isolated from prostate gland
2) Many reproductive organs produce prostaglandins
Quickly metabolized
1) Lungs
Protein Hormones:
There are three subclasses
Glycoproteins
Proteins
• Growth hormone
• Prolactin
• Placental lactogens
Cytokines (Immune system)
Polypeptides
12. 12
Protein Hormones:
Pituitary hormones
1) Growth hormone (GH)
2) Prolactin (PRL)
Placental hormones
1) Placental lactogen (PL)
2) GH-Variant (GH-V)
• Affect metabolism and lactation
• Affect ovarian functions
Cytokines:
Cytokines are different from hormones. No specific organ/cell is involved for its production.
• Immune response
• Inflammation
Multiple targets
Interactions to modulate activities of other cytokines
Redundant functions
Auto/paracrine factor rather than endocrine factor
Hypothalamic neuropeptides:
Gonadotropin-releasing hormone (GnRH) is a hypothalamic neuropeptide hormone.
• Regulates secretion of LH and FSH
• Composed of 10 amino acids
Posterior pituitary hormones:
Oxytocin:
• Composed of 9 amino acids
• Produced by the neurons within the hypothalamus but secreted by the posterior pituitary
gland
• Induces contraction of smooth muscles
• Critical for milk let-down
13. 13
Hormone Biochemical
classification
Source Action in female Effect on ovary
GnRH Decapeptide Hypothalamus Release FSH and LH Follicular develop-
ment & ovulation
LH Glycoprotein Pituitary Stimulates ovulation and
P4 secretion
Formation of CL
FSH Glycoprotein Pituitary Follicular development,
E2 synthesis
Development of
follicles
Progesterone Steroid CL, placenta Maintenance of
pregnancy
Inhibits GnRH release
Estradiol Steroid Follicle,
placenta
Sexual behavior -
hCG Glycoprotein Chorion ovarian P4 synthesis -
eCG Glycoprotein Chorion Formation of accessory
CL’s
-
PGF2a Prostaglandin Endometrium Destruction of CL Luteolysis
Inhibin Glycoprotein Granulosal
cells
Inhibits FSH secretion Inhibits follicle
development
5- Estrus Synchronization:
A management technique that makes use of hormones to control or reschedule the estrous cycle.
Hormones associated with reproduction:
LH & FSH
Progesterone
Estrogen
Prostaglandin
Why synchronize?
Group females for parturition (calving interval)
Shorten breeding season
Reduce estrus detection
Synchronization Methods:
Method Trade Name Female Type for Effectiveness
Prostaglandins Cyclomate, Fertagyl, Lutalize,
Dalmazine
Cycling cows or heifers
Cycling mares
Progestins CIDR Cycling cows or heifers
Anestrous cows or heifers, Mares
GnRH Conceptal, Dalmarelin, IVF-C Postpartum cows
Anestrous cows
Cycling mares
Placental Gonadotropins Peri-pubertal gilts
16. 16
6-Types of Placenta:
The placentas of all eutherian (placental) mammals provide common structural and functional features, but there
are striking differences among species in gross and microscopic structure of the placenta. Two characteristics are
particularly divergent and form bases for classification of placental types:
The gross shape of the placenta and the distribution of contact sites between fetal membranes and endometrium.
The number of layers of tissue between maternal and fetal vascular
systems.
Just prior to formation of the placenta, there are a total of six layers of
tissue separating maternal and fetal blood. There are three layers of fetal
extraembryonic membranes in the chorioallantoic placenta of all
mammals, all of which are components of the mature placenta:
Endothelium lining allantoic capillaries
Connective tissue in the form of chorioallantoic mesoderm
Chorionic epithelium, the outermost layer of fetal membranes derived from trophoblast
There are also three layers on the maternal side, but the number of these layers which are retained - that is, not
destroyed in the process of placentation - varies greatly among species. The three potential maternal layers in a
placenta are:
Endothelium lining endometrial blood vessels
Connective tissue of the endometrium
Endometrial epithelial cells
Type of Placenta
Maternal Layers Retained
ExamplesEndometrial
Epithelium
Connective
Tissue
Uterine
Endothelium
Epitheliochorial + + + Horses, swine, ruminants
Endotheliochorial - - + Dogs, cats
Hemochorial - - - Humans, rodents
Type of Placenta Common Examples
Diffuse, epitheliochorial Horses and pigs
Cotyledonary, epitheliochorial Ruminants (cattle, sheep, goats, deer)
Zonary, endotheliochorial Carnivores (dog, cat, ferret)
Discoid, hemochorial Humans, apes, monkeys and rodents
17. 17
7- Ultrasound:
Early pregnancy diagnosis is essential for effective management of pregnant animals and early submission of
non-pregnant animals for subsequent breeding to reduce calving to conception interval. The present study
assessed the accuracy in early pregnancy diagnosis by ultrasonography and
estimated the loss due to delayed identification of non-pregnant animals. The
main theme of ultrasonography is to check; Fetal Viability, Gestational Age,
Appearance of Fetal Structures, Fetal Size, Fetal Number. Frequency usually
range from 3.5 - 7.5 MHz. With greater MHz you see more detail but have
less depth penetration.
A latest ultrasound machine has the following parts:
Transducer probe: probe that sends and receives the sound waves
Central processing unit (CPU): computer that does all of the calculations and
contains the electrical power supplies for itself and the transducer probe
Transducer pulse controls: changes the amplitude, frequency and duration of the pulses emitted from the
transducer probe
Display: displays the image from the ultrasound data processed by the CPU
Keyboard/cursor: inputs data and takes measurements from the display
Disk storage device (hard, USB, CD): stores the acquired images
Printer: prints the image from the displayed data
8- Mummification & Maceration:
Fetal death may be followed by abortion, fetal maceration, or fetal mummification. In cases of abortion and fetal
maceration, the hormonal support of pregnancy is lost. The animal normally shows signs that pregnancy has
terminated. An aborted fetus may be found, the dam may show an abnormal vaginal discharge, and she may return
to estrus. Fetal bones may be trapped in the uterus and compromise future breeding.
In cases of fetal mummification, fetal death is often not
immediately apparent. In such cases, the corpus luteum
persists in the ovary, and there is no vaginal discharge and no
signs of estrus. The abnormal pregnancy in such animals
continues indefinitely. Affected animals are normally
identified when owners notice that external signs of late
pregnancy, including abdominal enlargement, are less obvious
than in other members of a group. Clinical examination reveals
that the fetus is dead, although the dam is pregnant. Rectal
examination reveals an irregularly shaped, contracted uterus
with a fetal mass but no fetal fluid within it. There is no
fremitus in the uterine artery. Ultrasonographic examination
of accessible parts of the uterus per rectum confirms the
diagnosis. The abnormal pregnancy can be terminated by a
single IM injection of prostaglandin F2α. The fetus is expelled
from the uterus and can be manually removed from the vagina
48 hr later.
In sheep, fetal mummification can be diagnosed by abdominal
palpation supported by a transabdominal ultrasonographic
scan. Affected animals are normally culled on economic grounds. Treatment can be attempted
18. 18
9- Hydropsy Conditions:
Hydropsy is seen in most of the species even in human beings. There are of two types of hydropsy generally in
cattle:
Hydroallantois: increased fluid in allantoic cavity
Hydroamnios: increased fluid in amniotic cavity
Hydrallantois:
Hydrallantois accounts 90 % of hydropsy conditions. In the last trimester
of pregnancy, it mostly occurs but can also occurs after five months of
gestation. There is accumulation of large quantity of fluid and abdomen
becomes extended, enlarged and barrel shaped. Normally amount of fluid
in allontoic cavity is round about 20 liters but in this case 150-260 liters
(watery amber fluid or plasma like fluid) is there. Level of sodium,
potassium and creatinin are in greater amount in this fluid. It is reported
that it is associated with the uterine and placental diseases. It is common
in twin pregnancies. Animal looks to give birth to three calves.
Hydramnios:
There are 10 % cases. It is accumulation of fluid in amniotic cavity.
Filling of fluid is slow. So animal does not assume barrel shape rather
gets pear shape. Mostly it occurs in last half of gestation. About 20-100
liters fluid may accumulate (normally 4-8 liters). Principal reason is
genetically, congenitally, defective fetus. (In Hydrallantois placenta is
defective).
In defective fetus swallowing is impaired, the fluid may be inhaled in
bronchi and large amount of saliva will be constantly produced.
Abdomen is pear shaped and less tense because of gradual filling. This
condition is more common in cattle, less common in sheep and not in
mare.
10- Early Embryonic Mortality (EEM):
The rate of early embryonic death is 25%. Average conception rate is 60 %. While 5-15 % is rate of failure of
fertilization. EEM is a way to get rid of undesirable genetic material at low biological cost because animal is
wasting 21 days of his life in EEM. On the other hand, if a cow born abnormal fetus, there will be a loss of 9
months.
Early embryonic mortality occurs between 8-19 days; mostly it occurs at day 14, 15.
Causes of EEM:
Lack of PGF2α
Nutrition Deficiency
Cytogenic Abnormalities
Immunological Factors
Age
Breed
Uterine Environment
Hormonal Levels/ Imbalances
19. 19
High Temperature
Effect of AI or Time of AI
Practical Topics:
1- Identification of different Breeds
2- Pregnancy diagnose in Rajan Puri Goats through Ultrasound
3- Preparation of Bull for Semen Collection for AV Method
4- Semen Evaluation
5- Thawing of Semen
6- CASA
1- Identification of different Breeds:
Sahiwal:
• This breed is medium-sized, and has a fleshy body.
• Females have reddish dun colour; males may have a
darker colour around the orbit, neck, and hindquarters.
• Males have stumpy horns; females are often dehorned.
• Ears are medium-sized and drooping.
• The tail ends in a black switch.
Jersey:
• Country of origin: Jersey
• Use: Dairy
• Color: Fawn
• Weight
Male: 540–820 kilograms (1,190–1,810 lb)
Female: 400–500 kilograms (880–1,100 lb)
Holsten Friesian:
20. 20
• Other names: Holstein Cattle
• Country of origin: Netherlands
• Distribution: Worldwide
• Use: Dairy
• Coat: Black and white patched coat (occasionally red and
white).
Neli Ravi:
• These buffaloes are massive, somewhat wedge-shaped
animals.
• They are mostly black, but often have white markings on
the forehead, face, and muzzle, and lower parts of the legs.
Due to which it is called “Panj Kalyan”.
• The tail switch is often white.
• They have all curly horns, wall eyes, and a large and
strong udder.
• Males attain maturity at the age of 30 months, and females
at 36 months.
• Average age at first calving is 1390 days
• Milk yield is 1800-2500 litres per lactation (322 days)
with 6.5% butter fat.
• Adult males weigh 550-650 kg, while females weigh 350-
450 Kg.
• Males may be used for draught purposes, especially for
preparing land for paddy cultivation and are a good source of beef.
• White markings extending above hock and knee and over the neck and body constitute a serious
disqualification.
1- Pregnancy diagnose in Rajan Puri Goats through Ultrasound:
Early detection of pregnancy and determining fetal numbers have economic benefits to goats for better
reproduction. Transabdominal B-mode Ultrasonography are able to accurately diagnose both pregnancy and
fetal numbers. The optimum time for detecting pregnancy is from 45 to 90 days of gestation in goat both by
using 3.8MHz convex probe. On 22/07/2016 we performed ultrasound of Rajan Puri Goats for pregnancy
diagnose and fetal number determination at day 50 after AI. We checked 6 Goats. Only one of them was
pregnant having 3 fetuses which were clearly identified.
21. 21
3- Preparation of Bull for Semen Collection for AV Method:
Semen collection from bulls using an AV requires three people: one to handle the animal acting as dummy, one
to control the bull and one to collect the semen. It is important that the collection area have non-slip flooring to
avoid injuries and because ejaculation may be inhibited if the bull is nervous about his footing. Bulls are heavy
and should have regular hoof care. Poor hoof condition can inhibit the bull from mounting or cause pain when
dismounting.
The back and rear quarters of the dummy washed with a disinfectant every
collection day. It is also common for the rear quarters to be clipped
routinely. The bull's preputial hair should be clipped in preparation for using
the AV. These sanitary precautions are intended to minimize microbial
contamination of the semen being collected.
For collection, the dummy is positioned straight in front of the bull for
mounting. Oftentimes, it helps to arouse the bull if the steer is led around
the collection area with the bull behind, then stopped abruptly, similar to the
behavior of a cow in estrus.
The artificial vaginal uses thermal and mechanical stimulation to stimulate
ejaculation. The liner of the AV is filled with water at 42-48 degrees Celsius,
and the inner surface is lubricated with something like K-Y jelly. An
insulating cone is placed over the end from which the collection tube
protrudes to avoid subjecting the semen to temperature shock.
22. 22
False mounting is an effective way to sexually stimulate the bull. Providing two false mounts with two minutes
of active restraint and one additional false mount maximizes sperm cell numbers. Final preparations are made to
the AV between the second and third false mounts. Proper construction of the AV is important to avoid damaging
the bull's penis and to avoid stressing sperm cells.
Successful semen collection with an AV depends on the bull
being comfortable around people, and they need to be trained
to use the AV. During collection, the person handling the AV
must remain aware of where their feet are relative to the bull.
As the animal ejaculates, it is common for him to jump
forward. To avoid foot injury, collectors should wear boots
with steel toes.
In artificial insemination centers, bulls are typically collected
2 or 3 times per week, with 2 or 3 ejaculates per collection
day. The following images depict routine semen collection
from a bull.
4- Semen Evaluation:
ELEMENTS OF A BULL SEMEN ANALYSIS REPORT
Element Definition Reference Range
Semen volume The total amount of fluid ejaculated ≥6 mL
Sperm concentration (commonly
known as ‘sperm count’)
The number of sperm in a measured
volume of the ejaculate is counted.
The sperm concentration is reported
as the number of sperm per mL of
semen.
≥800-2000 million per mL
Total sperm number (also known as
‘total sperm count’)
The total number of sperm in the
ejaculate, calculated by multiplying
the semen volume by the sperm.
≥7-15 billion
Sperm motility (the ability of sperm
to swim or move forward)
The number of motile (moving)
sperm is compared to the number of
non-motile sperm and is reported as
a percentage of the total number of
sperm.
≥60-70% motile within 60 minutes
of ejaculation
Normal Sperm (‘live’ sperm) The number of normal sperm in the
sample that are ‘alive’ as a
percentage of the total number of
sperm.
≥70-95%
Semen pH Measured to test if the ejaculate is
acidic or alkaline. Semen should be
slightly alkaline. More acidic
semen, together with a low amount
(volume) of semen, may mean there
is a blockage in the flow of semen.
≥6.2-6.8
23. 23
Sperm antibodies Normally done in specialized
laboratories using methods
approved by the World Health
Organization.
<50% motile sperm showing
antibody activity
Stages of Cryopreservation of Bovine Semen:
Preservation of Semen consist of following main Processes.
1- Evaluation
2- Dilution
3- Preservation
1- Evaluation:
In evaluation we conclude appearance (color), morphology of semen and also keep in mind that there will be no
debris, puss and urine. Normal Volume of semen is 6-8ml of a bull.
In evaluation we also check the live and dead sperms percentage. For this purpose, a smear of semen with
“Nigrosin Eosin” is prepared to check under the microscope. Motility of sperms should be 60-70% minimum.
Sperm Cell Concentration and Semen Color:
Color Concentration Billion/mL
Creamy >2.0
Light Creamy 1.0
Milky 0.5
Semen
Collection
Initial Semen
Evaluation
Dilution
Cooling
Equilibiration
Straw Filling
Programable
Freezing
Storage
24. 24
Cloudy 0.1
color <0.05
If sample has lesser than this value, then It should be rejected. To get the feel for the motion, place the dragging
slide at an angle of 45° and move it into contact with the aliquot of semen (left panel), which runs along the edge
of the slide (middle panel). Bring the dragging slide slowly back (over approximately 1 second) along the length
of the slide to produce the smear (right panel).
2- Dilution:
It is addition of suitable media to the semen for certain reasons:
Increases the semen volume leading to inseminating larger number of females.
Supply proper substances to protect spermatozoa from sudden variations in temperature, also nutrients
supplements.
Improving spermatozoa fertilization ability especially by decreasing capacitating time.
Sample Dilution:
Specie Dilution Detail
Boar 1+50 70µL Semen + 3.5ml NaCl Solution (0.9%)
Bull 1+100 35µL Semen + 3.5ml NaCl Solution (0.9%)
Ram 1+500 8µL Semen + 4.0ml NaCl Solution (0.9%)
Stallian 1+25 120µL Semen + 3.0ml NaCl Solution (0.9%)
Detailed Flu Chart for Cryopreservation of Semen:
25. 25
6- CASA (Computer Assisted Sperm Analysis)
Reasons for Use:
Reproducible and consistency
Accurate and reliable
Easy to perform
Quick and not time consuming
Objective analysis
1
• Semen collection with AV at 42ᵒ c
2
• Initial Semen evaluation Volume+Motility+Concentration
3
• Holding time at 37ᵒc for 15 minutes
4
• Dilution in Tris-Citric Acid Extender (pH=7, OP=320mOsm/kg & Conc=50×106/mL
5
• Cooling at 4ᵒc for 4 hours
6
• Equilibiration at 4ᵒc for 4 hours
7
• Filling in 0.5mL straws at 4ᵒc
8
•Programable freezing from 4ᵒc to -15ᵒc@3ᵒc /minutes, -15ᵒc to -90ᵒc@10ᵒc/minutes
9
•Plunging and storage in Liquid Nitrogen (-196ᵒc)
10
•Thawing for 15 seconds at 37ᵒc
26. 26
Livestock Research Section:
This subunit of ASI consist of 141 total animals (15 pure Sahiwal, 3 Frezzian, 35 Buffalo) for different research
purpose. Live Stock Research Section includes Maternity Unit, Cow & Buffalo Shed, Buffalo Heifer Shed, 2
Angora Rabbit Sheds, Feed Storage Unit, Silage Technology Unit, Veterinary Dispensary and hardworking staff
working on the mission of “White Revolution” under the supervision of Dr. M Afzal.
Program Incharge:
Dr. M.Afzal PSO
Period of Stay:
25 July- 29 July
27. 27
Practical Topics:
1- Farm Management
2- Record Keeping
3- Angora Rabbit Farming
4- Silage Making
5- Tagging, Vaccination & Blood Sampling of young Calves
6- P Test of Sahiwal cow
1- Farm Management:
Feeding:
When pasture is short or of low quality (dry) regularly assess condition of cattle and buffalo with supplement
pasture as necessary to maintain desired weight or condition and support growth, pregnancy and lactation. Hand
feeding is often needed during autumn and winter depending on seasonal conditions and during late pregnancy
and lactation. Daily bathing before feeding should also be practice till the first feeding up to 10:30 AM
Water:
Ensure safe water is always available.
Culling:
Annually at weaning, cull out cattle that are unfit or too old to survive and be productive. Cull cows which do not
conceive on time.
Breeding:
Average pregnancy 282 days in cow.
Join in June-July for Autumn calving.
Join in December for September calving.
Prefer AI after proper Heat detection especially in buffalos.
Pregnancy
Do pregnancy test after 6 weeks.
In last 2 months ensure good nutrition.
28. 28
Calving:
Inspect twice daily and assist if needed.
Have 3 in 1(calcium, magnesium and dextrose) milk fever treatment on hand and inject if symptoms appear.
Provide a paddock close to cattle yards.
Marking:
When calving is completed or any time from one day to 3 months old.
Castrate males with ring or knife if not for future breeding.
Ear tag or ear mark.
Proper vaccination with proper shedule
Weaning when calves are ready for sale or about 8 weeks before next calving.
Disease control and prevention vaccination:
Do vaccination especially FMD, HS on proper time.
Worms:
Treat in February with a Albendazole or ivermectin products.
Repeat it If indicated by diarrhoea, wasting and high worm egg count.
Bulls:
before joining.
Calves:
At 4 months and weaning.
Weaners and Young Cattle at weaning and in May, August and November.
With the exception of February any broad-spectrum product may be used. Oral, injectable and pour-on
products.
Use product effective against mature and immature fluke.
Pour-on, spray or injection for Lice.
Grass Tetany:
May occur in cows with calves at foot, May to September. Avoid stress and grass dominant pasture, feed clover
hay, and provide magnesium supplement to at risk herds.
Magnesium supplements:
"Causmag" powder applied to hay every second day. A large capsule placed in the rumen or grass tetany blocks.
Bloat:
When grazing lush clover or lucerne.
Strip graze or use preventative treatment.
Supervise closely and treat early if affected.
29. 29
Digestive Problems:
Diarrhea is a common issue in all animals. Use Sulpha drugs for treatment
Health and Welfare:
All animals require:
A safe environment.
Nutrition to sustain life, growth, production and reproduction.
Regular and thorough inspections.
Prompt treatment of sickness and injury or humane destruction.
Professional advice and treatment in outbreaks of disease or deaths.
Reporting of Notifiable Diseases
Selling:
Direct to abattoir at per kg dressed.
In the paddock to butcher or farmer.
Saleyard auction, must use an agent, per kg live weight or per head.
Property identification tags:
The law requires that all cattle must have an approved tag, which identifies the property of origin, attached before
they leave the property for sale or slaughter.
Buying
Saleyard auction
In the paddock from a farmer
Agent to source and purchase
2- Record Keeping:
Maintaining performance records for animals is one of the best management tools you can use to increase the
efficiency of operation. Such factors as performance, weaning weights, calving percentage, and death losses have
a direct effect on the income and profitability of flock. All producers should try to maintain some form of record
keeping system. Producers interested in making serious gains in productivity, however, will want to develop a
record keeping system to track the performance of individual animals. Maintaining records helps producers
pinpoint areas of weakness in the overall flock performance, which will help when making decisions about flock
management, the selection of new breeding stock and culling low performing animals.
Another major advantage of individually identifying stock is being able to track animals that have been treated
with medication. This helps ensure that animals are not shipped for slaughter before medication withdrawal times
have been met and helps improve the efficiency of medication administration. Improved timing and tracking of
medication use could potentially save on medication costs and decrease the likelihood of developing resistant
strains of bacteria on farm.
There are different types of record like
Birth Record
Tag Allotment Record
32. 32
3-Angora Rabbit Farming:
The Angora rabbit is a variety of domestic rabbit bred for its long, soft wool. They first appeared in the United
States in the early 20th century. They are bred largely for their long Angora wool, which may be removed by
shearing, combing, or plucking. There are many individual breeds of Angora rabbits, four of which are recognized
by American Rabbit Breeders' Association (ARBA); they are English, French, Giant, and Satin. Other breeds
include German, Chinese, Swiss, Finnish, Korean, and St. Lucian.
Model Rabbitry of NARC:
Advantages of Angora Rabbit wool:
Angora rabbit wool is high in demand and considered top drawer in the fiber production market.
Angora Rabbit Farming is a high value livelihood source for Pakistani women.
150-250 gram wool obtain from a rabbit on each shearing.
Angora fiber can be sold raw as their natural color.
It's a fiber so fine, that it's usually blended with other fibers such as sheep’s wool, mohair, silk, and cashmere.
Angora is said to be seven times warmer than sheep's wool and considered too warm for a garment.
Blending angora fiber with others will add softness, warmth.
Inexpensive due to less feed expenditure.
NARC
33. 33
Harvesting the wool is relaxing and pleasurable.
Fiber can be sold for profit or kept on hand for hand-spinning for the breeder.
A well-groomed animal will have very little debris in their fiber, and therefore the harvested wool is not
required to be washed or carded.
Allowing for quick results in the spinning process.
Angora wool has a superior quality in its ability to retain dye color permanently over all other types of wool
fibers.
Most breeds of Angora rabbits molt with their natural growth cycle about every four months.
Feeding:
No. Age Mixture % Dry Fodder % Vegetable, Fruits,
Leaves etc
1 In Early Age 80 80 AS NEEDED
2 ≥ 7 week of age 60 30 AS NEEDED
3 13-24 week of age 90 30-40 AS NEEDED
4 24 week of age 140 50-60 AS NEEDED
Feed Percentage:
Particles Young Rabbits Adult Rabbits Lactating Does
Male Female
Maiz 15 15 15 20
Ragi/ Jowar/ Bajra 15 15 15 15
Deoled rice brass/ Wheat brass 33.5 38.5 33 24.5
Ground nut cake 10 6 5 8
Sunflower cake 5 8 5 -
Soya meal - - 5 10
Lucererene meal 20 16 20 20
Mineral Mix 1 1 1.5 2
Common Salt 0.5 0.5 0.5 0.5
Total 100 100 100 100
Management:
Daily Feeding (Green Fodder 1-1.5 kg per day, Formulated Feed: 100-150 gram per day), Proper Ventilation,
Proper Sanitation, Proper breeding program, Weight gain record, Avoid disturbance, Adequate supply of water,
Proper care.
Breeding of Angora Breeds:
Breeding angora rabbits takes a bit of preparation and planning before the breeding ever occurs. Angora rabbits
must be at least 6 months old before they can be bred. The buck can be used to breed somewhere between 6-7
months of age. Some can show signs of being ready to breed younger than 6 months. Many angora breeders only
breed in the winter, since angoras suffer in the heat and the summer is show season. Put the doe into the buck
cage and watch the whole time. If you do not watch, you will never know if he did his job. He should mount and
when he makes contact, he will stiffen, sometimes make funny noises and fall off of her. The standard practice is
to remove the doe and return her to the buck 30 minutes later for another time. The buck may try to breed the doe
without success if the doe flattens herself to the floor of the cage. To assist in this case, place a hand under the
34. 34
doe’s belly (from the head) and gently raise the doe’s hips,
making sure that the does tail is over her back. This process
can be repeated again in 24 hours to increase the litter size.
Bucks can be used multiple times in a week, some suggest up
to 7 times a week without a decrease in sperm.
Does have two horns in their uterus and either or both can be
impregnated. On a rare occasion when both horns have been
fertilized the doe could deliver on different days, especially if
you do a second breeding. Kits (babies) will be born between
28-31 days after breeding.
Identification of Male & Female:
Female Male
Prohibited Edibles for Angora Rabbits:
35. 35
Enemies of Angora Rabbit:
Diseases:
Coccidiosis Shorehock
Pasteurellosis Hind quarter paralysis
Wryneck Allergy
Enter its complex Ear canker
4-Silage Making:
Forage which has been grown while still green and nutritious can be conserved through a natural ‘pickling’
process. Lactic acid is produced when the sugars in the forage plants are fermented by bacteria in a sealed
container (‘silo’) or bale with no air. Forage conserved this way is known as ‘ensiled forage’ or ‘silage’ and will
keep for up to three years without deteriorating. Silage is very palatable to livestock and can be fed at any time.
36. 36
Silage Making in NARC:
Baled Silage method is adopted in LRS (NARC). This is the most modern way of silage making in which fodder
is preserved in the form of bale. Fodder is converted into bale via machine called silage baler and this bale is then
tightly wrapped with polyethylene sheet with the help of wrapper. This bale can be easily transported.
Method:
Maze is mostly used in Silage making because it is most nutritional than the other crops. Crop is harvested at the
stage when there are maximum nutrients present in crop with 65-70% moisture content. In case of maize moisture
reaches this level when:
Color of Lower leaves of plant starts changing to light green
Husk's color is from green to light green
Kernel has visible dent
There is 40-50% moisture in grain
Kernel Milk line is 50%
Grab test is used to measure the moisture concentration in fodder. To check the moisture, take a hand full of
fodder and press it in hand for few seconds. On opening of hand, there will be a ball of fodder:
If this ball suddenly opens, it means moisture connect is too low.
If this ball remains it shape, it means moisture content is too high.
If this ball opens slowly, it means moisture content in fodder is suitable to be ensiled.
Use maize chopper for harvesting and chopping of fodder. If maize chopper is not available, then harvest it and
chop it up to size of 1-2 cm.
Mixing of Additives:
Different feed additives may be mixed to stimulate or inhibit the microbial activities in silage. These additives
may include:
Inorganic chemical: Calcium carbonate, magnesium carbonate, ammonium sulphate, sodium sulphate, zinc
sulphate, copper sulphate, ferrous sulphate, manganese sulphate, sodium chloride, sodium nitrite, calcium
phosphate, calcium silicate and phosphoric acid.
Organic chemicals: Acetic acid, citric acid, benzoic acid, formic acid, lactic acid, propionic acid, formaldehyde,
ethylalcohol, propylene, glycol, gention violet, lactate, sodium gluconate, ethyl acetate, ethyl butyrate, ethyl
diamine, dihydro iodine and urea etc.
Feed stuffs: Used as silage additives are wheat bran, crushed maize, starch, dextrose, molasses, whey and yeast
etc.
37. 37
Fermentation products and microorganism: A few enzymes, extract of fungi and several species of microorganism
like Lactobacillus acidophilus, Turolopsis species, Bacillus subtilis etc.
Some commercial inoculants to enhance the process of ensiling are also available in market.
The it is transferred to Silage Baler and after that wrapper wraps the bale with polythene sheet.
5-Tagging, Vaccination & Blood Sampling of young Calves:
An ear tag is a plastic or metal object used for identification of domestic livestock and
other animals. Non electronic ear tags are the simply handwritten for the convenience of
identification (these are known as "management tags") which are used in LRS (NARC).
Vaccination is also important to control the future risk factor of different disease like
FMD, HS, BQ. Blood sampling should also be taken at different age stages to know the
either there is a problem or not. On 29/7/2016 we performed tagging, FMD Vaccination
with the dose rate of 2mL/Calf S/C and blood sampling through jugular vein of 6 calves
having tag number 732, 733, 734, 735, 736, 737 respectively.
Info about calves is given below the table:
Date of Birth Tag No. which was given Sex Dam No.
1/10/2015 732 M 689
14/5/2016 733 M 456
6/6/2016 734 F 455
28/6/2016 735 M 694
11/7/2016 736 M 688
18/7/2016 737 F 196
How to Tag:
Before beginning, squeeze the handles of the tagger to check that the pin slides easily into the hole on the
opposite end of the tagger, to ensure that the halves of the tag will meet in proper alignment. Replace the tagger
pin if necessary.
38. 38
Place the male component of the tag on the tagger pin, and the
female component of the tag on the opposite side, seating the plug
into the cavity of the tagger, below the metal plate. The metal plate
will serve to hold the female component in place.
Select your tagging location on the ear, in the middle
one third of the ear (see above considerations). Briefly
clean the site by removing gross debris, and by wiping the
site with alcohol or another disinfectant. Align the tagger.
The male component (with the pin) should be on the
inside of the ear, while the larger female tag should be on
the outside/back of the ear. NOTE: If using the RFID
electronic tags, the male portion of the tag must go on the
OUTSIDE of the ear, with the numbered disk, or female half of the tag going on the inside of the ear.
Squeeze the tagger quickly but firmly, you should feel a strong click as the tag snaps into place. Remove the
tagger and ensure that the halves are interlocked, and that the tag is placed both securely and comfortably.
Watch the animal over the next week for signs of infection or tissue death associated with the ear tag. If severe
pain, redness, or discharge develops, the tag may need to be removed and replaced at a later date after a course of
antibiotic treatment and resolution of the infection.
6- P Test of Sahiwal Cow:
Rectal palpation is a very common and highly popular method among all cattle producers in primarily performing
pregnancy checks on cows and heifers. Rectal palpation is undoubtedly the messiest, yet cheapest and often
quickest form of pregnancy checking that can be easily learned by all those who have a breeding herd of cattle.
• Palpation of pregnancy through the rectal/uterine walls. Results are known immediately.
• Fetal membranes, amniotic vesicle, cotyledons and fetus can be palpated easily.
• Pregnancy can be determine at 35 to 40 days after insemination.
On 29/7/2016 near about 10:00 AM we performed pregnancy test in a cow at dispensary area of LRS with the
help of Technician staff under the supervision of Dr. Afzal.
Steps of Rectal Palpation:
1) Utilization of proper palpation equipment.
• A protective sleeve is put over the arm used for palpation.
• It is important to use a non-irritating lubricant that is placed on the palpation sleeve, which assists the palpator
in getting their arm into the rectum of the cow.
2) Visual assessment of the rear end of the cow.
•Make sure that she has two external outlets under the tail, otherwise you’ve been had!!
• Check the cow’s body condition. Extremely thin cows are usually open.
•Look for signs of recent estrous activity.
39. 39
∗ Rubbed tail head or a scab.
∗ Mud on the animal’s sides and (or) rump.
∗ Clear mucus discharge from the vulva.
3) Determination of internal structures of the reproductive tract and pelvis
• Cervix: landmark structure that is palpated first as it leads to the uterus
∗ Find cervix by sweeping the floor of the pelvis from side to side.
∗ Caution, location of the cervix should not be used as a primary criterion for pregnancy.
• Uterine horns: primary anatomical structure palpated to determine pregnancy status.
∗ Size: uterine horns increase in size as gestation advances.
∗ Location: in relation to pelvic rim, advances in anterior direction.
∗ Tone: pregnant horns have a flaccid feeling to them.
∗ Within the uterus the presence of fluid, embryo/fetus, and placentomes are palpated for to assist in determining
the pregnancy status of the animal.
• Chorionic Membrane:
∗ Detected by grasping the uterine wall between thumb and forefinger and lifting slightly; called “slipping the
membrane”. CAUTION, this can terminate pregnancy if too much pressure is used and the chorion is damaged.
∗ By mid-gestation, the placentomes are large enough to palpate
• Ovaries:
∗ Presence of a corpus luteum (CL) which produces progesterone.
∗ Use the CL to determine the side of pregnancy up to 120 days.
∗ A smooth ovary with no significant structures (follicles, CL) is an indication that the female is probably
anestrous or non-cycling; hence, she is probably not pregnant.
• Uterine artery palpation (During mid to late gestation pregnancy)
40. 40
∗ Found on the right side near the forward edge of the pelvis. The artery is enlarged and when pressure is applied
to it, it generates a “BUZZ” in the fingers of the palpator.
∗ Increased diameter allows for increased blood flow, which is coincides with an increase in the size of the
placenta and fetus.
4) Pregnancy staging to determine the age of the pregnancy:
• 30 to 45 days
∗ Cervix & uterus are usually in the pelvic canal.
∗ One horn is slightly enlarged and fluid-filled. CL is on the same side as gravid horn.
∗ Membrane slip technique used to detect pregnancy. Proceed with caution because damage to membrane can
cause pregnancy to be terminated.
• 45 to 60 days (60 days is A in figure)
∗ Cervix is typically in the pelvic cavity.
∗ Pregnant uterine horn begins to fill with fluid with little fluid in non-pregnant horn.
∗ Amniotic cavity is about the size of a hen egg.
∗ Use membrane slip technique. Caution: too much pressure can damage membranes
• 60 to 90 days (90 days is B in figure)
∗ Cervix moves in anterior position; torsion evident when you attempt to
pick up the tract.
∗ Pregnant horn is at the anterior part of pelvic brim and may start to fall
over the rim.
∗ Amniotic cavity is about the size of a grapefruit & fetus about size of a
small rat.
∗ Difficult to move hand completely around the pregnant uterus.
∗ This stage of gestation is the earliest stage that most individuals like to
start to palpate pregnancy with a high degree of accuracy.
• 90 to 120 days (120 days is C in figure)
∗ Cervix is at the pelvic brim.
∗ Uterine body enlarged & fluid-filled about the size of a football. Uterus
usually dropped over the pelvic brim.
∗ Fetus is the size of a small cat.
∗ Start to feel the placentomes.
• 120 to 150 days (150 days is D in figure)
∗ Cervix is almost completely over the pelvic brim.
∗ Uterine body and horns are not easily palpated.
∗ Placentomes about the size of quarters or larger.
∗ Fetus is the size of a large cat.
• 150 to 180 days
∗ Cervix is well over the pelvic brim.
∗ Entire uterus is stretched and fluid-filled and well down into the body
cavity.
∗ Very hard to palpate fetus if you have short arms.
∗ Placentomes are about the size of a fifty-cent piece.
∗ There is a nice buzz to the uterine artery.
A
B
C
D
E
41. 41
• 180 to 210 days (150 days is E in figure)
∗ Pregnancy easy to detect. Fetal head is at or near pelvic cavity and can be palpated.
∗ Fetus about the size of a beagle dog.
∗ Placentomes are about the size of a silver dollar.
∗ There is a very strong buzz to the uterine artery.
• > 210 days to term
∗ Pregnancy is easy to detect.
∗ Fetal calf quite often located in pelvic cavity and its head is easy to feel.
∗ Very strong buzz to the uterine artery when digital pressure is applied to it.
∗ Bounce fetus like a basketball.
Small Ruminant Section:
This subunit of ASI consist of 91 total animals (8 Male + 83 Female). Beetal, Rajan Puri, Pahari are major breeds
for different research purpose. Small Ruminant Section includes 3 different sheds include Kidding pen, Kids,
Bucks, Goat portions, Veterinary Dispensary and hardworking staff working under the supervision of Dr. Faisal
Ishfaq
Program Incharge:
Dr. M Fatah Ullah/Dr. Faisal Ishfaq Senior Director/ SSO
Period of Stay:
1 Aug- 5 Aug
Practical Topics:
1- Identification of Different Breeds
2- Management
3- Common Diseases & Problems
42. 42
4- AI in Goats
5- Wool Diameter Identification
1- Identification of Different Breeds:
Beetal:
Type: Milk/meat
Habitat: Almost all districts of central Punjab, extending to Multan
Colour: Golden-brown or red-spotted with white or black patches
Size: Large
Average body weight (kg): 45-55
Average wool yield/annum: Smooth-coated, generally not clipped
General description: Massive head, Roman nose, long, broad & pendulous ears,
spiraled horns, longer in males; long stout legs; short tail; udder well-developed
& long teats, milk yield 190 litres during 150 days lactation; more than 50 %
twin or triplet births; Beetal males raised especially for sacrifice on Eid-ul-Azha,
body weight being 70-80 kg.
Phari:
Type: Meat
Habitat: D.G. Khan in Punjab & Loralai district in Balochistan
Colour: Black but some white, brown or grey animals also exist
Size: Small
Average body weight (kg): 25-30
Average wool yield/annum: 1 kg/head
General description: Head small, ears erect, horns thin, white or brown hair
streaks run from base of horns to muzzle; udder medium, 120 litres milk in 120 days; twins rare.
2- Management:
Housing:
Housing or sheltering doesn’t affect much in domestic goat rearing. But for commercial goat farming purpose
making a suitable house or shelter for goats is a must. For commercial purpose, you can make a fully concrete
house or concrete structure with adbestos roof. Always ensure a good drainage system and cleaning facilities
inside the house. Ensure sufficient flow of light and fresh air inside the house. Always try to make south faced
house.
Feeding:
Goats are unbelievable creatures. They can eat and digest almost everything eatable which they find in front of
them. But for good production you can feed them home prepared complementary food with regular green foods.
Goats love to eat green foods and leaves. Natural goat food includes tree leaves, leaves of non-legume plans, fresh
legumes, flowering, cereals, grasses, roots, silage, natural roughage, hays, dried leaves, fruits, legume seeds and
43. 43
many types of corns. So grazing plays an important role in health. In NARC the goats graze in the morning till
11:00 AM after that they are served by some more minerals and nutrient elements with their complementary food
in shed.
Breeding:
Breeding is also an important factor for successful goat farming business. Nowadays, most of the farmers are
using artificial breeding process along with natural breeding. For successful breeding, gather enough information
and study as much as possible about goat reproduction.
Select healthy, diseases free fresh goats for reproduction.
Proper care and managements are must for continuous reproduction.
Goats are known as seasonal breeders. August to March is considered as the usual breeding season of goat.
Take extra care to the buck, selected for breeding purpose.
Grazing Place:
Making a pasture or grazing place reduces the food cost and helps to keep your goats healthy. Make a fence
surrounding your farm. This will prevent your goats from other animal and they will not be able to go outside.
Care & Management:
Along with providing all types of facilities (housing, food etc.), your goats also need some special care and
management. Only experienced goat producers can take extra or special care and management for their goats.
Start raising goats and gradually you will learn everything related to goat farming.
Veterinary Facilities:
Availability of proper veterinary service is very essential for livestock farming. Although, goats generally suffers
less by diseases. But, you have to be sure about full availability of veterinary. This will help you if something
goes wrong.
Observations & Record:
Spending a few minutes every day watching your animals is time well spent. You can learn the normal behavior
and attitude of your goats and then can recognize anything that may be wrong. This knowledge is one of the most
important characteristics of a good herder. If abnormal behavior is observed, use common sense, experience,
knowledge, and your physical senses to determine the problem. Don’t overlook the obvious.
A physical exam may show an abscess, cut, or bruise. Ask questions. How is the behavior abnormal? Is the head
down, or are the ears drooping? Is the animal off-feed? Is it sweating or shivering? Is the respiratory rate normal
at 12-20 breaths/minute? Is there a fever? Temperatures range from 101.7-103.5°F, with an average of 102.3°F.
Is the heart rate normal at 70-100 beats/minute? Has this disease occurred previously? Record all observations on
a permanent record. Do you have a record of these same symptoms at another time? Has your veterinarian seen
these diseases in other herds?
44. 44
3- Common Disease & Problems:
Coccidiosis:
A common disease of young kids. Rotating all the kids through one or two pens is not recommended. Older goats
shed coccidia in the manure and infect the pens. As coccidia build up in the pens, infection in kids is increased.
Signs are diarrhea or pasty feces -- sometimes on rump or legs -- loss of condition, general unthriftiness, and poor
growth. Acute cases sometimes result in death with no noticeable symptoms beforehand. For some producers, the
first indication of coccidiosis will be death of kids.
To help prevent coccidiosis in dairy goats, the kids need as little stress as possible. They should be grouped by
size in clean, well-ventilated inside pens or outside portable pens that are moved to clean ground periodically.
Eradication is difficult once the facilities are infected. Coccidiostats added to the water or feed are necessary. A
management control program also includes strict sanitation to minimize the contamination of kids with coccidia
from the manure of adults or infected kids. Chronic coccidiosis is one of the main causes of poor growth in kids.
It is important to keep feed off the ground and keep feed troughs free of manure.
Enterotoxemia:
Also called overeating disease, is common in both kids and adults. Clostridium perfringens type C or D, primarily
type D, can be fatal. It is usually but not always associated with a change in quality and quantity of feed. In
problem herds, vaccination every three to six months may be necessary compared to once yearly in other herds.
Vaccination helps prevent acute death syndrome, but a few vaccinated animals may develop symptoms of the
disease. In young kids, signs are watery diarrhea, depression, wobbly gait, and sometimes convulsions. In acute
cases, kid temperature may reach 105°F, and death usually occurs in four to 48 hours. Milk yield drops abruptly
if the animal is lactating, and death may occur in 24 hours. Contact your veterinarian immediately if you have a
problem, but death may be the first observed symptom. Treatment involves administration of antitoxin and
antibiotics plus treatment of acidosis.
Pneumonia:
It is related respiratory problems are more common in kids but affect all ages of goats. To prevent the disease,
decrease stress on the goats by providing dry, well-ventilated housing with adequate space. Good nutrition,
deworming, and avoiding changes in the environment reduce the incidence of the problem. Vaccination for
specific organisms causing the respiratory problems will help. Work with your veterinarian on both vaccines and
antibiotics as few are approved for use in goats. To treat respiratory diseases, correct the predisposing factors
contributing to the disease and treat with antibiotics. If you treat a lactating goat with antibiotics, be sure to follow
proper milk withdrawal times.
45. 45
Pinkeye or infectious keratoconjunctivitis:
It occurs more often in warm or hot weather because it is spread by flies and close contact. To control the disease,
good sanitation and management, including fly control, are essential. To treat the infected goats, use broad-
spectrum antibiotics and commercially available sprays or powders. If the infection is severe, the goats should be
removed from sunlight or have the eye covered with a patch. Treatment of pinkeye should be prompt since it can
be highly contagious.
Soremouth:
is the most common skin disease of goats and is caused by a virus in the “pox” family. Vaccination for contagious
ecthyma (soremouth) is not recommended unless the disease exists in the herd. The main problems with infected
kids are difficulty in eating and spreading lesions to the does’ udders or the herder. Also, these kids are not allowed
to attend goat shows. A live virus vaccine is used by scarifying the skin -- for example, inside the thighs or under
the tail -- and painting on the vaccine. It is easier to put a drop of vaccine on a hypodermic needle and pierce the
ears. However, the probability of immunization is decreased, and the ear is more likely to be touched by the herder
than areas under the thigh or tail. Lesions may last as long as four weeks. After the scabs have healed, the animals
can go to shows. If the herd is shown extensively, it should be vaccinated. Always be aware that humans,
especially youth, may be infected with soremouth, usually on their arms, hands or face, and exposure to the
vaccine can cause infection.
Diarrheal diseases or scours:
Are more common in young kids. In addition to coccidia, other causes include colibacillus such as Escherichia
coli (E. coli), worms, salmonella, and viruses. Symptoms vary with the cause but, in general, are anorexia, high
temperature, weakness, and watery or pasty feces. Good sanitation, housing, and management are the primary
methods to prevent diarrhea. Treatment includes antibiotics, intestinal astringents (bolus or fluid to decrease
contractions), and fluid and electrolyte therapy.
Individual herds may have a high incidence of specific diseases, such as foot rot, caseous lymphadenitis (CL—
abscesses of lymph nodes, primarily in the head and neck region), caprine arthritis and encephalitis (CAE), or
other infectious diseases. Owners should contact their veterinarian promptly before the disease has a chance to
spread to other animals in the herd. In lactating herds, it is critical to promptly treat mastitis before it spreads to
others in the herd. Additional control measures for mastitis are listed later in this publication.
Each dairy goat herder should have an annual calendar listing approximate times and ages when certain activities
should be performed to maximize profits. This annual calendar should begin with the pregnant doe at 40 to 90
days prior to kidding. The dry period should be considered the beginning of the next lactation. The following
calendar is an example of one arrangement of dairy goat health practices on a farm.
Vaccination Schedule:
Disease To be Vaccinated
Enterotoximia Jan, June – July, Dec
Anthrax Feb, Aug
Goat Pox Sep, March
FMD April, Oct
Pluropneumonia Nov, May
CCPP May, Nov
46. 46
4- AI in Goats:
Equipment Needed to Inseminate Does with Frozen Semen:
1. Speculum (25 x 175 mm for doelings or 25 x 200 mm for does)
2. AI light or headlight
3. Straw tweezers
4. Sterile lubricant (non-spermicidal)
5. Insemination gun (for straws)
6. Breeding stand or facilities to restrain the doe
7. Thaw box
8. Paper towels
9. Straw cutter
10. Thermometer
Semen Thawing and Insemination Procedure:
The first step is to restrain the doe to be inseminated. This can be done with a breeding stand or any other
satisfactory facility. After the doe is restrained, the semen is thawed and the insemination gun is prepared. Frozen
semen should be thawed according to the processor’s recommendations. If these recommendations are not
available, remove the frozen straw from the liquid nitrogen tank with the straw tweezers and place it in a thaw
box filled with warm water (95ºF) for 30 seconds. After thawing, dry the straw thoroughly with a paper towel.
Semen must be kept warm and must not be exposed to sunlight or water during the thawing and inseminating
process to prevent damaging or killing sperm cells. Pull the plunger back 4 to 6 inches on the insemination gun
and place the straw into the gun with the cotton plug toward the plunger. After the straw has been secured in the
gun, the sealed end of the straw must be cut off with the straw cutter. The cover sheath should now be placed over
the insemination gun and secured with an O ring. The next step is the actual insemination process. It may be
necessary to lift the doe’s hindquarters if she will not stand. If working alone, hold the insemination gun in your
mouth, or have an assistant hand the insemination gun to you at the appropriate time. Turn your headlight on.
Lubricate the speculum with a non-spermicidal lubricant. Clean the doe’s vulva with a dry paper towel and insert
the lubricated speculum slowly into the vulva. Insert the speculum at an upward angle to prevent vaginal irritation.
Once the speculum has been inserted, visually locate the cervix. The cervix should have a red-purple color, and
white mucus will be present if the doe is in heat. Center the speculum over the opening of the cervix. Insert the
insemination gun into the speculum and thread it into the opening of the cervix. Use a circular motion and slight
pressure to work the insemination gun through the rings of the cervix. Do not penetrate the cervix more than 1.5
inches. It is a good idea to draw a red ring around the cover sheath of the insemination gun 1.5 inches from the
tip. This mark lets you to know how far you have penetrated the cervix. Deposit the semen slowly by pushing the
plunger forward. Remove the insemination gun slowly and remove the speculum.
47. 47
5- Wool Diameter Identification:
The average diameter of wool fibers is a dominant dimensional characteristic of the material immediately
affecting its value for manufacturing purposes. In the establishment of the Pakistan standards for wool and wool
top, the average diameter of the fibers is the sole basis for the classification. Sets of these standards are in general
use in the wool industry; they define the official scale of quality in country in terms of which the wool grader
gives numerical expression to his results.
A micron (micrometer) is the measurement used to express the diameter of wool fiber. Fine wool fibers have low
micron value. Small samples can be taken from the side or fleece of a sheep and measured using a portable
instrument such as an OFDA (Optical Fiber Diameter Analyzer)
In NARC, The Wool lab works under the small ruminant subunit. Wool diameter identification consists of the
following procedures which are adopted in Wool Lab.
1- Cleaning / Washing of Wool
2- Drying of Wool
3- Measurement through AFDA Machine
1- Cleaning / Washing of Wool:
Securing Unit is used for cleaning and washing of wool. Wool bags are put in a hot water having temperature
60ᵒc with detergent for 3-4 hours. Hand stirrer should be used for proper cleaning of wool. After 3-4 hours drained
the bags and put them in another apartment having same temperature 60ᵒc but has no detergent. Hand Stirrer also
use. Now again bags put in another two apartments having cold water after proper drainage.
48. 48
2- Drying & Separation of Wool:
After washing wool is kept in hot air over for 24 hours for drying at temperature of 60-70ᵒc. After that separation
of the wool filament is done with handmade local spreader machine.
3- Measurement through AFDA Machine:
Measurement of the wool filament through AFDA Machine consists of:
Cutting of filament
Spread the filament’s small parts with the help of AFDA automatic spreading machine
Put the slide under AFDA machine
Measure the filament diameter, density, mean opacity, mean madulation.
49. 49
Wildlife & Poultry:
Poultry farming is the raising of domesticated birds such as chickens, ducks, turkeys and geese for the purpose of
farming meat or eggs for food. Poultry are farmed in great numbers with chickens being the most numerous. More
than 50 billion chickens are raised annually as a source of food. Wildlife & Poultry subunit of ASI consist of 4
Shed, 1 Hatchery, 3 Brooding Rooms, 1 Ostrich Farm, 1 Dispensary and hardworking staff working under the
supervision of Dr. Faisal Ishfaq. Black Puff, Black Naked Neck, Golden Puff, Naked Neck Brown, PARC Hybrid,
Black Astralorp are major breeds present in these sheds.
Program Incharge:
Dr. Farukh Saleem SO
50. 50
Period of Stay:
8Aug- 12 Aug
Practical Topics:
1-General Management
2- Egg placement in Incubator
3- Brooding Room Preparation
4- Flushing of Chicks
5- Vaccination of day old Chicks
1- General Management:
Housing:
The purpose is to protect the birds from dogs, cats, snakes, rats and other pests and thieves and to keep out mice,
rats and birds from eating valuable poultry feed and transmitting disease.
Basic requirements for the building are:
It is rain proof
It protects poultry from direct sunlight
It is not subject to flooding
It is wild bird proof (difficult to do)
It has enough space
It is easy to clean out
It has a solid door with a lock
Floor:
The floor must be flat with no protruding rocks or other objects. It should be covered with suitable litter (sawdust,
wood shavings, dried leaves, dried grass, chopped straw, rice hulls, and coffee hulls, peanut hulls) to absorb
moisture from birds’ droppings and to reduce odor. Wet litter releases ammonia which can affect the bird’s eyes
and respiratory system. Breast blisters and down-grading of the carcass will result. The litter should be raked
weekly and changed after about every two batches of broilers, or each time the layer shed is emptied.
51. 51
Equipment:
Drinkers:
It is essential that birds always have access to clean, fresh water. A simple floor drinker can be made out of a can
or drum inverted in a dish or tray with a hole punched about 2.5 cm above the end of the can. Other kinds of
plastic drinkers can be purchased that can either be suspended from the ceiling, and height above the floor adjusted,
or sitting on the floor.
Feeders:
Laying hens should have a continuous supply of feed. Any
attempt to restrict their feed will give reduced production and a smaller profit. Feed troughs can be made from
local material or made from old 20 litre drums (tube feeder). The feed drops into a feeding tray just below the
drum, as the birds consume their diet. Feeders are either on the floor or suspended from the ceiling and adjusted
according to bird age. Feed troughs can be purchased but they should always have a lid to prevent birds from
entering the bin. Floor feeders need to be filled regularly but should not be over-filled resulting in feed wastage.
Adequate trough space should be provided.
Brooding:
In commercial and semi-commercial production, the young chick needs to be kept warm (brooded) as there is
normally no mother hen to brood them. In countries where the days are hot the chicks need very little (if any)
additional heat except possibly when the temperature drops at night. If there is a supply of electricity 60 or 100
watt bulb can be suspended above the chicks or placed in a can on the floor as practicing in NARC. There are
also special heat lamps.
Huddled up and chirping Too cold
crowding around the edges Too warm
Dispersed evenly within the circle Just right
Feeding:
The object is to include a combination of ingredients in the diet that meets all of the nutrient requirements of
layers and meat chickens at least cost. This requires detailed information of the nutrient composition of each
ingredient and the requirements of poultry for essential nutrients.
General Disease Control Practices:
The following can only be used as guidelines for disease control, for proper disease diagnosis and treatment.
• Don’t overcrowd brooders
• Adequate ventilation
• Feed must be of good quality
52. 52
• Give clean water ad-lib
• Don’t mix young and older birds
• Clean poultry house
• Dispose of dead birds quickly and isolate sick ones
• Provide disinfectant at entrance to house
• NB: Antibiotics should never be used to replace good management
Signs of ill Health
• Dullness
• Reduced feed intake
• Reduced water intake
• Low egg production
• Reduced growth rate
• Rough coat
Record Keeping
It should include:
• Production data e.g. number of eggs produced
• Amount of food eaten
• Health interventions e.g. treatment
• Deaths
• Sales and purchases
2- Egg Placement in Incubator:
In Wildlife and Poultry Subunit digital incubator is used in a room with constant temperature avoiding drafty
areas and direct sunlight. The ideal room temperature is 70ᵒF +/- 3ᵒF for the Still Air Incubator. Incubating unit
has a built in display panel to display the internal temperature, humidity percentage, and count down the days to
hatch. The temperature is set to 37ᵒC-37.5ᵒC, Humidity 55-65 for Chicken baby chicks while for the Ostrich egg
temperature should be 36ᵒC -36.5ᵒC. If below 30ᵒC then due to low humidity Heat shocking of chicks occur.
Eggs should be turned once a day, 45 degrees each way, back and forth through 90º during the storage period.
Insufficient turning can cause the yolk to float and touch membranes near the shell. If the embryo touches, then
it may stick and prevent growth once inside the incubator. The red indicator light will turn on and off frequently
which is normal to control the desired temperature for your egg species.
53. 53
3- Brooding Room Preparation:
Clean the room with disinfectant especially floor then place the chick guards. Now put the bedding material like
Saw dusk, Rice Husk etc. after that place the newspaper on it. A brooder is placed are suspended to keep the chick
warm. If there is a supply of electricity, then 60 or 100 watt bulbs can be suspended above the chicks or placed
on the floor as practicing in NARC. There are also special heat lamps available in market.
4- Flushing of Chicks:
Flushing of Chicks is very important. Molasses, Sugar can be used as flushing with the ratio of 3-5%. Vitamins
like Vit E, D, and Antibiotics can also be used in flushing water. Flushing water should be done when chicks
arrive. Flushing water should be served for 8 hours.
54. 54
5- Vaccination of day old Chicks:
On 10 Aug, 2016 we performed vaccination of Pox of day old chicks with Sanna Dilluent of 30 ml for 1000 doses
through eye drops.
Dairy Technology:
Seamless interaction of dairy production related processes is vital to successful operations. This technology
provides us with complete dairy solutions to meet our production requirements from milk reception to finished
goods, from field level to the ERP level. This breadth of dairy production expertise ensures that your dairy
workflow achieves perfect quality with increased flexibility and at reduced costs.
This subunit of ASI consists of Milk Testing, Dairy Technology, Dairy Chemistry, Dairy Microbiology, Cheese
and Yoghurt Unit and hardworking staff under the supervision of Dr. M. Amin Shah.
Program Incharge:
Dr. M. Amin Shah PSO
55. 55
Period of Stay:
15Aug- 19 Aug
Practical Topics:
1- Plain Cheese Making
2- Plain Yoghurt Making
3- Milk Testing
1- Cheese Making:
Cheese is fermented milk from which a portion of the water and lactose has been removed. In Dairy Technology
lab of ASI plain Cheese is formed.
There are 3 basic steps to making cheese:
Curdling
Draining
Pressing
Once these 3 steps are complete, the cheese has been made! The unique flavor of each type of cheese type is due
to one or more of the following:
The kind of milk used
The method of curdling milk
The method of cutting and forming of the curd
The amount of salt or seasonings added
Cheese Making Made Simple:
• Milk is pasteurised and a bacteriological starter at 42ᵒc is added to ‘sour’ and thicken the milk.
• A renneting agent or Strick acid is added with 10% ratio to the milk to form curds.
• The curd is left to set.
• The curd is milled and salt is added
• The curd is pressed into moulds and pressing mechanism apply for 24 hours to expel out all the water.
56. 56
• Cut the Cheese in desired pieces and pack them after 24 hours.
2- Plain Yogurt Making:
Combine ingredients and heat.
Milk must be heated so that the proteins bind together instead of forming curds and
whey. Do not substitute this heating step for pasteurization. Place cold, pasteurized
milk in the top of a double boiler or in a saucepan and stir in nonfat dry milk powder
for additional solids. (Adding nonfat dry milk to heated milk will cause some milk
proteins to coagulate and form strings.)
a. Add sugar or honey if a sweeter, less tart yogurt is desired.
b. For a thick, firm yogurt soften 1 teaspoon unflavored gelatin in a little milk for 5
minutes. Add this to the milk and nonfat dry milk mixture before cooking.
c. Heat milk to 90°c over low heat, stirring gently. Hold temperature at 80°c to 90°c
for 10 minutes for thinner yogurt or up to 20 minutes for thicker yogurt. Do not boil. If
not using a double boiler, stir constantly to avoid scorching.
Cool and add starter.
Place the top of the double boiler (or saucepan) in cold water to cool milk rapidly to 45°c. Remove one cup of the
warm milk and blend it with the yogurt starter culture in a small bowl. Add this mixture to the rest of the warm
milk. The temperature of the mixture should now be 43°c.
Incubate.
Pour immediately into clean, sterilized, warm container; cover and place in prepared incubator. Close the
incubator and incubate for 3 hours at 43°c (plus or minus 2°c) Yogurt should set firm when the proper acid level
is achieved (pH 4.6). Incubating yogurt for several hours after the yogurt has set will produce more acidity. This
will result in a tarter or acidic flavor and eventually cause the whey to separate.
3- Milk Testing:
1- Lactometer reading Test
2- Milk Fat Test
3- Soda Test
57. 57
4- Starch Test
5- Urea Test
6- Hydrgen Per Oxide (H2O2) Test
7- Formalin Test
8- MBRD Test
1- Lactometer reading Test:
Lactometer, a cylindrical vessel made by blowing a glass tube. One side of
glass tube looks like a bulb with filled by mercury and another site is thin
tube with scaled.
Here below some steps mentioned for milk testing:
# Step 1- Whenever you want to test the milk purity you just put the
lactometer in milk.
# Step 2- If it sinks up to the mark ‘M’ which mentioned at lactometer that
means milk is pure or if not that means milk is impure.
# Step 3- If the milk is mixed in water then it would sink higher then marked
‘M’.
# Step4- If it stands at the mark 3 that means milk is 75% pure and respectively 2 for 50% purity and 1 means
25% purity.
Milk Source LR LR Mean
Buffalo 26-29 27.65
Cow 28-34 30
Goat 27-30 28.65
Sheep 27-29 28.05
Determination of total solids (TS) and Solids-not-fat (SNF) content:
A lactometer is used to measure the specific gravity of milk. Based on the lactometer reading of milk taken under
standard conditions and knowing the fat percentage as determined by the Gerber method, it is possible to calculate
TS and SNF.
% TS = CLR/4 + 1.2 F + 0.14
% SNF= CLR/4+0.2 F + 0.14
Where, CLR = corrected lactometer readings, obtained by applying the specific correction factor to the observed
lactometer readings based on temperature of milk.
2- Milk Fat Test:
Fat test of milk is done for making payment of the milk. Among several methods, one common method is the
acidobutyrometric butterfat test or Gerber test. Fat globule membranes and proteins of the milk are hydrolyzed
with concentrated sulphuric acid to break the emulsion and to set the fat free. The volume of fat from a given
quantity of milk sample is measured in a specially designed glass recipient, known as butyrometer. The
butyrometer reading gives the result directly in fat percentage. For accurate results, the reading has to be taken
quickly to avoid cooling of the fat column.
Procedure:
58. 58
Isolate the fat from milk by Gerber method using specially designed milk butyrometer, which is open at both ends.
Close the stem side opening with a good quality acid resistant silicon stopper. Add 10 ml of Gerber sulphuric
acid, 11 ml milk and 1 ml iso-amyl alcohol. Close the neck side with lock stopper; mix the content and centrifuge
at 1200 rpm, 15 min to get a clear fat column. After 15 minutes check the Fat Colum.
3- Soda Test:
Take 2 ml milk sample in a test tube and add 2 ml rosalic acid solution. Mix the contents. If alkali is present in
milk, a rose red colour appears whereas pure milk shows only orange colour.
4- Starch Test:
20 g of potassium iodide and dissolve it in distilled water to obtain a 100
ml solution. Take 1 g starch powder and dissolve it in distilled water by
heating and make up the volume to 100 ml. Mix equal volumes of 20%
potassium iodide solution and 1% starch solution.
Procedure:
Take 1 ml of milk sample in a test tube. Add 1 ml of the potassium iodide-
starch reagent and mix well. Observe the color of the solution in the tube.
Blue color will have developed in the presence of H2O2, whereas pure
milk sample remain white in color.
5- Urea Test:
Urea is a natural constituent of milk and it forms a major part of the non-
protein nitrogen of milk. Urea concentration in milk is variable within
herd. Urea content in natural milk varies from 20 mg/100 ml to 70 mg/100
ml. However, urea content above 70 mg/100 ml in milk indicates milk
containing ‘added urea’. The addition of urea to milk can be detected by
using para-dimethyl amino benzaldehyde (DMAB).
59. 59
Procedure:
Mix 1 ml of milk with 1 ml of 1.6% DMAB reagent. Distinct yellow colour is observed in milk containing added
urea. The control (normal milk) shows a slight yellow colour due to presence of natural urea. The limit of detection
of method is 0.2%.
6- Hydrogen Per Oxide (H2O2) Test:
For the detection of Hydrogen Per Oxide, commercial strips are used like Per Oxide 100 which are easily available
in local markets.
Procedure:
Take a strip and dip it into the milk. Wait for a while and then compare the colour of strips with the colour present
on the bottle.
7- Formalin Test:
Procedure:
Take milk sample (2 ml) in a test tube and add 2 ml of 90 percent H2SO4 containing traces of ferric chloride from
the side of the test tube slowly. Formation of purple ring at the junction indicates formaldehyde is present in milk.
If sucrose is present, distil the milk sample (25 ml) and then carry out the test on the distillate by taking 2-3 ml of
distillate and adding 2 ml of formaldehyde free milk. The violet coloration does not appear usually when relatively
large quantities of formaldehyde are present.
Precaution: If H2SO4 is added from the top and not from the side of the test tube, it may burn the milk solids and
affect the end result.
8- MBRD Test:
Microbiological tests provide information on the sanitary condition and keeping quality of milk. The tests are
intended to be carried out on samples collected for microbiological analysis. Microbiological standards for cow
milk have been presented in below Table.
60. 60
Methylene blue and Resazurin reduction tests measure the bio-chemical activity of microorganisms in milk. They
get reduced, if added to milk, after a certain time and lose their colour. Quick reduction of a given quantity of dye
means high microbiological activity and vice versa.
NRLPD (National References Lab for Poultry Diseases) Section:
This Subunit of ASI is specific for the poultry disease where different Bacteriology, Virology, Washing and
Sterilization labs are there. PCR, Virus Inoculation & Harvesting, Staining, Biotechnology Lab, Bacterial growth
on different agers to identify the bacteria and other important tests like API, Antibody sensitivity tests also
perform here.
Program Incharge:
Dr. Naila Siddique SSO
Period of Stay:
22 Aug- 26 Aug
Practical Topics Topics:
1- Washing & Sterilization
2- Postmortem of Poultry Birds
3- Tissue Processing of Poultry Samples
4- Gram Staining
5- Ager Preparation
6- Bacterial Culture
7- API Test
8- Antibody Sensitivity Test
9- Inoculation & Harvesting of Embryonated Egg
10- PCR
1- Washing & Sterilization:
The process by which lab equipment are made free from germs is known as sterilization.
There are following two methods:
Physical Method
Procedures:
Autoclave:
In this equipment we sterilize the media’s. This procedure is done at 121ᵒc 15-pound pressure for 15 mints.
Aluminum foil is used in wrapping of steel ware.
Hot Air Oven:
In this equipment the glass ware is (wrapped in paper sheet) are sterilized at 175ᵒc for 2hrs.
61. 61
2- Postmortem of Poultry Birds:
Post mortem examinations on birds that die give useful information of the disease status of the whole flock and
may prevent others from dying. It is important that the sample that you send us is representative of the whole
flock. If the problem is mortality, then dead birds is the best sample. If the problem is culled birds, then these are
the ones that need to be sent for examination.
Postmortem Techniques:
External examination of bird
Preparation of the carcase and opening of the coelomic cavity
Removing the internal organs
Examination and inspection of the internal organs
Examination of the head: evaluation of the nasal cavity and the brain
Examination of the locomotor apparatus
Evaluation of nerves, joints, bones and muscles
62. 62
3- Tissue Processing of Poultry Samples:
Took sample, cut it then put in plastic bag and added PBS, and then placed in Stomacher machine for 2 minutes
The centrifuged the sample that is in plastic bag
After centrifgation, separated the super ants and then filtered
Added antibiotic in it.
Kept at room temperature for 15 minutes
Inoculated in the eggs and kept in the incubator
4- Gram Staining:
Equipment:
Bunsen burner, alcohol-cleaned microscope slide, water
Reagents:
Crystal violet, Gram's iodine solution, acetone/ethanol (50:50), 0.1% basic fuchsine solution
1. Prepare Slide Smear:
A. Transfer a drop of the suspended culture to be examined on a slide with an inoculation loop. If the culture is
to be taken from a Petri dish or a slant culture tube, first add a drop or a few loop full of water on the slide and
aseptically transfer a minute amount of a colony from the Petri dish. Note that only a very small amount of culture
is needed; a visual detection of the culture on an inoculation loop already indicates that too much is taken. If
staining a clinical specimen, smear a very thin layer onto the slide, using a wooden stick. Do not use a cotton
swab, if at all possible, as the cotton fibres may appear as artefacts. The smear should
be thin enough to dry completely within a few seconds. Stain does not penetrate thickly applied specimens,
making interpretation very difficult.
B. Spread the culture with an inoculation loop to an even thin film over a circle of 1.5 cm in diameter,
approximately the size of a dime. Thus, a typical slide can simultaneously accommodate 3 to 4 small smears if
more than one culture is to be examined.
C. Air-dry the culture and fix it or over a gentle flame, while moving the slide in a circular fashion to avoid
localized overheating. The applied heat helps the cell adhesion on the glass slide to make possible the subsequent
rinsing of the smear with water without a significant loss of the culture. Heat can also be applied to facilitate
drying the smear. However, ring patterns can form if heating is not uniform, e.g. taking the slide in and out of the
flame.
D. Add crystal violet stain over the fixed culture. Let stand for 10 to 60 seconds; for thinly prepared slides, it is
usually acceptable to pour the stain on and off immediately. Pour off the stain and gently rinse the excess stain
with a stream of water from a faucet or a plastic water bottle. Note that the objective of this step is to wash off
the stain, not the fixed culture.
E. Add the iodine solution on the smear, enough to cover the fixed culture. Let stand for 10 to 60 seconds. Pour
off the iodine solution and rinse the slide with running water. Shake off the excess water from the surface.
F. Add a few drops of decolourizer so the solution trickles down the slide. Rinse it off with water after 5 seconds.
The exact time to stop is when the solvent is no longer coloured as it flows over the slide. Further delay will cause
excess decolourisation in the gram-positive cells, and the purpose of staining will be defeated.
G. Counter stain with basic fuchsine solution for 40 to 60 seconds. Wash off the solution with water. Blot with
bibulous paper to remove the excess water. Alternatively, the slide may shake to remove most of the water and
air-dried.
64. 63
5- Agar Preparation:
Agar is used for the cultivation of microbes supporting growth of a wide range of non-fastidious organisms. Agar
is a gelling agent extracted from red seaweed. Nutrient agar is a commonly used food medium for microbial
cultures. It is popular because it can grow a variety of types of bacteria and fungi, and contains many nutrients
needed for the bacterial growth.
Nutrient agar contains:
Beef extract (provides carbohydrates, nitrogen, vitamins, salts)
Peptone (helps control pH)
Agar (a carbohydrate used as a solidifying agent)
Distilled water (an agent for distributing food materials to growing colonies of micro-organisms)
Types of Agar:
Following Agars are mostly use in Labs
Name of Agar Description
Blood Agar Most commonly used medium. 5-10% defibrinated sheep or horse blood is added
MacConkey Agar Most commonly used for enterobac-teriaceae.
Nutrient Agar Will grow the largest number of different types of microbes
EMB Is a selective stain for Gram-negative bacteria.
BGA Recommended for the selective enrichment of Salmonella spp
Protocol for Agar Preparation:
Weigh out the desire agar according to the prescribed quantity for desire volume.
Swirl to mix - the contents do not have to be completely in solution, but any powder left on the sides of the
flask will caramelize on the glass during autoclaving.
Cover the top of the flask with aluminum foil and label with autoclave tape.
Autoclave on the liquid setting for 20 minutes or according to your autoclave's specifications.
After removing the solution from the autoclave, allow the agar solution to cool to 55°C.
Note: This can be done by placing the flask in a 55°C oven or water bath, as this will hold the temperature and it
can be left unattended for some time.
When pouring plates, keep your bench area sterile by working near a flame or bunsen burner.
Pour ~20mL of agar per 10cm polystyrene Petri dish.
Note: Pour slowly from the flask into the center of the petri dish. When the agar has spread to cover about 2/3 of
the dish stop pouring and the agar should spread to cover the entire plate. You may need to tilt the plate slightly
to get the agar to spread out completely. If you pour in too much, the plate will be fine, but it will reduce the
number of plates you can make per batch.
65. 64
Place the lids on the plates and allow them to cool for 30-60 minutes (until solidified), then invert the plates.
Let sit for several more hours or overnight.
Label the bottom of plates with antibiotic and date and store in plastic bags or sealed with parafilm at 4°C.
6- Bacteria Culture:
A microbiological culture, or microbial culture, is a method of multiplying microbial organisms by letting them
reproduce in predetermined culture media under controlled laboratory conditions. Microbial cultures are used to
determine the type of organism, its abundance in the sample being tested, or both. It is one of the primary
diagnostic methods of microbiology and used as a tool to determine the cause of infectious disease by letting the
agent multiply in a predetermined medium.
Protocol:
1) Direct contact:
This is when bacteria are transferred to the petri dish using direct contact, i.e. touching the agar. One of the most
common ways of doing this is to simply press your fingertip (either before or after washing your hands) lightly
onto the surface of the agar. However, you could also try pressing a fingernail or the surface of an old coin into
the agar, or even placing a small hair or drop of milk into the dish. Use your imagination!
Sample collection:
With this method, you can collect bacteria from almost any surface and transfer it to the petri dish, all you need
are some clean cotton swabs. Simply grab a swab and swipe it over of any surface you can think of - the inside
of your mouth, a door handle, the keys on your computer keyboard or the buttons of your remote control - then
use it streak the surface of the agar (without tearing it). These places harbor a lot of bacteria, and should provide
some interesting (and disgusting) results in a couple days’ time.
2) Label and seal the petri dishes:
Once you have introduced the bacteria, you should replace the lid on the petri dish and seal it with some tape.
3) Place the petri dishes in a warm, dark place:
66. 65
Leave the petri dishes in a warm, dark place where the bacteria can develop, undisturbed, for several days.
Remember to store the dishes upside down, so the bacterial growth remains undisturbed by any water droplets.
7- API (Analytical Profile Index) Test:
Protocol:
The API 20e is a standardized identification system for Enterobacteriaceae and other non-fastidious, Gram
negative rods.
• The API 20e strip consists of 20 micro tubes (each one of micro tubes have cupule, and a small tube ) containing
dehydrated substrates.
• These tests are inoculated with a bacterial suspension that reconstitutes the media.
• During incubation, metabolism produces color changes that are either spontaneous or revealed by the addition
of reagents.
• The reactions are read according to the reading table and the identification is obtained by referring to the
Analytical Profile Index or using the identification software.
• Create anaerobiosis in the tests ADH, LDC, ODC, H2S and URE. by overlaying with mineral oil.
• Close the incubation box. Incubate at 36°C ± 2°C for 18-24 hours.
Results:
• The nitrates still present in the tube have been reduced by the Zinc.
• This reaction is useful when testing Gram-negative, oxidase positive rods.
8- Antibody Sensitivity Test:
Protocol:
Disk diffusion method is probably the most widely used method for determining antimicrobial resistance in
private veterinary clinics. A growth medium is first evenly seeded throughout the plate with the isolate of interest
that has been diluted at a standard concentration (approximately 1 to 2 x 10⁸ colony forming units per ml).
Commercially prepared disks, each of which are pre-impregnated with a standard concentration of a particular
antibiotic, are then evenly dispensed and lightly pressed onto the agar surface. The test antibiotic immediately
begins to diffuse outward from the disks, creating a gradient of antibiotic concentration in the agar such that the
highest concentration is found close to the disk with decreasing concentrations further away from the disk. After
67. 66
an overnight incubation, the bacterial growth around each disc is
observed. If the test isolate is susceptible to a particular antibiotic, a clear
area of “no growth” will be observed around that particular disk. The
zone around an antibiotic disk that has no growth is referred to as the zone
of inhibition since this approximates the minimum antibiotic
concentration sufficient to prevent growth of the test isolate. This zone is
then measured in mm and compared to a standard interpretation chart used
to categorize the isolate as susceptible, intermediately susceptible or
resistant. MIC measurement cannot be determined from this qualitative
test, which simply classifies the isolate as susceptible, intermediate or
resistant.
9- Inoculation & Harvesting of Embryonated Egg:
1
• Candling & viability of eggs
2
• Wiped top of eggs with 70 % ethanol
3
• Injected 0.1-0.2 ml specimen in eggs (CAM)
4
• Incubated at 37 degree Celsius for 2-5 days
5
• Candling every day to check viability of embryo
6
• Harvested chorio-allantoic fluid
7
• Centrifuged harvested fluid at 2000 rpm for 5 min
8
• HA test for confirmation of presence of hemagglutination virus