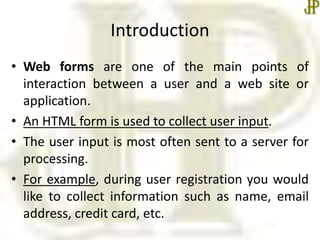
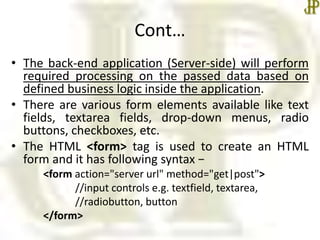
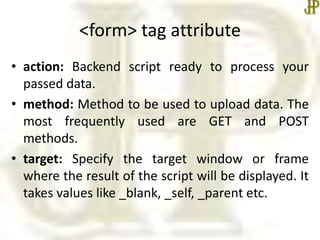
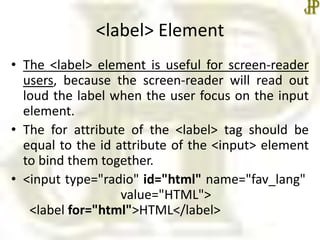
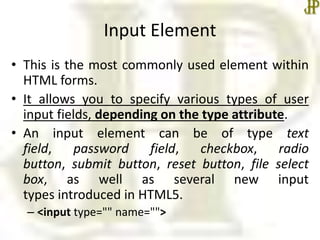
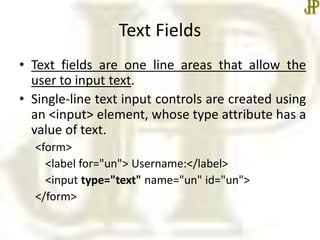
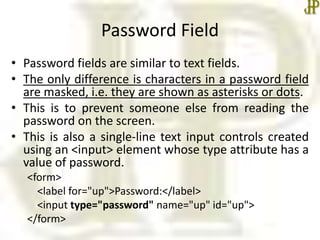
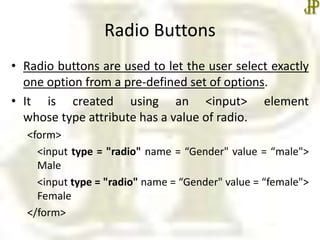
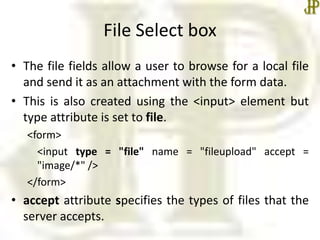
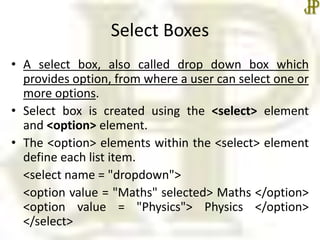
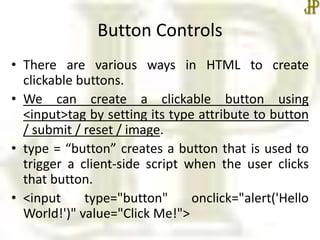
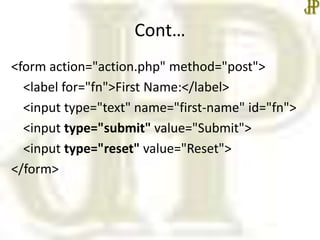
COMPUTER APPLICATIONS
CLASS X (Code 165)
TOPIC:
UNIT 2: HTML Forms
By
HIMANSHU PATHAK
Contents
• Introduction
• HTML Form Tag
• Form Elements
Introduction
• Web forms are one of the main points of
interaction between a user and a web site or
application.
• An HTML form is used to collect user input.
• The user input is most often sent to a server for
processing.
• For example, during user registration you would
like to collect information such as name, email
address, credit card, etc.
Cont…
• The back-end application (Server-side) will perform
required processing on the passed data based on
defined business logic inside the application.
• There are various form elements available like text
fields, textarea fields, drop-down menus, radio
buttons, checkboxes, etc.
• The HTML <form> tag is used to create an HTML
form and it has following syntax −
<form action="server url" method="get|post">
//input controls e.g. textfield, textarea,
//radiobutton, button
</form>
<form> tag attribute
• action: Backend script ready to process your
passed data.
• method: Method to be used to upload data. The
most frequently used are GET and POST
methods.
• target: Specify the target window or frame
where the result of the script will be displayed. It
takes values like _blank, _self, _parent etc.
<label> Element
• The <label> element is useful for screen-reader
users, because the screen-reader will read out
loud the label when the user focus on the input
element.
• The for attribute of the <label> tag should be
equal to the id attribute of the <input> element
to bind them together.
• <input type="radio" id="html" name="fav_lang"
value="HTML">
<label for="html">HTML</label>
Input Element
• This is the most commonly used element within
HTML forms.
• It allows you to specify various types of user
input fields, depending on the type attribute.
• An input element can be of type text
field, password field, checkbox, radio
button, submit button, reset button, file select
box, as well as several new input
types introduced in HTML5.
– <input type="" name="">
Text Fields
• Text fields are one line areas that allow the
user to input text.
• Single-line text input controls are created using
an <input> element, whose type attribute has a
value of text.
<form>
<label for="un"> Username:</label>
<input type="text" name="un" id="un">
</form>
Password Field
• Password fields are similar to text fields.
• The only difference is characters in a password field
are masked, i.e. they are shown as asterisks or dots.
• This is to prevent someone else from reading the
password on the screen.
• This is also a single-line text input controls created
using an <input> element whose type attribute has a
value of password.
<form>
<label for="up">Password:</label>
<input type="password" name="up" id="up">
</form>
Radio Buttons
• Radio buttons are used to let the user select exactly
one option from a pre-defined set of options.
• It is created using an <input> element
whose type attribute has a value of radio.
<form>
<input type = "radio" name = “Gender" value = “male">
Male
<input type = "radio" name = “Gender" value = “female">
Female
</form>
Checkboxes
• Checkboxes allows the user to select one or more
option from a pre-defined set of options.
• It is created using an <input> element
whose type attribute has a value of checkbox.
• Set to checked if you want to select it by default.
<form>
<input type = "checkbox" name = “sports"> Cricket
<input type = "checkbox" name = “sports"> Tennis
<input type = "checkbox" name = “sports"> Chess
</form>
File Select box
• The file fields allow a user to browse for a local file
and send it as an attachment with the form data.
• This is also created using the <input> element but
type attribute is set to file.
<form>
<input type = "file" name = "fileupload" accept =
"image/*" />
</form>
• accept attribute specifies the types of files that the
server accepts.
Textarea
• Textarea is a multiple-line text input control that
allows a user to enter more than one line of text.
• Multi-line text input controls are created using
an <textarea> element.
<form>
Description : <br>
<textarea rows = "5" cols = "50" name = "description">
Enter description here...
</textarea>
</form>
Select Boxes
• A select box, also called drop down box which
provides option, from where a user can select one or
more options.
• Select box is created using the <select> element
and <option> element.
• The <option> elements within the <select> element
define each list item.
<select name = "dropdown">
<option value = "Maths" selected> Maths </option>
<option value = "Physics"> Physics </option>
</select>
Button Controls
• There are various ways in HTML to create
clickable buttons.
• We can create a clickable button using
<input>tag by setting its type attribute to button
/ submit / reset / image.
• type = “button” creates a button that is used to
trigger a client-side script when the user clicks
that button.
• <input type="button" onclick="alert('Hello
World!')" value="Click Me!">
Submit & Reset Button
• A submit button is used to send the form data to
a web server.
• When submit button is clicked the form data is
sent to the file specified in the
form's action attribute to process the submitted
data.
• A reset button resets all the forms control to
default values.
Cont…
<form action="action.php" method="post">
<label for="fn">First Name:</label>
<input type="text" name="first-name" id="fn">
<input type="submit" value="Submit">
<input type="reset" value="Reset">
</form>
Summary
• HTML Forms & their various elements
• In the next class, we will start Unit II – Embed
Multimedia in detail.
•Thanks

Html forms

  • 1.
    COMPUTER APPLICATIONS CLASS X(Code 165) TOPIC: UNIT 2: HTML Forms By HIMANSHU PATHAK
  • 2.
    Contents • Introduction • HTMLForm Tag • Form Elements
  • 3.
    Introduction • Web formsare one of the main points of interaction between a user and a web site or application. • An HTML form is used to collect user input. • The user input is most often sent to a server for processing. • For example, during user registration you would like to collect information such as name, email address, credit card, etc.
  • 4.
    Cont… • The back-endapplication (Server-side) will perform required processing on the passed data based on defined business logic inside the application. • There are various form elements available like text fields, textarea fields, drop-down menus, radio buttons, checkboxes, etc. • The HTML <form> tag is used to create an HTML form and it has following syntax − <form action="server url" method="get|post"> //input controls e.g. textfield, textarea, //radiobutton, button </form>
  • 5.
    <form> tag attribute •action: Backend script ready to process your passed data. • method: Method to be used to upload data. The most frequently used are GET and POST methods. • target: Specify the target window or frame where the result of the script will be displayed. It takes values like _blank, _self, _parent etc.
  • 6.
    <label> Element • The<label> element is useful for screen-reader users, because the screen-reader will read out loud the label when the user focus on the input element. • The for attribute of the <label> tag should be equal to the id attribute of the <input> element to bind them together. • <input type="radio" id="html" name="fav_lang" value="HTML"> <label for="html">HTML</label>
  • 7.
    Input Element • Thisis the most commonly used element within HTML forms. • It allows you to specify various types of user input fields, depending on the type attribute. • An input element can be of type text field, password field, checkbox, radio button, submit button, reset button, file select box, as well as several new input types introduced in HTML5. – <input type="" name="">
  • 8.
    Text Fields • Textfields are one line areas that allow the user to input text. • Single-line text input controls are created using an <input> element, whose type attribute has a value of text. <form> <label for="un"> Username:</label> <input type="text" name="un" id="un"> </form>
  • 9.
    Password Field • Passwordfields are similar to text fields. • The only difference is characters in a password field are masked, i.e. they are shown as asterisks or dots. • This is to prevent someone else from reading the password on the screen. • This is also a single-line text input controls created using an <input> element whose type attribute has a value of password. <form> <label for="up">Password:</label> <input type="password" name="up" id="up"> </form>
  • 10.
    Radio Buttons • Radiobuttons are used to let the user select exactly one option from a pre-defined set of options. • It is created using an <input> element whose type attribute has a value of radio. <form> <input type = "radio" name = “Gender" value = “male"> Male <input type = "radio" name = “Gender" value = “female"> Female </form>
  • 11.
    Checkboxes • Checkboxes allowsthe user to select one or more option from a pre-defined set of options. • It is created using an <input> element whose type attribute has a value of checkbox. • Set to checked if you want to select it by default. <form> <input type = "checkbox" name = “sports"> Cricket <input type = "checkbox" name = “sports"> Tennis <input type = "checkbox" name = “sports"> Chess </form>
  • 12.
    File Select box •The file fields allow a user to browse for a local file and send it as an attachment with the form data. • This is also created using the <input> element but type attribute is set to file. <form> <input type = "file" name = "fileupload" accept = "image/*" /> </form> • accept attribute specifies the types of files that the server accepts.
  • 13.
    Textarea • Textarea isa multiple-line text input control that allows a user to enter more than one line of text. • Multi-line text input controls are created using an <textarea> element. <form> Description : <br> <textarea rows = "5" cols = "50" name = "description"> Enter description here... </textarea> </form>
  • 14.
    Select Boxes • Aselect box, also called drop down box which provides option, from where a user can select one or more options. • Select box is created using the <select> element and <option> element. • The <option> elements within the <select> element define each list item. <select name = "dropdown"> <option value = "Maths" selected> Maths </option> <option value = "Physics"> Physics </option> </select>
  • 15.
    Button Controls • Thereare various ways in HTML to create clickable buttons. • We can create a clickable button using <input>tag by setting its type attribute to button / submit / reset / image. • type = “button” creates a button that is used to trigger a client-side script when the user clicks that button. • <input type="button" onclick="alert('Hello World!')" value="Click Me!">
  • 16.
    Submit & ResetButton • A submit button is used to send the form data to a web server. • When submit button is clicked the form data is sent to the file specified in the form's action attribute to process the submitted data. • A reset button resets all the forms control to default values.
  • 17.
    Cont… <form action="action.php" method="post"> <labelfor="fn">First Name:</label> <input type="text" name="first-name" id="fn"> <input type="submit" value="Submit"> <input type="reset" value="Reset"> </form>
  • 18.
    Summary • HTML Forms& their various elements • In the next class, we will start Unit II – Embed Multimedia in detail. •Thanks