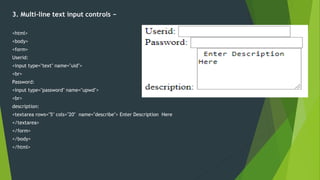
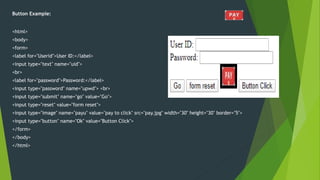
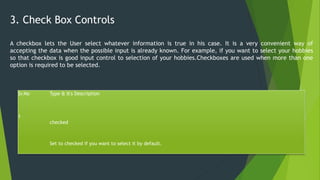
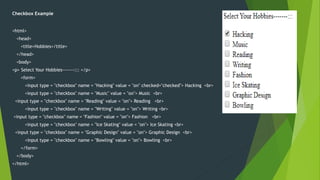
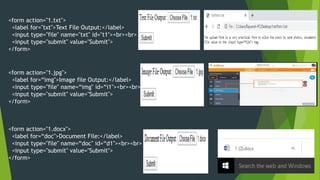
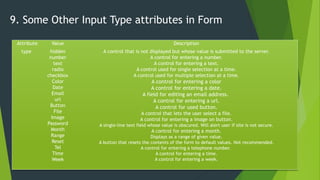
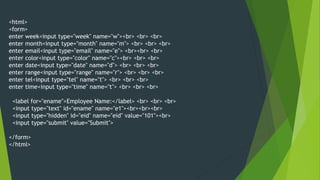
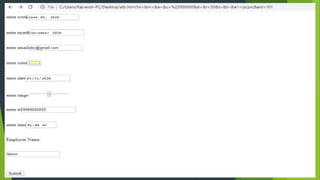
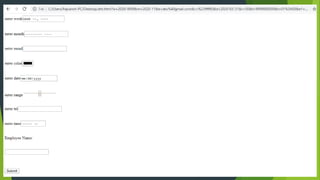
HTML Form Controls
OBJECTIVES
 To understand the concept of Form in HTML.
 To understand about different controls in Form.
 To understand about the different attributes of form in HTML.
 To understand about the form tag which is used in HTML.
HTML Form
An HTML form is a section of a document containing normal
content, markup, special elements called controls (checkboxes,
radio buttons, menus, textarea ,text etc.), and labels on those
controls. Users generally "complete" a form by modifying its
controls (entering text, selecting menu items, etc.), before
submitting the form to an agent for processing (e.g., to a Web
server, to a mail server, etc.).
Attributes of Form
Form Attributes Description
action Backend script ready to process your passed data.
method Method to be used to upload data. The most frequently used are GET and POST methods.
target Specify the target window or form where the result of the script will be displayed. It takes values
like _blank, _self, _parent etc.
HTML Form Controls
There are different types of form controls that you can use to collect data using HTML form
−:
1. Text Input Controls
2. Submit Button/ Clickable Buttons Controls( image button)
3. Checkboxes Controls
4. Radio Box Controls
5. Drop-down list or select controls
6. Field set / Grouping Form Controls
7. HTML output Tag
8. File upload controls
9. Some Other Input Type attributes in Form
1. Text Input Controls
Input text controls are used to collect User data as a free text. On the web page, it will form a
rectangle box where Users can input the data. There are different types of input text controls that
can be used in the HTML forms. There are three types of text input used on forms −
1. Single-line text input controls − This control is used for items that require only one line of
user input, such as search boxes or names. They are created using HTML <input> tag. This allows the
user to enter only a single line of data. A typical example of such input text controls is for entering
the name, search box, city, etc.
2. Password input controls − This is also a single-line text input but it masks the character as soon
as a user enters it. They are also created using HTMl <input> tag. As the name suggests this is typically
used for the password field. This works in the same way as the input text field but the text gets
masked for safety purposes.
3. Multi-line text input controls − This is used when the user is required to give details that may
be longer than a single sentence. Multi-line input controls are created using HTML <textarea> tag.
This input control type allows the user to enter data of multiple lines. Typical usage of such input
controls is for comments, addresses, description and so on.
Attributes of Text Input
Sr.No Attribute & It's Description
1type (Common for all controls)
Indicates the type of input control and for text input control it will be set to text.
2name (Common for all controls)
Used to give a name to the control which is sent to the server to be recognized and get the
value.
3value (Common for all controls)
This can be used to provide an initial value inside the control.
4size (Common for Text, Password and Text area)
Allows to specify the width of the text-input control in terms of characters.
5maxlength (Common for Text, Password and Text area)
Allows to specify the maximum number of characters a user can enter into the text box.
6rows (Use for Multiline Controls)
Indicates the number of rows of text area box.
7cols (Use for Multiline Controls)
Indicates the number of columns of text area box
1. Single-line text input controls −
<html>
<body>
<form>
Userid:
<input type="text" name="uid">
<br>
Password:
<input type="text" name="upwd">
</form>
</body>
</html>
2. Password input controls −
<html>
<body>
<form>
Userid:
<input type="text" name="uid">
<br>
Password:
<input type="password" name="upwd">
</form>
</body>
</html>
3. Multi-line text input controls −
<html>
<body>
<form>
Userid:
<input type="text" name="uid">
<br>
Password:
<input type="password" name="upwd">
<br>
description:
<textarea rows="5" cols="20" name="describe"> Enter Description Here
</textarea>
</form>
</body>
</html>
2. Button Input Controls
A submit button is used to send the form data to a web server. When submit button is clicked the form data is
sent to the file specified in the form's action attribute to process the submitted data. A reset button resets all
the forms control to default values.
Sr.No Type & It's Description
1submit
Form submit buttons usually send the form data to the script that was specified in the action attribute of the form tag.
2reset
The reset button type is used to reset the contents of the form to their original values. This means that each form field will change
back to the value it had when the form loaded – either null (empty), or the default value set with the value attribute.
3button
This creates a button that is used to trigger a client-side script when the user clicks that button.
4image
This creates a clickable button but we can use an image as background of the button. It is use some other attributes like:
src -: this attributes used to set an image on button.
width -: set the width of image.
height -: set the height of image.
border -: set the border of image.
align -: set the alignment of image button.
hspace -: set hspace of image.
vspace -: set vspace of image.
Button Example:
<html>
<body>
<form>
<label for="Userid">User ID:</label>
<input type="text" name="uid">
<br>
<label for="password">Password:</label>
<input type="password" name="upwd"> <br>
<input type="submit" name="go" value="Go">
<input type="reset" value="form reset">
<input type="image" name="payu" value="pay to click" src="pay.jpg" width="30" height="30" border="5">
<input type="button" name="Ok" value="Button Click">
</form>
</body>
</html>
3. Check Box Controls
Sr.No Type & It's Description
1
checked
Set to checked if you want to select it by default.
A checkbox lets the User select whatever information is true in his case. It is a very convenient way of
accepting the data when the possible input is already known. For example, if you want to select your hobbies
so that checkbox is good input control to selection of your hobbies.Checkboxes are used when more than one
option is required to be selected.
Checkbox Example
<html>
<head>
<title>Hobbies</title>
</head>
<body>
<p> Select Your Hobbies-------::: </p>
<form>
<input type = "checkbox" name = "Hacking" value = "on" checked="checked"> Hacking <br>
<input type = "checkbox" name = "Music" value = "on"> Music <br>
<input type = "checkbox" name = "Reading" value = "on"> Reading <br>
<input type = "checkbox" name = "Writing" value = "on"> Writing <br>
<input type = "checkbox" name = "Fashion" value = "on"> Fashion <br>
<input type = "checkbox" name = "Ice Skating" value = "on"> Ice Skating <br>
<input type = "checkbox" name = "Graphic Design" value = "on"> Graphic Design <br>
<input type = "checkbox" name = "Bowling" value = "on"> Bowling <br>
</form>
</body>
</html>
4. Radio Button Controls
Sr.No Type & It's Description
1
checked
Set to checked if you want to select it by default.
Radio buttons are used when you expect Users to fill data as a Boolean value or you expect only one input as
true out of multiple options. Some common use case of radio buttons is gender determination which is male or
female and employee type (Regular / Adhoc / Visiting) and so on. Radio buttons are used when out of many
options, just one option is required to be selected.
RadioButton Example
<html>
<head>
<title>Hobbie</title>
</head>
<body>
<form>
<p> Gender </p>
<input type = "radio" name = "gender" id="male"> male <br>
<input type = "radio" name = "gender" id="female"> female <br>
<p> Employee Type </p>
<input type = "radio" name = "type" value = "r1"> Regular <br>
<input type = "radio" name = "type" value = "ad"> Adhoc <br>
<input type = "radio" name = "type" value = "vi"> Visting <br>
</form>
</body>
</html>
5. Drop Down List
A drop-down list (abbreviated drop-down; also known as a drop-down menu, drop menu, pull-down list, pick
list) is a graphical control element, similar to a list box, that allows the user to choose one value from a list.
When a drop-down list is inactive, it displays a single value.
Attribute Value Description
id Select id Defines which form the drop-down list belongs to
multiple multiple The HTML <select> multiple attribute is a Boolean Attribute. It specifies that the
user is allowed to select more than one value that presents in <select> element.
name name Defines a name for the drop-down list
required required Specifies that the user is required to select a value before submitting the form
number number Defines the number of visible options in a drop-down list
Drop Down List Example
<html>
<body>
<h1> Drop Down List Example </h1>
<p>Drop Down List is create a list</p>
<label for=“state">Select State:</label>
<select id=“state">
<option value=“UP">UP</option>
<option value=“MP">MP</option>
<option value=“Delhi">Delhi</option>
<option value=“Chhattisgarh"> Chhattisgarh </option>
</select>
</body>
</html>
6. Field Set
The <fieldset> tag in HTML5 is used to make a group of related elements in the form and it creates the box
over the elements. The <fieldset> tag is new in HTML5. The HTML <fieldset> tag is found within the <form>
tag and is used to group related elements in an HTML form. Use a <legend> tag to create a caption for the
<fieldset>.This tag is also commonly referred to as the <fieldset> element.
Attribute Value Description
align left
right
center
top
bottom
Deprecated − Specifies the content alignment.
disabled disabled Specifies that a group of related form elements should be disabled.
form form_id Specifies forms which belongs to fieldset.
name text Specifies a name for fieldset.
Field Set
<html>
<head>
<title>Field Set Tag used as a group box or box</title>
</head>
<body>
<form>
<fieldset>
<legend>Employee Information</legend>
Employee id: <input type = "text" name="eid"><br>
Employee Name:<input type = "text" name="ename"><br>
Eage:<input type = "text" name = "eage"> <br>
Esite:<input type = "url" name = "esite">
</fieldset>
</form>
</body>
</html>
7. HTML output Tag
The <output> tag is one of the HTML5 elements. It defines a place for representing the result of a
calculation performed by a script or user’s interaction with a form element (<form> tag). The <output> tag
is designed for complex calculations, new tag in HTML 5 and it requires a starting and end tag.
Attribute Description
for This attribute contains an attribute value element_id which is used to specify the relation between result
and calculations.
form This attribute contains an attribute value form_id which is used to specify the one or more forms of output
elements.
name This attribute contains an attribute value name which is used to specify the name of output element.
Oninput This attributes is used to store input value of form controls.
Output Tag:
<html>
<form
oninput="sum1.value=parseInt(t1.value)+parseInt(t2.value)+parseInt(t3.value)+parseInt(t4.value)+parseInt
(t5.value)">
<label for="Marks"> Enter Hindi Marks </label><br>
<input type="number" name="t1" value=""><br>
<label for="Marks"> Enter English Marks </label><br>
<input type="number" name="t2" value=""><br>
<label for="Marks"> Enter Chemistry Marks </label><br>
<input type="number" name="t3" value=""><br>
<label for="Marks"> Enter Physics Marks </label><br>
<input type="number" name="t4" value=""><br>
<label for="Marks"> Enter History Marks </label><br>
<input type="number" name="t5" value=""><br><br>
Sum of Five Subject Marks:<output name="sum1"></output> <br>
</form>
</html>
1. Input type Color
8. File upload controls
The upload form is a very practical form to allow the users to send photos, documents or any other kind of
files to the server.To create an upload form we will only have to establish the file value to the <input
type=“file"> tag.
Attribute Description
Type Mention attributes type means it is file ,text,number etc.
<form action="1.txt">
<label for="txt">Text File Output:</label>
<input type="file" name="txt" id="t1"><br><br>
<input type="submit" value="Submit">
</form>
<form action="1.jpg">
<label for=“img">Image file Output:</label>
<input type="file" name=“img" id=“i1"><br><br>
<input type="submit" value="Submit">
</form>
<form action="1.docx">
<label for=“doc">Document File:</label>
<input type="file" name=“doc" id=“d1"><br><br>
<input type="submit" value="Submit">
</form>
9. Some Other Input Type attributes in Form
Attribute Value Description
type hidden
number
text
radio
checkbox
Color
Date
Email
url
Button
File
Image
Password
Month
Range
Reset
Tel
Time
Week
A control that is not displayed but whose value is submitted to the server.
A control for entering a number.
A control for entering a text.
A control used for single selection at a time.
A control used for multiple selection at a time.
A control for entering a color
A control for entering a date.
A field for editing an email address.
A control for entering a url.
A control for used button.
A control that lets the user select a file.
A control for entering a image on button.
A single-line text field whose value is obscured. Will alert user if site is not secure.
A control for entering a month.
Displays as a range of given value.
A button that resets the contents of the form to default values. Not recommended.
A control for entering a telephone number.
A control for entering a time.
A control for entering a week.
<html>
<form>
enter week<input type="week" name="w"><br> <br> <br>
enter month<input type="month" name="m"> <br> <br> <br>
enter email<input type="email" name="e"> <br><br> <br>
enter color<input type="color" name="c"><br> <br> <br>
enter date<input type="date" name="d"> <br> <br> <br>
enter range<input type="range" name="r"> <br> <br> <br>
enter tel<input type="tel" name="t"> <br> <br> <br>
enter time<input type="time" name="t"> <br> <br> <br>
<label for="ename">Employee Name:</label> <br> <br> <br>
<input type="text" id="ename" name="e1"><br><br><br>
<input type="hidden" id="eid" name="eid" value="101"><br>
<input type="submit" value="Submit">
</form>
</html>
Thank You

Html Form Controls

  • 1.
  • 2.
    OBJECTIVES  To understandthe concept of Form in HTML.  To understand about different controls in Form.  To understand about the different attributes of form in HTML.  To understand about the form tag which is used in HTML.
  • 3.
    HTML Form An HTMLform is a section of a document containing normal content, markup, special elements called controls (checkboxes, radio buttons, menus, textarea ,text etc.), and labels on those controls. Users generally "complete" a form by modifying its controls (entering text, selecting menu items, etc.), before submitting the form to an agent for processing (e.g., to a Web server, to a mail server, etc.).
  • 4.
    Attributes of Form FormAttributes Description action Backend script ready to process your passed data. method Method to be used to upload data. The most frequently used are GET and POST methods. target Specify the target window or form where the result of the script will be displayed. It takes values like _blank, _self, _parent etc.
  • 5.
    HTML Form Controls Thereare different types of form controls that you can use to collect data using HTML form −: 1. Text Input Controls 2. Submit Button/ Clickable Buttons Controls( image button) 3. Checkboxes Controls 4. Radio Box Controls 5. Drop-down list or select controls 6. Field set / Grouping Form Controls 7. HTML output Tag 8. File upload controls 9. Some Other Input Type attributes in Form
  • 6.
    1. Text InputControls Input text controls are used to collect User data as a free text. On the web page, it will form a rectangle box where Users can input the data. There are different types of input text controls that can be used in the HTML forms. There are three types of text input used on forms − 1. Single-line text input controls − This control is used for items that require only one line of user input, such as search boxes or names. They are created using HTML <input> tag. This allows the user to enter only a single line of data. A typical example of such input text controls is for entering the name, search box, city, etc. 2. Password input controls − This is also a single-line text input but it masks the character as soon as a user enters it. They are also created using HTMl <input> tag. As the name suggests this is typically used for the password field. This works in the same way as the input text field but the text gets masked for safety purposes. 3. Multi-line text input controls − This is used when the user is required to give details that may be longer than a single sentence. Multi-line input controls are created using HTML <textarea> tag. This input control type allows the user to enter data of multiple lines. Typical usage of such input controls is for comments, addresses, description and so on.
  • 7.
    Attributes of TextInput Sr.No Attribute & It's Description 1type (Common for all controls) Indicates the type of input control and for text input control it will be set to text. 2name (Common for all controls) Used to give a name to the control which is sent to the server to be recognized and get the value. 3value (Common for all controls) This can be used to provide an initial value inside the control. 4size (Common for Text, Password and Text area) Allows to specify the width of the text-input control in terms of characters. 5maxlength (Common for Text, Password and Text area) Allows to specify the maximum number of characters a user can enter into the text box. 6rows (Use for Multiline Controls) Indicates the number of rows of text area box. 7cols (Use for Multiline Controls) Indicates the number of columns of text area box
  • 8.
    1. Single-line textinput controls − <html> <body> <form> Userid: <input type="text" name="uid"> <br> Password: <input type="text" name="upwd"> </form> </body> </html>
  • 9.
    2. Password inputcontrols − <html> <body> <form> Userid: <input type="text" name="uid"> <br> Password: <input type="password" name="upwd"> </form> </body> </html>
  • 10.
    3. Multi-line textinput controls − <html> <body> <form> Userid: <input type="text" name="uid"> <br> Password: <input type="password" name="upwd"> <br> description: <textarea rows="5" cols="20" name="describe"> Enter Description Here </textarea> </form> </body> </html>
  • 11.
    2. Button InputControls A submit button is used to send the form data to a web server. When submit button is clicked the form data is sent to the file specified in the form's action attribute to process the submitted data. A reset button resets all the forms control to default values. Sr.No Type & It's Description 1submit Form submit buttons usually send the form data to the script that was specified in the action attribute of the form tag. 2reset The reset button type is used to reset the contents of the form to their original values. This means that each form field will change back to the value it had when the form loaded – either null (empty), or the default value set with the value attribute. 3button This creates a button that is used to trigger a client-side script when the user clicks that button. 4image This creates a clickable button but we can use an image as background of the button. It is use some other attributes like: src -: this attributes used to set an image on button. width -: set the width of image. height -: set the height of image. border -: set the border of image. align -: set the alignment of image button. hspace -: set hspace of image. vspace -: set vspace of image.
  • 12.
    Button Example: <html> <body> <form> <label for="Userid">UserID:</label> <input type="text" name="uid"> <br> <label for="password">Password:</label> <input type="password" name="upwd"> <br> <input type="submit" name="go" value="Go"> <input type="reset" value="form reset"> <input type="image" name="payu" value="pay to click" src="pay.jpg" width="30" height="30" border="5"> <input type="button" name="Ok" value="Button Click"> </form> </body> </html>
  • 13.
    3. Check BoxControls Sr.No Type & It's Description 1 checked Set to checked if you want to select it by default. A checkbox lets the User select whatever information is true in his case. It is a very convenient way of accepting the data when the possible input is already known. For example, if you want to select your hobbies so that checkbox is good input control to selection of your hobbies.Checkboxes are used when more than one option is required to be selected.
  • 14.
    Checkbox Example <html> <head> <title>Hobbies</title> </head> <body> <p> SelectYour Hobbies-------::: </p> <form> <input type = "checkbox" name = "Hacking" value = "on" checked="checked"> Hacking <br> <input type = "checkbox" name = "Music" value = "on"> Music <br> <input type = "checkbox" name = "Reading" value = "on"> Reading <br> <input type = "checkbox" name = "Writing" value = "on"> Writing <br> <input type = "checkbox" name = "Fashion" value = "on"> Fashion <br> <input type = "checkbox" name = "Ice Skating" value = "on"> Ice Skating <br> <input type = "checkbox" name = "Graphic Design" value = "on"> Graphic Design <br> <input type = "checkbox" name = "Bowling" value = "on"> Bowling <br> </form> </body> </html>
  • 15.
    4. Radio ButtonControls Sr.No Type & It's Description 1 checked Set to checked if you want to select it by default. Radio buttons are used when you expect Users to fill data as a Boolean value or you expect only one input as true out of multiple options. Some common use case of radio buttons is gender determination which is male or female and employee type (Regular / Adhoc / Visiting) and so on. Radio buttons are used when out of many options, just one option is required to be selected.
  • 16.
    RadioButton Example <html> <head> <title>Hobbie</title> </head> <body> <form> <p> Gender</p> <input type = "radio" name = "gender" id="male"> male <br> <input type = "radio" name = "gender" id="female"> female <br> <p> Employee Type </p> <input type = "radio" name = "type" value = "r1"> Regular <br> <input type = "radio" name = "type" value = "ad"> Adhoc <br> <input type = "radio" name = "type" value = "vi"> Visting <br> </form> </body> </html>
  • 17.
    5. Drop DownList A drop-down list (abbreviated drop-down; also known as a drop-down menu, drop menu, pull-down list, pick list) is a graphical control element, similar to a list box, that allows the user to choose one value from a list. When a drop-down list is inactive, it displays a single value. Attribute Value Description id Select id Defines which form the drop-down list belongs to multiple multiple The HTML <select> multiple attribute is a Boolean Attribute. It specifies that the user is allowed to select more than one value that presents in <select> element. name name Defines a name for the drop-down list required required Specifies that the user is required to select a value before submitting the form number number Defines the number of visible options in a drop-down list
  • 18.
    Drop Down ListExample <html> <body> <h1> Drop Down List Example </h1> <p>Drop Down List is create a list</p> <label for=“state">Select State:</label> <select id=“state"> <option value=“UP">UP</option> <option value=“MP">MP</option> <option value=“Delhi">Delhi</option> <option value=“Chhattisgarh"> Chhattisgarh </option> </select> </body> </html>
  • 19.
    6. Field Set The<fieldset> tag in HTML5 is used to make a group of related elements in the form and it creates the box over the elements. The <fieldset> tag is new in HTML5. The HTML <fieldset> tag is found within the <form> tag and is used to group related elements in an HTML form. Use a <legend> tag to create a caption for the <fieldset>.This tag is also commonly referred to as the <fieldset> element. Attribute Value Description align left right center top bottom Deprecated − Specifies the content alignment. disabled disabled Specifies that a group of related form elements should be disabled. form form_id Specifies forms which belongs to fieldset. name text Specifies a name for fieldset.
  • 20.
    Field Set <html> <head> <title>Field SetTag used as a group box or box</title> </head> <body> <form> <fieldset> <legend>Employee Information</legend> Employee id: <input type = "text" name="eid"><br> Employee Name:<input type = "text" name="ename"><br> Eage:<input type = "text" name = "eage"> <br> Esite:<input type = "url" name = "esite"> </fieldset> </form> </body> </html>
  • 21.
    7. HTML outputTag The <output> tag is one of the HTML5 elements. It defines a place for representing the result of a calculation performed by a script or user’s interaction with a form element (<form> tag). The <output> tag is designed for complex calculations, new tag in HTML 5 and it requires a starting and end tag. Attribute Description for This attribute contains an attribute value element_id which is used to specify the relation between result and calculations. form This attribute contains an attribute value form_id which is used to specify the one or more forms of output elements. name This attribute contains an attribute value name which is used to specify the name of output element. Oninput This attributes is used to store input value of form controls.
  • 22.
    Output Tag: <html> <form oninput="sum1.value=parseInt(t1.value)+parseInt(t2.value)+parseInt(t3.value)+parseInt(t4.value)+parseInt (t5.value)"> <label for="Marks">Enter Hindi Marks </label><br> <input type="number" name="t1" value=""><br> <label for="Marks"> Enter English Marks </label><br> <input type="number" name="t2" value=""><br> <label for="Marks"> Enter Chemistry Marks </label><br> <input type="number" name="t3" value=""><br> <label for="Marks"> Enter Physics Marks </label><br> <input type="number" name="t4" value=""><br> <label for="Marks"> Enter History Marks </label><br> <input type="number" name="t5" value=""><br><br> Sum of Five Subject Marks:<output name="sum1"></output> <br> </form> </html> 1. Input type Color
  • 23.
    8. File uploadcontrols The upload form is a very practical form to allow the users to send photos, documents or any other kind of files to the server.To create an upload form we will only have to establish the file value to the <input type=“file"> tag. Attribute Description Type Mention attributes type means it is file ,text,number etc.
  • 24.
    <form action="1.txt"> <label for="txt">TextFile Output:</label> <input type="file" name="txt" id="t1"><br><br> <input type="submit" value="Submit"> </form> <form action="1.jpg"> <label for=“img">Image file Output:</label> <input type="file" name=“img" id=“i1"><br><br> <input type="submit" value="Submit"> </form> <form action="1.docx"> <label for=“doc">Document File:</label> <input type="file" name=“doc" id=“d1"><br><br> <input type="submit" value="Submit"> </form>
  • 25.
    9. Some OtherInput Type attributes in Form Attribute Value Description type hidden number text radio checkbox Color Date Email url Button File Image Password Month Range Reset Tel Time Week A control that is not displayed but whose value is submitted to the server. A control for entering a number. A control for entering a text. A control used for single selection at a time. A control used for multiple selection at a time. A control for entering a color A control for entering a date. A field for editing an email address. A control for entering a url. A control for used button. A control that lets the user select a file. A control for entering a image on button. A single-line text field whose value is obscured. Will alert user if site is not secure. A control for entering a month. Displays as a range of given value. A button that resets the contents of the form to default values. Not recommended. A control for entering a telephone number. A control for entering a time. A control for entering a week.
  • 26.
    <html> <form> enter week<input type="week"name="w"><br> <br> <br> enter month<input type="month" name="m"> <br> <br> <br> enter email<input type="email" name="e"> <br><br> <br> enter color<input type="color" name="c"><br> <br> <br> enter date<input type="date" name="d"> <br> <br> <br> enter range<input type="range" name="r"> <br> <br> <br> enter tel<input type="tel" name="t"> <br> <br> <br> enter time<input type="time" name="t"> <br> <br> <br> <label for="ename">Employee Name:</label> <br> <br> <br> <input type="text" id="ename" name="e1"><br><br><br> <input type="hidden" id="eid" name="eid" value="101"><br> <input type="submit" value="Submit"> </form> </html>
  • 29.