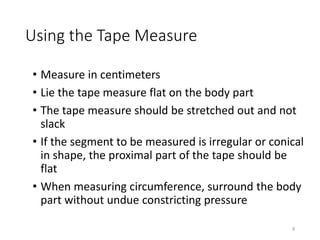
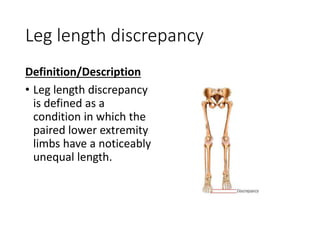
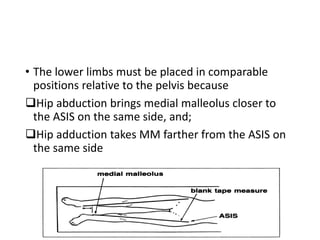
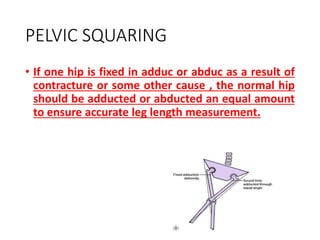
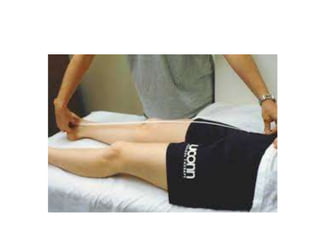
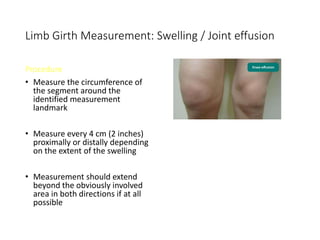
EVALUATION METHODS
BY: DR. RACHANA SHAH
MPT(CARDIO)
CMPP
OBJECTIVES:
• LIMB LENGTH DISCREPANCIES ( LLD)
• LEG LENGTH DISCREPANCIES
• TRUE AND APPARENT LEG LENGTH DISCREPANCY
• UPPER LIMG LENGTH DISCREPANCY
• GIRTH MEASUREMENT
• MUSCLE BULK
• JOINT EFFUSION/SWELLING
• LIMB GIRTH
ANTHROPOMETRY
• ANTHRO: HUMAN(GREEK)
• METRY: MEASUREMENT
• REFERS TO THE MEASUREMENT OF THE HUMAN
BODY
• THE SCIENTIFIC STUDY OF MEASUREMENTS AND
PROPORTIONS OF HUMAN BODY
• In physical therapy, anthropometry may include the
assessment of
• Edema
• Localized swelling
• Joint effusion
• Muscular changes
• Asymmetry of body parts
• Effects of surgical procedures
4
6
Why measure/Use?
• Aids the clinician in determining the patients
impairments and in providing the appropriate
treatment
• Provides a baseline to monitor the rehabilitation
outcome
• effective treatment vs. patient deterioration
7
Why measure/Use? Continued….
• Provides feedback and motivation to patients
• Aids in designing equipment and materials for
special population such as children, elderly and the
differently-abled
8
Using the Tape Measure
• Measure in centimeters
• Lie the tape measure flat on the body part
• The tape measure should be stretched out and not
slack
• If the segment to be measured is irregular or conical
in shape, the proximal part of the tape should be
flat
• When measuring circumference, surround the body
part without undue constricting pressure
9
Measurements Commonly
Performed in the Clinics
10
LIMB LENGTH DISCREPANCY (
LLD)
• Limb length discrepancy or anisomelia, is
defined as a condition in which the paired
upper or lower extremities have a
significantly noticeable unequal length.
1. LIMB LENGTH
• LEG LENGTH
• ARM LENGTH
Leg length discrepancy
Definition/Description
• Leg length discrepancy
is defined as a
condition in which the
paired lower extremity
limbs have a noticeably
unequal length.
Leg Length Measurement
Indications
 postural deviations
 gait deviations
 checking for leg
length discrepancy
Etiological factors
• Idiopathic developmental
abnormalities;
• Fracture;
• Trauma to the epiphyseal
endplate prior to skeletal
maturity;
• Degenerative disorders;
• Legg-calvé- Perthes
disease;
• Cancer or neoplastic
changes;
• Infections;
Etiological factors contd..
• Functional:
• Shortening of soft
tissues;
• Joint contractures;
• Ligamentous laxity;
• Axial malalignments;
• Foot biomechanics
(such as excessive ankle
pronation).
Classification of leg length discrepancy
(LLD)
• THERE ARE TWO TYPES OF LEG LENGTH
DISCREPANCY.
True leg length discrepancy/ true shortening
Apparent or Functional leg length discrepancy /
apparent or Functional shortening.
True LLD
• It is caused by an anatomic or structural change in the
lower leg.
• Resulting from congenital maldevelopment (e.g
adolescent coxa vara, congenital hip dysplasia, bony
abnormality) or trauma( e.g fracture)
• As there's an anatomic short leg, the spine and pelvis
are often affected leading to lateral pelvic tilt and
scoliosis.
Functional LLD
• It is the result of
compensation for a
change that may have
occurred because of
positioning instead of
structure.
• For example, a
functional LLD may
occur because of
unilateral foot
pronation or spinal
scoliosis.
Measuring of true and apparent
leg length
Measurement of true leg length
TAPE MEASUREMENT
• POSITIONING:
 Before any measuring is done, the examiner must
set the pelvis square.
 The legs should be 15 to 20 cm apart(4 to 8
inches)
 If the legs are not placed in proper relation to the
pelvis, apparent shortening of the limb may occur.
• The lower limbs must be placed in comparable
positions relative to the pelvis because
Hip abduction brings medial malleolus closer to
the ASIS on the same side, and;
Hip adduction takes MM farther from the ASIS on
the same side
PELVIC SQUARING
• If one hip is fixed in adduc or abduc as a result of
contracture or some other cause , the normal hip
should be adducted or abducted an equal amount
to ensure accurate leg length measurement.
• METHOD:
• To obtain the leg length, the examiner measures
from the ASIS to lateral or medial malleolus.
• Leg length measurement is usually taken from the
ASIS to the medial malleolus, however these values
may be altered by muscle wasting or obesity.
• Measuring to the lateral malleolus is less likely be
affected by the muscle bulk.
• The flat metal end of the tape measure is placed
immediately distal to the ASIS and pushed up against
it.
• The thumb then presses tape end firmly against the
bone, rigidly fixing the tape measure against the bone.
• The index finger of other hand is placed immediately
distal to the lateral or medial malleolus and pushed
against it.
• The thumb nail is brought down against the tip of the
index finger so that the tape measure is pinched
between them.
• A slight difference ( as much as 1 To 1.5 cm) in leg
lengths is considered normal: however this
difference can still cause symptoms.
METHOD II
• VISUAL METHOD/ WEBER-BARSTOW MANEUVER
POSITIONING:
The patient lies in supine with hips and knees
flexed
• The examiner stands at the patient’s feet and
palpates the distal aspect of the medial malleoli
with the thumbs.
• The pt then lifts the pelvis from the examining table
and returns to the starting position.
• Next, the examiner passively extends the pt’s legs
and compares the positions of the malleoli using
the borders of the thumbs.
• If one leg is shorter than the other, the examiner can
determine where the difference is by measuring the
following:
1. From the iliac crest to the greater trochanter of the
femur( for coxa vara or valga)
2. From GT of the femur to the knee joint line on the
lateral aspect( for femoral shaft shortening)
3. From the knee joint line on the medial side to the
medial malleolus (for tibial shaft shortening)
The relative length of tibia may also be examined(
visually) with the patient lying prone.
• The examiner places the thumbs transversely
across the soles of the feet just in front of the
heels.
• The knees are flexed to 90 degrees and the relative
height of the thumbs are noted.
• Care must be taken to ensure that the legs are
perpendicular to the examining table.
Femoral lengths
• Similarly, femoral
lengths can be
compared by having
the patient lie supine
with the hips and knees
flexed to 90 degrees .
• If one of the femur is
longer than the other,
its height will be higher.
APPARENT OR FUNCTIONAL
SHORTENING
• Apparent/ functional shortening of the leg is
evident if the patient has a lateral pelvic tilt when
the measurement is taken.
• Apparent or functional shortening of the limb is
the result of adaptations the patient has made in
response to pathology or contracture somewhere
in the spine, pelvis, or lower limbs.
• In reality, there is no structural or anatomic
difference in bone lengths.
• If there were, it would be called true shortening of
the limb
MEASUREMENT OF APPARENT
LLD
• When measuring the apparent leg length
shortening, the examiner obtains the distance
from the tip of the xiphisternum or umbilicus to the
medial malleolus.
• IF true leg length is normal but the umbilicus to
malleoIus measurements are different, a functional
leg length discrepancy is present.
• Values obtained by these measurements may be
affected by muscle wasting, obesity, asymmetric
position of the xiphisternum or umbilicus or
asymmetric positioning of the lower limbs.
Leg Length Measurement
41
STANDING LEG LENGTH:
• BLOCK METHOD:
• Indirect methods.
• Method slightly more reliable & accurate
than use of the tape.
• Patient standing with feet 10cm apart, knees
extended & equal weight on both feet.
• Places his/her hands on bilateral anatomical
structure: ASIS & PSIS left & right.
• Visually assesses, if there is a length
inequality, places a wooden board of 0.5cm
under the foot shorter side.
• Keep placing thicker planks under the
shorter side until equal length reached.
• Thickness of plank is equal to the leg length
difference.
• Limb Length inequalities-0.5cm to 2.0cm,
common in normal.
• More than 2.5cm –considered significant ,
needs treatment & correction.
Upper limb length:
Whole upper limb length
• Position:Patient in supine lying. The arm is
positioned in the anatomical position, relaxed at
the side of the subject.
• Measurement is taken from most superior lateral
point of acromion process (acromial landmark) to
the lower and lateral border of styloid process of
radius (radial landmark).
Segmental measurement:
Upper arm length:
• Position: Patient in high sitting with arm supported
on pillow. With elbow flexed at 90º, so that ulnar
surface of forearm and hand are horizontal and
palms facing medially with fingers extended,
• Measurement: is taken from acromial landmark to
the posterior surface of olecranon process of ulna.
Forearm length:
• Position: Supine or High sitting.
• It is the distance from the head of radius (upper
radial landmark) to the most distal point of the
styloid process of radius (or styloid).
Hand length:
• With hand extended and the palm rested in the
direction of the longitudinal axis of forearm,
• measurement is taken from styloid process at base
of thumb to the tip of middle finger.
LIMB GIRTH
MEASUREMENT
Muscle Bulk Measurement
Indications
• conditions where a
decrease (or increase)
in muscle bulk is
expected
• Atrophy (SCI, fractures,
CVA)
• Hypertrophy (Duchene
muscular dystrophy)
Position
• Supine or sitting provided that the segment be
assessed is well supported
Note:
• If the affection is unilateral, measure the
uninvolved extremity prior to measuring the
affected part.
• The muscles should be at rest when muscle bulk is
measured
Landmarks
• Identify a stable bony landmark at the proximal
part of the segment to measured (1)
• Identify the area of the segment where the muscle
bulk is the greatest (2)
• Measure the distance between (1) and (2). Record
this as the measurement landmark.
Procedure
• Measure the circumference of the segment around
the identified measurement landmark.
• Measure the other extremity using the same
landmarks
BICEPS QUADRICEPS CALF
Limitation
• Individual muscles cannot be measured
Limb Girth Measurement
Indications
• Swelling
• Joint effusion
• Edema
Limb Girth Measurement:
Swelling / Joint effusion
Position
• Supine or sitting provided that the segment be
assessed is well supported
Landmarks
• Identify a stable bony landmark closest to the area
of swelling
Limb Girth Measurement: Swelling / Joint effusion
Procedure
• Measure the circumference of
the segment around the
identified measurement
landmark
• Measure every 4 cm (2 inches)
proximally or distally depending
on the extent of the swelling
• Measurement should extend
beyond the obviously involved
area in both directions if at all
possible
Limb Girth Measurement:
Swelling / Joint effusion
Procedure
• Measure the other extremity using the same
landmarks to compare
• Measurement should preferably be from a point of
zero difference to another point of zero difference
Limb Girth Measurement: For
Edema
Position
• Supine or sitting provided that the segment be
assessed is well supported
Limb Girth Measurement: Edema
UPPER LIMB:
• At the Axilla
• 8cm proximal to olecranon.
• 11cm distal to olecranon.
• Wrist.
• Level with web of thumb.
Limb Girth Measurement: Edema
LOWER LIMB:
• 15cm below apex of patella.(6inches)
• Apex of patella.
• 5cm above the base of patella.(2 inches)
• 10cm above the base of patella.(4 inches)
• 15cm above the base of patella.(6 inches)
• 23cm above the base of the patella.(9
inches)
FIGURE OF EIGHT
MEASUREMENT:
• For Wrist
• Distal aspect of ulnar styloid process, as starting
point.
• The anterior wrist of the most distal aspect of
the radial styloid process.
• Back(dorsum) of the hand & over the fifth MCP
joint line.
• the anterior aspect of the MCP joints & then
diagonally across the back of the hand to where
the tape started.
FIGURE OF EIGHT
MEASUREMENT
• For Ankle:
• Patient in long sitting with ankle and lower leg beyond
the end of the examining table with ankle plantigrade
90.
• Places on tibialis anterior tendon,medially across the
instep just distal to the navicular tuberosity.
REFERENCES:
• ORTHOPEDIC PHYSICAL ASSESMENT-DAVID J.
MAGEE.(SIXTH EDITION)
• JOINT STRUCTURE AND FUNCTION- PAMELA K.
LEVANGIE,
CYNTHIA C. NORKIN.(FIFTH EDITION)
• TIDY’S PHYSIOTHERAPY-THOMSON,ANN
M.(TWELFTH EDITION)
THANK YOU!!

EVALUATION METHODS.presentation for evaluation

  • 1.
    EVALUATION METHODS BY: DR.RACHANA SHAH MPT(CARDIO) CMPP
  • 2.
    OBJECTIVES: • LIMB LENGTHDISCREPANCIES ( LLD) • LEG LENGTH DISCREPANCIES • TRUE AND APPARENT LEG LENGTH DISCREPANCY • UPPER LIMG LENGTH DISCREPANCY • GIRTH MEASUREMENT • MUSCLE BULK • JOINT EFFUSION/SWELLING • LIMB GIRTH
  • 3.
    ANTHROPOMETRY • ANTHRO: HUMAN(GREEK) •METRY: MEASUREMENT • REFERS TO THE MEASUREMENT OF THE HUMAN BODY • THE SCIENTIFIC STUDY OF MEASUREMENTS AND PROPORTIONS OF HUMAN BODY
  • 4.
    • In physicaltherapy, anthropometry may include the assessment of • Edema • Localized swelling • Joint effusion • Muscular changes • Asymmetry of body parts • Effects of surgical procedures 4
  • 6.
  • 7.
    Why measure/Use? • Aidsthe clinician in determining the patients impairments and in providing the appropriate treatment • Provides a baseline to monitor the rehabilitation outcome • effective treatment vs. patient deterioration 7
  • 8.
    Why measure/Use? Continued…. •Provides feedback and motivation to patients • Aids in designing equipment and materials for special population such as children, elderly and the differently-abled 8
  • 9.
    Using the TapeMeasure • Measure in centimeters • Lie the tape measure flat on the body part • The tape measure should be stretched out and not slack • If the segment to be measured is irregular or conical in shape, the proximal part of the tape should be flat • When measuring circumference, surround the body part without undue constricting pressure 9
  • 10.
  • 11.
    LIMB LENGTH DISCREPANCY( LLD) • Limb length discrepancy or anisomelia, is defined as a condition in which the paired upper or lower extremities have a significantly noticeable unequal length.
  • 12.
    1. LIMB LENGTH •LEG LENGTH • ARM LENGTH
  • 13.
    Leg length discrepancy Definition/Description •Leg length discrepancy is defined as a condition in which the paired lower extremity limbs have a noticeably unequal length.
  • 14.
    Leg Length Measurement Indications postural deviations  gait deviations  checking for leg length discrepancy
  • 15.
    Etiological factors • Idiopathicdevelopmental abnormalities; • Fracture; • Trauma to the epiphyseal endplate prior to skeletal maturity; • Degenerative disorders; • Legg-calvé- Perthes disease; • Cancer or neoplastic changes; • Infections;
  • 16.
    Etiological factors contd.. •Functional: • Shortening of soft tissues; • Joint contractures; • Ligamentous laxity; • Axial malalignments; • Foot biomechanics (such as excessive ankle pronation).
  • 17.
    Classification of leglength discrepancy (LLD) • THERE ARE TWO TYPES OF LEG LENGTH DISCREPANCY. True leg length discrepancy/ true shortening Apparent or Functional leg length discrepancy / apparent or Functional shortening.
  • 18.
    True LLD • Itis caused by an anatomic or structural change in the lower leg. • Resulting from congenital maldevelopment (e.g adolescent coxa vara, congenital hip dysplasia, bony abnormality) or trauma( e.g fracture)
  • 19.
    • As there'san anatomic short leg, the spine and pelvis are often affected leading to lateral pelvic tilt and scoliosis.
  • 20.
    Functional LLD • Itis the result of compensation for a change that may have occurred because of positioning instead of structure. • For example, a functional LLD may occur because of unilateral foot pronation or spinal scoliosis.
  • 21.
    Measuring of trueand apparent leg length
  • 22.
    Measurement of trueleg length TAPE MEASUREMENT • POSITIONING:  Before any measuring is done, the examiner must set the pelvis square.
  • 23.
     The legsshould be 15 to 20 cm apart(4 to 8 inches)  If the legs are not placed in proper relation to the pelvis, apparent shortening of the limb may occur.
  • 24.
    • The lowerlimbs must be placed in comparable positions relative to the pelvis because Hip abduction brings medial malleolus closer to the ASIS on the same side, and; Hip adduction takes MM farther from the ASIS on the same side
  • 25.
    PELVIC SQUARING • Ifone hip is fixed in adduc or abduc as a result of contracture or some other cause , the normal hip should be adducted or abducted an equal amount to ensure accurate leg length measurement.
  • 26.
    • METHOD: • Toobtain the leg length, the examiner measures from the ASIS to lateral or medial malleolus. • Leg length measurement is usually taken from the ASIS to the medial malleolus, however these values may be altered by muscle wasting or obesity. • Measuring to the lateral malleolus is less likely be affected by the muscle bulk.
  • 28.
    • The flatmetal end of the tape measure is placed immediately distal to the ASIS and pushed up against it. • The thumb then presses tape end firmly against the bone, rigidly fixing the tape measure against the bone. • The index finger of other hand is placed immediately distal to the lateral or medial malleolus and pushed against it. • The thumb nail is brought down against the tip of the index finger so that the tape measure is pinched between them.
  • 29.
    • A slightdifference ( as much as 1 To 1.5 cm) in leg lengths is considered normal: however this difference can still cause symptoms.
  • 30.
    METHOD II • VISUALMETHOD/ WEBER-BARSTOW MANEUVER POSITIONING: The patient lies in supine with hips and knees flexed
  • 31.
    • The examinerstands at the patient’s feet and palpates the distal aspect of the medial malleoli with the thumbs. • The pt then lifts the pelvis from the examining table and returns to the starting position. • Next, the examiner passively extends the pt’s legs and compares the positions of the malleoli using the borders of the thumbs.
  • 33.
    • If oneleg is shorter than the other, the examiner can determine where the difference is by measuring the following: 1. From the iliac crest to the greater trochanter of the femur( for coxa vara or valga) 2. From GT of the femur to the knee joint line on the lateral aspect( for femoral shaft shortening) 3. From the knee joint line on the medial side to the medial malleolus (for tibial shaft shortening)
  • 34.
    The relative lengthof tibia may also be examined( visually) with the patient lying prone. • The examiner places the thumbs transversely across the soles of the feet just in front of the heels. • The knees are flexed to 90 degrees and the relative height of the thumbs are noted. • Care must be taken to ensure that the legs are perpendicular to the examining table.
  • 36.
    Femoral lengths • Similarly,femoral lengths can be compared by having the patient lie supine with the hips and knees flexed to 90 degrees . • If one of the femur is longer than the other, its height will be higher.
  • 37.
    APPARENT OR FUNCTIONAL SHORTENING •Apparent/ functional shortening of the leg is evident if the patient has a lateral pelvic tilt when the measurement is taken. • Apparent or functional shortening of the limb is the result of adaptations the patient has made in response to pathology or contracture somewhere in the spine, pelvis, or lower limbs. • In reality, there is no structural or anatomic difference in bone lengths.
  • 38.
    • If therewere, it would be called true shortening of the limb
  • 39.
    MEASUREMENT OF APPARENT LLD •When measuring the apparent leg length shortening, the examiner obtains the distance from the tip of the xiphisternum or umbilicus to the medial malleolus. • IF true leg length is normal but the umbilicus to malleoIus measurements are different, a functional leg length discrepancy is present. • Values obtained by these measurements may be affected by muscle wasting, obesity, asymmetric position of the xiphisternum or umbilicus or asymmetric positioning of the lower limbs.
  • 41.
  • 42.
    STANDING LEG LENGTH: •BLOCK METHOD: • Indirect methods. • Method slightly more reliable & accurate than use of the tape. • Patient standing with feet 10cm apart, knees extended & equal weight on both feet. • Places his/her hands on bilateral anatomical structure: ASIS & PSIS left & right.
  • 44.
    • Visually assesses,if there is a length inequality, places a wooden board of 0.5cm under the foot shorter side. • Keep placing thicker planks under the shorter side until equal length reached. • Thickness of plank is equal to the leg length difference.
  • 45.
    • Limb Lengthinequalities-0.5cm to 2.0cm, common in normal. • More than 2.5cm –considered significant , needs treatment & correction.
  • 46.
  • 47.
    Whole upper limblength • Position:Patient in supine lying. The arm is positioned in the anatomical position, relaxed at the side of the subject. • Measurement is taken from most superior lateral point of acromion process (acromial landmark) to the lower and lateral border of styloid process of radius (radial landmark).
  • 48.
    Segmental measurement: Upper armlength: • Position: Patient in high sitting with arm supported on pillow. With elbow flexed at 90º, so that ulnar surface of forearm and hand are horizontal and palms facing medially with fingers extended, • Measurement: is taken from acromial landmark to the posterior surface of olecranon process of ulna.
  • 49.
    Forearm length: • Position:Supine or High sitting. • It is the distance from the head of radius (upper radial landmark) to the most distal point of the styloid process of radius (or styloid).
  • 50.
    Hand length: • Withhand extended and the palm rested in the direction of the longitudinal axis of forearm, • measurement is taken from styloid process at base of thumb to the tip of middle finger.
  • 51.
  • 52.
    Muscle Bulk Measurement Indications •conditions where a decrease (or increase) in muscle bulk is expected • Atrophy (SCI, fractures, CVA) • Hypertrophy (Duchene muscular dystrophy)
  • 53.
    Position • Supine orsitting provided that the segment be assessed is well supported Note: • If the affection is unilateral, measure the uninvolved extremity prior to measuring the affected part. • The muscles should be at rest when muscle bulk is measured
  • 54.
    Landmarks • Identify astable bony landmark at the proximal part of the segment to measured (1) • Identify the area of the segment where the muscle bulk is the greatest (2) • Measure the distance between (1) and (2). Record this as the measurement landmark.
  • 55.
    Procedure • Measure thecircumference of the segment around the identified measurement landmark. • Measure the other extremity using the same landmarks BICEPS QUADRICEPS CALF
  • 56.
  • 57.
    Limb Girth Measurement Indications •Swelling • Joint effusion • Edema
  • 58.
    Limb Girth Measurement: Swelling/ Joint effusion Position • Supine or sitting provided that the segment be assessed is well supported Landmarks • Identify a stable bony landmark closest to the area of swelling
  • 59.
    Limb Girth Measurement:Swelling / Joint effusion Procedure • Measure the circumference of the segment around the identified measurement landmark • Measure every 4 cm (2 inches) proximally or distally depending on the extent of the swelling • Measurement should extend beyond the obviously involved area in both directions if at all possible
  • 60.
    Limb Girth Measurement: Swelling/ Joint effusion Procedure • Measure the other extremity using the same landmarks to compare • Measurement should preferably be from a point of zero difference to another point of zero difference
  • 61.
    Limb Girth Measurement:For Edema Position • Supine or sitting provided that the segment be assessed is well supported
  • 62.
    Limb Girth Measurement:Edema UPPER LIMB: • At the Axilla • 8cm proximal to olecranon. • 11cm distal to olecranon. • Wrist. • Level with web of thumb.
  • 63.
    Limb Girth Measurement:Edema LOWER LIMB: • 15cm below apex of patella.(6inches) • Apex of patella. • 5cm above the base of patella.(2 inches) • 10cm above the base of patella.(4 inches) • 15cm above the base of patella.(6 inches) • 23cm above the base of the patella.(9 inches)
  • 64.
    FIGURE OF EIGHT MEASUREMENT: •For Wrist • Distal aspect of ulnar styloid process, as starting point. • The anterior wrist of the most distal aspect of the radial styloid process. • Back(dorsum) of the hand & over the fifth MCP joint line. • the anterior aspect of the MCP joints & then diagonally across the back of the hand to where the tape started.
  • 66.
    FIGURE OF EIGHT MEASUREMENT •For Ankle: • Patient in long sitting with ankle and lower leg beyond the end of the examining table with ankle plantigrade 90. • Places on tibialis anterior tendon,medially across the instep just distal to the navicular tuberosity.
  • 68.
    REFERENCES: • ORTHOPEDIC PHYSICALASSESMENT-DAVID J. MAGEE.(SIXTH EDITION) • JOINT STRUCTURE AND FUNCTION- PAMELA K. LEVANGIE, CYNTHIA C. NORKIN.(FIFTH EDITION) • TIDY’S PHYSIOTHERAPY-THOMSON,ANN M.(TWELFTH EDITION)
  • 69.