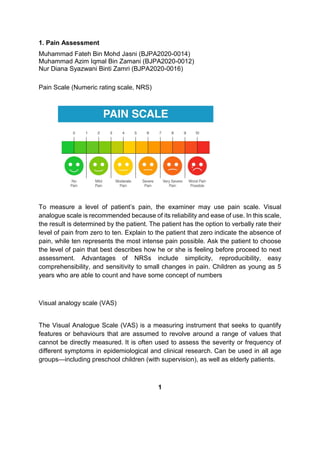
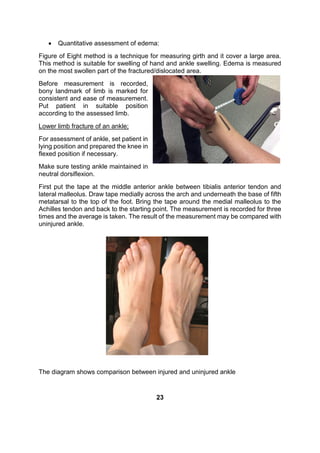
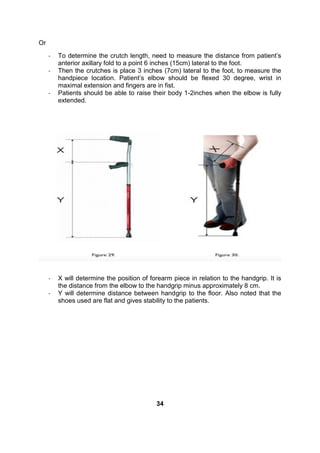
Here are the key steps for taking limb girth measurements:
1. Identify and mark the measurement sites around the limb with a pen or marker. Common sites include the wrist, forearm, elbow, upper arm, thigh, knee, calf, and ankle.
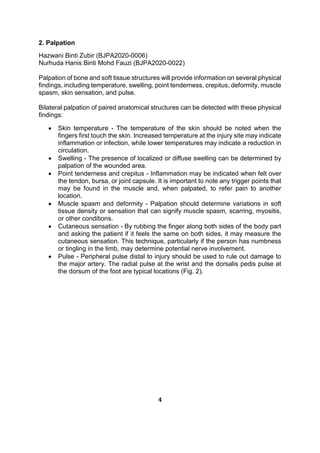
2. Place the tape snug but not tight around the limb, ensuring it is horizontal and the tape is not overlapping.
3. Record the girth measurement to the nearest 0.1 cm or 1/8 inch.
4. Repeat measurements on both limbs and record for future comparison to monitor changes over time. Regular measurements allow assessment of swelling, muscle size, or response to treatment.
The girth measurement is a simple but useful
Muscle energy technique, a manual therapy technique with a long term history and 8 variations which can be used in various condition to treat muscle as well as joints. This slide show consists of detailed history, variations/types and summary of MET in detail.
This is the presentation which was delivered to third year Bachelor of Physiotherapy students at Kathmandu University School of Medical Sciences (KUSMS), Dhulikhel, Nepal. Different schools of thoughts in manual therapy are the part of curriculum for the undergraduate students at KUSMS.
The McKenzie Method is a classification system and treatment approach developed by Robin McKenzie for back, neck, and extremity pain. It involves assessing a patient's response to various movements and positions to determine the cause of their pain and develop an individualized exercise plan. The goals are to centralize or reduce pain. There are three main syndromes - postural, dysfunction, and derangement - each with different treatments like posture correction, mobilizing exercises, or movements to induce a directional preference. The McKenzie Method aims to actively involve patients to self-manage their pain.
This document discusses shoulder impingement syndrome, including its anatomy, causes, symptoms, diagnosis, stages, and treatment approaches. It provides details on the rotator cuff muscles, signs and symptoms of impingement, external and internal factors that can lead to impingement, stages of the syndrome, common tests used for diagnosis, goals of treatment, and manual therapy, therapeutic exercise, and preventative measures used in treatment.
Myofascial release refers to the manual
technique for stretching the fascia and
releasing bonds between fascia and
Lintegument, musles,and bones, with the goal of
eliminating pain, increasing range of motion
and balancing the body.
This document provides information on myofascial release (MFR). It discusses the history and concept of MFR, describing it as a technique that addresses tightness and restrictions in the fascia through the application of gentle, sustained pressure. The document outlines the layers and components of fascia, and how MFR is believed to work by converting restricted fascia back to a more gel-like state, allowing collagen and elastin fibers to rearrange and adhesions to release. MFR aims to restore normal play and function to the myofascial system.
Retraining of motor control basing on understanding of normal movement & analysis of motor dysfunction.
Emphasis of MRP is on practice of specific activities, the training of cognitive control over muscles & movt. Components of activities & conscious elimination of unnecessary muscle activity.
In rehabilitation programme involve – real life activities included.
Neurodynamics, mobilization of nervous system, neural mobilizationSaurab Sharma
This is the presentation which was delivered to third year Bachelor of Physiotherapy students at Kathmandu University School of Medical Sciences (KUSMS), Dhulikhel, Nepal. Different schools of thoughts in manual therapy are the part of curriculum for the undergraduate students at KUSMS.
The document provides information about taping techniques used in physiotherapy. It discusses:
1) The principles and purposes of taping, which include immobilizing joints to reduce pain and aid recovery while allowing some functional mobility.
2) The various materials used for taping like tape, underwrap, adhesive remover, scissors, powder, pads, and adhesive spray.
3) Different taping techniques like Kinesio taping, McConnell taping, Mulligan taping and their specific applications and characteristics.
4) Guidelines for proper taping including cleaning the skin, applying underwrap to sensitive skin, and positioning the joint in its range of motion.
A type of manual therapy in which the muscle or the joint is altered and placed in a position of comfort for certain duration after which the pain disappears completely or gets reduced. this slide show explains about the principles, mechanism and Phases of PRT
Tendon transfer is a surgical procedure that moves a tendon from one location to another to restore function lost due to nerve damage or injury. The document discusses pre and post-operative physiotherapy management for tendon transfers in the hand. Key points include indications for tendon transfers when nerve recovery is unlikely, prerequisites like full range of motion, and post-operative goals like protecting the transferred tendon and regaining range of motion. Specific procedures are described to address radial, ulnar and median nerve palsies. Post-operative splinting and rehabilitation protocols aim to protect the transfer initially and progress to strengthening.
Physiotherapy for CONGENITAL TALIPES EQUINOVARUS Sreeraj S R
The document discusses congenital club foot (CCF), also known as congenital talipes equinovarus (CTEV). CCF is a deformity occurring in the ankle, subtaloid, and mid-tarsal joints. There are several theories for its causes, and its severity depends on the degree of displacement, while resistance to treatment depends on soft tissue rigidity. The deformity can be categorized into four components: cavus, adductus, varus, and equinus (CAVE). Treatment aims to fully correct the deformity early on through non-operative methods like serial casting or the Ponseti method, which involves weekly manipulation and casting. Education of parents on care and follow-up is
Hello everyone here I upload mckenzie exrercise basic details and some of its position.Its technique for use to cervical, Lumabar pain relief via particular position.Thank you.
This is the presentation which was delivered to third year Bachelor of Physiotherapy students at Kathmandu University School of Medical Sciences (KUSMS), Dhulikhel, Nepal. Different schools of thoughts in manual therapy are the part of curriculum for the undergraduate students at KUSMS.
Dr.MD.Monsur Rahman,PT
MPT-Musculoskeletal Disorders
Maharishi Markandeshwar Institute Of Physiotherapy And Rehabilitation, Maharishi Markandeshwar (Deemed to be University), Mullana - Ambala,133-207 (Haryana)
Physiotherapy Management for Wound Ulcers Rahul.AP BPT,MPT (CRD&ICU Managemen...Rahul Ap
This document discusses wound assessment and treatment. It describes the three phases of normal wound healing and factors that can impair healing such as pressure and decreased blood flow. Pressure ulcers are defined as wounds caused by unrelieved pressure. Assessment involves examining the wound history, type, stage, drainage, and surrounding skin. Treatment aims to promote healing and involves cleaning, dressing, and physical therapy modalities like ultrasound, electrical stimulation, and compression therapy to accelerate healing.
This document provides an overview of performing an examination of the shoulder, including assessing functional anatomy, subjective factors, and objective tests. It describes the resting and closed pack positions of the glenohumeral, acromioclavicular, and sternoclavicular joints. Subjective factors covered include symptoms, aggravating/relieving factors, and past history. The objective examination involves observation, palpation, range of motion testing, strength testing, and multiple special tests to assess various structures like the labrum, biceps, rotator cuff, nerves. The goal is a thorough subjective and physical assessment of the shoulder.
Physiotherapy for Rickets and OsteomalaciaSreeraj S R
Rickets and osteomalacia are metabolic bone diseases caused by a deficiency of vitamin D or calcium. Rickets occurs in children and is characterized by the failure of mineralization of the osteoid matrix in bones. The most common cause is vitamin D deficiency. Osteomalacia occurs in adults and results from impaired mineralization of bone. Symptoms include bone pain and muscle weakness. Physical therapy can help treat related impairments through exercises and manual techniques while ensuring medical management addresses the underlying deficiency.
Physiotherapy Management in Peripheral nerve & Plexus injuriesSreeraj S R
1. The document discusses various aspects of peripheral nerve anatomy and injury. It describes the formation and branches of the major plexuses from spinal nerves and classifies peripheral nerve injuries.
2. Mechanisms of nerve injury including compression, ischemia, traction and friction are outlined. The process of nerve degeneration and regeneration after injury is explained.
3. Methods for assessing peripheral nerve injuries are provided, including history taking, physical examination techniques, and electrodiagnostic studies. Specific peripheral nerves like the radial and ulnar nerves are used as examples.
This presentation give an upto date insightful information on balance/postural assessment and key domains of Occupational Therapy during assessment of balance using different scales.
This document discusses principles of tendon transfers for restoring lost movement. It outlines key principles such as having supple joints before transfer, using a donor tendon with adequate excursion and strength, adhering to principles of synergy and straight line of pull. The timing of transfers depends on the likelihood of nerve recovery but can be done early to aid recovery. Contraindications include a lack of suitable donor muscles or transfers for joints with stiffness. Classification systems like Sunderland and Seddon are used to describe nerve injuries requiring tendon transfers.
This document provides guidance on assessing patients with spinal cord injuries. It outlines how to take a thorough history including injury details, symptoms, and rehabilitation. The assessment involves observing the patient, palpating for issues like edema, and examining motor function, sensation, reflexes, and functional abilities. Common scales for assessing spinal cord injuries are described, including the ISNCSCI for determining neurological level and the ASIA Impairment Scale for classifying injury severity. The SCIM is also summarized as a measure of independence in self-care, respiration/sphincter control, and mobility.
This document provides information about frozen shoulder (adhesive capsulitis), including its causes, symptoms, diagnosis, treatment, and rehabilitation. It describes frozen shoulder as a condition causing stiffness and tightness in the shoulder joint capsule. There are typically three stages: freezing, frozen, and thawing. Risk factors include age over 40, female gender, diabetes, injury or trauma, and recent surgery. Symptoms are pain, stiffness, and difficulty moving the shoulder. Treatment involves hot/cold packs, TENS, gentle mobilization exercises, and physical therapy focused on maintaining range of motion. The pathology involves inflammation and fibrosis of the joint capsule and synovium. Diagnosis is made based on signs, symptoms, and imaging like x
1. The document outlines the process of assessing the musculoskeletal system, including taking a thorough history, examining various parts of the body, and considering appropriate clinical investigations.
2. The history should explore the chief complaints, pain characteristics, and psychosocial factors, while the physical examination evaluates gait, range of motion, muscle strength, and other elements of the bones, joints, and nervous system.
3. Clinical investigations like radiography, CT scans, and MRI may be used to further diagnose musculoskeletal conditions, though guidelines recommend limiting radiation exposure when possible.
The document discusses orthopedic surgery and provides details on:
- The history and origins of orthopedics as a field dealing with deformities, bone/joint diseases, and musculoskeletal injuries
- Common symptoms in orthopedics such as pain, stiffness, swelling, and deformity
- The typical examination process for orthopedic issues including inspection, palpation, and assessing range of motion and tests
- Key terminology used in orthopedics to describe anatomical planes, directions, alignments, and types of deformities
This document provides an overview of orthopedic surgery and musculoskeletal symptoms and examination. It discusses the history and origins of orthopedics, describes common orthopedic symptoms like pain, stiffness, swelling, and deformity. It then outlines the process of examining a musculoskeletal patient, including inspection, palpation, and assessing range of motion and muscle strength. Various joint types are also classified, including fibrous, cartilaginous, and synovial joints. Synovial joints are described in further detail.
Rheumatoid arthritis is a chronic inflammatory disease that causes pain, stiffness, swelling and loss of function in the joints. It is characterized by symmetrical inflammation of peripheral joints. Treatment involves rest, splinting, medications and physical therapy exercises to relieve pain, improve range of motion and function. The goal of rehabilitation is to reduce inflammation, prevent deformities and help patients maintain independence with daily activities. The prognosis can vary from partial remission to slow or rapid progression resulting in joint damage and disability.
The document summarizes a case of a 29-year-old male patient referred to physical therapy with complaints of gradually developed right knee pain, increased stiffness with activity, mild swelling, and occasional popping sound while climbing stairs. The patient is an avid long distance runner covering 10 miles 4 days a week and occasionally does biking. The physical therapist suspects possible right iliotibial band syndrome based on the patient's medical history and symptoms affecting his normal exercise routine.
Part 4 examination of motor and sensory systemAtul Saswat
This document summarizes the examination of the motor and sensory systems. It describes how to examine muscle bulk, tone, power, and involuntary movements. It also outlines how to test various sensory modalities like pain, touch, temperature, proprioception, vibration, and cortical sensations. Key points examined include muscle wasting, tone (loss or increase), power grading, reflexes, coordination, dermatomes, and signs for proprioception. Assessment methods are provided for each test with normal and abnormal findings.
Rotator cuff injuries are common in the upper extremity. The rotator cuff is made up of four muscles that stabilize the shoulder joint. Rotator cuff tendinitis is an inflammation of the tendons that makes up the rotator cuff, usually caused by repetitive overhead motions. Symptoms include shoulder pain that worsens with overhead activities. Treatment focuses on rest, ice, anti-inflammatory medications, and physical therapy. Surgery may be needed for tears that do not improve with nonsurgical treatment.
Mukesh Suryawanshi - The human shoulder is a complex joint that allows for a wide range of motion. However, there is also a risk of injury, especially to the rotator cuff. The rotator cuff is a group of muscles and tendons that surround the shoulder joint, providing stability and enabling movement. When the rotator cuff is damaged or torn, it can cause pain, and limited mobility, and affect daily activities. In such cases, rotator cuff surgery becomes a viable option to reduce symptoms and restore shoulder function. In this blog, Mukesh Suryawanshi Morya Suisse will explain the details of rotator cuff surgery including its purpose, procedures, recovery, and possible results. Mukesh Suryawanshi.
- Rotator cuff tears are a common shoulder injury, especially in overhead sports or jobs involving repetitive arm movements.
- The rotator cuff is made up of four muscles that stabilize the shoulder joint and allow for arm movement.
- Rotator cuff tears can be caused by acute injuries like falls or repetitive stress/overuse from activities like throwing.
- Symptoms include shoulder pain and weakness, especially with overhead motions. Exams involve range of motion and strength tests.
- Treatment may include rest, anti-inflammatories, physical therapy, corticosteroid injections, or surgery to repair the tear.
Occupational therapy uses purposeful and therapeutic activities to help people participate in daily tasks according to their goals. Therapeutic activities include exercises focused on improving range of motion, strength, or a specific function as well as purposeful activities where the focus is on completing a meaningful task. Occupational therapists evaluate clients, develop customized intervention plans involving different types of exercises and activities, and assess outcomes to ensure goals are met.
A 21-year old female marathon runner has begun experiencing knee pain around the patella after increasing her training from twice to 4-5 times per week on hills. This document provides an overview of patellofemoral pain syndrome (PFPS), including causes, risk factors, diagnosis, and treatment options. PFPS is caused by an imbalance of forces around the patella that leads to pain. Treatment focuses on strengthening the quadriceps and hips to correct biomechanics and management of pain. The prognosis is generally good if treatment addresses contributing factors and allows for gradual return to activity.
Abstract
Objective: To assess the outcome of arthroscopic release in patients with cronicalchronic lateral epicondylitis. Materials and methods: Arthroscopic release in three patients with lateral epicondylitis was performed. The Mayo Elbow Performance Index (or Mayo Elbow Performance score) was used pre and post surgical treatment. Sample: Two females and one male. The patients were principal labourers and not athletes. Patients had significant pain and pain was the principal symptom that affected the score of the performance index.
Results: Scores on the performance index improved after surgery. No neurological complications were reported and early return to normal daily activities was noted.
Conclusion: Arthroscopic treatment was an alternative safe and effective method for treating chronic lateral epicondiyitis in three cases. This method makes it possible to simultaneously scan the articulation to diagnostic and treatment associated diseases. It is necessary most wide assays and comparative studies for establish sure treatment protocols.
What is a PowerPoint presentation or PPT? Answer: A combination of various slides depicting a graphical and visual interpretation of data, to present information in a more creative and interactive manner is called a PowerPoint presentation or PPT.
Different Splinting Time for Carpal Tunnel Syndrome in Women: Comparative Studyiosrjce
Study objective: To define the best splinting wear times, night or day, in pain relief for female patients with
idiopathic chronic CTS in exacerbation phase.
Design: Quasi experimental comparative design.
Method and measurements: 24 female patients (42 wrists) from military hospital in Riyadh participated in
this study. Their CTS was diagnosed by the nerve conduction velocity (NCV). On basis of splint wear time
patients were divided into two groups; day time and night time. Thermoplastic, custom-made,neutral
wristsplints were given to both groups (21 wrists each). Patients completed 3 consecutive weeks of follow-up.
Pain (pressure) threshold through, algometer, was used to measure the pain in both groups. Four
measurements were applied; one at the initial assessment and 3 during follow-up weeks.
Results: The current study showed a statistical s i g n i f i c a n t improvement (p = 0.0001) in pain threshold
with splint wear. This was true for both groups. Patients received splint in day time showed little increase in
pain threshold when compared with night time wear instruction but without significant difference.
Conclusion: W rist splint is an effective conservative treatment for CTS. No difference was found between
night or day time splint wear. Patient should wear the splint at their most adherent time
This document discusses two clinical tests used to evaluate low back nerve pain - the straight leg raise (SLR) test and the slump test. It reviews several studies on the sensitivity and specificity of these tests. While the SLR has high specificity, studies found it has low sensitivity in detecting nerve pain. In contrast, the slump test appears to be more sensitive and specific than the SLR, though more research is needed. The document concludes that both tests can provide useful information for clinicians when used along with other examination techniques.
Jose Austine- Orthopaedic evaluation of cerebral palsyJose Austine
This document provides an overview of cerebral palsy (CP), including its history, definition, classification, etiology, assessment, and orthopedic evaluation. CP is caused by non-progressive brain lesions early in development that result in abnormal muscle tone and movement. It is important to correctly classify a patient's CP based on their motor function and movement disorder. A thorough orthopedic evaluation includes assessing medical history, physical exam of muscle tone and strength, contractures, deformities, and gait. Gait analysis through observation and in a lab helps document the patient's movement and plan for surgical interventions. The goal of evaluation and classification is to guide appropriate treatment and management of CP.
Similar to Physiotherapy assessment in fracture and dislocation edited (20)
Stealth attraction for mens gets her with your wordsichettrisagar95
My article gives a set of techniques used by men to subtly and effectively attract women without overtly displaying their intentions. It involves using non-verbal cues, body language, and subtle psychological tactics to create intrigue and build attraction. The goal is to appear confident, mysterious, and charismatic while maintaining an air of mystery that piques the interest of the person you are trying to attract. This approach emphasizes subtlety and finesse in communication and interaction to create a powerful and lasting impression.
ProSocial Behaviour - Applied Social Psychology - Psychology SuperNotesPsychoTech Services
A proprietary approach developed by bringing together the best of learning theories from Psychology, design principles from the world of visualization, and pedagogical methods from over a decade of training experience, that enables you to: Learn better, faster!
Covey says most people look for quick fixes. They see a big success and want to know how he did it, believing (and hoping) they can do the same following a quick bullet list.
But real change, the author says, comes not from the outside in, but from the inside out. And the most fundamental way of changing yourself is through a paradigm shift.
That paradigm shift is a new way of looking at the world. The 7 Habits of Highly Effective People presents an approach to effectiveness based on character and principles.
The first three habits indeed deal with yourself because it all starts with you. The first three habits move you from dependence from the world to the independence of making your own world.
Habits 4, 5 and 6 are about people and relationships. The will move you from independence to interdependence. Such, cooperating to achieve more than you could have by yourself.
The last habit, habit number 7, focuses on continuous growth and improvement.
This presentation delves into the core principles of personality development as taught by Tim Han. Understand the importance of self-awareness, goal setting, and maintaining a positive attitude. Gain valuable tips on improving communication skills and developing emotional intelligence. Tim Han’s practical advice and holistic approach will help you embark on a transformative journey towards becoming your best self.
Aggression - Applied Social Psychology - Psychology SuperNotesPsychoTech Services
A proprietary approach developed by bringing together the best of learning theories from Psychology, design principles from the world of visualization, and pedagogical methods from over a decade of training experience, that enables you to: Learn better, faster!
2. Contributors:
1. Admund Anak Winduy
2. Ahmad Amirullah Bin Ahmad Jailani
3. Aishah Binti Hamid
4. Clementina Binti Banadus
5. Haziq Zhafri Bin Harun
6. Hazwani Binti Zubir
7. Khairul Nabilah Binti Azmir
8. Luqmanul Hakim Bin Mohd Ramli
9. Mohd Irfan Shalahuddin Bin Salem
10. Muhamad Khairul Imran Bin Mohammed Noor
11. Muhammad Afiq Bin Noor Azimi
12. Muhammad Azim Iqmal Bin Zamani
13. Muhammad Fadzwan Bin Hamali
14. Muhammad Fateh Bin Mohd Jasni
15. Noor Affifah Binti Abdul Ani
16. Nor Diana Syazwani Binti Mohd Zamri
17. Nur Irdina Izzati Binti Adnan
18. Nur Rasyidah Binti Mohd Jamri
19. Nur Roraini Airin Binti Rozizi
20. Nurasfawana Binti Jefpary
21. Nurhaidatul Alia Binti Sha’ari
22. Nurhuda Hanis Binti Mohd Fauzi
23. Nurul Aqilah Binti Juhari
24. Nurul Fatini Dalilah Binti Khairussalleh
25. Nurunnadhirah Binti Azmi
26. Nurzatul Sakinah Amalina Binti Zaidel
27. Renny Bagak
28. Riyaz Akmal Bin Mohd Raffi
29. Ulfah Binti Dzulkifli
Editor : Nurhaidatul Alia Binti Sha’ari
Ilustrator : Muhammad Afiq Bin Noor Azimi
3. Table Of Content
Topic Page
1. Pain assessment 1-3
2. Palpation 4-5
3. Range Of Motion 6-8
4. Muscle strength 9-11
5. Limb girth 12-14
6. Leg length 15-20
7. Swelling measurement 21-23
8. Bed mobility 24-27
9. Balance 28-29
10. Functional ability test 30-31
11. Crutch measurement 32-35
12. Wheel chair 36-48
13. Gait analysis 49-51
4. 1. Pain Assessment
Muhammad Fateh Bin Mohd Jasni (BJPA2020-0014)
Muhammad Azim Iqmal Bin Zamani (BJPA2020-0012)
Nur Diana Syazwani Binti Zamri (BJPA2020-0016)
Pain Scale (Numeric rating scale, NRS)
To measure a level of patient’s pain, the examiner may use pain scale. Visual
analogue scale is recommended because of its reliability and ease of use. In this scale,
the result is determined by the patient. The patient has the option to verbally rate their
level of pain from zero to ten. Explain to the patient that zero indicate the absence of
pain, while ten represents the most intense pain possible. Ask the patient to choose
the level of pain that best describes how he or she is feeling before proceed to next
assessment. Advantages of NRSs include simplicity, reproducibility, easy
comprehensibility, and sensitivity to small changes in pain. Children as young as 5
years who are able to count and have some concept of numbers
Visual analogy scale (VAS)
The Visual Analogue Scale (VAS) is a measuring instrument that seeks to quantify
features or behaviours that are assumed to revolve around a range of values that
cannot be directly measured. It is often used to assess the severity or frequency of
different symptoms in epidemiological and clinical research. Can be used in all age
groups—including preschool children (with supervision), as well as elderly patients.
1
5. Verbal Rating Scale (VRS)
In the Verbal Rating Scale (VRS) adjectives are used to describe different levels of
pain. The patient was asked to mark the adjective that best suited the intensity of the
pain. Can be used with any individuals, including those with moderate to severe
cognitive impairment.
FLACC scale
For children aged two to seven. It assesses a child's pain based on their facial
expression, leg and arm movements, extent of crying and ability to be consoled.
2
6. Pain drawing
Pain drawing is a simple way to get a graphical representation of where pain is felt by
a client. Pain drawing consists of an outline of the human body, front and back, where
the client demonstrates where the pain is experienced by digging the painful area and
showing the type of pain by using symbols such as pins and needles or a burning
sensation
3
7. 2. Palpation
Hazwani Binti Zubir (BJPA2020-0006)
Nurhuda Hanis Binti Mohd Fauzi (BJPA2020-0022)
Palpation of bone and soft tissue structures will provide information on several physical
findings, including temperature, swelling, point tenderness, crepitus, deformity, muscle
spasm, skin sensation, and pulse.
Bilateral palpation of paired anatomical structures can be detected with these physical
findings:
Skin temperature - The temperature of the skin should be noted when the
fingers first touch the skin. Increased temperature at the injury site may indicate
inflammation or infection, while lower temperatures may indicate a reduction in
circulation.
Swelling - The presence of localized or diffuse swelling can be determined by
palpation of the wounded area.
Point tenderness and crepitus - Inflammation may be indicated when felt over
the tendon, bursa, or joint capsule. It is important to note any trigger points that
may be found in the muscle and, when palpated, to refer pain to another
location.
Muscle spasm and deformity - Palpation should determine variations in soft
tissue density or sensation that can signify muscle spasm, scarring, myositis,
or other conditions.
Cutaneous sensation - By rubbing the finger along both sides of the body part
and asking the patient if it feels the same on both sides, it may measure the
cutaneous sensation. This technique, particularly if the person has numbness
or tingling in the limb, may determine potential nerve involvement.
Pulse - Peripheral pulse distal to injury should be used to rule out damage to
the major artery. The radial pulse at the wrist and the dorsalis pedis pulse at
the dorsum of the foot are typical locations (Fig. 2).
4
8. Figure 2 Peripheral pulses. Pulse can be taken at the radial pulse in the wrist (A)
or the dorsalis pedis on the dorsum of the foot (B).
5
9. 3. Range of Motion (ROM)
Clementina Binti Banadus (BJPA2020-0004)
Nurzatul Amalina Sakinah Binti Zaidel (BJPA2020-0026)
The ability to perform a movement is known as a range of motion (ROM). The range
of motion can be measured using a goniometer.
Range of Motion(ROM) assessment is done to evaluate the range of motion (ROM)
on the main joints used for performing activities and self-care management. It is also
used to plan the treatment that will be given to the patient in order to help them
performing movements at the optimal range of motion.
ROM evaluation can be done through three (3) ways namely:
i. Active range of motion - patient can perform movement independently.
ii. Assisted active range of motion - patients perform their own movements while
helping themselves by using non-affected side .
iii. Passive range of motion - patients are unable to perform their own movements
thus need help from others.
6
10. Upper limb Range of Motion (ROM) Assessment
Shoulder joint
Movement Normal ROM (degrees)
Flexion 0 – 180
Extension 0 – 60
Internal rotation 0 – 70
External rotation 0 – 90
Abduction 0 – 150
Adduction 0 – 50
Elbow joint
Movement Normal ROM (degrees)
Flexion 0 - 150
Extension 0
Pronation 0 - 90
Supination 0 - 90
Wrist joint
Movement Normal ROM (degrees)
Flexion 0 - 75
Extension 0 - 70
Ulnar deviation 0 - 30
Radial deviation 0 - 20
7
11. Lower limb Range of Motion (ROM) Assessment
HIP JOINT
MOVEMENTS ACTIVE (degree)
Abduction 0 - 40
Adduction 0 - 30
Extension 0 - 30
Flexion 0 - 120
External Rotation 0 - 45
Internal Rotation 0 - 45
KNEE
MOVEMENTS ACTIVE (degree) Information
Extension 0 - (-5) hyper mobility
Flexion 0 - 135
ANKLE
MOVEMENTS ACTIVE (degree) Information
Eversion 0 - 10
Inversion 0 - 20
Dorsiflexion 10 - 20 10 for knee ext
/ 20 for knee
flex
Plantarflexion 30 - 50
8
12. 4. Muscle Strength
Admund Anak Winduy (BJPA2020-0001)
Muhammad Afiq Bin Noor Azimi (BJPA2020-0011)
Muscle strength is used to assess complaints of muscle weakness, often when a
patient is suspected of having a neurological disease or the occurrence of muscle
imbalance or weakness
9
Illustration
photos
13. Femur is the proximal hind limb bone located on the vertebrate tetrapod, femur is the
largest bone of the human body. The head of the femur is articulated with the
acetabulum located in the pelvic bone that forms the hip joint, while the distal part of
the femur is articulated with the tibia and knee then the knee joint will form.
But what will happen if the femur is fractured or dislocated? Of course the thing that
will happen is that the muscles located near the femur will stop working for a while.
Among the muscles involved are the hamstring, quadriceps and adductor muscles
where these muscles work together for the process of straightening or lengthening the
legs and the process of bending the legs while the legs will be pulled together with the
adductor muscles. Due to not being able to perform their duties then these muscles
will experience muscle atrophy.
10
Example of Femur
Bone
14. Muscle atrophy is occurs when a muscle has lost its capacity. It usually occurs when
a person lacks physical activity. When a person suffers from illness or injury then it will
make a person difficult and even impossible to move the arms or legs. Lack of mobility
can also lead to muscle weakness. Finally, we can identify that fractures or bone
dislocations can have a huge impact on our body and obviously, muscles will lose their
ability and need a certain amount of time to restore them to their original state.
11
Examples of Muscle
Atrophy
Femoral
Fracture
Muscle at
thigh
15. 5. Limb Girth
Ahmad Amirullah Bin Ahmad Jailani (BJPA2020-0002)
Luqmanul Hakim Bin Mohd Ramli (BJPA2020-0008)
Limb girth or girth measurement is a method to look for changes that happen
on body dimensions over time by using tape. It’s commonly used to determine
the composition, body size, swelling, muscle atrophy and to monitor changes
in parameters. Girths are circumference measures at standard sites of
anatomical around the body.
The equipment requires is a measurement tape and a pen. While the Myotape
also can be used for self-assessment.
Assist with the comparing data
Indications: swelling, muscle atrophy, and joint effusion
Advantages:
Low cost involving in the testing procedure
Easy to handle (can be self-administered for
many sites)
Relatively accurate
Calculations can be performed easily
Disadvantages:
Some individuals may feel uncomfortable
Not work well for lean individuals and lack high
appeal
Procedure:
All measurement need to be recorded
Make sure tape is not too loose or too tight
Flat on the skin (horizontal)
12
16. GIRTH MEASUREMENTS:
Forearm (Arm Flexed)
Taken on the correct aspect of the body. The arm is raised to
a horizontal position within the sagittal (forward) plane, with
the elbow at concerning forty-five degrees. The subject
maximally contracts the skeletal muscle, and therefore the
largest circumference is measured. Once recording, make
sure the tape isn't too tight or too loose, lying flat on the skin,
and is unbroken vertical. The supreme girth isn't invariably
obvious, so the tape may have to move along to search out
the purpose of the most circumference.
Upper Thigh (Gluteal) Girth
Taken on the correct aspect of the body. The subject stands
erect with their weight equally distributed on each foot and
legs slightly compound. The circumference live is taken one
cm below the striated muscle line or fold (buttock crease) with
the tape command horizontal. Once recording, you would like
make sure the tape isn't too tight or too loose and is lying flat
on the skin. This measurement is used to make the clothing
easier to fit when you're sitting somewhere.
Ankle joint
Placed the zero-point over the mark on the anterior facet of the
ankle joint and force the tape medially over the navicular
eminence, so infero-laterally across the medial arch to the
proximal facet of the bottom of the fifth metatarsal. The tape
was then force superiorly and medially over the tarsal bones
across the inferior facet of the medial malleolus, and
posterolaterally round the sinew over the distal lateral
malleolus to complete at the zero. Lastly record the measure.
13
17. 14
Chest Girth
Place the tape just above the bust and passing the tape under
the arms. When the tape is in position, the arms should be
relaxed by the side and the measurements were taken at the
end of the normal breathing. When recording, it is necessary
to make sure that the tape is not too tight or too loose, is flat
on the skin, and horizontal, especially around the back. The
measurement is taken at the widest point of the chest just
above the bust.
Waist Girth
Placing the tape around the narrowest part of the waist,
usually above the belly button. If you are unsure that this
measurement has been taken at the narrowest level, take
several measurements at different levels and take the lowest
measurement. Keep the tape flat and horizontal on the floor,
not too tight or too loose, and must lie flat on the skin. This is
the measurement of the narrowest girth of the waist.
Calf Girth
This girth measuring is typically taken on the correct aspect
of the body. The topic stands erect with their weight equally
distributed on each feet and legs slightly apart. Measuring is
taken at the amount of the most important circumference of
the calf. The maximal girth isn't continuously obvious, and
also the tape may have to be right up and right down to notice
the purpose of most circumference. Once recording, make
sure the tape isn't too tight or too loose, is lying flat on the
skin, and is horizontal. It’s going to facilitate to own the topic
stand on a box to form the measuring easier.
18. 6. Leg Length
Haziq Zhafri Bin Harun (BJPA2020-0005)
Riyaz Akmal Bin Mohd Raffi (BJPA2020-0028)
LEG LENGTH DISCREPANCY
Leg length discrepancy (LLD) or anisomelia, is defined as a condition in which
the paired lower extremity limbs have a noticeably unequal length. Leg length
discrepancy (LLD) has been a controversial issue among researchers and
clinicians for many years. Its presence is accepted but there is little consensus as
to its many aspects, including the extent of LLD considered to be clinically
significant, the prevalence, reliability, and validity of the measuring methods, the
effect of LLD on function, and its role in various neuromusculoskeletal conditions.
CLASSIFICATION OF LEG LENGTH DISCREPANCY
ANATOMICAL
- structural limb length inequality. It’s a physical (osseous) shortening of one
lower limb between the trochanter femoral major and the ankle mortise.
Congenital conditions include mild developmental abnormalities found at birth
or childhood, whereas acquired conditions include trauma, fractures,
orthopedic degenerative diseases, and surgical disorders such as joint
replacement.
FUNCTIONAL
- non-structural shortening. It is a unilateral asymmetry of the lower extremity
without any shortening of the osseous components of the lower limb. FLLD may
be caused by an alteration of lower limb mechanics, such as joint contracture,
static or dynamic mechanical axis malalignment, muscle weakness, or
shortening. It is impossible to detect these faulty mechanics using a non-
functional evaluation, such as radiography. FLLD can develop due to an
abnormal motion of the hip, knee, ankle, or foot in any of the three planes of
motion.
15
19. EXAMINATION MEASURE
- The most accurate method to identify leg (limb) length inequality
(discrepancy) is through radiography. It’s also the best way to differentiate an
anatomical from a functional limb length inequality.
WALKING
o Gait asymmetries throughout the kinetic chain
o Increased vertical displacement of the center of mass resulting in
increased energy consumption. Compensatory mechanisms for this
include-calcaneal eversion: knee extension: toe walking:
circumduction: hip or knee flexion (steppage gait)
o Decreased stance time and stride length in the shorter leg
o Decreased walking velocity, increased walking
16
20. DIRECT METHODS
o Involves measuring limb length with a tape measure between 2 defined
points, in the stand. Two common points are the anterior iliac spine and
the medial malleolus or the anterior inferior iliac spine and lateral
malleolus. Be careful, however, because there is a great deal of
criticism and debate surroundings the accuracy of tape measure
methods.
o Always use the mean of at least 2 or 3 measures
o If possible, compare measures between 2 or more clinicians
o Iliac asymmetries may mask or accentuate a limb length inequality
o Unilateral deviations in the long axis of the lower limb may mask or
accentuate a limb length inequality
o Asymmetrical position of the umbilicus
o Joint contractures
17
21. RUNNING
o Biomechanics in running is different from walking, as is the effect of
LLD. In running, the vertical oscillation is greater and there is no double
support so weight is not shared between legs. The stance phase is
only 30% in running whereas 60% in walking. This results in stress on
the lower extremity that is three times that of walking. Evidence is
conflicting about the effect of running but it is suggested that the effect
is also augmented threefold.
18
22. MEDICAL MANAGEMENT
- Two factors dictate if intervention is needed or not: the magnitude of the
inequality and whether or not the patient is symptomatic. It has been suggested
to divide limb length inequality into three categories: mild (0-30 mm), moderate
(30-60mm), and severe (>60mm). In addition, it had been suggested that mild
cases shouldn’t be treated surgically, except if the patient is symptomatic then
a non-surgical intervention can be applied. Moderate cases should be dealt with
case by case and may be dealt with surgical intervention. Severe cases should
be corrected surgically.
- SURGICAL INTERVENTION
o The treatments surgically induced slowing of growth by blockade of the
epiphyseal plates around the knee joint, or leg lengthening with
osteotomy and subsequent distraction of the bone callus with fully
implanted or external apparatus.
o Consist of stopping the bone growth (in the longest leg) in adolescents
and children.
o Sometimes, in patients with skeletal maturity, limb shortening by bone
resection procedures is sometimes performed.
o Limb lengthening is generally reserved for LLI greater than 40-50mm. It
involves cortical osteotomy followed by the extremity being fitted with an
external fixation device that applies continuous longitudinal distraction
across the osteotomy site.
- NON-SURGICAL INTERVENTION
o consists of stretching the muscles of the lower extremity. This is
individually different, whereby e.g. Tensor Fascia Latae, the adductors,
the hamstring muscles, piriformis, and Iliopsoas are stretched or any
muscles in the kinetic chain needing stretching or strengthening are
addressed.
o This non-surgical intervention belongs also to the use of shoe lifts. These
shoe lifts consist of either a shoe insert (up to 10-20mm of correction) or
building up the sole of the shoe on the shorter leg (up to 30-60mm of
correction). This lift therapy should be implemented gradually in small
increments.
19
23. Block Method
o Using block adjustment methodology by standing weight-bearing position. The
patient compensates for shortening by abduct the leg. Correct the deformity
first whereas keeping the trunk erect.
o Correction of the deformity is recommended by iliac spines being at an
equivalent level.
o As shortly as each ASIS are level insert wooden blocks beneath the affected
foot so as to maintain at that level. The height of the woodblock needed is the
limb length inequality.
20
24. 7. Swelling Measurement
Aishah Binti Hamid (BJPA2020-0003)
Nur Rasyidah Binti Mohd Jamri (BJPA2020-0018)
Ulfah Bin Dzulkifli (BJPA2020-0029)
Excess fluid trapped in patient’s body tissues will cause swelling known as edema.
This is the effect of increased flow of fluid and white blood cell to the injured area.
Edema can affect any part of the body especially in the legs, ankles, feet, hands and
arms of fractured and dislocated limb. The way to relieve edema is usually by taking
medication that can remove excess fluid and reduce the amount of salt in the food.
The prolonged symptom requires specific care in cases where edema could be a sign
of a fundamental infection.
Material used:
Tape measurement and semi-permanent marker pen. A tension-controlled tape is
recommended over normal tape for measurement accuration.
Qualitative assessment
Symptoms and Signs
History taking is important to know the causes of legs swelling. Key elements of the
history include:
o What is the duration of edema? Acute or chronic. Record the changes in edema
o Is the edema painful?
o Does the edema improve? Inflammation is the sign of the body reacting to the
limb’s injury to protect it from further injury. Swelling is the part of healing
process although excessive swelling indicates overuse to the injured area.
21
25. Physical Examination
Key elements of the physical examination include palpation of edema:
o Distribution of edema: This may occur along the length of the leg or may be
more localized. This assessment of edema is vital in identification of causes of
swelling whether it is because of fracture/dislocation or other issues.
Unilateral leg edema
Bilateral edema
Generalised edema
Diagram shows an edema results from fracture ankle
o Tenderness- pain when touched and cannot bear weight on the injured area.
o Skin changes; the temperature of the swelling site is high than uninjured limb.
The heat radiates from the swelling area is due to extra blood flow.
o Type of edema; may be filled with colourless/yellowish liquid or inflammation
reaction to the bone and joint injury.
22
26. Quantitative assessment of edema:
Figure of Eight method is a technique for measuring girth and it cover a large area.
This method is suitable for swelling of hand and ankle swelling. Edema is measured
on the most swollen part of the fractured/dislocated area.
Before measurement is recorded,
bony landmark of limb is marked for
consistent and ease of measurement.
Put patient in suitable position
according to the assessed limb.
Lower limb fracture of an ankle;
For assessment of ankle, set patient in
lying position and prepared the knee in
flexed position if necessary.
Make sure testing ankle maintained in
neutral dorsiflexion.
First put the tape at the middle anterior ankle between tibialis anterior tendon and
lateral malleolus. Draw tape medially across the arch and underneath the base of fifth
metatarsal to the top of the foot. Bring the tape around the medial malleolus to the
Achilles tendon and back to the starting point. The measurement is recorded for three
times and the average is taken. The result of the measurement may be compared with
uninjured ankle.
The diagram shows comparison between injured and uninjured ankle
23
27. 8. Bed Mobility
Khairul Nabilah Binti Azmir (BJPA2020-0007)
Nurul Aqilah Binti Juhari (BJPA2020-0023)
PURPOSE OF BED MOBILITY
Moving to a sitting position at the side of the bed, and leaning on the side of the bed,
to comfortably help patients roll to the side of the bed.
EXERSICE TO IMPROVE BED MOBILITY
Bed mobility is called the capacity to move around in bed. To help improve the way
able to scoot, roll, and sit up or lie down on bed, physical therapy can recommend
specific exercises:
1. Gluteal Sets to Improve Bed Mobility - The gluteal sets is a simple exercise to do
that can get buttock muscles working after a period of bed rest. It may also be done
after surgery to keep blood moving to prevent blood cloot. The squeezing and relaxing
of butt muscles act like a sponge, pushing blood along through body to prevent
clotting.To perform the gluteal set, lie on back in bed and squeeze buttocks holding
back flatulence. Squeeze buttock muscles (called the gluteals or glutes) and hold them
squeezed for five seconds. Relax slowly and repeat the exercise for 10 repetitions.
24
28. 2. Hip adduction squeeze - To boost the way move in bed; powerful hip muscles are
important. A great isometric exercise is the hip adduction squeeze that can strengthen
the function of groin muscles. Obtain a ball or a rolled up bath towel to execute the hip
adduction squeeze. With knees bent and a ball between them, lie flat on back. Tighten
the muscles of stomach and then squeeze the ball or towel gently. For five seconds,
hold the squeeze, and then relax slowly.Repeat 10 repetitions of the hip adduction ball
squeeze and then proceed to the next bed mobility exercise.
3. Low trunk rotation to improve rolling in bed - To help safely get out of bed in the
morning, the ability to roll in bed is important. Here's how you're doing that:
Lie with your legs bent on your back.
Roll your knees to one side slowly and softly.
When your knees roll, make sure to keep your shoulders flat.
Return your knees to the starting spot, then roll to the other side.
Repeat for 10 reps.
25
29. 4. Straight leg raise to improve bed mobility - To help keep going in bed, strengthen
the strength of hip muscles. Lying on back with one knee bent and one knee straight,
to do the workout. Tighten the muscles in the straight leg on the top of calf, and raise
leg up about 12 inches slowly. Keep this place for two seconds, then drop the straight
leg down slowly. For each leg, repeat for 10 repetitions.
Roll to side
Tell patient to clench their hands together and bend the opposite knee. After patient
flex their head and neck towards the side they want to roll, then the patient can roll
their opposite shoulder. When patient already on their side, ask them to bend their
leg and slide the leg from the bed with knees bent. Instruct patient to push their body
using arms.
26
30. Supine to sit
Using the same procedure as roll to side and then patient move to the edge or with
the help of draw sheet to the edge of bed. After that, patient hold the edge of bed
with arm and pushes the trunk up while put their leg over the edge. Patient can
slowly shift their weight to do erect posture and move forward to the edge until the
feet are firmly on the floor with guidance from physical therapy.
27
31. 9. Balance: Static And Dynamic
Nur Roraini Airin Binti Rozizi (BJPA2020-0019)
Nurunnadhirah Binti Azmi (BJPA2020-0025)
The purpose of balance training in physiotherapy assessment are to prevent fall,
prevent inactivity and to improve physical ability, help to improve function and balance
in daily life.
Static balance is the ability to ensure body in some postural stability. Body at rest.
Dynamic balance is the ability to maintain stabilize posture while the other body parts
are in anticipatory phase to an action occurring. Adopted posture when the body is in
action.
28
32. Single-leg stance exercises
Physiotherapy assessment:
Try to balance the injured leg and stand without using any support.
For 30 seconds, keep standing on the one leg
Repeat for 3 times with the same move.
Begin to do the exercise with eyes open and then closed eyes
When the patient has mastered the exercise, try to do the exercise with same
posture on a pillow or any unstable surface
Maintaining proper balance is important when the fracture is healing. Balancing
training either in static or dynamic can help the patient to regain normal balance to
help them return to their normal daily activities.
29
33. 10. Functional Ability Test
Nurasfawana Binti Jefpary (BJPA2020-0020)
Renny Bagak (BJPA2020-0027)
Functional test is referred to as a measure of performance based on patient’s tasks
assessed by performing a variety of tasks such as strength based activities, postural
tolerance, balance, lifting mobility and hand dexterity. It is also a test to determine the
functional capabilities of the patient which is important role in the evaluation of the
patient-test selected needs to address their injury. May involve task analysis,
observations of patient’s day activities or evaluation of the patient’s ability to function
in everyday life. Test will be depending on the patient lifestyle, activities, sport and
more again.
Next, to evaluate physical, cognitive, and psychosocial abilities required for patient’s
independence. When doing functional test on the patient, physiotherapist must identify
acute or chronic conditions impacting negatively on the effected and non-effected side
injury and factors influencing the fracture that happened to patient.
Besides, with this functional test physiotherapist can setting up aim and goal, plan
treatment, and the effective management for patient to promote and maintain optimal
function. It also to reduce the chance of falling in community for patient in the future.
30
34. Example : timed sit to stand, grip strength, stair climbing, 20 meter timed walk.
Purpose of functional ability
To get quickly information about:
● Quality of movement
● Pain score during movement
● Active range of motion (ROM)
● Muscles strength
As physiotherapist, it is very important to give treatment or exercise that improve
functional ability of patient because when we give exercise it is must base on patient’s
problem is. Besides, the exercise that prescribed also must functional and cure during
daily living activities thus patient can apply that exercise during perform activity daily
of living (ADL). For example, if the patient having problem with gripping object so we
have to test the functional ability first before we give exercise that suitable for patient
and the exercise that prescribed must be related patient’s daily activities such as
gripping fork during eat. At the same, patient eating and also performing exercise
gripping an object.
31
35. 11.Crutches Measurement
Noor Affifah Bt Abdul Ani (BJPA2020-0015)
Nurul Fatini Dalilah Binti Khairussalleh (BJPA2020-0024)
Crutches is a kind of Walking Aids that serve to extend the individual size of the
Support Base. This transfers weight from the legs to the higher body and is commonly
employed by those who cannot use their legs to support their weight because of
fractures. For examples patient who had femur fracture on a limb they need to use
crutches (if their upper body can manage) as a way of ambulation.
There are 3 type of crutch:
Axilla or underarm crutches they must really be positioned concerning five cm below
the axillary fossa with the elbow flexed fifteen degrees, some. Each height and
appendage height may be adjusted about 12cm to 153 cm.
Forearm crutches (elbow or Canadian crutches). The length of the forearm crutches
indicated from handgrip to the ground. Can be adjusted from 74 to 89 cm.
Gutter/platform Crutches (forearm support crutches) these crutches consists of soft
forearm support made of metal, a strap and adjustable hand piece with a rubber cap.
These crutches used for patients can’t support their weight through the wrist and hand
because of arthritis or fracture.
32
36. Axilla crutches measurement
- X will determine the position of underarm piece in relation to the handgrip.
Important to mention that the measurement is taken when elbow is flexed less
than 30 degree
- Y will determine the distance along your handgrip and the bottom of the crutch
tip or the floor. The shoe must have great stability and flat.
- Z will determine the length of the cradle/underarm piece. It depend on thickness
of users arm, but it always standard measurement.
33
37. Or
- To determine the crutch length, need to measure the distance from patient’s
anterior axillary fold to a point 6 inches (15cm) lateral to the foot.
- Then the crutches is place 3 inches (7cm) lateral to the foot, to measure the
handpiece location. Patient’s elbow should be flexed 30 degree, wrist in
maximal extension and fingers are in fist.
- Patients should be able to raise their body 1-2inches when the elbow is fully
extended.
- X will determine the position of forearm piece in relation to the handgrip. It is
the distance from the elbow to the handgrip minus approximately 8 cm.
- Y will determine distance between handgrip to the floor. Also noted that the
shoes used are flat and gives stability to the patients.
34
39. 12. Wheelchair
Muhamad Khairul Imran Bin Mohammed Noor (BJPA2020-0010)
Nur Irdina Izzati Binti Adnan (BJPA2020-0017)
Nurhaidatul Alia Binti Sha’ari (BJPA2020-0021)
Physical Assessment:
As part of the seating evaluation process, the Mechanical Assessment Tool (MAT) is
commonly used by seating clinicians. The second portion of the Wheelchair Assessment
Process is a type of biomechanical assessment and physical evaluation. It consists of three
components to decide how much support the wheelchair user needs, with data from each
of these assisting wheelchair service staff.
i. Identifying the Presence, Risk of or History of Pressure Areas.
ii. Identifying Method of Propulsion.
iii. Assessment of Sitting Balance.
Presence, Risk of or History of Pressure Areas.
In most cases, a full musculoskeletal examination of the user's range of motion, joint
flexibility, muscle length, and skeletal alignment will also be included in the physical
assessment, with neurological problems such as tone and spasm patterns also noted as
they affect posture and muscle length. In their current wheelchair, in supine, and sitting
on a firm surface, it also incorporates a postural evaluation of the user. The wheelchair
service staff should continuously observe the wheelchair user and their interactions with
their equipment throughout the wheelchair evaluation, including both physical and
psychological interactions with the family member / caregiver.
36
40. There is a history or risk of skin breakdown, a skin check is indicated. Against seating
support surfaces such as the cushion and back support, several sitting-acquired pressure
areas develop. In the supine or side lying position, a skin check for redness or evidence of
skin damage is performed to evaluate these sites. If they cannot feel or have other risk
factors, a wheelchair user is at risk of developing a pressure area, including:
moisture from
sweat, water or
incontinence
poor diet and not
drinking enough
water
decreased
mobility and/or
paralysis
weight
(underweight or
overweight)
previous or
current pressure
sore
decreased
sensation
poor posture
aging
Diagram 1
37
41. Method of Propulsion
It is important to find out what propulsion method the wheelchair user is going to use to
push, as this can affect the wheelchair choice and the way it is set up, for example:
Diagram 2
38
42. Assessment of Sitting Balance
The data on the postural alignment of the patient at the head, shoulder, trunk, pelvis and
lower extremities should be collected using the skills of visual observation and palpation.
The Sitting Balance Assessment is finished to determine any additional postural support
devices required by:
Observation of sitting posture without support.
Fixed Posture
A part of the body of the wheelchair user is 'fixed'. There is no
motion with gentle force (strong force should never be used). To
accommodate the non-neutral (fixed) posture, wheelchair service
staff should provide support for
Flexible to Neutral Posture
The portions of the wheelchair user's body that are not neutral can
be brought to neutral with gentle force. The right support should be
given in this scenario to help the wheelchair user maintain a neutral
sitting posture.
Flexible Part way to Neutral Posture
With gentle force the parts of the wheelchair user’s body that are
not in neutral can be moved only part way toward neutral. Support
is provided in this situation to help the user of the wheelchair sit as
close to the neutral posture as is comfortable and functional for
them.
39
43. Observation Pelvis and Hip Posture Screen
Pelvis Posture Screen
Hip Posture Screen
Step explanation
i. The evaluator bends both the knees of the wheelchair user slightly and provides
some support, which helps to relieve hip tension
ii. The assistant places his hands firmly on the trunk of the wheelchair user, around
its lower ribs
iii. The assessor gently grips the pelvis with ASIS thumbs
iv. The evaluator checks whether the thumbs/ASIS are level
v. If not level, the evaluator tries gently but firmly to align the pelvis so that the two
ASIS are level
vi. If he/she feels the trunk movement, the assistant reports, which means there is
some limitation on the movement
vii. Note how close the pelvis can be brought to neutral/level
viii. If the pelvis can be level on the intermediate wheelchair evaluation form, the
evaluator records.
ix. An assistant gently but firmly holds the pelvis of the wheelchair user
x. The evaluator bends the leg that is not slightly tested at the knee, resting the foot
on the mat. This helps to reduce the tension in the tested hip. It may need to be
supported by this leg.
xi. The evaluator gently moves the tested leg into a neutral sitting posture
xii. If he/she feels the pelvis movement, the assistant reports, which means that the
movement has some limit (restriction)
xiii. The evaluator feels how the hip joint can move freely.
xiv. Repeats on the other side of the evaluator and compares
xv. Assessor records if the right and left hip on the intermediate wheelchair
evaluation form can bend to neutral sitting posture.
40
44. xvi. assessor records how close to neutral posture each hip can reach with a
goniometer with the help of an assistant
xvii. The assessor places the goniometer's pivot point on the hip joint. In line with the
trunk, the assessor places one arm of the goniometer along the thigh bone and one
arm
xviii. The evaluator firmly holds the two arms together
xix. Right and left hip angle measurements are recorded by the evaluator on the
intermediate wheelchair evaluation form. On a separate piece of paper or on the
back of the intermediate wheelchair assessment form, the assessor can also draw
the angle of the goniometer.
carrying out hand simulation to ‘simulate’ the support that a wheelchair and
additional postural supports may provide the wheelchair user
When performing a hand simulation, important aspects to remember are:
clarification to the wheelchair user about what you are going to do and
why. Ask the wheelchair user to sit on a flat surface that is firm but padded.
An evaluation box is designed so that the front, back and sides of the
wheelchair service staff and assistant or family member/ caregiver can
easily provide support to the wheelchair user. Ask an assistant or family
member/caregiver to support them if the wheelchair user cannot sit safely
without support. Ensure that the feet of the wheelchair user are supported
at the proper height for them.
Make sure remind them to:
Place where your hands are
The force/support direction
The amount of force/support used
How much surface area is covered by your hands (for example, you
use only one finger or an entire hand)
41
45. Part of the physical evaluation in order to start the hand simulation:
kneel or squat in front of the wheelchair user;
gently place hands on both sides of the wheelchair user’s pelvis;
if the wheelchair user’s pelvis is not in neutral - use hands to bring
the pelvis as close to neutral as is comfortable;
do not use very strong force;
find how close to neutral the pelvis can be supported;
observe how moving the pelvis towards neutral affects the
wheelchair user’s trunk, hips, head and neck.
Finally, ensure that you only make one change at a time and observe how other parts are
affected by changes in one part of the body, always receiving feedback from the user of
the wheelchair.
Example of form
42
46. Type of Wheelchair
Wheelchair is used as mobility device for person with a disability such as patient who
has fracture. It has sufficient support and allow for maximum functional mobility.
Wheelchair is needed by those who cannot or should not walk because it is
inadvisable. The patients need wheelchair to move freely because of these conditions.
a) Prior to ambulation
b) Inadequate safety in walking
c) Interference with wound healing
d) Contraindications to weight-bearing
e) Deficiency of the patient’s judgement
43
47. Involvement of both lower limbs usually resulting in deficiency in ambulation by many
conditions such as:
1. Paralysis
2. Incoordination
3. Pain on weight bearing
4. Absence of an essential part
5. Deformity
A typical wheelchair has average length of 42 inch, average height of 36 inch, average
seat heights around 19.5 inch and average width of 25 inch. A well-defined wheelchair
is can fit correctly, light weight in size, cosmetic to the user, strong as possible and
can modified based on needs.
There are a few factors depends on description given by the physiotherapist:
1. Age, size and weight
2. Functional skills
3. Indoor / outdoor use
4. Service
5. Disability and prognosis
6. Portability / accessibility
7. Reliability / durability
8. Cosmetic features
9. Options available
10. Cost of the wheelchair
11. Environment
44
48. The components of wheelchair are including the frame either stationary or foldable,
seat and cushion, fixed or removable arm rests, foot rests, adjustable or removable
leg rest and chest belts as restraints. There are also other components on the
wheelchair as shown in the picture.
Wheelchair has many types including:
1. Standard wheelchair
2. Standard lightweight wheelchair
3. Ultra lightweight transport wheelchair
4. Bathroom wheelchair
5. Reclining back rigid frame sports chair
6. Heavy duty paediatric wheelchair
7. Hemiplegic wheelchair
8. Amputee wheelchair
9. Sports wheelchair
10. Child/Junior chairs
11. Powered wheelchair
12. Highly advanced wheelchairs
45
49. Every patient who need to use wheelchair will undergo assessment process. The
steps of the assessment are shown below:
1. History of the patient
2. Interview the patient
3. Medical and surgical history
4. Tests and measures
5. Neurological status
6. Postural control
7. Musculoskeletal status
8. Sensory status
9. Functional skills level
10. Cognitive perceptual behavioural status
11. Communication level
12. Patient’s workplace
13. Patient’s home environment includes kitchen bathroom, doors and ramps.
Then, the patient will be examined with physical examination, examination of function
using existing equipment, supine examination and seated examination.
a) Physical examination
₋ Patients would be examined in gravity minimized position (supine or side lying)
₋ They would also be examined gravity dependent position (sitting)
b) Supine examination
₋ Determine the ROM of patient’s lower extremity.
₋ Pelvic tilt should be neutralized
₋ Flex the knee to 90° to 100° to eliminate effect of hamstrings.
c) Seated examination
₋ Determine the way patient slides out of chair
₋ Determine the way patient leans left, right or forward
₋ Determine any propelling difficulties
46
50. WHEELCHAIR FOR BROKEN LEG
INTRODUCTION
A fracture or a broken leg typically take about 8 until 12 weeks to heal, maybe even
slightly longer if patient have been unfortunate enough to fracture their femur. Till that
time, not only will their leg be in cast, patient will not be able to put any weight on the
broken leg.
If patient have suffered from an ankle fracture, physician therapist will most likely
advice their patient to keep the ankle bone facing upwards to quicken the healing
process. In a wheelchair, patient ankle will always face downwards.
47
51. ASSESSMENT
Assessment interview is the first part of the assessment. The assessment interview
components at both basic and intermediate level include information about wheelchair
user, patient physical condition, patient lifestyle and environment and also examines
patient existing wheelchair, if applicable.
Physician can ask their patient about her/his goals, so that, therapist can understand
what the wheelchair user expects from their wheelchair. For example, patient would
like to be more comfortable when sitting and be able to get into a lift to reach his/her
apartment.
Broken leg will not be able support any weight of patients, it is better if patient
wheelchair has calf supports attached with the footrest. The reason is because, it is
good for support patient leg / calf muscle.
The wheelchair must be lightweight and easy to maneuver for patient comfort. For
example, patient can use transport wheelchairs to travel with, compared to a standard
wheelchair. This will have increased mobility for patient because of these manual
wheelchair trade off some of the durability of a heavy-duty construction in exchange.
The width of the wheelchair must be narrow enough for patient to be able to
comfortably pass through doorways and passageways.
Finally, physician therapist would likely have to told their patient to maintain as much
physical activity as possible. Therefore, therapist can recommend for patient to buying
a manual self-propelled wheelchair and not the power wheelchair if their patient will
be likely on the wheelchair for about 2-3 months but still depend on patient budget and
condition. Self-propelling wheelchair will help patient to be active throughout their
recovery process.
48
52. 13. Gait Analysis
Muhammad Fadzwan Bin Hamali (BJPA2020-0013)
Mohd Irfan Shalahuddin Bin Salem (BJPA2020-0009)
Gait Analysis is the diagnosis of different neurological diseases and the evaluation of
patient improvement during rehabilitation and recovery from the effects of neurological
illness, musculoskeletal injury or disease process, or lower limb amputation, an
overview of each aspect of the three phases of ambulation is an important element.
The Gait Cycle
The walking sequences that occur can be summed up as follows:
1. Registration and activation within the central nervous system of the gait order.
2. Transmission of gait processes to the nervous system of the periphery.
3. Muscle contraction.
4. Generating various powers.
5. Regulation through synovial joints and skeletal segments of joint forces and
moments.
There are two stages in the usual forward step: the stance phase and the swing phase.
Both feet are in contact with the floor simultaneously for around 25 percent of the time
in a full two-step period. This portion of the cycle is referred to as the period of double
support. Phases of the gait cycle: the phase of stance and the phase of swing and
includes a mixture of movements of the open and close chain.
49
53. Gait training will help to strengthen the ability to walk and stand. If you've had an illness
or injury that affects your ability to get around, your doctor might prescribe gait training.
Even if you need an adaptive system, it can help you gain independence while walking.
Training in gait will assist:
1. Strengthen the joints and muscles
2. Improve the equilibrium and posture
3. Build up your stamina
4. Build your memory of muscles
5. For repeated motion, retrain your legs
6. Reduce the possibility of falls thus enhancing mobility
If you have lost your ability to walk because of an injury, disease, or other health
condition, your doctor can prescribe gait training. For instance, the following conditions
can lead to walking difficulties:
1. Lesions of the spinal cord
2. Split pelvis or legs
3. Joint accidents or substitutions
4. Amputations of the lower limbs
5. Neurological conditions or strokes
6. Dystrophy of muscles or other musculoskeletal diseases
The majority of exercises in gait training are intended to help strengthen your muscles
or enhance stability. Such activities might include:
1. Rolling around on a treadmill
2. To raise your legs
3. Sitting down there
4. Standing up, standing up
5. Stepping Items Over
50
55. References
1. Airaksinen, O., Brox, J. I., Cedraschi, C., Hildebrandt, J., Klaber-Moffett, J., Kovacs,
F., … Zanoli, G. (2006). Chapter 4: European guidelines for the management of
chronic nonspecific low back pain. European Spine Journal, 15(SUPPL. 2), 192–300.
2. American Chronic Pain Association, (2013). ACPA Resource Guide 2013 Edition
American Chronic Pain Association, 116
3. Carpenter, L., Baker, G. a, & Tyldesley, B. (2001). The use of the Canadian
occupational performance measure as an outcome of a pain management program.
Canadian Journal of Occupational Therapy. Revue Canadienne D’ergotherapie, 68(1),
16–22.
4. CAOT. (2012). CAOT position statement: Pain management and occupational
therapy.
5. Engel, J. (2013). Evaluation and Pain Managment. In Pendleton, H. M., & Schultz-
Krohn, W., Pedretti's occupational therapy: Practice skills for physical dysfunction (p.
718-728). Missouri, MO: Elsevier Health Sciences.
6. Anderson, M. K., & Parr, G. P. (2013). Foundations of athletic training: Prevention,
assessment, and management. Baltimore: Wolters Kluwer Health/Lippincott Williams
& Wilkins.
7. Victor, P., Francisco, A., Jaime, F. F. & Francisco G. V. (November 01,2015).
Descriptive profile of hip range of motion in elite tennis players. Physical Therapy in
Sport.
8. Palmer, M. L. & Epler, M.E. (1998). Fundamentals of Musculoskeletal Assessment
Techniques. Philadelphia, PA: Lippincott-Raven Publishers.
56. 9. Kent, M. (2007). The Oxford Dictionary of Sports Science & Medicine (3 ed.)
10. Kitai T. A. & Sale D. G. (1989). Specificity of joint angle in isomet-ric training. Eur
J Appl Physiol Occup Physiol. 58(7): 744–748
11. Daniel J. Hedequist, Benton E. Heyworth (eds.). (2010). Pediatric femur fractures:
A practical guide to evaluation and management (1 ed.).Springer International
Publishing.
12. Shrawan Kumar.(2004). Muscle strength(1 ed.). CRC Press.
13. Connolly J.F.(1995). Fractures and dislocations [Volume 2]. W.R Xaunders
Company.
14. Kenneth J. Koval, Joseph D. Zuckerman.(2006). Handbook of fractures (Third ed.).
Lippincott Williams & Wilkins.
15. Jim Stoppani.(2006). Encyclopedia of muscle & strength. Human Kinetics.
16. Alshami, A. M., & Alhassany, H. A. (2020). Girth, strength, and flexibility of the calf
muscle in patients with knee osteoarthritis: A case-control study. Journal of Taibah
University Medical Sciences, 15(3), 197–202.
17. Andrea, Oh. (2012, December 21). How to Take Accurate Girth Measurements.
Business.Fit.
18. Hart, J. M., Swanik, C. B., & Tierney, R. T. (2005). Effects of sport massage on
limb girth and discomfort associated with eccentric exercise. Journal of athletic
training, 40(3), 181–185.
57. 19. Thomovsky, S. A., Chen, A. V., Kiszonas, A. M., & Lutskas, L. A. (2016).
Goniometry and Limb Girth in Miniature Dachshunds. Journal of veterinary medicine,
2016, 5846052.
20. Robert Wood. (2008). "Ankle Girth Measurement." Topend Sports Website.
21. GA., K. (2005, December 13). anatomical & functional leg length. Retrieved from
Chiropractic & osteopathy
22. JC., D. (2019, November 12). Keys to recognizing and treating limb length
discrepancy. Retrieved from podiatry today
23. Khamis S, C. E. (2017, June 14). new concept for measuring leg length. Retrieved
from orthopaedic
24.Lueck, M., Spangler, C., Schilling, K., & Zwart, E. (2010). Edema Swelling
Measurement Device. United State: Physical Therapist Clinical Specialist, University
of Michigan.
25. Trayes, K., Studdiford, J., Pickle, S., & Tully, A. (2013). Edema: Diagnosis and
Management. American Family Physician, 102-110.
26. Sears, B. (2020, 5 20). Bed mobility in physical therapy. Retrieved from verrywell
health: (2020, 6 23). exersice to improve bed mobility. Retrieved from verywell health
27. Max Esser, M., & McRae , R. (2008). Practical Fracture Treatment (5th Revised
ed.). London, United Kingdom: Elsevier Health Sciences.
28. MD, K. A., MD, K. J., & MD, J. D. (2010). Handbook of fracture. New York:
Lippincott Williams & Wilkins.
29. MD, M. E., & MD MPH, R. L. (2011). Fracture Management for Primary Care (third
ed.). Portland, Oregon: Elsevier Saunders.
58. 30. Stanley Hoppenfeld, S., & L. Murthy, V. (1999). Treatment and Rehabilitation of
Fractures. Lippincott William and Wilkins.
31.Tonny J Pedersen & Jens M Lauritsen (2016) Routine functional assessment for
hip fracture patients, Acta Orthopaedica, 87:4, 374-379
32. Steve Allison, Jill Galper, David Hoyle & Jim Mocham (30 April 2018) Current
concept in functional capacity evaluation, A best practices guideline
33. Samsonaite, R. (2008). Transformable Crutch [PDF]. Lund: Lund University,
Industrial Design/LTH Department of Design Sciences.
34. Azzam Taktak, P. G. (2013). Clinical Engineering-1st Edition-A Handbook for
Clinical and Biomedical Engineers. Cambridge: Academic Press.
35. Sarah Frost, K. M. (2013). Wheelchair Service Training Package - Reference
Manual for Participants - Intermediate Level. Geneva: World Health Organization.
36. Michael KM, Allen JK, Macko RF. Reduced ambulatory activity after stroke: the
role of balance, gait, and cardiovascular fitness. Arch Phys Med Rehabil.
2005;86(8):1552–1556.