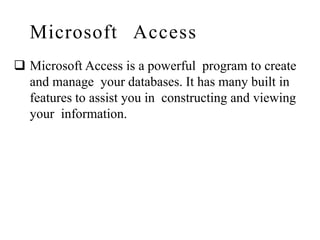
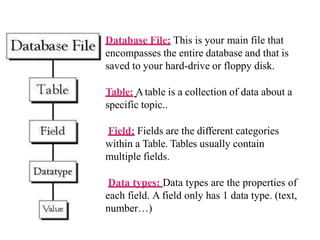
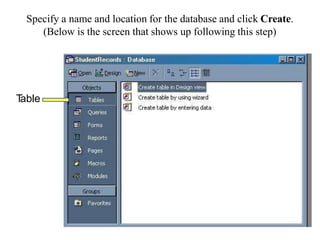
2. Microsoft Access
Microsoft Access is a powerful program to create
and manage your databases. It has many built in
features to assist you in constructing and viewing
your information.
3.
4. Database File: This is your main file that
encompasses the entire database and that is
saved to your hard-drive or floppy disk.
Table: Atable is a collection of data about a
specific topic..
Field: Fields are the different categories
within a Table. Tables usually contain
multiple fields.
Data types: Data types are the properties of
each field. A field only has 1 data type. (text,
number…)
5. Specify a name and location for the database and click Create.
(Below is the screen that shows up following this step)
T
able
6. Atable is a collection of data about a
specific topic, such as students or
contacts. Using a separate table for
each topic means that you store that
data only once, which makes your
database more efficient, and reduces
data-entry errors.
Tables
7. Under the Description column, enter the text that describes
what you field is. (This field is optional).
8. Primary Key
One or more fields (columns) whose value or values uniquely
identify each record in a table.
A primary key does not allow Null values and must always have
a unique value. A primary key is used to relate a table to foreign
keys in other tables.
NOTE: You do not have to define a primary key, but it's usually
a good idea. If you don't define a primary key, MicrosoftAccess
asks you if you would like to create one when you save the
table.
To do this, simply select the # field and select the primary key button
After you do this, Save the table
9. Switching Views
To switch views form the datasheet (spreadsheet view) and
the design view, simply click the button in the top-left hand
corner of theAccess program.
10. Entering Data
Click on the Datasheet View and
simply start "chugging" away by
entering the data into each field.
11. Manipulating Data
• Adding a new row
Simply drop down to a new line and enter the
information
• Updating a record
Simply select the record and field you want to
update, and change its data with what you want
• Deleting a record
Simply select the entire row and hit the Delete Key
on the keyboard
12. Create a Form using the Wizard
It is a very good idea to create a form using the wizard, unless you
are an advanced user and know what you are doing. Microsoft
Access does a very good job of creating a form using the wizard.
The following steps are needed to create a basic form:
Switch to the Database Window. You can do this by pressing F11
on the keyboard.
Click on the Forms button under Objects on the left side of
screen
Double click on Create Form Using Wizard
On the next screen select the fields you want to view on your
form. Most of the time you would select all of them.
13. Click Next
Select the layout you wish
Click Next
Select the style you desire...HINT: if you plan on printing your
form, I suggest you use a light background to save on printer
toner and ink
Click Next
Give you form a name, and select Open the Form and enter
information
Select Finish
You should see your form. To adjust the design of your form,
simply hit the design button (same as with the tables), and adjust
your form accordingly
14. Creatinga Report
As with the Form, it is a very good idea to create a report using
the wizard, unless you are an advanced user. Microsoft Access
does a very good job using the wizard to create reports.
3Switch to the Database Window. You can do this by pressing F11
on the keyboard.
Click on the Reports button under Objects on the left side of
screen
Double click on Create Report Using Wizard
On the next screen select the fields you want to view on your
form. Most of the time you would select all of them.
Click Next
15. Select if you would like to group your files. Keep repeating this
step for as many groupings as you would like.
Click Next
Select the layout and the paper orientation you desire
Click Next
Select the style you desire...HINT: if you plan on printing your
report, I suggest you use a light background to save on printer
toner and ink
Click Next
Give you report a name, and select Preview the Report
Select Finish
16. You should see your report. To adjust the design of your
report, simply hit the design button (same as with the tables),
and adjust your report accordingly