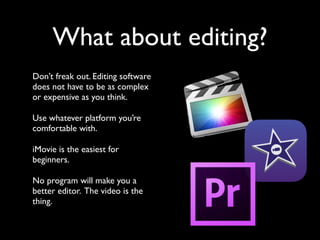
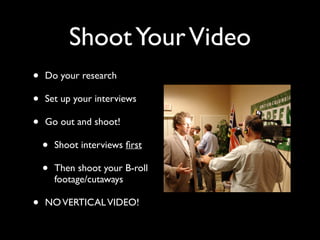
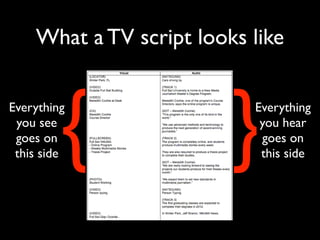
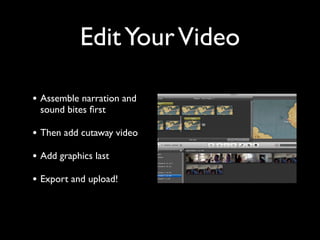
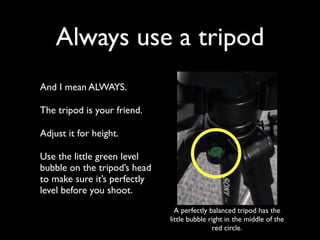
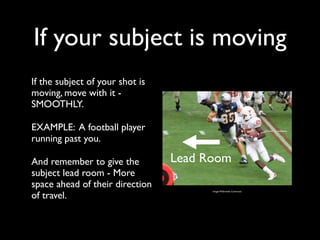
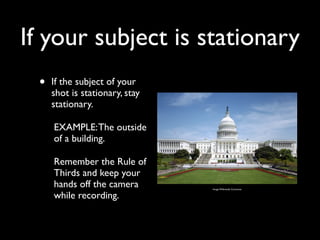
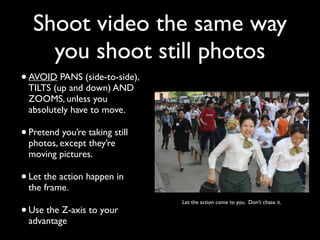
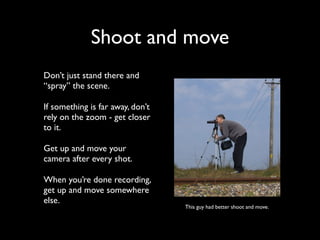
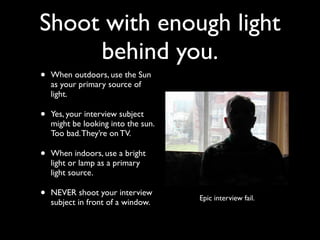
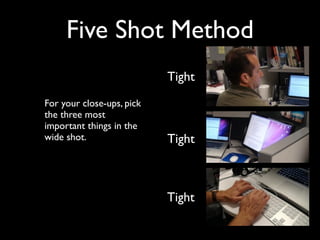
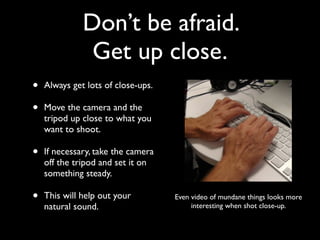
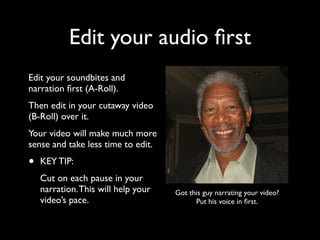
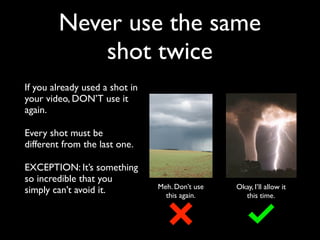
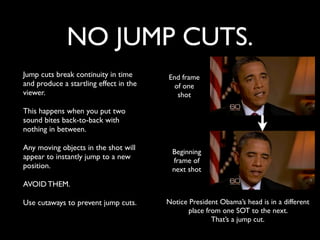
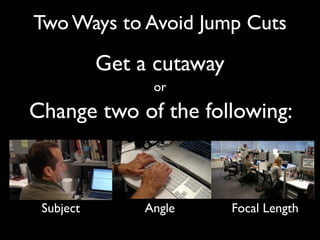
The 15 Commandments 
of Video 
Jeff Sharon 
Full Sail University 
@Jeff_Sharon
About Me 
• Graduated from UCF (’05) 
and Syracuse (’06) 
• Sports Reporter & Anchor for 
WNEG-TV (now WUGA) 
from ’06-‘08 
• Host and Coordinator of 
Broadcast Productions for 
UCF Athletics from ’08-’10 
• Course Director at Full Sail 
since 2011 
• UCF Insider for 
SportsTalkFlorida.com
Want to get noticed? 
! 
! 
! 
! 
Video is where it’s at.
Why? 
! 
More and 
more people 
are watching 
online video. 
Source: Pew Research
But if you’re going 
to do it, do it right. 
! 
This ain’t home 
movies.
What you need 
• Camera (or phone) 
• Tripod or Monopod 
• Lavaliere Mic 
• Headphones 
• Bag
What about editing? 
Don’t freak out. Editing software 
does not have to be as complex 
or expensive as you think. 
Use whatever platform you’re 
comfortable with. 
iMovie is the easiest for 
beginners. 
No program will make you a 
better editor. The video is the 
thing.
The Video Production 
Process 
1. Shoot. 
2. Write. 
3. Edit. 
4. Share.
Shoot Your Video 
• Do your research 
• Set up your interviews 
• Go out and shoot! 
• Shoot interviews first 
• Then shoot your B-roll 
footage/cutaways 
• NO VERTICAL VIDEO!
Write Your Story 
• Import your video. 
• Select your sound bites. 
• Then plan which shots you 
will use as cutaways and 
where you will place them. 
• Write your narration.
What a TV script looks like 
Everything 
you hear 
goes on 
this side { } 
Everything 
you see 
goes on 
this side
Edit Your Video 
• Assemble narration and 
sound bites first 
• Then add cutaway video 
• Add graphics last 
• Export and upload!
Post Your Video 
• Export at the right settings 
(Check for YouTube-optimized) 
• Upload to ONE site (not 
many) 
• Embed on your blog 
• Share on your Social Media
The 15 Commandments 
of Shooting and Editing 
Great Video
Rule #1 
Double-check 
your gear.
Double-check your gear 
Before you go on a shoot, make 
sure: 
• Your battery is fully charged 
• You have your tripod 
• Your microphones work 
• You have your headphones 
• You have your SD card (with 
room on it)
Rule #2: 
Always use a tripod.
Always use a tripod 
And I mean ALWAYS. 
The tripod is your friend. 
Adjust it for height. 
Use the little green level 
bubble on the tripod’s head 
to make sure it’s perfectly 
level before you shoot. 
A perfectly balanced tripod has the 
little bubble right in the middle of the 
red circle.
Rule #3 
If it’s moving, move with it. 
If it’s not moving, don’t 
move.
If your subject is moving 
If the subject of your shot is 
moving, move with it - 
SMOOTHLY. 
EXAMPLE: A football player 
running past you. 
And remember to give the 
Lead Room 
subject lead room - More 
space ahead of their direction 
of travel. Image: Wikimedia Commons
If your subject is stationary 
• If the subject of your 
shot is stationary, stay 
stationary. 
EXAMPLE: The outside 
of a building. 
Remember the Rule of 
Thirds and keep your 
hands off the camera 
while recording. 
Image: Wikimedia Commons
Shoot video the same way 
you shoot still photos 
• AVOID PANS (side-to-side), 
TILTS (up and down) AND 
ZOOMS, unless you 
absolutely have to move. 
• Pretend you’re taking still 
photos, except they’re 
moving pictures. 
• Let the action happen in 
the frame. 
• Let the action come to you. Don’t chase it. 
Use the Z-axis to your 
advantage
Rule #4 
Shoot and move.
Shoot and move 
Don’t just stand there and 
“spray” the scene. 
If something is far away, don’t 
rely on the zoom - get closer 
to it. 
Get up and move your 
camera after every shot. 
When you’re done recording, 
get up and move somewhere 
else. 
This guy had better shoot and move.
Rule #5 
Shoot with the light 
behind you.
Shoot with enough light 
behind you. 
• When outdoors, use the Sun 
as your primary source of 
light. 
• Yes, your interview subject 
might be looking into the sun. 
Too bad. They’re on TV. 
• When indoors, use a bright 
light or lamp as a primary 
light source. 
• NEVER shoot your interview 
subject in front of a window. Epic interview fail.
Rule #6 
Visual Diversity: 
Vary your shots.
For every object, person or 
scene you shoot, use this 
modified variation of the 
Five Shot Method.
Five Shot Method 
With every object, 
person, or action you 
shoot, get five shots to 
ensure visual diversity: 
Wide 
Tight 
Tight 
Medium Tight
Five Shot Method 
For your close-ups, pick 
the three most 
important things in the 
wide shot. 
Tight 
Tight 
Tight
Remember: 
Wide, medium, 
tight, tight, tight.
Rule #7 
If you hear it, shoot it.
If you hear it, shoot it. 
When you get to a 
place where a story is 
happening, stop and 
listen to the natural 
sound. 
Whatever you hear, 
make sure you get 
video of it. 
If you’re at the beach, you’d better get 
a few shots of the waves.
TIP: 
Pick your best natural sound shot. 
Use that as your establishing 
(first) shot.
Rule #8 
Shoot in 10-second 
bursts.
Shoot in 10-second 
bursts. 
Here’s how to actually shoot: 
• Set up your shot. 
• Check your framing. 
• Hit record and then don’t 
touch the camera. 
• Count to 10. 
• Stop recording. 
• Repeat. 
Give yourself enough time to let action happen in the frame.
Rule #9 
Don’t be afraid. 
Get up close.
Don’t be afraid. 
Get up close. 
• Always get lots of close-ups. 
• Move the camera and the 
tripod up close to what you 
want to shoot. 
• If necessary, take the camera 
off the tripod and set it on 
something steady. 
• This will help out your 
natural sound. 
Even video of mundane things looks more 
interesting when shot close-up.
Rule #10 
ALWAYS follow the 
Rule of Thirds
Always follow the 
Rule of Thirds 
• Divide the screen into a 
tic-tac-toe board. 
• The focal point of each 
shot should be at one of 
the intersections. 
Rule of Thirds FTW!
Good Framing
Bad Framing
Bad Framing
Bad Framing
Bad Framing
Rule #11: 
Edit your audio first.
Edit your audio first 
Edit your soundbites and 
narration first (A-Roll). 
Then edit in your cutaway video 
(B-Roll) over it. 
Your video will make much more 
sense and take less time to edit. 
• KEY TIP: 
Cut on each pause in your 
narration. This will help your 
video’s pace. 
Got this guy narrating your video? 
Put his voice in first.
Why audio first? 
Sound bites are fixed 
elements - In other words, 
they cannot be changed in 
post (at least, not ethically). 
Narration can always be 
changed. 
Also: This will save you 
TONS of time in the editing 
process.
Rule #12: 
NEVER use the same 
shot twice.
Never use the same 
shot twice 
If you already used a shot in 
your video, DON’T use it 
again. 
Every shot must be 
different from the last one. 
EXCEPTION: It’s something 
so incredible that you 
simply can’t avoid it. Meh. Don’t use 
this again. 
Okay, I’ll allow it 
this time.
Rule #13: 
NO JUMP CUTS.
NO JUMP CUTS. 
Jump cuts break continuity in time 
and produce a startling effect in the 
viewer. 
This happens when you put two 
sound bites back-to-back with 
nothing in between. 
Any moving objects in the shot will 
appear to instantly jump to a new 
position. 
AVOID THEM. 
Use cutaways to prevent jump cuts. 
End frame 
of one 
shot 
Beginning 
frame of 
next shot 
Notice President Obama’s head is in a different 
place from one SOT to the next. 
That’s a jump cut.
Two Ways to Avoid Jump Cuts 
Get a cutaway 
or 
Change two of the following: 
Subject Angle Focal Length
My tip to avoid jump 
cuts: 
Everything in the shot should 
be completely different from 
the last one.
Rule #14: 
NEVER use 
crazy effects
DON’T use crazy effects 
KEEP IT SIMPLE! 
Use only cuts or dissolves for 
transitions. 
NOTE: Dissolves should only be 
used to show the passage of time, 
or if the video is moving at a 
leisurely pace. 
Don’t use effects on video. This 
isn’t Instagram. 
Use fonts that are easily readable. 
No cursive or other craziness. 
No fancy wipes or transitions. EVER. 
Stop that! No weird effects! 
Unemployment in 
America 
Say what? No crazy fonts!
Rule #15: 
Share like you care
Share like you care 
• Pick one site (YouTube or 
Vimeo) to upload to. 
• Fill out the title, 
description, and tags. Mind 
the details! 
• Embed - Don’t link - Your 
video on your site. 
• Share on your social media 
accounts. 
• BE CONSISTENT! 
YouTube has the largest number of 
users among video sites.
Recommended Viewing 
• 60 Minutes 
• CBS Sunday 
Morning 
• PBS Frontline 
• Reality TV 
• Anything else where 
the Kardashians 
might show up
Rule #16
Once you have mastered 
the rules, only then can 
you break them.* 
*Just because you just learned the rules 
doesn’t mean you can break them now. 
All non-original photos from flickr and Wikimedia Commons
Thanks. 
jsharon@fullsail.com 
@Jeff_Sharon

15 Commandments of Video

  • 1.
    The 15 Commandments of Video Jeff Sharon Full Sail University @Jeff_Sharon
  • 2.
    About Me •Graduated from UCF (’05) and Syracuse (’06) • Sports Reporter & Anchor for WNEG-TV (now WUGA) from ’06-‘08 • Host and Coordinator of Broadcast Productions for UCF Athletics from ’08-’10 • Course Director at Full Sail since 2011 • UCF Insider for SportsTalkFlorida.com
  • 3.
    Want to getnoticed? ! ! ! ! Video is where it’s at.
  • 4.
    Why? ! Moreand more people are watching online video. Source: Pew Research
  • 5.
    But if you’regoing to do it, do it right. ! This ain’t home movies.
  • 6.
    What you need • Camera (or phone) • Tripod or Monopod • Lavaliere Mic • Headphones • Bag
  • 7.
    What about editing? Don’t freak out. Editing software does not have to be as complex or expensive as you think. Use whatever platform you’re comfortable with. iMovie is the easiest for beginners. No program will make you a better editor. The video is the thing.
  • 8.
    The Video Production Process 1. Shoot. 2. Write. 3. Edit. 4. Share.
  • 9.
    Shoot Your Video • Do your research • Set up your interviews • Go out and shoot! • Shoot interviews first • Then shoot your B-roll footage/cutaways • NO VERTICAL VIDEO!
  • 10.
    Write Your Story • Import your video. • Select your sound bites. • Then plan which shots you will use as cutaways and where you will place them. • Write your narration.
  • 11.
    What a TVscript looks like Everything you hear goes on this side { } Everything you see goes on this side
  • 12.
    Edit Your Video • Assemble narration and sound bites first • Then add cutaway video • Add graphics last • Export and upload!
  • 13.
    Post Your Video • Export at the right settings (Check for YouTube-optimized) • Upload to ONE site (not many) • Embed on your blog • Share on your Social Media
  • 14.
    The 15 Commandments of Shooting and Editing Great Video
  • 15.
  • 16.
    Double-check your gear Before you go on a shoot, make sure: • Your battery is fully charged • You have your tripod • Your microphones work • You have your headphones • You have your SD card (with room on it)
  • 17.
    Rule #2: Alwaysuse a tripod.
  • 18.
    Always use atripod And I mean ALWAYS. The tripod is your friend. Adjust it for height. Use the little green level bubble on the tripod’s head to make sure it’s perfectly level before you shoot. A perfectly balanced tripod has the little bubble right in the middle of the red circle.
  • 19.
    Rule #3 Ifit’s moving, move with it. If it’s not moving, don’t move.
  • 20.
    If your subjectis moving If the subject of your shot is moving, move with it - SMOOTHLY. EXAMPLE: A football player running past you. And remember to give the Lead Room subject lead room - More space ahead of their direction of travel. Image: Wikimedia Commons
  • 21.
    If your subjectis stationary • If the subject of your shot is stationary, stay stationary. EXAMPLE: The outside of a building. Remember the Rule of Thirds and keep your hands off the camera while recording. Image: Wikimedia Commons
  • 22.
    Shoot video thesame way you shoot still photos • AVOID PANS (side-to-side), TILTS (up and down) AND ZOOMS, unless you absolutely have to move. • Pretend you’re taking still photos, except they’re moving pictures. • Let the action happen in the frame. • Let the action come to you. Don’t chase it. Use the Z-axis to your advantage
  • 23.
    Rule #4 Shootand move.
  • 24.
    Shoot and move Don’t just stand there and “spray” the scene. If something is far away, don’t rely on the zoom - get closer to it. Get up and move your camera after every shot. When you’re done recording, get up and move somewhere else. This guy had better shoot and move.
  • 25.
    Rule #5 Shootwith the light behind you.
  • 26.
    Shoot with enoughlight behind you. • When outdoors, use the Sun as your primary source of light. • Yes, your interview subject might be looking into the sun. Too bad. They’re on TV. • When indoors, use a bright light or lamp as a primary light source. • NEVER shoot your interview subject in front of a window. Epic interview fail.
  • 27.
    Rule #6 VisualDiversity: Vary your shots.
  • 28.
    For every object,person or scene you shoot, use this modified variation of the Five Shot Method.
  • 29.
    Five Shot Method With every object, person, or action you shoot, get five shots to ensure visual diversity: Wide Tight Tight Medium Tight
  • 30.
    Five Shot Method For your close-ups, pick the three most important things in the wide shot. Tight Tight Tight
  • 31.
    Remember: Wide, medium, tight, tight, tight.
  • 32.
    Rule #7 Ifyou hear it, shoot it.
  • 33.
    If you hearit, shoot it. When you get to a place where a story is happening, stop and listen to the natural sound. Whatever you hear, make sure you get video of it. If you’re at the beach, you’d better get a few shots of the waves.
  • 34.
    TIP: Pick yourbest natural sound shot. Use that as your establishing (first) shot.
  • 35.
    Rule #8 Shootin 10-second bursts.
  • 36.
    Shoot in 10-second bursts. Here’s how to actually shoot: • Set up your shot. • Check your framing. • Hit record and then don’t touch the camera. • Count to 10. • Stop recording. • Repeat. Give yourself enough time to let action happen in the frame.
  • 37.
    Rule #9 Don’tbe afraid. Get up close.
  • 38.
    Don’t be afraid. Get up close. • Always get lots of close-ups. • Move the camera and the tripod up close to what you want to shoot. • If necessary, take the camera off the tripod and set it on something steady. • This will help out your natural sound. Even video of mundane things looks more interesting when shot close-up.
  • 39.
    Rule #10 ALWAYSfollow the Rule of Thirds
  • 40.
    Always follow the Rule of Thirds • Divide the screen into a tic-tac-toe board. • The focal point of each shot should be at one of the intersections. Rule of Thirds FTW!
  • 41.
  • 42.
  • 43.
  • 44.
  • 45.
  • 46.
    Rule #11: Edityour audio first.
  • 47.
    Edit your audiofirst Edit your soundbites and narration first (A-Roll). Then edit in your cutaway video (B-Roll) over it. Your video will make much more sense and take less time to edit. • KEY TIP: Cut on each pause in your narration. This will help your video’s pace. Got this guy narrating your video? Put his voice in first.
  • 48.
    Why audio first? Sound bites are fixed elements - In other words, they cannot be changed in post (at least, not ethically). Narration can always be changed. Also: This will save you TONS of time in the editing process.
  • 49.
    Rule #12: NEVERuse the same shot twice.
  • 50.
    Never use thesame shot twice If you already used a shot in your video, DON’T use it again. Every shot must be different from the last one. EXCEPTION: It’s something so incredible that you simply can’t avoid it. Meh. Don’t use this again. Okay, I’ll allow it this time.
  • 51.
    Rule #13: NOJUMP CUTS.
  • 52.
    NO JUMP CUTS. Jump cuts break continuity in time and produce a startling effect in the viewer. This happens when you put two sound bites back-to-back with nothing in between. Any moving objects in the shot will appear to instantly jump to a new position. AVOID THEM. Use cutaways to prevent jump cuts. End frame of one shot Beginning frame of next shot Notice President Obama’s head is in a different place from one SOT to the next. That’s a jump cut.
  • 53.
    Two Ways toAvoid Jump Cuts Get a cutaway or Change two of the following: Subject Angle Focal Length
  • 54.
    My tip toavoid jump cuts: Everything in the shot should be completely different from the last one.
  • 55.
    Rule #14: NEVERuse crazy effects
  • 56.
    DON’T use crazyeffects KEEP IT SIMPLE! Use only cuts or dissolves for transitions. NOTE: Dissolves should only be used to show the passage of time, or if the video is moving at a leisurely pace. Don’t use effects on video. This isn’t Instagram. Use fonts that are easily readable. No cursive or other craziness. No fancy wipes or transitions. EVER. Stop that! No weird effects! Unemployment in America Say what? No crazy fonts!
  • 57.
    Rule #15: Sharelike you care
  • 58.
    Share like youcare • Pick one site (YouTube or Vimeo) to upload to. • Fill out the title, description, and tags. Mind the details! • Embed - Don’t link - Your video on your site. • Share on your social media accounts. • BE CONSISTENT! YouTube has the largest number of users among video sites.
  • 59.
    Recommended Viewing •60 Minutes • CBS Sunday Morning • PBS Frontline • Reality TV • Anything else where the Kardashians might show up
  • 60.
  • 61.
    Once you havemastered the rules, only then can you break them.* *Just because you just learned the rules doesn’t mean you can break them now. All non-original photos from flickr and Wikimedia Commons
  • 62.