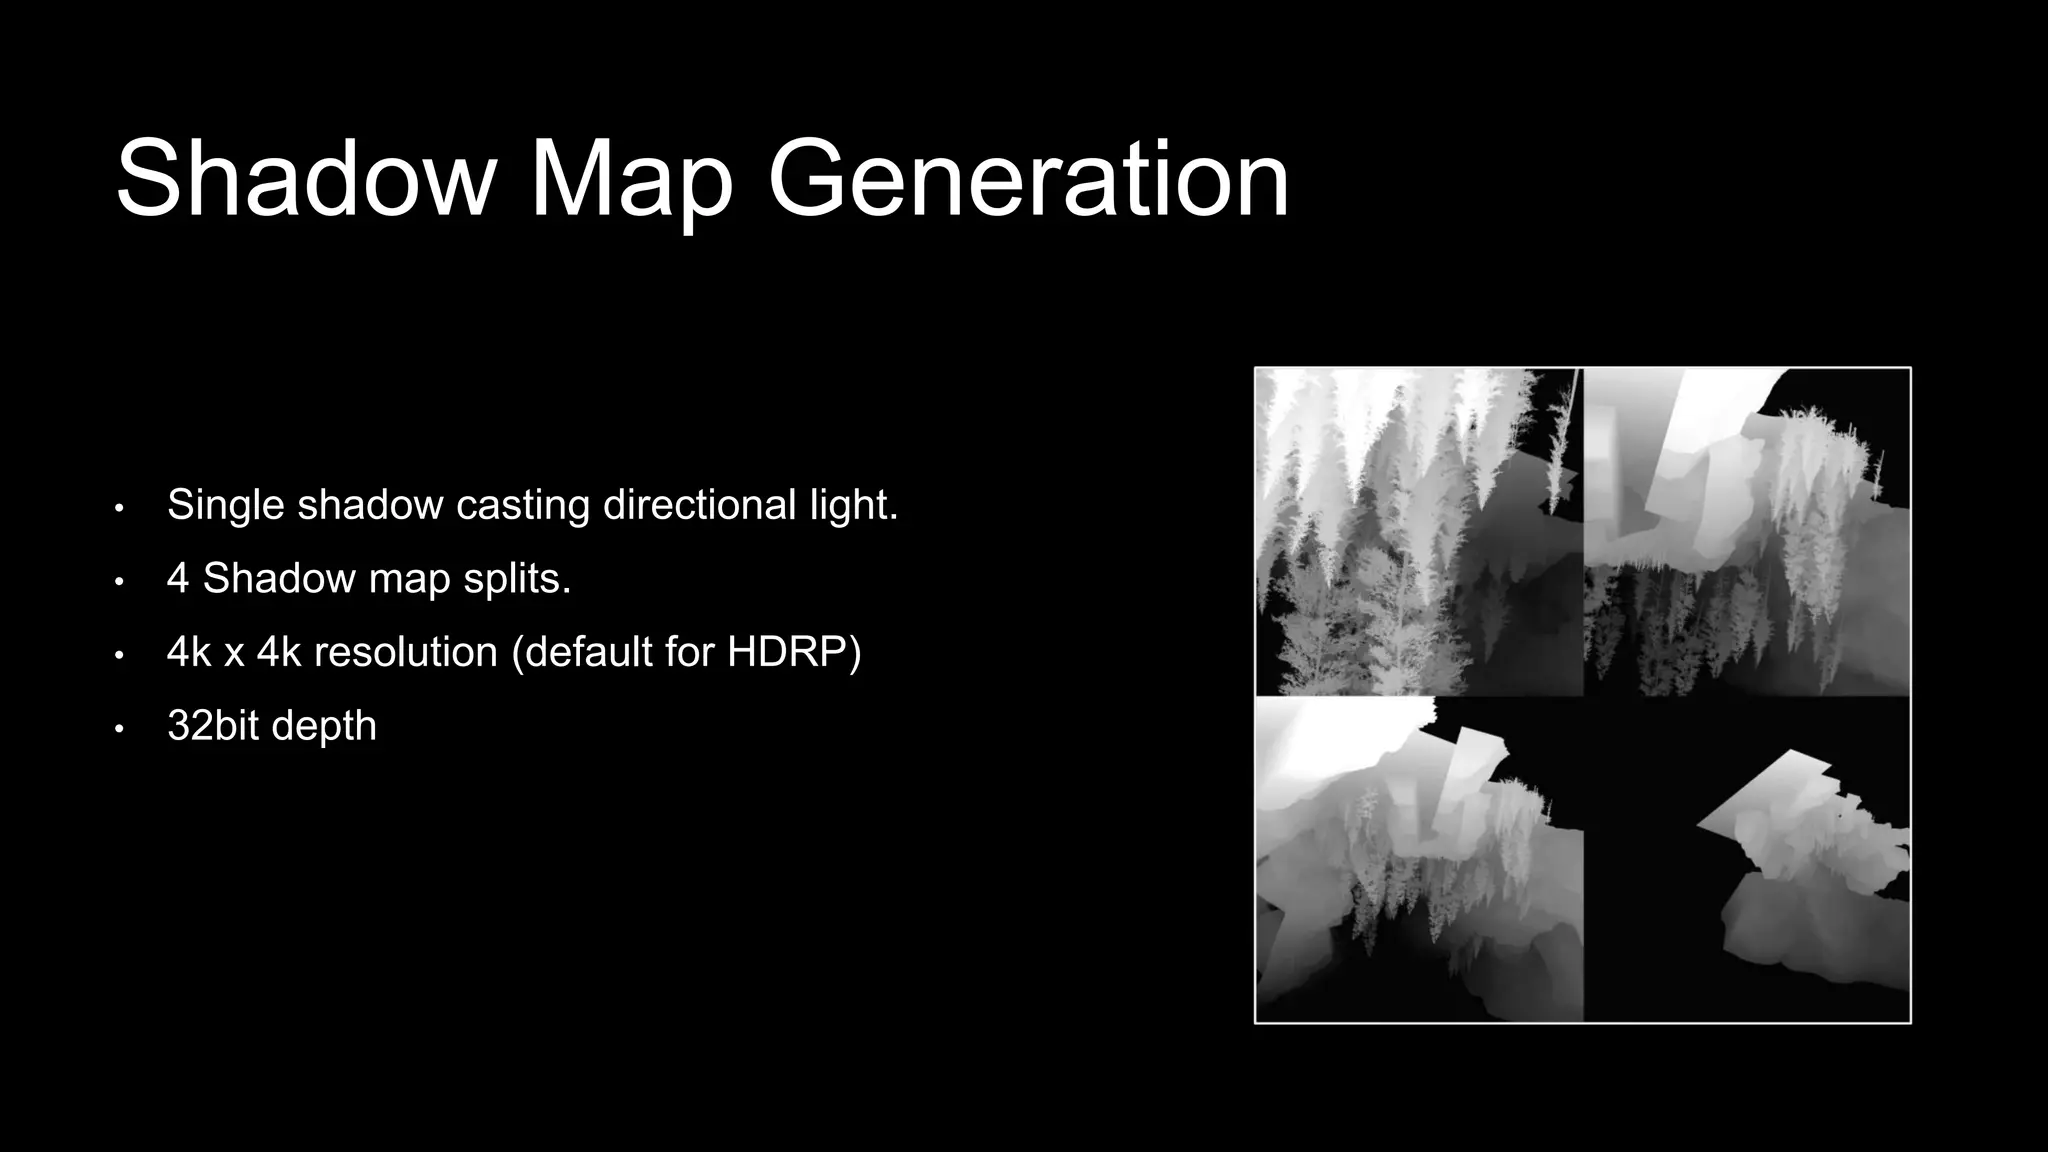
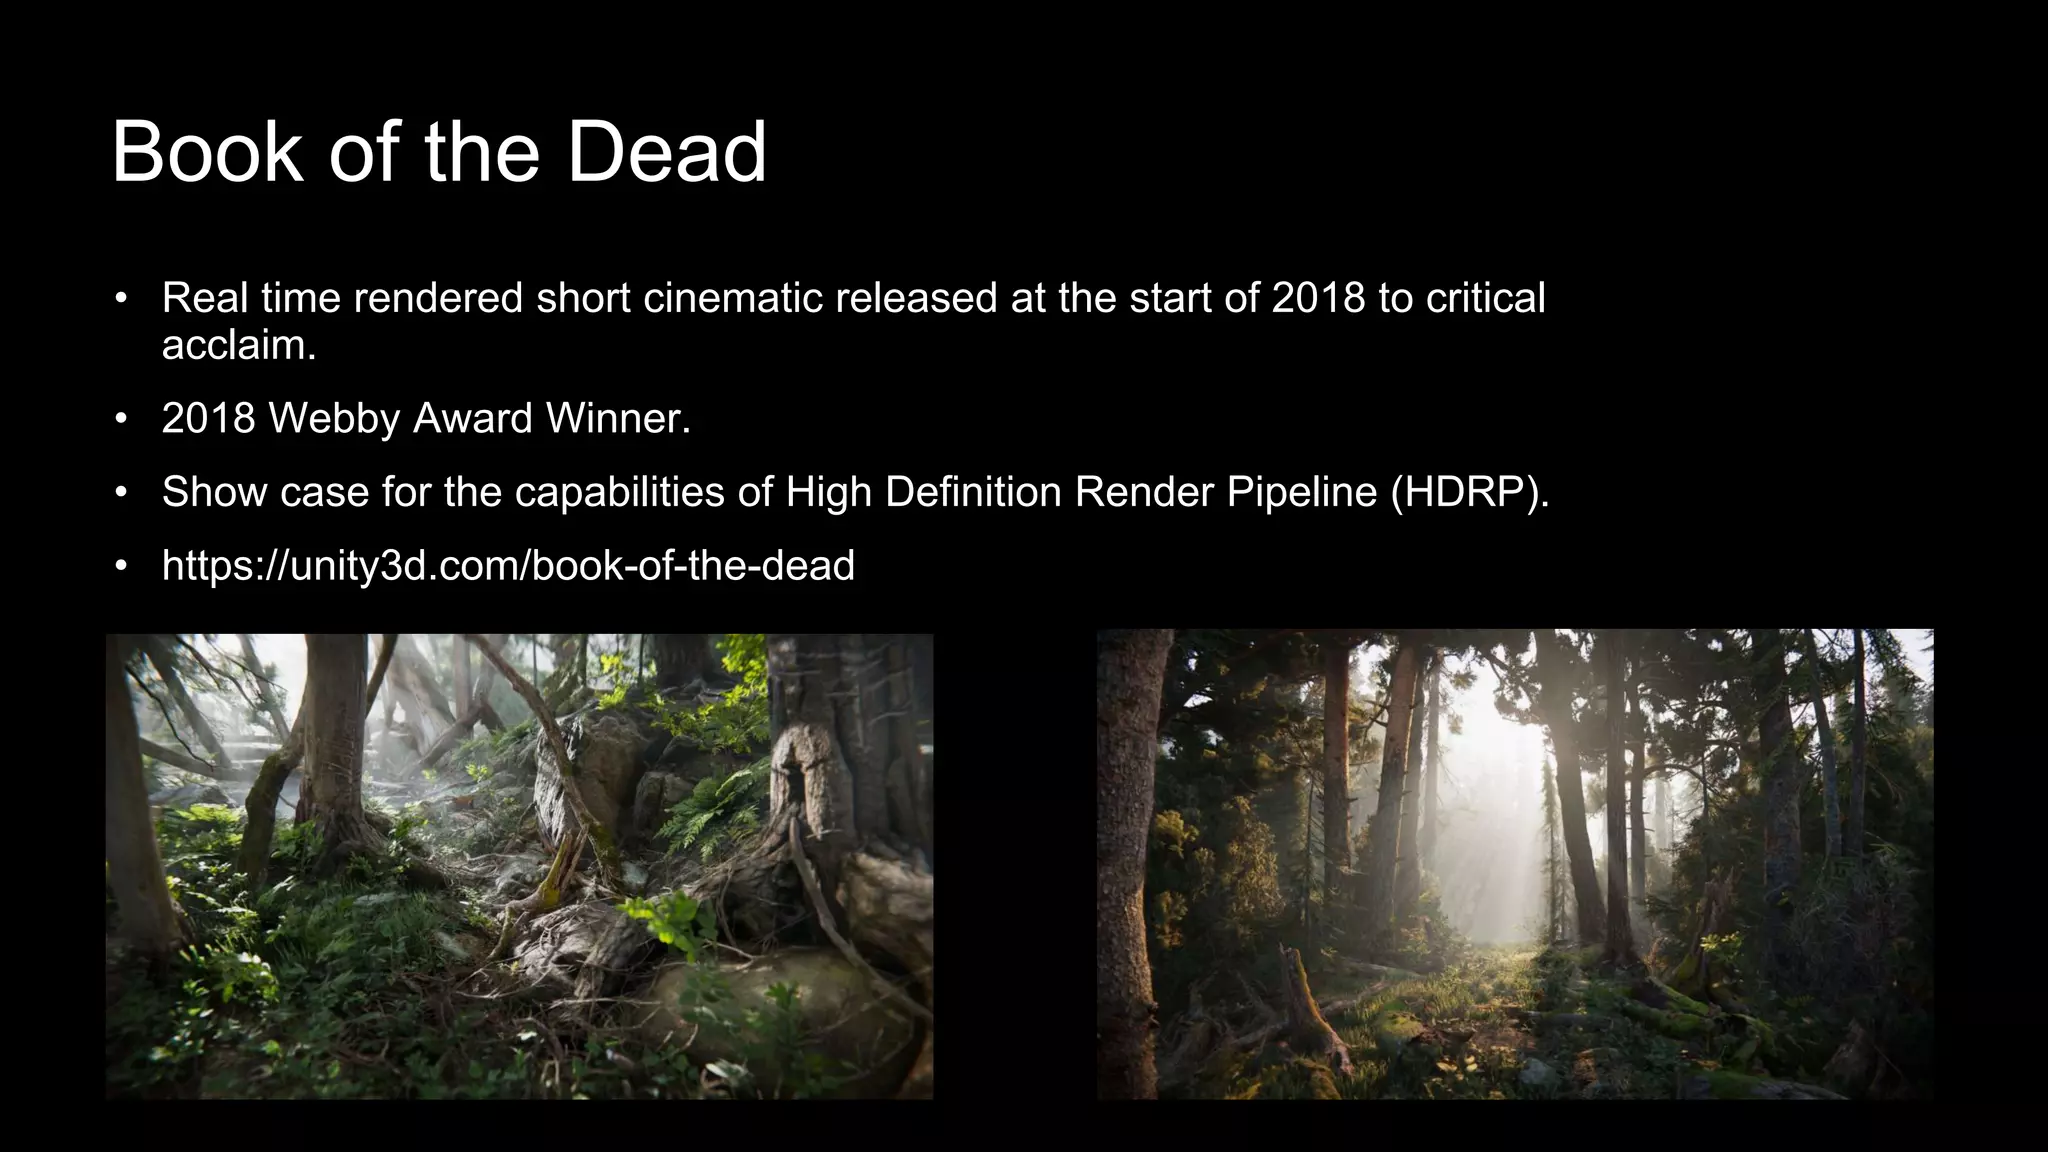
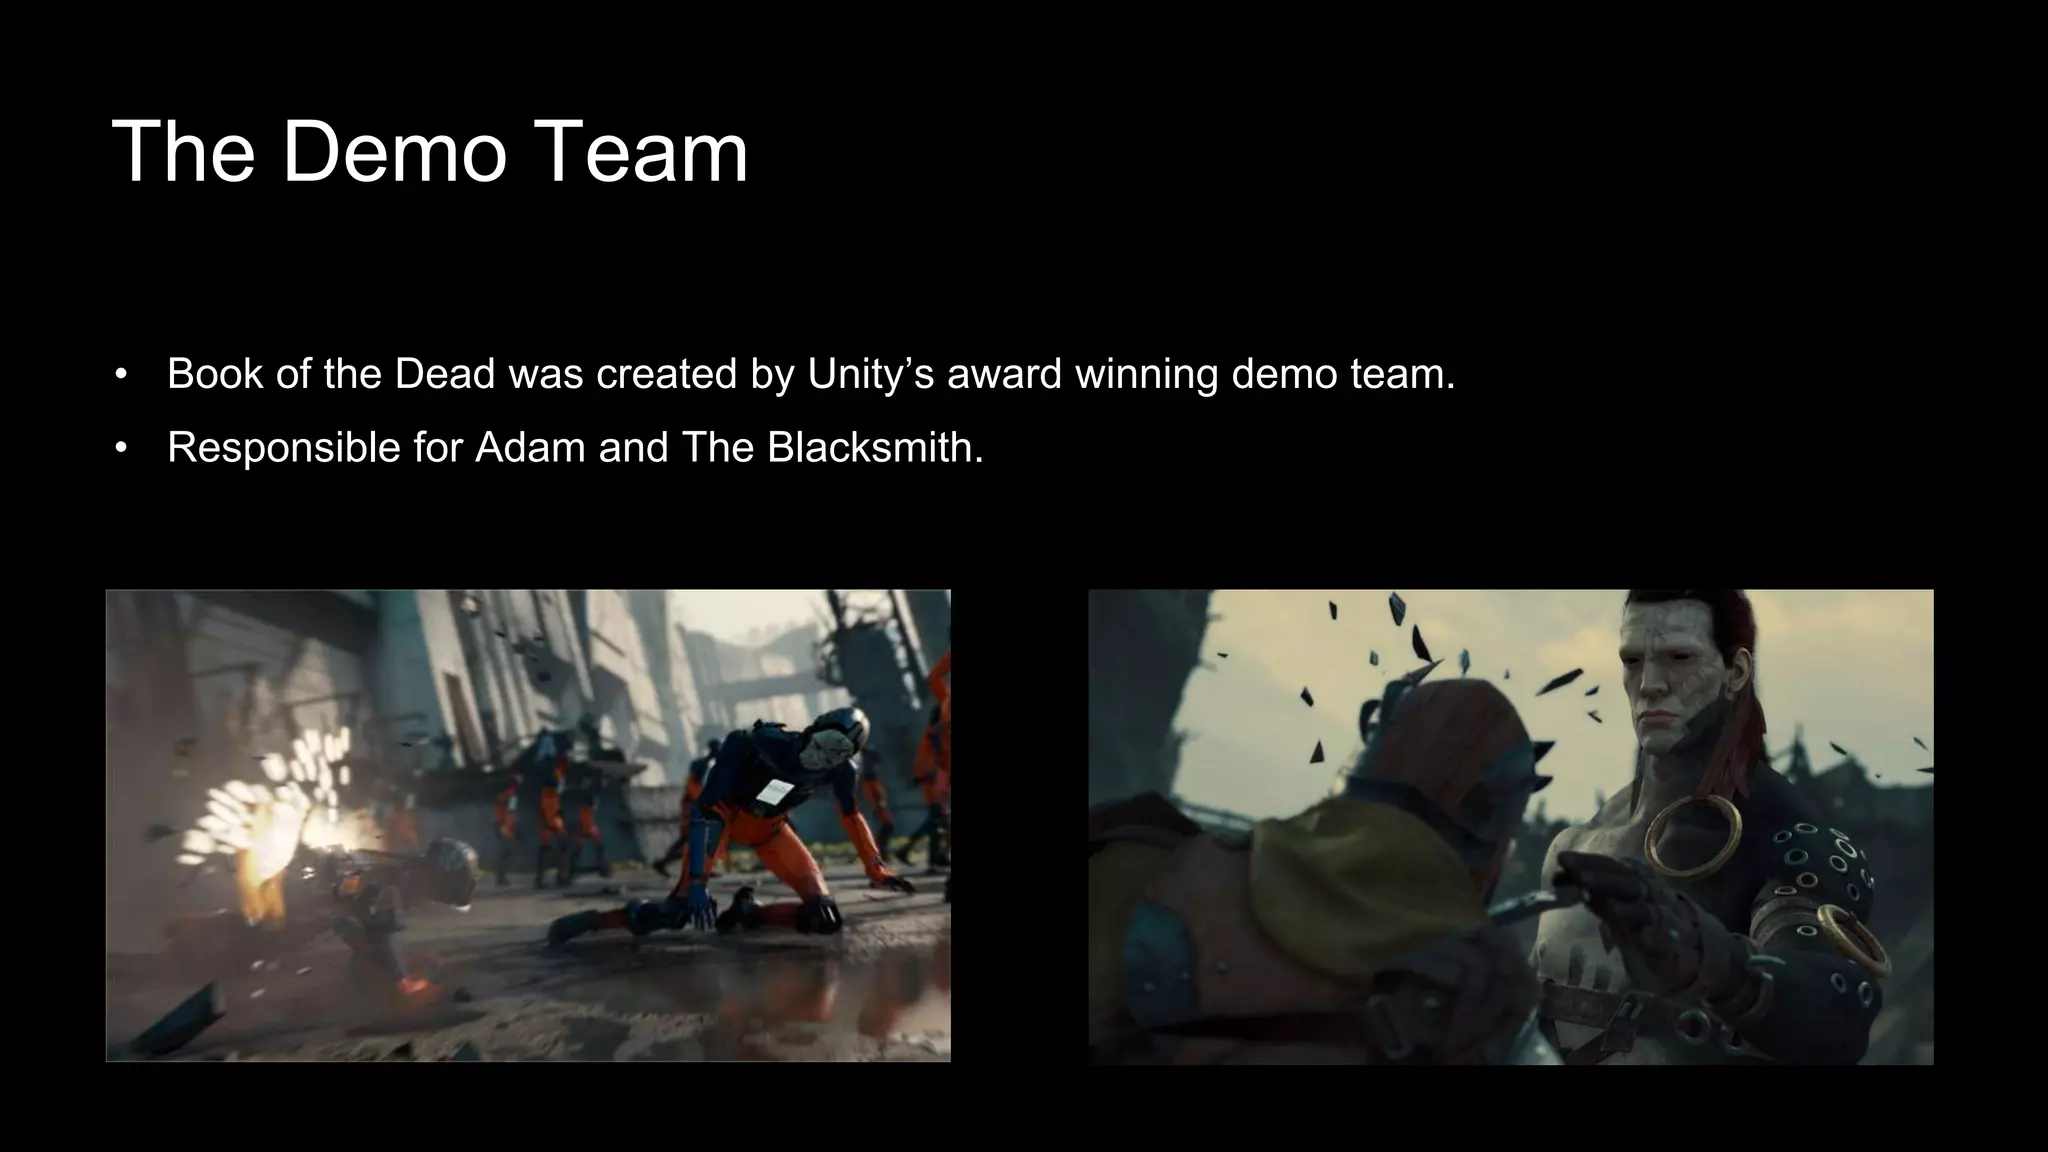
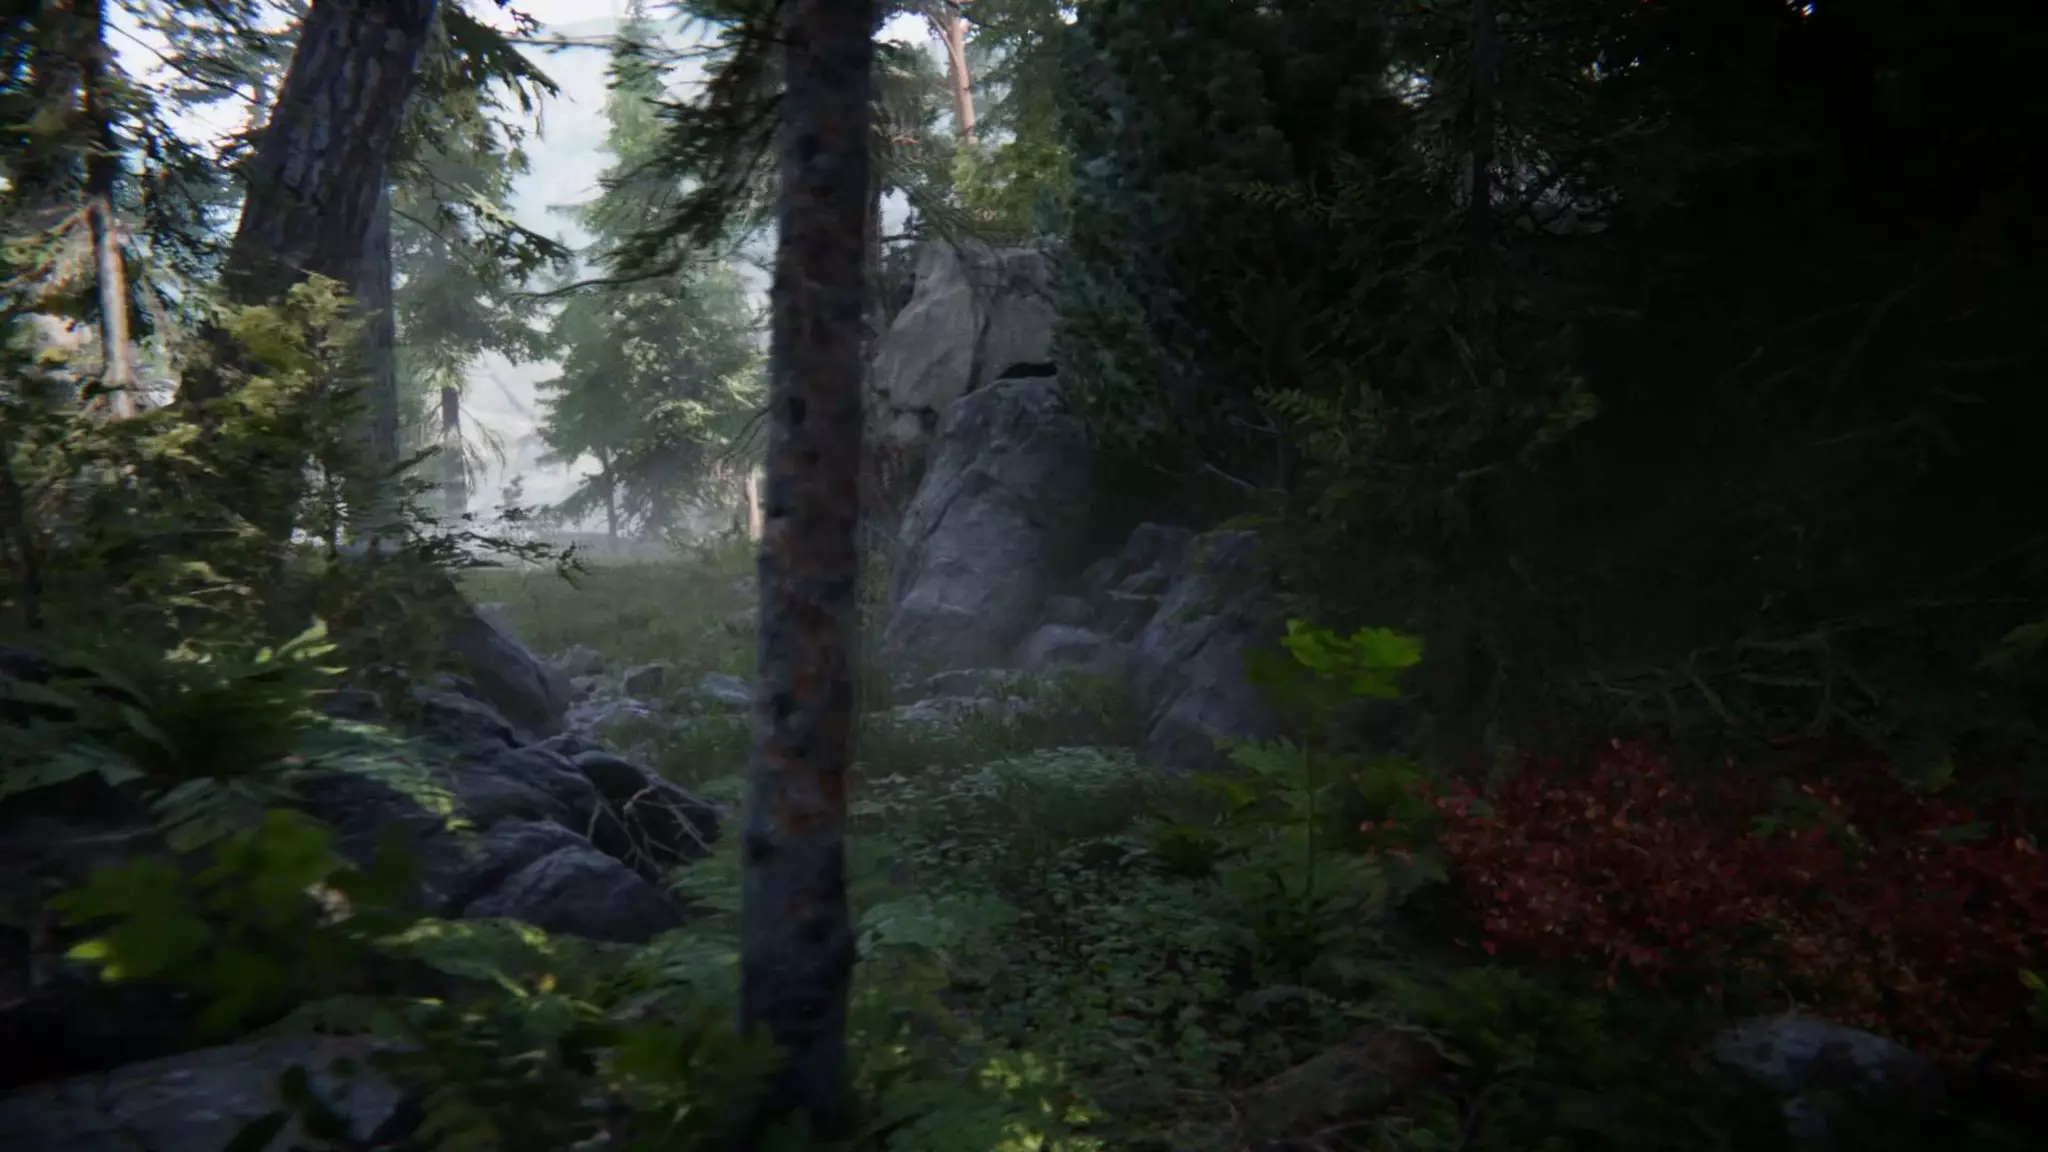
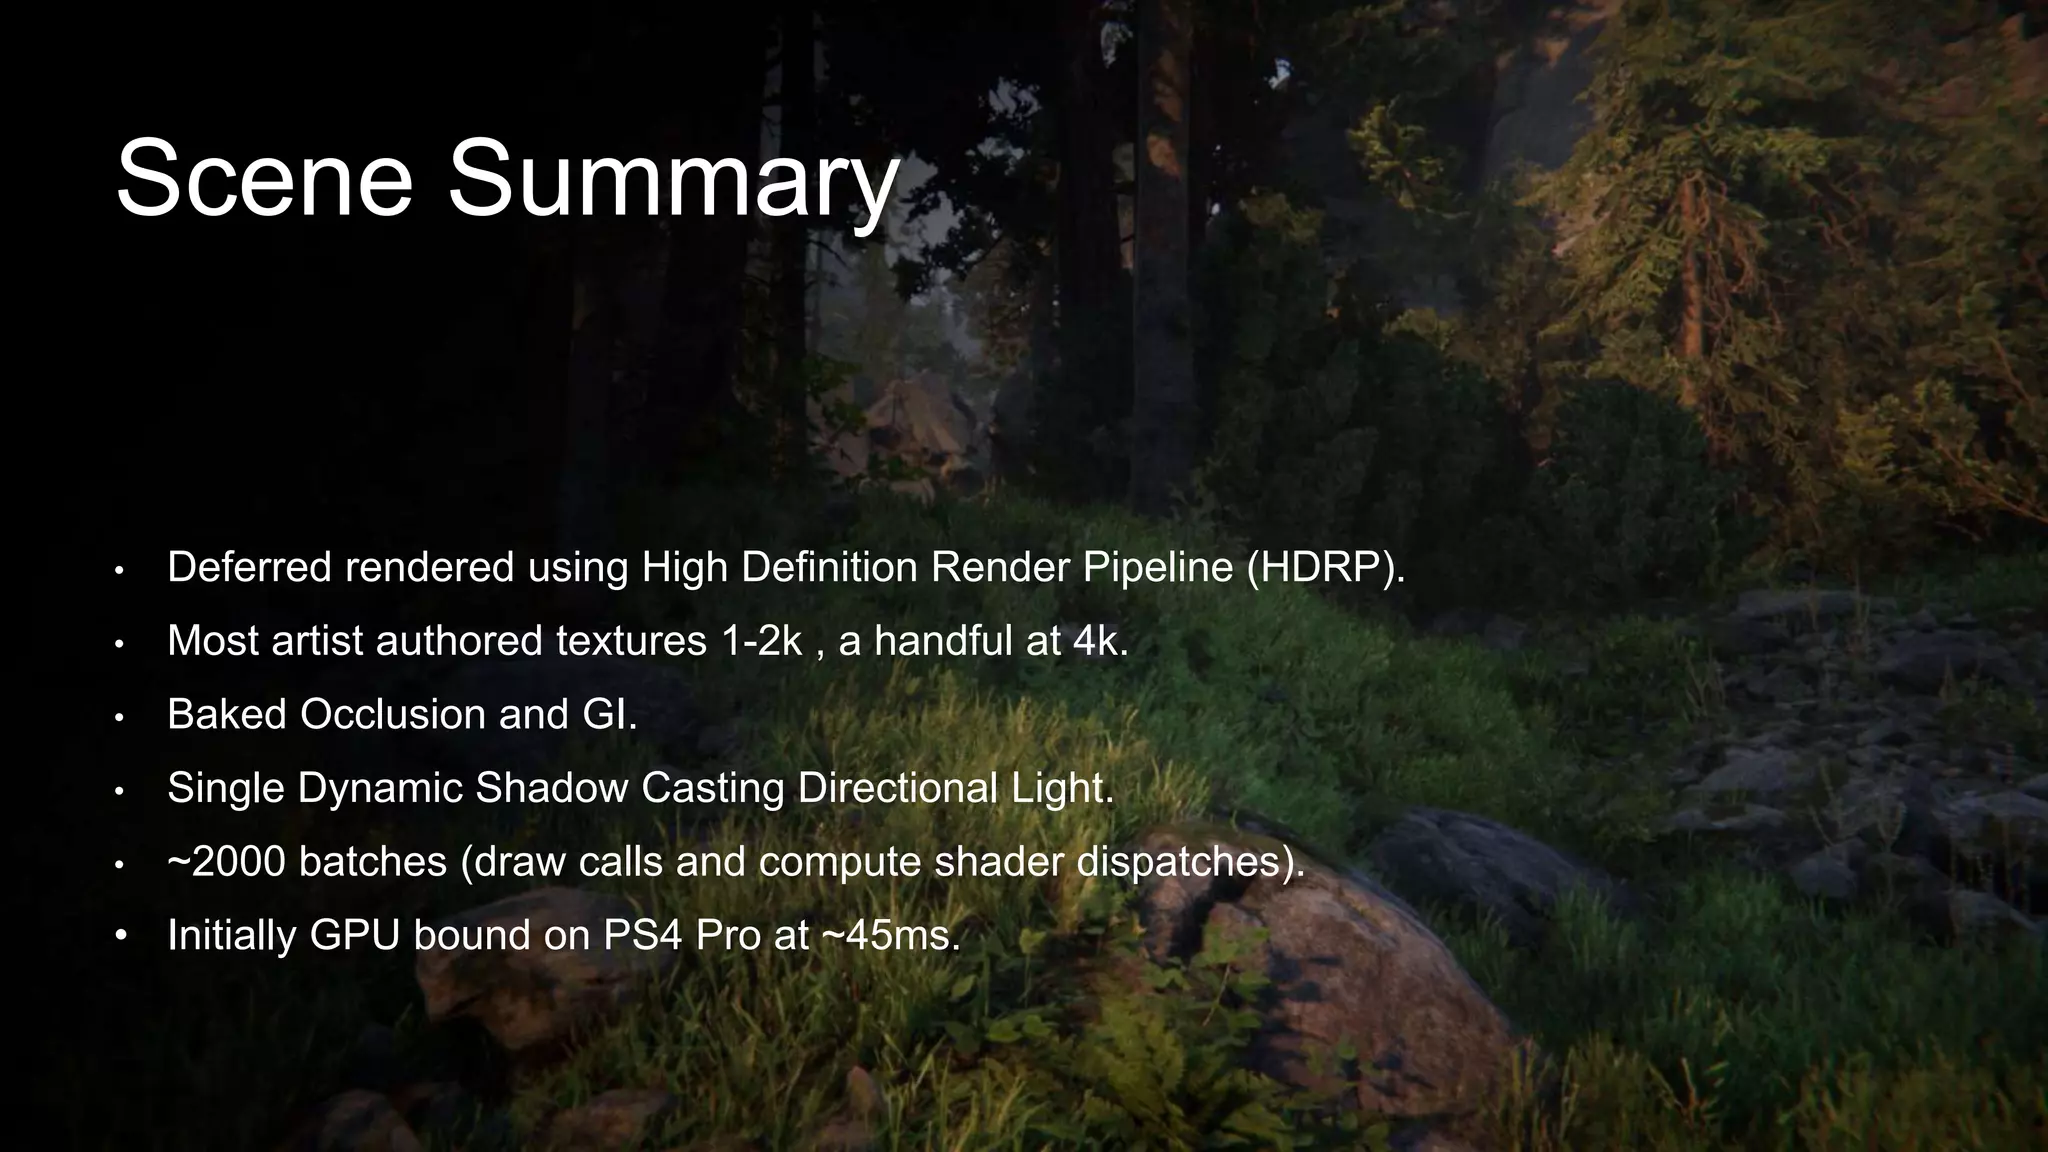
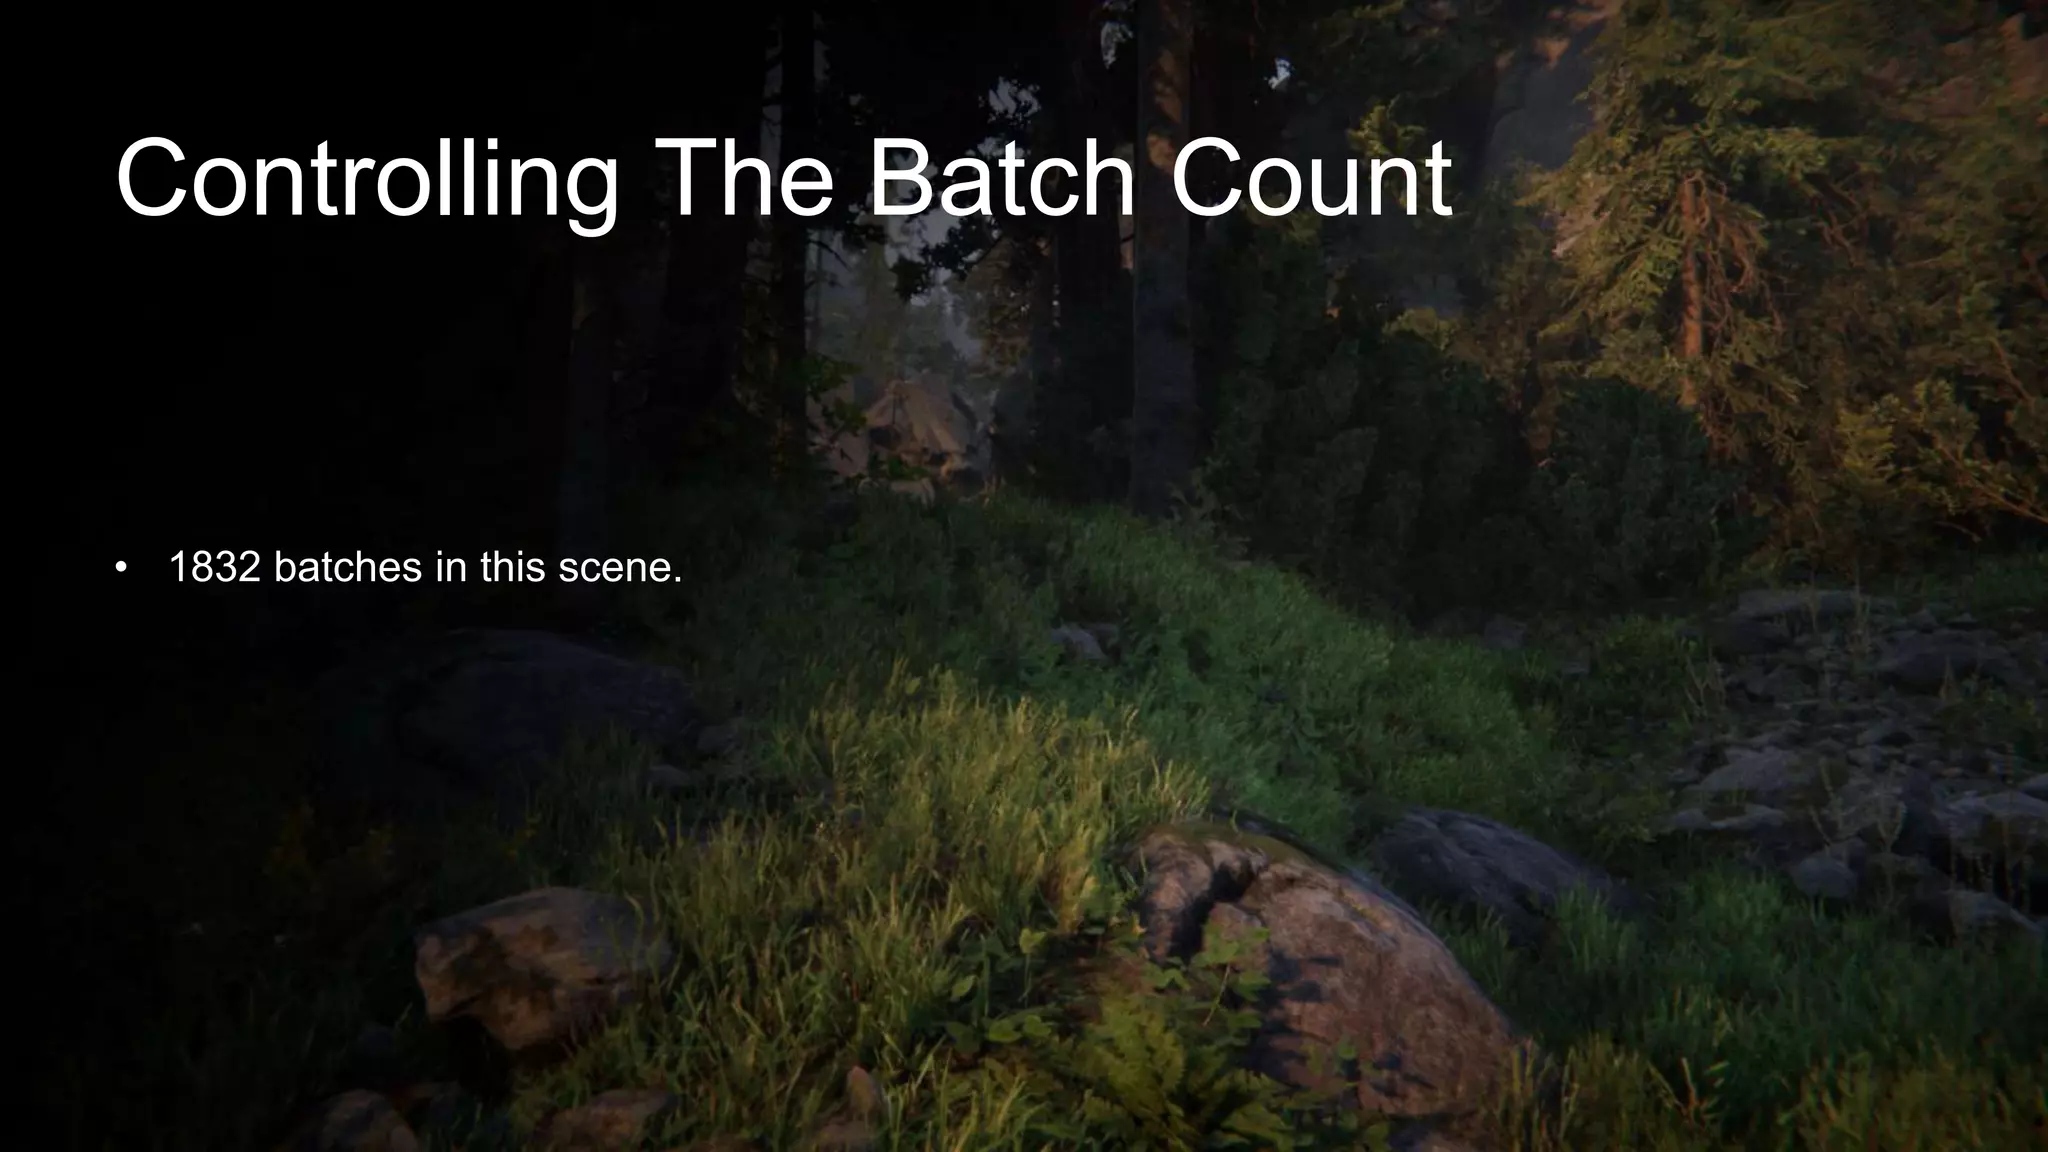
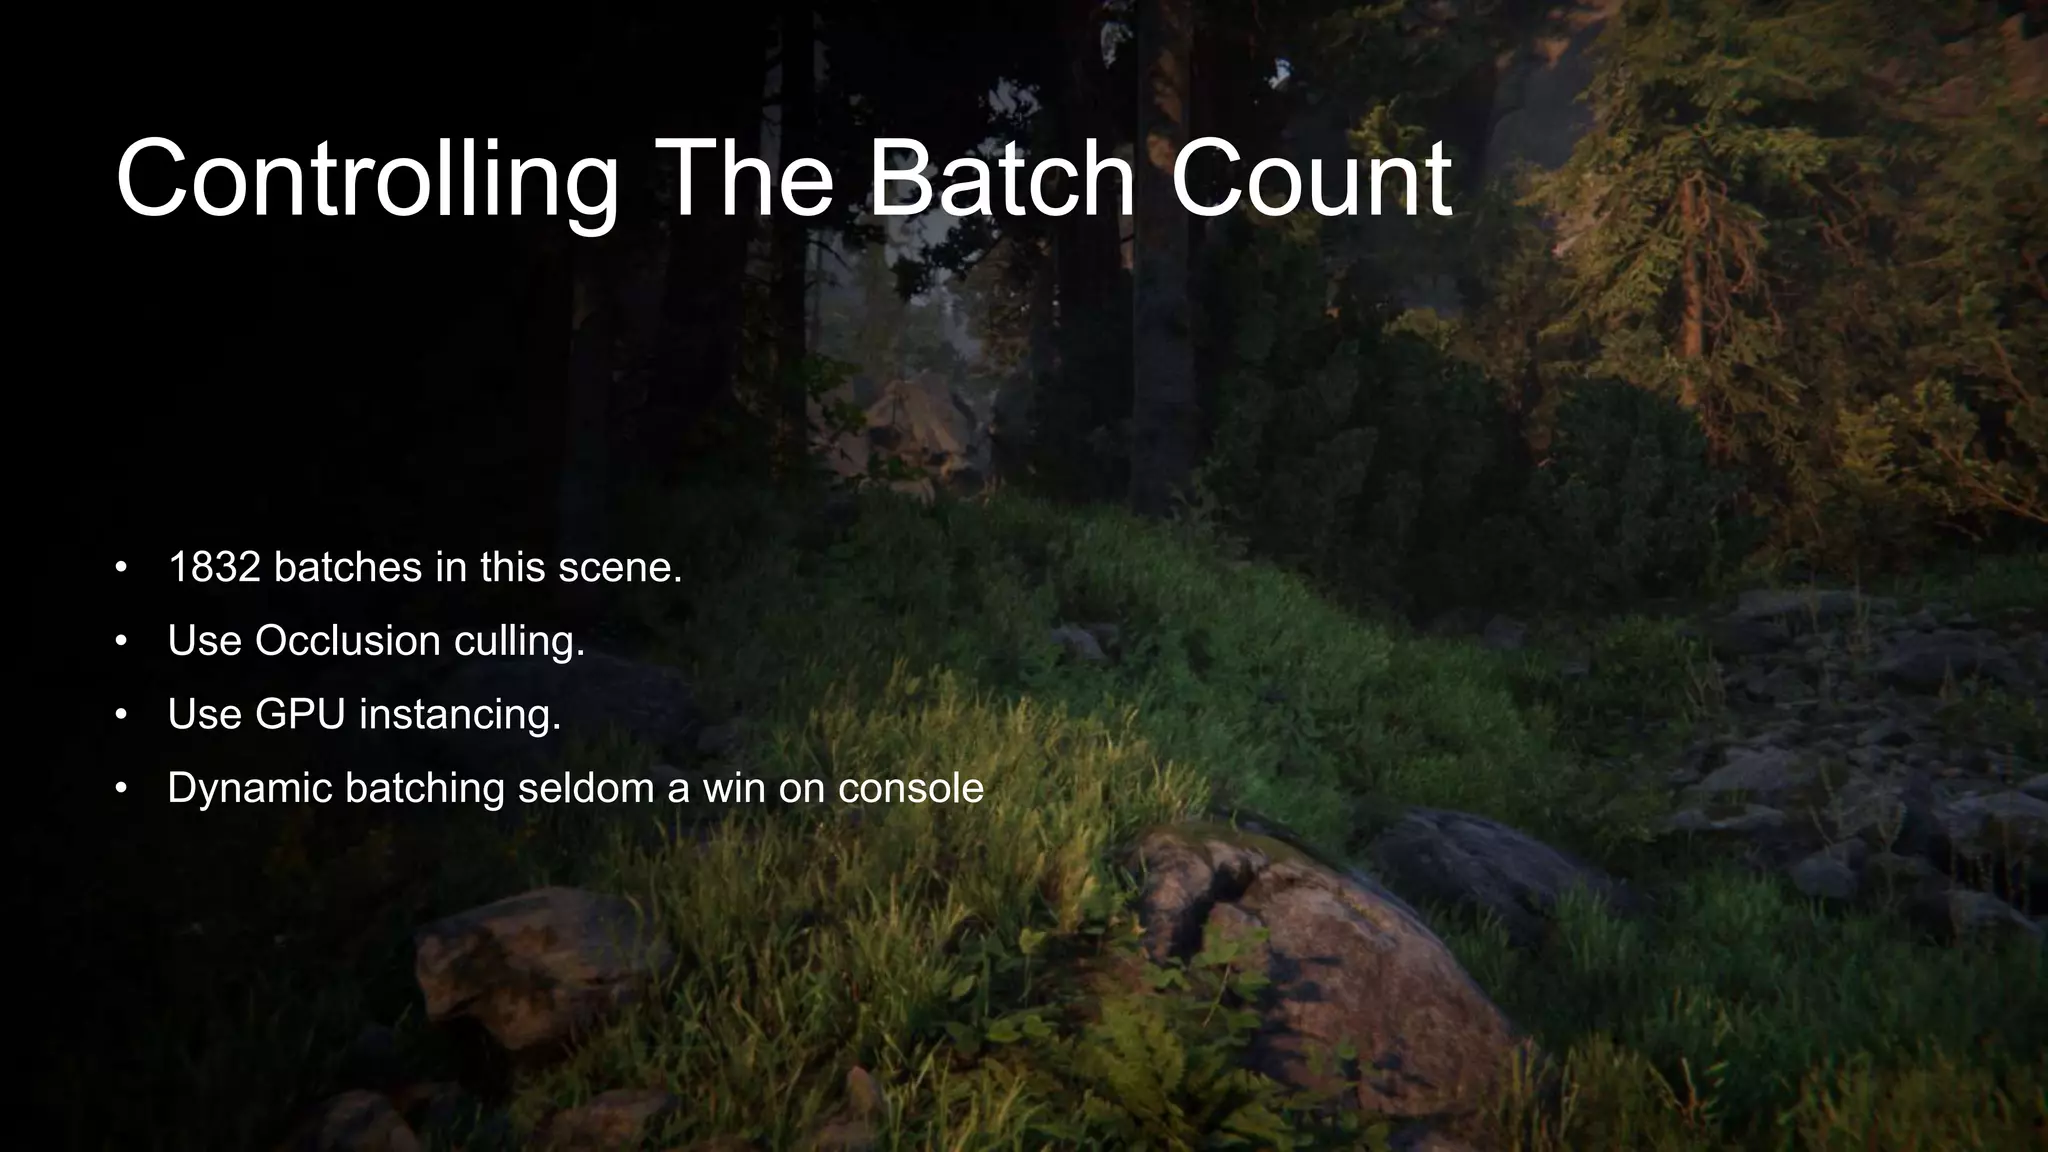
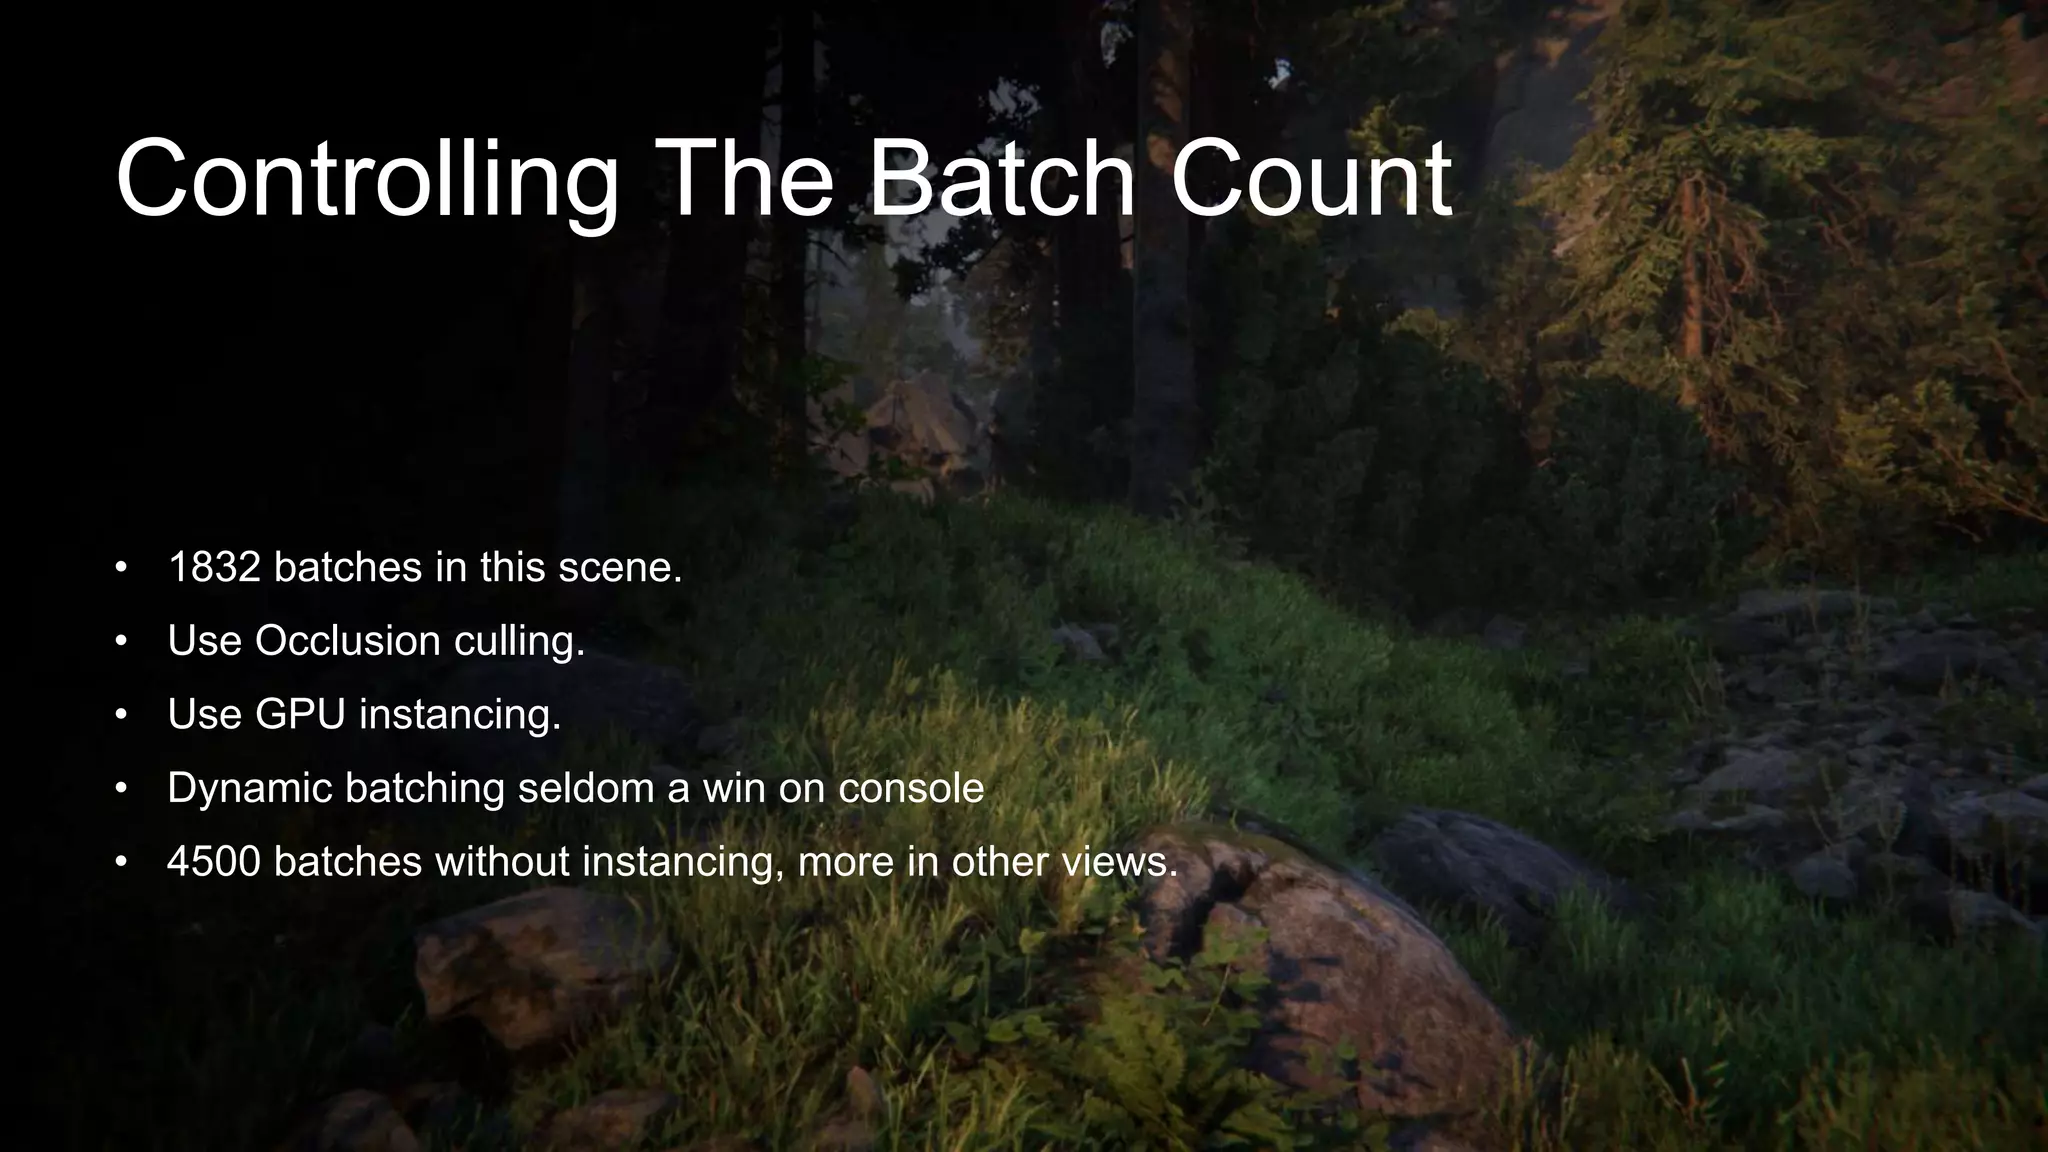
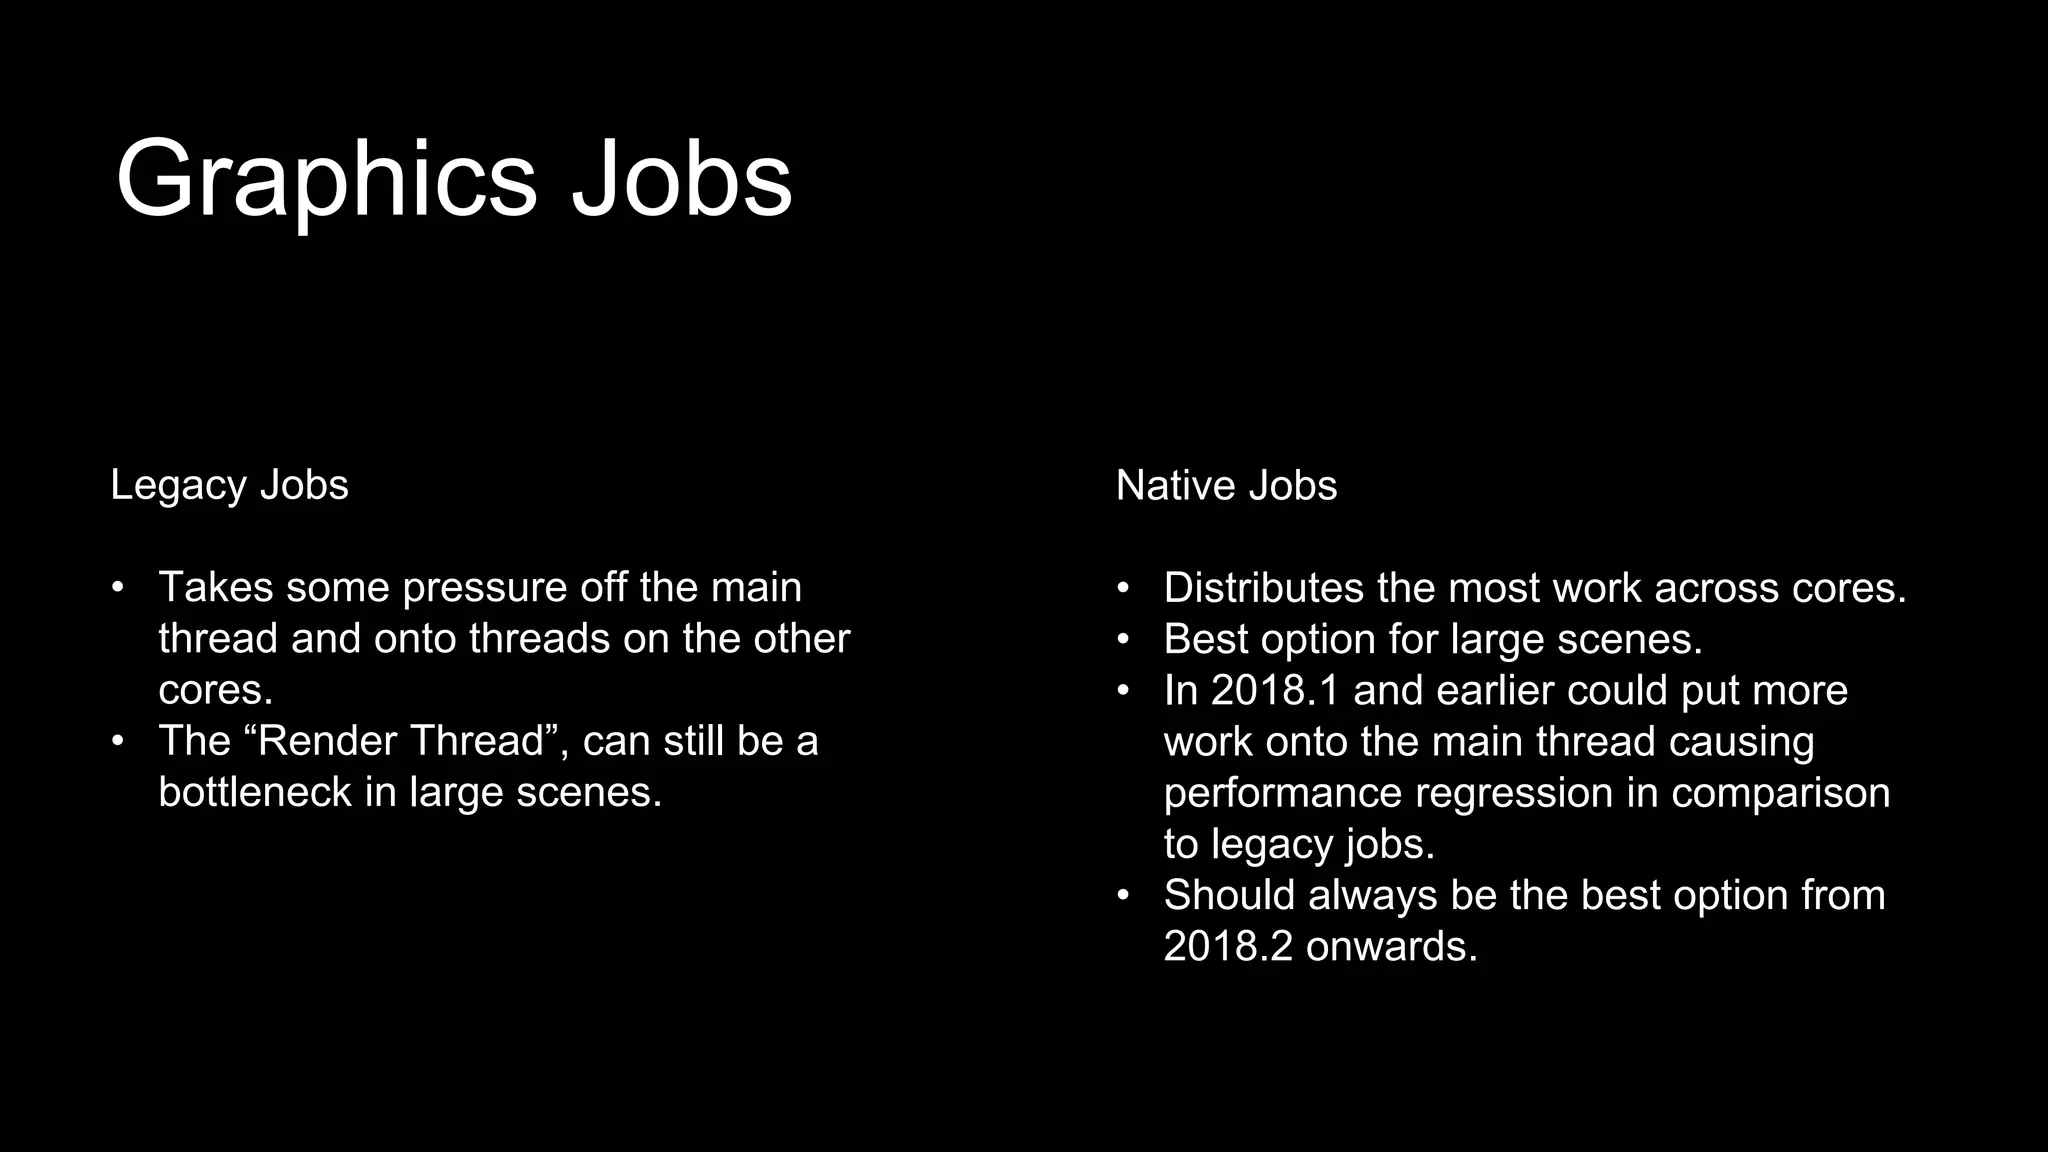
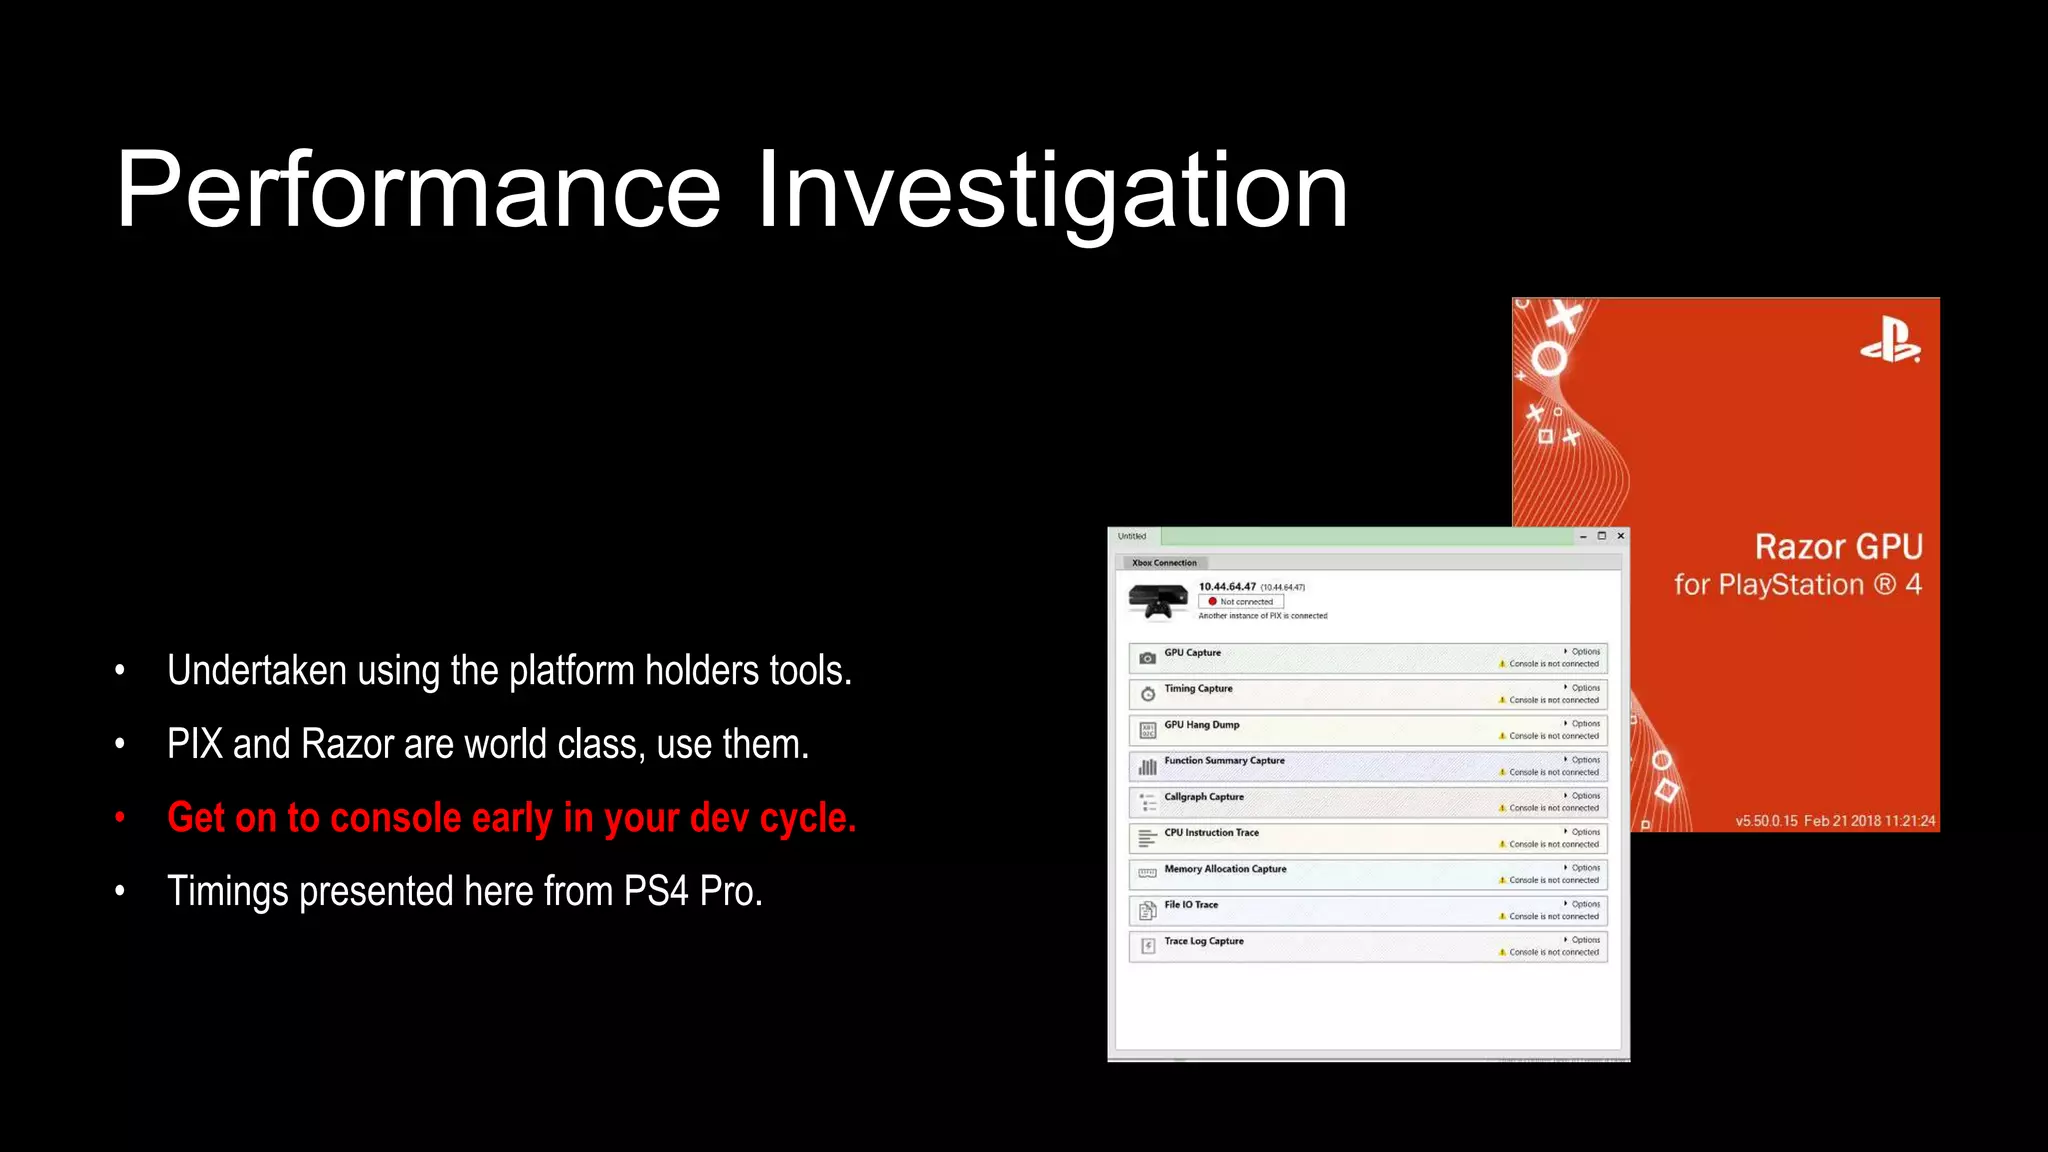
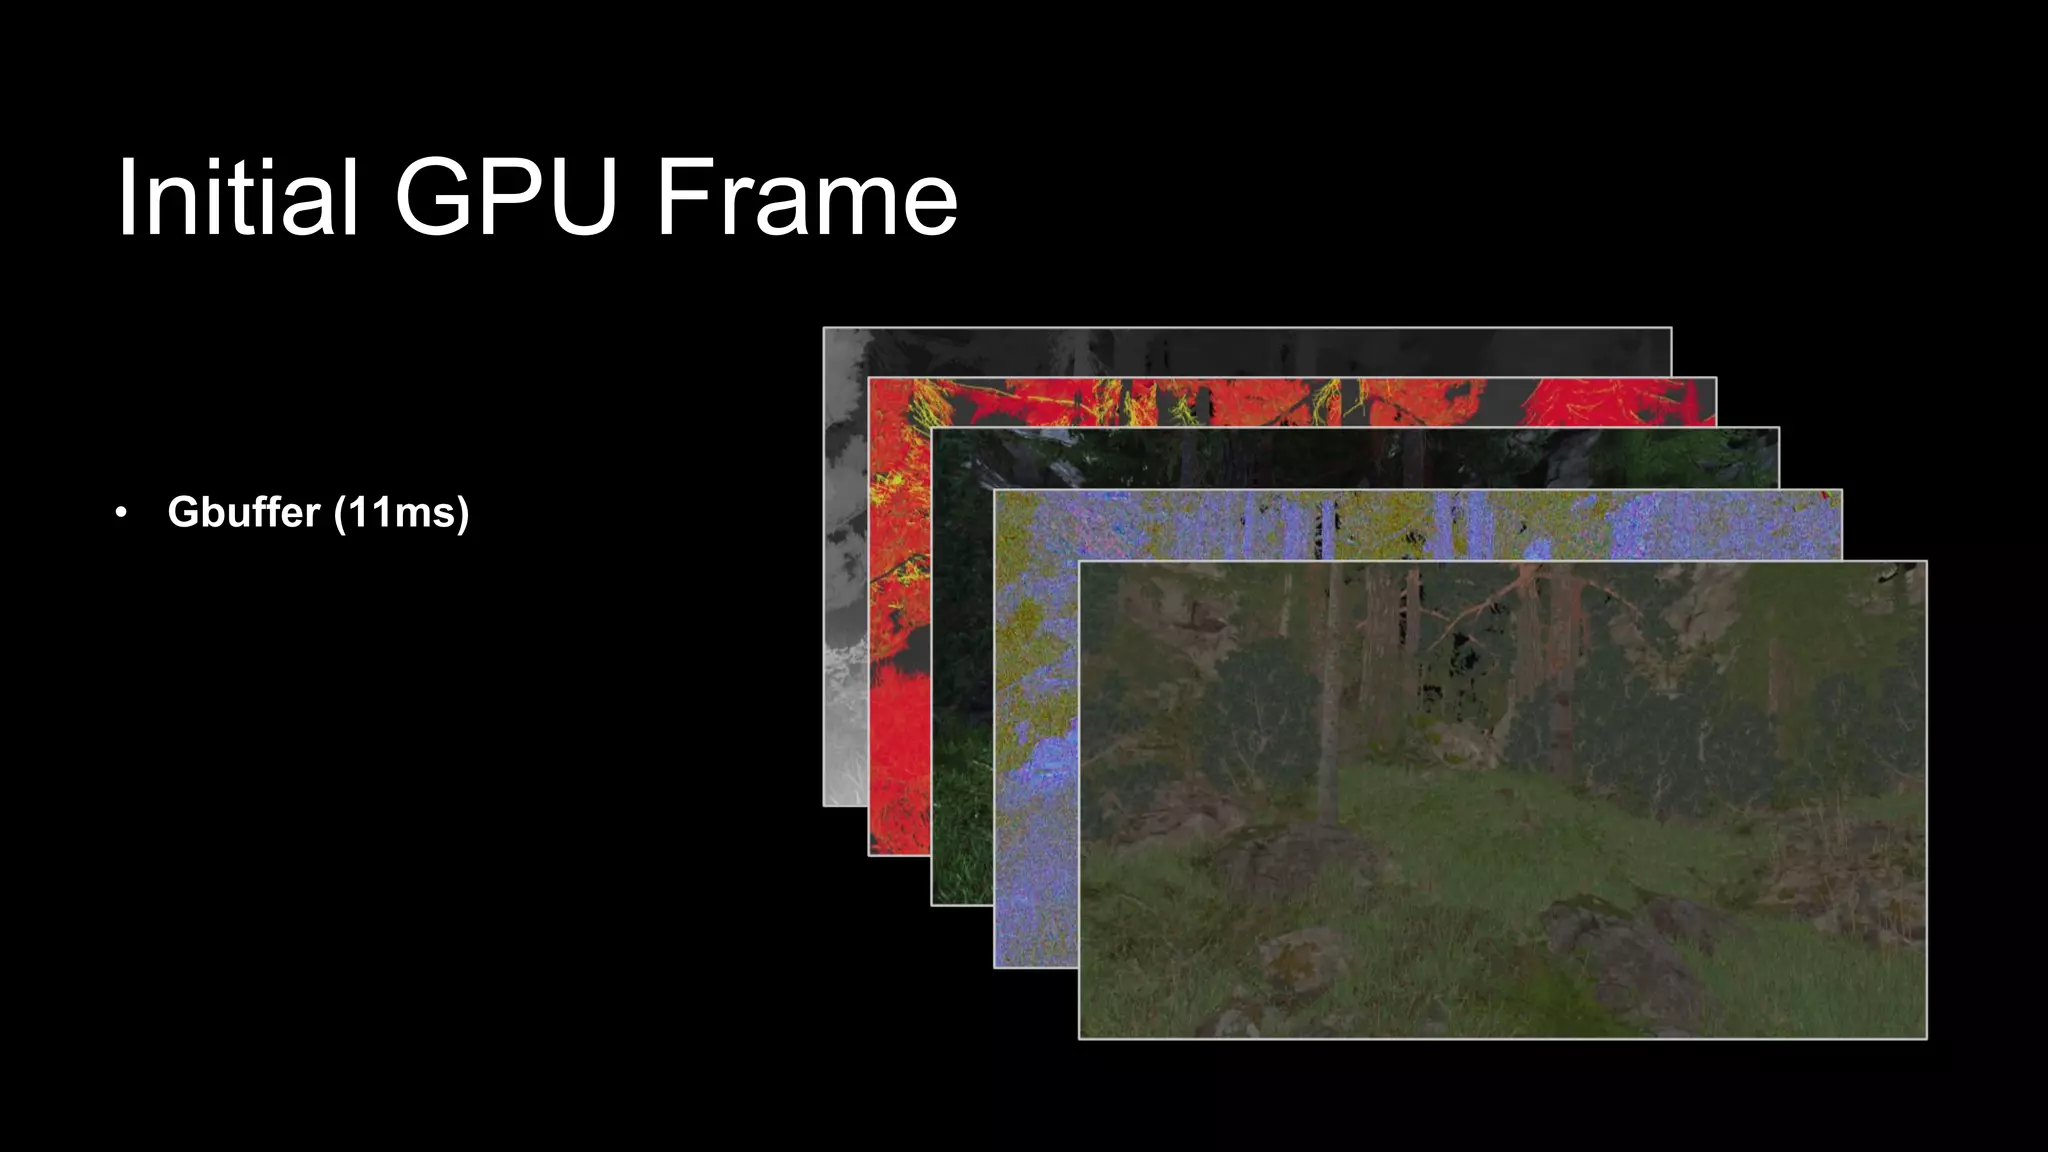
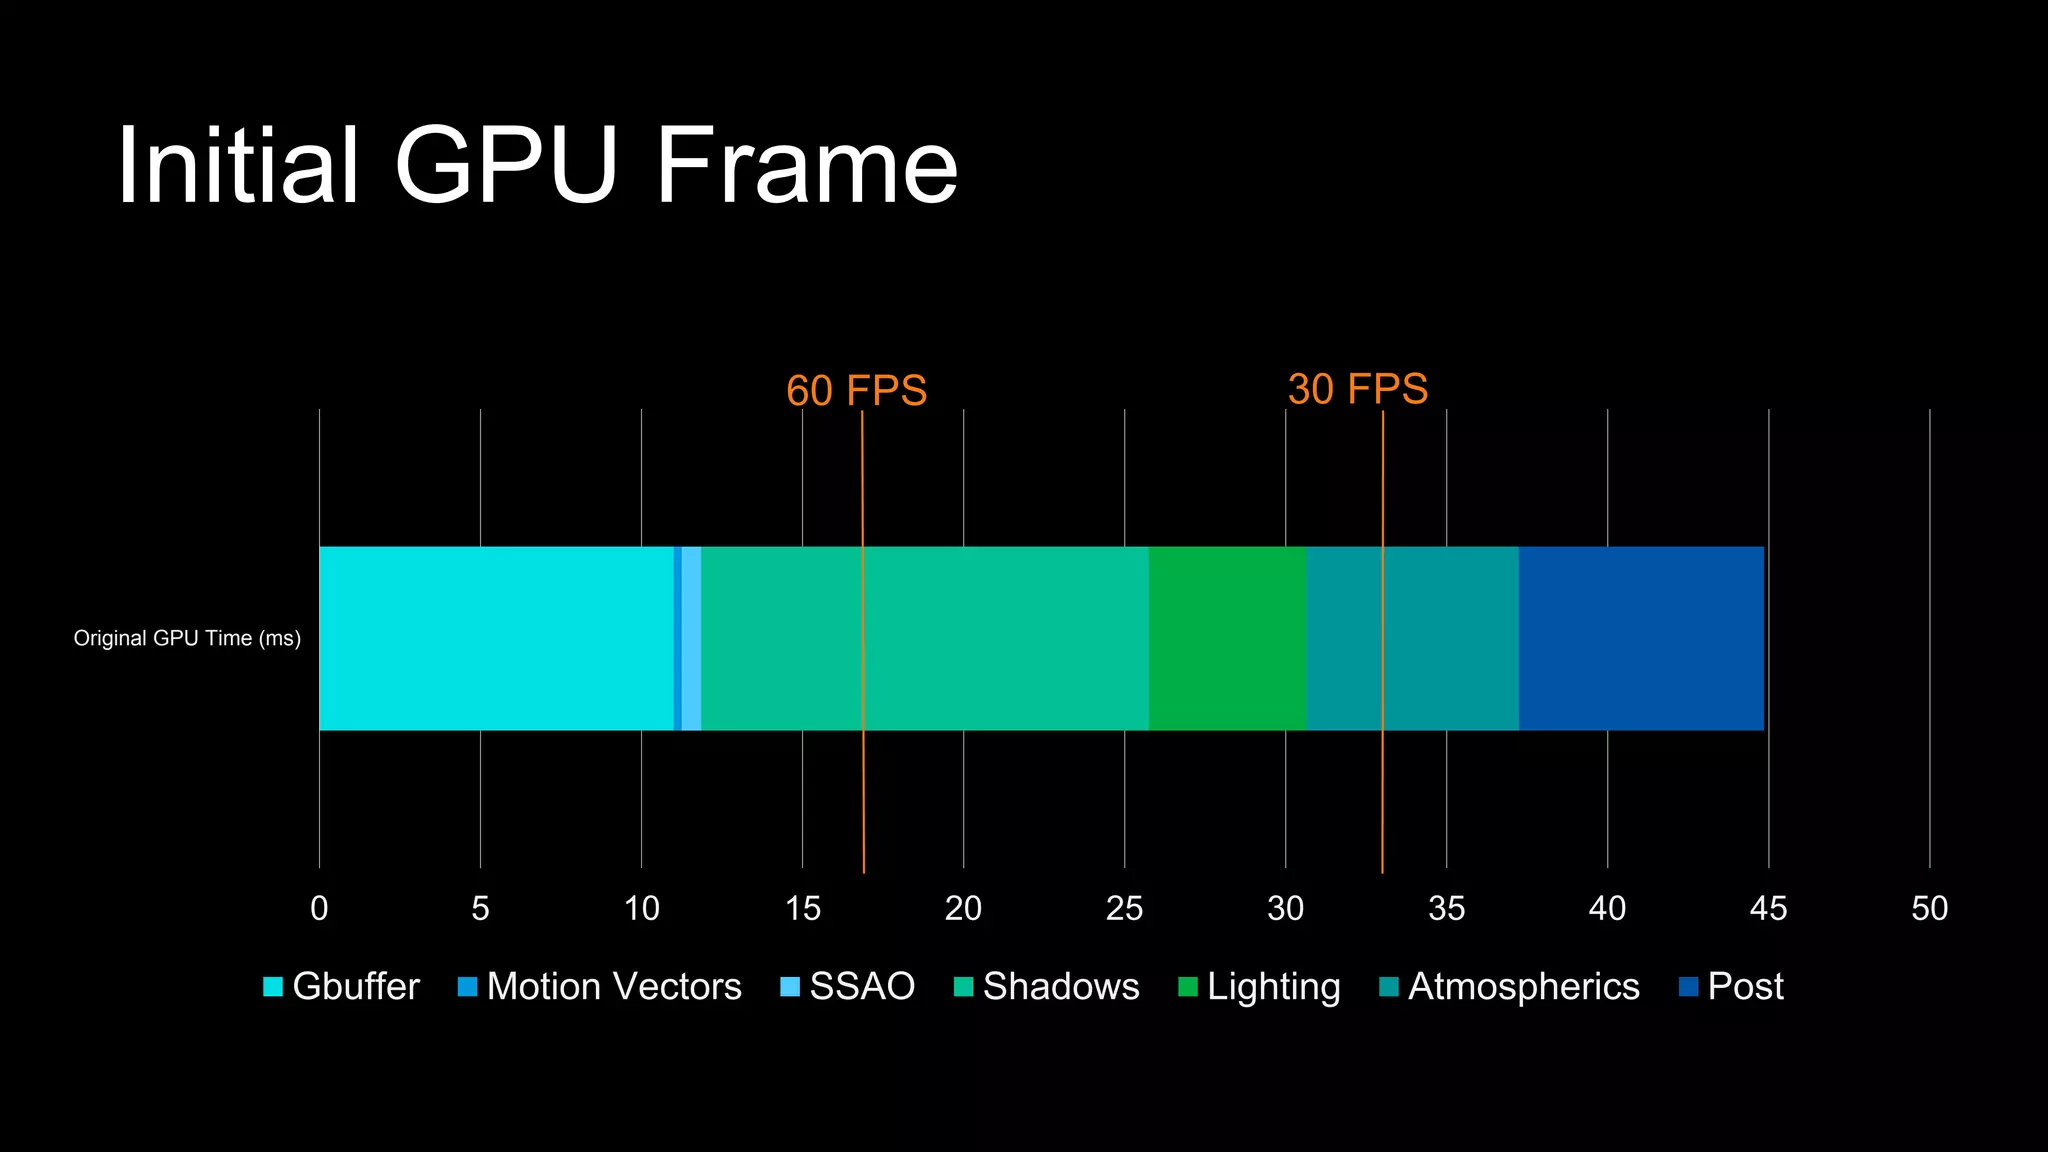
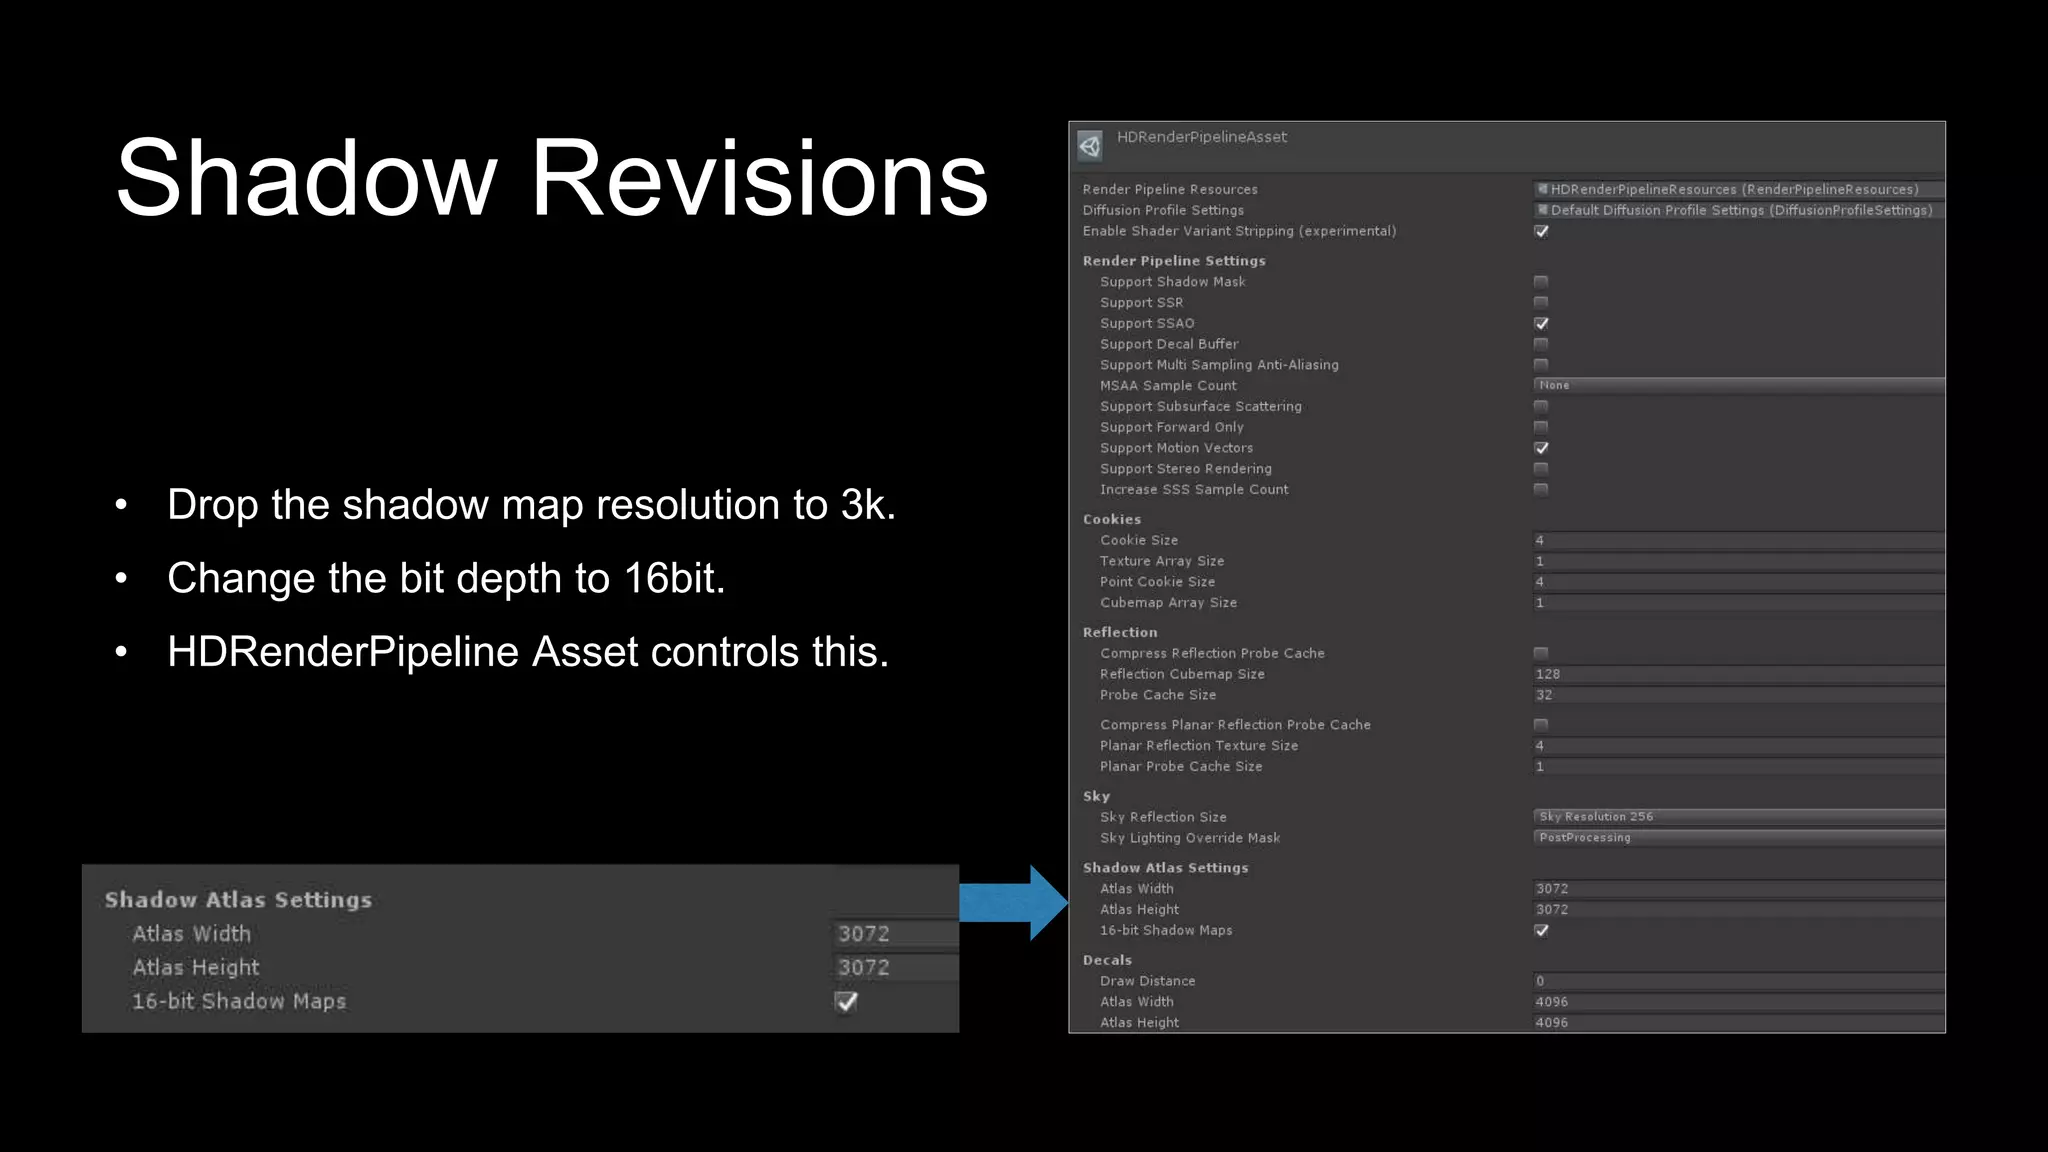
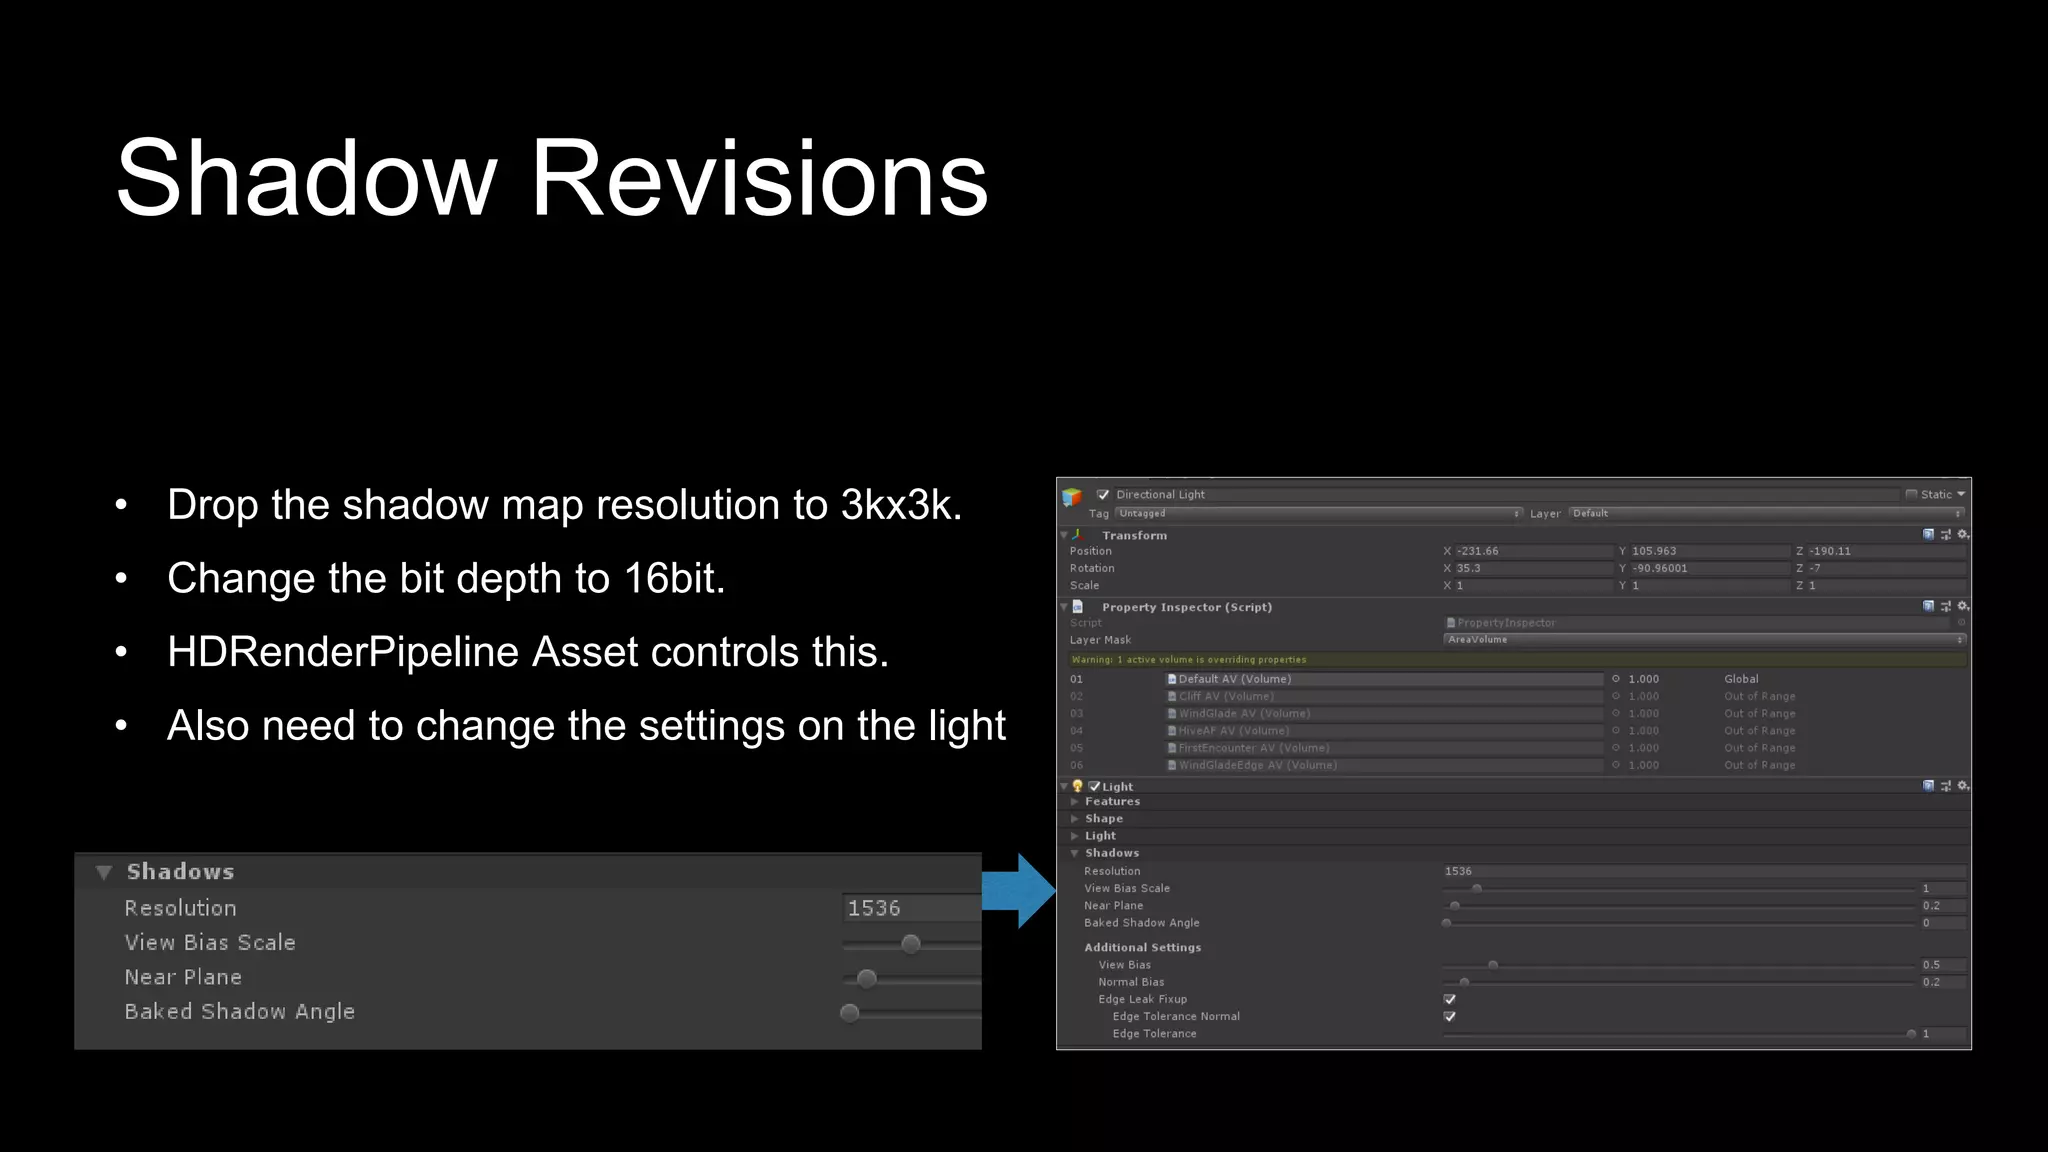
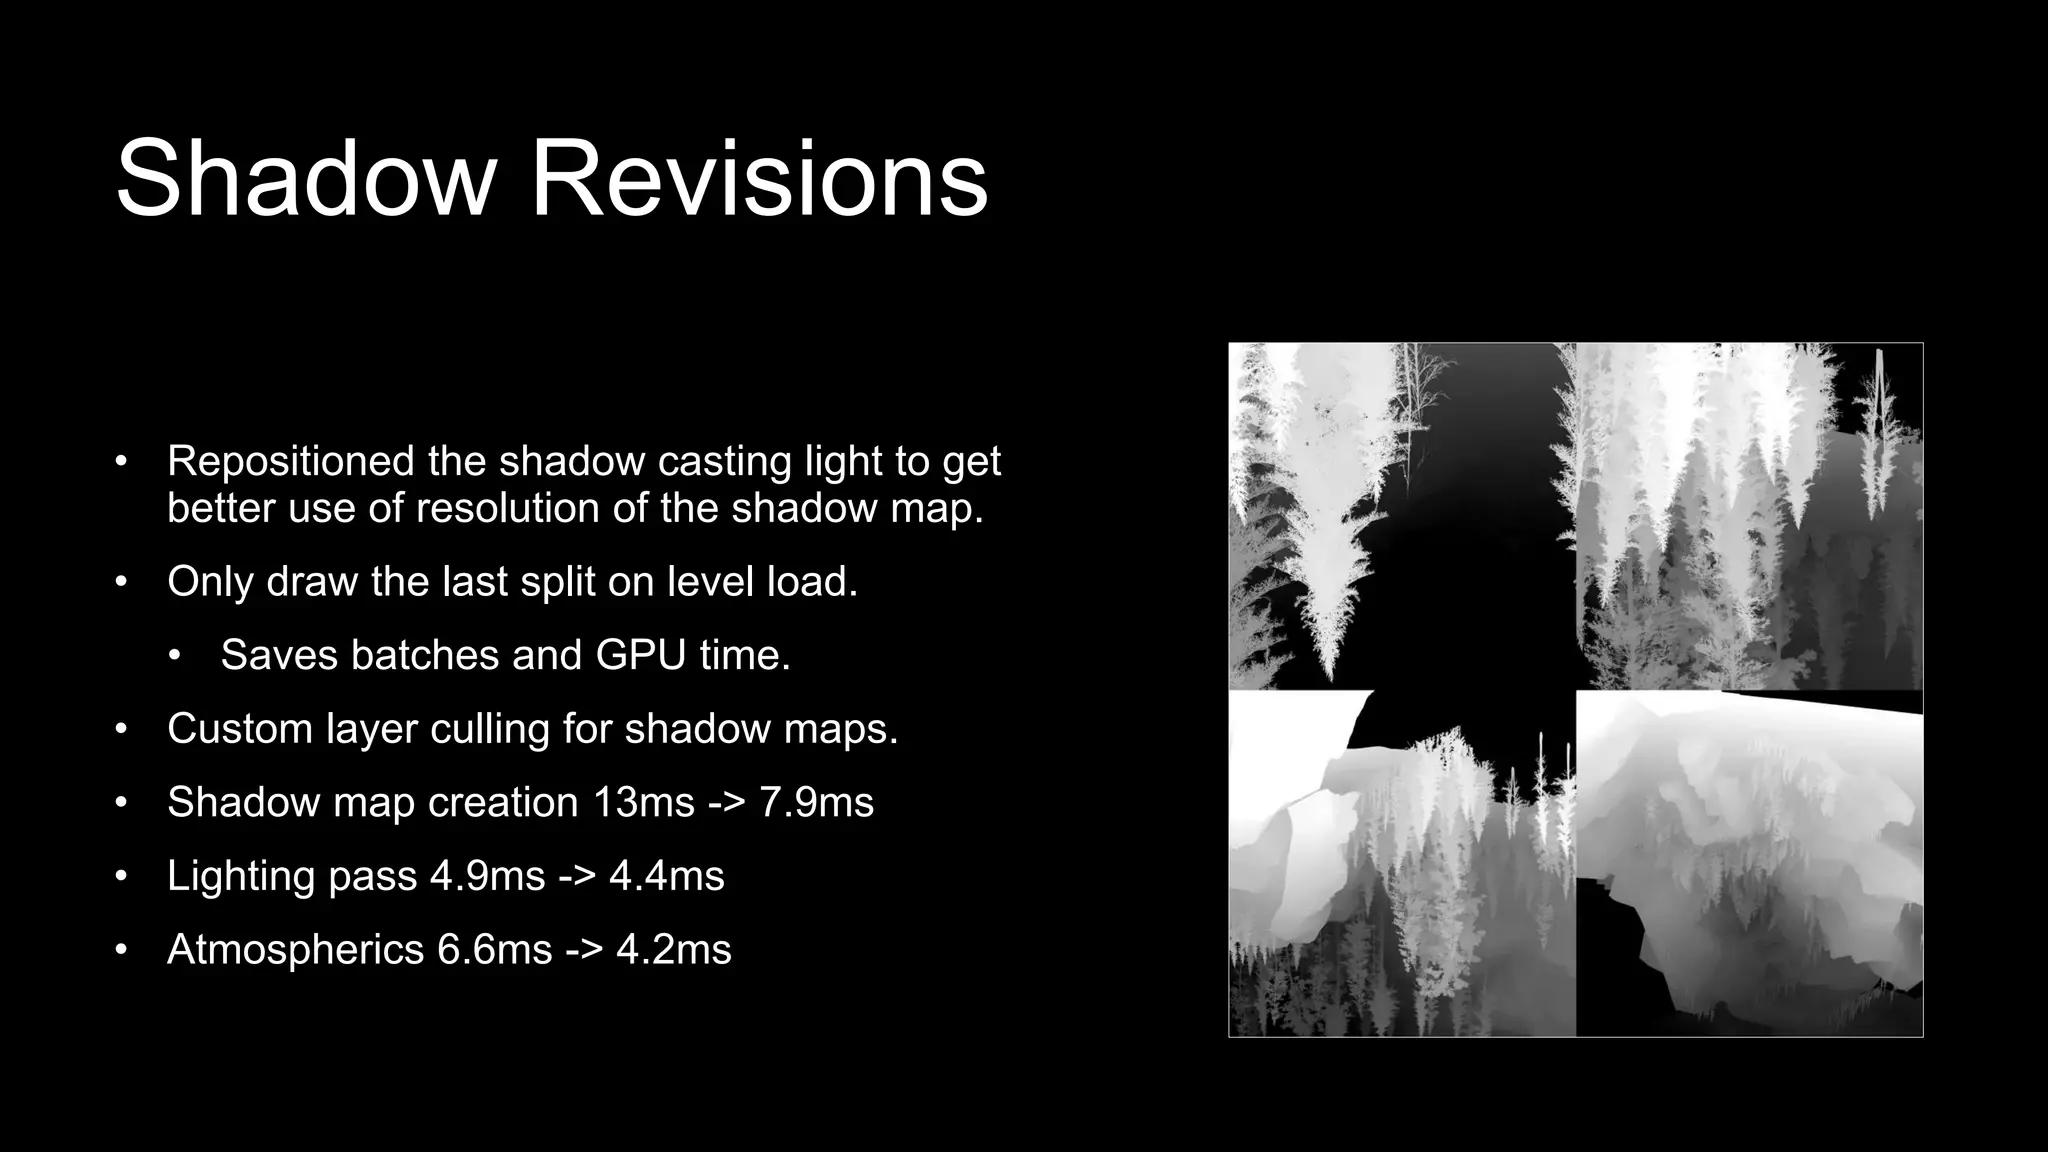
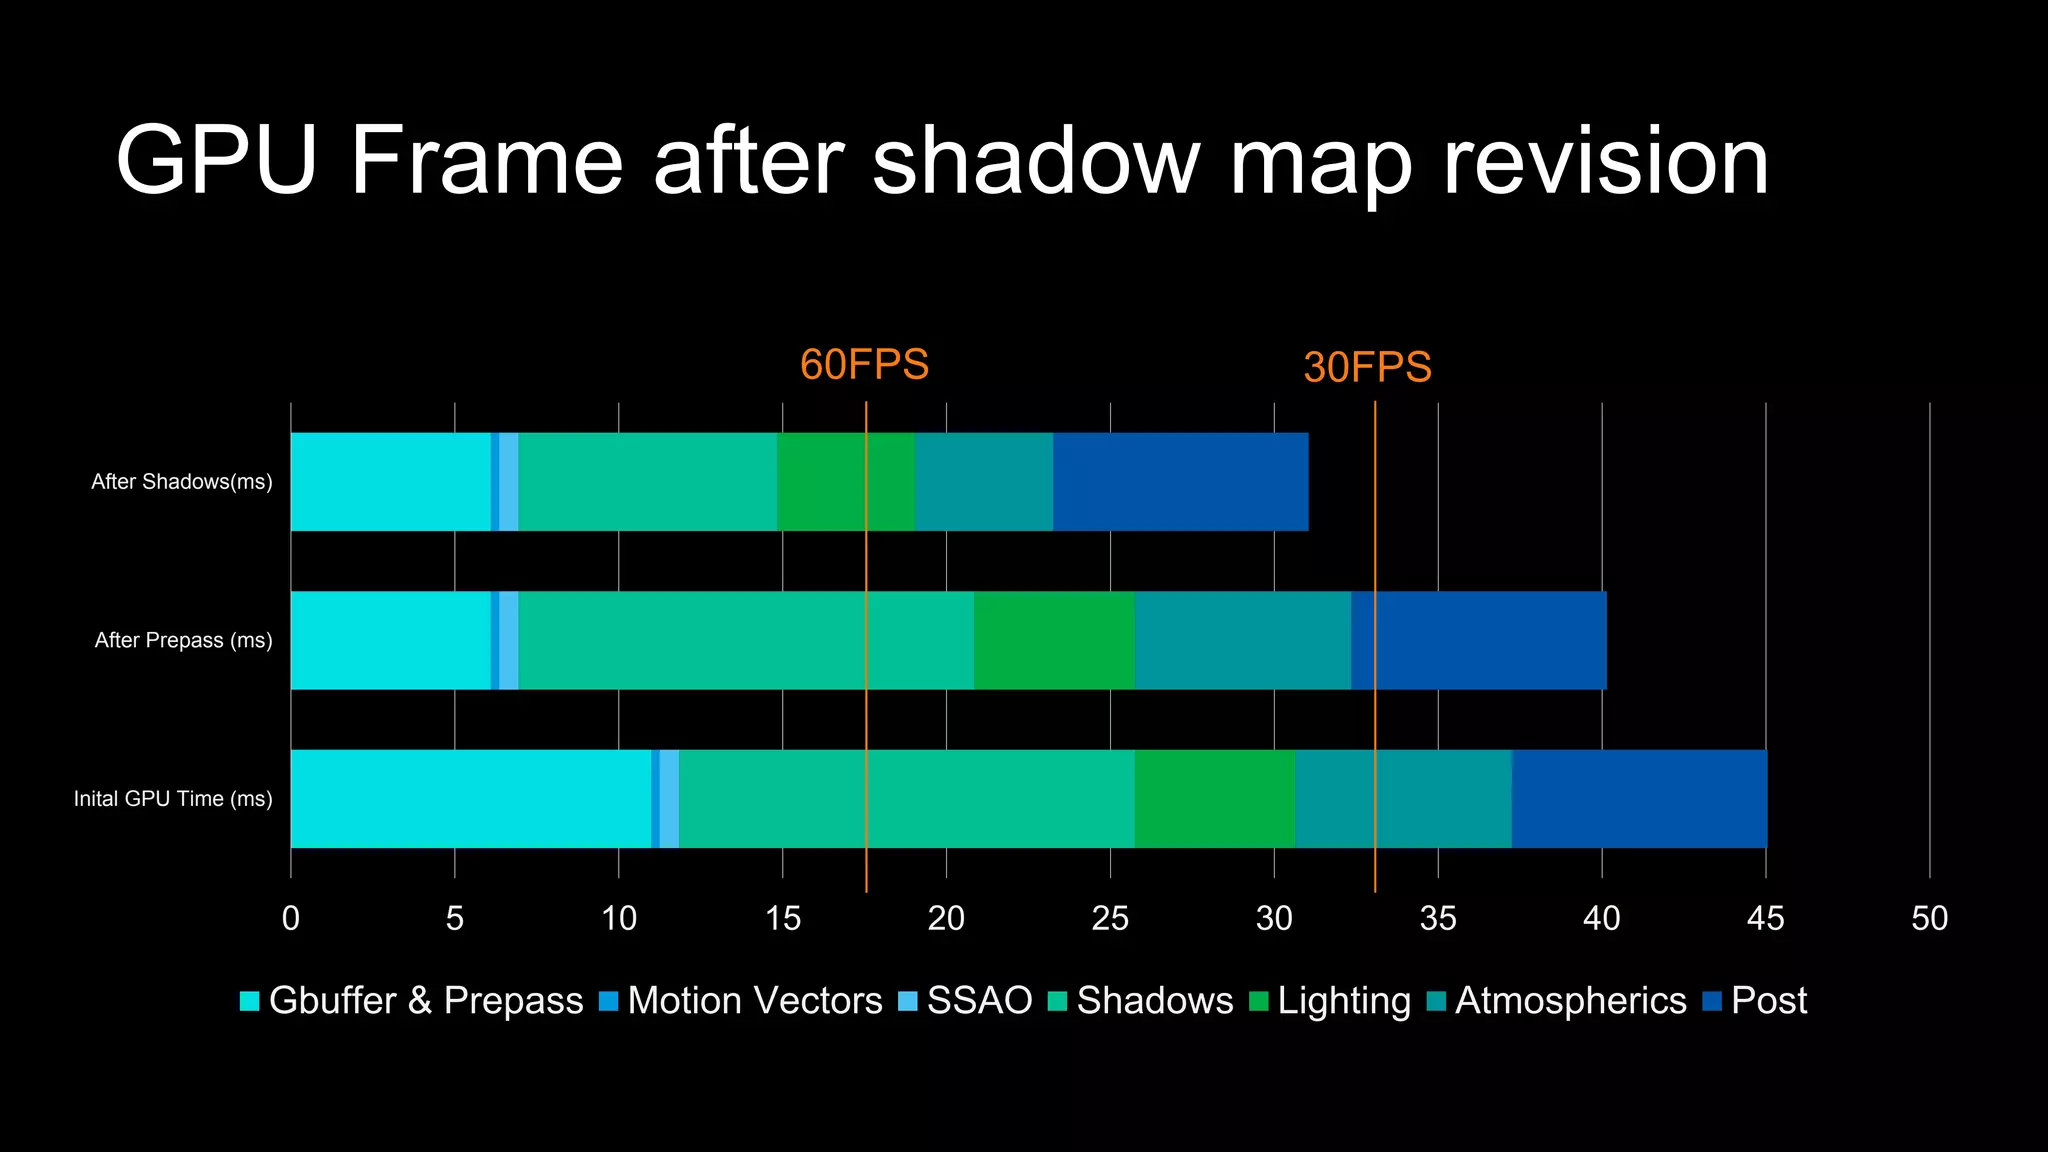
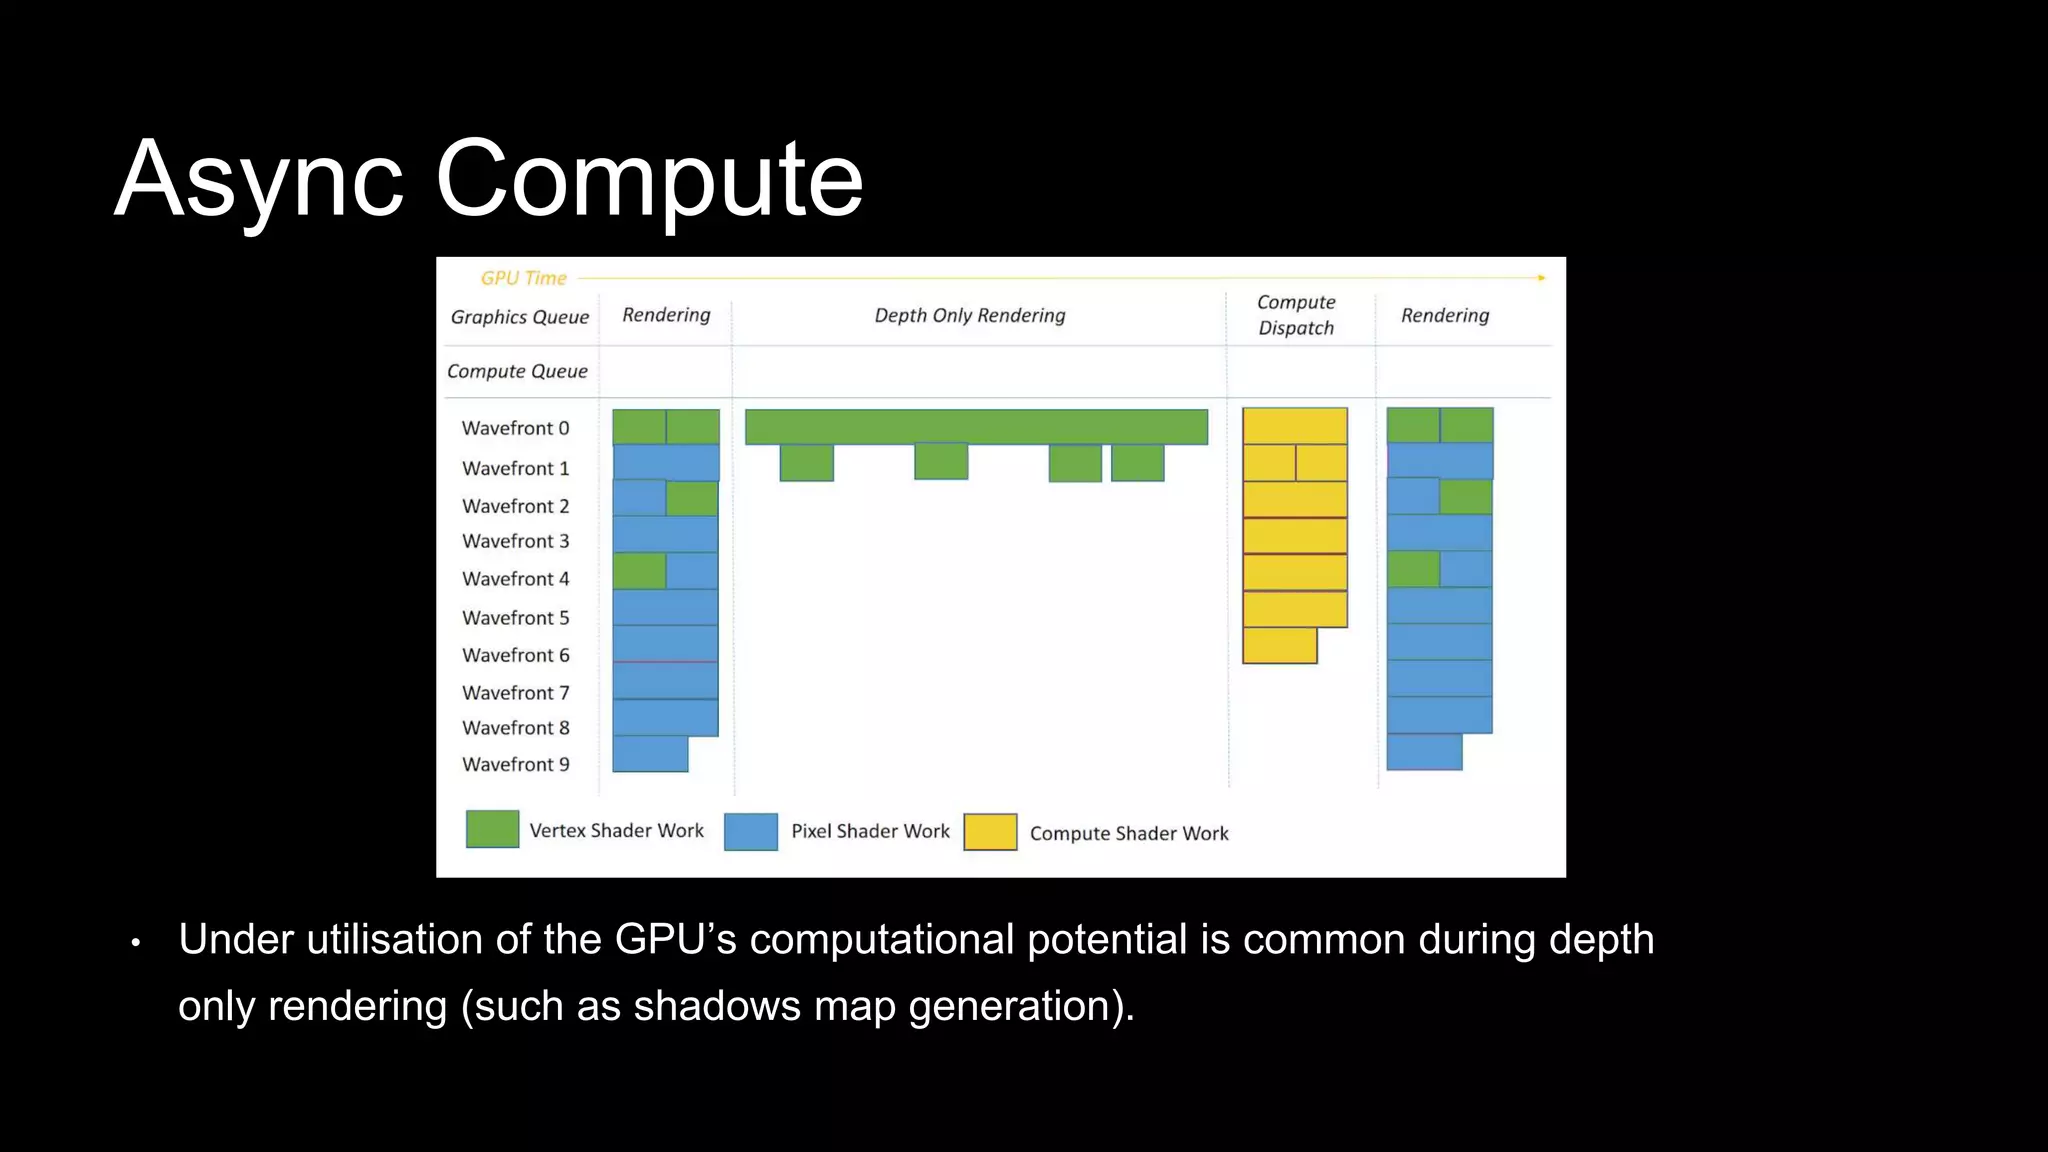
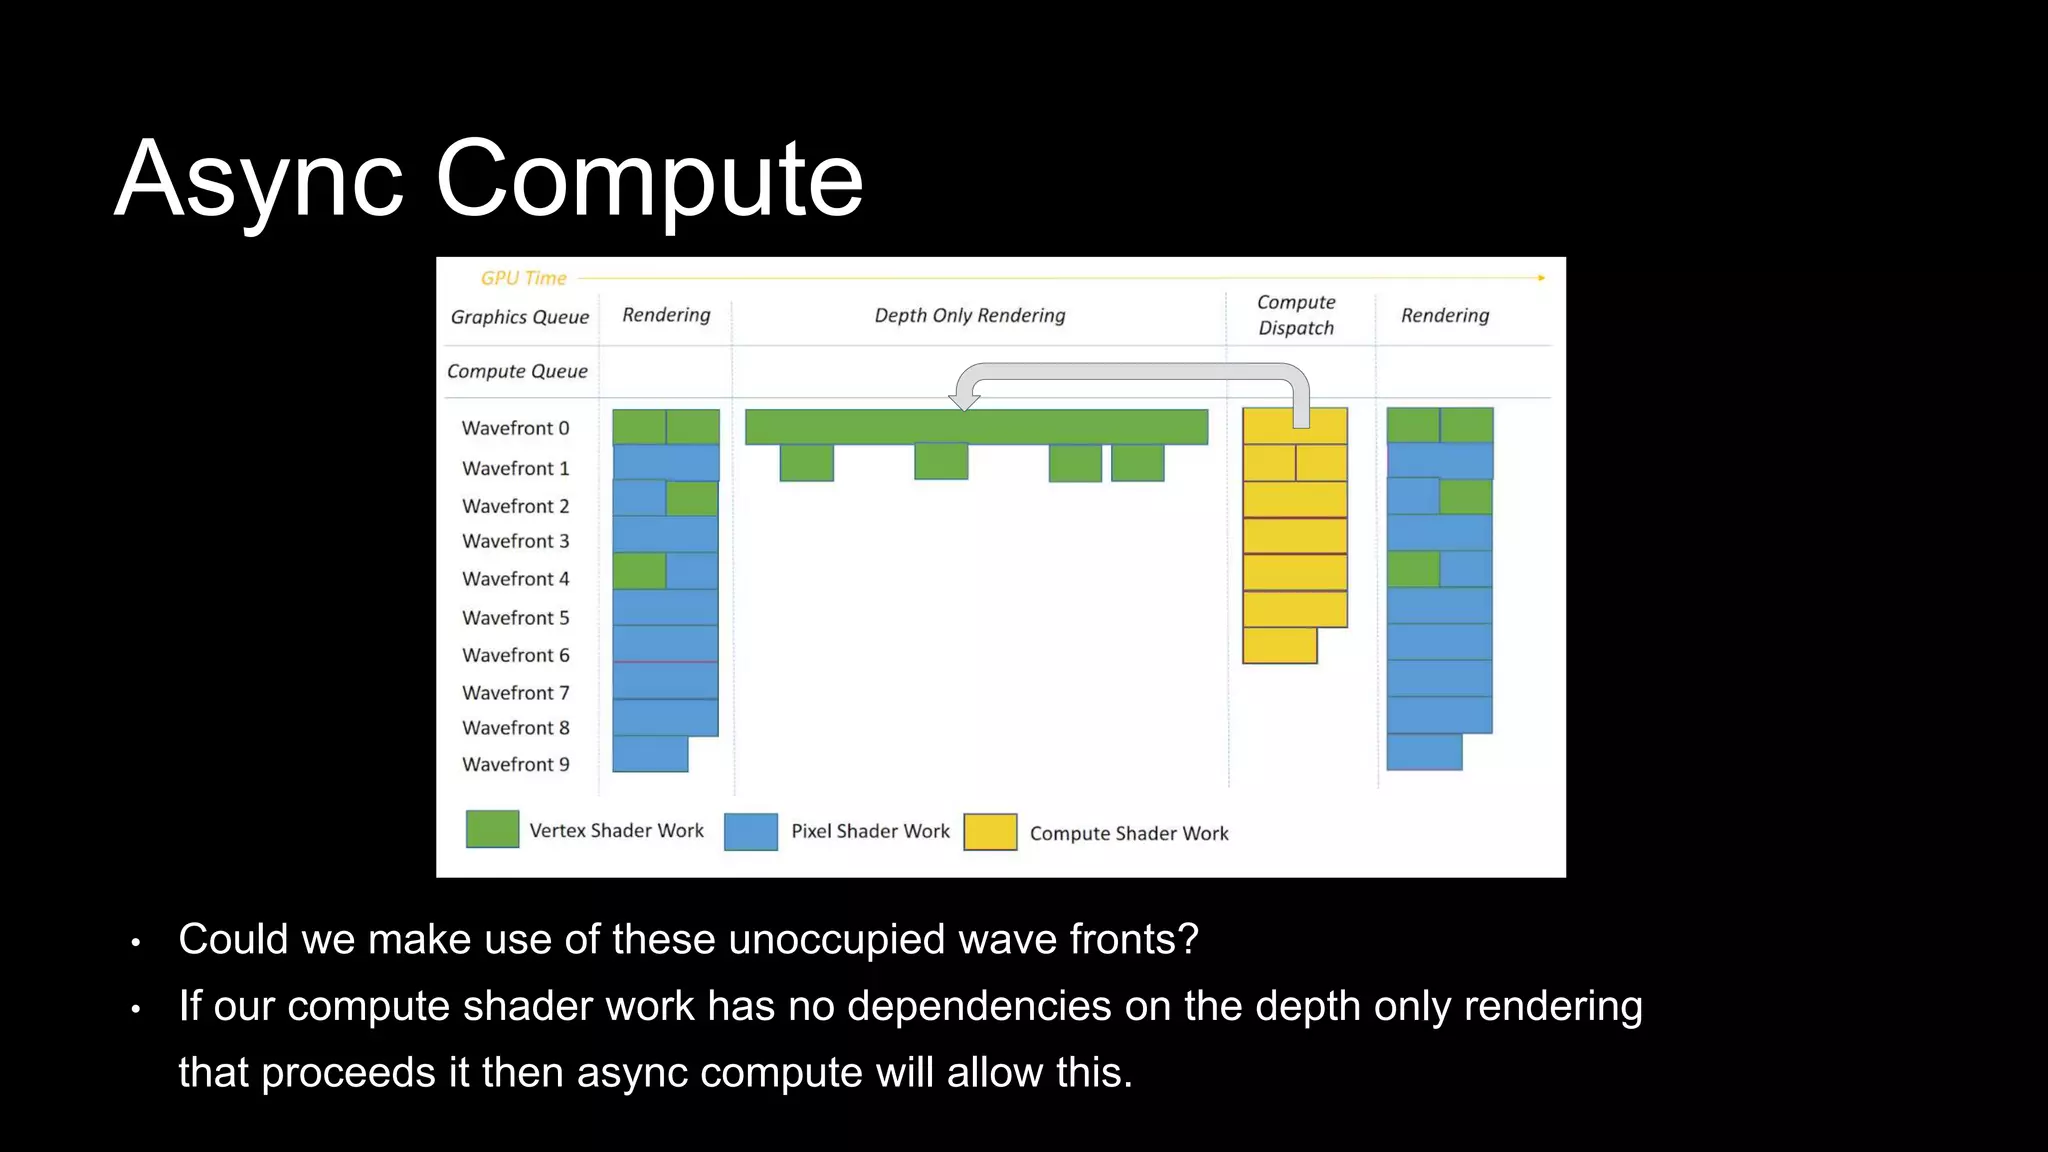
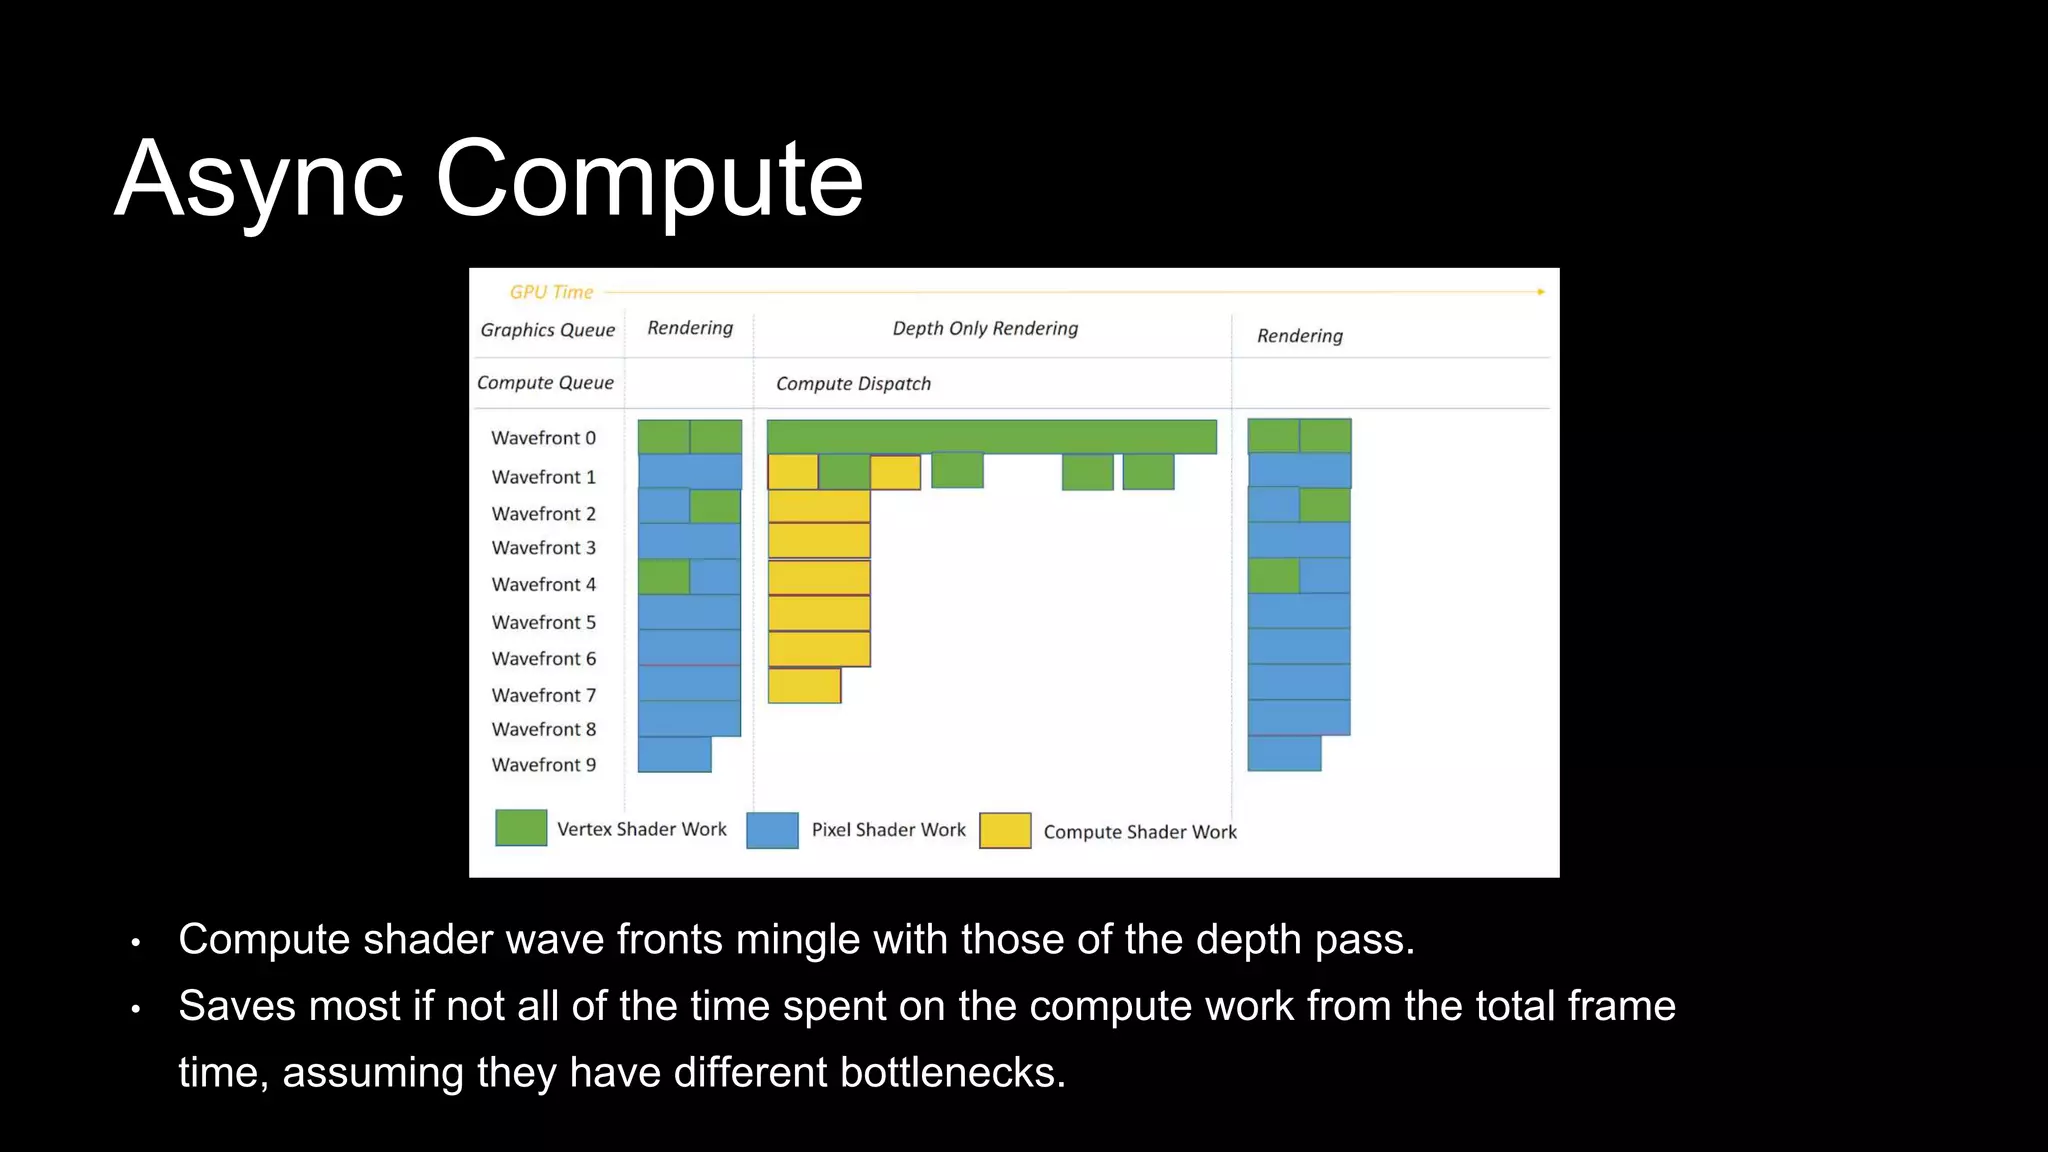
Book of the Dead
Optimizing Performance for
High-End Consoles
Rob Thompson
Consoles Graphics Programmer
Unity Technologies
• Technical presentation, focussed on graphics optimisation.
• Looking at Xbox One & PlayStation 4.
• Case study using a Scriptable Render Pipelines (SRP) based project.
Presentation Overview
• Real time rendered short cinematic released at the start of 2018 to critical
acclaim.
• 2018 Webby Award Winner.
• Show case for the capabilities of High Definition Render Pipeline (HDRP).
• https://unity3d.com/book-of-the-dead
Book of the Dead
• Book of the Dead was created by Unity’s award winning demo team.
• Responsible for Adam and The Blacksmith.
The Demo Team
Book of the Dead:
Environment interactive demo
• Allow users to explore Book of the Dead content in an interactive environment.
• Show Book of the Dead quality visuals on hardware people have at home.
• Provide an example Unity project for high end HDRP content.
- All of the script code and assets are now available on the asset store.
• Target Xbox One and PlayStation 4.
• 1080p, 30fps or better on PlayStation 4 Pro and Xbox One X.
Objectives
Book of the Dead:
Environment interactive demo
Performance Case Study
• Worst case view for profiling in terms of GPU load.
Sample Scene
• Deferred rendered using High Definition Render Pipeline (HDRP).
• Most artist authored textures 1-2k , a handful at 4k.
• Baked Occlusion and GI.
• Single Dynamic Shadow Casting Directional Light.
• ~2000 batches (draw calls and compute shader dispatches).
• Initially GPU bound on PS4 Pro at ~45ms.
Scene Summary
CPU Performance
Controlling The Batch Count
• 1832 batches in this scene.
Controlling The Batch Count
• 1832 batches in this scene.
• Use Occlusion culling.
• Use GPU instancing.
• Dynamic batching seldom a win on console
Controlling The Batch Count
• 1832 batches in this scene.
• Use Occlusion culling.
• Use GPU instancing.
• Dynamic batching seldom a win on console
• 4500 batches without instancing, more in other views.
Scene With No Instances
Scene With Instances
Scene With No Instances
Graphics Jobs
• Both PS4 and Xbox One are mutli core machines.
• Good CPU performance is dependant on using those cores effectively.
• Graphics Jobs are Unity’s mechanism for getting rendering work spread across
those cores.
• In Unity find the Graphics Jobs controls under Player Settings -> Other
Settings.
• It’s still flagged as experimental!
Graphics Jobs
Should see a performance gain using Graphics Jobs on consoles if you are rendering anything
more than a handful of batches.
• Graphics Jobs off is the default.
Legacy Jobs
• DX11 for Xbox One
• Available on PS4
Native Jobs
• DX12 for Xbox One
(coming soon)
• Available on PS4
Graphics Jobs
Legacy Jobs
• Takes some pressure off the main
thread and onto threads on the other
cores.
• The “Render Thread”, can still be a
bottleneck in large scenes.
Native Jobs
• Distributes the most work across cores.
• Best option for large scenes.
• In 2018.1 and earlier could put more
work onto the main thread causing
performance regression in comparison
to legacy jobs.
• Should always be the best option from
2018.2 onwards.
GPU Performance Analysis
Performance Investigation
• Undertaken using the platform holders tools.
• PIX and Razor are world class, use them.
• Get on to console early in your dev cycle.
• Timings presented here from PS4 Pro.
Initial GPU Frame
• Gbuffer (11ms)
Initial GPU Frame
• Gbuffer (11ms)
• Motion Vectors (0.25ms)
• SSAO (0.6ms)
Initial GPU Frame
• Gbuffer (11ms)
• Motion Vectors (0.25ms)
• SSAO (0.6ms)
• Shadow maps (13.9ms)
Initial GPU Frame
• Gbuffer (11ms)
• Motion Vectors (0.25ms)
• SSAO (0.6ms)
• Shadow maps (13.9ms)
• Deferred Lighting (4.9ms)
Initial GPU Frame
• Gbuffer (11ms)
• Motion Vectors (0.25ms)
• SSAO (0.6ms)
• Shadow maps (13.9ms)
• Deferred Lighting (4.9ms)
• Atmospheric Scattering (6.6ms)
Initial GPU Frame
• Gbuffer (11ms)
• Motion Vectors (0.25ms)
• SSAO (0.6ms)
• Shadow maps (13.9ms)
• Deferred Lighting (4.9ms)
• Atmospheric Scattering (6.6ms)
• TAA & Post Process (7.6ms)
Initial GPU Frame
0 5 10 15 20 25 30 35 40 45 50
Original GPU Time (ms)
Gbuffer Motion Vectors SSAO Shadows Lighting Atmospherics Post
60 FPS 30 FPS
GBuffer Performance
• Too slow at 11ms
• Initial GPU profile showed use of GPU tessellation during GBuffer and shadow map passes.
• Generally using tessellation shaders best avoided on consoles.
 Slow in comparison to rendering the equivalent pre authored assets.
 Should only be used when it solves a visual issue that would be hard or cannot be solved in
art.
• So why use tessellation here?
GBuffer Performance
Tessellation Use
• Tree bark is an ideal use case for tessellated displacement.
• Trees are “hero objects” in our scene.
 Adding extra detail in this manner helps hide LOD transitions on these important assets.
 Same mesh used for LOD0 and LOD1 but the effect of tessellation is dialled back as we
transition between the two.
• Decided to stick with tessellation despite the performance issues as the advantages in this use
case deemed worth the cost.
Tessellation Use
• Too slow at 11ms
• PIX / Razor analysis showed GPU wave front patterns like that on the right.
• Diagram shows wave front occupancy during a portion of the Gbuffer Pass
• We should see heavy vertex shader (green) and pixel shader (blue) occupancy as we see in
the image on the left. Instead the GPU is starved of work.
Gbuffer Performance
Good Wave Front Occupancy Bad Wave Front Occupancy
Overdraw
• Especially bad on consoles when discard instructions in pixel shaders used.
• This causes depth rejection to not be performed until after pixel shaders have run.
• A lot of our objects are “alpha tested”.
Solution: Use a depth pre-pass
• HDRP now always runs a depth pre-pass for alpha tested objects.
• Option provided to pre-pass everything.
 HDRenderPipeLineAsset -> Rendering Settings.
• Down side, more batches!
• Be careful of CPU performance when using a prepass
Gbuffer Performance
• Some asset optimisation also carried out during this phase.
• GBuffer creation was at ~11ms.
• Now Depth Prepass + GBuffer creation totals ~6ms
Gbuffer Performance
GPU Frame after Prepass
0 5 10 15 20 25 30 35 40 45 50
Inital GPU Time (ms)
After Prepass (ms)
Gbuffer & Prepass Motion Vectors SSAO Shadows Lighting Atmospherics Post
60FPS 30FPS
• Single shadow casting directional light.
• 4 Shadow map splits.
• 4k x 4k resolution (default for HDRP)
• 32bit depth
Shadow Map Generation
• Resolution almost always the performance limiting factor when it comes to shadow maps.
• Analysis in Razor and PIX backed this up.
• Most of our draw calls are in the shadow mapping pass.
• Interesting wave front stall at the end of the shadow mapping wave fronts.
Shadow Map Generation
• Consoles write to compressed depth buffers.
• This speeds up depth testing significantly.
• However before the depth buffer can be sampled as a texture it must be decompressed.
• The decompression is our stall in this case around 0.7ms.
• Stall bigger for larger 32 bit render targets.
• Can be problematic on large render targets that are updated sporadically.
• On PS4 from script use PS4.RenderSettings.DisableDepthBufferCompression to experiment
with disabling compression on large depth targets that might only be partially written to in any
given frame (e.g. atlases).
Shadow Map Generation
• The first stage of our atmospheric scattering effect reads the shadow map as an input.
• Initially at 6.6ms.
• Razor and PIX showed that this was significantly bandwidth bound reading from the
shadow map.
Shadow Map As Input
• Drop the shadow map resolution to 3k.
• Change the bit depth to 16bit.
• HDRenderPipeline Asset controls this.
Shadow Revisions
• Drop the shadow map resolution to 3kx3k.
• Change the bit depth to 16bit.
• HDRenderPipeline Asset controls this.
• Also need to change the settings on the light
Shadow Revisions
• Repositioned the shadow casting light to get
better use of resolution of the shadow map.
• Only draw the last split on level load.
• Saves batches and GPU time.
• Custom layer culling for shadow maps.
• Shadow map creation 13ms -> 7.9ms
• Lighting pass 4.9ms -> 4.4ms
• Atmospherics 6.6ms -> 4.2ms
Shadow Revisions
GPU Frame after shadow map revision
0 5 10 15 20 25 30 35 40 45 50
Inital GPU Time (ms)
After Prepass (ms)
After Shadows(ms)
Gbuffer & Prepass Motion Vectors SSAO Shadows Lighting Atmospherics Post
60FPS 30FPS
Async Compute
• Under utilisation of the GPU’s computational potential is common during depth
only rendering (such as shadows map generation).
Async Compute
• Could we make use of these unoccupied wave fronts?
• If our compute shader work has no dependencies on the depth only rendering
that proceeds it then async compute will allow this.
Async Compute
• Compute shader wave fronts mingle with those of the depth pass.
• Saves most if not all of the time spent on the compute work from the total frame
time, assuming they have different bottlenecks.
Async Compute
• BOTD uses tile light list gather (part of the lighting pass ) and SSAO on async compute.
• Both overlap with the shadow map rendering where the most “gaps” in our wave front
utilisation occur.
• Async Compute is currently PS4 only, coming to DX12 soon.
• Accessible in script though Unity’s Command Buffer interface (not just SRP).
• Look at HDRP or BOTD script code for examples.
Async Compute
• Can also use it with the legacy renderers.
• Unity automatically creates the fences internally when adding async compute command
buffers to lights or cameras.
• Results in your async compute commands being executed at the appropriate light or camera
event on the graphics queue.
Async Compute
• Learn the platform holders tools (PIX, Razor).
• Get onto console early in your dev cycle.
• Use Graphics Jobs.
• Use GPU Instancing.
• Don’t use Tessellation without good cause.
Key Take Aways
• Consider a depth prepass when using SRP.
• Be careful with shadow map resolution / bit depth.
• Try enabling async compute when using HDRP.
• Consider async compute for any custom compute tasks.
• Book of the Dead: Environment interactive demo is availble on the asset store
now.
Key Take Aways
Thanks To
• The Demo Team.
• Xbox and PlayStation Teams.
• Unity Paris.
• Spotlight Europe.
Thank you!
Visit the
Microsoft & PlayStation booths
Experience the Book of the Dead: Environment interactive demo for yourself

Unite Berlin 2018 - Book of the Dead Optimizing Performance for High End Consoles

  • 1.
    Book of theDead Optimizing Performance for High-End Consoles
  • 2.
    Rob Thompson Consoles GraphicsProgrammer Unity Technologies
  • 3.
    • Technical presentation,focussed on graphics optimisation. • Looking at Xbox One & PlayStation 4. • Case study using a Scriptable Render Pipelines (SRP) based project. Presentation Overview
  • 4.
    • Real timerendered short cinematic released at the start of 2018 to critical acclaim. • 2018 Webby Award Winner. • Show case for the capabilities of High Definition Render Pipeline (HDRP). • https://unity3d.com/book-of-the-dead Book of the Dead
  • 5.
    • Book ofthe Dead was created by Unity’s award winning demo team. • Responsible for Adam and The Blacksmith. The Demo Team
  • 7.
    Book of theDead: Environment interactive demo
  • 8.
    • Allow usersto explore Book of the Dead content in an interactive environment. • Show Book of the Dead quality visuals on hardware people have at home. • Provide an example Unity project for high end HDRP content. - All of the script code and assets are now available on the asset store. • Target Xbox One and PlayStation 4. • 1080p, 30fps or better on PlayStation 4 Pro and Xbox One X. Objectives
  • 10.
    Book of theDead: Environment interactive demo Performance Case Study
  • 11.
    • Worst caseview for profiling in terms of GPU load. Sample Scene
  • 12.
    • Deferred renderedusing High Definition Render Pipeline (HDRP). • Most artist authored textures 1-2k , a handful at 4k. • Baked Occlusion and GI. • Single Dynamic Shadow Casting Directional Light. • ~2000 batches (draw calls and compute shader dispatches). • Initially GPU bound on PS4 Pro at ~45ms. Scene Summary
  • 13.
  • 14.
  • 15.
    Controlling The BatchCount • 1832 batches in this scene.
  • 16.
    Controlling The BatchCount • 1832 batches in this scene. • Use Occlusion culling. • Use GPU instancing. • Dynamic batching seldom a win on console
  • 17.
    Controlling The BatchCount • 1832 batches in this scene. • Use Occlusion culling. • Use GPU instancing. • Dynamic batching seldom a win on console • 4500 batches without instancing, more in other views.
  • 18.
    Scene With NoInstances
  • 19.
  • 20.
    Scene With NoInstances
  • 21.
    Graphics Jobs • BothPS4 and Xbox One are mutli core machines. • Good CPU performance is dependant on using those cores effectively. • Graphics Jobs are Unity’s mechanism for getting rendering work spread across those cores. • In Unity find the Graphics Jobs controls under Player Settings -> Other Settings. • It’s still flagged as experimental!
  • 22.
    Graphics Jobs Should seea performance gain using Graphics Jobs on consoles if you are rendering anything more than a handful of batches. • Graphics Jobs off is the default. Legacy Jobs • DX11 for Xbox One • Available on PS4 Native Jobs • DX12 for Xbox One (coming soon) • Available on PS4
  • 23.
    Graphics Jobs Legacy Jobs •Takes some pressure off the main thread and onto threads on the other cores. • The “Render Thread”, can still be a bottleneck in large scenes. Native Jobs • Distributes the most work across cores. • Best option for large scenes. • In 2018.1 and earlier could put more work onto the main thread causing performance regression in comparison to legacy jobs. • Should always be the best option from 2018.2 onwards.
  • 24.
  • 25.
    Performance Investigation • Undertakenusing the platform holders tools. • PIX and Razor are world class, use them. • Get on to console early in your dev cycle. • Timings presented here from PS4 Pro.
  • 26.
    Initial GPU Frame •Gbuffer (11ms)
  • 27.
    Initial GPU Frame •Gbuffer (11ms) • Motion Vectors (0.25ms) • SSAO (0.6ms)
  • 28.
    Initial GPU Frame •Gbuffer (11ms) • Motion Vectors (0.25ms) • SSAO (0.6ms) • Shadow maps (13.9ms)
  • 29.
    Initial GPU Frame •Gbuffer (11ms) • Motion Vectors (0.25ms) • SSAO (0.6ms) • Shadow maps (13.9ms) • Deferred Lighting (4.9ms)
  • 30.
    Initial GPU Frame •Gbuffer (11ms) • Motion Vectors (0.25ms) • SSAO (0.6ms) • Shadow maps (13.9ms) • Deferred Lighting (4.9ms) • Atmospheric Scattering (6.6ms)
  • 31.
    Initial GPU Frame •Gbuffer (11ms) • Motion Vectors (0.25ms) • SSAO (0.6ms) • Shadow maps (13.9ms) • Deferred Lighting (4.9ms) • Atmospheric Scattering (6.6ms) • TAA & Post Process (7.6ms)
  • 32.
    Initial GPU Frame 05 10 15 20 25 30 35 40 45 50 Original GPU Time (ms) Gbuffer Motion Vectors SSAO Shadows Lighting Atmospherics Post 60 FPS 30 FPS
  • 33.
  • 34.
    • Too slowat 11ms • Initial GPU profile showed use of GPU tessellation during GBuffer and shadow map passes. • Generally using tessellation shaders best avoided on consoles.  Slow in comparison to rendering the equivalent pre authored assets.  Should only be used when it solves a visual issue that would be hard or cannot be solved in art. • So why use tessellation here? GBuffer Performance
  • 35.
  • 36.
    • Tree barkis an ideal use case for tessellated displacement. • Trees are “hero objects” in our scene.  Adding extra detail in this manner helps hide LOD transitions on these important assets.  Same mesh used for LOD0 and LOD1 but the effect of tessellation is dialled back as we transition between the two. • Decided to stick with tessellation despite the performance issues as the advantages in this use case deemed worth the cost. Tessellation Use
  • 37.
    • Too slowat 11ms • PIX / Razor analysis showed GPU wave front patterns like that on the right. • Diagram shows wave front occupancy during a portion of the Gbuffer Pass • We should see heavy vertex shader (green) and pixel shader (blue) occupancy as we see in the image on the left. Instead the GPU is starved of work. Gbuffer Performance Good Wave Front Occupancy Bad Wave Front Occupancy
  • 38.
    Overdraw • Especially badon consoles when discard instructions in pixel shaders used. • This causes depth rejection to not be performed until after pixel shaders have run. • A lot of our objects are “alpha tested”. Solution: Use a depth pre-pass • HDRP now always runs a depth pre-pass for alpha tested objects. • Option provided to pre-pass everything.  HDRenderPipeLineAsset -> Rendering Settings. • Down side, more batches! • Be careful of CPU performance when using a prepass Gbuffer Performance
  • 39.
    • Some assetoptimisation also carried out during this phase. • GBuffer creation was at ~11ms. • Now Depth Prepass + GBuffer creation totals ~6ms Gbuffer Performance
  • 40.
    GPU Frame afterPrepass 0 5 10 15 20 25 30 35 40 45 50 Inital GPU Time (ms) After Prepass (ms) Gbuffer & Prepass Motion Vectors SSAO Shadows Lighting Atmospherics Post 60FPS 30FPS
  • 41.
    • Single shadowcasting directional light. • 4 Shadow map splits. • 4k x 4k resolution (default for HDRP) • 32bit depth Shadow Map Generation
  • 42.
    • Resolution almostalways the performance limiting factor when it comes to shadow maps. • Analysis in Razor and PIX backed this up. • Most of our draw calls are in the shadow mapping pass. • Interesting wave front stall at the end of the shadow mapping wave fronts. Shadow Map Generation
  • 43.
    • Consoles writeto compressed depth buffers. • This speeds up depth testing significantly. • However before the depth buffer can be sampled as a texture it must be decompressed. • The decompression is our stall in this case around 0.7ms. • Stall bigger for larger 32 bit render targets. • Can be problematic on large render targets that are updated sporadically. • On PS4 from script use PS4.RenderSettings.DisableDepthBufferCompression to experiment with disabling compression on large depth targets that might only be partially written to in any given frame (e.g. atlases). Shadow Map Generation
  • 44.
    • The firststage of our atmospheric scattering effect reads the shadow map as an input. • Initially at 6.6ms. • Razor and PIX showed that this was significantly bandwidth bound reading from the shadow map. Shadow Map As Input
  • 45.
    • Drop theshadow map resolution to 3k. • Change the bit depth to 16bit. • HDRenderPipeline Asset controls this. Shadow Revisions
  • 46.
    • Drop theshadow map resolution to 3kx3k. • Change the bit depth to 16bit. • HDRenderPipeline Asset controls this. • Also need to change the settings on the light Shadow Revisions
  • 47.
    • Repositioned theshadow casting light to get better use of resolution of the shadow map. • Only draw the last split on level load. • Saves batches and GPU time. • Custom layer culling for shadow maps. • Shadow map creation 13ms -> 7.9ms • Lighting pass 4.9ms -> 4.4ms • Atmospherics 6.6ms -> 4.2ms Shadow Revisions
  • 48.
    GPU Frame aftershadow map revision 0 5 10 15 20 25 30 35 40 45 50 Inital GPU Time (ms) After Prepass (ms) After Shadows(ms) Gbuffer & Prepass Motion Vectors SSAO Shadows Lighting Atmospherics Post 60FPS 30FPS
  • 49.
  • 50.
    • Under utilisationof the GPU’s computational potential is common during depth only rendering (such as shadows map generation). Async Compute
  • 51.
    • Could wemake use of these unoccupied wave fronts? • If our compute shader work has no dependencies on the depth only rendering that proceeds it then async compute will allow this. Async Compute
  • 52.
    • Compute shaderwave fronts mingle with those of the depth pass. • Saves most if not all of the time spent on the compute work from the total frame time, assuming they have different bottlenecks. Async Compute
  • 53.
    • BOTD usestile light list gather (part of the lighting pass ) and SSAO on async compute. • Both overlap with the shadow map rendering where the most “gaps” in our wave front utilisation occur. • Async Compute is currently PS4 only, coming to DX12 soon. • Accessible in script though Unity’s Command Buffer interface (not just SRP). • Look at HDRP or BOTD script code for examples. Async Compute
  • 55.
    • Can alsouse it with the legacy renderers. • Unity automatically creates the fences internally when adding async compute command buffers to lights or cameras. • Results in your async compute commands being executed at the appropriate light or camera event on the graphics queue. Async Compute
  • 56.
    • Learn theplatform holders tools (PIX, Razor). • Get onto console early in your dev cycle. • Use Graphics Jobs. • Use GPU Instancing. • Don’t use Tessellation without good cause. Key Take Aways
  • 57.
    • Consider adepth prepass when using SRP. • Be careful with shadow map resolution / bit depth. • Try enabling async compute when using HDRP. • Consider async compute for any custom compute tasks. • Book of the Dead: Environment interactive demo is availble on the asset store now. Key Take Aways
  • 58.
    Thanks To • TheDemo Team. • Xbox and PlayStation Teams. • Unity Paris. • Spotlight Europe.
  • 59.
  • 60.
    Visit the Microsoft &PlayStation booths Experience the Book of the Dead: Environment interactive demo for yourself

Editor's Notes

  • #4 If you’re already familiar with console development less of what we’ll cover here will be news to you, hopefully though there will still be relevant information for you to take away. HDRP is one of Unity’s Scriptable Render Pipelines intended as a template for your own pipelines or to use out of the box for high end graphics titles.
  • #8 An interactive experience based in an expanded Book of the Dead environment. Navigable in a familiar gaming manner and playable on current console hardware.
  • #11 We’re going to show our process, some examples of the use of the platform holders tools and talk about the optimisations we made. These are all in the scope of the unity user as all changes are either to settings, art or public script code.
  • #12 Not necessarily worse scene on the CPU, but this view consistently the heaviest on the GPU. Complex long view into the rest of the level.
  • #13 BOTD forest sample uses a customised version of HDRP. Something we expect to see users doing with our published scriptable render pipelines.
  • #14 Wasn’t a big issue for this demo as we’re light on the CPU in comparison to the demands of the complex visuals and the Demo team had taken many sensible decisions to help here. Real games however are much more likely to be CPU bound though once all of the games script code and systems are taken into account. Consequently there are some key things worth calling out before we dig into the GPU.
  • #15 Not going mad with the batches is essential for keeping your CPU overheads down. A few thousand batches is realistic on consoles.
  • #16 Not many batches considering the complexity here.
  • #17 Instancing is key to keeping the batch count down. Dynamic batching seldom a win on console.
  • #18 Could probably have coped with 4500 batches on the CPU if we were using Native Graphics jobs. What this illustrates though is the more than 2x batch saving from intelligent use of instances.
  • #19 The scene showing only single instance renders. Emphasises how much instancing the demo team used.
  • #20 The scene showing only single instance renders. Emphasises how much instancing the demo team used.
  • #21 The scene showing only single instance renders. Emphasises how much instancing the demo team used.
  • #22 Graphics jobs, an essential feature that’s off by default 
  • #23 DX11 and DX12 here refers to both desktop and Xbox One
  • #24 Experimentation is encouraged when choosing which version of graphics jobs to use. Native jobs also comes with a small GPU overhead.
  • #25 The real effort of optimising this demo was on the GPU.
  • #26 Can’t emphasise enough how good these tools are in comparison to what’s available on other platforms. Get on console early to enjoy the most use of them.
  • #27 Gbuffer layout described in a Unity Blog post on HDRP by Sebastien Lagarde.
  • #30 This is an floating point render target so the colour range has been scaled here to make it visible.
  • #31 Atmospherics are not those from standard HDRP but a custom effect authored by the demo team for “The Blacksmith”. The standard HDRP equivalent was still under development during the demo’s production and this version was battle tested. It adds the dramatic “light shafts” seen at many points during the demo though it’s impact on this view is minimal.
  • #32 Post process includes depth of field, motion blur, bloom, colour correction
  • #33 Again all frame timings on a PS4 Pro. The two orange vertical lines are where we’d need to be for 30Hz and 60Hz.
  • #34 First thing to look at. Gbuffer production should be fast in a deferred renderer but often it ends up a significant part of the frame.
  • #38 This kind of distribution shows an under use of the GPU. We can’t keep the GPU fed with vertex shader work alone as we can’t spawn vertex shader wave fronts as fast as they are being completed. It’s common when we are transforming vertices but rasterising few pixels as a result. Typical pattern from too much overdraw, small triangles, back faces or rendering verts off screen.
  • #39 HDRP didn’t have a pre-pass of any sort for deferred rendering when we started. The pre-pass is a win as we use very light fast shaders to render everything to depth only first. Then our Gbuffer pass can benefit from early depth rejection against the depth buffer we’ve created, saving the need to run the heavier Gbuffer pixel shaders for pixels that will be occluded in our final image.
  • #40 Asset optimisation also going on in the background for LODs. This also helped reduce the Gbuffer costs.
  • #41 We are winning but still a way to go to hit that right hand orange line. Those green blocks look way too large.
  • #42 HDRP defaults primarily tuned for greatest quality here rather than optimal console performance.
  • #43 Blank space here shows the GPU waiting for something before it can carry on with the deferred lighting.
  • #45 The atmospherics take many taps from the shadow map result, making them bandwidth bound.
  • #46 Experimentation in art to find acceptable reductions in shadow map res and bit depth.
  • #47 Experimentation in art to find acceptable reductions in shadow map res and bit depth.
  • #48 The optimisation to only draw the most distant shadow map split once at level load time was significant in that it reduced GPU time each frame and reduced the number of batches being submitted by the CPU helping to offset the additional batches we incurred from the addition of the prepass. The demo team experimented with various versions of this optimisation. In one version in addition to only drawing the last split once, the second and third splits were only updated on alternate frames. This was a great performance win but due to the chaotic nature of the wind effects in this scene the visual results made the shadows look like they were running in slow motion. Would have been a good win though on scenes where the taller environment pieces were more static. This is an excellent example of the flexibility for customisation that SRP offers.
  • #49 Yay, we are within the boundary needed to hit 30Hz vsync-ed. The demo moved on after this point for additional content and systems so the timings presented here may not line up with the asset store version but is what you can see running on Microsoft and Sony’s stands here at Unite Berlin.
  • #50 Advanced feature for getting the most out of the GPU when using compute shaders as part of your render pipeline.
  • #51 This is a conceptual diagram showing wave fronts running on the GPU during the rendering of some scene. We do some vertex and pixel shader based work, then we do some depth only rendering, then we issue some compute work and finally swap back to vertex and pixel shader work. Our wave front utilisation is good apart from during our depth only pass. Under utilisation of the GPU common during depth only passes. Can we make use of this untapped processing power?
  • #53 Overlapping graphics and async compute queue tasks that have the same GPU bottlenecks will seldom be an optimisation. Compute shader dispatches that are genuinely bound on computation are usually the best candidate.
  • #55 SRP style example of async compute use. Create a separate Command Buffer to contain your async compute tasks. Use GPUFences to synchronise when the async compute work should start in relation to the graphics queue, and where the graphics queue should wait for it to finish.