System Area Manager
Remote Management
Remote Management
•

•

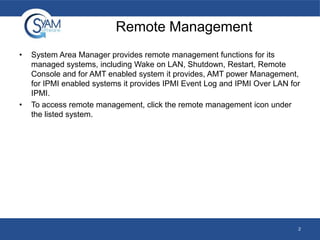
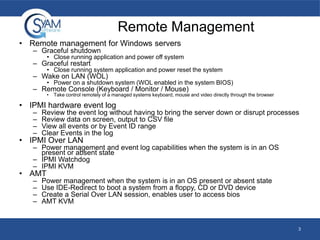
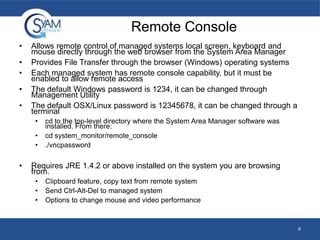
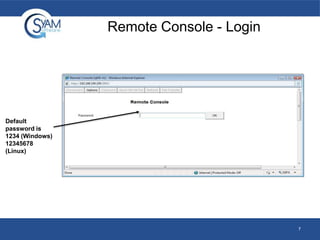
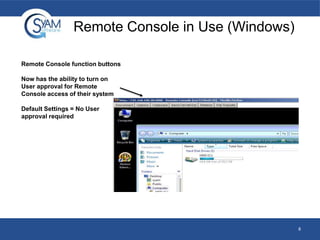
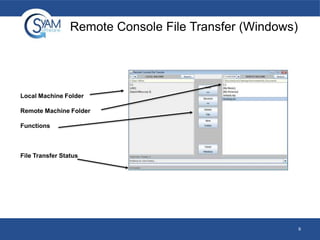
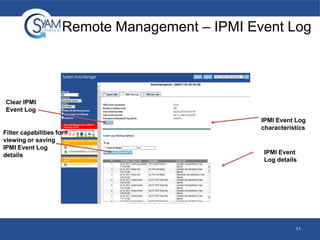
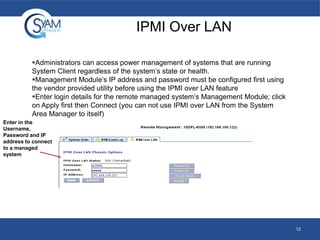
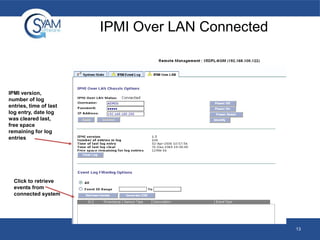
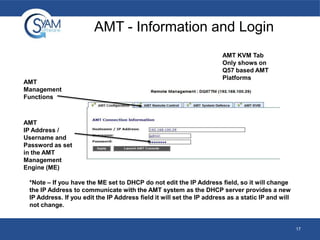
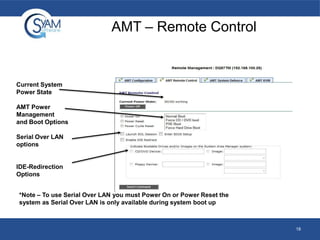
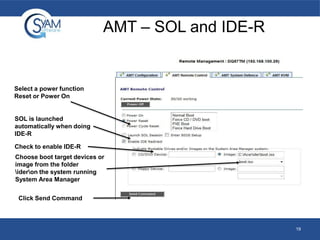
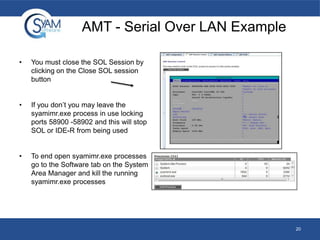
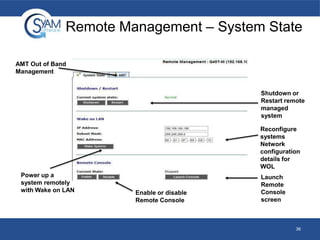
System Area Manager provides remote management functions for its
managed systems, including Wake on LAN, Shutdown, Restart, Remote
Console and for AMT enabled system it provides, AMT power Management,
for IPMI enabled systems it provides IPMI Event Log and IPMI Over LAN for
IPMI.
To access remote management, click the remote management icon under
the listed system.

2
Remote Management
• Remote management for Windows servers
– Graceful shutdown

• Close running application and power off system

– Graceful restart

• Close running system application and power reset the system

– Wake on LAN (WOL)

• Power on a shutdown system (WOL enabled in the system BIOS)

– Remote Console (Keyboard / Monitor / Mouse)
•

Take control remotely of a managed systems keyboard, mouse and video directly through the browser

• IPMI hardware event log
–
–
–
–

Review the event log without having to bring the server down or disrupt processes
Review data on screen, output to CSV file
View all events or by Event ID range
Clear Events in the log

• IPMI Over LAN

– Power management and event log capabilities when the system is in an OS
present or absent state
– IPMI Watchdog
– IPMI KVM

• AMT
–
–
–
–

Power management when the system is in an OS present or absent state
Use IDE-Redirect to boot a system from a floppy, CD or DVD device
Create a Serial Over LAN session, enables user to access bios
AMT KVM

3
Shutdown / Restart
•

When you use the shutdown or restart command
–

•

The System Area Manager issues a command to the agent running on that server to
gracefully shutdown all running applications and either power off and stay powered off or
perform a power down and restart

This function can only be performed on systems where the agent is
functioning

4
Wake On LAN
•

WOL needs to be enabled on the server through its BIOS configuration

•

The WOL option broadcasts over the network a power on command to the
MAC address displayed

•

System Client provides a default Subnet Mask and MAC address on the
Remote Management screen. (If it is not correct for the WOL enabled
interface, enter the correct values)

•

You can not wake up systems that are
•

Still powered on

•

Powered on but in an O/S Crashed state

•

Not on the same subnet as the System Area Manager server

5
Remote Console
•
•
•
•
•

Allows remote control of managed systems local screen, keyboard and
mouse directly through the web browser from the System Area Manager
Provides File Transfer through the browser (Windows) operating systems
Each managed system has remote console capability, but it must be
enabled to allow remote access
The default Windows password is 1234, it can be changed through
Management Utility
The default OSX/Linux password is 12345678, it can be changed through a
terminal
•

•
•

•

cd to the top-level directory where the System Area Manager software was
installed. From there:
cd system_monitor/remote_console
./vncpassword

Requires JRE 1.4.2 or above installed on the system you are browsing
from.
•
•
•

Clipboard feature, copy text from remote system
Send Ctrl-Alt-Del to managed system
Options to change mouse and video performance

6
Remote Console - Login

Default
password is
1234 (Windows)
12345678
(Linux)

7
Remote Console in Use (Windows)
Remote Console function buttons
Now has the ability to turn on
User approval for Remote
Console access of their system
Default Settings = No User
approval required

8
Remote Console File Transfer (Windows)

Local Machine Folder
Remote Machine Folder
Functions

File Transfer Status

9
Configuring the BMC for IPMI Over LAN
• Use the server vendor’s utility to configure the system’s
BMC or mBMC for remote access over LAN.
• Configure the IP address, subnet mask and gateway of
the BMC or mBMC.
• If applicable assign the LAN Privilege Level limit to
“Admin” and set a password.

10
Remote Management – IPMI Event Log

Clear IPMI
Event Log

Filter capabilities for
viewing or saving
IPMI Event Log
details

IPMI Event Log
characteristics

IPMI Event
Log details

11
IPMI Over LAN
Administrators can access power management of systems that are running
System Client regardless of the system’s state or health.
Management Module’s IP address and password must be configured first using
the vendor provided utility before using the IPMI over LAN feature
Enter login details for the remote managed system’s Management Module; click
on Apply first then Connect (you can not use IPMI over LAN from the System
Area Manager to itself)
Enter in the
Username,
Password and IP
address to connect
to a managed
system

12
IPMI Over LAN Connected

IPMI version,
number of log
entries, time of last
log entry, date log
was cleared last,
free space
remaining for log
entries

Click to retrieve
events from
connected system

13
Intel® Active Management Technology
(AMT)
•

Intel® Active Management Technology is also know as Intel vPro™
Technology

•

The AMT technology provides a set of out of band functions through the
System Area Manager interface to provide management of the system even
when in a non operational state

•

AMT is found on Q965, Q35, Q45, Q57, Q67 and Q77 chipset platforms
*Note – Please check the vPro Configuration guides for setting up the AMT Management Engine
configuration specific to your system

14
Intel® Active Management Technology
(AMT)

15
Intel® Active Management Technology
(AMT)
When the System Client detects Intel AMT technology configured on the
hardware it will have the System Area Manager present the AMT tab
AMT Tab
Remote Manage icon

*Note – If you do not see the AMT Tab, open up a web browser and browse to port 16992 on that system
example (http://I192.168.200.13:16992) this will open up the embedded AMT Web Server
If you do not get a login screen check your AMT Configuration settings in the Management Engine on that
system
16
AMT - Information and Login

AMT
Management
Functions

AMT KVM Tab
Only shows on
Q57 based AMT
Platforms

AMT
IP Address /
Username and
Password as set
in the AMT
Management
Engine (ME)
*Note – If you have the ME set to DHCP do not edit the IP Address field, so it will change
the IP Address to communicate with the AMT system as the DHCP server provides a new
IP Address. If you edit the IP Address field it will set the IP address as a static IP and will
not change.

17
AMT – Remote Control

Current System
Power State
AMT Power
Management
and Boot Options
Serial Over LAN
options

IDE-Redirection
Options
*Note – To use Serial Over LAN you must Power On or Power Reset the
system as Serial Over LAN is only available during system boot up

18
AMT – SOL and IDE-R

Select a power function
Reset or Power On

SOL is launched
automatically when doing
IDE-R
Check to enable IDE-R
Choose boot target devices or
image from the folder
ideron the system running
System Area Manager
Click Send Command

19
AMT - Serial Over LAN Example
•

You must close the SOL Session by
clicking on the Close SOL session
button

•

If you don’t you may leave the
syamimr.exe process in use locking
ports 58900 -58902 and this will stop
SOL or IDE-R from being used

•

To end open syamimr.exe processes
go to the Software tab on the System
Area Manager and kill the running
syamimr.exe processes

20
AMT KVM
•

By checking off the Local User Approval Required
you will require the user to provide you with the
pass-code presented on their screen and enter this
onto your interface before you can take remote
control of their system.

•

The timeout is the number of seconds you have to
enter this code before the remote connection is
closed.

•

The KVM Password is the password programmed
into the ME, this is required to log into the Remote
system’s KVM. The password must be 8 characters
and contain upper and lower case, numbers and
characters. example: P@ssw0rd

•

The KVM Inactivity Timeout is the number of
minutes the remote KVM connection will disconnect
with the remote system when there has been no
mouse or keyboard activity to the remote system
through the browser.

•

After you have applied the password and settings
you must start the KVM before you can Launch the
KVM. You can stop the KVM after it has been used
for additional security.

•

When you click the Launch KVM button you will be
presented with the KVM Authentication screen.

*Note – Your Management Engine (ME) must be configured to
support KVM, this requires a processor with integrated graphics
such as a i5 Processor. Please check your hardware manual for
the list of supported processors for the KVM capability.
The AMT KVM and Remote Console can not run at the same
time

21
AMT KVM In Use

Function Buttons for
the AMT KVM Screen
Disconnect /

Send Ctrl + Alt + Del
Refresh

*Note – The AMT KVM and Remote Console can not run at the same time

22
AMT IDE-Redirect Example
•

You must close the SOL/IDE-R
Session by clicking on the Close
SOL session button

•

If you don’t you may leave the
syamimr.exe process in use
locking ports 58900 -58902 and
this will stop SOL or IDE-R from
being used

•

To end open syamimr.exe
processes go to the Software tab
on the System Area Manager and
kill the running syamimr.exe
processes

23
AMT System Defense
•

AMT System Defense allows the System Area Manager to configure
network security policies in the AMT Management Engine, and to enable,
disable, or delete these policies.

•

“AMT-Quarantine” policy - causes the Intel AMT device to block all packets
to/from the operating system running on the client. So the administrator
would have to go to the system to troubleshoot or repair the system.

•

“AMT-Management” policy - causes the Intel AMT device to block all
packets to/from the operating system running on the client, except those
sent to and from System Area Manager management components.

24
AMT Launch Console (Embedded Web
Server)
•

The AMT Console will open up a
new browser window and connect
to the embedded web server

•

You will need to provide the
Username and Password to login
into the AMT Console

•

Once Logged in you will be
presented with some system
controls

25
DASH
• The DASH standard allows secure remote and out-of-band systems
management. The DASH tab will appear in the Remote
Management interface if this feature is supported by the system
hardware and System Client version.

26
Launching DASH
•

Enter the DASH out of band authentication information as configured for the
client, and click Apply to save your configuration. The IP Address box is
automatically populated with the IP address used by the operating system.
Some systems will require a different IP address for the DASH connection.
If the OS is configured to use DHCP, and DASH is configured to use the
same IP address, do not edit the IP Address field as any change will cause
it to be treated as a static IP address. The system name can be used
instead of the IP address.

•

Click the Launch DASH Console button to open a new window and log in to
the system’s embedded DASH management console.

27
DASH Remote Management
• With DASH configured in System Area
Manager, direct power control of
supported systems is enabled.
• Click the DASH Remote Management
tab, then click the Establish DASH
Connection button.

• The current power state of the system
will be displayed.

28
DASH Remote Management
•

•

•

Choose a power option. If the system
state is On, clicking the Power Off
button will cause a shutdown. You
can also click the Power On radio
button (if the system state is Off) or
the Power Reset button (if the
system state is On), followed in
either case by clicking the Send
Command button. The result of the
chosen power command will be
displayed at the bottom of the
screen.
When finished, you must disconnect
the DASH session by clicking the
DASH Configuration tab, then
clicking the Disconnect Session
button. Remote sessions will be left
connected if they are not disabled.
Once disconnected, the system
status will update to Not Connected.

29
DASH Serial Over LAN
• With Serial Over LAN you can access the system during its boot
sequence, enabling you to access the system BIOS to make any
needed changes.
• Serial Over LAN is only available as the system powers on. The
operating system GUI will not be displayed.
• If the System State is Off, click the Power On radio button, or if the
System State is On, click the Power Reset radio button. Check the
box to Launch SOL. Click the Send Command button.
• The Serial Over LAN console will be displayed in your web browser.
Click on the console and press the BIOS access key (for example,
F2 or DEL) to enter the BIOS setup when the message comes up.
Should you need to reboot, you can click the Power Reset System
button.

30
DASH Serial Over LAN

You can also go directly into BIOS configuration by checking the Enter
BIOS Setup box when launching Serial Over LAN.

31
DASH Serial Over LAN
You can also go directly into BIOS configuration by checking the Enter
BIOS Setup box when launching Serial Over LAN.

32
DASH USB Redirection
• With System Area Manager and the DASH configured managed
system, you can redirect media from the Area Manager system to
the client system by using the USB Redirect feature in the DASH
Remote Management tab.
• USB redirection is available as the system powers on. This allows
you to boot from .IMG or .ISO bootable images.
• In addition, USB redirection can be used when the system OS is
running, and the image can be accessed as if it were physically
connected to the client system.

33
DASH USB Redirection
• To make image files available for USB redirection, place them in the
following folder on the System Area Manager:
• C:SyAMJettysyamwebappsrootdashiso
• 1. On the DASH Remote Management tab, establish a connection.
• 2. Check the box to Enable USB Redirect.

34
DASH USB Redirection
•

In the Image drop down menu, select
the IMG or ISO image that will be
redirected to the client system, then
click the Send Command button. This
will then redirect the image to the client
system, where the files on that image
can be accessed.

•

ISO images will appear as CD devices
on the Windows client system.

35
Remote Management – System State
AMT Out of Band
Management

Shutdown or
Restart remote
managed
system
Reconfigure
systems
Network
configuration
details for
WOL
Power up a
system remotely
with Wake on LAN

Enable or disable
Remote Console

Launch
Remote
Console
screen

36
System State
•

•

•

Clicking the remote management
icon will bring you to the System
State page for the chosen system
From this page you can shutdown,
restart or, wake up the system
through a Wake on LAN.
Remote console can also be
enabled giving you KVM control
over the system

37

Remote Management

  • 1.
  • 2.
    Remote Management • • System AreaManager provides remote management functions for its managed systems, including Wake on LAN, Shutdown, Restart, Remote Console and for AMT enabled system it provides, AMT power Management, for IPMI enabled systems it provides IPMI Event Log and IPMI Over LAN for IPMI. To access remote management, click the remote management icon under the listed system. 2
  • 3.
    Remote Management • Remotemanagement for Windows servers – Graceful shutdown • Close running application and power off system – Graceful restart • Close running system application and power reset the system – Wake on LAN (WOL) • Power on a shutdown system (WOL enabled in the system BIOS) – Remote Console (Keyboard / Monitor / Mouse) • Take control remotely of a managed systems keyboard, mouse and video directly through the browser • IPMI hardware event log – – – – Review the event log without having to bring the server down or disrupt processes Review data on screen, output to CSV file View all events or by Event ID range Clear Events in the log • IPMI Over LAN – Power management and event log capabilities when the system is in an OS present or absent state – IPMI Watchdog – IPMI KVM • AMT – – – – Power management when the system is in an OS present or absent state Use IDE-Redirect to boot a system from a floppy, CD or DVD device Create a Serial Over LAN session, enables user to access bios AMT KVM 3
  • 4.
    Shutdown / Restart • Whenyou use the shutdown or restart command – • The System Area Manager issues a command to the agent running on that server to gracefully shutdown all running applications and either power off and stay powered off or perform a power down and restart This function can only be performed on systems where the agent is functioning 4
  • 5.
    Wake On LAN • WOLneeds to be enabled on the server through its BIOS configuration • The WOL option broadcasts over the network a power on command to the MAC address displayed • System Client provides a default Subnet Mask and MAC address on the Remote Management screen. (If it is not correct for the WOL enabled interface, enter the correct values) • You can not wake up systems that are • Still powered on • Powered on but in an O/S Crashed state • Not on the same subnet as the System Area Manager server 5
  • 6.
    Remote Console • • • • • Allows remotecontrol of managed systems local screen, keyboard and mouse directly through the web browser from the System Area Manager Provides File Transfer through the browser (Windows) operating systems Each managed system has remote console capability, but it must be enabled to allow remote access The default Windows password is 1234, it can be changed through Management Utility The default OSX/Linux password is 12345678, it can be changed through a terminal • • • • cd to the top-level directory where the System Area Manager software was installed. From there: cd system_monitor/remote_console ./vncpassword Requires JRE 1.4.2 or above installed on the system you are browsing from. • • • Clipboard feature, copy text from remote system Send Ctrl-Alt-Del to managed system Options to change mouse and video performance 6
  • 7.
    Remote Console -Login Default password is 1234 (Windows) 12345678 (Linux) 7
  • 8.
    Remote Console inUse (Windows) Remote Console function buttons Now has the ability to turn on User approval for Remote Console access of their system Default Settings = No User approval required 8
  • 9.
    Remote Console FileTransfer (Windows) Local Machine Folder Remote Machine Folder Functions File Transfer Status 9
  • 10.
    Configuring the BMCfor IPMI Over LAN • Use the server vendor’s utility to configure the system’s BMC or mBMC for remote access over LAN. • Configure the IP address, subnet mask and gateway of the BMC or mBMC. • If applicable assign the LAN Privilege Level limit to “Admin” and set a password. 10
  • 11.
    Remote Management –IPMI Event Log Clear IPMI Event Log Filter capabilities for viewing or saving IPMI Event Log details IPMI Event Log characteristics IPMI Event Log details 11
  • 12.
    IPMI Over LAN Administratorscan access power management of systems that are running System Client regardless of the system’s state or health. Management Module’s IP address and password must be configured first using the vendor provided utility before using the IPMI over LAN feature Enter login details for the remote managed system’s Management Module; click on Apply first then Connect (you can not use IPMI over LAN from the System Area Manager to itself) Enter in the Username, Password and IP address to connect to a managed system 12
  • 13.
    IPMI Over LANConnected IPMI version, number of log entries, time of last log entry, date log was cleared last, free space remaining for log entries Click to retrieve events from connected system 13
  • 14.
    Intel® Active ManagementTechnology (AMT) • Intel® Active Management Technology is also know as Intel vPro™ Technology • The AMT technology provides a set of out of band functions through the System Area Manager interface to provide management of the system even when in a non operational state • AMT is found on Q965, Q35, Q45, Q57, Q67 and Q77 chipset platforms *Note – Please check the vPro Configuration guides for setting up the AMT Management Engine configuration specific to your system 14
  • 15.
    Intel® Active ManagementTechnology (AMT) 15
  • 16.
    Intel® Active ManagementTechnology (AMT) When the System Client detects Intel AMT technology configured on the hardware it will have the System Area Manager present the AMT tab AMT Tab Remote Manage icon *Note – If you do not see the AMT Tab, open up a web browser and browse to port 16992 on that system example (http://I192.168.200.13:16992) this will open up the embedded AMT Web Server If you do not get a login screen check your AMT Configuration settings in the Management Engine on that system 16
  • 17.
    AMT - Informationand Login AMT Management Functions AMT KVM Tab Only shows on Q57 based AMT Platforms AMT IP Address / Username and Password as set in the AMT Management Engine (ME) *Note – If you have the ME set to DHCP do not edit the IP Address field, so it will change the IP Address to communicate with the AMT system as the DHCP server provides a new IP Address. If you edit the IP Address field it will set the IP address as a static IP and will not change. 17
  • 18.
    AMT – RemoteControl Current System Power State AMT Power Management and Boot Options Serial Over LAN options IDE-Redirection Options *Note – To use Serial Over LAN you must Power On or Power Reset the system as Serial Over LAN is only available during system boot up 18
  • 19.
    AMT – SOLand IDE-R Select a power function Reset or Power On SOL is launched automatically when doing IDE-R Check to enable IDE-R Choose boot target devices or image from the folder ideron the system running System Area Manager Click Send Command 19
  • 20.
    AMT - SerialOver LAN Example • You must close the SOL Session by clicking on the Close SOL session button • If you don’t you may leave the syamimr.exe process in use locking ports 58900 -58902 and this will stop SOL or IDE-R from being used • To end open syamimr.exe processes go to the Software tab on the System Area Manager and kill the running syamimr.exe processes 20
  • 21.
    AMT KVM • By checkingoff the Local User Approval Required you will require the user to provide you with the pass-code presented on their screen and enter this onto your interface before you can take remote control of their system. • The timeout is the number of seconds you have to enter this code before the remote connection is closed. • The KVM Password is the password programmed into the ME, this is required to log into the Remote system’s KVM. The password must be 8 characters and contain upper and lower case, numbers and characters. example: P@ssw0rd • The KVM Inactivity Timeout is the number of minutes the remote KVM connection will disconnect with the remote system when there has been no mouse or keyboard activity to the remote system through the browser. • After you have applied the password and settings you must start the KVM before you can Launch the KVM. You can stop the KVM after it has been used for additional security. • When you click the Launch KVM button you will be presented with the KVM Authentication screen. *Note – Your Management Engine (ME) must be configured to support KVM, this requires a processor with integrated graphics such as a i5 Processor. Please check your hardware manual for the list of supported processors for the KVM capability. The AMT KVM and Remote Console can not run at the same time 21
  • 22.
    AMT KVM InUse Function Buttons for the AMT KVM Screen Disconnect / Send Ctrl + Alt + Del Refresh *Note – The AMT KVM and Remote Console can not run at the same time 22
  • 23.
    AMT IDE-Redirect Example • Youmust close the SOL/IDE-R Session by clicking on the Close SOL session button • If you don’t you may leave the syamimr.exe process in use locking ports 58900 -58902 and this will stop SOL or IDE-R from being used • To end open syamimr.exe processes go to the Software tab on the System Area Manager and kill the running syamimr.exe processes 23
  • 24.
    AMT System Defense • AMTSystem Defense allows the System Area Manager to configure network security policies in the AMT Management Engine, and to enable, disable, or delete these policies. • “AMT-Quarantine” policy - causes the Intel AMT device to block all packets to/from the operating system running on the client. So the administrator would have to go to the system to troubleshoot or repair the system. • “AMT-Management” policy - causes the Intel AMT device to block all packets to/from the operating system running on the client, except those sent to and from System Area Manager management components. 24
  • 25.
    AMT Launch Console(Embedded Web Server) • The AMT Console will open up a new browser window and connect to the embedded web server • You will need to provide the Username and Password to login into the AMT Console • Once Logged in you will be presented with some system controls 25
  • 26.
    DASH • The DASHstandard allows secure remote and out-of-band systems management. The DASH tab will appear in the Remote Management interface if this feature is supported by the system hardware and System Client version. 26
  • 27.
    Launching DASH • Enter theDASH out of band authentication information as configured for the client, and click Apply to save your configuration. The IP Address box is automatically populated with the IP address used by the operating system. Some systems will require a different IP address for the DASH connection. If the OS is configured to use DHCP, and DASH is configured to use the same IP address, do not edit the IP Address field as any change will cause it to be treated as a static IP address. The system name can be used instead of the IP address. • Click the Launch DASH Console button to open a new window and log in to the system’s embedded DASH management console. 27
  • 28.
    DASH Remote Management •With DASH configured in System Area Manager, direct power control of supported systems is enabled. • Click the DASH Remote Management tab, then click the Establish DASH Connection button. • The current power state of the system will be displayed. 28
  • 29.
    DASH Remote Management • • • Choosea power option. If the system state is On, clicking the Power Off button will cause a shutdown. You can also click the Power On radio button (if the system state is Off) or the Power Reset button (if the system state is On), followed in either case by clicking the Send Command button. The result of the chosen power command will be displayed at the bottom of the screen. When finished, you must disconnect the DASH session by clicking the DASH Configuration tab, then clicking the Disconnect Session button. Remote sessions will be left connected if they are not disabled. Once disconnected, the system status will update to Not Connected. 29
  • 30.
    DASH Serial OverLAN • With Serial Over LAN you can access the system during its boot sequence, enabling you to access the system BIOS to make any needed changes. • Serial Over LAN is only available as the system powers on. The operating system GUI will not be displayed. • If the System State is Off, click the Power On radio button, or if the System State is On, click the Power Reset radio button. Check the box to Launch SOL. Click the Send Command button. • The Serial Over LAN console will be displayed in your web browser. Click on the console and press the BIOS access key (for example, F2 or DEL) to enter the BIOS setup when the message comes up. Should you need to reboot, you can click the Power Reset System button. 30
  • 31.
    DASH Serial OverLAN You can also go directly into BIOS configuration by checking the Enter BIOS Setup box when launching Serial Over LAN. 31
  • 32.
    DASH Serial OverLAN You can also go directly into BIOS configuration by checking the Enter BIOS Setup box when launching Serial Over LAN. 32
  • 33.
    DASH USB Redirection •With System Area Manager and the DASH configured managed system, you can redirect media from the Area Manager system to the client system by using the USB Redirect feature in the DASH Remote Management tab. • USB redirection is available as the system powers on. This allows you to boot from .IMG or .ISO bootable images. • In addition, USB redirection can be used when the system OS is running, and the image can be accessed as if it were physically connected to the client system. 33
  • 34.
    DASH USB Redirection •To make image files available for USB redirection, place them in the following folder on the System Area Manager: • C:SyAMJettysyamwebappsrootdashiso • 1. On the DASH Remote Management tab, establish a connection. • 2. Check the box to Enable USB Redirect. 34
  • 35.
    DASH USB Redirection • Inthe Image drop down menu, select the IMG or ISO image that will be redirected to the client system, then click the Send Command button. This will then redirect the image to the client system, where the files on that image can be accessed. • ISO images will appear as CD devices on the Windows client system. 35
  • 36.
    Remote Management –System State AMT Out of Band Management Shutdown or Restart remote managed system Reconfigure systems Network configuration details for WOL Power up a system remotely with Wake on LAN Enable or disable Remote Console Launch Remote Console screen 36
  • 37.
    System State • • • Clicking theremote management icon will bring you to the System State page for the chosen system From this page you can shutdown, restart or, wake up the system through a Wake on LAN. Remote console can also be enabled giving you KVM control over the system 37