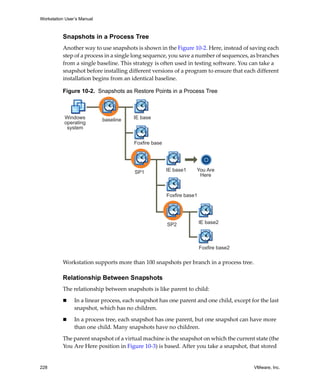
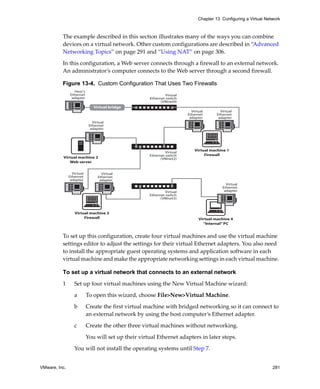
This document is the user manual for VMware Workstation version 6.0. It provides an overview of the new features in version 6, including upgraded virtual debugging tools, expanded API for automation, and increased support for newer operating systems and hardware. The manual describes how to install, upgrade, and use Workstation on both Windows and Linux hosts. It also explains how to create, configure, and manage virtual machines running various guest operating systems.


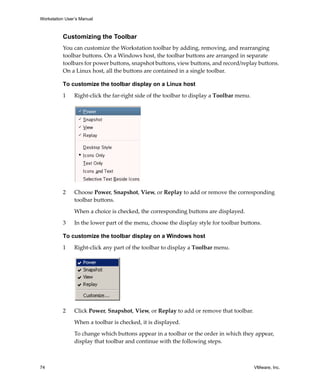
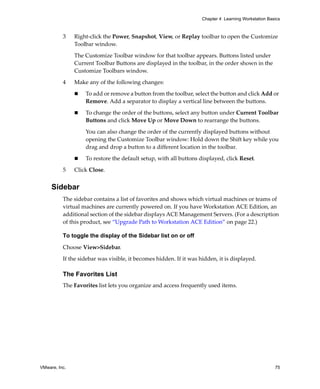
![Chapter 2 Installing VMware Workstation
Some installations might require that you reboot your computer. When you restart, you
don’t need to log in as a user with Administrator privileges.
Installing Workstation Silently
If you are installing Workstation on several Windows host computers, you might want
to use the silent installation feature of the Microsoft Windows Installer. This feature is
convenient, for example, in a large enterprise.
Before installing Workstation silently, ensure that the host computer has version 2.0 or
higher of the MSI runtime engine. This version of the installer is available in versions of
Windows beginning with Windows XP and is available separately from Microsoft. For
additional details on using the Microsoft Windows Installer, see the Microsoft Web site.
To install Workstation silently
1 Silently extract the administrative installation image from the VMware
Workstation installer:
setup.exe /a /s /v"/qn TARGETDIR=<InstallTempPath>"
setup.exe is the name of the installer on the CD distribution. If you are using a
downloaded installer, the filename is similar to
VMwareWorkstation-<xxxx>.exe, where <xxxx> is a series of numbers
representing the version and build numbers.
<InstallTempPath> is the full path to the folder where you want to store the
administrative installation image.
2 Run a silent installation using msiexec and the administrative installation image
you extracted in the previous step:
msiexec -i "<InstallTempPath>VMware Workstation.msi"
[INSTALLDIR="<PathToProgramDirectory>"] ADDLOCAL=ALL
[REMOVE=<featurename,featurename>] /qn
Enter the command on one line. To install Workstation in a location other than the
default, change the path that follows INSTALLDIR= to specify the location.
Use the optional REMOVE=<property> to skip installation of certain features. The
REMOVE=<property> setting can take one or more of the values listed in Table 2‐1.
VMware, Inc. 51](https://image.slidesharecdn.com/ws6manual-120904030552-phpapp01/85/Ws6-manual-51-320.jpg)

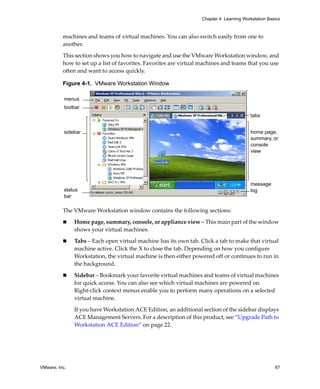
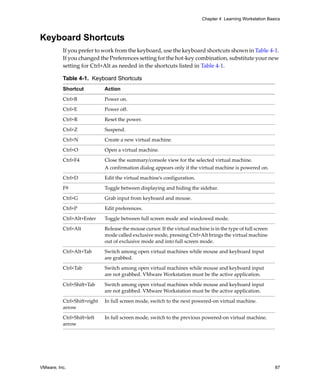


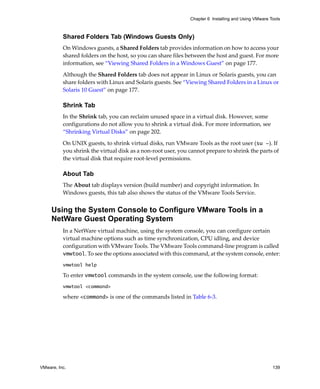
![Workstation User’s Manual
Table 6-3. VMware Tools Commands for Netware Guests
vmwtool Command Definition
help Displays a summary of VMware Tools commands and
options in a NetWare guest.
partitonlist Displays a list of all disk partitions in the virtual disk
and whether or not a partition can be shrunk.
shrink [<partition>] Shrinks the listed partitions. If no partitions are
specified, all partitions in the virtual disk are shrunk.
The status of the shrink process appears at the bottom of
the system console.
devicelist Lists each removable device in the virtual machine, its
device ID, and whether the device is enabled or
disabled. Removable devices include the virtual
network adapter, CD‐ROM, and floppy drives.
disabledevice [<device Disables the specified device or devices in the virtual
name>] machine. If no device is specified, all removable devices
in the virtual machine are disabled.
enabledevice [<device name>] Enables the specified device or devices in the virtual
machine. If no device is specified, all removable devices
in the virtual machine are enabled.
synctime [on|off] Lets you turn on or off synchronization of time in the
guest operating system with time on the host operating
system. By default, time synchronization is turned off.
Use this command without any options to view the
current time synchronization status.
idle [on|off] Lets you turn the CPU idler on or off. By default, the
idler is turned on. The CPU idler program is included in
VMware Tools for NetWare guests.
The idler program is needed because NetWare servers
do not idle the CPU when the operating system is idle.
As a result, a virtual machine takes CPU time from the
host regardless of whether the NetWare server software
is idle or busy.
140 VMware, Inc.](https://image.slidesharecdn.com/ws6manual-120904030552-phpapp01/85/Ws6-manual-140-320.jpg)


![Chapter 9 Using Disks
Management). Right‐click the partition you want to unmap, and choose
Change Drive Letter and Paths. Click Remove.
(Linux only) Set the device group membership or device ownership, as follows:
a Make sure the master physical disk device or devices are readable and
writable by the user who runs VMware Workstation. On most distributions,
the physical devices, such as /dev/hda (IDE physical disk) and /dev/sdb
(SCSI physical disk) belong to group‐id disk. If this is the case, you can add
VMware Workstation users to the disk group.
Another option is to change the owner of the device. Consider all the security
issues involved in this option.
b Grant VMware Workstation users access to all /dev/hd[abcd] physical
devices that contain operating systems or boot managers.
You can then rely on the physical disk configuration files in VMware Workstation
to guard access. This provides boot managers access to configuration files and
other files they might need to boot the operating systems. For example, LILO needs
to read /boot on a Linux partition to boot a non‐Linux operating system that
might be on another drive.
After you are finished preparing the physical disk, use either of the following strategies
to use the physical disk in a virtual machine:
“Creating a New Virtual Machine That Uses a Physical Disk” on page 209
“Using the Virtual Machine Settings Editor to Add a Physical Disk” on page 211
For general information about using physical disks with Workstation, see “Physical
Disks” on page 200.
Creating a New Virtual Machine That Uses a Physical Disk
Use the New Virtual Machine wizard if you want to create a new virtual machine that
uses a physical disk rather than simply add a physical disk to an existing virtual
machine.
VMware, Inc. 209](https://image.slidesharecdn.com/ws6manual-120904030552-phpapp01/85/Ws6-manual-209-320.jpg)
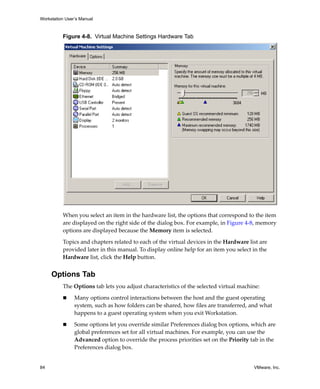
![Chapter 9 Using Disks
With Virtual Disk Manager you can change whether the virtual disk type is
preallocated or growable and whether the virtual disk is stored in a single file or split
into 2GB files. For example, you might allocate all the disk space for a virtual disk, but
later find that you need to reclaim some hard disk space on the host. You can convert
the preallocated virtual disk into a growable disk, and then remove the original virtual
disk file. The new virtual disk is large enough to contain all the data in the original
virtual disk. The virtual disk grows as you add data to it.
These features and the ability to use scripting to automate management of virtual disks
were added to Workstation in version 5.0.
You can use the Virtual Disk Manager to:
Automate the management of virtual disks with scripts.
Create virtual disks that are not associated with a particular virtual machine, for
example, to be used as templates.
Switch the virtual disk type from preallocated to growable, or from growable to
preallocated. When you change the disk type to growable, you reclaim some disk
space. You can shrink the virtual disk to reclaim even more disk space.
Expand the size of a virtual disk so it is larger than the size specified when you
created it.
Defragment virtual disks.
Prepare and shrink virtual disks without powering on the virtual machine
(Windows hosts only).
You can use the Virtual Disk Manager with virtual disks created under VMware Server
and VMware Workstation.
NOTE You cannot use the Virtual Disk Manager to create physical disks or shrink them.
Running the VMware Virtual Disk Manager Utility
To run the VMware Virtual Disk Manager utility, open a command prompt or terminal
on the host operating system. On a Windows host, change to the directory where you
installed your Workstation software. By default, this directory is:
C:Program FilesVMwareVMware Workstation
The command syntax is:
vmware-vdiskmanager [options]
VMware, Inc. 217](https://image.slidesharecdn.com/ws6manual-120904030552-phpapp01/85/Ws6-manual-217-320.jpg)
![Workstation User’s Manual
Table 9‐1 lists the options you can use with vmware-vdiskmanager. For examples of
how you use these options to perform various tasks, see “Examples Using the VMware
Virtual Disk Manager” on page 220.
Table 9-1. VMware Virtual Disk Manager Utility Commands
Options and
Parameters Description
<diskname> Name of the virtual disk file. The virtual disk file must have a .vmdk extension.
Specify a path to the folder where you want to store the disk files. If you mapped
a network share on your host operating system, you can create the virtual disk on
that share by providing the correct path information with the disk filename.
-c Creates the virtual disk. Use the -a, -s, and -t options, and specify the name of
the virtual disk (<diskname>).
-r Converts the specified virtual disk, creating a new virtual disk as a result. Use the
<sourcediskname> -t option to specify the disk type to which the virtual disk is converted, and
specify the name of the target virtual disk (<targetdiskname>).
After the conversion is completed and you have tested the converted virtual disk
to make sure it works as expected, delete the original virtual disk file.
For the virtual machine to recognize the converted virtual disk, use the virtual
machine settings editor to remove the existing virtual disk from the virtual
machine, and then add the converted disk to the virtual machine. See “Adding
Virtual and Physical Disks to a Virtual Machine” on page 204.
-x <n>[GB|MB] Expands the virtual disk to the specified capacity. Specify the new, larger size of
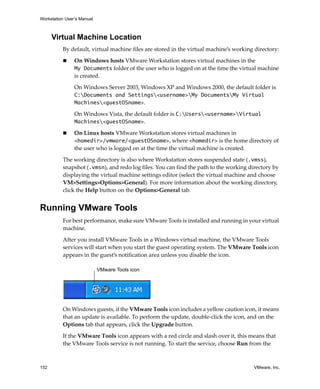
<diskname> the virtual disk in gigabytes or megabytes. You cannot change the size of a
physical disk.
Caution: Before running the Virtual Disk Manager utility, back up your virtual
disk files.
-d <diskname> Defragments the specified virtual disk. You can defragment only growable
virtual disks. You cannot defragment preallocated virtual disks.
-p <mountpoint> (Windows only) Prepares a virtual disk for shrinking. For more information, see
“Shrinking Virtual Disks with Virtual Disk Manager (Windows Only)” on
page 219.
-k <diskname> (Windows only) Shrinks the specified virtual disk. For more information, see
“Shrinking Virtual Disks with Virtual Disk Manager (Windows Only)” on
page 219.
-a [ide|buslogic| Specifies the disk adapter type. Specify an adapter type when creating a new
lsilogic] virtual disk. Choose one of the following types:
ide – For an IDE adapter.
buslogic – For a BusLogic SCSI adapter.
lsilogic – For an LSI Logic SCSI adapter.
218 VMware, Inc.](https://image.slidesharecdn.com/ws6manual-120904030552-phpapp01/85/Ws6-manual-218-320.jpg)
![Chapter 9 Using Disks
Table 9-1. VMware Virtual Disk Manager Utility Commands (Continued)
Options and
Parameters Description
-s <n>[GB|MB] Specifies the size of the virtual disk. Specify whether the size <n> is in gigabytes
or megabytes. Specify the size of a virtual disk when you create it.
Even though you must specify the size of a virtual disk when you expand it, do
not use the -s option.
-t [0|1|2|3] Specify the type of virtual disk when you create a new one or reconfigure an
existing one. Specify one of the following disk types:
0 – To create a growable virtual disk contained in a single virtual disk file.
1 – To create a growable virtual disk split into 2GB files.
2 – To create a preallocated virtual disk contained in a single virtual disk file.
3 – To create a preallocated virtual disk split into 2GB files.
-q Disables Virtual Disk Manager logging.
If you keep logging enabled, messages generated by the Virtual Disk Manager
are stored in a log file. The name and location of the log file appear in the
command prompt or terminal window after the Virtual Disk Manager command
is run.
Shrinking Virtual Disks with Virtual Disk Manager
(Windows Only)
On a Windows host, you can use the Virtual Disk Manager to prepare and shrink
growable virtual disks (not physical disks) without powering on the virtual machine.
Shrinking a virtual disk does not reduce the maximum capacity of the virtual disk itself.
For more information, see “Shrinking Virtual Disks” on page 202.
CAUTION You cannot shrink a virtual disk if the virtual machine has snapshots. To keep
the virtual disk in its current state, use the snapshot manager to delete all snapshots. To
discard changes made since you took a snapshot, revert to the snapshot.
To shrink a virtual disk
1 Mount each volume of the virtual disk.
If the virtual disk is partitioned into volumes, each volume of the virtual disk
(drive C: or D:, for example) must be must be mounted and prepared separately.
To mount a volume, see “Using a Mapped Drive (Windows Only)” on page 180. Or
use the VMware DiskMount Utility, available as a free download from the VMware
Web site. Go to www.vmware.com/download/diskmount.html. The VMware
DiskMount user’s manual is available from the VMware Web site at
VMware, Inc. 219](https://image.slidesharecdn.com/ws6manual-120904030552-phpapp01/85/Ws6-manual-219-320.jpg)


![Workstation User’s Manual
To remove a host virtual adapter from a Linux host
1 In a terminal window, become root (su -) and run the Workstation configuration
program.
vmware-config.pl
2 Respond to the following question:
Do you want networking for your Virtual Machines? (yes/no/help) [yes]
Enter yes if you still want to use any networking in your virtual machines, and
continue to the next question.
Otherwise, enter no to remove all networking.
3 If you enter yes, when you receive the following prompt, enter editor.
This is the only way to delete virtual network adapters without removing all of
them.
Would you prefer to modify your existing networking configuration using
the wizard or the editor? (wizard/editor/help) [wizard] editor
After you enter editor, you will see a list of virtual networks that have been
configured.
4 Select the network corresponding to the adapter you want to disable.
The following virtual networks have been defined:
. vmnet0 is bridged to eth0
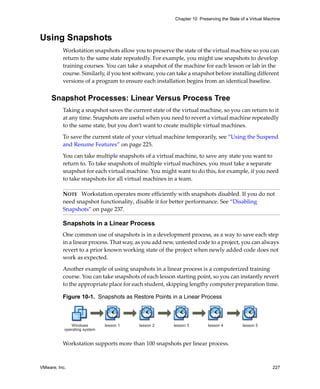
. vmnet1 is a host-only network on subnet 172.16.155.0.
. vmnet8 is NAT network on a private subnet 172.16.107.0.
Which virtual network do you wish to configure? (0-99) 1
5 If you receive the a prompt similar to the following, enter yes:
The network vmnet1 has been reserved for a host-only network. You may
change it, but it is highly recommended that you use it as a host-only
network. Are you sure you want to modify it? (yes/no) [no] yes
6 When you receive the a prompt similar to the following, enter none, and the virtual
network will be removed.
What type of virtual network do you wish to set vmnet1?
(bridged,hostonly,nat,none) [hostonly] none
290 VMware, Inc.](https://image.slidesharecdn.com/ws6manual-120904030552-phpapp01/85/Ws6-manual-290-320.jpg)

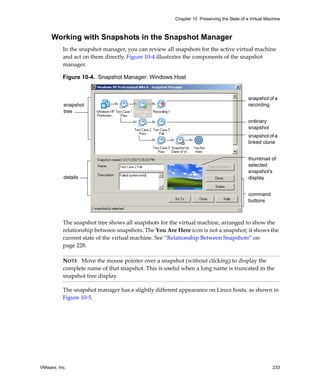
![Workstation User’s Manual
Maintaining and Changing the MAC Address of a Virtual
Machine
When a virtual machine is powered on, Workstation assigns each of its virtual network
adapters an Ethernet MAC (media access control) address. A MAC address is the
unique address assigned to each Ethernet network device.
The software guarantees that virtual machines are assigned unique MAC addresses
within a given host system. The virtual machine is assigned the same MAC address
every time it is powered on if both of the following conditions are true:
The virtual machine is not moved. That is, the path name and filename for the
virtual machine’s configuration file remain the same.
No changes are made to certain settings in the configuration file.
In addition, Workstation does its best, but cannot guarantee, to automatically assign
unique MAC addresses for virtual machines that run on multiple host systems.
Avoiding MAC Changes
To avoid changes in the MAC address automatically assigned to a virtual machine, do
not move the virtual machine’s configuration file. Moving it to a different host
computer or even moving it to a different location on the same host computer changes
the MAC address.
Also do not change certain settings in the virtual machine’s configuration (.vmx) file. If
you never edit the configuration file by hand and do not remove the virtual Ethernet
adapter, these settings remain unchanged. If you do edit the configuration file by hand,
do not remove or change the following options:
ethernet[n].generatedAddress
ethernet[n].addressType
ethernet[n].generatedAddressOffset
uuid.location
uuid.bios
ethernet[n].present
In these options, [n] is the number of the virtual Ethernet adapter, for example 0.
NOTE To preserve a virtual Ethernet adapter’s MAC address, you also must be careful
not to remove the adapter. If you remove the adapter but later re‐create it, the adapter
might receive a different MAC address.
296 VMware, Inc.](https://image.slidesharecdn.com/ws6manual-120904030552-phpapp01/85/Ws6-manual-296-320.jpg)
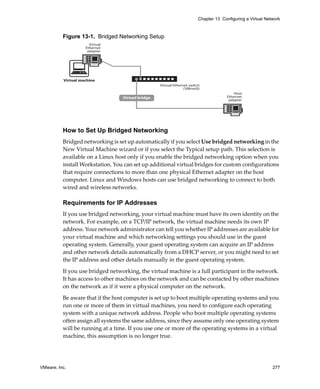
![Chapter 13 Configuring a Virtual Network
Manually Assigning a MAC Address
To guarantee that the same MAC address is assigned to a given virtual machine every
time you power it on, even if the virtual machine is moved, or if you want to guarantee
a unique MAC address for each virtual machine within a networked environment, you
can assign the address manually instead of allowing Workstation to assign it.
To assign the same unique MAC address to any virtual machine manually, use a text
editor to remove three lines from the configuration file and add one line. The
configuration file has a.vmx extension at the end of the filename. On a Linux host, a
virtual machine created with an earlier VMware product might have a configuration
file with a .cfg extension.
Remove the three lines that begin with the following from the configuration file:
ethernet[n].generatedAddress
ethernet[n].addressType
ethernet[n].generatedAddressOffset
In these options, [n] is the number of the virtual Ethernet adapter, for example,
ethernet0.
Add the following line to the configuration file:
ethernet[n].address = 00:50:56:XX:YY:ZZ
In this line, the fourth pair of numbers, XX, must be a valid hexadecimal number
between 00h and 3Fh, and YY and ZZ must be valid hexadecimal numbers between 00h
and FFh. Because Workstation virtual machines do not support arbitrary MAC
addresses, you must use the above format. Place this line above the UUID lines in the
file.
If you choose a value for XX:YY:ZZ that is unique among your hard‐coded addresses,
conflicts between the automatically assigned MAC addresses and the manually
assigned addresses should never occur.
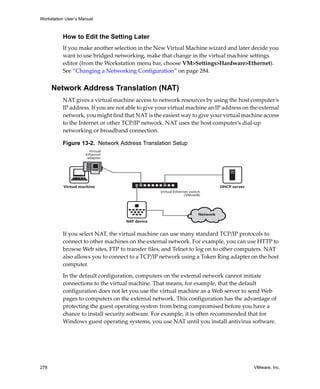
Controlling Routing Information for a Host-Only Network on
Linux
A host‐only network is a full‐fledged network. It has a network interface associated
with it (VMnet1) that is marked “up” at the time the host operating system is booted.
Consequently, routing server processes that operate on the host operating system, such
as routed and gated, automatically discover it and propagate information on how to
reach it unless you explicitly configure them not to do so.
VMware, Inc. 297](https://image.slidesharecdn.com/ws6manual-120904030552-phpapp01/85/Ws6-manual-297-320.jpg)
![Workstation User’s Manual
To bridge networks by running vmware-config.pl
1 On the host computer, become root (su -) and run the Workstation configuration
program:
vmware-config.pl
2 If you have more than one physical Ethernet adapter, enter yes at the following
prompt:
The following bridged networks have been defined:
. vmnet0 is bridged to eth0
Do you wish to configure another bridged network? (yes/no) [no]
If you have additional physical Ethernet adapters not yet connected to a bridged
network, the prompt is repeated, showing information about all currently
configured bridged networks.
3 When you have set up all the bridged networks you want, enter no.
Setting Up Two Separate Host-Only Networks
For some configurations, you might need to set up more than one host‐only network on
the same host computer. You might, for example, want to have two virtual machines
connected to one host‐only network, and at the same time have other virtual machines
connected to another host‐only network so the network traffic on each network is
isolated.
Or you might want to test routing between two virtual networks. Or you might want to
test a virtual machine with multiple network interface cards, without using any
physical Ethernet adapters.
On Windows hosts, the first host‐only network is set up automatically when you install
Workstation.
On Linux hosts, the first host‐only network is set up when you run the
vmware-config.pl program after you install Workstation, provided you agree to
install host‐only networking. If you did not agree to use host‐only networking, you
need to run the program again to set up host‐only networking. For instructions, see
“Configuring Workstation with vmware‐config.pl” on page 54.
300 VMware, Inc.](https://image.slidesharecdn.com/ws6manual-120904030552-phpapp01/85/Ws6-manual-300-320.jpg)

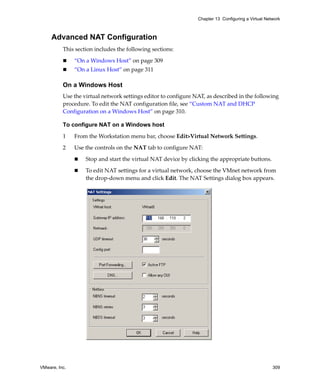
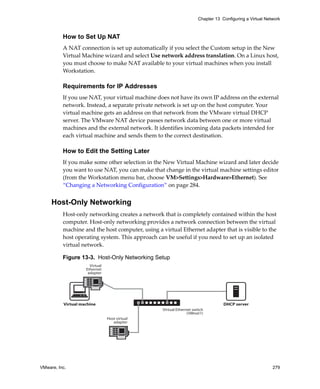
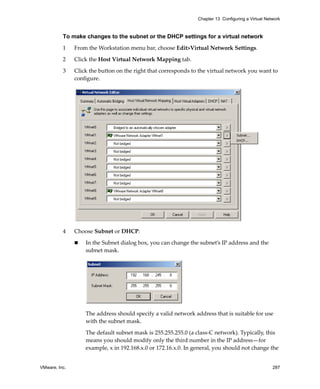
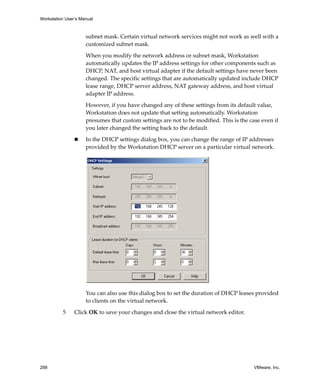
![Workstation User’s Manual
3 Click the appropriate button to set up or change port forwarding or to specify DNS
servers the virtual NAT device should use.
4 Click OK to close the virtual network editor.
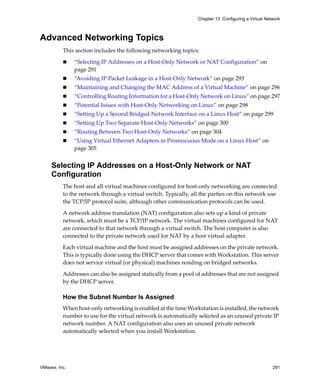
Custom NAT and DHCP Configuration on a Windows Host
If you are an advanced user on a Windows host computer, you can make custom
configuration settings by editing the NAT and DHCP configuration files. If your host
operating system is installed on the C drive, the configuration files for NAT and DHCP
are in the following locations:
NAT: C:Documents and SettingsAll UsersApplication
DataVMwarevmnetnat.conf
For more information about this file, see “Contents of the NAT Configuration File”
on page 311.
DHCP: C:Documents and SettingsAll UsersApplication
DataVMwarevmnetdhcp.conf
NOTE You can change many key NAT and DCHP settings using the virtual network
settings editor (Edit>Virtual Network Settings). However, if you make manual
changes to the configuration files, those changes might be lost when you use the virtual
network settings editor. If you make manual changes, make backup copies of the files
before changing any settings in the virtual network settings editor. You can then copy
your manual changes back into the appropriate configuration files.
Specifying Connections from Ports Below 1024
When a client machine makes a TCP or UDP connection to a server, the connection
comes from a particular port on the client (the source port) and connects to a particular
port on the server (the destination port). For security reasons, some servers accept
connections only from source ports below 1024. You might see this configuration on
machines used as NFS file servers, for example.
If a virtual machine using NAT attempts to connect to a server that requires the client
to use a source port below 1024, it is important that the NAT device forward the request
from a port below 1024. You can specify this behavior in the vmnetnat.conf file.
This behavior is controlled by entries in sections headed [privilegedUDP] and
[privilegedTCP]. You might need to add settings to or modify settings in either or
both of these sections, depending on the kind of connection you need to make.
You can set two parameters, each of which appears on a separate line.
autodetect = <n>
310 VMware, Inc.](https://image.slidesharecdn.com/ws6manual-120904030552-phpapp01/85/Ws6-manual-310-320.jpg)
![Chapter 13 Configuring a Virtual Network
The autodetect setting determines whether the VMware NAT device automatically
attempts to map virtual machine source ports below 1024 to NAT source ports below
1024. A setting of 1 means true. A setting of 0 means false. On a Windows host, the
default is 1 (true). On a Linux host, the default is 0 (false).
port = <n>
The port setting specifies a destination port (where <n> is the port on the server that
accepts the connection from the client). Whenever a virtual machine connects to the
specified port on any server, the NAT device attempts to make the connection from a
source port below 1024. You can include one or more port settings in the
[privilegedUDP] or [privilegedTCP] section or in both sections, as required for the
connections you need to make. Enter each port setting on a separate line.
On a Linux Host
Use the NAT configuration file on the host to configure the NAT device. This file is
located in /etc/vmware/vmnet8/nat/nat.conf.
The configuration file is divided into sections. Each section configures a part of the NAT
device. Text surrounded by square brackets—such as [host]—marks the beginning of
a section. In each section is a configuration parameter that can be set. The configuration
parameters take the form ip = 192.168.27.2/24.
For an example of a NAT configuration file, see “Sample Linux vmnetnat.conf File” on
page 317. The configuration file variables are described in “Contents of the NAT
Configuration File” on page 311.
Contents of the NAT Configuration File
The NAT configuration file is located in:
On a Windows host:
C:Documents and SettingsAll UsersApplication DataVMwarevmnetnat.conf
If you edit this file and then use the virtual network settings editor (Edit>Virtual
Network Settings), your edits might be lost.
On a Linux host:
/etc/vmware/vmnet8/nat/nat.conf
The NAT configuration file contains the following sections.
VMware, Inc. 311](https://image.slidesharecdn.com/ws6manual-120904030552-phpapp01/85/Ws6-manual-311-320.jpg)
![Workstation User’s Manual
The [host] Section
ip
The IP address that the NAT device should use. It can optionally be followed by a
slash and the number of bits in the subnet.
netmask
The subnet mask to use for the NAT network. DHCP addresses are allocated from
this range of addresses.
configport
A port that can be used to access status information about the NAT device.
device
The VMnet device to use. Windows devices are of the form VMnet<x> where <x>
is the number of the VMnet. Linux devices are of the form /dev/vmnet<x>.
activeFTP
Flag to indicate if active FTP is to be allowed. Active FTP allows incoming
connections to be opened by the remote FTP server. Turning this off means that
only passive mode FTP works. Set this flag to 0 to turn it off.
The [udp] Section
timeout
Number of seconds to keep the UDP mapping for the NAT network.
The [dns] Section
This section is for Windows hosts only. Linux does not use this section.
policy
Policy to use for DNS forwarding. Accepted values include:
order – Send one DNS request at a time in order of the name servers.
rotate – Send one DNS request at a time and rotate through the DNS servers.
burst – Send to three servers and wait for the first one to respond.
timeout
Time in seconds before retrying a DNS request.
retries
Number of retries before the NAT device gives up on a DNS request.
312 VMware, Inc.](https://image.slidesharecdn.com/ws6manual-120904030552-phpapp01/85/Ws6-manual-312-320.jpg)
![Chapter 13 Configuring a Virtual Network
autodetect
Flag to indicate whether the NAT device should detect the DNS servers available
to the host.
nameserver1
IP address of a DNS server to use.
nameserver2
IP address of a DNS server to use.
nameserver3
IP address of a DNS server to use.
If autodetect is on and some name servers are specified, the DNS servers specified
in nameserver1, nameserver2 and nameserver3 are added before the list of
detected DNS servers.
The [netbios] Section
This section applies to Windows hosts only. Linux does not use this section.
nbnsTimeout = 2
Timeout, in seconds, for NBNS queries.
nbnsRetries = 3
Number of retries for each NBNS query.
nbdsTimeout = 3
Timeout, in seconds, for NBDS queries.
The [incomingtcp] Section
Use this section to configure TCP port forwarding for NAT. In this section, you can
assign a port number to an IP address and port number on a virtual machine.
The following line shows the format used in this section:
8887 = 192.168.27.128:21
This example creates a mapping from port 8887 on the host to the IP address
192.168.27.128 and port 21. When this mapping is set and an external machine connects
to the host at port 8887, the network packets are forwarded to port 21 (the standard port
for FTP) on the virtual machine with IP address 192.168.27.128.
VMware, Inc. 313](https://image.slidesharecdn.com/ws6manual-120904030552-phpapp01/85/Ws6-manual-313-320.jpg)
![Workstation User’s Manual
The [incomingudp] Section
Use this section to configure UDP port forwarding for NAT. In this section, you can
assign a port number to an IP address and port number on a virtual machine.
The following line shows the format used in this section. It illustrates a way to forward
X server traffic from the host port 6000 to the virtual machine’s port 6001:
6000 = 192.168.27.128:6001
This example creates a mapping from port 6000 on the host to the IP address
192.168.27.128 and port 6001. When this mapping is set and an external machine
connects to the host at port 6000, the network packets are forwarded to port 6001 on the
virtual machine with IP address 192.168.27.128.
Considerations for Using NAT
Following are the considerations to take into account when you use NAT:
NAT causes some performance loss.
Because NAT requires that every packet sent to and received from a virtual
machine must be in the NAT network, there is an unavoidable performance
penalty.
NAT is not perfectly transparent.
It does not normally allow connections to be initiated from outside the network,
although you can set up server connections by manually configuring the NAT
device. The practical result is that some TCP and UDP protocols that require a
connection be initiated from the server machine—some peer to peer applications,
for example—do not work automatically, and some might not work at all.
NAT provides some firewall protection.
A standard NAT configuration provides basic‐level firewall protection because the
NAT device can initiate connections from the private NAT network, but devices on
the external network cannot normally initiate connections to the private NAT
network.
Using NAT with NetLogon
When using NAT networking in a virtual machine with a Windows guest operating
system running on a Windows host, you can use NetLogon to log on to a Windows
domain from the virtual machine. You can then access file shares known by the WINS
server in the domain.
314 VMware, Inc.](https://image.slidesharecdn.com/ws6manual-120904030552-phpapp01/85/Ws6-manual-314-320.jpg)

![Chapter 13 Configuring a Virtual Network
Sample Linux vmnetnat.conf File
# Linux NAT configuration file
[host]
# NAT gateway address
ip = 192.168.237.2/24
hostMAC = 00:50:56:C0:00:08
# enable configuration; disabled by default for security reasons
#configport = 33445
# VMnet device if not specified on command line
device = VMnet8
# Allow PORT/EPRT FTP commands (they need incoming TCP stream...)
activeFTP = 1
# Allows the source to have any OUI. Turn this one if you change the OUI
# in the MAC address of your virtual machines.
#allowAnyOUI = 1
[udp]
# Timeout in seconds, 0 = no timeout, default = 60; real value might
# be up to 100% longer
timeout = 30
[dns]
# This section applies only to Windows.
#
# Policy to use for DNS forwarding. Accepted values include order,
# rotate, burst.
#
# order: send one DNS request at a time in order of the name servers
# rotate: send one DNS request at a time, rotate through the DNS servers
# burst: send to three servers and wait for the first one to respond
policy = order;
# Timeout in seconds before retrying DNS request.
timeout = 2
# Retries before giving up on DNS request
retries = 3
# Automatically detect the DNS servers (not supported in Windows NT)
autodetect = 1
# List of DNS servers to use. Up to three may be specified
#nameserver1 = 208.23.14.2
VMware, Inc. 317](https://image.slidesharecdn.com/ws6manual-120904030552-phpapp01/85/Ws6-manual-317-320.jpg)
![Workstation User’s Manual
#nameserver2 = 63.93.12.3
#nameserver3 = 208.23.14.4
[netbios]
# This section applies only to Windows.
# Timeout for NBNS queries.
nbnsTimeout = 2
# Number of retries for each NBNS query.
nbnsRetries = 3
# Timeout for NBDS queries.
nbdsTimeout = 3
[incomingtcp]
# Use these with care - anyone can enter into your virtual machine through
# these...
# FTP (both active and passive FTP is always enabled)
# ftp localhost 8887
#8887 = 192.168.27.128:21
# WEB (make sure that if you are using named webhosting, names point to
# your host, not to guest... And if you are forwarding port other
# than 80 make sure that your server copes with mismatched port
# number in Host: header)
# lynx http://localhost:8888
#8888 = 192.168.27.128:80
# SSH
# ssh -p 8889 root@localhost
#8889 = 192.168.27.128:22
[incomingudp]
# UDP port forwarding example
#6000 = 192.168.27.128:6001
Using Samba with Workstation
If you have Samba running on your Linux host, you can configure Samba so that it
works with Workstation, as described in this section.
Modify your Samba configuration so that it includes the IP subnet used by the
Workstation virtual Ethernet adapter, VMnet1.
To determine which subnet is being used by VMnet1, run:
/sbin/ifconfig vmnet1
318 VMware, Inc.](https://image.slidesharecdn.com/ws6manual-120904030552-phpapp01/85/Ws6-manual-318-320.jpg)


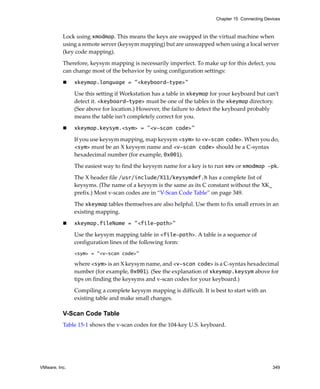
![Workstation User’s Manual
Table 15-1. V-Scan Codes for the 104-Key U.S. Keyboard
Symbol Shifted Symbol Location V-Scan Code
Esc 0x001
1 ! 0x002
2 @ 0x003
3 # 0x004
4 $ 0x005
5 % 0x006
6 ^ 0x007
7 & 0x008
8 * 0x009
9 ( 0x00a
0 ) 0x00b
‐ _ 0x00c
= + 0x00d
Backspace 0x00e
Tab 0x00f
Q 0x010
W 0x011
E 0x012
R 0x013
T 0x014
Y 0x015
U 0x016
I 0x017
O 0x018
P 0x019
[ { 0x01a
] } 0x01b
Enter 0x01c
Ctrl left 0x01d
350 VMware, Inc.](https://image.slidesharecdn.com/ws6manual-120904030552-phpapp01/85/Ws6-manual-350-320.jpg)


![Workstation User’s Manual
Starting and Stopping Virtual Machines on the User’s Computer
Use the vmware-fullscreen command to run VMware Workstation in full screen
switch mode and to start and stop virtual machines on a user’s computer. The
command can pass certain information to the virtual machine when it starts.
As administrator, you must decide how to issue the command. For example, you can
use a custom application or script running on the host operating system to issue one or
more vmware-fullscreen commands. Or you can include the command to start a
virtual machine in a shortcut in the host operating system’s startup group, so the virtual
machine starts when the user logs on to the host computer.
Issue the vmware-fullscreen command once for each virtual machine you want to
start or stop.
Starting a Virtual Machine
At its most basic, the vmware-fullscreen command to power on a virtual machine
has the following syntax:
vmware-fullscreen -poweron "<config-file>"
Provide the full path to the virtual machine’s configuration (.vmx) file.
The user sees no immediate indication that the virtual machine has started, but the user
can switch to the virtual machine with its direct‐switch key or with the cycle key.
To power on the virtual machine and pass additional information to the virtual
machine, use one or more of the options shown in the following syntax:
vmware-fullscreen -poweron [-s variable=value] [-name=<alias>]
[-directkey=<keyspec>] [-fullscreen] "<config-file>"
When you use the optional switches shown here, the -poweron switch is required and
must be the first switch after the vmware-fullscreen command. Provide the full path
to the virtual machine’s configuration (.vmx) file at the end of the command line. Enter
the complete command on one line.
Use the -s switch to pass a variable name and value to be used in configuring the
virtual machine. You can include multiple <variable>=<value> pairs in the
command. Each <variable>=<value> pair must be preceded by -s.
Use -name=<alias> to give a name to the virtual machine. You can the use that alias in
-switchto and -poweroff commands.
Use -directkey=<keyspec> to specify the virtual machine’s direct‐switch key. If a
direct‐switch key is specified in the virtual machine’s configuration file, the one
specified on the command line overrides the one in the configuration file.
402 VMware, Inc.](https://image.slidesharecdn.com/ws6manual-120904030552-phpapp01/85/Ws6-manual-402-320.jpg)

![A
Workstation Command-Line
Reference A
This appendix discusses the command‐line options that are available for the vmware
program and the vmrun program. This appendix contains the following topics:
“Startup Options for Workstation and Virtual Machines” on page 407
“Command‐Line Application for Operating Virtual Machines” on page 409
For information abut using the vmware-fullscreen command to use full screen
switch mode, see “Starting and Stopping Virtual Machines on the User’s Computer” on
page 402.
Startup Options for Workstation and Virtual Machines
Table A‐1 describes options available when you run VMware Workstation from the
command line. You can type these commands in a Linux terminal window or at the
Windows command prompt. You can also create scripts to run multiple commands.
The syntax for this command is:
On a Linux host operating system:
/usr/bin/vmware [-n] [-x] [-X] [-m] [-t] [-q] [-s <variablename>=<value>]
[-v]
[/<path_to_virtual_machine>/<virtual_machine_name>.vmx]
[X toolkit options]
On a Windows host operating system:
C:Program FilesVMwareVMware WorkstationProgramsvmware.exe [-B] [-n]
[-x] [-X] [-t] [-q] [-s <variablename>=<value>] [-v]
[<path_to_virtual_machine><virtual_machine_name>.vmx]
VMware, Inc. 407](https://image.slidesharecdn.com/ws6manual-120904030552-phpapp01/85/Ws6-manual-407-320.jpg)
![Appendix A Workstation Command-Line Reference
Using Startup Options in a Windows Shortcut
The most convenient way to use the startup options is to incorporate them into the
command generated by a Windows shortcut.
To create the shortcut, right‐click the shortcut and click Properties. In the Target field,
add any switches you want to use after the vmware.exe filename. For example, the
following command launches the Windows Me virtual machine specified, powers it on,
and switches to full screen mode.
"C:Program FilesVMwareVMware WorkstationProgramsvmware.exe -X
C:Documents and Settings<username>My DocumentsMy Virtual
MachinesWindows MeWindows Me.vmx"
Enclose the entire command string in quotation marks.
NOTE The configuration file has a .vmx extension by default.
Command-Line Application for Operating Virtual
Machines
VMware Workstation includes a separate application, vmrun, for operating teams or
virtual machines from the command line. To launch the vmrun application, from the
command prompt, enter: vmrun COMMAND [OPTION].
Before using the vmrun command on a Windows host, you must do one of the
following:
Change your working directory to the VMware Workstation directory. The default
location is:
c:Program FilesVMwareVMware Workstation
Add the VMware Workstation directory to the system path. On Windows 2000 and
XP, you can change this setting at
Control Panel>System>Advanced>Environment Variables>System
variables>Path
Valid vmrun commands and options are described in Table A‐2.
If authentication is required in the guest operating system, use the following
authentication flags, as appropriate:
-gu <userName in guest OS>
-gp <password in guest OS>
VMware, Inc. 409](https://image.slidesharecdn.com/ws6manual-120904030552-phpapp01/85/Ws6-manual-409-320.jpg)
![Workstation User’s Manual
Table A-2. vmrun Commands and Parameters
Command Description Parameters
General Commands
list List all running virtual machines. None
upgradevm Upgrade a virtual machine to the current [Path to .vmx file]
Workstation version.
installtools Install VMware Tools in the guest [Path to .vmx file]
operating system. In Windows guests,
the VMware Tools installer runs
automatically. In Linux guests, this
command connects the virtual machine’s
virtual CD‐ROM drive to the VMware
Tools ISO image for that guest, but the
installer does not start automatically.
Complete the installation with additional
manual steps, as described in “Installing
VMware Tools on a Linux Guest” on
page 125.
Power Commands
start Start a virtual machine (.vmx file) or team [Path to .vmx or .vmtm file]
(.vmtm file).
stop Stop a virtual machine (.vmx file) or team [Path to .vmx or .vmtm file]
(.vmtm file). [hard|soft]
reset Reset a virtual machine (.vmx file) or [Path to .vmx or .vmtm file]
team (.vmtm file). [hard|soft]
suspend Suspend a virtual machine (.vmx file) or [Path to .vmx or .vmtm file]
team (.vmtm file). [hard|soft]
Snapshot Commands
snapshot Create a snapshot of a virtual machine. [Path to .vmx file]
[snapshot name]
listSnapshots List all snapshots in a virtual machine. [Path to .vmx file]
deleteSnapshot Remove a snapshot from a virtual [Path to .vmx file]
machine. [snapshot name]
410 VMware, Inc.](https://image.slidesharecdn.com/ws6manual-120904030552-phpapp01/85/Ws6-manual-410-320.jpg)
![Appendix A Workstation Command-Line Reference
Table A-2. vmrun Commands and Parameters (Continued)
Command Description Parameters
revertToSnapshot Go to a snapshot in a virtual machine. [Path to .vmx file]
If a snapshot has a unique name within a [snapshot name]
virtual machine, revert to that snapshot or
by specifying the path to the virtual [Path to .vmx file]
machine’s configuration file and the [snapshot name1/
snapshot name: snapshot name2]
[Path to .vmx file][snapshot name]
If several snapshots have the same name,
you can still specify a snapshot by
including a “path name” for the snapshot
name. A path name is a series of snapshot
names, separated by forward slash
characters ( / ). Each name specifies a
different snapshot in the tree.
For example, suppose you include the
path name Snap1/Snap2. This will
identify a snapshot named Snap2 that
was taken from the state of a root
snapshot named Snap1.
Because you can use the forward slash in
a path name, VMware recommends that
you avoid using the slash character when
you name a snapshot because this makes
it difficult for you to predict which
snapshot a path name will identify.
Guest Operating System Commands
runProgramInGuest Run a program in the guest operating [Path to .vmx file]
system. [Program [Program
arguments]]
fileExistsInGuest Check whether the specified file exists in [Path to .vmx file]
the guest system. [Path to file in guest]
setSharedFolderState Modify the location of a folder shared [Path to .vmx file]
between the host and guest. [Share name]
[New path to folder on
host]
addSharedFolder Add a folder to be shared between the [Path to .vmx file]
host and guest. [Share name]
[Path to folder on host]
removeSharedFolder Remove a folder shared between the host [Path to .vmx file]
and guest. [Share name]
VMware, Inc. 411](https://image.slidesharecdn.com/ws6manual-120904030552-phpapp01/85/Ws6-manual-411-320.jpg)
![Workstation User’s Manual
Table A-2. vmrun Commands and Parameters (Continued)
Command Description Parameters
listProcessesInGuest List the processes running in the guest [Path to .vmx file]
operating system.
killProcessInGuest Kill the specified process on the guest [Path to .vmx file]
operating system. [Process ID]
runScriptInGuest Run a script in the guest operating [Path to .vmx file]
system. [Interpreter path script
text]
deleteFileInGuest Delete a file from the guest operating [Path to .vmx file]
system. [Path to file on the guest]
createDirectoryInGuest Create a directory in the guest operating [Path to .vmx file]
system. [Directory path on the
guest]
deleteDirectoryInGuest Delete a directory from the guest [Path to .vmx file]
operating system. [Directory path on the
guest]
listDirectoryInGuest List the contents of a directory in the [Path to .vmx file]
guest operating system. [Directory path on the
guest]
copyFileFromHostToGuest Copy a file from the host to the guest [Path to .vmx file]
operating system. [File path on the host]
[File path on the guest]
copyFileFromGuestToHost Copy a file from the guest operating [Path to .vmx file]
system to the host. [File path on the guest]
[File path on the host]
renameFileInGuest Rename a file in the guest operating [Path to .vmx file]
system. [Original file name]
[New file name]
Examples for vmrun
For example, to reset a virtual machine:
In a Linux terminal, enter:
vmrun reset /usr/local/VMs/<virtual_machine_name>.vmx soft
On the Windows command line, enter:
vmrun reset c:Virtual Machines<virtual_machine_name>.vmx soft
412 VMware, Inc.](https://image.slidesharecdn.com/ws6manual-120904030552-phpapp01/85/Ws6-manual-412-320.jpg)