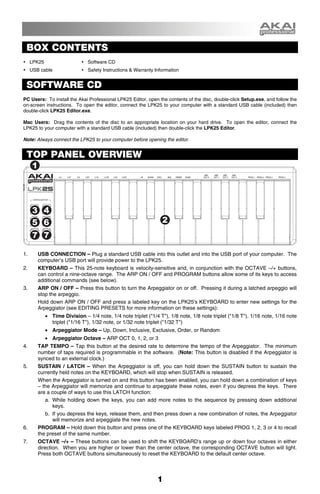
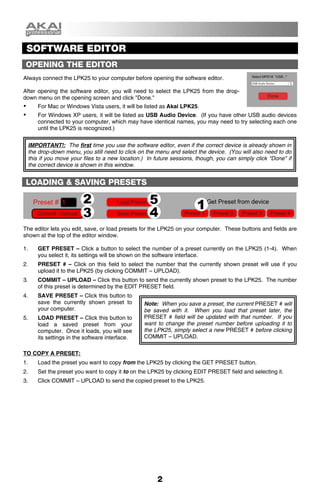
MPK Mini Keyboard Controller Quickstart GuideAkai Pro
The Akai Pro MPK mini keyboard controller has an impressive array of buttons, knobs and pads to provide "hands-on" performance and production control no matter your location. Use the MPK mini keyboard quickstart guide for an overview of the mini keyboard and all it's functions.
The document describes the Steinberg layout and functionality for the Mackie Control hardware controller when used with Nuendo. Key points include:
1. The Steinberg overlay provides custom key bindings for Mackie Control functions in Nuendo. It can be placed over the top right of Mackie Control.
2. Mackie Control operates in Selected Channel, Fader Set, or Global mode depending on the parameter group selected. Selected Channel mode controls a single channel, Fader Set mode controls a parameter across multiple channels, and Global mode controls global settings.
3. Parameter pages can be navigated with Page Up/Down buttons to access different EQ, FX, and insert parameters for the selected channel or global settings.
This document provides instructions for outputting a sine waveform from Channel 1 of a signal generator:
1. Select Channel 1 and the sine waveform. Set the frequency to 20 kHz, amplitude to 2.5 Vpp, offset to 500 mVDC, and start phase to 10 degrees.
2. Additional settings like output parameters can be configured through the Channel Setting menu.
3. Enable the Channel 1 output to output the configured sine waveform from its BNC connector.
The document provides an overview guide for setting up and using the Novation Impulse USB MIDI keyboard. It includes sections on connecting the Impulse, its basic operation including the keyboard, controls and ports, installing bundled software and setting up HUI control in various DAWs like Pro Tools, Cubase, Reaper and Studio One. It also covers using the Impulse to control mixer tracks and plugins in a DAW and additional Ableton Live clip launch functionality.
SPP-01 Super Parameter Programmer User Manual
Available at http://shop.ultisolar.com Paypal, Amazing Shipping freight to 100 countries and more. -Ultisolar New Energy Co., Ltd SWH Controllers||SWH Pump Stations||MPPT/PWM Solar Controllers||Flow Meter||Hall Flow Sensors||Heat Exchangers
This document is an installation and operation manual for ATEM production switchers. It introduces the ATEM switcher and explains what an M/E (Mix Effects) switcher is. It provides instructions for plugging in equipment like cameras, control panels, and monitors. It also explains how to install and use the ATEM software control panel and update the switcher's software. The manual covers setting up and operating the switcher, including features like transitions, keying effects, and auxiliary outputs.
Get the workflow of a traditional 1 M/E SDI switcher combined with a very portable compact 2 RU size and a software control panel you can run on your laptop!
Latency refers to the delay between producing a sound and hearing it played back. This delay can be distracting and annoying when trying to record audio. The Multimix USB mixer allows for zero-latency monitoring, meaning you can hear yourself in real-time while recording without any delay. To set this up, you connect the mixer to your computer via USB, set the mixer controls appropriately, and configure your DAW (Digital Audio Workstation) software to route audio through the mixer for both input and output. This allows you to monitor yourself in real-time during recording.
manual de usuario videograbador 4 canales sinrobos.comSimon Chaler
videograbador de 4 canales de http://www.sinrobos.com con alta resolución podrás ver tus cámaras de seguridad desde cualquier smartphone, ordenador o tablet
PAM 1 MK2 Audio Monitoring Unit Training 2015 Anoushka Farouk
The document provides explanations and instructions for various features and functions of the PAM1-MK2 audio monitoring unit. It describes the front panel controls, menu navigation, saving and recalling presets, loudness measurement tools, audio routing options using the assign matrix, audio delay settings, loudspeaker muting controls, and preset standard switching which allows the unit to automatically change monitoring settings based on input signal format.
PAM1 MK2 Audio Monitoring system training 2014 Anoushka Farouk
TSL Products' manufacture a range of Audio Monitoring products for music, TV and film broadcasting applications.
The PAM1 MK2 Audio Monitoring system is an evolutionary step up from the original PAM1-3G8, offering an improved feature set and user interface, upgraded speaker system, larger screens and a full set of functions carried over from the flagship PAM2 MK2 Precision Audio Monitor. See our comprehensive training video on the capabilities of this piece of equipment or visit our website for more information:
http://www.tslproducts.com/our-products/audio-monitoring/
PAM2 MK2 Audio Monitoring system training 2014 Anoushka Farouk
The document provides an overview of the front panel controls and menu options of the PAM2-MK2 audio monitoring unit. It describes features such as preset selection, metering views, loudness measurement, audio routing options, and preset standard switching to automatically change monitoring configuration based on input signal format.
The V-8 video mixer has 8 video inputs, 3 outputs, and expanded special effects capabilities compared to previous models. It offers high quality digital processing and over 500 lines of video resolution. In addition to standard effects, it includes new effects like feedback, afterimage, and stretch transitions. It allows direct input of computer signals and integration of computer graphics with video sources. The V-8 provides a versatile one-unit solution for various applications like events, concerts, sports, and weddings.
Khoa Học - Kỹ Thuật & Giải Trí: http://phongvan.org
Tài Liệu Khoa Học Kỹ Thuật: http://tailieukythuat.info
Thiết bị Điện Công Nghiệp - Điện Hạ Thế: http://dienhathe.vn
System Area Manager provides remote management functions for managed systems including graceful shutdown, restart, Wake on LAN, Remote Console, IPMI event log, IPMI over LAN, and AMT power management. It allows accessing these functions by clicking the remote management icon for a system. Key features include remote shutdown/restart, Wake on LAN, Remote Console for keyboard/mouse/video control, IPMI event log viewing and clearing, and AMT power control and boot options even when the system is offline.
The document provides instructions for operating the Yamaha 01V96i digital mixing console. It begins with an overview of the rear panel connections and top panel controls. It then details how to select channels, control channel faders and patches, use the equalizer, pan, dynamics, routing, effects, scene memory and other functions. Recording live audio directly to a computer using the 01V96i is also covered.
The SKT100 manual provides instructions for using a device to program transponders from various manufacturers including Texas Instruments, Atmel, Sokymat, and Phillips. The SKT100 can read and write transponder keys, recover lost keys using built-in calculators, and generate prepared keys. It connects to a computer via USB to be controlled with software that allows selecting the transponder type and performing operations like reading, writing, and cloning transponder data. The manual describes the software interface and provides step-by-step instructions for operating with different transponder types.
This introductory guide covers the basic functions and operation of the AeroCheck+ instrument. It describes the various keys including power, cursor keys, balance key, freeze key and menu/back key. It also outlines how to open the end panels, access quick menus and main menu, and use advanced functions such as auto phase, loop, trace, record and replay, dual frequency auto mixing, and guides.
The document provides installation and usage instructions for the MATRIX 2.0 software. It outlines the minimum hardware requirements to run the software, including the need for a serial cable and free serial port. It describes downloading and extracting necessary files, and installing MASK files if needed. The software allows monitoring and controlling a frequency inverter locally, editing parameters, recording actual values, and documenting settings and fault memories. It provides functions to save parameter settings to the inverter and explains how to uninstall the software.
The document provides operating instructions for an Aastra 620d phone system. It includes:
1) Descriptions of the phone's operating elements such as buttons, display symbols, and safety information.
2) Instructions for basic call functions like answering calls, making calls, and using features accessed by the buttons.
3) Information about the phone system it connects to including trial licenses, call routing options, and synchronized contacts.
4) Legal disclaimers and trademark information about the documentation.
This document provides instructions for setting up and operating the Alzatex PR121B Take-A-Turn ticket printing system. The system prints numbered tickets to help manage customer queues and waiting times. It includes a ticket printer, controller software, wall display, and buttons to increment the ticket number. Setup involves connecting power supplies, running cabling between components, and configuring ticket numbering and templates using the printer's control panel. The guide describes the printer's operating modes and provides troubleshooting tips for issues like paper jams or low battery alerts.
This document provides instructions for entering service and adjustment modes on TV models TV-F2400 and TV-F2500 using a jig remote controller. It describes how to reset aging hours, check and adjust distinction switch settings, and access menus to adjust various parameters including horizontal and vertical position, color balance, focus, brightness, and more. Electrical adjustments are made using the remote controller to change values on adjustment menus and optimize the image based on test patterns and instruments.
This document provides an overview and summary of Siemens S7-300 PLC programming. It covers the STEP 7 programming software, comparing CPU models and modules, addressing modules, loading memory, data types, and instructions for statement list programming, logic, math, timers, and more. Programming examples are also included at the end.
This document provides installation instructions for the CM-120TX wireless digital keypad. It describes the keypad's features, which include 999 users with over 1 million possible codes from 1-8 digits. It operates on batteries and is compatible with 915MHz products. The document outlines installation steps for mounting and wiring the keypad, and provides programming instructions for setting user codes and access options.
The document provides an overview of new features introduced in SD7 software versions 1.6.131+, known as MACH 2. Key additions include 16 stereo FPGA reverbs, additional effects like delays and choruses, dynamic EQ per output channel EQ band, 8-band output channel EQ with pre/post-insert sections, and multi-band dynamics processing per channel. The changes are designed to expand creative signal processing options while maintaining the core user interface.
This document provides instructions for programming a Web Mountain SW-7 switch and faceplate in the Upstart control system. It describes adding the device, assigning it to a room and giving it a name, selecting its configuration as a single rocker or multi-button faceplate, and configuring its receive and transmit components to control lights and scenes via taps, holds, or button presses. It also describes using the test and communications tabs to check the device functionality and signal levels.
This document provides a quick start user manual for the MIC 1462 1/4 DIN setpoint programmer. It describes the power up procedure, keypad operation, indicators, displays, and how to program profiles into the controller. Profiles can be programmed with global parameters, program parameters, and segment parameters. Segment programming allows setting the final setpoint, time/ramp rate, and events for each segment. A sample profile is provided as an example.
QBASIC is a simple BASIC programming language introduced in the 1980s. It has several features that make it user-friendly, like using simple English commands and allowing variables to be easily named. A QBASIC program consists of lines with line numbers and commands. Common commands include PRINT to display output, LET to assign values to variables, and REM for remarks. QBASIC can run in either direct mode for single line commands or program mode to store and run multi-line programs.
QBASIC is a simple BASIC programming language introduced in the 1980s. It has a direct mode for executing single commands and a program mode for writing and running programs with line numbers. QBASIC programs use commands like PRINT, LET, REM, CLS, and END. Variables can be numeric or alphanumeric, and constants can be numeric or strings enclosed in quotes. Programs are made up of statements executed in order, following syntax rules.
This document is an instruction manual for a Sansui LCD/LED television. It begins with welcoming the customer to Sansui and discussing their goal of providing high quality products. It then provides instructions on setting up and using the television, including connecting antennas and devices, descriptions of the control buttons on the television and remote, and explanations of the menu system and settings. The document provides technical specifications for the television and instructions for troubleshooting issues. It concludes by providing guidelines for proper disposal of the product.
This document provides an overview of the main features and functions of the D1200mkII digital audio workstation, including:
1) It allows for 16-channel recording and mixing with 12 tracks that can be bounced to 96 virtual tracks, and includes modeling effects for guitar, bass and microphone recording.
2) Other features include 8 insert effects, 2 master effects, a final effect, 100 scenes and marks, track editing, and the ability to backup songs and burn audio CDs using the built-in CD burner.
3) The user interface allows for controlling inputs, tracks, effects, scenes and more using tabs to navigate between channels, effects and other parameters which can be adjusted using knobs and buttons
The Comcast Custom 3-Device universal remote control can control a cable box, TV, and one other device such as a VCR or DVD player. It comes pre-programmed but additional devices can be programmed by entering their codes. The remote has options for changing volume controls and locking channel functions to the cable box. The document provides setup instructions and troubleshooting tips.
The Comcast Custom 3-Device universal remote control can control up to three home entertainment devices including a cable box, TV, VCR, DVD player, or DVR. It comes pre-programmed to control a Comcast cable box, RCA TV, and RCA VCR but can be programmed to control other devices. Programming involves entering a 4-digit code for the device from the list provided. The remote can also search for codes for devices not listed. It allows assigning device keys, changing volume lock settings, and deactivating channel control lock.
The document provides instructions for operating the Stanton C.313 professional tabletop CD player. It has the following key features:
- MP3 playback up to 320kbps with folder and track browsing
- 10 seconds of anti-shock memory
- 4 memory pads for saving loops, cue points, or samples
- Adjustable pitch range from +/-8% to +/-100% with key lock
The document provides information about the Stanton C.313 professional tabletop CD player, including:
- An introduction describing the C.313's design for DJ use with features like a large jog wheel and MP3 functionality.
- The main features of the C.313 such as MP3 playback, looping, sampling pads, pitch control, and more.
- Explanations of the controls and displays on the C.313.
- Instructions for operating the C.313 including loading discs, browsing tracks, playback controls, cueing, and more.
- Specifications for the C.313 such as dimensions, weight, audio characteristics, and playability standards.
- Information on
This document provides information about the basic components and functions of a computer system. It discusses the hardware components including the system unit, monitor, keyboard, and mouse. It describes the internal components of the system unit such as drives, ports and buttons. It explains the types of monitors, functions of the mouse, layout and keys of the keyboard. It provides illustrations and diagrams to enhance understanding of computer hardware.
This document provides a 3-sentence summary of the key equipment and operations at Manhattan Neighborhood Network's production studios:
The document outlines the primary recording options of SD card recorders and XDCAM disks, and how to format, insert media, and operate these recorders. It also describes the intercom system, on-air telephones, teleprompter, cameras, audio board, and other production equipment. Proper use of the equipment like cameras, audio board, switcher, and timer are explained to help producers successfully record and create their shows within the designated time lengths.
This document provides an overview of common computer components and their troubleshooting, including:
- The CPU and its functions as the central processing unit that executes instructions. Troubleshooting steps are outlined for issues like no power.
- Common computer peripherals like monitors, keyboards, mice, and printers. Block diagrams show the components and potential issues covered include no video signal, keys not working, cursor issues, and printers not powering on.
- Other devices like UPS systems are introduced and freezing or crashing issues are addressed with solutions like using Ctrl-Alt-Del and safe boot modes. Basic maintenance tips are provided like periodic reboots and avoiding dust.
This two-page document provides installation and programming instructions for SECO-LARM two-channel RF receivers models SK-910RBQ and SK-910RB2Q. The receivers can be programmed to control devices like garage doors and gates remotely using compatible RF transmitters. Programming involves selecting the relay output function and learning transmitter codes using the channel mode switches. The receivers can store up to 15 codes per channel and have a range of up to 500 feet.
This document provides operating instructions for the TECNOLOGIC spa - TLK 43 digital electronic controller. It describes the controller's front panel, programming functions, installation and use instructions, main functions including control modes, auto-tuning, alarms, outputs and communications. The document is intended to ensure proper installation, maintenance and use of the controller and provides technical specifications for electrical, mechanical and functional characteristics.
Similar to LPK25 Keyboard Controller Quickstart Guide (20)
Inspire: Igniting the Spark of Human Potentialgauravingole9
Inspire: Igniting the Spark of Human Potential
Inspiration is the force that propels individuals from ordinary to extraordinary. It transforms ideas into innovations, dreams into realities, and individuals into icons. This article delves into the multifaceted nature of inspiration, exploring its sources such as nature, art, personal experiences, and the achievements of others, and its profound impact on personal growth, societal progress, and cultural evolution. Through the lens of historical figures and timeless quotes, we uncover how inspiration fuels creativity, drives societal change, and ignites the spark of human potential.
As we navigate through the ebbs and flows of life, it is natural to experience moments of low motivation and dwindling passion for our goals.
However, it is important to remember that this is a common hurdle that can be overcome with the right strategies in place.
In this guide, we will explore ways to rekindle the fire within you and stay motivated towards your aspirations.
Procrastination is a common challenge that many individuals face when it comes to completing tasks and achieving goals. It can hinder productivity and lead to feelings of stress and frustration.
However, with the right strategies and mindset, it is possible to overcome procrastination and increase productivity.
In this article, we will explore the causes of procrastination, how to recognize the signs of procrastination in oneself, and effective strategies for overcoming procrastination and boosting productivity.
Understanding of Self - Applied Social Psychology - Psychology SuperNotesPsychoTech Services
A proprietary approach developed by bringing together the best of learning theories from Psychology, design principles from the world of visualization, and pedagogical methods from over a decade of training experience, that enables you to: Learn better, faster!
You may be stressed about revealing your cancer diagnosis to your child or children.
Children love stories and these often provide parents with a means of broaching tricky subjects and so the ‘The Secret Warrior’ book was especially written for CANSA TLC, by creative writer and social worker, Sally Ann Carter.
Find out more:
https://cansa.org.za/resources-to-help-share-a-parent-or-loved-ones-cancer-diagnosis-with-a-child/
2. BOX CONTENTS
LPK25 Software CD
USB cable Safety Instructions & Warranty Information
SOFTWARE CD
PC Users: To install the Akai Professional LPK25 Editor, open the contents of the disc, double-click Setup.exe, and follow the
on-screen instructions. To open the editor, connect the LPK25 to your computer with a standard USB cable (included) then
double-click LPK25 Editor.exe.
Mac Users: Drag the contents of the disc to an appropriate location on your hard drive. To open the editor, connect the
LPK25 to your computer with a standard USB cable (included) then double-click the LPK25 Editor.
Note: Always connect the LPK25 to your computer before opening the editor.
TOP PANEL OVERVIEW
1
3 4
5 6 2
7 7
1. USB CONNECTION – Plug a standard USB cable into this outlet and into the USB port of your computer. The
computer’s USB port will provide power to the LPK25.
2. KEYBOARD – This 25-note keyboard is velocity-sensitive and, in conjunction with the OCTAVE –/+ buttons,
can control a nine-octave range. The ARP ON / OFF and PROGRAM buttons allow some of its keys to access
additional commands (see below).
3. ARP ON / OFF – Press this button to turn the Arpeggiator on or off. Pressing it during a latched arpeggio will
stop the arpeggio.
Hold down ARP ON / OFF and press a labeled key on the LPK25's KEYBOARD to enter new settings for the
Arpeggiator (see EDITING PRESETS for more information on these settings):
• Time Division – 1/4 note, 1/4 note triplet ("1/4 T"), 1/8 note, 1/8 note triplet ("1/8 T"), 1/16 note, 1/16 note
triplet ("1/16 T"), 1/32 note, or 1/32 note triplet ("1/32 T")
• Arpeggiator Mode – Up, Down, Inclusive, Exclusive, Order, or Random
• Arpeggiator Octave – ARP OCT 0, 1, 2, or 3
4. TAP TEMPO – Tap this button at the desired rate to determine the tempo of the Arpeggiator. The minimum
number of taps required is programmable in the software. (Note: This button is disabled if the Arpeggiator is
synced to an external clock.)
5. SUSTAIN / LATCH – When the Arpeggiator is off, you can hold down the SUSTAIN button to sustain the
currently held notes on the KEYBOARD, which will stop when SUSTAIN is released.
When the Arpeggiator is turned on and this button has been enabled, you can hold down a combination of keys
– the Arpeggiator will memorize and continue to arpeggiate these notes, even if you depress the keys. There
are a couple of ways to use this LATCH function:
a. While holding down the keys, you can add more notes to the sequence by pressing down additional
keys.
b. If you depress the keys, release them, and then press down a new combination of notes, the Arpeggiator
will memorize and arpeggiate the new notes.
6. PROGRAM – Hold down this button and press one of the KEYBOARD keys labeled PROG 1, 2, 3 or 4 to recall
the preset of the same number.
7. OCTAVE –/+ – These buttons can be used to shift the KEYBOARD's range up or down four octaves in either
direction. When you are higher or lower than the center octave, the corresponding OCTAVE button will light.
Press both OCTAVE buttons simultaneously to reset the KEYBOARD to the default center octave.
1
3. SOFTWARE EDITOR
OPENING THE EDITOR
Always connect the LPK25 to your computer before opening the software editor.
After opening the software editor, you will need to select the LPK25 from the drop-
down menu on the opening screen and click "Done."
For Mac or Windows Vista users, it will be listed as Akai LPK25.
For Windows XP users, it will be listed as USB Audio Device. (If you have other USB audio devices
connected to your computer, which may have identical names, you may need to try selecting each one
until the LPK25 is recognized.)
IMPORTANT!: The first time you use the software editor, even if the correct device is already shown in
the drop-down menu, you still need to click on the menu and select the device. (You will also need to do
this if you move your files to a new location.) In future sessions, though, you can simply click "Done" if
the correct device is shown in this window.
LOADING & SAVING PRESETS
The editor lets you edit, save, or load presets for the LPK25 on your computer. These buttons and fields are
shown at the top of the editor window.
1. GET PRESET – Click a button to select the number of a preset currently on the LPK25 (1-4). When
you select it, its settings will be shown on the software interface.
2. PRESET # – Click on this field to select the number that the currently shown preset will use if you
upload it to the LPK25 (by clicking COMMIT – UPLOAD).
3. COMMIT – UPLOAD – Click this button to send the currently shown preset to the LPK25. The number
of this preset is determined by the EDIT PRESET field.
4. SAVE PRESET – Click this button to
save the currently shown preset to Note: When you save a preset, the current PRESET # will
your computer. be saved with it. When you load that preset later, the
5. LOAD PRESET – Click this button to PRESET # field will be updated with that number. If you
load a saved preset from your want to change the preset number before uploading it to
computer. Once it loads, you will see the LPK25, simply select a new PRESET # before clicking
its settings in the software interface. COMMIT – UPLOAD.
TO COPY A PRESET:
1. Load the preset you want to copy from the LPK25 by clicking the GET PRESET button.
2. Set the preset you want to copy it to on the LPK25 by clicking EDIT PRESET field and selecting it.
3. Click COMMIT – UPLOAD to send the copied preset to the LPK25.
2
4. EDITING PRESETS
This section outlines the editable items for each preset.
1. PRESET MIDI CHANNEL – Click this field to select the number of the MIDI channel which the LPK25
will use to transmit MIDI messages while using this preset.
2. TRANSPOSITION – Click on this field and drag up or down with the mouse (or use your keyboard's
or keys) to change the transposition of the LPK25's KEYBOARD. You can transpose it up to 12
semitones in either direction.
3. OCTAVE – Click this field to select the default octave for the preset.
4. ARP OCTAVE – Click this field to select the number of octaves (0-3) that an arpeggio will span. If this
number is larger than zero, after the first arpeggio in its original octave, subsequent arpeggios will
sound in increasingly higher octaves. After sounding at the highest octave (assigned here), the
process will repeat from the original octave.
5. ARP ENABLE – Click this button to enable or disable the Arpeggiator. The button is red when the
Arpeggiator is enabled.
6. ARP MODE – Click this field to select the mode for the Arpeggiator.
Up – Notes arpeggiate from the lowest note up to the highest note.
Down – Notes arpeggiate from the highest note down to the lowest note.
Inclusive – Notes arpeggiate from the lowest to the highest note and back down. Lowest and
highest notes are retriggered when the arpeggio changes direction.
Exclusive – Notes arpeggiate from the lowest to the highest note and back down. Lowest and
highest notes are not retriggered when the arpeggio changes direction.
Order – Notes will be repeated in the same order in which their keys were pressed.
Random – Plays the held notes in random selection.
7. ARP TIME DIVISION – Click this field to select the time division, which determines how often the
Arpeggiator will play a note. The smaller the value, the faster the arpeggio.
8. ARP CLOCK – Click this field to select whether the Arpeggiator will follow the LPK25's internal clock or
an external clock. (Note: When synced to an external clock, the LPK25's TAP TEMPO button will be
disabled.)
9. ARP LATCH – Click this button to enable or disable latching for the Arpeggiator. When this button is
red, latching is enabled, which means notes will continue to arpeggiate even after the key is no longer
being pressed. (Press the ARP ON / OFF button to stop the arpeggio.) When latching is disabled,
notes will only arpeggiate when their keys are held down.
10. TAP TEMPO TAPS – Click this field to select the minimum number of taps (of the TAP TEMPO button)
required to detect and enter a new tempo for the Arpeggiator.
11. TEMPO – Click on this field and drag up or down with the mouse (or use your keyboard's or keys)
to change the current tempo for the Arpeggiator.
3
5. MIDI IMPLEMENTATION CHART
Manufacturer: Akai Professional Model: LPK25 Version: 1.0 Date: 2009.05.15
Transmit/Export Recognize/Import Remarks
1. Basic Information
MIDI channels 1-16 1-16
Note numbers 0-127 0-127
Program change No No
Bank Select response? (Yes/No)
No No
If yes, list banks utilized in remarks column
Modes supported: Mode 1: Omni-On, Poly (Yes/No)
Mode 2: Omni-On, Mono (Yes/No)
Mode 3: Omni-Off, Poly (Yes/No) No No
Mode 4: Omni-Off, Mono (Yes/No)
Multi Mode (Yes/No)
Note-On Velocity (Yes/No) Yes No
Note-Off Velocity (Yes/No) No No
Channel Aftertouch (Yes/No) No No
Poly (Key) Aftertouch (Yes/No) No No
Pitch Bend (Yes/No) No No
Active Sensing (Yes/No) No No
System Reset (Yes/No) Yes No
Tune Request (Yes/No) No No
Universal System Exclusive:
Sample Dump Standard (Yes/No)
Device Inquiry (Yes/No)
File Dump (Yes/No)
MIDI Tuning (Yes/No)
Master Volume (Yes/No)
Master Balance (Yes/No)
Notation Information (Yes/No)
Turn GM1 System On (Yes/No) No No
Turn GM2 System On (Yes/No)
Turn GM System Off (Yes/No)
DLS-1 (Yes/No)
File Reference (Yes/No)
Controller Destination (Yes/No)
Key-based Instrument Ctrl (Yes/No)
Master Fine/Coarse Tune (Yes/No)
Other Universal System Exclusive
Manufacturer or Non-Commercial System Exclusive Yes Yes
NRPNs (Yes/No) No No
RPN 00 (Pitch Bend Sensitivity) (Yes/No)
RPN 01 (Channel Fine Tune) (Yes/No)
RPN 02 (Channel Coarse Tune) (Yes/No)
No No
RPN 03 (Tuning Program Select) (Yes/No)
RPN 04 (Tuning Bank Select) (Yes/No)
RPN 05 (Modulation Depth Range) (Yes/No)
2. MIDI Timing and Synchronization
MIDI Clock (Yes/No) No Yes
Song Position Pointer (Yes/No) No Yes
Song Select (Yes/No) No No
Start (Yes/No)
Continue (Yes/No) No Yes
Stop (Yes/No)
MIDI Time Code (Yes/No) No No
MIDI Machine Control (Yes/No) No No
MIDI Show Control (Yes/No)
No No
If yes, MSC Level supported
3. Extensions Compatibility
General MIDI compatible? (Level(s)/No)
No No
Is GM default power-up mode? (Level/No)
DLS compatible? (Levels(s)/No)
No No
(DLS File Type(s)/No)
Standard MIDI Files (Type(s)/No) No No
XMF Files (Type(s)/No) No No
SP-MIDI compatible? (Yes/No) No No
4
6. SPECIFICATIONS
Number of presets: 4
MIDI output channels over USB: 16
Note keys: 25 (velocity-sensitive)
Inputs/outputs: 1 USB-mini port
Power: < 100 mA, 5V DC via USB
Dimensions (W x D x H): 339 mm x 97 mm x 33 mm
Weight: 40 g
5