Orbital reconstruction
•Download as PPTX, PDF•
7 likes•965 views

Orbital reconstruction aims to restore the orbital anatomy and function by repairing injured tissues and returning the orbit to its premorbid form. The goals are to restore vision, eye movement, tear production, and facial aesthetics. Immediate repair is indicated for entrapped tissues causing eye problems or asymmetry, while delayed repair within 2 weeks can address diplopia or developing issues. Observation may be appropriate for minimal fractures without symptoms. A variety of materials can be used for orbital floor reconstruction including titanium, polyethylene, bone grafts, and preformed implants, each with advantages and disadvantages.

Recommended
More Related Content
What's hot
What's hot (20)
Similar to Orbital reconstruction
Similar to Orbital reconstruction (20)
More from Jamil Kifayatullah
More from Jamil Kifayatullah (20)
Recently uploaded
Recently uploaded (20)
Orbital reconstruction
- 2. Goal of orbital reconstruction • To return the patient to form and function by restoring the external and internal orbital anatomy to its premorbid form • To repair or reposition entrapped or injured tissues. Reference :Current therapies in omfs
- 3. AIMS OF ORBITAL SURGERY • TO RESTORE THE ANATOMICAL STRUCTURE TO ITS NATURAL AND AESTHETIC FORM • TO PRESERVE VISION • IMPROVE EYE MOVEMENT & LACRIMATION • TO RESTORE FACIAL AESTHETICS • (WARDBOOTH P.217)
- 4. AIM OF ORBITAL RECONSTRUCTION • TO ACHIEVE THE CORRECT PREINJURY ANATOMY OF SKELETON (P 861 LARS ANDERSON)
- 5. GOAL OF RECONSTRUCTION • TO RESTORE THE SHAPE OF THE ORBIT AND ORBITAL VOLUME WITH A RECONSTRUCTIVE MATERIAL.
- 7. Indications for Repair • Diplopia that persists beyond 7 to 10 days • Obvious signs of entrapment • Relative enophthalmos greater than 2mm • Fracture that involves greater than 50% of the orbital floor (most of these will lead to significant enophthalmos when the edema resolves) • Entrapment that causes an oculocardiac reflex with resultant bradycardia and cardiovascular instability • Progressive V2 numbness
- 8. Immediate repair • Nonresolving oculocardiac reflex with entrapment – Bradycardia, heart block, nausea, vomiting, syncope • Early enophthalos or hypoglobus causing facial asymmetry • “White-eyed” floor fracture with entrapment Clinical Recommendations for Repair of Isolated Orbital Floor Fractures, An Evidence-based Analysis, Michael A Burnstine, MD, Ophthalmology 2002; 109: 1207-1210.
- 9. Repair Within Two Weeks • Symptomatic diplopia with positive forced duction test • Large floor fracture causing latent enophthalmos • Significant hypoglobus • Progressive infraorbital hypesthesia Clinical Recommendations for Repair of Isolated Orbital Floor Fractures, An Evidence-based Analysis, Michael A Burnstine, MD, Ophthalmology 2002; 109: 1207-1210.
- 10. Observation • Minimal diplopia – Not in primary or downgaze • Good ocular motility • No significant enophthalmos • No significant hypoglobus Clinical Recommendations for Repair of Isolated Orbital Floor Fractures, An Evidence-based Analysis, Michael A Burnstine, MD, Ophthalmology 2002; 109: 1207-1210.
- 11. ABSOLUTE INDICATIONS OF ORBITAL FLOOR FRACTURE EXPLRATION 1) Acute enophthalmos (> 2 to 3 mm) and/or hypoopthalmos (>2 TO 3 mm) 2) Mechanical restriction of gaze associated with diplopia Reference: atlas of craniomaxillofacial surgery
- 12. Relative indications • conditions that can later cause enophthalmous and/or hypoophthalmous, theoretically 2-3 mm of a 1.5 cm to 2 cm2area of displaced wall or soft tissue can cause these deformities .these changes can be recognised ON CORONAL AND HORIZONTAL CT SCANS.
- 13. Trapdoor Fractures • Trapdoor fractures with entrapment differ in children and adults – Children repaired within 5 days of injury do better that those repaired within 6-14 days or those repaired > 14 days – There is no difference in early timing of adults (1-5 days or 6-14 days) – Adults repaired less than 14 days from injury have less long term sequela than those repaired greater than 14 days from injury The Differences of Blowout Fracture of the Inferior Orbital Wall Between Children and Adults, Kwon et al. Archives Oto head & Neck.
- 14. Orbital floor fracture WHEN TO OBSERVE • indicated in slightly or non-dislocated orbital floor fractures without disturbance of eye mobility, or in cases where patient condition does not allow surgical intervention. The decision to observe or to perform surgery is based on thorough evaluation; correction of a potential secondary deformity is challenging. Observation may also be considered in a significant orbital fracture of the only seeing eye.
- 15. Open treatment OF ORBITAL FLOOR # • The decision to perform open treatment or to observe is based on thorough clinical and radiographic (CT) evaluation. • Open treatment is indicated in the presence of: • Significant internal orbital defects proven by imaging • Disturbances of eye mobility that are the result of incarceration of ocular muscles • Enophthalmos • Exophthalmos secondary to blow-in fractures • Hypophthalmos
- 16. orbital floor fracture, Reduction with or without fixation • In some cases the orbital floor may be reduced and the fracture segment may be stable. Fixation may not be necessary. In other cases, a small plate can be used to maintain the position of the reduced trap door. In these cases, the patient should have close clinical follow-up.
- 17. orbital floor fracture, Reduction with or without fixation
- 18. Contraindications • Severe ocular trauma such as a rupture of the globe, hyphema, retinal detachment, traumatic optic nerve lesions, or other severe globe injury may necessitate delay of orbital wall repair. • General patient condition not allowing surgery • Orbital fracture in the only seeing eye (relative contraindication)
- 19. Orbital floor fracture, Reconstruction • The majority of cases require reconstruction of the orbital floor to support the globe position and restore the shape of the orbit as the bony walls are comminuted and/or bone fragments are missing. Reconstructing of the missing bone rather than reducing bone fragments can be achieved with different materials. • There is hardly any anatomic region in the human body that is so controversial in terms of appropriate material used for fracture repair: • Nonresorbable versus resorbable • Autogenous/allogenous/xenogenous versus alloplastic material • Non-prebent versus prebent (anatomical) plates • Standard versus custom-made plates • Nonporous versus porous material • Noncoated versus coated plates
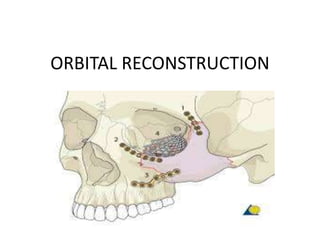
- 20. ORBITAL FLOOR # RECONSTRUCTION
- 21. ORBITAL FLOOR # RECONSTRUCTION • Many surgeons recommend materials that allow bending to an anatomical shape, that are radiopaque (to allow for intra- or postoperative radiologic confirmation of placement) and stable over time. • Recontouring of the dislocated orbital walls is demanding. Secondary changes to this contour are undesirable. This is why one must be critical in considering the use of resorbable materials • There are different preferences of implant material depending on regional differences, variations in schools of teaching, and socio- economic factors. There is a paucity of evidence to support the ideal choice for an orbital implant. Modern imaging analysis offers a unique chance to quantitatively assess the surgical result and stability over the time. This can provide valuable information for future recommendations.
- 22. Titanium meshes Advantages: • Availability • Stability • Contouring (eased by the artificial sterile skull) • Adequate in large three-wall fractures (the prebent plate is limited to medial wall and orbital wall fractures only). • Radiopacity • Spaces within the mesh to allow dissipation of fluids • No donor site needed • Tissue incorporation may occur
- 23. TITANIUM • strong, inert metal. It does not integrate but can be easily fixated to the surrounding bones and can provide excellent support for orbital structures. If bone resorption occurs, it may infrequently require removal. Overall, titanium mesh can be an excellent choice for orbital fracture repair and has a significant track record of safety
- 24. DISADVANTAGES • reoperations following implantation of titanium mesh are more difficult as fibrous scar tissue insinuates itself into the holes of the mesh . • COST • Possible sharp edges if not properly trimmed
- 25. TITANIUM MESH
- 26. Porous polyethylene sheets (PPE) Advantages: • Availability • Contouring (eased by the artificial sterile skull) • Smooth edges • Allows tissue ingrowth • Disadvantages: • Not radiopaque (not visible on postoperative images) • Lack of rigidity when a very thin wafer of PPE is used. When a thicker rigid wafer is used there is a risk of causing a dystopia. • Less drainage from the orbit than with titanium mesh
- 27. Porous polyethylene sheets (PPE)
- 28. Composite of porous polyethylene and titanium mesh • By combining titanium mesh with porous polyethylene the material becomes radiopaque, and more rigid than porous polyethylene of a similar thickness. Some surgeons also believe that there is less risk of retention from sharp barbs, which can lead to an entrapment of soft tissues during placement.
- 29. Composite of porous polyethylene and titanium mesh
- 30. Advantages Of composite of PPE WITH TITANIUM • Availability • Stability • Contouring (eased by the artificial sterile skull) • Adequate in large three-wall fractures (the prebent plate is limited to medial wall and orbital wall fractures only). • Radiopacity • No donor site needed • Tissue incorporation may occur
- 31. Disadvantages Of composite of PPE WITH TITANIUM • Less drainage from the orbit than with titanium mesh
- 32. Resorbable materials • Advantages: • Availability • Handling/contourability (only for thermoplastics) • Smooth surface and smooth edge
- 33. Resorbable materials • Disadvantages: • No radiopacity • Degradation of material with possible contour loss • Sterile infection / inflammatory response • Difficult to shape according to patients anatomy (only for non-thermoplastics) • Less drainage from the orbit than with uncovered titanium mesh (when nonperforated material is used)
- 35. Preformed orbital implant Advantages: • Radiopacity • Smooth surface • Minimal or no contouring necessary Disadvantages: • Cost
- 37. Bone graft • Advantages • Low material costs • Smooth surface • Variability in thickness • Radiopacity • Maximal biocompatibility • Periorbita readily dissects off of the bone in secondary reconstructions • Avoid risk of infected implant
- 38. Disadvantages • Additional donor site required (harvest time, pain, scar, and possible surgical complications) • Possible contour and dimensional changes due to remodeling • Difficult to shape to patients anatomy • Less drainage from the orbit than with titanium mesh
- 40. Medial orbital wall fracture Observation • Observation may be indicated in non- or slightly dislocated medial orbital wall fractures where increase in orbital volume is minimal and there is no disturbance of eye motility. Observation may also be necessary in cases where patient condition does not allow for surgical intervention. • The decision to observe or to perform surgery is based on thorough clinical and radiographic (CT) evaluation because correction of a potential secondary deformity is challengin
- 41. MEDIAL WALL # OBSERVE
- 42. Orbital medial wall fracture, Open treatment • The decision to perform orbital reconstruction or to observe is based on thorough clinical and radiographic (CT) evaluation. • Orbital reconstruction is indicated when there is/are: • Significant internal orbital defects proven by imaging • Disturbance of eye mobility as a result of incarceration of ocular muscles • Enophthalmos
- 43. Contraindications for opening • Contraindications: • Severe ocular trauma such as a rupture of the globe, hyphema, retinal detachment, traumatic optic nerve lesions, or other severe globe injury may require delay of orbital wall repair. • General patient condition not allowing surgery • Orbital fracture in the only seeing eye (relative contraindication)
- 44. options • Same as for floor
- 45. Combined orbital fracture (medial wall and orbital floor), Observation • Observation may be indicated in slightly or non- dislocated orbital wall fractures without disturbance of eye mobility, or in cases where patient condition does not allow surgical intervention. The decision to observe or to perform surgery is based on thorough evaluation; correction of a potential secondary deformity is challenging. Observation may also be considered in a significant orbital fracture of the only seeing eye.
- 46. Combined orbital fracture (medial wall and orbital floor), Observation
- 47. Combined orbital fracture (medial wall and orbital floor), Open treatment • The decision to perform orbital reconstruction or to observe is based on thorough clinical and radiographic (CT) evaluation. • Orbital reconstruction is indicated in the presence of: • Significant internal orbital defects proven by imaging • Disturbances of eye mobility that are the result of incarceration of ocular muscles • Enophthalmos • Exophthalmos secondary to blow-in fractures • Hypophthalmos
- 48. Combined orbital fracture (medial wall and orbital floor), Open treatment
- 49. Contraindications: • Severe ocular trauma such as a rupture of the globe, hyphema, retinal detachment, traumatic optic nerve lesions, or other severe globe injury may necessitate delay of orbital wall repair. • General patient condition not allowing surgery • Orbital fracture in the only seeing eye (relative contraindication)
- 50. • The majority of cases require reconstruction of the orbital walls to support the globe position and restore the shape of the orbit as the bony walls are comminuted and/or bone fragments are missing (see CT scan). It is therefore impossible to reduce the bony fragments. The orbital walls must be reconstructed. • Reconstruction of missing bone rather than reducing bone fragments can be achieved using various materials
- 52. Orbital roof fracture, Observation • Observation is often indicated, especially if there is no effect on the orbital shape and volume, or displacement of the globe. Depending on accompanying lesions (eg, CSF leak, injury to the dura) of the adjacent tissues, specific treatment of these accompanying lesions may be necessary and should be addressed. The decision to observe or to perform surgery is based on thorough evaluation because correction of a potential secondary deformity is challenging.
- 54. Orbital roof fracture, Open treatment • The decision to perform open treatment or to observe is based on thorough clinical and radiographic (CT) evaluation. • Open treatment is indicated when there is/are: • Significant internal orbital defects proven by imaging • Disturbance of eye or upper eyelid mobility • Exophthalmos secondary to blow-in fractures • Hypophthalmos
- 55. Contraindications • Severe ocular trauma such as rupture of the globe, hyphema, retinal detachment, traumatic optic nerve lesions, or other severe globe injury may require delay of orbital wall repair • General patient condition not allowing surgery • Orbital fracture in the only seeing eye (relative contraindication)
- 56. Surgical approaches • For access to orbital floor • Subciliary • Infraorbital • Transconjunctival
- 57. Subciliary lower-eyelid • The skin incision is made just below the eyelashes. Subsequent to the skin incision there are three optional pathways for the dissection down to the orbital rim: • Subcutaneous • Deep to the orbicularis oculi muscle • Step dissection or layered Converse technique
- 58. Subcutaneous DISSECTION • Subcutaneous dissection produces an extremely thin skin flap predisposed to scar contracture and hence a high incidence of ectropion. For access to the infraorbital rim the orbicularis muscle and the periorbita must be split below the infraorbital rim.
- 59. • In options 2(Deep to the orbicularis oculi muscle) and 3(Step dissection or layered Converse technique) the integrity of the orbital septum has to be meticulously preserved, otherwise there is a risk of vertical lid shortening. The incision through the periosteum for entry into the floor of the orbit is made beneath the infraorbital rim.
- 60. COMPLICATIONS ASSOCIATED WITH SUBCUTANEOUS AND DEEP TO ORBICULARIS OCULI MUSCLE Common complications Are: • skin buttonholes, • darkening of the skin, • ectropion, and • occasionally entropion
- 61. WHAT IS ECTROPION • Ectropion is an abnormal eversion (outward turning) of the lid margin away from the globe. Without normal lid globe apposition, corneal exposure, tearing, keratinization of the palpebral conjunctiva, and visual loss may result.
- 62. DEEP TO THE ORBICULARIS DISSECTION • The path of dissection deep to the orbicularis oculi muscle includes the pretarsal orbicularis muscle in the elevated skin muscle flap if the skin incision is placed across the tarsus. Motor denervation can critically reduce lower lid tone and diminish vertical lid support.
- 63. Step dissection • The step dissection is technically easier than the other two methods. It preserves pretarsal fibers of the orbicularis oculi, thereby limiting scarring at the eyelid margin.
- 64. The advantages of the step dissection • imperceptible scar and • the ease of extending laterally for additional exposure of the entire lateral orbital rim.
- 65. Evaluation of skin creases • The skin creases around the orbit are evaluated carefully. If a lateral extension of the subciliary incision line is anticipated, it is useful to mark the lateral tail of the skin crease that passes inferiorly. The lateral extension of the subciliary incision always follows the natural crease. If edema obscures the direction of skin creases, one may look at the contralateral eyelid to determine the direction and position of the creases.
- 66. Evaluation of skin creases
- 67. Marking of skin incision • Marking of the incision line is planned just below the eyelashes paralleling the lid margin. The lateral extension runs out into a natural skin crease. It can reach approximately 2 cm past the lateral canthus. Next, the lower eyelid may be infiltrated using a local anesthetic containing a vasoconstrictor.
- 68. Marking of skin incision
- 69. Marking of skin incision
- 70. Subcutaneous dissection • A skin flap over the pretarsal portion of the orbicularis oculi muscle is developed along the entire extent of the incision.
- 72. Sc dissection • This skin flap goes inferiorly over an approximate distance of 4-6 mm. This is performed by sharp dissection with scalpel or scissors. Clinical example shows the separation of the pretarsal skin flap. The intact muscular portion of the orbicularis oculi is revealed. •
- 74. Undermining of orbicularis • The approach is continued in stepwise fashion. The orbicularis oculi layer is undermined and a dissection plane between the muscle and the septum orbitale is created. • The suborbicular undermining begins with a slit-like lateral incision of the muscle over the bony infraorbital rim.
- 76. OPENING OF PLANE • Next, the suborbicular dissection plane is opened by spreading the introduced scissors. This leaves the orbital septum intact. The suborbicular pocket is extended downwards over the anterior edge of the infraorbital rim.
- 77. OPENING OF SUBORBICULARIS PLANE
- 78. Extending and Opening of pocket • The pocket is extended over the whole lower palpebral region. Finally, the upper portion of the pocket below the tarsus is opened with the spreading scissors. This allows for the step incision of the muscle.
- 79. Extending and Opening of pocket
- 80. Incision between pretarsal and preseptal portions of orbicularis oculi muscle • The remaining orbicularis oculi muscle layer is then separated at the level just below the lower border of the tarsus to complete the step incision. This enables retraction of the lower lid as a skin muscle flap. •
- 81. Periosteal incision over the infraorbital rim • The skin muscle flap is retracted inferiorly over the anterior edge of the infraorbital rim along its whole horizontal extent. • An incision through the periosteum at this level should avoid the orbital septum and is inclined to the lateral side. •
- 82. Periosteal incision over the infraorbital rim
- 83. Subperiosteal dissection of anterior maxilla and/or orbit • Periosteal elevators are then used to strip the periosteum from the underlying osseous skeleton. The infraorbital nerve is located below the medial portion of the infraorbital rim and can be approached after the periosteal incision is made. After identifying the infraorbital foramen and the nerve exit zone, the upper facial surface of the anterior maxilla can be dissected in the subperiosteal plane. • The infraorbital rim is exposed superiorly for the subsequent periorbital dissection. •
- 84. Subperiosteal dissection of anterior maxilla and/or orbit
- 85. Schematic view of the subperiosteal dissection of the anterior maxilla and the dissection of the periorbita (= periosteum of the orbital cavity).
- 86. Closure • Closure can be performed in two or three layers: • Periosteum • Muscle (optional) • Skin • The periosteum is redraped over the bony surfaces and closed with resorbable interrupted sutures.
- 87. Closure
- 88. Suturing of orbicularis • Suturing of the orbicularis oculi muscle is optional in a limited approach. It is recommended if the approach is extended with vertical cuts through the muscle and/or excessive stripping over the zygomatic body. • Resorbable interrupted sutures are placed laterally, in particular when the orbicularis oculi muscle has been cut at this position.
- 89. Closure of skin wound • The skin wound is closed with a 6-0 nonresorbable or fast-resorbing suture. Either running or interrupted sutures can be used.
- 90. Closure of skin wound
- 92. Subciliary more clear concept • The subciliary, or blepharoplasty incision, is made approximately 2 mm inferior to, and parallel with, the superior free margin of the lower lid. It extends from the medial canthal region into or parallel to one of the resting skin tension lines located along the lateral aspect of the orbit, which usually turn slightly inferiorly. Once the incision has been made, the dissection can be made 1 of 2 ways depending on the path of dissection through the orbicularis oculi muscle.
- 93. Skin only techinique • With the skin-only technique the dissection is entirely between the skin and orbicularis muscle to the level of the infraorbital rim.
- 94. Skin muscle flap • The skin-muscle technique differs in that the flap is made by dissecting through the orbicularis muscle either initially, or in a stepped manner, first dissecting the skin for several millimeters before penetrating the orbicularis oculi muscle. Both of these approaches preserve the position of the pretarsal orbicularis oculi muscle. However, when the skin and orbicularis muscle are incised coincidently, no orbicularis oculi muscle is left attached to the inferior tarsus. With either method, once the orbital rim is reached, an incision through the periosteum is made and subperiosteal dissection exposes the orbital region of interest.
- 95. Infraorbital incision, • the skin, orbicularis oculi muscle, and periosteum are incised coincidently. This approach, relative to the other transcutaneous approaches, provides the quickest and most direct route to the orbital rim and floor. • Disadvantages: visible scar
- 96. Subtarsal lower-eyelid approach • Evaluation of skin creases
- 97. Marking of skin incision • Marking of the incision line is planned in a natural crease at a level below the inferior margin of the lower tarsus. If edema obscures the direction of skin creases, the contralateral eyelid determines the direction and position of the creases. The incision is diagonally oriented and starts medially about 2–3 mm below the lid margin and courses in a laterocaudal direction.
- 98. Marking of skin incision
- 99. LA • Next, the lower eye lid may be infiltrated using a local anesthetic containing a vasoconstrictor.
- 100. Skin incision • The initial incision can be made through skin and orbicularis musculature. However, it can also be performed only through the skin as demonstrated here.
- 101. • The orbicularis muscle is exposed.
- 102. Dissection of the orbicularis muscle layer • The muscle is elevated laterally from the orbital septum and a small slit is opened using scissors.
- 103. ORBICULARIS DISSECTION • Through this opening, the orbicularis muscle is undermined in the preseptal space.
- 104. ORBICULARIS DISSECTION • Then the muscle layer is separated from laterally to medially along the course of the muscle fibers leaving the orbital septum intact.
- 105. Orbital dissection • The dissection proceeds inferiorly in a preseptal suborbicular plane until the infraorbital bony margin is reached.
- 106. suborbicular dissection • The suborbicular dissection can be carried out sharply using a scalpel, always adhering to the muscle plane
- 107. suborbicular dissection • Alternatively, a pair of scissors can be used for suborbicular blunt dissection with spreading motions.
- 108. Exposure of infraorbital rim • The infraorbital rim is dissected in a supraperiosteal plane.
- 109. Subperiosteal dissection • To gain access to the orbit, the periosteum over the infraorbital rim is incised starting laterally at a level below the rim.
- 110. • The infraorbital rim is exposed superiorly for the subsequent periorbital dissection.
- 111. Periorbital dissection • The periorbital dissection is continued to expose any fractures of the orbital walls in the infero-mediolateral circumference of the bony cavity.
- 112. • Wound closure • After repair of the orbital walls, the subtarsal approach is closed in layers starting with the periosteum. Next, the orbicular muscle layer is reapproximated as shown.
- 113. • Intraoperative appearance after closure of the orbicularis muscle.
- 114. • Skin closure with running or interrupted sutures. The latter is shown here.
- 115. Suspensory suture for lower eyelid • Transcutaneous lower-eyelid approaches may be complicated by vertical scar contraction during the healing period with an ectropion. Skin and septal scaring may be counteracted by so called Frost sutures. • This is a mattress suture through the Gray line of the lower lid and is applied at the end of the operation. It lengthens the lower eyelid when it is taped to the forehead. This creates traction for several days until the wound healing has passed its first critical phase.
- 116. Suspensory suture for lower eyelid
- 117. • The taping to the forehead is done in several layers in order to suspend the suture firmly and prevent downward slippage. • The suture is positioned over a first layer of tape which is applied directly to the skin. It is then secured with a second tape over it. • Next, the suture is folded over this second layer and another strip of tape secures it finally. •
- 119. • Postoperative examination of vision is possible by either removing the two uppermost layers of tape and opening both eyelids or by reflecting the upper eyelid only.
- 120. Transconjunctival lower-eyelid approaches • Transconjunctival lower-eyelid approaches are performed in several ways. • A) Transconjunctival (inferior fornix transconjunctival using a retroseptal or preseptal route) B) Transcaruncular (=medial transconjunctival) C) Transconjunctival with lateral skin extension(lateral canthotomy/”swinging eyelid”) D) Combination of inferior (A) and medial (B) transconjunctival E) C-shaped incision (ie, Combination of inferior (A) and medial transconjunctival (B) plus lateral skin extension (C))
- 121. transconjunctival
- 122. Access areas • The typical (lower fornix) transconjunctival approach in the lower eyelid exposes the floor of the orbit and infraorbital rim as well as the upper edge of the anterior maxilla (A). Via a pre- or transcaruncular incision, the medial wall of the orbit behind the posterior lacrimal crest can be exposed (B). The combination of the lower fornix and the medial transconjunctival approach provides access to both previously mentioned areas at a time.
- 124. Access areas TC
- 125. ACCESS • Extensions: • • Lateral Skin / Lateral Canthotomy (“Swinging Eyelid”) • If a canthotomy is performed in conjunction with the lower fornix transconjunctival approach, the lateral orbital rim and wall can additionally be accessed (C).
- 126. C-shaped Incision • The C-shaped incision combines the medial and inferior transconjunctival approach with the lateral canthotomy and provides the maximal exposure of the medio-inferolateral orbit and the zygomatic body.
- 127. Complications • Transconjunctival approaches demand surgical precision in execution because several complications can occur: • Damage and abrasion to the cornea • Damage to extraocular muscles • Eyelid malposition • A thorough evaluation is essential to choose the appropriate lower eyelid approach (eg, a snap- back test to assess the laxity of the eyelid).
- 128. Surgical routes • The typical inferior fornix transconjunctival approach can use two different routes to access the infraorbital rim: • Retroseptal • Preseptal • These two approaches vary in relation to the orbital septum on the pathway to the infraorbital rim. Controversy exists on the advantages and disadvantages of these two surgical routes. We explain the retroseptal approach in more detail.
- 129. Retroseptal - route • The retroseptal route enters directly into the fat compartments of the lower eyelids.
- 130. RETROSEPTAL ROUTE • After vasoconstriction and insertion of a corneal shield two or three traction sutures are place through the lower eyelid. • After eversion of the lower eyelid, the position of the lower border of the tarsal plate is identified. • The incision is placed in the depth of the fornix. For the incision, scissors, scalpels, or electrocautery can be used. • When using scissors, the conjunctiva is elevated laterally with a fine forceps and incised over a distance of about 8 mm including the lower-eyelid retractors.
- 132. Retroseptal – Incision and dissection • Starting from the initial transconjunctival incision, the conjunctiva and the lower-eyelid retractors are undermined towards the inner angle of the lids.
- 133. Medial extension and fat exposure • Then the incision line is extended from laterally to medially to expose the fat compartment behind the orbital septum.
- 134. Alternative: scalpel or electrocautery incision • Instead of using scissors, the transsection of the conjunctiva and the lower-eyelid retractors can be carried out using a scalpel. Prior to this, the conjunctival tissues of the lower fornix are spanned over the infraorbital rim using a spatula and to small retractors.
- 135. scalpel or electrocautery incision
- 136. Retroseptal – Incision of the periorbita • The lower lid is retracted downwards to expose the periorbita just behind the edge of the infraorbital rim. • (If it was decided to suture the posterior edge of the conjunctival flap as corneal protection, this is done now). • Next, the periorbita is incised parallel but just posterior to the infraorbital rim. • Once the infraorbital rim is exposed the periorbital dissection can be performed in the usual fashion
- 137. Retroseptal – Incision of the periorbita
- 139. dissection
- 140. Retroseptal - Closure • Closure of the periosteum or the periorbita respectively is not possible. The conjunctival incision is closed with a running 6-0 fast- absorbing suture. The suture ends may be buried or guided transcutaneously to bury the knots.
- 141. Retroseptal closure
- 142. Preseptal - Route • Principle The preseptal route requires entering the suborbicularis oculi/preseptal space above the fusion of the lower lid retractors and the orbital septum. This allows direct visualization of the septum.
- 143. • After vasoconstriction and insertion of a corneal shield, two or three traction sutures are place through the lower eyelid. • After eversion of the lower eyelid, the position of the lower border of the tarsal plate is identified. • The posterior edge of the conjunctiva is tented and secured with a stay suture and traction is applied to lift the conjunctiva while the lid margin is everted. The lower border of the tarsal plate is raised upward in this manner.
- 144. stay suture to secure conjunctiva
- 145. Preseptal – Incision and blunt dissection • The incision is made directly below the lower tarsal border and the suborbicularis oculi/preseptal space is entered. • The incision is made using fine scissors starting laterally or a scalpel/electrocautery. Hemostasis is achieved with bipolar coagulation.
- 146. Preseptal – Incision and blunt dissection
- 147. • Blunt preseptal dissection is performed until the infraorbital rim is reached in the supraperiosteal plane. • At this point, the corneal shields are removed and the cephalic edge of the conjunctival flap is pulled up to be sutured to the upper lid for corneal protection. •
- 149. • Once the infraorbital rim is exposed, the periorbital dissection can be performed in the usual fashion. •
- 150. Preseptal - Closure • In the preseptal approach, the periosteum over the periorbital rim can be closed. The transconjunctival incision is closed using a 6-0 resorbable running suture with the suture ends either buried or guided through the skin externally to bury the knots. • An accurate alignment of the conjunctival flaps must be guaranteed.
- 151. Preseptal closure
- 152. The caruncula lacrimalis, or lacrimal caruncle • small, pink, globular nodule at the inner corner (the medial angle) of the eye. It is made of skin covering sebaceous (oil) and sudoriferous (sweat) glands. • With ocular allergies, the lacrimal caruncle and plica semilunaris may be inflamed and pruritic (itchy) due to histamine release in the tissue and tear film. • When healthcare providers instill ophthalmic medications into the eye, they apply gentle pressure to the Inner Canthus with the eyes closed, over the lacrimal caruncle, to delay drainage of the drug down the punctum, or tear duct opening, thus preventing systemic absorption of the drug
- 153. Transconjunctival lower-eyelid approaches - transcaruncular • Principles • The medial orbital wall can be exposed using a medial conjunctival incision posterior to the lacrimal drainage system along the semilunar fold. The incision is either precaruncular or transcaruncular.
- 154. TRANSCARUNCULAR
- 155. TRANSCARUNCULAR • The dissection pathway is continued inside the periorbital soft tissues until the posterior lacrimal crest is reached. The posterior limb of the medial canthus as well as the lacrimal system is left intact. Along the posterior lacrimal crest, the periorbita is incised and the medial orbital wall is dissected directly on the bony surface.
- 156. TRANSCARUNCULAR
- 157. TRANSCARUNCULAR • Anatomic specimen showing the precaruncular incision (caruncula grasped with forceps) and the dissection pocket inside the periorbita medially to Horner’s muscle. For better visualization the lower lid has been incised and reflected.
- 158. HORNERS MUSCLE • Additional parts of the orbicularis have been given separate names—namely, Horner’s muscle and the muscle of Riolan; they come into close relation with the lacrimal apparatus and assist in drainage of the tears. The muscle of Riolan, lying close to the lid margins,..
- 159. HORNERS MUSCLE • Retraction of the lateral conjunctival edge to fully show Horner’s muscle.
- 160. TRANSCARUNCULAR • After vertical incision of the periorbita posterior of the insertion of Horner’s muscle, the medial orbital wall is exposed. The retractor is located just in front of the anterior ethmoidal artery.
- 161. Vasoconstriction • The conjunctiva in the area of the semilunar fold and the caruncle may be infiltrated with a vasoconstrictor. This is done about 7-10 min prior to the incision so that any distortion of the structures can settle by diffusion of the agent.
- 162. VASOCONSTRICTION
- 163. Incision • The upper and lower eyelids next to the medial angle are retracted with traction sutures. Damage to the lacrimal puncta and canaliculi should be avoided. Alternatively, Desmarres or Green retractors can be used. Additionally, the globe can be moved laterally with malleable Jaeger lid plate retractor or broad spatula. • These maneuvers flatten the caruncle and improve visibility of the incision area. • The initial incision with scissors is placed pre- or transcaruncular while the caruncle is grasped with a delicate forceps and pulled laterally.
- 164. INCISION
- 165. INCISION
- 166. Subconjunctival dissection • Gradually, the incision is extended vertically over a distance of 12-15 mm through the conjunctiva.
- 167. DISSECTION TRANSCARUNCULAR • The soft-tissue space deep to the caruncle is spread in a posteromedial direction on top of Horner’s muscle. Following the surface of the muscle the dissection will proceed directly to the posterior lacrimal crest where the muscle inserts. The tip of the scissors may be used to palpate the underlying bone.
- 169. • A malleable retractor or periosteal elevator is inserted and directed against the medial orbital wall behind the posterior lacrimal crest.
- 170. TRANSCARUNCULAR
- 171. Periosteal incision and exposure • The periorbita along the posterior lacrimal crest is incised in a superoinferior direction with a spreading motion of sharp, pointed scissors.
- 172. Periosteal incision and exposure
- 173. PERIOSTEAL INCISION AND EXPOSURE
- 174. Subperiosteal dissection and exposure of medial orbital wall • Subperiosteal dissection begins with periosteal elevation. The retractor or periosteal elevator is gradually inserted into the pocket along the bony surface. The medial orbital wall is exposed with sweeping motions from superior to inferior in order to obtain a wide entrance. The ethmoidal arteries indicate the superior extent of the surgical cavity while the inferior extension is limited only by the retractability of the globe
- 175. Subperiosteal dissection and exposure of medial orbital wall
- 177. Closure • The periorbita is usually not closed. The conjunctiva and the caruncular area are sutured using 6-0 resorbable sutures, either interrupted or partially uninterrupted. The suture ends may be buried. •
- 178. CLOSURE
- 179. fornix
- 180. fornix • The fornix of the conjunctivae refers to loose arching folds connecting the conjunctival membrane lining the inside of the eyelid with the conjunctival membrane covering the eyeball. • In anatomy, a vault like or arched structure. "Fornix" is the Latin word for "vault or arch."
- 181. transconjunctival with lateral skin extension • General consideration • The lower transfornix transconjunctival incision can be extended with a lateral skin incision which is then enhanced by a lateral canthotomy. The lateral extension can be combined with a transconjunctival incision via either the preseptal or retroseptal route. The approach can be started with the lateral canthotomy and continued medially into the transconjunctival approach or reversely. We describe the former option.
- 182. transconjunctival with lateral skin extension
- 183. Vasoconstriction • The conjunctiva in the area of the lower fornix and the area of the lateral canthotomy may be infiltrated with small amount of local anesthetic containing a vasoconstrictive agent.
- 184. vasoconstriction
- 185. vasoconstriction
- 186. Arcus marginalis • The Arcus Marginalis(AM) is the bone attachment of the orbital septum. Think of the orbital septum as a "dam" holding back the lower eyelid fat and the AM is at the bottom of the dam. As we age, the orbital septum loses its elasticity and begins to bulge out forming a "bag". The rate at which we lose this elasticity is different from person to person and depends on many factors. This bulging is also enhanced by the deflation and dropping of the cheek and sub-obicularis oculi fat pads - just like the outgoing tide reveals the rocks on the beach.
- 191. Orbital septum • The orbital septum is a thin sheet of fibrous tissue that originates in the orbital periosteum and inserts in the palpebral tissues along the tarsal plates. The orbital septum provides a barrier against the spread of periorbital infections into the orbit proper
- 193. Tarsas (eyelids) • The tarsi (tarsal plates) are two comparatively thick, elongated plates of dense connective tissue, about 2.5 cm (1.0 in) in length; one is found in each eyelid, and contributes to its form and support. They directly abut the lid margins.[1] The tarsus has a lower and upper part making up the palpebrae. •
- 196. What are transcutaneous approaches? • The subciliary, subtarsal, and infraorbital incisions are collectively considered the transcutaneous approaches to the orbital floor and infraorbital rim
- 197. Enophthalmous • Enophthalmos is the recession of the ocular globe within the bony orbit.
- 199. Enophthalmos • Two to three millimeters of enophthalmos is clinically detectable, and more than 5 mm is disfiguring.
- 200. Cornea position • In the uninjured state, the cornea extends approximately 16-17 mm anterior to the lateral orbital rim. Immediately after injury, however, globe position may appear normal or proptotic owing to soft tissue swellin
- 201. Traumatic enophthalmos • Traumatic enophthalmos is the most common residual deformity in complex orbital injuries. The underlying cause is a discrepancy between the volume of the bony cavity and its contents. The intraorbital soft tissue envelope may diminish in volume, as a result of atrophy or displacement of fat from within the intramuscular cone, cicatricial retraction of the ocular muscles, or entrapment of the supporting ligament system.
- 202. Traumatic enophthalmos • in posttraumatic enophthalmos, the mechanisms that determine globe position are: 1) the enlargement of the orbital cavity; 2) the herniation of orbital fat into the maxillary sinus; and 3) fat atrophy, loss of ligament support, and scar contracture.
- 203. Traumatic enophthalmos • the most well accepted concept is the enlargement of the orbital cavity after displacement due to orbital fractures. Generally, a 1 cm3 increase in orbital volume causes 0.8 mm of enophthalmos • Chang Gung Med J 2006 May-Jun;29(3):251-61. Management of posttraumatic enophthalmos.
Editor's Notes
- ECTROPION