The document outlines a syllabus for a Non-Destructive Testing (NDT) course, covering fundamental concepts, various testing methods, their advantages, and limitations. It details units on visual inspection, liquid penetrant tests, magnetic particle tests, radiography, ultrasonics, and thermography, providing insights into their applications in engineering. The document serves as both a course framework and a reference guide for students and professionals in the field of materials evaluation and structural integrity assessment.
Overview of NDT with academic details, course objectives defined, syllabus structure introduced.
Detailed syllabus layout with topics related to NDT methods, including visual, liquid penetrant, and magnetic particle tests.
Introductory insights into NDT principles versus conventional testing, addressing merits, limitations, and common methods.
Description and significance of visual inspection, alongside its principles and role in NDT methods.
Introduction to characteristics and methods of liquid penetrant testing, including developers and applications.
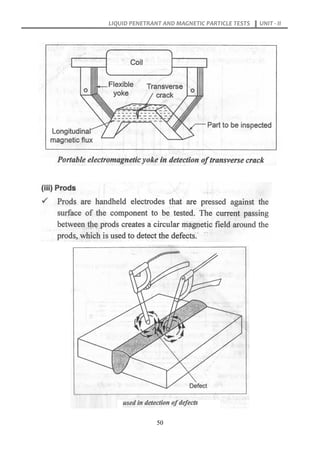
Principles, processes, advantages, and limitations of magnetic particle testing in detecting surface and sub-surface flaws.
Essentials of radiography including x-ray production, properties, and its operational characteristics within NDT.
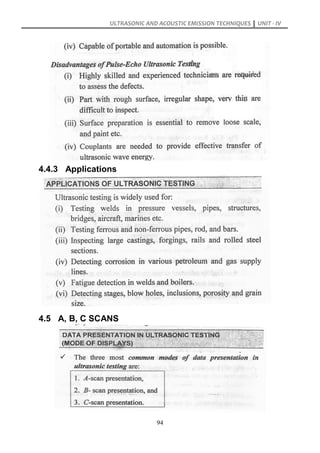
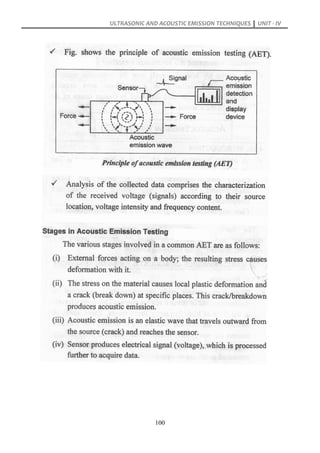
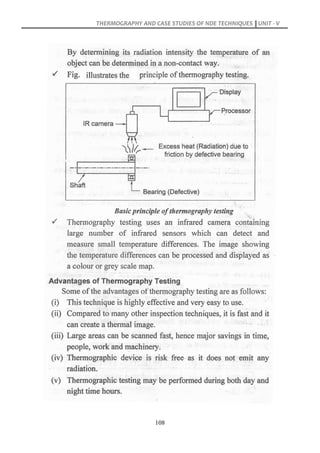
Overview of ultrasonic and acoustic emission techniques, generation methods of ultrasonic waves, and applications.Principles of thermography, its applications, and case studies demonstrating the effectiveness of various NDE methods.
Details on optical and acoustical holography, explaining classifications, principles, and imaging systems.
Analysis of defects through various NDT methods, focusing on case studies of welded, cast, and formed components.
III
16MFPE05 - NONDESTRUCTIVE EVALUATION
COURSE OBJECTIVE:
To familiarize the principles of non-destructive material and to introduce non destructive
evaluation in engineering applications
UNIT - I CONCEPTS OF NDT (9)
Relative merits and limitations of NDT Vs. Conventional testing –Visual inspection,
thermal inspection methods. Liquid penetrate Inspection
UNIT – II LIQUID PENETRANT AND MAGNETIC PARTICLE TESTS (9)
Characteristics of liquid penetrates - different washable systems - Developers -
applications - Methods of production of magnetic fields - Principles of operation of
magnetic particle test - Applications - Advantages and limitations.
UNIT - III RADIOGRAPHY (9)
Sources of ray-x-ray production - properties of d and x rays - film characteristics -
exposure charts - contrasts - operational characteristics of x ray equipment -
applications.
UNIT – IV ULTRASONIC AND ACOUSTIC EMISSION TECHNIQUES (9)
Production of ultrasonic waves - different types of waves - general characteristics of
waves - pulse echo method –A, B, C scans - Principles of acoustic emission techniques
- Advantages and limitations - Instrumentation - applications.
UNIT - V THERMOGRAPHY (9)
Thermography - Principles, types, applications, advantages and limitations. Optical
and Acoustical holography- Principles, types, applications, advantages and
limitations. Casestudies: weld, cast and formed components.
Contact Periods: Lecture: 45 Periods Total: 45 Periods
REFERENCE BOOKS:
1. Barry Hull and Vernon John, "Non Destructive Testing ", MacMillan, 1988
2. American Society for Metals, “Metals Hand Book ", Vol.II, 1976
3. Hull. “Non Destructive Testing”. ELBS Edition. 1991
4. Baldevraj.,Jayakumar.T., Thavasimuthu. M., “Practical Non-destructive Testing”.
Narosa Publishers. 1997
5. McGonnagle. W.T. “Non-Destructive Testing”, McGraw Hill. 1961
6. ASM Metals Hand Book. Vol. (9). “Non-destructive Testing and Inspection”, 1988
7. C.Hellier, Hand Book “Non-Destructive Evaluation”, McGraw-Hill Professional,1st
Edition,2001.
L T P C
3 0 0 3
4.
IV
TABLE OF CONTENTS
TITLEPAGE
No.
SYLLABUS iii
UNIT I – CONCEPTS OF NDT 01
1.0 INTRODUCTION 02
1.0.1 CONVENTIONAL TESTING (DESTRUCTIVE TESTING) 03
1.0.2 NON-DESTRUCTIVE TESTING (NDT): 03
1.1 RELATIVE MERITS AND LIMITATIONS OF
NDT VS. CONVENTIONAL TESTING
04
1.1.1 MERITS OF CONVENTIONAL TESTING
(DESTRUCTIVE TESTING)
04
1.1.2 LIMITATIONS OF CONVENTIONAL TESTING
(DESTRUCTIVE TESTING)
05
1.1.3 MERITS OF NON-DESTRUCTIVE TESTING 05
1.1.4 LIMITATIONS OF NON-DESTRUCTIVE TESTING 06
1.2 VISUAL INSPECTION 08
1.2.1 BASIC PRINCIPLE OF VISUAL INSPECTION 09
1.2.2 TYPES OF VISUAL TESTING 10
1.3 THERMAL INSPECTION 15
1.4 LIQUID PENETRATE INSPECTION 17
1.4.1 PRINCIPLE OF LIQUID PENETRANT INSPETION 17
1.4.2 LIQUID PENETRANT TEST PROCESS 19
5.
V
UNIT – II- LIQUID PENETRANT AND MAGNETIC
PARTICLE TESTS
24
2.1 CHARACTERISTICS OF LIQUID PENETRATES 25
2.2 DEVELOPERS 32
2.2.1 TYPES OF DEVELOPERS 34
2.3 PENETRANTS TESTING METHODS (OR)
DIFFERENT WASHABLE SYSTEMS
37
2.3.1 WATER WASHABLE PENETRANT TECHNIQUE 37
2.3.2 POST-EMULSIFIABLE PENETRANT TECHNIQUE 39
2.3.3 SOLVANT REMOVABLE PENETRANT TECHNIQUE 43
2.4 EQUIPMENT FOR LIQUID PENETRANT TESTING &
APPLICATIONS
45
2.5 METHODS OF PRODUCTION OF MAGNETIC
FIELDS
48
2.6 PRINCIPLES OF OPERATION OF MAGNETIC
PARTICLE TEST
54
2.6.1 PRINCIPLES OF MAGNETIC PARTICLE TESTING 54
2.6.2 MAGNETIC PARTICLE TESTING PROCESS 56
2.7 ADVANTAGES AND LIMITATIONS 59
2.8 APPLICATIONS 60
UNIT – III - RADIOGRAPHY 61
3.0 INTRODUCTION 62
3.1 SOURCES OF RAY-X-RAY PRODUCTION 63
6.
VI
3.2 PROPERTIES OFGAMMA AND X RAYS 65
3.3 FILM CHARACTERISTICS 66
3.4 SCREENS AND FILTERING 73
3.5 CONTRASTS 74
3.6 EXPOSURE CHARTS 76
3.7 OPERATIONAL CHARACTERISTICS OF X-RAY
EQUIPMENT
78
3.8 APPLICATIONS 82
UNIT - IV - ULTRASONIC AND ACOUSTIC EMISSION
TECHNIQUES
83
4.0 INTRODUCTION 84
4.1 PRODUCTION OF ULTRASONIC WAVES 84
4.1.1 GALTON WHISTLE 84
4.1.2 MAGNETOSTRICTION GENERATOR 85
4.1.3. PIEZOELECTRIC GENERATOR 86
4.2 DIFFERENT TYPES OF WAVES 87
4.3 GENERAL CHARACTERISTICS OF WAVES 89
4.4 ULTRA SONIC TESTING METHODS 90
4.4.1 TRANSMISSION METHOD 91
4.4.2 PULSE ECHO METHOD 92
4.4.3 APPLICATIONS 94
7.
VII
4.5 A, B,C SCANS 94
4.6 PRINCIPLES OF ACOUSTIC EMISSION
TECHNIQUES
99
4.7 ADVANTAGES AND LIMITATIONS 101
4.8 INSTRUMENTATION 102
4.9 APPLICATIONS 104
UNIT – V THERMOGRAPHY 105
5.0 INTRODUCTION 106
5.1 PRINCIPLES, ADVANTAGES AND LIMITATIONS 107
5.2. APPLICATIONS 110
5.3. ELEMENTS OF INFRARED DETECTION SYSTEM 111
5.4 CLASSIFICATIONS AND TYPES 115
5.4.1 PASSIVE APPROACH 117
5.4.2 ACTIVE APPROACH 118
5.4.2 .1 Pulsed Thermography 122
5.4.2.2 Lock-In Thermography 127
5.4.2.3 Burst Vibro Thermography 130
5.4.2.4 Lock in Vibro Thermography 132
5.4.3 NON-CONTACT THERMOGRAPHY TEST 136
5.5 OPTICAL AND ACOUSTICAL HOLOGRAPHY 138
8.
VIII
5.6. TYPES OFOPTICAL - ACOUSTICAL IMAGING
SYSTEMS
141
5.6.1 LIQUID SURFACE DEFORMATION 143
5.6.2 BRAFF DIFFRACTION (or) DIRECT SOUND-LIGHT
INTERACTION
144
5.6.3 LASER BEAM SCANNING 147
5.6.4 ELECTRON BEAM SCANNING OF DEFORMED
SURFACE
147
5.6.5 SOKOLOV IMAGE TUBE CONVERTER 148
5.6.6 METAL FIBER FACE 150
5.6.7 PYROELECTRIC IMAGE CONVERTER AND IMAGE
STORAGE
151
5.6.8 ELECTROSTATIC TRANSDUCER 152
5.6.9 PIEZOELECTRIC ARRAY WITH ELECTRONIC
FOCUSING AND SCANNING
152
5.6.10 FREQUENCY SWEPT HOLOGRAPHIC IMAGING 154
5.6.11 ZONE-PLATE ACOUSTIC IMAGING DEVICES 155
5.6.12 ACOUSTIC TOMOGRAPHY 156
5.6.13 PIEZORESISTIVE IMAGE CONVERTER 157
5.6.14 ELECTROLUMINESCENT ACOUSTIC-IMAGE
DETECTOR
158
5.6.15 SOLID AND LIQUID CRYSTAL ACOUSTIC
DISPLAYS
159
5.6.16 POHLMAN CELL 160
5.6.17 OIL THERMOPLASTIC and PHOTOPLASTIC FILMS 160
9.
IX
5.7 CASE STUDIES162
5.7.0 SELECTION OF NDT METHODS 162
5.7.1 DEFECTS IN WELD, CAST AND FORMED
COMPONENTS
162
5.7.1.1 Discontinuities and Types 163
5.7.1.2 Inherent Discontinuities 164
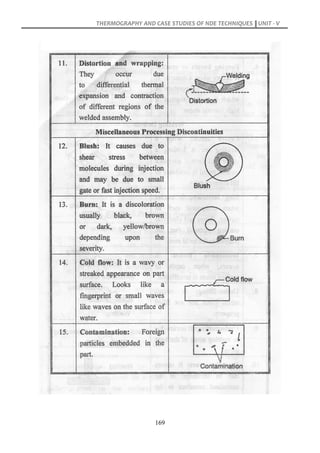
5.7.1.3 Processing Discontinuities 167
5.7.1.4 Service-Induced Discontinuities 170
5.7.2 STUDIES ON DEFECTS - LIQUID PENETRATE TEST
SAMPLES
172
5.7.3 STUDIES ON DEFECTS - MAGNETIC PARTICLE
TEST SAMPLES
175
5.7.4 DEFECT IDENTIFICATION TECHNIQUES IN
RADIOGRAPHIY TESTS
176
5.7.5 STUDIES ON DEFECTS IDENTIFICATION –
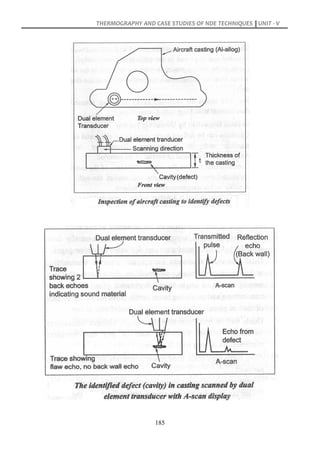
ULTRASONIC TESTS
181
5.7.6 STUDIES ON DEFECTS IDENTIFICATION –
ACOUSTIC EMMISSION TESTS
188
5.7.7 APPLICABILITY AND CAPABILITY OF VARIOUS
NDE METHODS
190
5.7.8 RELATIVE COST AND OTHER CHARACTERISTICS
OF VARIOUS NDE METHODS
191
5.7.9 NDE METHOD SELECTION CHART 192
10.
CONCEPTS OF NDTUNIT - I
1
UNIT – I
CONCEPTS OF NDT
(Relative merits and limitations of NDT Vs. Conventional testing –Visual
inspection, thermal inspection methods. Liquid penetrate Inspection)
11.
CONCEPTS OF NDTUNIT - I
2
Nondestructive evaluation (NDE) is a term that is often used
interchangeably with NDT. However, technically, NDE is used to describe
measurements that are quantitative in nature. NDE may be used to
determine material properties, such as fracture toughness, formability,
and other physical characteristics.
1.0 INTRODUCTION:
There are various testing methods those somehow destruct the test
specimens. These were, tensile testing, hardness testing, etc. In certain
applications, the evaluation of engineering materials or structures without
impairing their properties is very important, such as the quality control of
the products, failure analysis or prevention of the engineered systems in
service.
This kind of evaluations can be carried out with Non destructive test
(NDT) methods. It is possible to inspect and/or measure the materials or
structures without destroying their surface texture, product integrity and
future usefulness.
The field of NDT is a very broad, interdisciplinary field that plays a
critical role in inspecting that structural component and systems perform
their function in a reliable fashion. Certain standards has been also
implemented to assure the reliability of the NDT tests and prevent certain
errors due to either the fault in the equipment used, the miss-application
of the methods or the skill and the knowledge of the inspectors.
Successful NDT tests allow locating and characterizing material
conditions and flaws that might otherwise cause planes to crash, reactors
to fail, trains to derail, pipelines to burst, and variety of less visible, but
12.
CONCEPTS OF NDTUNIT - I
3
equally troubling events. However, these techniques generally require
considerable operator skill and interpreting test results accurately may be
difficult because the results can be subjective.
These methods can be performed on metals, plastics, ceramics,
composites, cermets, and coatings in order to detect cracks, internal
voids, surface cavities, delamination, incomplete c defective welds and
any type of flaw that could lead to premature failure.
1.0.1 CONVENTIONAL TESTING (DESTRUCTIVE TESTING):
Destructive testing are the tests, which are carried out to the
specimens failure. Destructive testing includes methods where material is
broken down to evaluate the mechanical properties, such as strength,
toughness and hardness. Destructive tests in turn indicate how and when
the objects are in danger of breaking down or failing.
For example, finding the quality of a weld is good enough to
withstand extreme pressure and to verify the properties of a material.
1.0.2 NON-DESTRUCTIVE TESTING (NDT):
Nondestructive testing (NDT) is the process of inspecting, testing,
or evaluating materials, components or assemblies for discontinuities, or
differences in characteristics without destroying the serviceability of the
part or system. In addition, when the inspection or test is completed the
part can still be used.
The use of noninvasive techniques to determine the integrity of a
material, component or structure or quantitatively measure some
characteristic of an object. i.e. Inspect or measure without doing harm.
13.
CONCEPTS OF NDTUNIT - I
4
1.1 RELATIVE MERITS AND LIMITATIONS OF NDT VS.
CONVENTIONAL TESTING
1.1.1 MERITS OF CONVENTIONAL TESTING
(DESTRUCTIVE TESTING):
Provides direct and reliable measurements
Quantitative measurements
Result interpretation is easy
It can be performed without very high skilled professional
Correlation between test measurements and material properties is
direct
Allows a roughly identify the mechanical properties of the adhesive
joint (fracture strength, elongation, modulus of elasticity
The mechanical properties of the adhesive or adhesive bonding can
be defined according to the different types of stresses (tension,
compression, shear, peel, dynamic forces of impact)
There are many standards to be followed on destructive testing
The costs of equipment for destructive testing are cheaper compare
with the equipment used in nondestructive testing.
Ability to compare adhesives with this type of testing
Verification of surface preparation, curing conditions, working
conditions and adhesives system products (primers, activators,
adhesives)
Predict and identify the approximate nature of the failure or
breakdown that may occur during the lifetime of the bonded joint in
use, when the specimen is previously submitted to an accelerated
ageing
Tests on a relatively cheaper cost
14.
CONCEPTS OF NDTUNIT - I
5
Tests usually simulate one of more service conditions.
Consequently, they tend to measure serviceability directly and
reliably
1.1.2 LIMITATIONS OF CONVENTIONAL TESTING
(DESTRUCTIVE TESTING) :
Tests are performed only to a sample and the sample may not be a
representative of the group
Tests parts are destroyed during the testing
Specimens cannot be reused once have been tested again
Usually cannot be used the same specimen for multiple destructive
testing
May be restricted for costly or few in number parts
Difficult to predict cumulative effect of service usage
Hard to apply to parts in service if done testing terminates their
useful life
Extensive machining or preparation of test specimen is often
required
Capital equipment and labor cost re often high
Test ofte require more time
It’s not possible to identify internal defectology (bubbles,
delaminating, pores, wrong thickness) of the real bonded joint,
preventing repairs before being put in use or during their lifetime
Test equipment is usually not portable.
1.1.3 MERITS OF NON-DESTRUCTIVE TESTING:
Tests are done directly on objects
15.
CONCEPTS OF NDTUNIT - I
6
100% Testing (or representative samples) on actual components
can be performed
Different NDT methods can be applied on the same components
and hence many or all properties of the interest can be examined
Non – Destructive Test can be repeated on the same specimen
It can be performed on components which are in-service
Little or no specimen preparation is required
The test equipment is often portable
Labor costs are usually low
Most NDT methods are quick
1.1.4 LIMITATIONS OF NON-DESTRUCTIVE TESTING:
Measurements are indirect
Reliability to be verified
Measurements are often qualitative or comparative
Result interpretation is often difficult
Skilled personal are required for testing and result interpretation
Different observers may interpret the test results differently
Some test equipment requires a large capital investment
Some Uses of NDE Methods:
Flaw Detection and Evaluation
Leak Detection
Location Determination
Dimensional Measurements
Structure and Microstructure Characterization
Estimation of Mechanical and Physical Properties
Stress (Strain) and Dynamic Response Measurements
16.
CONCEPTS OF NDTUNIT - I
7
Material Sorting and Chemical Composition Determination
Fluorescent penetrant indication
NDE Methods are used when,
there are NDE application at almost any stage in the production or
life cycle of a component
to assist in product development
to screen or sort incoming materials
to monitor, improve or control manufacturing processes
to verify proper processing such as heat treating
to verify proper assembly
to inspect for in-service damage
Most Common NDT Methods
Visual Inspection
Liquid Penetrant Test
Magnetic powder Test
Ultrasonic Test
Thermography Test Eddy Current Test
Radiography Test (X-ray, Gamma Ray etc.)
17.
CONCEPTS OF NDTUNIT - I
8
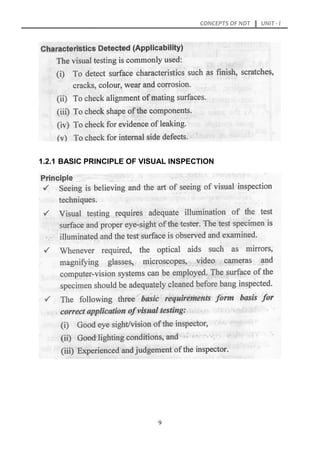
1.2 VISUAL INSPECTION
Visual Inspection is the fastest, simplest and by far the most
commonly used non-destructive testing method.
As the name suggests, visual inspection relies primarily on good
eyesight and can be carried out with the naked eye (known as
unaided visual inspection) or using some optical aids (aided
visual inspection) such as mirrors, magnifying glasses and
microscopes.
Definition : Visual inspection is commonly defined as “ the
examination of a material, component or product for conditions of
non-conformance using light and eyes, alone or in conjunction with
various aids”.
Visual inspection is also involves shaking, listening, feeling and
sometimes even smelling the component being inspected.
Other NDE Methods Rely On Visual Testing
Visual testing is inherently part of all other NDT test method. Visual
inspection is commonly employed to compliment / support other
NDT method.
Other NDT method required visual interventions to interpret images
obtained while carrying out the examination. At some point, all NDT
methods fall back on visual testing.
For example, liquid penetrating method uses dyes that rely on the
inspector’s ability to visually identify surface indications.
Radiographic technique requires that the technician use visual
judgement to determine the soundness of the object being tested.
18.
CONCEPTS OF NDTUNIT - I
9
1.2.1 BASIC PRINCIPLE OF VISUAL INSPECTION
LIQUID PENETRANT ANDMAGNETIC PARTICLE TESTS UNIT - II
24
UNIT – II
LIQUID PENETRANT AND MAGNETIC
PARTICLE TESTS
(Characteristics of liquid penetrates - different washable systems -
Developers - applications - Methods of production of magnetic fields -
Principles of operation of magnetic particle test - Applications -
Advantages and limitations)
34.
LIQUID PENETRANT ANDMAGNETIC PARTICLE TESTS UNIT - II
25
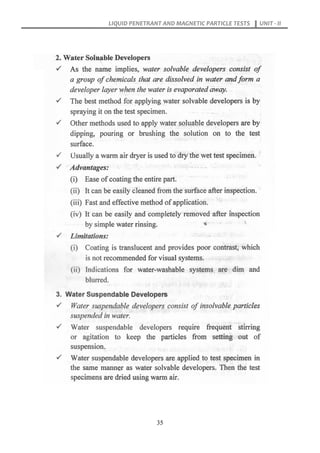
2.1 CHARACTERISTICS OF LIQUID PENETRATES
LIQUID PENETRANT ANDMAGNETIC PARTICLE TESTS UNIT - II
37
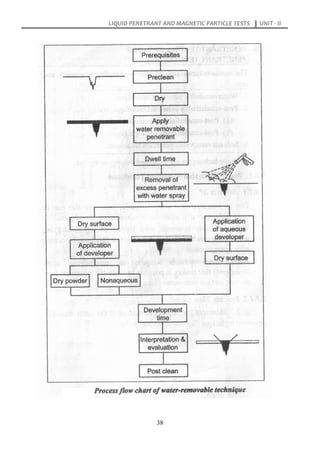
2.3 PENETRANTS TESTING METHODS (OR) DIFFERENT
WASHABLE SYSTEMS
2.3.1 WATER WASHABLE PENETRANT TECHNIQUE
LIQUID PENETRANT ANDMAGNETIC PARTICLE TESTS UNIT - II
54
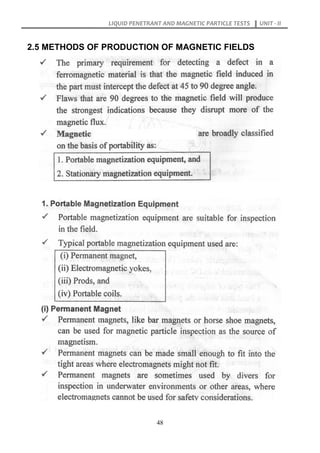
2.6 PRINCIPLES OF OPERATION OF MAGNETIC
PARTICLE TEST
2.6.1 PRINCIPLES OF MAGNETIC PARTICLE TESTING
RADIOGRAPHY UNIT -III
61
UNIT – III
RADIOGRAPHY
(Sources of ray-x-ray production - properties of d and x rays - film
characteristics - exposure charts - contrasts - operational characteristics
of x-ray equipment – applications)
ULTRASONIC AND ACOUSTICEMISSION TECHNIQUES UNIT - IV
83
UNIT – IV
ULTRASONIC AND ACOUSTIC EMISSION
TECHNIQUES
(Production of ultrasonic waves - different types of waves - general
characteristics of waves - pulse echo method –A, B, C scans - Principles
of acoustic emission techniques - Advantages and limitations -
Instrumentation - applications)
94.
ULTRASONIC AND ACOUSTICEMISSION TECHNIQUES UNIT - IV
84
4.1 PRODUCTION OF ULTRASONIC WAVES
Ultrasonic are generated by means of following:
1. Galton Whistle
2. Magnetostriction Generator
3. Piezoelectric Generator.
4.1.1 GALTON WHISTLE
Galton whistle works on the principle of organ pipe. It consists of a
closed end air Column A whose length can be adjusted with the help of
a movable piston. The piston P can be moved to the desired position with
the help of a screw 51. The open end of the pipe A is fitted with a lip L.
The position of the pipe C can be adjusted with the help of the screw S2.
The gap between the ends of A and C can be adjusted with the help of
the screw S2.
An air blast is blown through the nozzle N at the top. The blast of air
coming out of C strikes against the lip L and the column of air in the pipe is
95.
ULTRASONIC AND ACOUSTICEMISSION TECHNIQUES UNIT - IV
85
set into vibration. By adjusting the length of the air column in A, it is brought
to the resonant position. The resonant frequency will depend on the length
and diameter of the pipe A. If l is the length of the air column in A,
Galton’s Whistle
x the end correction, then the wavelength λ= 4 ( L + x)
The frequency of sound is v = v /λ = V / 4( L+x)
with the help of this whistle, frequencies of the order of 30,000 Hz can be
produced. The micrometer screw 51 can also be calibrated to give directly
the frequency the sound.
4.1.2 MAGNETOSTRICTION GENERATOR
It is found that the length of a bar of a ferromagnetic material such
as iron or nickel changes when the bar is subjected to strong magnetic
field parallel to its length. This phenomenon is known as magnetostriction.
However, if the bar is subjected to an alternating magnetic field, it expands
and on tracts alternately. Due to this linear contraction and expansion,
longitudinal waves are produced in the medium surrounding the bar. If the
rod is clamped in the centre, the frequency of vibration n is given by
N=1/2L √Y/p
where L is the length of rod, Y is its Young’s modulus and r is the density
of the material of the rod.
The below figure shows the electric circuit used for the generation
of ultrasonic waves using magnetostriction. The coils L1 and L2 are
96.
ULTRASONIC AND ACOUSTICEMISSION TECHNIQUES UNIT - IV
86
wraped round the ferromagnetic rod AB; One is connected in the grid
circuit and the other to the plate circuit of a triode valve. The rod is
clamped in the middle. It is magnetised by the plate current flowing in the
coil L1. A change in tum changes its length due to the magnetostriction
effect.
Generation of Ultrasonic waves using the effect of magnetostriction
The change in the length of the rod alters the magnetic field across
the coil L2 due to converse magnetostriction effect. The varying field, so
produced across L2 changes its flux causing an induced emf across this
coil, which changes the potential difference across the grid circuit. These
vibrations are amplified by the triode valve and passed on the plate circuit.
The system thus provides a feedback for the triode valve as an oscillator.
The frequency of the oscillator can be adjusted by changing the
capacitance of the condenser C. A magnetostriction generator produces
ultrasonic waves of comparatively low frequency, upto 200 kHz.
4.1.3. PIEZOELECTRIC GENERATOR
For generating ultrasonic waves of high frequency (about 50 MHz)
a generator using the piezoelectric effect is employed. It is found that
when crystals of some materials such as quartz, tourmaline, rocksalt etc.
are subjected to a mechanical pressure in a certain direction, each
charges of opposite sign develop as their faces, normal to the direction
of the direction of the applied pressure. This phenomenon is known as the
piezoelectric effect.
97.
ULTRASONIC AND ACOUSTICEMISSION TECHNIQUES UNIT - IV
87
Circuit arrangement used to generate ultrasonic waves using
piezoelectric effect
Figure shows circuit arrangements that can be used to generate
ultrasonic waves by using the piezoelectric effect. A thin slice of quartz
crystal R is placed between two metal plates A and B to form a parallel
plate capacitor, with the quartz crystal as dielectric. The plates are
connected to the terminals of a coil which is inductively coupled to the
oscillating circuit of a triode valve. An alternating potential difference
developed across the condenser plates due to the electrical circuits. The
quartz slab is thus subjected to an alternating electric field which produces
alternate contraction and expansion of the slab in the perpendicular
direction leading to the oscillation of the crystal.
The variable condenser C is adjusted so that the frequency of the
oscillatory circuit is equal to the natural frequency of one of the modes of
vibration of the crystal. This produces resonant mechanical vibrations in
the crystal due to the linear expansion and contraction. If one of the faces
of the crystal is placed in contact with some medium in which elastic
waves can be propagated, ultrasonic waves are generated.
4.2 DIFFERENT TYPES OF WAVES
THERMOGRAPHY AND CASESTUDIES OF NDE TECHNIQUES UNIT - V
105
UNIT – V
THERMOGRAPHY
(Thermography - Principles, types, applications, advantages and
limitations. Optical and Acoustical holography- Principles, types,
applications, advantages and limitations. Case studies: weld, cast and
formed components.)
THERMOGRAPHY AND CASESTUDIES OF NDE TECHNIQUES UNIT - V
138
5.5 OPTICAL AND ACOUSTICAL HOLOGRAPHY
Holography is the science and practice of making holograms. A
hologram is a physical structure that diffracts light into an image.
Typically, a hologram is a photographic recording of a light field,
rather than of an image formed by a lens, and it is used to display a
fully three-dimensional image of the holographed subject, which is
seen without the aid of special glasses or other intermediate optics.
The term 'hologram' can refer to both the encoded material and
the resulting image. A holographic image can be seen by looking into
an illuminated holographic print or by shining a laser through a
hologram and projecting the image onto a screen.
Holography Principle :
Holography is based on the principle of interference. A
hologram captures the interference pattern between two or more
beams of coherent light (i.e. laser light). One beam is shown directly
on the recording medium and acts as a reference to the light
scattered from the illuminated scene.
Acoustic holography:
Acoustic holography is a method for estimating the sound field
near a source by measuring acoustic parameters away from the
source by means of an array of pressure and/or particle velocity
transducers.
Acoustic holography is an acoustical measurement
technique used to determine the spatial propagation of
acoustical waves, or for detecting acoustic sources or objects. It
is based on spatial Fourier transforms.
149.
THERMOGRAPHY AND CASESTUDIES OF NDE TECHNIQUES UNIT - V
139
Acoustic Holography Principles
Acoustic holography makes it possible to determine the
noise radiated by each of the mechanical components of a
complex system, it is the near field acoustic imagery. It delivers
a fine representation of the distribution of the sound sources on
the surface of the equipment or in any parallel plan near this
surface. By measuring the pressure in the immediate
environment of the system, acoustic holography allows to
calculate the field of pressure in any point close to the sound
sources or in the far field.
The complex field of sound measured by the antenna is
broken up into an infinity of propagatives elementary plane and
evanescentes waves. The evanescentes acoustic waves
describe the complex field of the sound existing close to the
envelope and partly mirroing the vibrations. The level and the
direction of each acoustic wave are described by their number of
acoustic wave.
The principal treatment of acoustic holography is to apply
to each acoustic element components (planes, cylinders, etc) an
opposite operator of propagation, in order to obtain it sound field
on a surface parallel with the plan of measurement in near field.
Starting from the same data of measurement, it is possible to
calculate the radiated acoustic pressure in the far-field.
The use of a measured signal correlation (quadratic pressure) at
each point with the same reference signal (as signal of reference
related to the source). In this case, the measurement is done
150.
THERMOGRAPHY AND CASESTUDIES OF NDE TECHNIQUES UNIT - V
140
with phase as a reference. One carries out finally the ratio
interspectre / measurement means. This method is called
'technique of measurement of the transfer function'. For vibrating
structures, the output signal (as signal of reference related to the
source) is cautiously selected. The problem is that in an
industrial environment, it is not possible to use the same
reference of phase in all frequency bands.
151.
THERMOGRAPHY AND CASESTUDIES OF NDE TECHNIQUES UNIT - V
141
5.6. TYPES OF OPTICAL - ACOUSTICAL IMAGING
SYSTEMS
THERMOGRAPHY AND CASESTUDIES OF NDE TECHNIQUES UNIT - V
151
5.6.7 PYROELECTRIC IMAGE CONVERTER AND IMAGE STORAGE
162.
THERMOGRAPHY AND CASESTUDIES OF NDE TECHNIQUES UNIT - V
152
5.6.8 ELECTROSTATIC TRANSDUCER
5.6.9 PIEZOELECTRIC ARRAY WITH ELECTRONIC FOCUSING AND
SCANNING
THERMOGRAPHY AND CASESTUDIES OF NDE TECHNIQUES UNIT - V
162
5.7 CASE STUDIES:
5.7.0 SELECTION OF NDT METHODS
The following methods influence the Selection of NDT methods
Types of discontinuity
Origin of discontinuity
Material manufacturing process
Accessibility of the components
Type of equipment available
Availability of time and
Cost
5.7.1 DEFECTS IN WELD, CAST AND FORMED COMPONENTS
The following topics would support to find the defects in varous
components manufactured through joining processes, welding
processes and casting processes
173.
THERMOGRAPHY AND CASESTUDIES OF NDE TECHNIQUES UNIT - V
163
5.7.1.1 Discontinuities and Types
174.
THERMOGRAPHY AND CASESTUDIES OF NDE TECHNIQUES UNIT - V
164
5.7.1.2 Inherent Discontinuities